HMI Wilkinson ST 50 User manual

Set the action at the nut.
Set the action at the bridge
Adjust the pickup height
The last step is intonating the guitar by adjusting
the string lengths at the bridge saddles so the
guitar plays in tune all the way up the neck.
Using a strobe or other accurate tuner, first tune
the strings to pitch. Then, press the high E string
lightly at the 12th fret using just enough pres-
sure to sound the note. Check it with your tuner.
If the note reads flat, the saddle needs to be
adjusted forward towards the nut, shortening the
length of the string.
If the note reads sharp, the saddle needs to be
adjusted back away from the nut, increasing the
string length.to set the intonation
Adjust the action at the bridge by raising or
lowering the string saddles. Measure string
height over the 12th fret between the bottom of
the string and the top of the fret.
A good starting point is:
High (unwound) E string: 1/16" at the 12th fret
Low (wound) E string: 5/64" at the 12th fret
You can always go lower or higher depending on
your playing style. After setting the two E strings,
dial in the remaining strings to match the curve of
the fretboard. Stew Mac 7.25” Radius guage
included in the set # 0353 is ideal for this ..
Holding down the low E and high E strings at
the 22nd fret, adjust the bass side of the pick-
ups to 5/64" from the top of the pickup pole to
the bottom of the low E string.
Adjust the treble side to 1/16".
Set the intonation
Lower your string nut slots for better playability
using gauged nut files. Measure string height
over the 1st fret, between the bottom of the string
and the top of the fret. A comfortable medium
action is: Unwound strings (G, B, E): 0.012" at the
1st fret, wound strings (E,A,D): 0.020" at the 1st
fret Use feeler gauges to measure the gap, or
use guitar strings whose gauges match the meas-
urement you’re after. Stop when the string sits on
your feeler gauge. Go slow and check your work
frequently—it’s easy to go too far in this step and
ruin the nut.
Your guitar is now be ready to play and ENJOY !!
Now Re-tune your guitar and check the action .
Sight down the neck and check for any Over bow (bending backwards causing string buzz on an
open string or Under bow on the neck causing a higher than necessary action in the midle of the
neck when playing. Adjust the optimum action with the truss rod.
Assembly Instructions
ST 50 / ST 60 models
Welcome to the wonderful world of guitar building!
These are the tools and supplies we recommend for assembling this kit.
(Stew Mac item numbers are included where applicable.)
Nut-slotting files
0.010" width(#0821)
0.013" width (#0823)
0.020" width (#0828)
0.035" width (#0832)
0.042" width (#0833)
0.046” width (#5313
Electric hand drill or Bench Drill press
Small Hammer # 4895
ESP Multi Spanner # 1344
Phillips screwdrivers, size #1 & #2 (#3000)
Understring radius guages Item # 0353
Center punch or awl (#3000)
Clamp (#3721)
Soldering iron
Drill bits: 1/16” 5/64“ 3/32” 7/64“ 1/8” 11/64“
Whether you are a first time builder or Professional Luthier this kit will
give you a top quality "Custom Shop grade"
Great sounding, Great playing instrument.
This Kit Features Genuine Wilkinson Hardware,
Tuners and Pickups. CTS pots and CRL switches.

Classic "Strat style" Unfinished fine sanded body in 2 piece centre jointed American
Alder
Classic 50s' "Original style" neck in 1 piece Maple with Walnut "Skunk" stripe and
correct vintage one piece truss rod with heel adjuster. (ST50 kit)
Classic 60s' "Original style" neck in Maple with Rosewood “Slab FingerboardBoard
and correct vintage one piece truss rod with heel adjuster. (ST60 kit
Period correct pickguard loaded and wired with Wilkinson WVS alnico"V" single coil
pickups, CTS potentiometers and CRL lever switch and cloth covered push back
hook up wire.
Wilkinson WJ55 "Kluson" style tuners with safety posts
Wilkinson WVC 5+1 vintage style vibrato
Period correct accessories and screws etc....
Wilkinson "Slipstick" dry lube for screws, saddles and nut etc...
Parts included in your KIT
Using the correct amount of springs in relation to the feel and string tension is one of the most mis-
understood aspects of vibratos. Quite simply, no matter how many springs you install in relation to
string gauge the least springs you can use will give you the smoothest feeling and best “return to zero”
possible. This will result in superior tuning stability.
Neck relief refers to adjusting a neck so that it has a very slight upbow, rather than being
perfectly straight. This relief allows a little more room for string vibration, reducing the
chance of hitting the lower frets and causing fret buzz. Depending on your playing style,
and how perfectly level your fret tops are, a neck should be anywhere from perfectly
straight to having 0.012" of relief. This measurement refers additional string height over
the 12th fret, compared to a perfectly straight neck. A straight neck tends to play and
sound better, but very few guitars end up with no relief at all, and several thousandths of
an inch or more is perfectly normal.
Straight neck, or a little relief?
Truss rod
Heel adjuster
Leave the vibrato backing plate under the back of the top plate and install at least 2
springs (.009 to .042 ) or 3 springs (.010 to .046 or bigger). For a fully floating vibrato
unless you are using much heavier strings like (013 to .060), 3 springs should suffice.
Now screw the spring claw screws in to give more tension to the springs and tune your
guitar to pitch. If the backing plate becomes dislodged from under the bridge plate tighten
the spring claw screws even further until the backing plate is held firmly in place by the
springs. Once you have achieved your desired tuning, start to back off the spring claw
screws until the backing plate falls out from under the bridge plate. You will find now that
the guitar is still tuned to pitch and the bridge will be floating at the ideal angle to give you
both upward and downward pitch changes.
Floating the vibrato
Adjusting the Truss rod Increase relief
Decrease relief
Install the strings and the remaining Vibrato springs.
Assembling your guitar
During assembly, use a padded surface to protect the finish from scratches and
dents.
Installing the tuners.
Fit the tuner post bushings in the face of the headstock. These can be tapped in
place with a hammer using a small maple dowel to save damaging the face of the
bushing, Alternatively if you have a small drill press then close the empty chuck and
use this to press the bushing home.
Lay out the tuners using a ruler to make sure they’re in line with one another and
square to the edge of the peghead.
Mark out your mounting holes with a scribe or punch. Tuner mounting screws are
very delicate and will break off if forced into hard maple. Use a 5/64" drill bit to make
pilot holes for the screws; if these holes are any smaller you risk shearing off the
screw heads.
Lubricate the screw threads with the Wilkinson “Slipstick” provided in the kit.
With the tuners in place, install the screws in the pilot holes with a #1 Phillips scre-
driver.
Whenever you drill a hole be sure to countersink slightly larger than the screw
diameter this will reduce wood tearout amd make for a clean assembl
Install the Strap Buttons
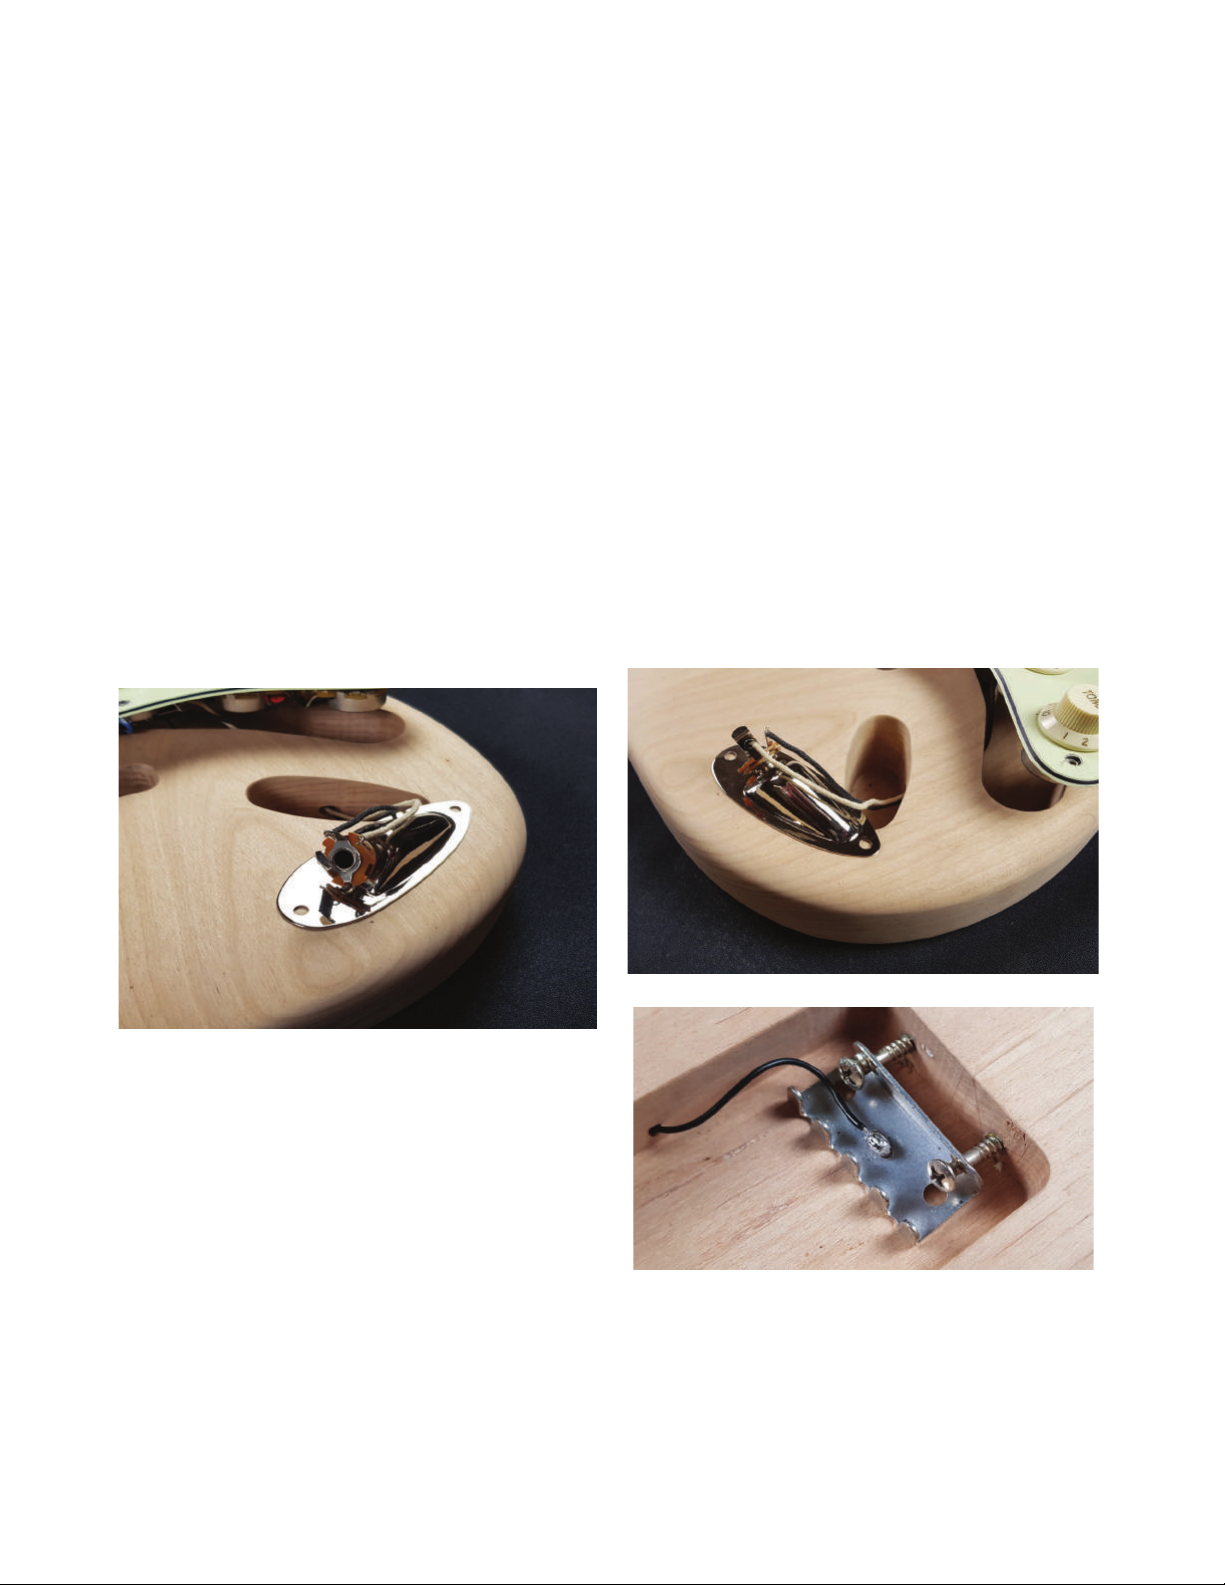
Fitting the Pick-guard and Jack socket plate
Soldering the string ground
The two-strand hookup wire from the volume pot goes to the output jack. Thread the wire through
the hole from pickup cavity into the jack cavity. Solder the white insulated wire to the jack’s tip
lug (the rounded lug). Solder the bare ground wire to the jack’s sleeve lug (the square lug).
For more information, see our Stew Mac Trade Secrets video #186 “How to get a good clean
solder joint!” at stewmac.com
The remaining black lead wire is for the string
ground. Feed this wire through the hole from
the pickup cavity to the spring cavity. Solder this
ground wire to the spring claw. Now that you've
wired the output and ground, install the pick-
guard and the jack plate.
Lay out the pick-guard and jack plate using the neck and bridge for reference. Once positioned,
mark out the mounting screw holes with a scribe or punch. Drill pilot holes for the screws using
a 1/16" drill bit. Do not install the pick-guard yet. Mark the mounting holes for your jack plate,
then drill pilot holes for the screws using a 1/16" drill bit. Drill the jack plate mounting holes.
Always countersink drilled holes slightly to stop any grain lift when installing screws.
Do not install the jack plate yet.
Now you can fit the pickguard and Jack plate. Use the screws provided and don't forget
a little Wilkinson "Slipstick" on the threads to make the install even simpler.
Solder the output jack
Enlarge the 4 screw holes in the body with 11/64" drill bit. The body holes are drilled intentionally
small to allow the neck holes to be perfectly aligned. Before installing the neck it is essential that
these body holes have clearance for the neck bolt/screws to pass through the body un-hindered.
This is essential in order to facilitate a truly tight neck to body joint for maximum transfer of string
resonance from the neck to the body. I also find that countersinking these holes slightly
(under the neck plate) also helps provide the tightest neck to body joint as the countersunk
screw head can be deeper than the countersinks of the neck plate. Use a #2 Phillips screwdriver
to install the neck mounting screws through the neck mounting plate. Lubricate the 4 neck
mounting screws with "Slipstick" Dry Lube. Tighten the screws to hold the neck in place.
Install the neck
Your body has already been drilled for the correct locations of these buttons.
Use the screws provided with the kit. A little Wilkinson "Slipstick" on the screws
will make installing these a breeze.
Always countersink drilled holes slightly to stop any grain lift when installing screws.

Assembling your guitar
During assembly, use a padded surface to protect the finish from scratches and
dents.
Installing the tuners.
Fit the tuner post bushings in the face of the headstock. These can be tapped in
place with a hammer using a small maple dowel to save damaging the face of the
bushing, Alternatively if you have a small drill press then close the empty chuck and
use this to press the bushing home.
Lay out the tuners using a ruler to make sure they’re in line with one another and
square to the edge of the peghead.
Mark out your mounting holes with a scribe or punch. Tuner mounting screws are
very delicate and will break off if forced into hard maple. Use a 5/64" drill bit to make
pilot holes for the screws; if these holes are any smaller you risk shearing off the
screw heads.
Lubricate the screw threads with the Wilkinson “Slipstick” provided in the kit.
With the tuners in place, install the screws in the pilot holes with a #1 Phillips scre-
driver.
Whenever you drill a hole be sure to countersink slightly larger than the screw
diameter this will reduce wood tearout amd make for a clean assembl
Install the Strap Buttons
Fitting the Pick-guard and Jack socket plate
Soldering the string ground
The two-strand hookup wire from the volume pot goes to the output jack. Thread the wire through
the hole from pickup cavity into the jack cavity. Solder the white insulated wire to the jack’s tip
lug (the rounded lug). Solder the bare ground wire to the jack’s sleeve lug (the square lug).
For more information, see our Stew Mac Trade Secrets video #186 “How to get a good clean
solder joint!” at stewmac.com
The remaining black lead wire is for the string
ground. Feed this wire through the hole from
the pickup cavity to the spring cavity. Solder this
ground wire to the spring claw. Now that you've
wired the output and ground, install the pick-
guard and the jack plate.
Lay out the pick-guard and jack plate using the neck and bridge for reference. Once positioned,
mark out the mounting screw holes with a scribe or punch. Drill pilot holes for the screws using
a 1/16" drill bit. Do not install the pick-guard yet. Mark the mounting holes for your jack plate,
then drill pilot holes for the screws using a 1/16" drill bit. Drill the jack plate mounting holes.
Always countersink drilled holes slightly to stop any grain lift when installing screws.
Do not install the jack plate yet.
Now you can fit the pickguard and Jack plate. Use the screws provided and don't forget
a little Wilkinson "Slipstick" on the threads to make the install even simpler.
Solder the output jack
Enlarge the 4 screw holes in the body with 11/64" drill bit. The body holes are drilled intentionally
small to allow the neck holes to be perfectly aligned. Before installing the neck it is essential that
these body holes have clearance for the neck bolt/screws to pass through the body un-hindered.
This is essential in order to facilitate a truly tight neck to body joint for maximum transfer of string
resonance from the neck to the body. I also find that countersinking these holes slightly
(under the neck plate) also helps provide the tightest neck to body joint as the countersunk
screw head can be deeper than the countersinks of the neck plate. Use a #2 Phillips screwdriver
to install the neck mounting screws through the neck mounting plate. Lubricate the 4 neck
mounting screws with "Slipstick" Dry Lube. Tighten the screws to hold the neck in place.
Install the neck
Your body has already been drilled for the correct locations of these buttons.
Use the screws provided with the kit. A little Wilkinson "Slipstick" on the screws
will make installing these a breeze.
Always countersink drilled holes slightly to stop any grain lift when installing screws.

The Bridge mounting holes are marked.
Drill to depth (25mm) with the 1/8th drill.
Countersink the holes pror to installing the srews.
The spring claw must be attached to the body
before the bridge can be installed. Center the
claw in the spring cavity so it sits 1/16" below
the surface of the body. The Holes for the
fixing screws are already drilled. Attach the
claw using the 2 long screws provided, lubri-
cate with Wilkinson “Slipstick” and screw the
claw in place.
Attach the Wilkinson WVC vibrato using the 6 round
head screws provided. (lubricate the screw threads
with the Wilkinson “Slipstick” prior to inserting).
With the Vibrato plate sitting flat on the body
screw each of the pivot screws in to the body
through the bridge plate but leave a small gap
between the underside of the head and the top
plate allowing the plate to fulcrum un-handed .
This will ensure a perfect retern to "Zero" when
in use and the full travel of the fulcrum action of
the vibrato
Install one spring in the centre of the spring
block with enough tension on the claw to hold
the bridge in place. I like to use the vibrato cover
backing plate as a shim between the underside
of the back of the bridge and the body, this not
only stops the plate from damaging the body but
later it will allow easy adjustment of the spring
tension to give just the right amount of clearance
allowing the bridge the clearance it needs to be
a true floating vibrato.
Install the Bridge and Spring Claw.
Lining up the neck with the body and bridge.
Use a clamp to lightly hold the neck in place. Place a scrap of wood or soft faced clamp over the
frets so they don’t suffer any damage to their surface. Beware over tightening the clamp as this
could crush the frets and change/flatten the fret radius at this point of contact.
To align the neck and body I like to use a length of string/twine or thin hook up wire threaded
through the E string holes in the block and then run the wire/ string up the neck through the nut to
the E tuners to check alignment and make side-to-side adjustments to the neck as needed to
make sure the strings ride even along both edges of the fretboard.
When you are happy with the alignment of the neck use the holes in the body to mark the hole
locations in the heel of the neck. A scribe, nail, or transfer punch will make clean marks in the
neck to show you where to drill. A 1/8th brad-point drill bit turned by hand works perfectly for
making these marks.
Drill the neck mounting holes
It’s important that these holes are drilled square to the neck so a drill press works best for this job.
Use a 1/8" bit and drill the holes 11/16" deep. If you don’t have access to a drill press, use a drill
guide to keep your hand drill squared up.
Assembling your guitar
During assembly, use a padded surface to protect the finish from scratches and
dents.
Installing the tuners.
Fit the tuner post bushings in the face of the headstock. These can be tapped in
place with a hammer using a small maple dowel to save damaging the face of the
bushing, Alternatively if you have a small drill press then close the empty chuck and
use this to press the bushing home.
Lay out the tuners using a ruler to make sure they’re in line with one another and
square to the edge of the peghead.
Mark out your mounting holes with a scribe or punch. Tuner mounting screws are
very delicate and will break off if forced into hard maple. Use a 5/64" drill bit to make
pilot holes for the screws; if these holes are any smaller you risk shearing off the
screw heads.
Lubricate the screw threads with the Wilkinson “Slipstick” provided in the kit.
With the tuners in place, install the screws in the pilot holes with a #1 Phillips scre-
driver.
Whenever you drill a hole be sure to countersink slightly larger than the screw
diameter this will reduce wood tearout amd make for a clean assembl
Install the Strap Buttons
Fitting the Pick-guard and Jack socket plate
Soldering the string ground
The two-strand hookup wire from the volume pot goes to the output jack. Thread the wire through
the hole from pickup cavity into the jack cavity. Solder the white insulated wire to the jack’s tip
lug (the rounded lug). Solder the bare ground wire to the jack’s sleeve lug (the square lug).
For more information, see our Stew Mac Trade Secrets video #186 “How to get a good clean
solder joint!” at stewmac.com
The remaining black lead wire is for the string
ground. Feed this wire through the hole from
the pickup cavity to the spring cavity. Solder this
ground wire to the spring claw. Now that you've
wired the output and ground, install the pick-
guard and the jack plate.
Lay out the pick-guard and jack plate using the neck and bridge for reference. Once positioned,
mark out the mounting screw holes with a scribe or punch. Drill pilot holes for the screws using
a 1/16" drill bit. Do not install the pick-guard yet. Mark the mounting holes for your jack plate,
then drill pilot holes for the screws using a 1/16" drill bit. Drill the jack plate mounting holes.
Always countersink drilled holes slightly to stop any grain lift when installing screws.
Do not install the jack plate yet.
Now you can fit the pickguard and Jack plate. Use the screws provided and don't forget
a little Wilkinson "Slipstick" on the threads to make the install even simpler.
Solder the output jack
Enlarge the 4 screw holes in the body with 11/64" drill bit. The body holes are drilled intentionally
small to allow the neck holes to be perfectly aligned. Before installing the neck it is essential that
these body holes have clearance for the neck bolt/screws to pass through the body un-hindered.
This is essential in order to facilitate a truly tight neck to body joint for maximum transfer of string
resonance from the neck to the body. I also find that countersinking these holes slightly
(under the neck plate) also helps provide the tightest neck to body joint as the countersunk
screw head can be deeper than the countersinks of the neck plate. Use a #2 Phillips screwdriver
to install the neck mounting screws through the neck mounting plate. Lubricate the 4 neck
mounting screws with "Slipstick" Dry Lube. Tighten the screws to hold the neck in place.
Install the neck
Your body has already been drilled for the correct locations of these buttons.
Use the screws provided with the kit. A little Wilkinson "Slipstick" on the screws
will make installing these a breeze.
Always countersink drilled holes slightly to stop any grain lift when installing screws.
Classic "Strat style" Unfinished fine sanded body in 2 piece centre jointed American
Alder
Classic 50s' "Original style" neck in 1 piece Maple with Walnut "Skunk" stripe and
correct vintage one piece truss rod with heel adjuster. (ST50 kit)
Classic 60s' "Original style" neck in Maple with Rosewood “Slab FingerboardBoard
and correct vintage one piece truss rod with heel adjuster. (ST60 kit
Period correct pickguard loaded and wired with Wilkinson WVS alnico"V" single coil
pickups, CTS potentiometers and CRL lever switch and cloth covered push back
hook up wire.
Wilkinson WJ55 "Kluson" style tuners with safety posts
Wilkinson WVC 5+1 vintage style vibrato
Period correct accessories and screws etc....
Wilkinson "Slipstick" dry lube for screws, saddles and nut etc...
Parts included in your KIT
Using the correct amount of springs in relation to the feel and string tension is one of the most mis-
understood aspects of vibratos. Quite simply, no matter how many springs you install in relation to
string gauge the least springs you can use will give you the smoothest feeling and best “return to zero”
possible. This will result in superior tuning stability.
Neck relief refers to adjusting a neck so that it has a very slight upbow, rather than being
perfectly straight. This relief allows a little more room for string vibration, reducing the
chance of hitting the lower frets and causing fret buzz. Depending on your playing style,
and how perfectly level your fret tops are, a neck should be anywhere from perfectly
straight to having 0.012" of relief. This measurement refers additional string height over
the 12th fret, compared to a perfectly straight neck. A straight neck tends to play and
sound better, but very few guitars end up with no relief at all, and several thousandths of
an inch or more is perfectly normal.
Straight neck, or a little relief?
Truss rod
Heel adjuster
Leave the vibrato backing plate under the back of the top plate and install at least 2
springs (.009 to .042 ) or 3 springs (.010 to .046 or bigger). For a fully floating vibrato
unless you are using much heavier strings like (013 to .060), 3 springs should suffice.
Now screw the spring claw screws in to give more tension to the springs and tune your
guitar to pitch. If the backing plate becomes dislodged from under the bridge plate tighten
the spring claw screws even further until the backing plate is held firmly in place by the
springs. Once you have achieved your desired tuning, start to back off the spring claw
screws until the backing plate falls out from under the bridge plate. You will find now that
the guitar is still tuned to pitch and the bridge will be floating at the ideal angle to give you
both upward and downward pitch changes.
Floating the vibrato
Adjusting the Truss rod Increase relief
Decrease relief
Install the strings and the remaining Vibrato springs.

Set the action at the nut.
Set the action at the bridge
Adjust the pickup height
The last step is intonating the guitar by adjusting
the string lengths at the bridge saddles so the
guitar plays in tune all the way up the neck.
Using a strobe or other accurate tuner, first tune
the strings to pitch. Then, press the high E string
lightly at the 12th fret using just enough pres-
sure to sound the note. Check it with your tuner.
If the note reads flat, the saddle needs to be
adjusted forward towards the nut, shortening the
length of the string.
If the note reads sharp, the saddle needs to be
adjusted back away from the nut, increasing the
string length.to set the intonation
Adjust the action at the bridge by raising or
lowering the string saddles. Measure string
height over the 12th fret between the bottom of
the string and the top of the fret.
A good starting point is:
High (unwound) E string: 1/16" at the 12th fret
Low (wound) E string: 5/64" at the 12th fret
You can always go lower or higher depending on
your playing style. After setting the two E strings,
dial in the remaining strings to match the curve of
the fretboard. Stew Mac 7.25” Radius guage
included in the set # 0353 is ideal for this ..
Holding down the low E and high E strings at
the 22nd fret, adjust the bass side of the pick-
ups to 5/64" from the top of the pickup pole to
the bottom of the low E string.
Adjust the treble side to 1/16".
Set the intonation
Lower your string nut slots for better playability
using gauged nut files. Measure string height
over the 1st fret, between the bottom of the string
and the top of the fret. A comfortable medium
action is: Unwound strings (G, B, E): 0.012" at the
1st fret, wound strings (E,A,D): 0.020" at the 1st
fret Use feeler gauges to measure the gap, or
use guitar strings whose gauges match the meas-
urement you’re after. Stop when the string sits on
your feeler gauge. Go slow and check your work
frequently—it’s easy to go too far in this step and
ruin the nut.
Your guitar is now be ready to play and ENJOY !!
Now Re-tune your guitar and check the action .
Sight down the neck and check for any Over bow (bending backwards causing string buzz on an
open string or Under bow on the neck causing a higher than necessary action in the midle of the
neck when playing. Adjust the optimum action with the truss rod.
Assembly Instructions
ST 50 / ST 60 models
Welcome to the wonderful world of guitar building!
These are the tools and supplies we recommend for assembling this kit.
(Stew Mac item numbers are included where applicable.)
Nut-slotting files
0.010" width(#0821)
0.013" width (#0823)
0.020" width (#0828)
0.035" width (#0832)
0.042" width (#0833)
0.046” width (#5313
Electric hand drill or Bench Drill press
Small Hammer # 4895
ESP Multi Spanner # 1344
Phillips screwdrivers, size #1 & #2 (#3000)
Understring radius guages Item # 0353
Center punch or awl (#3000)
Clamp (#3721)
Soldering iron
Drill bits: 1/16” 5/64“ 3/32” 7/64“ 1/8” 11/64“
Whether you are a first time builder or Professional Luthier this kit will
give you a top quality "Custom Shop grade"
Great sounding, Great playing instrument.
This Kit Features Genuine Wilkinson Hardware,
Tuners and Pickups. CTS pots and CRL switches.
This manual suits for next models
1
Table of contents
Other HMI Musical Instrument manuals


