nord C2 User manual

9WIV1ERYEP
2SVHG
OS Version 1.x
Part No. 50326 Copyright Clavia DMI AB 2010
Print Edition 1.4

CAUTION - ATTENTION
RISK OF ELECTRIC SHOCK
DO NOT OPEN
RISQUE DE SHOCK ELECTRIQUE
NE PAS OUVRIR
CAUTION: TO REDUCE THE RISK OF ELECTRIC SHOCK
DO NOT REMOVE COVER (OR BACK).
NO USER SERVICEABLE PARTS INSIDE.
REFER SERVICING TO QUALIFIED PERSONNEL.
ATTENTION:POUR EVITER LES RISQUES DE CHOC ELECTRIQUE, NE
PAS ENLEVER LE COUVERCLE.
AUCUN ENTRETIEN DE PIECES INTERIEURES PAR L´USAGER.
CONFIER L´ENTRETIEN AU PERSONNEL QUALIFE.
AVIS: POUR EVITER LES RISQUES D´INCIDENTE OU D´ELECTROCUTION,
N´EXPOSEZ PAS CET ARTICLE A LA PLUIE OU L´HUMIDITET.
1) Read these instructions.
2) Keep these instructions.
3) Heed all warnings.
4) Follow all instructions.
5) Do not use this apparatus near water.
6) Clean only with dry cloth.
7) Do not block any ventilation openings. Install in accordance
with the manufacturer’s instructions.
8) Do not install near any heat sources such as radiators, heat
registers, stoves, or other apparatus (including amplifiers) that
produce heat.
9) Do not defeat the safety purpose of the polarized or
grounding-type plug. A polarized plug has two blades with one
wider than the other. A grounding type plug has two blades
and a third grounding prong. The wide blade or the third prong
are provided for your safety. If the provided plug does not fit
into your outlet, consult an electrician for replacement of the
obsolete outlet.
10) Protect the power cord from being walked on or pinched
particularly at plugs, convenience receptacles, and the point
where they exit from the apparatus.
11) Only use attachments/accessories specified by the manu-
facturer.
12) Use only with the cart, stand,
tripod, bracket, or table specified by the
manufacturer, or sold with the apparatus.
When a cart is used, use caution when
moving the cart/apparatus combination to
avoid injury from tip-over.
13) Unplug this apparatus during lightning
storms or when unused for long periods of time.
14) Refer all servicing to qualified service personnel. Servicing
is required when the apparatus has been damaged in any way,
such as power-supply cord or plug is damaged, liquid has been
spilled or objects have fallen into the apparatus, the apparatus
has been exposed to rain or moisture, does not operate nor-
mally, or has been dropped.
The lightning flash with the arrowhead symbol within
an equilateral triangle is intended to alert the user to the
presence of uninsulated voltage within the products en-
closure that may be of sufficient magnitude to constitute
a risk of electric shock to persons.
Le symbole éclair avec le point de flèche à l´intérieur d´un triangle
équilatéral est utilisé pour alerter l´utilisateur de la presence à
l´intérieur du coffret de ”voltage dangereux” non isolé d´ampleur
suffisante pour constituer un risque d`éléctrocution.
The exclamation mark within an equilateral triangle is
intended to alert the user to the presence of important
operating and maintenance (servicing) instructions in the
literature accompanying the product.
Le point d´exclamation à l´intérieur d´un triangle équilatéral est
employé pour alerter l´utilisateur de la présence d´instructions
importantes pour le fonctionnement et l´entretien (service) dans le
livret d´instructions accompagnant l´appareil.
Instructions pertaining to a risk of fire, electric shock or injury to persons.
IMPORTANT SAFETY INSTRUCTIONS
SAVE THESE INSTRUCTIONS
Trademarks: The Nord logo is trademark of Clavia DMI AB. All other trademarks mentioned
in this publication are the properties of their respective holders.
Specifications and appearances are subject to change without notice.
Copyright © Clavia DMI AB
No naked flame sources, such as lighted candles, should be placed on
the apparatus;
Do not use the apparatus in tropical climates.
WARNING: To reduce the risk of fire or electric shock, do not expose
this apparatus to rain or moisture.
The apparatus shall not be exposed to dripping or splashing and that
no objects filled with liquids, such as vases, shall be placed on the
apparatus.
The maims plug is used as the disconnect device and shall remain
readily operable.
Il convient de ne pas placer sur l´appareil de sources de flammes nues,
telles que des bougies allumées;
L´appareil n’est pas destiné á étre utilisé sous un climat tropical.
L´appareil ne doit pas étre exposé á des égouttements d´eau ou des
éclaboussures et de plus qu´aucun objet rempli de liquide tel que des
vases ne doit étre placé sur l´appareil.
Lorsque la prise du résau d’alimentation est utilisée comme dispositif
de déconnexion, ce dispositif doit demeuré aisément accessible.
Warning - When using electric products, basic precautions should always be followed, including the following:
Additional Safety Information

`
-RXVSHYGXMSR
8LERO]SY .................... 4
(IZIPSTQIRXKSEPW ............ 4
*IEXYVIW ...................... 4
%FSYXXLMWYWIVQERYEP ....... 4
3ZIVZMI[
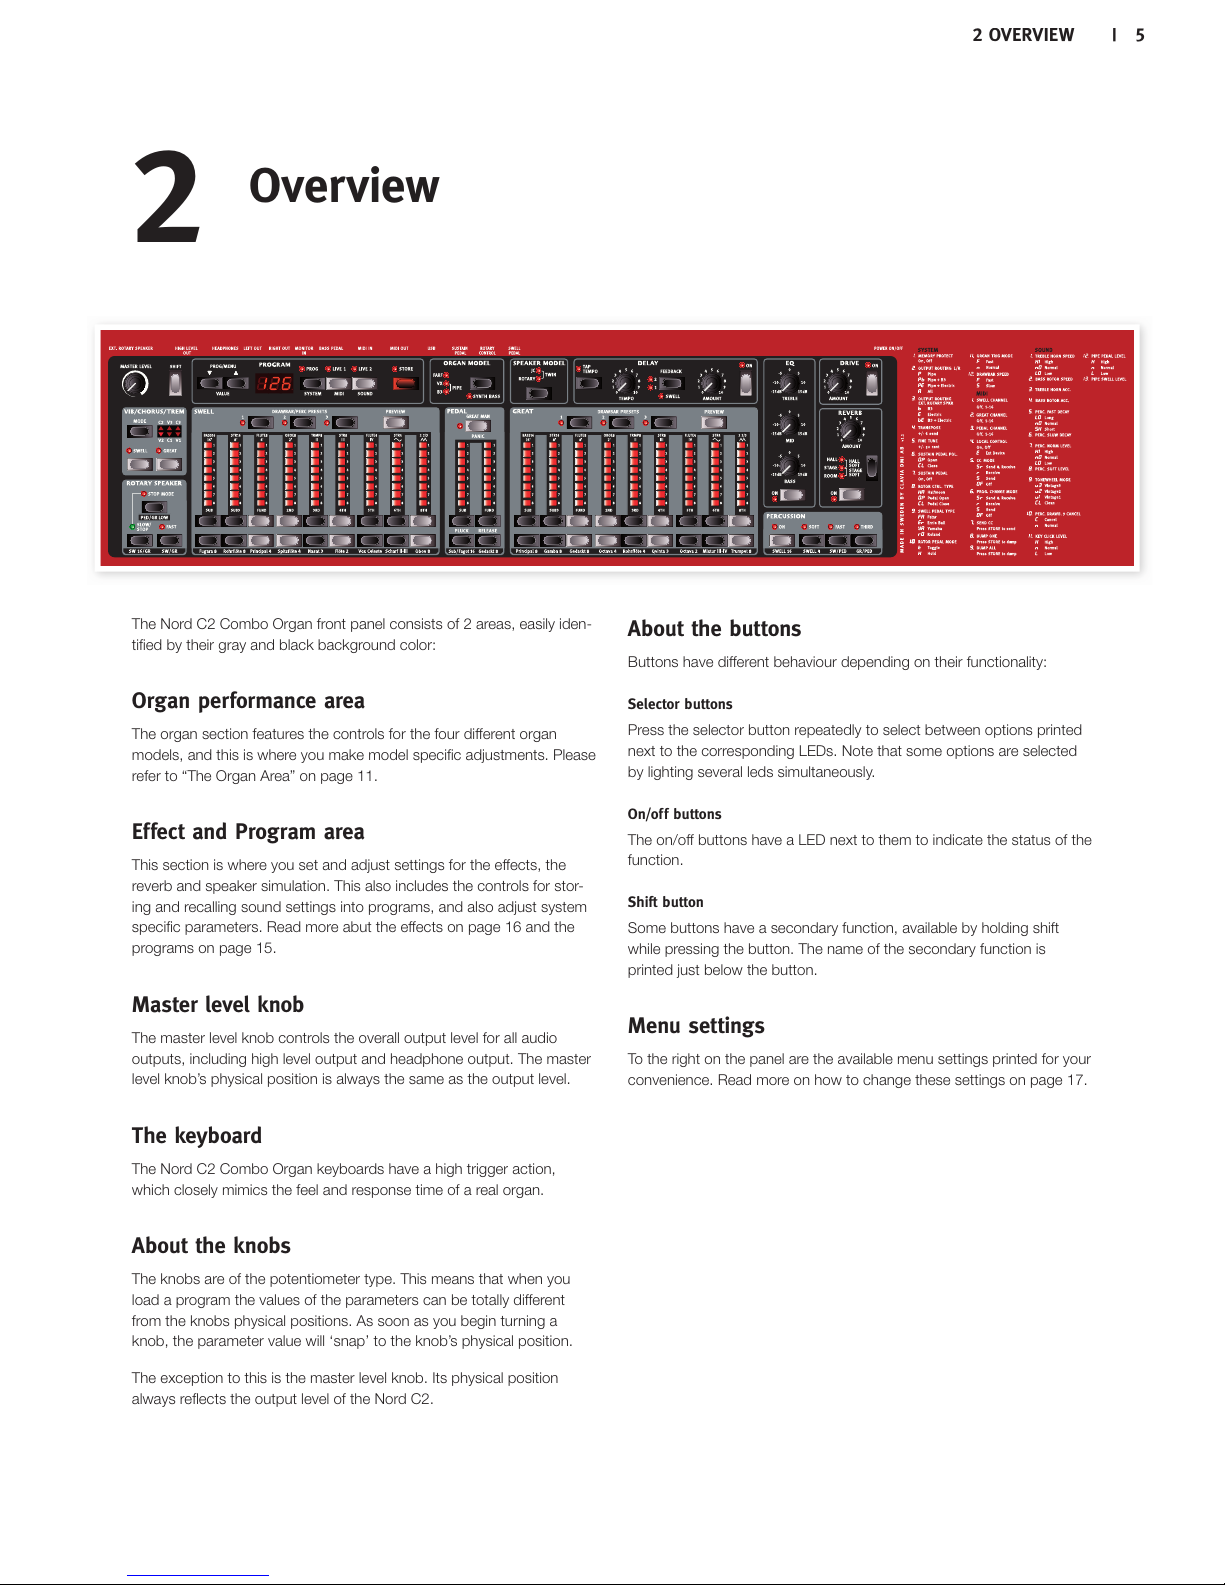
Organ performance area............ 5
Effect and Program area ............ 5
Master level knob ................. 5
The keyboard .................... 5
About the knobs .................. 5
About the buttons ................. 5
Menu settings . . . . . . . . . . . . . . . . . . . . 5
'SRRIGXMSRW
4IHEPGSRRIGXMSRW ............. 6
Swell Pedal input.................. 6
Rotary Control input ............... 6
Sustain Pedal input ................ 6
1-(-97&'SRRIGXMSRW ...... 6
USB Connection .................. 6
MIDI Out ........................ 6
MIDI IN ......................... 6
Bass Pedal ...................... 7
%YHMSGSRRIGXMSRW ............. 7
Main stereo output - Left & Right ..... 7
Headphone output ................ 7
Rotary Speaker ................... 7
+IXXMRK7XEVXIH
%FSYXXLITVSKVEQW........... 8
7IPIGXETVSKVEQ .............. 8
)HMXETVSKVEQ ................ 8
1IQSV]TVSXIGX ............... 8
7XSVMRKETVSKVEQ............. 8
8LI0MZIFYJJIVW .............. 9
%HHMRKIJJIGXW................. 9
Activate an amplifier emulation ....... 9
The Rotary effect ........... 9
7IPIGXMRKERSVKERQSHIP..... 9
Splitting the great/lower manual ......10
9WMRKXLI7SYRH1EREKIV ....10
Installation of the USB driver.........10
Sound Manager installation Windows. .10
Sound Manager installation Mac OSX .10
Connecting the Manager and the C2 . .10
2SVH'6IJIVIRGI
Master level knob .................11
Shift button ......................11
8LI3VKEREVIE................11
The Drawbars ....................11
Drawbar/Perc Preset Buttons........11
Preview .........................11
Splitting the great manual ..........11
Selecting The Organ Model .........11
The B3 Model ....................12
The VX Model ....................13
The Farf Model ...................13
The Pipe Organ ..................14
The Synth Bass Model .............14
4VSKVEQEVIE..................15
What is a program? ................15
Loading a Program . . . . . . . . . . . . . . . .15
Storing a Program.................15
Prog/Menu Buttons . . . . . . . . . . . . . . .15
Display..........................15
Live ............................15
)JJIGXEVIE .....................16
Speaker Model ...................16
Rotary Speaker controls ............16
Delay ...........................16
Drive ...........................16
Reverb..........................16
8LI1IRYW
7]WXIQ1IRY..................17
Memory Protect – On, Off ...........17
Output Routing L/R................17
Output Routing Ext. Rotary Spkr .....17
Transpose .......................17
Fine Tune........................17
Sustain Pedal Polarity ..............17
Sustain Pedal Configuration .........17
Rotor Ctrl. Type ...................17
Swell Pedal Type..................17
Rotor Pedal Mode .................18
Organ Trig Mode ..................18
Drawbar Speed...................18
1-(-1IRY.....................18
Swell Channel ....................18
Great Channel....................18
Pedal Channel....................18
Local Control.....................18
Control Change (CC) Mode..........18
Program Change Mode.............18
Send CC ........................18
Dump One.......................18
Dump All ........................18
7SYRH1IRY...................18
Treble Horn Speed ................18
Bass Rotor Speed.................18
Treble Horn Acceleration............19
Bass Rotor Acceleration ............19
Perc. Fast Decay ..................19
Perc. Slow Decay .................19
Perc. Norm Level..................19
Perc. Soft Level ...................19
Tonewheel Mode..................19
Perc Drawbar 9 Cancel .............19
Key Click Level ...................19
Rotary Model.....................19
Pipe Pedal Level ..................19
Pipe Swell Level ..................19
1-(-JYRGXMSRW
About the MIDI implementation ..... 20
Keyboard velocity ................ 20
Program change ................. 20
MIDI Sysex (System Exclusive) ...... 20
2SVH'[MXLEWIUYIRGIV.... 20
Connections .................... 20
Local On/Off .................... 20
MIDI Channel.................... 20
Program Change................. 20
Controllers...................... 20
4VSKVEQERH''HYQTW .......21
Sending program dumps ...........21
Sending MIDI Controller dumps ......21
Receive MIDI SysEx dumps .........21
MIDI Controller list.................21
MIDI Implementation Chart ......... 22
%TTIRHM\
Nord Sound Manager ............ 23
System requirements ............. 23
Updates........................ 23
-RHI\
Index ...........................24
8EFPISJGSRXIRXW

-RXVSHYGXMSR
8LERO]SY
We would first like to thank you for purchasing the Nord C2 Combo
Organ! We hope you will find it to be everything you wished for and that
you’ll have many hours of great fun with your new instrument.
(IZIPSTQIRXKSEPW
First some history: at the time of designing the Nord C2 Combo Organ,
Clavia had already been developing digital tonewheel organ models
for more than a decade. The first model featured in the Nord Electro
series of instruments was designed to fit comfortably in a multi electro-
mechanical instrument along side various piano implementations. With
focus given to fit several mechanical instruments into a single package,
you are always forced to make some compromises.
Though not surprised, we were definitely thrilled when the Electro
started to appear in different magazine’s tonewheel clone tests and
shoot-outs. It was included for its fabulous sound that some found
to be better than far more expensive hardcore clone units. However,
due to its single manual and additional piano samples, it was generally
included “out of contest”.
With the Nord C2’s predecessor the C1 Combo Organ we wanted to
design an instrument without having to find the right blend of things;
like piano vs. organ keyboard action, or multi-effects suited for a wide
array of sounds. We wanted to focus on the things needed for killer
organ sounds, and those things only.
Some areas we knew were up for improvement prior to the start of
the project, others were found along the way. What really paid off was
focusing on each of the components involved in the sound generating
process, rather than just the sounding outcome. After spending thou-
sands of man hours leaving no detail untouched - no matter how small
and seemingly insignificant - we believe we have not only reproduced
the perfect tonewheel sound but also the proper response and feel of
playing the original instrument.
Taking the next step after developing the Nord C1 was looking at the
classical organ sounds. We sourced a beautiful baroque organ and
sampled it with the same painstaking effort and focus on quality as we
do when we create our other instruments.
And we could not resist the possibility to further tweak the B3 model,
to take the award winning realism one step further. The key-on and
key-off clicks have been improved together with the modelling of the
level and mixes of the individual tonewheels. Enjoy.
*IEXYVIW
The Nord C2 Combo Organ features high quality digital emulations
of three vintage organs, a sampled baroque pipe organ, a bunch of
effects as well as several amp and speaker cabinet combinations in a
single lightweight package.
The dual keyboards, bass pedal input and high level outputs allows you
to use the instrument in the exact same application and set-up as with
the vintage originals - and several more!
By focusing on each individual component involved in the sound gener-
ating process you get not only a vintage sound experience but also
spot-on response and feel of playing the original instruments.
The Nord C2 Combo Organ has the following features:
1 model of a vintage Tonewheel organt
2 models of vintage Vox and Farfisa transistor organst
1 sampled baroque pipe organt
3 Amplifier models, featuring simulations of the gain characteristics oft
two popular combo amps as well as a rotary speaker cabinet.
Selectable rotary speaker models.t
Overdrive, offering a gentle to massive amount of tube-style distor-t
tion.
Vintage-sounding delay, with tap-tempo function and a possibility tot
limit its operation to the upper manual.
3-band EQt
5 types of Reverberation - Room, Stage and Hall-types with varia-t
tions
Dual manuals with 2 x 61 waterfall keys, featuring a high trigger pointt
for the optimal organ keyboard feel and response time.
Dedicated MIDI connector for use with any MIDI compatible foott
pedalboard to play the bass registers.
High level outputs, featuring quarter-inch as well as a 11-pin Lesliet
standard connectors allows you to connect directly to rotary speak-
ers. When using the 11-pin connector, the panel controls for rotation
speed are transferred as well.
%FSYXXLMWYWIVQERYEP
This manual is arranged mainly as a reference manual. In many cases
you’ll get tips on how to practically use functions.
The LED-display is referred to as the Display. Whenever there is a refer-
ence to the ‘keyboard’, that reference also applies to incoming MIDI
note messages.
`236(''31&336+%297)61%29%037:<

The Nord C2 Combo Organ front panel consists of 2 areas, easily iden-
tified by their gray and black background color:
3VKERTIVJSVQERGIEVIE
The organ section features the controls for the four different organ
models, and this is where you make model specific adjustments. Please
refer to “The Organ Area” on page 11.
)JJIGXERH4VSKVEQEVIE
This section is where you set and adjust settings for the effects, the
reverb and speaker simulation. This also includes the controls for stor-
ing and recalling sound settings into programs, and also adjust system
specific parameters. Read more abut the effects on page 16 and the
programs on page 15.
1EWXIVPIZIPORSF
The master level knob controls the overall output level for all audio
outputs, including high level output and headphone output. The master
level knob’s physical position is always the same as the output level.
8LIOI]FSEVH
The Nord C2 Combo Organ keyboards have a high trigger action,
which closely mimics the feel and response time of a real organ.
%FSYXXLIORSFW
The knobs are of the potentiometer type. This means that when you
load a program the values of the parameters can be totally different
from the knobs physical positions. As soon as you begin turning a
knob, the parameter value will ‘snap’ to the knob’s physical position.
The exception to this is the master level knob. Its physical position
always reflects the output level of the Nord C2.
%FSYXXLIFYXXSRW
Buttons have different behaviour depending on their functionality:
7IPIGXSVFYXXSRW
Press the selector button repeatedly to select between options printed
next to the corresponding LEDs. Note that some options are selected
by lighting several leds simultaneously.
3RSJJFYXXSRW
The on/off buttons have a LED next to them to indicate the status of the
function.
7LMJXFYXXSR
Some buttons have a secondary function, available by holding shift
while pressing the button. The name of the secondary function is
printed just below the button.
1IRYWIXXMRKW
To the right on the panel are the available menu settings printed for your
convenience. Read more on how to change these settings on page 17.
3ZIVZMI[
3:)6:-); `

4IHEPGSRRIGXMSRW
The Nord C2 Combo Organ has three pedal inputs; one for a sustain
pedal, one for a rotary speed controller and one for a swell pedal.
7[IPP4IHEPMRTYX
Used for controlling the swell level of the selected organ model. When
connecting an expression pedal to the Swell Pedal input, you should
use a stereo cable with a Tip-Ring-Sleeve connector. Please note that
the pedal must have a stereo output jack. The resistance range of a
control pedal should be 10 or 50 kOhm. To simplify setup, the most
common pedal models (Roland, Yamaha, Ernie Ball and Fatar) are
pre-configured in the Nord C2, and you simply select the type of pedal
which you want to use in the System menu. Have a look at page 17 for
further instructions.
6SXEV]'SRXVSPMRTYX
Used for controlling the rotary speaker’s speed. You can use any stan-
dard sustain pedal, switch pedal or the Half Moon Switch accessory.
When using the Half Moon Switch accessory you have to configure this
as the Control Pedal Type in the System menu. Have a look at page 17
for further instructions.
7YWXEMR4IHEPMRTYX
¼" connector for a switch type pedal. When a connected pedal is oper-
ated, the notes you play will be sustained. You can use any standard
sustain type pedal. A polarity setting can be selected in the system
menu. Read more on this on page 17.
A connected sustain pedal will not affect the Pipe organ model.M
If you use external sound devices you can disable the Nord C2 Combo
Organ from responding to sustain messages, but still transmit them via
MIDI out. This is set in the System menu, read more on page 17.
1-(-97&'SRRIGXMSRW
The settings of the MIDI transmission and reception behavior can be
adjusted in the MIDI menu. For more information about this, please go
to page 17.
97&'SRRIGXMSR
The USB connection is used for the Nord C2 to communicate with a
personal computer in order to update the OS or manage the programs.
The computer can e.g. be used to transfer the operating system if the
unit needs to be updated and to make backups of the memory content.
Computers running Microsoft Windows operating systems need aM
driver for the USB connection to work. The driver can be found at
the www.nordkeyboards.com website.
1-(-3YX
Both manuals, all knobs and buttons (Shift, Store and Master Level
excluded), pedal connector ports as well as the Bass Pedal input trans-
mits messages via MIDI Out.
1-(--2
MIDI connection used to receive MIDI messages to the Nord C2 from
other equipment such as keyboards or computers.
'SRRIGXMSRW
`236(''31&336+%297)61%29%037:<

&EWW4IHEP
To play the Nord C2 Combo Organ’s dedicated bass registers, connect
the MIDI Out from your external controller (preferably a bass pedal-
board) to the Bass Pedal connector. The bass registers will respond to
all MIDI note messages received regardless of their MIDI channel.
%YHMSGSRRIGXMSRW
1SRMXSV-R
Use this to connect and monitor a signal from an mp3 or a CD player
at the Nord C2's headphone output. This allows you to e.g. rehearse
with the C2 to pre-recorded music.
Signals connected to this input will not be processed with theM
Nord C2's effects or appear at the left and right output jacks.
1EMRWXIVISSYXTYX0IJX6MKLX
The left and right line level outputs from the Nord C2 are unbalanced.
Use the ¼" connectors to connect the Nord C2 to an amplifier or
recording equipment.
General guide on audio connections:
t.BLFBMMUIFDPOOFDUJPOTCFGPSFZPVUVSOPOUIFQPXFSUPZPVSBNQMJmFS
t5VSOPOUIFQPXFSUPZPVSBNQMJmFSMBTU
t5VSOPGGUIFQPXFSUPZPVSBNQMJmFSmSTU
,IEHTLSRISYXTYX
This is where you connect a ¼" stereo connector from a pair of head-
phones.
Playing at a high volume level can result in hearing impairmentsE
such as permanent hearing loss.
6SXEV]7TIEOIV
The rotary speaker high level outputs consist of a ¼" and a 11-pin
Leslie™ standard connector. The high level out are 14V RMS high level,
unbalanced, and are only intended to be used, directly connected to
a rotary speaker cabinet with built in amplifier. Any other form of use
might result in damaged equipment.
It is possible to route the tonewheel organ to the High Level and 11-pin
outputs and the other organs to the main outputs. Other combinations
are also possible. Read more about this on page 17.
'322)'8-327 `

%FSYXXLITVSKVEQW
Complete sound settings are stored in the Program memory of the
Nord C2. This memory area has 126 locations. Every program can be
edited and replaced as you wish. A complete set of the factory pro-
grams are available on the www.nordkeyboards.com website.
7IPIGXETVSKVEQ
Press the Up or Down button repeatedly until you’ve selected the
desired program number. The program will be loaded immediately.
)HMXETVSKVEQ
Editing a program is just as easy as grabbing a knob, press some
drawbar buttons to change a setting, or press a button to select a
different setting. The knob’s physical position isn’t always as the stored
setting in the program that is active, but as soon as you start turning a
knob, the parameter will snap to the knob’s position.
When you have edited a program, a dot will appear in the lower right
display corner next to the program number. This will alert you to the
fact that the program has been edited but not yet saved. If you select a
new program without saving, any edits you have made will be lost and
the program will have its original settings the next time you select it.
1IQSV]TVSXIGX
There is a Memory Protect function that is set to On when the Nord C2
leaves the Nord Factory. This has to be turned Off in the System Menu
before you can save a program.
Press Shift + System and use the Up/Down buttons to select
the Memory Protect Option – this is the very first option in the
System menu.
Change the setting of the memory protection to Off by pressing
and holding Shift and the Up or Down buttons.
Exit the System menu by pressing the Prog / System button again.
The setting of the memory protection will be remembered even ifM
the Nord C2 is turned off.
7XSVMRKETVSKVEQ
If you are happy with an edit that you have made,
you should probably Store the program.
Press the Store button.
The program number LEDs starts flashing.
Select a new location where you want to store the program.
Use the Up/Down buttons to navigate to a new program location
if you do not want to overwrite the original program.
Press the Store button a second time to confirm your choice.
The edited program has now replaced the previous one in the
location you specified.
To cancel the procedure, press the Shift button before you pressM
Store the second time.
With Memory Protect set to Off, a double tap on the Store buttonM
will store a Program in its original location.
+IXXMRK7XEVXIH
Let’s take a few minutes to get familiar with the Nord C2. The user interface is designed to be as intuitive as possible, and to perform as well as you do
in a live situation. We hope that you soon will feel confident using it, and by following this short chapter, we will go through most of the functions.
`236(''31&336+%297)61%29%037:<

8LI0MZIFYJJIVW
The special Live buf-
fers can be described
as a “live program
memory”. If you acti-
vate the Live button, all
changes to the panel
settings you make will
be continuously saved.
If you switch the power off, or select another program, the settings
are still stored in a Live memory, so when you power up next time (or
return to a Live memory) all settings will be exactly as they were when
you left them. The dot that appears when a Program is changed is not
applicable when a Live buffers is active
If a Live memory is selected and you decide you wish to store the
settings permanently as a program you can do so using the stan-
dard methods (see above). You can also store programs into the Live
memory location, in which case the program settings will replace the
current Live memory settings.
%HHMRKIJJIGXW
Select a program and play some notes on the keyboard while
you....
... turn on the Delay (the On LED should be lit) and then press
repeatedly on the Feedback selector.
The feedback options are indicated with the selector LEDs and chang-
es in a cyclical fashion for each time the selector is pressed. When both
LEDs are lit you have the maximum amount of feedback.
Turn the Amount and the Tempo knobs while playing.
This changes the amount and the time between the repeats.
Turn on the Reverb with its On button.
Hold Shift and press repeatedly on the
reverb selector.
This allows you to reverse through the reverb
selections.
Holding Shift while pressing any selector
(except the Organ Model) will cycle through
the selections in a counter clockwise fashion.
Turn off the effect.
If you now continue to press on the effect selector after the effect is
turned off, the effect setting will change even though the effect is not
active.
This method can be used to select a certain effect setting while
playing, without affecting the sound until you actually activate the
effect.
%GXMZEXIEREQTPM´IVIQYPEXMSR
Press the Speaker Model button to activate the Amp emulation.
The Speaker Model LED will be lit.
Press repeatedly on the selector to cycle through the various options.
The Drive knob at the upper right of the panel controls the drive
for the amps and the rotary simulator. Make sure that Drive is On,
and then turn the knob to get the desired amount of overdrive.
8LI6SXEV]IJJIGX
The rotary effect adds some great sonic drama to the sound. The Nord
C2 rotary has three available speeds: fast, slow and stop. Stop does
not disengage the effect; it only stops the rotating speakers
Make sure that the Speaker Model is activated and select the
Rotary by pressing the effect selector.
The drive knob now controls the overdrive of the rotary amplifier.
Press the Slow/Stop and Fast buttons in
the Rotary Speed section to the left on the
panel, to cycle between the Fast and Slow
speeds of the rotary.
The rotors will speed up and slow down, producing
a nice swirly effect.
Press the Stop mode button to activate this one-speed mode.
The Stop Mode LED will be lit.
Press repeatedly on the Slow/Stop button to cycle between
Fast and Stop.
The rotary will now emulate the functionality of an early, one speed
original rotary speaker that had only the fast and the stopped rotary
speed options.
If you connect a foot switch to the rotor pedal input, you can
control the rotary speed with this pedal.
The Speaker Models cannot be used when the Pipe organM
selected.
7IPIGXMRKERSVKERQSHIP
Press repeatedly on the Organ Model selector to cycle through
the four types - the B3, Vox, Farfisa emulations and the sampled
Pipe organ.
The settings for the organ sounds are made
using the digital drawbars. The Farfisa and the
PIpe organ uses these in a switch mode, with
only two settings for each.
Make a setting with the drawbars and then press one of the
Drawbar/Preset buttons
Make a new preset setting, in order to be able to quickly change
from one to the other during a performance.
+)88-2+78%68)( `

If you press and hold Preview and then a Drawbar/Preset button,
you can set up a new sound while the previous settings are still
active, and then quickly activate the new settings by pressing the
Drawbar/Preset button again.
7TPMXXMRKXLIKVIEXPS[IVQERYEP
Select the B3 model and let us split the lower keyboard to try some
Bass there:
Press the Pedal - Great Man button to split the lower
keyboard.
The bottom two octaves will now play the tone-
wheel bass sound.
Use the Pedal drawbars to set up the bass sound as you like it.
Press the Shift and the Organ Model/Synth Bass button to
select the synthbass.
The synth bass is automatically selected if the VX or the FARF models
are active. The Pipe organ has its own bass registers as well.
Use the Shift and the Pedal drawbars to set the Pluck and
Release parameters of the Synth bass sound.
9WMRKXLI7SYRH1EREKIV
-RWXEPPEXMSRSJXLI97&HVMZIV
Before the Nord C2 Combo Organ can communicate with a computer
running a Windows operating system, you need to install a Clavia USB
driver. To install the USB driver, follow these instructions:
Mac users may skip this paragraph.
Download the driver from the Nord C2 download area at
www.nordkeyboards.com.
Unzip the downloaded archive.
Connect the USB cable between the Nord C2 Combo Organ and
the computer and power up the unit. The ‘Found New Hardware’
wizard should appear, accompanied by its reassuring alert sound.
Let the wizard search for the USB driver and install it, or point the
wizard to the folder where the driver is.
7SYRH1EREKIVMRWXEPPEXMSR;MRHS[W4'
Download the Windows version of Nord Sound Manager from the
www.nordkeyboards.com website.
Run the Install Nord Sound Manager v5.xx.exe and follow the
instructions in the setup program.
The Nord Sound Manager will be installed in the Program Files
folder on the hard disk.
During the installation you will have the option to select an alternative
location for the application.
Confirm every window in the installation procedure by clicking on
the Next button.
The installation may be aborted at any time by clicking on Cancel.
When the installation is complete, click the Close button to return
to the Windows desktop.
7SYRH1EREKIVMRWXEPPEXMSR1EG37<
Download the Mac OSX version of Nord Sound Manager from the
www.nordkeyboards.com website.
Open the image file (.dmg) and drag the Nord Sound Manager
v5.xx.app to the Applications folder.
When new versions of the Nord Sound Manager are released,
they will be available as a free download at www.nordkeyboards.
com.
'SRRIGXMRKXLI1EREKIVERHXLI'
Make sure that the Nord C2 Combo Organ is powered up, and
connected to the computer, to a USB port.
Launch the Nord Sound Manager from the Program Files folder or
the Start Menu (PC) or from the Applications folder (Mac OSX).
During the start-up procedure, the Manager will automatically try and
establish contact with the Nord C2 Combo Organ.
When the Editor finds a Nord C2 Combo Organ, this will be indi-
cated at the lower, right corner of the Manager window and the
Program tab will open automatically.
A list with all the current Programs in the memory will appear in
the Nord Sound Manager window. Read more about the functions
in the Manager in the pdf manual that is available on the www.
nordkeyboards.com website.
This finishes our little tour; we hope that you now have the ini-
tial knowledge on how to operate most of the functions on the
panel. The following chapter is the reference section.
` 236(''31&336+%297)61%29%037:<

1EWXIVPIZIPORSF
This control sets the overall output level of
the C2, at the line- and the headphone out-
puts. The setting of this control is not stored
in a Program.
7LMJXFYXXSR
Many buttons have a second job, whose function is
printed below the button or knob. You access these
additional functions and parameters by holding down
shift while pressing a button.
8LI3VKEREVIE
The Nord C2 Combo Organ features four Organ Models; one digitally
modeled tonewheel/B3 organ, two digitally modeled transistor (VX and
Farf) organs and a sampled baroque pipe organ.
The Organ area features three main sections for control:
The Drawbar section is where you set-up the basic organ soundt
structure. It is divided into three areas connected to the Swell and
Great manuals, plus the Bass Pedal registers.
The Percussion area is where you control the percussion effect (avail-t
able to the B3 organ model only)
The Vibrato/Chorus area is where you select the chorus and/ort
vibrato effect depending on the selected Organ Model.
8LI(VE[FEVW
The drawbars of Nord C2 Combo
Organ are represented by buttons and
LED chain graphs instead of ordinary
mechanical drawbars. This gives you
a big advantage: when you change
preset or program, the correct drawbar
settings are recalled immediately and
shown by the LEDs. In other words,
no need for the regular “trial and error”
method. It’s very easy to get the hang
of changing the drawbar settings in a
natural way with the Buttons.
The drawbars of Nord C2 Combo Or-
gan behave similar to their mechanical
counterparts, i.e. with the B3 and VX models you “pull out” and “push
in” the drawbars using the drawbar buttons.
The buttons are special in the way that they auto-increment/ decre-
ment the drawbar value when held. If you hold a drawbar button the
corresponding drawbar value will continue to increment or decrement
(within its range) until you release the button.
While holding a drawbar button, you can press its sibling button to
momentarily auto-increment/decrement in the opposite direction. With
the Farf and the Pipe models, drawbar buttons functions as switches,
toggling each register on or off.
(VE[FEV4IVG4VIWIX&YXXSRW
The preset buttons lets you change back and forth between different
drawbar set-ups instantly. Changes that you make needs to be saved
with the program or else they will be lost when you select a new pro-
gram. Read more on how to save a program on page 15.
If the Pipe organ is active, the six preset buttons stores the set-
tings for both the swell and the great manuals.
If the B3, VX or the Farf models are active, the presets contains
individual settings for the upper and lower manuals. Further to
storing the drawbar settings, the upper manual’s percussion set-
tings are stored as well.
4VIZMI[
By pressing and holding the Preview button and then one of the two
Presets that are not currently active, you can continue to play with
the “current” setting, while dialing in a new setting in the background.
When you are done, tap the flashing Preset button to immediately
activate the new setting.
7TPMXXMRKXLIKVIEXQERYEP
By pressing the Great Man button you split the
great (lower) manual in two sections at the C3
key. The lower two octaves of the great manual
is now connected to the Bass drawbars.
7IPIGXMRK8LI3VKER1SHIP
You select which model to play
using the Organ Model button. Only
one model can be used at a time.
2SVH'6IJIVIRGI
236('6)*)6)2') `

When the B3 model is activated the Bass Drawbars control the B3
bass registers.
When the B3 model is activated you can activate the Synth Bass
model by pressing Shift + Organ Model button.
When the VX or Farf models is activated, the Bass Drawbars control
the synth bass model.
When the Pipe model is activated, the Bass Drawbars control the pipe
organ bass stops.
8LI&1SHIP
This model is based on a digital simulation of the classic mechani-
cal tonewheel organ. This simulation utilizes innovative and advanced
methods to capture every nuance of the original sound, for example:
An extremely accurate digital model of the original chorus and vibratot
scanner.
Modeling of the individual random contact bounces for each har-t
monic.
Modeling of the unique frequency characteristics of the built-in pre-t
amplifier, which forms the “body” of the sound.
Simulation of the energy robbing on the tone wheels that results int
the typical “compressed” sound.
Authentic tuning of the tonewheels according to the original design.t
Extremely fast keyboard response.t
Full polyphony.t
8LI(VE[FEVW
The harmonic intervals for the tonewheel organ are printed on the panel
below the drawbars.
For basic drawbar operation, please refer to “The Drawbars” on page
11. Each drawbars represents a partial with a fixed harmonic interval in
relationship with the played note.
The illustration below shows the pitch interval among the nine
drawbars when the key of C3 is played. Note that the SUB3 drawbar
actually lies a 5th above the fundamental harmonic. However, in most
situations it is perceived as sounding below the basic harmonic.
4IVGYWWMSR
The Percussion effect adds
extra attack to the sound
by having a single envelope
generator controlling either
the 2nd or 3rd harmonic.
The envelope “opens up” for a short moment in the beginning of the
sound when you press the key(s). The percussion is a single-triggered
non-legato effect. By “single-triggered” we mean that the percussion is
only present when you hit the keys when no other note is sounding. In
other words, if you play a note or a chord and then add on more notes
without releasing the previously pressed keys, there will be no percus-
sion effect in the new notes. You have to release all keys to be able to
play new notes with the percussion effect.
The percussion effect is available to the swell manual, and is activate
and deactivate by pressing the On button. The Soft button toggles
between Normal and Soft percussion level. The Fast button toggles
between Slow and Fast decay times.
The Third button toggles between using the 2nd or 3rd partial as the
source for the percussion effect The percussion decay time can be
fine-tuned for Fast and Slow mode individually. Please refer to “The
Sound Menu” on page 17 for details.
With the original instrument, you could not use the percussionM
effect and 9th Drawbar simultaneously. However with the Nord C2
you have a choice. You can use the percussion and 9th Drawbar
together or chose to mimic the original organ behavior by turning
off the 9th Drawbar whenever the percussion is activated. Read
more on the Perc Drawbar 9 Cancel setting in the Sound menu on
page 17.
:MFVEXS
The original vibrato and chorus scanner in a
tonewheel organ consists of a tapped delay line
in combination with a rotating scanner. For the
Vibrato effect, phase Shift is applied to the signal.
For the Chorus effect, the phase modulated
signal is added to the original signal.
Three different types of choruses (C1- C3) and three different types of
vibratos (V1-V3) are available. Select one of these types by pressing
the Mode button. The effect can be activated/deactivated for both
manuals individually by pressing the Vibrato/Chorus button for the swell
and great drawbars
Please note that the Vibrato/Chorus button for the great manual also
controls this effect for the tonewheel Bass registers.
/I]GPMGOGSRXVSP
The key click produced by the random contact bounces is an impor-
tant audio artifact. This quickly became a desirable effect amongst
musicians. You can adjust the click level in the Sound menu.
Do not forget to try out the four tonewheel modes that are avail-
able in the Sound menu. These will dramatically change the sound
of the B3 model from squeaky clean to a battered, old work horse.
Upper & Lower
C3
` 236(''31&336+%297)61%29%037:<

8LI:<1SHIP
The original Vox™ organ is probably the most famous of all the
transistor-based combo organs that emerged in the early 60’s. Transis-
tor technology made it possible to manufacture much more compact
and portable organ instruments. Compared to the mighty sound of
tonewheel based organs, transistor organs generally sounded reedier
and weaker, but this one had a distinctive sound character which
together with the portability and cool design (inverse colored keyboard
and chrome “Z-frame” stand) made the instrument massively popular
at the time. The sound is timeless and recreated faithfully in Nord C2
Combo Organ.
8LI(VE[FEVW
The labels used for the VX drawbars are printed on the row directly
above the drawbar LEDs.
For basic drawbar operation, please refer to “The Drawbars” on page
11.
The seven left most drawbars control the level of each partial. Each
partial has a fixed harmonic interval relating to the played note. The
illustration below shows the pitch interval of the drawbars when the key
of C3 is played. The intervals vary for the upper and lower manual on
the original instrument, but are identical on the Nord C2.
The two right most drawbars control the sum of all partials in the form
of a filtered signal sounding soft and dark, and an unfiltered signal
sounding bright and intense.
If these drawbars are both fully “pushed in”, the organ will pro-E
duce no sound.
:MFVEXS
There are several types of vibrato and choruses available for the VX
model, which is activated using the Swell/Great buttons in the Vibrato
section. The V3 setting is the one that is modeled after the original
instrument.
The VX models vibrato setting is common for both the swell andM
great manual.
8LI*EVJ1SHIP
This typical “buzzy” sound of this vintage instrument is one of the most
distinct and easily recognizable organ sounds ever created, yet it is
actually possible to get quite a wide range of sounds out of the instru-
ment. Note that the voices aren’t supposed to replicate the instruments
they are named after, but rather to describe the basic tonal characteris-
tic of the voice; Flute - soft, Oboe - reedy, Trumpet - brassy.
8LI6IKMWXIVWIPIGXSVW
The labels used for the Farf drawbars are printed on the upper row
above the drawbar LEDs.
The drawbars act as on/off switches, or “register selectors” when the
Farf model is selected. Instead of drawbars, the original instrument
featured “rocker”-type switches select instrument “voices” (actually
different filter settings) in various footage (octave) ranges. The drawbars
buttons are used to turn voices on and off. The drawbars LEDs 5-8
are lit up for an activated voice, and drawbars LEDs 1-4 are lit up for a
deactivated voice. The table below shows the original register name.
6IKMWXIV
7IPIGXSV :SMGI 4ERIP2EQI
1 Bass 16 BASS16
2 Strings 16 STR16
3 Flute 8 FLUTE8
4 Oboe 8 OBOE8
5 Trumpet 8 TRMP8
6 Strings 8 STR8
7 Flute 4 FLUTE4
8 Strings 4 STR4
9 A bright voice, an octave
and a fifth above the
fundamental
2 2/3
The illustration below shows the pitch interval between each voice
when the key of C3 is played. Though some voices have the same
pitch, they differ in tonal character.
Upper
Lower
C3
Upper & Lower
C3
236('6)*)6)2') `

:MFVEXS
The original instrument have two basic vibrato modes; “Light” and
“Heavy”, with different rates for each mode. There are several types of
vibrato and choruses available for the FARF model in the C2, which are
activated using the ON button in the Vibrato section.
The V1, V2 and the V3 settings are the ones that are modeledM
after the original instrument’s.
The FARF models vibrato setting is common for both the swellM
and great manuals.
8LI4MTI3VKER
The pipe organ model is a sampled classic organ with a set of pipes
that is of the baroque variety. The drawbars on the C2 acts as “stops”
and the different stops are labeled below the lower drawbar buttons. A
stop can be on or off, similar to the register selectors in the FARF
model.
The two manuals have 9 different stops each. Their names are printed
on the panel below the drawbar buttons. The pedals have 3 stops, the
Fagot 16 can be added to the Sub stop by pressing the drawbar-down
button a second time.
When the pipe organ is selected, the speaker models, the sustainM
pedal and the drive function will be inactive.
8VIQYPERX
When the pipe organ is selected, the vibrato/chorus function acts like
the tremulant of the original instrument. This functionality is achieved
by varying the actual wind supply to the pipes on a pipe organ. The
tremulants in the C2 can be activated individually for the swell and the
great manuals and you select which one to use by pressing the Vibrato
Mode button. The tremulant has two rates (V and C) with three depths
each (1, 2 & 3).
Press and hold Shift to cycle through the tremulant settings in a
counter-clockwise fashion.
The bass stops are not affected by the tremulant.M
8LI'SYTPIVW
When the pipe organ is used, the controls on the panel for the Rotary
simulation and the Percussion controls are used to activate the pipe
organs couplers instead. A coupler allows the stops of one division or
manual to be played from another manual. This can be used to create
huge sounds, combinations of stops across the manuals and also to
use the pedal stops in combination with the two manual’s stops.
'SYTPIV (IWGVMTXMSR
PED/GR LOW This couples the lowest key played on the great
manual to the bass stop. The affected range ends
at F3. This is a great way to move some serious air
even if you do not have a set of pedals.
SW 16/GR This couples the stops on the swell manual to be
played on the great manual. The stops are also
transposed one octave down.
SW/GR This couples the stops on the swell manual to be
played on the great manual without any transposi-
tion.
SWELL 16 This doubles the stops on the swell manual, with
the doubling transposed one octave down.
SWELL 4 This doubles the stops on the swell manual, with
the doubling transposed one octave up.
SW/PED This couples the swell manual stops to the pedals.
GR/PED This couples the great manual stops to the pedals.
8LI7]RXL&EWW1SHIP
The synth bass model is available when the B3, VX or Farf models are
activated. For the tonewheel model you can alternate between the
original tonewheel bass registers or the synth bass model by pressing
Shift + Organ Model Buttons.
The main feature of the synth bass model is a monophonic bass
synthesizer with adjustable release time, giving you more time to
move your foot when using a foot pedal board. It also has an adjust-
able pluck for a more pronounced attack. Pluck and release time are
adjusted with the Bass drawbars while holding down the Shift key.
The bass can also be played from the Great manual, by pressing the
Great Man button. Please look at page 11 for detailed information.
Pluck Level
Release Time
Drawbar level
Note On Note Off
level
time
` 236(''31&336+%297)61%29%037:<

4VSKVEQEVIE
;LEXMWETVSKVEQ#
All sound related knob and button settings can be stored into any of
three storage areas; Prog, Live 1 and Live 2. These can be selected
with the corresponding buttons.
With Prog activated, 126 program locations are available. The current
program location number is shown in the display.
Changes that you make has to be stored in order not be lostE
when you select another program.
Live 1 and Live 2 contains one complete panel setting each. Changes
are saved automatically, so when you load a stored program or even
when you power off, all settings will be exactly as you left them the next
time you return to that live program.
0SEHMRKE4VSKVEQ
When Prog is activated, you can select a program location by pressing
the Prog/Menu buttons. Programs will be loaded automatically.
When a Live program is activated, you can select a stored program in
the Prog area by navigating the Prog/Menu buttons, but the program
will not be loaded until you press the Prog button.
7XSVMRKE4VSKVEQ
To store a program to any of the 126 program locations:
Press the Store button once and the current Program number will
start to flash.
If the LED shows “PRO”, you must turn off memory protection inM
the system menu. Please refer to “System Functions” on page 17.
Select the desired location with the Up/Down Buttons and press
Store again to confirm your intentions to store the current settings
to the selected location.
The LED will briefly indicate “STO” to confirm that the program has
been stored.
Press any button if you wish to abort the store procedure.
The Program section is also where you enter the System, MIDIM
and Sound menus. Read more about these functions on page 17.
4VSK1IRY&YXXSRW
The Prog/Menu Buttons to the left of the display have several functions
in the Nord C2. Press repeatedly to select one of the 126 Programs;
the number of the Program will be presented in the LED.
If you have activated any of the three menus, the System, MIDI or
Sound menu, these buttons are then used to select a function, and to-
gether with the Shift button, to change the value of a selected function.
Read more about the menus on page 17.
(MWTPE]
The LED display will show the active Program number. If you edit the
settings of a Program, a dot will appear next to the Program number, at
the bottom right of the display.
If you have activated any of the three menus, the System, MIDI or
Sound menu, the setting for each menu item is shown with the LED’s.
0MZI
If you press any of the two Live buttons, all changes to panel settings
you make will be continuously saved in the “Live Buffer”. If you switch
the power off, or select another program, the settings are still stored in
the live memory, so when you power up next time (or return to the live
memory) all settings will be exactly as you left them.
If the live memory is selected and you decide you wish to store the
settings permanently as a program you can do so using the stan-
dard methods (see above). You can also store programs into the live
memory location, in which case the program settings will replace the
current live memory settings.
236('6)*)6)2') `

)JJIGXEVIE
7TIEOIV1SHIP
This allows you to select the speaker/amp and rotary emulations.
JC and Twin emulates two different kinds of am-
plifier and speaker cabinets. The amount of over-
drive is controlled by the Drive Amount controls to
the upper right on the panel.
Rotary simulates a rotary speaker including its
built-in amplifier. The C2 has two models of rotary speakers, you select
these in the Sound Menu, see page 18 for details.
The Drive knob to the upper right on the panel sets the amount ofM
overdrive of the rotary amplifier.
The speed of the rotating speaker is set with the rotary speedM
controls on the left side of the panel.
Press the Speaker Model button repeatedly to cycle through the avail-
able settings.
6SXEV]7TIEOIVGSRXVSPW
The rotary speaker speed is set with the buttons
in the Rotary Speaker section to the left side of
the panel.
You can also connect an external control to the
Rotary control input on the back panel, such as
a sustain pedal, pedal switch or the Half Moon
Switch accessory.
A sustain pedal can operate by momentarily changing the speed
setting or by toggling between slow and fast or if the Stop mode is
activated on the panel, between stop and fast.
Please refer to the “System Functions” on page 15 for further informa-
tion.
(IPE]
The Nord C2 is
equipped with a
delay featuring
echoes/repeats with adjustable tempo and feedback settings. The On
button activates/deactivates the effect.
All knobs and buttons will always be active even though the effectM
needs to be activated in order for the change to be audible.
The tempo knob controls the delay time. The tap tempo button allows
you to set the delay time by tapping the button repeatedly “in time”.
The amount knob acts as a effect send control, to set the amount of
the dry signal that will be routed to the delay.
The feedback button selects number of repeats, starting with 1 repeat
(no LEDs lit) to many repeats (both LEDs lit). Press repeatedly on this
button to set the feedback amount.
By activating the Swell only function (Shift + Feedback), the delayM
effect is limited to the swell manual.
` 236(''31&336+%297)61%29%037:<
)5
This is a 3-band equalizer with treble, mid and bass controls. The
frequency ranges can be boosted/attenuated with +/- 15 dB. The On
button activates/deactivates the effect.
(VMZI
The Drive knob controls the amount of gain applied to the amps or
Rotary Speaker effects respectively, depending on the Speaker Model
setting. The On button activates/deactivates the effect.
If no speaker model is activated, the drive knob will introduce a generic
overdrive to the sound.
6IZIVF
The reverb simulates the natural sound reflections
in various acoustic environments. The On button
activates/deactivates the effect.
The Reverb amount knob sets the balance be-
tween the unprocessed and the processed signal.
By pressing the reverb button you can choose
between five reverb types, indicated by the three
LEDs lit one or two at a time.
tHall Soft - A reverb with the response and character of a spacious
hall, with a long decay and a mellow character.
tHall - A Hall reverb with a slightly brighter character.
tStage Soft - A reverb with a medium decay time and mellow char-
acter.
tStage - A medium decay reverb, with slightly brighter character.
tRoom - Room ambience with a rather short decay time.

7]WXIQ1IRY
1IQSV]4VSXIGX¦3R3JJ
This is set to “On” when the Nord C2 leaves the factory, meaning that
you cannot save any changes to the programs. Set this to Off when you
wish to store your own programs. The System, MIDI or Sound menu
settings and the Live memory are not protected by this setting.
Range: On (default), off
3YXTYX6SYXMRK06
If you want to process your sound using external effects or separate
amplifier systems, it can be convenient to route organs to separate
outputs of the Nord C2. This setting determines which organs should
be routed to the main left & right outputs.
Range: P - Pipe organ.
Pb - Pipe organ and the B3 model.
PE - Pipe organ and the VX and Farf models.
A - All models.
If the High Level or 11-pin output is not connected, all organs willE
be routed to the L&R outputs.
3YXTYX6SYXMRK)\X6SXEV]7TOV
This setting determines which organs should be routed to the 11-pin
and High Level outputs.
Range: b3 - B3 model.
E - The VX and Farf models.
bE - The B3, the VX and the Farf models.
If the High Level or 11-pin output is not connected, all organs willE
be routed to the L&R outputs.
8VERWTSWI
Transpose allows you transpose the pitch of the Nord C2 up or down in
semitone steps.
Range: -/+ 6 semitones (default = 0).
*MRI8YRI
This allows you to fine tune the pitch of the Nord C2.
Range: +/- 50 cent (default = 0).
7YWXEMR4IHEP4SPEVMX]
This allows you to change the polarity of a connected sustain pedal, in
case the functionality of your pedal is reversed (i.e. when the pedal is
up, sustain is on and vice versa).
Range: OP - Open, CL - Close (default).
7YWXEMR4IHEP'SR´KYVEXMSR
Controls weather the selected organ model should respond to sustain
pedal messages or not. When a pedal is connected to the sustain
pedal input, sustain pedal messages are always send via MIDI Out
regardless of this setting.
Range: On (default), Off.
The pipe organ is never affected by a sustain pedal.M
6SXSV'XVP8]TI
Specifies the type of controller connected to the Rotary Control input.
Range: HA - Halfmoon, OP - Open, CL - Closed (default).
7[IPP4IHEP8]TI
Different brands of control pedals have different specifications (resistance,
offset and linearity). To simplify setup and to optimize the response of the
pedal for the Nord C2, the most common pedal makes are pre-config-
ured, and you simply select the type of pedal you connect.
Roland, Yamaha and Fatar are linear control pedals with different scal-
ing and offset. Ernie Ball pedals (“ErnieB”) are marketed as volume ped-
als, with a logarithmic response, but the response is rescaled internally
in the Nord C2 to make them work nicely as control pedals. They may
need a Y-cable (stereo plug -> 2 mono plugs) to work with the Nord C2.
Range: FA - Fatar, Er - Ernie Ball, YA - Yamaha, rO - Roland
(default)
8LI1IRYW
Any settings that you change in the System, MIDI or Sound menu will take immediate effect on a global basis, and will be stored until you change
them the next time *. Enter the menus by pressing and holding Shift and the System, MIDI or Sound button (Prog, Live 1 or Live 2). Select a function
with the Up/Down buttons and change the setting by pressing and holding Shift and the Up or Down button. Exit the menus by pressing a second
time on the Prog, Live 1 or Live 2 button.
* The only exception to this is the MIDI Local On/Off setting which always reverts to Local On every time the Nord C2 is powered up.M
8,)1)297 `

6SXSV4IHEP1SHI
If you are using a sustain pedal connected to control Rotor Speed
this allows you to set how this should operate. “Hold” means that the
Rotor Speed is fast for as long as the pedal is down and reverts back
to slow/stopped when the pedal is released (or vice versa depending
on the set pedal polarity).
“Toggle” means that the fast & slow/stopped rotor speed is cycled
each time you activate the pedal, like an on/off switch pedal.
Range: Hd - Hold, (default), tO - Toggle.
3VKER8VMK1SHI
This allows you to change how the Nord C2 keyboard triggers the or-
gan sounds. When “High” is selected, you will trigger the organ sounds
before the key reaches the end of its travel. This mode closely mimics
the way a vintage tonewheel organ or a pipe organ trigger its notes.
Range: H- High (default), L- low
High trigger point Low trigger point
(VE[FEV7TIIH
This sets the speed with which the drawbars will increase or decrease
the values when the drawbar buttons are held down.
Range: F- Fast (default), S- slow.
1-(-1IRY
7[IPP'LERRIP
This sets the MIDI Channel that the swell manual on the Nord C2 trans-
mits and responds to.
Range: Off, 1-16 (default = 1)
+VIEX'LERRIP
This sets the MIDI channel that the great manual on the Nord C2 trans-
mits and responds to.
Range: Off, 1-16, (default = 2)
4IHEP'LERRIP
This sets the MIDI channel that the Bass section of the Nord C2 organ
transmits (if the Great manual is split) and responds to.
Range: Off, 1-16, (default = 3)
0SGEP'SRXVSP
This allows you to set if the Nord C2 keyboard and front panel controls
should control internal Programs or only send note and controller mes-
sages via MIDI. Local On is the normal “mode”. In Local Off mode, the
front panel and keyboard action are transmitted via MIDI only and does
not control the internal sound(s) directly.
If the “E” mode is active, the keyboard of the C2 will transmit velocity.
Range: On (default), Off, E - External Device
Local defaults back to mode On every time the Nord C2 is pow-M
ered on.
'SRXVSP'LERKI''1SHI
This setting specifies how the front panel’s knobs and buttons are han-
dled in the MIDI communication with MIDI Control Change messages.
You can select if the panel controls and functions should either send or
receive, or both or if Control Change messages should be ignored.
Range: Sr (send & receive - default), r (receive only), S (send only),
Off
4VSKVEQ'LERKI1SHI
Specifies how the Nord C2 should handle MIDI Program Change mes-
sages.
Range: Sr (send & receive - default), r (receive only), S (send only),
Off
7IRH''
You can perform a dump of all the active Program’s parameters as
MIDI Control Change messages. Press the Store button to perform the
dump.
(YQT3RI
This allows you to perform a MIDI SysEx dump of the currently selected
Program. Press the Store button to perform the dump.
(YQT%PP
This allows you to perform a MIDI SysEx dump of all the Programs in
the Nord C2. Press the Store button to perform the dump.
In the MIDI chapter, on page xx is a description on how the Nord C2
receives a Sys Ex dump.
7SYRH1IRY
8VIFPI,SVR7TIIH
Sets the speed setting (in the fast and slow speed modes) of the rotary
speaker simulation’s treble horn.
Range: H - High, n - Normal (default), L - Low
` 236(''31&336+%297)61%29%037:<

&EWW6SXSV7TIIH
Sets the speed setting (in the fast and slow speed modes) of the rotary
speaker simulation’s bass rotor.
Range: H - High, n - Normal (default), L - Low
8VIFPI,SVR%GGIPIVEXMSR
Sets the acceleration and retardation time of the rotary speaker simula-
tion’s treble horn.
Range: H - High, n - Normal (default), L - Low
&EWW6SXSV%GGIPIVEXMSR
Sets the acceleration and retardation time of the rotary speaker simula-
tion’s bass rotor.
Range: H - High, n - Normal (default), L – Low
4IVG*EWX(IGE]
Sets the fast mode decay time of the B3 percussion effect.
Range: L - Long, n - Normal (default), S- Short
4IVG7PS[(IGE]
Sets the slow mode decay time of the B3 percussion effect.
Range: L - Long, n - Normal (default), S- Short
4IVG2SVQ0IZIP
Sets the level of the percussion effect in the normal setting.
Range: H - High, n - Normal (default), L – Low
4IVG7SJX0IZIP
Sets the level of the percussion effect in the soft setting.
Range: H - High, n - Normal (default), L – Low
8SRI[LIIP1SHI
Sets the level of tonewheel crosstalk and cable leakage artifacts of the
B3 organ model.
Range: u3 – Vintage 3, u2 - Vintage2, u1 - Vintage1 (default),
Cl – Clean
4IVG(VE[FEV'ERGIP
If this is set to cancel, the 9th drawbar will be muted when the percus-
sion is activated, to mimic the behavior of an original organ.
Range: C – Cancel, n – Normal (default).
/I]'PMGO0IZIP
This sets the amount of Key Click for B3 organ model.
Range: High, Normal (default), Low
6SXEV]1SHIP
Sets the rotary model. The “A” model is a recent addition, modeled on
a vintage 145 unit. The “b” model is the original Clavia rotary emulation.
Range: A (default), b
4MTI4IHEP0IZIP
This allows you to adjust the level of the Pedal manual, for the Pipe
Organ.
Range: High, Normal (default), Low
4MTI7[IPP0IZIP
This allows you to adjust the level of the Swell manual for the Pipe
Organ.
Range: High, Normal (default), Low
8,)1)297 `

%FSYXXLI1-(-MQTPIQIRXEXMSR
The following MIDI messages can be transmitted and received from the
Nord C2:
Note On/Off
Note On and Note Off messages are transmitted and received.t
Controllers
In the MIDI Menu (see page xx), you can select if the Nord C2 should
transmit and/or receive Control Change messages.
Incoming MIDI Controller 7 controls the overall volume of the Nord C2.t
Incoming MIDI Controller 10 controls the panning of the Nord C2.t
If you have a control pedal connected to the Swell pedal input, this ist
transmitted as Controller 4 (Swell).
If you have a pedal connected to the sustain pedal input, this ist
transmitted as Controller 64 (Sustain Pedal).
If you have a pedal connected to the rotor pedal input, this pedal ist
transmitted as Controller 90.
Almost all other controls (knobs and buttons) on the front panel aret
also transmitted (and received) as Control Change messages. This
can be used to record your actions on the front panel into a MIDI
sequencer. For a full list of which parameters correspond to the Con-
troller numbers, see the MIDI implementation on the next page.
/I]FSEVHZIPSGMX]
The Nord C2 can transmit and receive keyboard velocity messages.
Organ sounds will always be played back at nominal level regardless of
incoming MIDI Velocity data. Release velocity is also transmitted.
4VSKVEQGLERKI
In the MIDI Menu (see page 17), you can select if the Nord C2 should
send and/or receive Program Change messages.
When you select a Program, a Program Change message is transmit-
ted via MIDI. If a Program Change message is received on the selected
MIDI Channel, the Nord C2 will change Program accordingly.
The 128 Program locations (programs 1-126 + Live 1 and Live 2) send
and respond to MIDI Program Change values 0-127.
1-(-7]WI\7]WXIQ)\GPYWMZI
Individual Programs or all Programs can be transmitted and received as
a System Exclusive dump.
2SVH'[MXLEWIUYIRGIV
'SRRIGXMSRW
Connect the MIDI Out on the Nord C2 to the MIDI In on your
sequencer.
Connect the MIDI Out from your sequencer to the MIDI In on the
Nord C2.
0SGEP3R3JJ
Local Off may be used when you use a sequencer to record and play
back from Nord C2. If the sequencer echoes back incoming MIDI data,
the Nord C2 may respond twice to every note and other message/ac-
tion if e.g. the keyboard and the sequencer sends the same MIDI infor-
mation to the unit. Local On/Off is set on the “MIDI menu” see page 17.
1-(-'LERRIP
The MIDI channel(s) that the Nord C2 uses are set up in the MIDI menu
- see “MIDI menu” on page 17.
4VSKVEQ'LERKI
Usually you select a Program Change value for a track in the sequenc-
er track settings. The 128 program locations send and respond to
Program Change values 0-127.
If you want to record a Program Change message, activate recording
in the sequencer and simply select the program on the Nord C2.
'SRXVSPPIVW
When you record actions with knobs and buttons, make sure that the
sequencer “echoes” the changes back on the correct MIDI Channel, or
your changes won’t have any effect.
7SQIRSXIWEFSYXGSRXVSPPIVWERH¨GLEWMRK©
Consider a situation where you record a Controller message, e.g. a
Drawbar opening, in the middle of your sequencer song. Then you “re-
wind” the sequencer to a position before the recorded Drawbar open-
ing. The problem is that the Nord C2’s Drawbar will remain opened,
although it really should be as it was before you recorded the opening.
To solve this, you could record a “snapshot” of all Controller settings
of the Nord C2 Program at the beginning of your sequencer song. See
“Sending MIDI Controller dumps” below.
1-(-JYRGXMSRW
` 236(''31&336+%297)61%29%037:<
Table of contents
Other nord Musical Instrument manuals