HMM Diagnostics smart LAB mini User manual

User Manual
D10421-08-01-02_R1_24/02/2011
HMM Diagnostics GmbH
D-69221 Dossenheim, Germany
www.hmm.info
Self-Monitoring Blood Glucose Meter
Please read this manual thoroughly before
first using this device


3
Contents
I. Introduction
Measuring principle 6
Intended use 6
Important information 7
II. Ihr smartLAB®mini
Display & functions 9
Specifications 9
The smartLAB®pro test strips 10
Explanation of symbols 11
III. Setup & Operating procedures
Installing batteries 13
Function check 14
Notes on using smartLAB®pro blood glucose test strips 15
Note on smartLAB® „NO CODE“-test strips 16
Running a blood glucose test 17
Alternate Site Testing (AST) with the transparent cap 19
Reading stored test results from memory 20
Understanding your test results 20
Control solution testing 23
IV. Miscellaneous
Maintenance 27
Troubleshooting 28
Limitations of the measurement procedure 31
Warranty 33

4

5
I. Introduction
Thank you for using the smartLAB®mini Self-Monitoring Blood Glu-
cose System. This system was produced in close association with di-
abetes health care professionals, hospitals and, most importantly,
people with diabetes. The measuring results can help you determine
the effects of food, exercise and diabetes medications.
Your smartLAB®mini glucose meter was designed to be dependable,
easy-to use, compact, lightweight and portable to assist you in
monitoring your blood glucose on a regular basis. Please read this
manual thoroughly before you begin testing. It provides you and
your diabetes care team with important information and step-by-
step direction to use meter correctly. Although your smartLAB®mini
system is easy to use, you should consult your healthcare profes-
sional (this may be your doctor, diabetes nurse educator or phar-
macist) for instructions on how to use the system. The only way to
obtain accurate results from any system is to make sure you cor-
rectly use it. If you have any concerns, please call your authorized
distributor in your country during business hours.

6
Measuring principle
The smartLAB®mini Self-Monitoring Blood Glucose System is de-
signed to allow rapid measurement of blood glucose by using an
electrochemical biosensor technology. This system employs a dis-
posable dry reagent strip technology, based on the glucose oxidase
method for glucose determination.
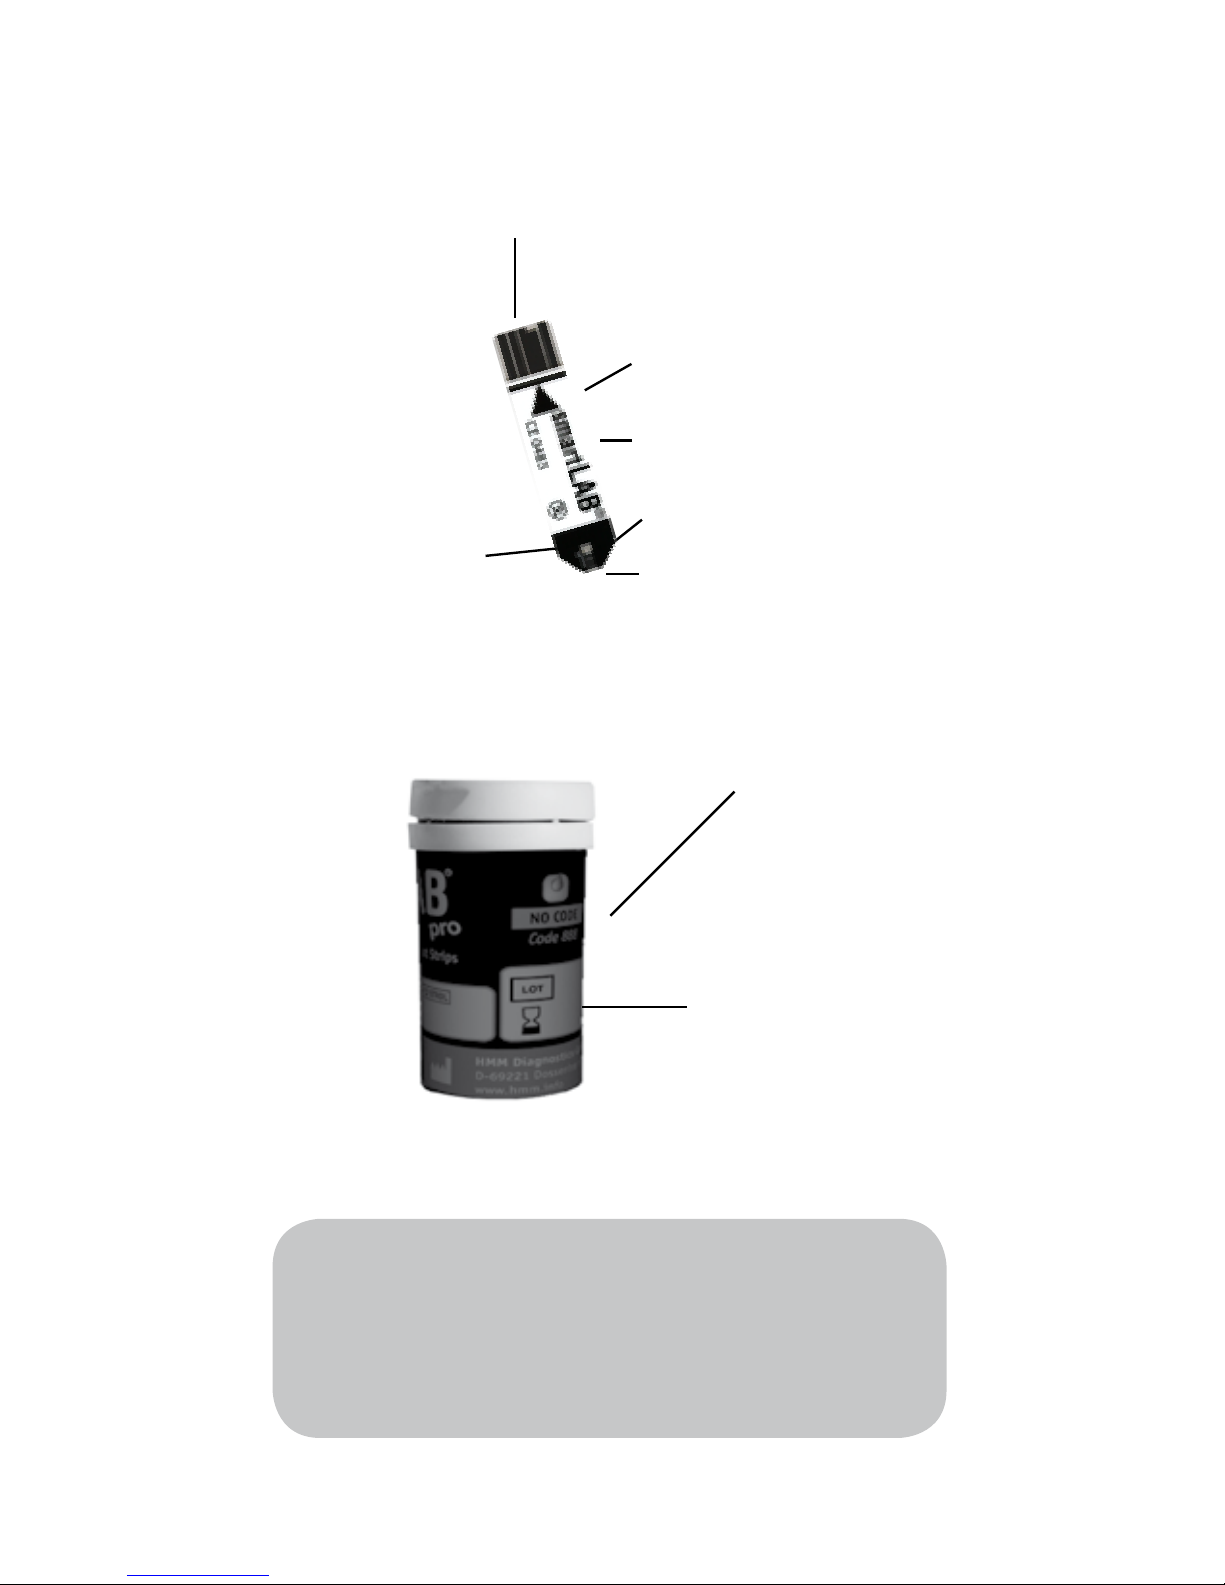
Each test strip features an electrode containing the glucose oxidase
from aspergillus niger. A capillary blood sample is applied to the
collecting area of the strip, and is automatically drawn into the
reaction zone, where the glucose oxidase catalyzes the oxidation of
glucose to produce glyconic acid. During the reaction, a mediator
transfers electrons to the electrode surface and generates a cur-
rent. The amount of the current is proportional to the amount of
glucose present in the blood sample. The glucose concentration
is measured by your smartLAB®mini meter and displayed on the
screen after 5 seconds.
Intended use
This blood glucose meter is a self-test IVD medical equipment and
intended for both home testing and for professional use to monitor
the blood glucose (B-D-glucose) value from capillary whole blood.
It is used outside the body only (In-vitro diagnostic use). The meter
should be used only smartLAB®pro blood glucose test strips. Testing
is not valid on neonatal blood specimen.

7
Important information
• Severe impact may cause the meter to malfunction. Do not disas-
semble the meter as it may damage components inside and cause
an incorrect reading. The warranty will be void if the meter has been
disassembled.
• Incorrect results may occur when performing the test. If you be-
lieve you are not feeling well, please contact your healthcare pro-
fessional immediately.
• Always keep the meter clean and store it in a safe place. Protect
from direct sunlight to ensure a longer lifespan.
• The strip slot should be kept free from dirt, dust, blood stains,
and water stains.
• Do not store the meter and test strips in a car, a bathroom or
a refrigerator. And the meter, strips and lancing device should be
kept away from children or pets.
• Please refer to the limitations of the procedure before testing.
• Remove batteries if the meter will not be used for one month or
more.
• Store the kits in a dry place with temperature range is 2 to 30°C
(35.6 to 86 °F). Keep away from direct sunlight and heat.

8
• Store your test strips in their original vial only. Do not transfer
them to a new vial or any other container.
• Indicate the date you open the vial. Discard all unused strips
immediately after 90 days from open date. The strips are for single
use only.
• Warning for potential biohazard: Healthcare professionals using
this system on multiple patients should be aware that all products
or objects that come in contact with human blood, even after clean-
ing, should be handled as if capable of transmitting viral disease.
Do not touch the test strip with wet hands
Do not use expired test strips
(see expiration date on the strip vial)
Do not bend, cut or twist the strip

9
II. Ihr smartLAB®mini
Display & functions
Test result
Measuring
unit
Battery power
Thermometer
Error code
Code number
Apply
blood or con-
trol solution to
the test strip
Specifications
1. Type: smartLAB®mini
2. Measuring range: 20~630 mg/dL
(1.1~35.0 mmol/L)
3. Measuring duration: 5 seconds
4. Memory: 20 values
5. Operating temperature: 10°C~40°C
(50°F~104°F)
6. Relative humidity: RH ≤90%
7. Blood sample: ≥ 0,6 µL capillary
whole blood
8. Calibration: Plasma equivalent
9. Hematocrit (Hct): 30-55%
10. Battery type: 2 CR 3V Lithium bat-
teries
11. Battery life: over 3000 measurements
12. Display-size: 30 x 30 mm
13. Meter dimensions: 80 x 50 x 5 mm
14. Weight: 22g (without batteries)

10
The smartLAB®pro test strips
Note: You can find the test strip expira-
tion date on the vial label next to the
symbol.
Expiration date
Vial opening date (please
note)
Electrode
Insert direction
Grip zone
Reaction zone
Aperture Application zone

11
Explanation of symbols
+
Please refer to the manual
This product meets the requirements of Directive
98/79/CE for in vitro diagnostic medical devices.
Lot number
Expiration date
For in vitro diagnostic use only
Use Lithium battery CR 2032 3V
Single use only
Storage temperature
Manufacturer
Before use, read manual first
Catalogue number
Serial number
Control solution
Opening date of test strip vial

12
Set contents
1 smartLAB®mini blood glucose meter
1 User manual
1 smartLAB® plastic box
2 CR 2032 3V batteries
1 smartLAB® lancing device
1 smartLAB® Check Strip
1 smartLAB® Quick Start instruction
10 smartLAB® lancets
10 smartLAB®pro blood glucose test strips
Optional:
1 smartLAB® control solution

13
III. Setup & Operating procedures
Installing batteries
The meter uses two CR 2032 3V Lithium
batteries. Batteries will normally last for
aprox. 3000 tests. Other types of CR 3V
lithium batteries are also acceptable, yet
the capacity of test times may differ. In-
stall the batteries when you first use the meter or replace with new
batteries when the “LP” message and the low battery symbol appear
on the LCD display. Open the battery lid on the back side of the
smartLAB®mini meter and insert batteries with plus sign to top.
First insert the battery on the right side and then press the left side
down until it clicks. Close the battery lid.
Note:
1. Remove the batteries when you will not be using the meter for
one month or longer.
2. Values won’t be deleted when the batteries are replaced.
Meter, batteries, lancets, test strips etc. must be disposed of
according to local regulations at the end of their usage.
Low battery symbol

14
Function check
You can carry out a function check with the Check Strip which is
included in your meter set. You do not have to do the function
check before every measurement. It helps you to control if your
smartLAB® meter works properly, from time to time, though.
1. Insert check strip into the meter:
Make sure your check strip is inserted with writing to top. The meter
will turn on automatically and the display will show „CHK“.
2. Check message in LCD display:
The function check will take approx. 3 seconds. The check can pro-
duce the following messages on the display:
• „OK” - your meter works properly
• „FAL“- change batteries and check again. If the message still ap-
pears, please refer to your local supplier.
3. Remove check strip:
The meter will turn off automatically after removing the test strip.
Please keep the check strip in the soft case of the meter.

15
Notes on using smartLAB®pro blood glucose test strips
• Use only with smartLAB® blood glucose self-monitoring systems.
• Keep the test strips in their original vial.
• Close the vial tightly right after you take out a test strip. This
keeps the test strips dry.
• Use the test strip within three minutes after you have taken it
out of the vial.
• The strip is for single use only. Do not reuse it.
• Record the date you first open the test strip vial. Be sure to check
the “Expiration Date” on the test strip vial. The test strip is
good for three months from the date the vial is opened or until
the “Expiration Date” on the vial, whichever comes first.
• Store the test strip vial and your meter in a cool dry place
• Store the test strips below 30°C (86°F). Do not freeze.
• Do not apply blood or control solution to the test strip before you
insert it into the meter.
• Do not touch the test strip with wet hands. Do not bend, cut, or
twist the test strips.

16
Note on smartLAB® „NO CODE“-test strips
The smartLAB®pro blood glucose test strips compatible with
smartLAB® glucose meters need not to be coded, any more. Thus,
when inserting a test strip, the display will read „Code 888“. That
is because all test strip charges only use this code. This will make
it easier for you to use your smartLAB® product free from errors.
(Avoidance of coding errors)
If „Code 888“ DOES NOT appear while inserting a test strip, your
meter either needs to be recoded or your glucose meter is not com-
patible with these smartLAB®pro blood glucose test strips. In either
case, please contact your distributor.

17
Running a blood glucose test
1. Preparations
Before running a blood glucose test, make
yourself acquaint with the test strips and
the lancing device. Keep all required ma-
terials ready for use: your smartLAB®mini
meter, the smartLAB®pro test strips and
the smartLAB® lancing device includ-
ing lancets.
Wash your hands thoroughly with warm water before colleting the
blood sample. Rinse your hands thoroughly.
2. Switch on the meter
Take a strip out of the vial and immediately close it. Insert the strip
into the meter in the direction of the arrow on the strip. The meter
turns on automatically. „Code 888“ appears on the display and af-
terwards the symbol for applying blood.
In case „Code 888“, DOES NOT appear on the display,
please contact your supplier (see chapter „Note on
smartLAB® „NO CODE“ test strips“)
3. Collecting a blood sample
When the blood drop flashes on the display,
gently massage the part of your finger tip
which you obtain a drop of blood from us-
ing the lancing device. Place the lancing device against the pad of
your finger. Press the trigger button to activate the lancing device.

18
4. Blood glucose measurement
Hold the application zone of the test strip vertically onto the blood
sample. The blood is automatically sucked in the reaction zone of
the test strip. Be sure to get enough blood on the strip’s reaction
zone, otherwise, an inaccurate reading may result. The signal tone
indicates that enough blood entered the reaction zone. The meter
will now start with the measurement which will last 5 seconds. The
LCD display shows the remaining time of measurement in seconds.
Afterwards the note „OK“ indicates a correct measurement. The
measurement is finished with another signal beep and the meas-
ured value is shown on the display.
5. Storing memories
The displayed result is automatically stored in the memory of the
meter. If more than 20 results are reached, the oldest one is de-
leted.
6. Discarding used test strips and lancets
Write down the measured result in your personal diabetic log book
and take the test strip off the strip slot. The meter turns off. If you
don’t take off the test strip, the meter will turn off automatically
after 5 minutes.
In order to discard lancets from the smartLAB® lancing device, re-
move the end cap and carefully pull the used lancet out of the hol-
der. Dispose of the lancet of according to local regulations.

19
Alternate Site Testing (AST) with the transparent cap
You can also gain the blood
sample from other parts of the
body than the finger tip. If you
want to use Alternate Site Test-
ing, please use the transparent
cap for your lancing device. Car-
ry out the following steps:
• Gently massage the desired
punctuation site on your arm or
hand for a few seconds. This will
improve the blood circulation.
• Push the lancing device with
the transparent cap against the desired blood collection site and
push the trigger button to gain a sample.
• Exercise a constant pressure until you see through the transpar-
ent cap, that enough blood is gained. After that you can carry out
the blood glucose test, as usual.
Alternate Blood Collection Sites

20
Reading stored test results from memory
You can read the last 20 test results on the internal memory of your
smartLAB®mini meter by inserting the check strip. The results will
be shown chronologically on the display.
Understanding your test results
The smartLAB®pro blood glucose test strips are whole-blood ref-
erenced. Your meter is plasma-calibrated for easier comparison to
lab results. The unit of blood glucose test results displayed on the
screen is either mg/dL or mmol/L, depending on which unit of
measurement you have selected. The mmol/L results will always in-
clude a decimal point; mg/dL results do not include a decimal point.
If „LO“ appears on the display, the monitor has determined that
your blood glucose level is lower than 1.1 mmol/L or 20 mg/dL. If
„HI“ appears on the display, the monitor has determined that your
blood glucose level is higher than 35 mmol/L or 630 mg/dL. Please
refer to the User Manual for instructions on warning messages.
Expected results for non-diabetic adults:
The normal fasting glucose range is 70 to 100 mg/dL (3.9 to 6.1
mmol/L). Two hours after meals, normal glucose values should be
less than 120 mg/dL (6.7 mmol/L).
Unusual test results:
If your blood glucose result doesn‘t match the way you feel, follow
these steps, and then repeat the test:
1. Check if the strips are within the expiration date.
This manual suits for next models
1
Table of contents
Other HMM Diagnostics Blood Glucose Meter manuals
Popular Blood Glucose Meter manuals by other brands

Sejoy
Sejoy HB-101 owner's booklet

MediSure
MediSure Blood glucose monitoring system user guide

EPS Bio Technology
EPS Bio Technology EasyPlus mini user manual

Universal Biosensors
Universal Biosensors PETRACKR owner's booklet

AgaMatrix
AgaMatrix Presto owner's guide

iGlucose
iGlucose Cellular diabetes care system quick start guide