Hoeptner Freeze Flow Sanitary Yard Hydrant User manual

Figure 3
Figure 2
Shut O Valve Leak Check:
6.) If no leaks are detected then replace backow preventer and proceed to back ll hydrant with soil.
SEAL, O-RING
21O17OOO2
Figure 4
Remove backow preventer at quick disconnect (Figure 2)
Operate hydrant at partial ow with thumb over outlet until the
water pressure forces past thumb. (Figure 3).
At this point shut o hydrant.
[ With hydrant full of water it is easier to detect if hydrant is leaking. Hydrant
should not drip from outlet once hydrant is full of water. ]
If hydrant leaks from outlet, remove operating rod and replace o-ring on stopper tip. (Figure 4)
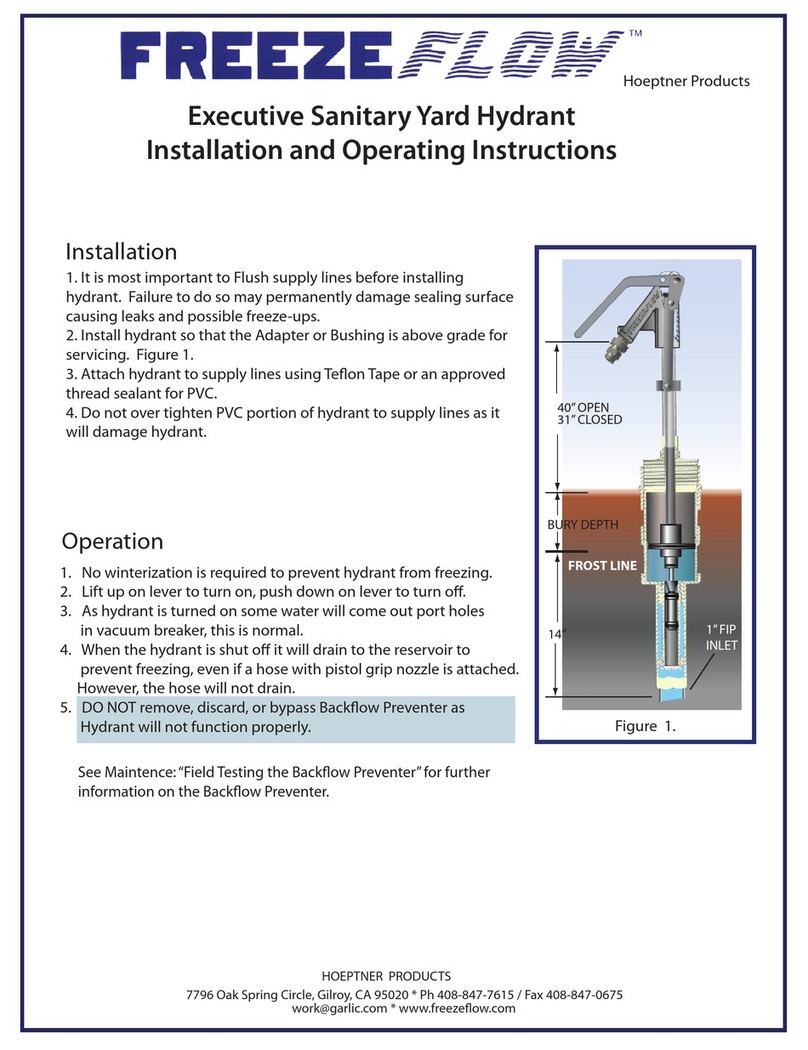
GROUND
LEVEL
BURY
DEPTH
27”
FROST
LINE
Figure 1
1.)
2.)
Hydrant canister must be placed below existing frost line. Figure1
5.)
No ground preparation is required for the Freeze Flow Sanitary Yard Hydrant; therefore
it can be placed in any soil condition. Hydrant canister is stainless steel and pipes are
all galvanized steel, which meet ASTM specs.
4.)
Attach hydrant to existing supply line using an approved thread sealant.
3.) Flush supply lines BEFORE installing hydrant.
It is still the responsibility of the installer to know his/her soil condition and to ensure that
proper corrosion protection is administered to the hydrant. The application of paint or
rubber tape may be needed to protect against some soil conditions.
BEFORE back lling with soil, perform a Shut O Valve Leak Check to make sure shut
o valve does not leak due to debris in supply line or damaged o-ring. A leaking seat
can cause hydrant to ll with water and possibly freeze.
INSTALLATION
Freeze Flow hydrants are designed for heavy-duty commercial use where safe potable
water is needed. This hydrant drains into the canister below the frost line to prevent
freeze ups and cross contamination with the soil bacteria
Sanitary Yard Hydrant
Installation Instructions
HOEPTNER PERFECTED PRODUCTS
7796 Oak Spring Circle, Gilroy, CA 95020 * Ph 408-847-7615 / Fax 408-847-0675
Hoeptner Products

Hydrant is designed to use clean water at 20 psi to 100 psi. Should
leakage occur at packing nut, simply tighten nut until leakage stops. If
tightening nut does not stop leakage, remove nut and replace with
packing. Figure 5
1.)
OPERATION AND MAINTENANCE
Packing Nut Leak
Sanitary Yard Hydrant
Operation and Maintenance Instructions
Hoeptner Products
HOEPTNER PERFECTED PRODUCTS
7796 Oak Spring Circle, Gilroy, CA 95020 * Ph 408-847-7615 / Fax 408-847-0675
packing nut
Figure 5
Float Valve
Assembly
Unscrew handle and operating rod from hose bib.
Lift out operating rod and change o-ring seal on tip.
Replace operating rod and tighten packing nut.
2.)
No adjustment is necessary.
5.) To prevent unauthorized use, the hydrant wheel handle can be removed.
6.) NOTE: If the hydrant has not been used for a long period of time, it is advisable to ush the hydrant for
60 seconds when water is used for drinking.
4.) Handle/operating rod adjustment
To Change Seal, O-ring
Unscrew packing nut from under handle.
Leakage from oat valve is typically due to not ushing supply lines properly.
3.)
Replace ball and o-ring after cleaning.
Reassemble Float Valve.
Remove ball and o-ring.
To clean, unscrew Hex Cap from round base.
Leakage from oat valve

NO RESTRICTIONS,
REMOVE HOSE AND
BACKFLOW PREVENTER
IF USED
SOLID
AERATED
WATER FLOW
BECOMES AERATED
FINISHED,
SHUT OFF HYDRANT
To prevent freezing during the
winter months, it is essential
that the hydrant reservoir be
evacuated to ensure proper
drainage of the standpipe.
Any restriction downstream of
the factory supplied hose bib
will prevent the hydrant
reservoir from emptying.
Therefore, for winter use,
remove the hose and back-
ow preventer, if used, using
the quick disconnect supplied.
Empty the reservoir by oper-
ating the hydrant at full ow
for 30 seconds to prevent
hydrant freeze-ups.
During this time you should
notice the water ow is solid
and then becomes aerated.
Reservoir is empty when water
exiting outlet is aerated.
Shutting o hydrant at
this point will permit the
water in the standpipe to
drain back into the empty
reservoir.
FULLY OPEN
30 SECONDS
More Winterizing information is available at www.freezeow.com
1.) 2.)
3.) 4.)
Sanitary Yard Hydrant
Winterizing Instructions
Hoeptner Products
HOEPTNER PERFECTED PRODUCTS
7796 Oak Spring Circle, Gilroy, CA 95020 * Ph 408-847-7615 / Fax 408-847-0675

Sanitary Yard Hydrant
Parts Diagram
Hoeptner Products
HOEPTNER PERFECTED PRODUCTS
7796 Oak Spring Circle, Gilroy, CA 95020 * Ph 408-847-7615 / Fax 408-847-0675
Patent# 4,854,339 5,033,500 other patents pending
( X = BURY DEPTH)
BULK (X = BURY DEPTH)
(X = BURY DEPTH)

Hoeptner Products
HOEPTNER PRODUCTS
7796 Oak Spring Circle, Gilroy, CA 95020 * Ph 408-847-7615 / Fax 408-847-0675
Hoeptner Perfected Products warrants this product to be free from defects in material or workmanship
for a period of one year from date of original shipment. Hoeptner Perfected Products will, at its
option, repair or replace any part of this product that proves, upon our inspection, and within one year
from date of shipment, to be defective in material or workmanship. Transportation costs or charges
incidental to warranty service are to be borne by the purchaser-user. This warranty does not apply to
goods or parts not manufactured by Hoeptner Perfected Products, instead Hoeptner Perfected
Product’s obligation for these parts is limited to the actual warranty extended to Hoeptner Perfected
Products by the manufacturer. This shall constitute the exclusive remedy for breach of warranty, and
Hoeptner Perfected Products shall not be responsible for any incidental or consequential damages,
including without limitation, damages or other costs resulting from labor charges, delays, vandalism,
negligence, fouling caused by foreign material, damage from adverse water conditions, chemicals, or
any other circumstances over which Hoeptner Perfected Products has no control. This warranty shall
be invalidated by any abuse, misuse, misapplication or improper installation of the product.
Hoeptner Perfected Products makes no other warranties express or implied of any kind with
respect to the goods, parts and materials, including but not limited to, any implied warranty as
to merchantability or as to the fitness of the merchandise for a particular use and shall not be
liable for any loss or damage, directly or indirectly, arising from the use of such merchandise
or for consequential or incidental damages
MANUFACTURER’S LIMITED ONE YEAR WARRANTY
RETURN POLICY
All products returned must be in new, perfect condition in their original packaging. We will not
accept returns after 30 days. All returns are subject to a 25% restocking fee. Shipping charges will
not be refunded.
All returns must be authorized in advance and be issued a Return Authorization Number - please
call or e-mail us before sending returns. Returns sent to us without prior authorization will be
refused delivery.
IMPLIED WARRANTY
There is no warranty other than the Manufacture’s Limited One Year Warranty.
Table of contents
Other Hoeptner Plumbing Product manuals
Popular Plumbing Product manuals by other brands

Glacier bay
Glacier bay HD67392W-6027D Installation and care guide

Graff
Graff MOD+ G-11530 Series installation instructions

Sanela
Sanela 22016 Mounting instructions

Laufen
Laufen TWINPLUS HF905410100000 manual

American Standard
American Standard Bath/Shower Trim Kits T373.500 installation instructions

IKEA
IKEA ALMAREN manual