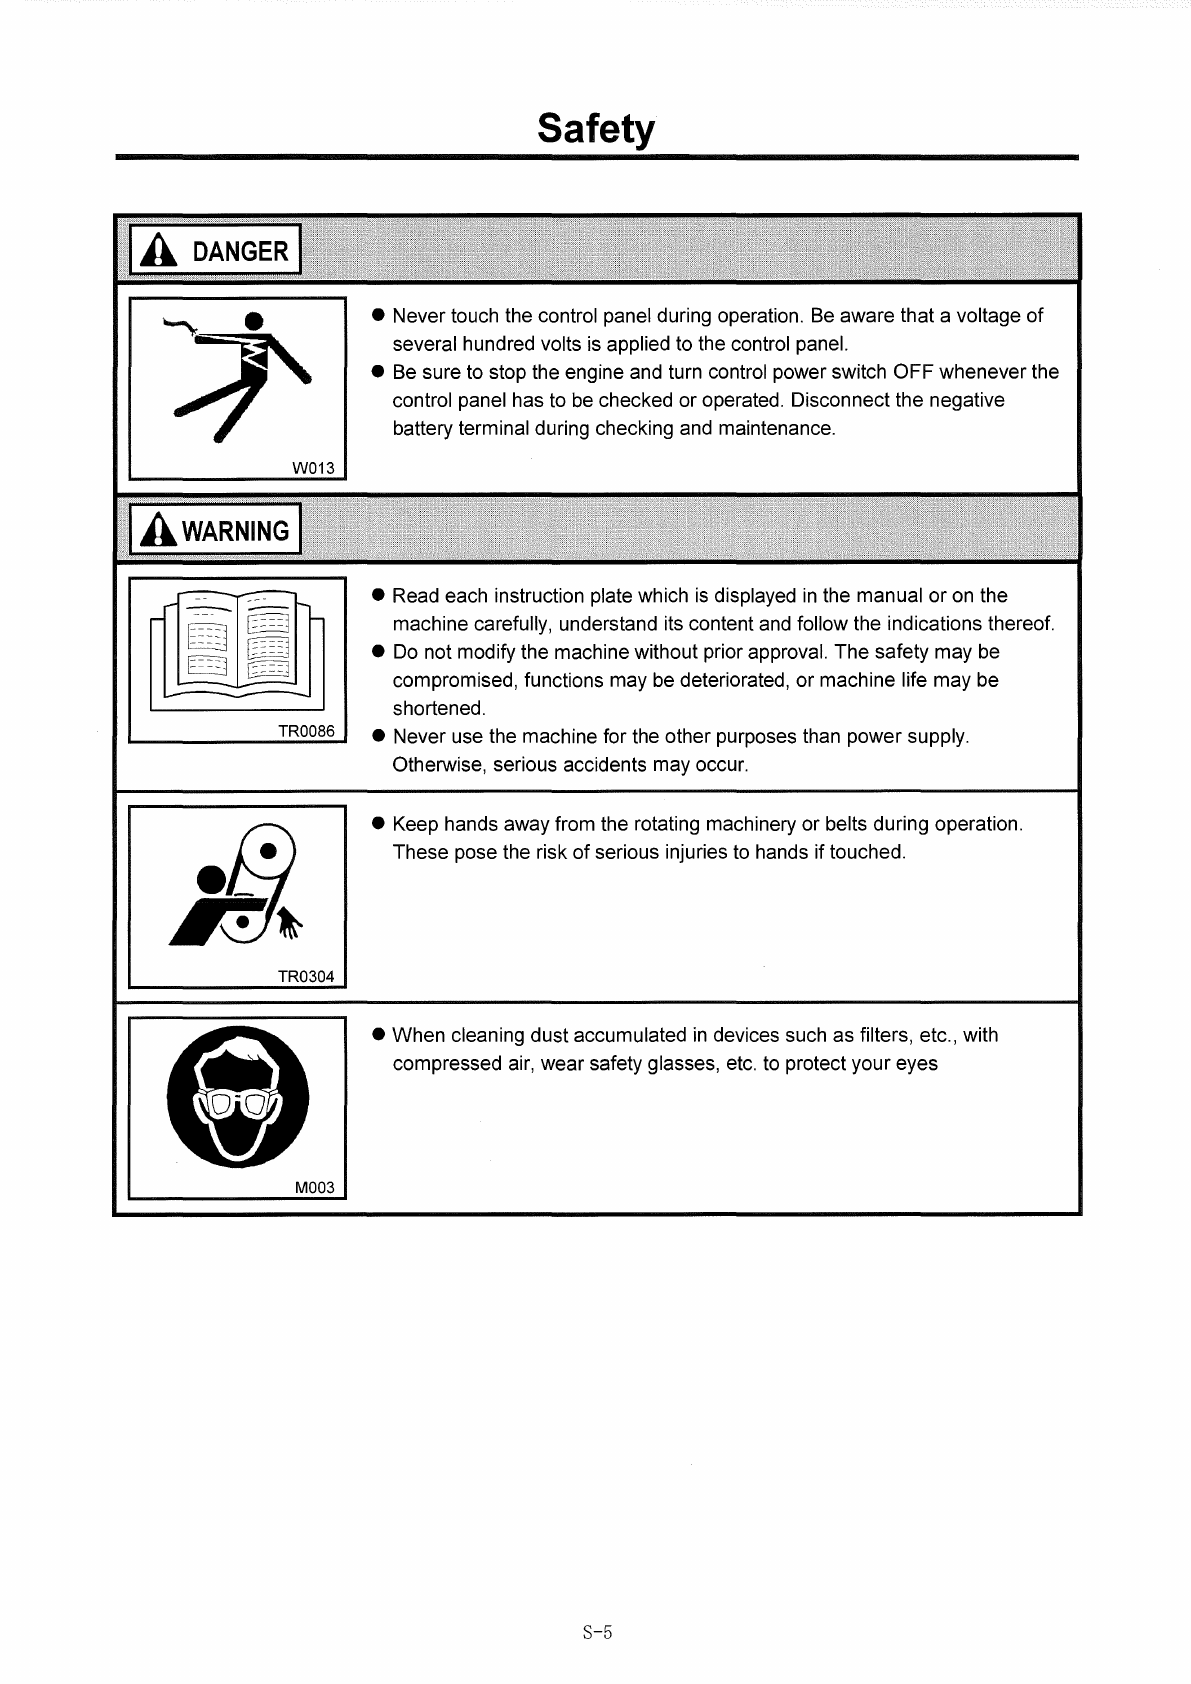
Hokuetsu AIRMAN SDG220S-8E1 User manual

AIRMAN
INSTRUCTION
MANUAL
ENGINE
GENERATOR
j
SDG220S-
8E1
j
[ENVIRONMENTAL
CONTAINMENT
BASE
TANK
TYPE]
Please
be
sure
to
read
this
manual
before
using
this
machine.
HOKUETSU
INDUSTRIES
CO.,
LTD.

Preface/Table
of
Contents
Thank you for choosing "Al
RMAN"
♦
Keep
this
manual
at
hand
and
refer
to
it
as
necessary.
♦
If
this
manual
is
missing
or
damaged,
order
a
new
copy from
our
office
or
your
nearest
dealer.
Make
sure
that
the
manual
is
included
with
the
machine
when
it
is
handed
over
to
another
user.
♦
The
contents
of
this
manual
may
differ from
the
machine
as
a
result
of
design
changes.
If
anything
is
unclear
please
contact
our
office
or
your
nearest
dealer
for clarification.
♦
Refer
to
the
Engine
Operation
Manual
for
engine
handling,
maintenance,
and
safety
information.
-Table
of
Contents -
1.
Major Components------------------------------------------------------------------------------
1-1
1.1
Internal
Components-------------------------
1- 1
2.
Transportation and Installation-------------------------------------------------------------
2-1
2.1
Transporting
Machine-------------------------
2-1
2.2
Conditions of Installation 2- 2
2.3 Grounding 2- 4
2.4 Selecting Cable 2- 6
2.5 Fuel Pipe Selector Valve 2- 7
3.
0 peration--------------------------------------------------------------------------------------------
3-1
3.1
Operation
Panel---------------------------
3- 1
3.2
Connecting Loads 3- 3
3.3
Engine Oil·Coolant· Fuel · DEF 3- 7
3.4 Before Starting the Unit 3- 9
3.5 Operating Procedure 3-15
3.6 Emergency Stop 3-22
3.
7 SCR Cleaning 3-23
3.8 SCR Inducement 3-25
4.
Fa
iIures and Troubleshooting--------------------------------------------------------------- 4-1
4.1
Protection
device--------------------------
4- 1
4.2
Troubleshooting---------------------------
4- 4
5.
Periodic Inspection ----------------------------------------------------------------------------- 5-1
5.1
Important Items at Periodic Inspection and
Maintenance-------------
5- 1
5.2
Periodic Inspection
and
Maintenance
Schedule----------------
5- 2
5.3
Periodic Replacement
Parts-----------------------
5- 3
5.4 Maintenance
Items--------------------------
5- 4
6.
Storage and Disposal -------------------------------------------------------------------------- 6-1
6.1
Preparation for Long-term Storage
--------------------
6- 1
6.2 Disposal of
Product-------------------------
6- 1
7.
Specifications------------------------------------------------------------------------------------- 7-1
7.1
Specifications---------------------------
7- 1
7.2
Outline
drawing---------------------------
7- 2
7.3
Generator Wiring
Diagram-----------------------
7- 4
7.4 Engine Wiring
Diagram------------------------
7- 5
7.5 Piping
Diagram--------------------------
7- 6

Safety
This
section
explains
safety
precautions
for
operation,
inspection,
maintenance,
installation,
movement
and
transportation.
Read
these
safety
requirements
carefully
and
fully
understand
the
contents
before
starting
the
machine.
For
better
understanding
of
the
precautions
in
this
manual
and
on
this
machine,
safety
precautions
are
classified
into
"DANGER", "WARNING"
and
"CAUTION"
messages
with
a
warning
symbol
ffi
marked,
according
to
the
degree
of
hazard.
When
one
of
these
messages
is
found,
please
take
preventive
measures
for
safety
and
carry
out
"SAFE
OPERATION AND PROPER MAINTENANCE OF THE MACHINE".
IA
DANGER
I DANGER indicates
an
imminently hazardous situation which, if not
avoided, will result
in
death or serious injury.
IAwARNINGI
WARNING indicates a potentially hazardous situation which, if not
avoided, could result
in
death or serious injury.
IA
CAUTION
I CAUTION indicates a potentially hazardous situation which, if not avoided,
may result
in
minor or moderate injury. It may also be used to alert against
unsafe practices.
IIMPORTANTI
IMPORTANT indicates important caution messages for the performance
or durability of the machine, which has no concern to injury or accident of
or to a human body.
This
manual
does
not
describe
all
safety
items.
We,
therefore,
advise
you
to
pay
special
attention
to
all
items
(even
though
they
may
not
be
described
in
the
manual)
for
your
safety.
PROPOSITION
65
WARNING
!ii
~
WARNING
I
Breathing engine exhaust exposes
you
to chemicals known to the State of California to cause cancer and
birth defects or other reproductive harm.
• Always start and operate the engine
in
a well-ventilated area.
• If
in
an
enclosed area, vent the exhaust system.
• Do not modify or tamper with the exhaust system.
• Do not idle the engine except as necessary
For more information, go towww.P65warnings.ca.gov/diesel
S-1

Safety
♦
If
you
have
any
questions
about
the
machine,
please
contact
our
office
or
your
nearest
dealer.
Be
sure
to
have
your
machine's
serial
number
to
assist
in
providing
the
correct
information
for you.
A
plate
stamped
with
the
model
and
serial
number
is
attached
to
side
of
the
machine.
/'
0
ENGINE
GENERATOR
MOD
EL
I
SER.
NO.
I
GEN.OUTPUT
I
VOLTAGE
I
FREQUENCY
I
POWER
FACTOR
80
X
PHASE
RULE
J
EM
1398
NET
DRY
MASS
I
OPERATING
MASSI
0
AIRMAN
USA
CORPORATION
ASSEMBLED
IN
USA
"
0
kVA
V
Hz
3
kg
kg
0
~
A180077
S-2
*
Each
illustrated
figure
(Fig.)
has
a
number
(for
instance,
A180077)
at
the
right
bottom.
This
number
is
not
a
part
number,
it
is
an
internal
reference
number.

Safety
[Safety Warning Labels]
Following
labels
are
attached
to
the
machine.
Keep
them
clean
at
all
times.
If
they
are
damaged
or
missing,
immediately
place
an
order
with
your
nearest
dealer
for
replacement.
Part
numbers
are
indicated
on
the
lower
right
corner
of
the
label.
Adhere
a
new
one
to
the
original
location.
1 2 3 4 5
ACAUTION
sf A
WARNING
;/f).
A
WARNING
~~J
2~
"\.,
0
ACAUTION
sf
PREVENT
BURNING ACCIDENT BEWARE OF
ENTANGLEMENT BEWARE OF
ENTANGLEMENT LIFTING BAIL PREVENT
BURNING ACCIDENT
When
work
is required Keep your handsAWAY from Keep your handsAWAY from
near hot
parts
,
wait
for
the
parts
to
coo
I
down
fu
11
y before
starting
work.
moving parts such as
V-belts, pilleys etc
..
Entanglement in them
can cause serious injury.
fan during opration.
Entanglement in the fan
can cause serious injury.
3917669500
39176
73800
39176
73500
6
DANGER
EXPLOSIVE GASES
~~-:~:·~~r1:1°fr:a~~~~:.
1
t~~tect:~~ir'~~~:;,/~:1:
oradjustponcoooectionswithoutproporinstructionandtraining,
KEEP VENT CAPS
TIGHT
AND
LEVEL
POISON
CAUSES SEVERE
BURNS
Contains
sulfuric
acid.
Avoid
contact
with
tkin,
eyas
01
clothing.
In
event
of
accident
flush
with
water
and
cal
a
phY1ldan
immediately.
KEEP
OUT
OF
REACH
OF
CHILDREN
39176
50000
9
7
&DANGER
Using
a
generator
indoors
CAN
KILL
YOU
IN
MINUTES.
Generator
exhaust
contains
carbon
monoxide.This
is
a
poison
you
cannot
see
or
smell.
fl:E=l>
NEVER
use
inside
a
home
Only
use
OUTSIDE
and
or
garage,EVEN
IF
doors
far
away
from
windows,
ana
windows
are
open.
doors,and
vents.
Avoid
other
generator
hazards.
READ
MANUAL
BEFORE
USE.
39176
09310
10
A
WARNING
A
DANGER
~
DO
NOT
OPEN
PANEL
WHILE
UNIT
IS
RUNNING
HIGH
VOLTAQ,~,
BEWARE
OF
EXHAUST
GASES
When
you operate machine
INDOORS
or
in TUNNEL,
provide good ventilation.
Poor
ventilation can cause
fatal accident.
39176
73300
12
Please
refill
DEF
when
refilling
diesel
fuel
®
FLAMMABLES
13
I
Ji)
DIESEL
FUEL
EPA
REGULA
TIDN
ULTRA
LOW SULFOR FUEL
ONLY.
DIESEL
A
TRES
FAIBLE
TENEUR
EN
SOUFRE
UN!QUEMENT.
39176 69300
Do
not open
radiator cap while
it
is
still hot.
39176
69600
8
f-------,··'&. WARNI
NG
Breathing diesel engine exhaust exposes
you
to
chemicals
known
to
the
State
of California
to
cause
cancer and birth
dC?feGts
or other reproductive harm.
· Always start and operate the engine in awell-
ventilated area.
· Ifin an enclosed area, vent the
exhaust
to
the
outside,
· Do not modify
or
tamper with the exhaust system.
• Do
not
idle the engine
except
as
necessary.
For mare information go
www.
P65warnings.ca.gov/diesel
39178 67840
11
A
WARNING
Do
not t"uch
live
electrical
parts.
Always
wear
dry
insulattng
gloves.
Do
not operate the
unit
ln
the rain,araund standing water
ar
when
wet.
Maintain
all
electrical
cords
and
conecttans
inJFooer
condition.
~lway~auncfHie
.9en~rator
to
eartb berore_gi_?raftn9.::
39175
52900
I
39178
70940
39178
22031
S-3

Safety
• The
locations
of
the
safety
warning
labels
are
as
follows.
A
1 2 3
VIEW A
VIEWB
. .
. I I [II!] .
[G
c-----fft-------,
Ill
[II!]
.
(!I
~
-
0 0
0 0
II
0
S-4
6
~
~
Battery
12 13
~
VIEWC
A210278

A_
DANGER
W013
TR0086
TR0304
M003
Safety
• Never touch the control panel during operation.
Be
aware that a voltage
of
several hundred volts is applied to the control panel.
•
Be
sure to stop the engine and turn control power switch OFF whenever the
control panel has to be checked or operated. Disconnect the negative
battery terminal during checking and maintenance.
• Read each instruction plate which
is
displayed
in
the manual or
on
the
machine carefully, understand its content and follow the indications thereof.
•
Do
not modify the machine without prior approval. The safety may be
compromised, functions may be deteriorated, or machine life may be
shortened.
• Never use the machine for the other purposes than power supply.
Otherwise, serious accidents may occur.
• Keep hands away from the rotating machinery or belts during operation.
These pose the risk
of
serious injuries
to
hands if touched.
• When cleaning dust accumulated
in
devices such as filters, etc., with
compressed air, wear safety glasses, etc. to protect your eyes
S-5

A
CAUTION
dH990432
Safety
•
Be
sure
to
stop the engine and let the coolant water sufficiently cool down
before draining
it.
• If the drain valve
is
opened before the coolant water
is
cool enough, hot
scalding water could jet out, causing burns.
• When washing the machine, cover the control panel, generator and its electric parts
to
prevent them
from being exposed
to
splashing water and avoid possible decrease
in
electrical insulation or other
troubles to the machine.
• Dust, sand and dirt accumulated inside control panel could cause malfunction or issues with the
instrumentation. Clean them using compressed air.
A100285
• Waste liquid from the machine contains harmful material. Do not discharge it
onto the ground or into the river, lake or sea. Such material will pollute the
environment.
•
Be
sure to use a container to hold waste liquid from the machine.
•
Be
sure to follow the designated regulations when disposing
of
oil, fuel,
coolant (antifreeze), filter, battery or other harmful materials.
• The engine
of
this machine contains many electrical and electronic parts.
Before welding,
be
sure
to
disconnect all electronic control equipment (specifically the ECM).
Failure to do so could result
in
equipment malfunction due to excessive current.
S-6

1.
Major Components
1.1
Internal Components
1 2 3 4
9 7 8 7 6 5
A210282
No.
Part
Name
Function
1 DOC (Diesel
Oxidation
Catalyst)
Catalyst
for oxidizing
exhaust
gas
2
Intercooler
Cools
the
air
compressed
by
the
engine
supercharger
3
Engine
Drives
the
generator
4
Control
Panel
(Operation
Panel)
Controlling
device;
various
meters
and
controls
5
Battery
Power
source to
start
the
engine
6
Alternator
Generates
the
electricity
supplied
to
the
load
7
Fuel
Tank
Vessel for
storing
fuel
8
Fuel
Pipe
Selector
Valve
Switches
to
external
fuel
tank
supply
9
SCR
(Selective
Catalytic
Reduction) Selective
reduction-type
catalyst
that
uses
DEF
as
a
reducing
agent
1-1

1.
Major Components
10
11
12
13
14
15
16
22 21 20 19
18
17
A210283
No.
Part
Name
Function
10
Air
Filter
Filters
dust
from
intake
air.
11
Fuel
air-
bleeding
electromagnetic
Device
that
automatically
bleeds
air
from
the
fuel
lines
pump
12
Engine
Oil
Filter
Filters
engine
oil
13
Breather/
OCV
(Open
Crankcase
Vents
gas
from
engine
crankcase
Ventilation)
14
Engine
Oil
Filler
Port Port
for
supplying
/
replenishing
engine
oil
(Oil Level Gauge)
Wso
for
checking
the
engine
oil
level
and
contamination)
15
Surge
Tank
For
checking
&
replenishing
coolant
16
Radiator
Cools
the
engine
coolant
17
DEF
Tank
Container
for
DEF
18
DEF
Filter
Filters
foreign
matter
&
particulate
mixed
in
DEF
19
Supply
Module
Pump
to move
DEF
fluid
within
the
system
20
Fuel
Pre-
Filter
Removes
dust
and
water
mixed
in
fuel
21
Fuel
Filter
Filters
foreign
matter
&
particulate
mixed
in
fuel
22
Output
Terminal
Board
Outlet
ports
for AC
power
1-2

2.
Transportation and Installation
2.1
Transporting Machine
•
When
loading
and
unloading
the
machine,
be
sure
to
use
the
lifting
bail
[A]
provided
on
the
center
of
the
machine
top.
2.1.1 Lifting
A180080-1
<Procedures>
1.
Before
lifting
the
unit
up,
make
sure
to
check
the
lifting
bail
[A]
for
any
cracks
or
loosened
bolts.
2.
Connect
the
hook
of
the
crane
or
shackle
with
the
lifting
bail
fitted
at
the
top
center
of
the
unit,
and
make
sure
that
there
is
no
person
standing
near
the
unit.
Then
perform
hoisting
operation.
• Select
an
appropriate
crane
or
truck
by
referring
to
the
mass
and
dimensions
mentioned
in
"Specifications".
•
Only
a qualified
crane
operator
is
allowed
to
operate
a
crane.
2.1.2 Fastening to a truck
bed
J A
C B
AwARNING
A
CAUTION
•
When
moving
or
removing
the
machine
from
the
work
site,
load
it
onto
a
truck
and
secure
it
to
the
truck
with
ropes
[B]
using
the
supplied
tie
points
[A]
on
both
sides
of
the
cover,
and
be
sure
to
install
a
chocking block [
C]
on
the
bed
of
the
truck
as
well.
A030104-1
A180079-1
A210376
• Never step underneath the unit when it is suspended. It
is
very dangerous.
• When moving or removing the unit from the work site, load it
onto a truck and use the supplied rope tie points [A] to secure
it firmly to the truck bed.
• Do not lift the unit while it
is
running. Otherwise, a fatal or
serious accident may occur.
• Before transporting, check if there
is
condensate (fuel, oil and
coolant) inside the oil fence, and if so drain
it.
(See 3.4.10)
• When transporting with condensate (fuel, oil and coolant)
accumulated inside the oil fence, the condensate may flow
out
of
the machine.
2-1

2.
Transportation and Installation
2.2 Conditions of Installation
•
The
machine
should
be
operated
in
the
following
conditions:
Using
the
machine
outside
the
above conditions
may
cause
serious
failure.
• Ambient temp: 5°F to 104°F (-15°C to 40°C)
• Humidity: Less than 85%
• Altitude: Lower than 1,000m above sea level
• The
machine
has
to
be
installed
on
a dry, firm,
and
level
area.
•
If
more
than
two
units
are
placed
parallel
in
operation, keep
enough
distance
so
that
exhaust
air
from
the
one does
not
affect
the
other
one.
1,500 or more
Unit:
mm
• Keep
enough
space
around
the
unit
for
inspection
SG0110
and
maintenance
access.
-------------------
gas
0
~
Private house
PC002
Using a blower
G--
fan for air intake
A050506-1
A050505
• Exhaust gas from the engine
is
poisonous. Exhaust
gas can cause death or serious injury upon
inhalation.
Avoid using the machine
in
an
insufficiently ventilated
building or a tunnel.
•
Do
not position the exhaust gas outlet
in
the direction
of a person or a house.
• If the unit is installed inside a tunnel, make sure to
provide fresh air and ventilate
it.
•
In
this case, make sure to extend the exhaust fume
pipe outdoors, and also make sure to prevent any
leak from any connecting pipes.
• Never position the unit with the exhaust muffler facing
any private house.
• As the exhaust gas from the engine
is
poisonous,
never direct it at people passing by
..
2-2

2.
Transportation and Installation
Exhaust
gas
outlet
Exhaust
pipe
port
-_~_-_-_
--
J)
[:
_____
:;'\
l->
/('&!
-..:-.:;
Air
Inlet
Exhaust
gas
_ __,__L.-___,_
_____
----'-_
__,_,___¢:::::::J
•
In
case that the unit
is
installed for indoor operation,
an
intake air port and exhaust fume outlet port should
be provided for better air ventilation.
• Make sure to secure enough space
in
front
of
the air
intake port and to secure it after exhaust fume outlet
port so that the engine will not get overheated.
• An exhaust pipe or the like should be provided at the
exhaust outlet port so as to send exhaust fumes
.,__
____________
A_o_9_o6_4_1-_1_.
outdoors.
A
CAUTIO
I/A
V/A
SG0103-1
Safety Fence
A050507-1
• The cooling air outlet port
of
the radiator should have
access to the outside air through a duct or the like for
air ventilation.
• The machine should be installed within 5°degree
inclination.
• If installation site
is
not flat, put square bar under the
machine
in
order
to
install it horizontally.
• Avoid installing the unit
in
a damp place or a place
where water collects. Such
an
installation could
cause electric shock.
• If the unit
is
installed
on
the coast, do not allow
seawater to come
in
direct contact with the unit, as
this may degrade the insulation inside the unit and
control panel.
• When installing the unit at a sandy location, make
sure the exhaust from the generator or radiator does
not blow the sand into the air or into the machine.
•
In
order
to
prevent any persons other than those
engaged
in
the job site from using or interacting with
the machine, please prepare safety fences around
the unit as necessary.
2-3

2.
Transportation and Installation
2.3 Grounding
2.3.1 Ground Terminal
0
Ll
L2
L3
N
0 0 0 0
Grounding
method
Load
Grounding
Rod
2.3.2 Grounding System
A
A180093
Circuit
Breaker
rn]
•
The
ground
terminal
[A]
on
the
AC
output
terminal
board
is
connected
to
the
ground
of
this
unit
and
to
the
ground
terminals
of
each
outlet.
Grounding Terminal
[A]
Grounding
Rod
A180091
AIRMAN's
generators
have
a
system
ground
that
connects
generator
frame
components
to
the
ground
terminals
in
the
AC
output
receptacles.
The
AC
neutral
wire
(N)
is
connected
to
the
system
ground.
2-4

2.
Transportation and Installation
2.3.3 GFCI Receptacles
•
All
of
the
20
ampere
120
volt
receptacles
on
the
generator
are
protected
by
a
GFCI
(Ground-fault
circuit
interrupter)
for
protection
against
the
hazards
of
ground
fault
currents.
An
example
of
ground-fault
current
is
the
current
which
would
flow
through
a
person
who
is
using
an
appliance
with
faulty
insulation
and,
at
the
same
time,
is
in
contact
with
an
electrical
ground
such
as
a
plumbing
fixture,
wet
floor,
or
earth.
•
The
ground-fault
circuit
interrupter
will
not
protect
against
short
circuits
or overloads.
The
circuit
breaker
in
the
control
panel
which
supplies
power
to
the
circuit
provides
that
protection.
•
The
ground-fault
circuit
interrupter
can
be
identified
by
the
TEST
and
RESET
buttons.
The
receptacles
on
the
GFCI
can
be
tested
with
the
TEST
and
RESET
buttons.
TEST
BUTTON:
RESET
BUTTON: To
test,
depress
the
"TEST"
button.
(Power is
turned
off)
To
restore
power,
depress
the
"RESET"
button.
•
Perform
this
test
monthly
or
every
250
hours
operation,
whichever
comes first,
in
order
to
ensure
proper
operation
of
the
GFCI
receptacle.
If
the
generator
is
stored
outdoors,
unprotected
from
the
weather,
test
the
GFCI
receptacle
before
each
use.
Record
your
test
on
the
GFCI
test
card
provided
on
the
control
panel.
Test
Button
0
Reset
Button
D
~
A180093
• Using the generator
in
rain, snow or near water can lead
to
death from electric shock. Keep the
generator dry.
2.3.4 Connections to a Building's Electrical System
•
Connections
for
standby
power
to
a
building's
electrical
system
must
be
made
by
a
qualified
electrician.
The
connection
must
isolate
the
generator
power
from
utility
power
and
must
comply
with
all
applicable
laws
and
electrical
codes.
A
CAUTION
• Improper connections to a building's electrical system can allow electrical current from the generator
to backfeed into the utility lines. Such backfeed may electrocute utility company workers or others
who are
in
contact with the lines during a power outage. For more information please consult with the
utility company or a qualified electrician.
• Improper connections to a building's electrical system can allow electrical current from the utility
company to backfeed into the generator. When utility power
is
restored, the generator may explode,
burn, or cause a fire
in
the building's electrical system.
2-5

2. Transportation and Installation
2.4 Selecting Cable
•
Select
a
cable
with
sufficient
diameter
by
considering
the
permissible
current
on
the
cable
and
the
distance
from
the
generator
to
the
load.
•
If
the
current
flowing
to
the
load
exceeds
the
permissible
current
of
the
cable,
resultant
overheating
may
burn
the
cable.
Similarly,
if
the
cable
is
too
small
in
thickness
to
the
length,
the
input
voltage
to
the
load
will fall
to
cause
the
load
input
power
to
drop,
as
a
result,
the
performance
of
the
machine
cannot
be
displayed.
Cable
Thickness
A
(mm
2)
j 0; 0
Cable
Length
L (m)
A180090
•
Simplified
formula
to
seek
voltage
drop
or
cross-sectional
area
of
the
cable
from
cable
length
and
working
current.
Select
such
a cable
length
and
thickness
so
that
the
voltage
drop
will
remain
within
5%.
Output system Voltage drop Cross-sectional e :Voltage drop
(V)
area
of the cable
e':
Voltage drop
between
an
outside
30.8XLXI
30.8XLXI
line
or
one
line
of
each
phase,
Three-phase
3-wire Type
e=
1,000XA
A=
l,000X
e
and
a
neutral
line
(V)
A:
Cable
thickness
(mm2)
Three-phase
4-wire Type
e'=
17.8XLXI
A=
17.8XLXI
L :Cable
length
(m)
1,000XA
l,000X
e' I :
Working
current
(A)
•
The
following
tables
show
the
relations
between
the
cable
length
and
the
cable
thickness
(nominal
cross-sectional
area)
suited
to
the
working
current.
(Based
on
the
condition
that
working
voltage
is
200 V,
with
voltage
drop
of
lOV.)
s·
I C d t C
bl
1ng
e-
on
uc
or a e
Unit:
mm
2
~
t 165ft (50m) 246ft (75m) 328ft (lO0m) 410ft (125m) 492ft (150m) 656ft (200m)
150A
38 38
50
60
80 100
200A 60
60 60
80 100
125
300A 100 100 100
125
150 200
400A 125 150 150 200 200 250
Three-Conductor Cable (Unit:
mm
2)
~
t 165ft
(50m)
246ft (75m) 328ft (lO0m) 410ft (125m) 492ft (150m) 656ft (200m)
150A 22x2 22x2
38X2 38X2
50X2
50X2
200A
38X2 38X2
38X2
50X2
50X2
60X2
300A
60X2 60X2 60X2
60X2
80X2
10ox2
400A
60X2
60X2 60X2
80X2
10ox2
125X2
2-6

2.
Transportation and Installation
2.5 Fuel Pipe Selector Valve
2.5.1 Overview
This
valve
is
designed
to
feed
fuel
directly
from
an
external
fuel
tank
or
from
the
installed
fuel
tank
as
described
below.
2.5.2 Operation method
<Procedures>
1.
The
machine
is
delivered
from
the
factory
with
fuel
line
piping
and
selector
valves
set
as
shown
in
the
following
Fig.I.
When
operating
the
machine
with
the
installed
fuel
tank,
run
the
machine
with
the
fuel
line
piping
and
the
handles
of
selector
valves
as
set
from
the
factory.
2.
When
using
an
external
fuel
tank,
remove
the
plug
fitted
at
the
connections
to
the
external
tank
and
set
the
piping
as
shown
in
Fig.2.
And
then
turn
the
handles
of
the
selector
valve
as
shown
in
Fig.2.
3.
When
removing
the
external
tank
piping
connection,
make
sure
to
return
the
handles
to
the
original
positions
shown
in
Fig.I
and
install
the
plugs.
2.5.3 Installation of Separate Storage Fuel tank and piping method
<Procedures>
1.
Use
oil
resistant
hoses
with
an
inside
diameter
of
8mm
to
10mm.
2.
Install
the
fuel
tank
so
that
the
fuel
level
of
the
tank
is
between
O
and
2.5m
high
from
the
machine
installation
level.
3.
In
order
to
avoid
suction
of
water
and
sediment
together,
install
the
suction
pipe
so
that
the
inlet
port
of
suction
pipe
may
be
kept
between
15mm
and
20mm
higher
than
the
bottom
line
of
the
tank.
Also
install
the
outlet
port
of
the
return
pipe
inside
the
tank.
(See Fig.2 ·A)
4.
When
refueling
the
tank,
take
caution
to
prevent
water
and
particulate
ingress.
Fig
1
A180092
2-7

2.
Transportation and Installation
A
CAUTIO
• Always watch the fuel supply conditions when supplying fuel from
an
external fuel tank.
• When using
an
external fuel tank, take care to ensure that the DEF tank
is
also refilled as needed.
• Make sure to return the handles
of
the selector valves to the predetermined positions. If you make a
mistake
in
turning the handles, it may cause fuel pipe rupture and cause overflowing from the fuel
tanks.
• Take great care not to use excessive force
on
the selector valve handle. It may cause damage or fuel
leakage.
• When using the external fuel tank, the Fuel Level displayed on the monitor will not provide
an
accurate
measurement.
2-8

3.1
Operation Panel
0
0
1.
Panel
Light
2.
Control
Panel
3.
Circuit
Breaker
4.
Circuit
Breaker
Handle
3.
Operation
1 2
0 0
0 0
7 6 5
5.
Panel
Light
Switch
6. Voltage
Adjuster
7.
Control
Power
Switch
3-1
4
0
3
A210284E

3.
Operation
Control Panel
Navigation buttons Display Monitor lamps
e
0
A180097E
Manual Mode button Alarm mute button
[How to switch between display screens]
1.
Items show below can be selected by pressing the Left or Right arrow buttons
@)
©.
Status
l++I
Engine
l++I
Generator
l++I
Alarms
l++IEGU
Current
DTGsl
t i
t I Aoout
l++I
Serial
Port
l++I
Event
log
l++I
ECU
Prev.DTCsl
2. Use the Up and Down buttons @
G)
to view details and parameters within a category.
3.
The panel will return to main screen if no buttoms are pressed for 3 minutes.
DEF
Tank
Level
E
11111
F
Main Screen A210286E
3-2
Table of contents
Other Hokuetsu Portable Generator manuals
Popular Portable Generator manuals by other brands

Rosenbauer
Rosenbauer RS 14 EFI SUPER SILENT EFI Operation manual

Bluetti
Bluetti EB70 User quick guide

Novation
Novation Ex-Power DEFENDER Operation & maintenance manual

Sumo
Sumo SMK35GEN Safety and operating manual

Coleman
Coleman Powermate PM0106004 Operator's manual

ALLPOWER
ALLPOWER APG3002S owner's manual