Holm HOLMFIR User manual

HOLMFIR User Guide
Document version 0.4.4 (November 1, 2008)
Compatible HOLMFIR versions 1.0.8.x
Compatible DSPre version DSPre 1
Compatible Microphone Mic 1

CONTENTS i
Contents
Contents i
I HOLMFIR in Basic Mode 1
1 Introduction 2
1.1 How to use this User Guide ........................... 2
2 Quick Start 3
2.1 The DSPre .................................... 3
2.2 Installing HOLMFIR ............................... 4
2.2.1 Computer Requirements ......................... 5
2.3 DSPre-1-way Setup ................................ 6
2.4 DSPre-2-way Setup ................................ 8
2.4.1 Adjusting Gain Levels .......................... 10
2.5 DSPre-3-way Setup ................................ 11
2.5.1 Adjusting Gain Levels .......................... 13
3 Crossover & Target 14
3.1 Crossovers (Only for DSPre-2,3-way) ...................... 14
3.2 Low Frequency Rolloff .............................. 15
3.3 High Frequency Rolloff .............................. 16
4 Equalization - Tonal Balance 17
4.1 Zoom with the Pointing Device (e.g. a mouse) ................. 18
4.2 Graphical Equalizer Tool ............................. 19
4.3 Enable/Disable Equalization ........................... 20
4.4 Open and Save Equalization ........................... 20
4.5 Presets ....................................... 21
5 Filter Bank 22
5.1 Save and Open Configurations .......................... 23
5.2 Copy Filter Configuration ............................ 23
HOLM Acoustics HOLMFIR User Guide v0.4.4

CONTENTS ii
6 Control the DSPre 24
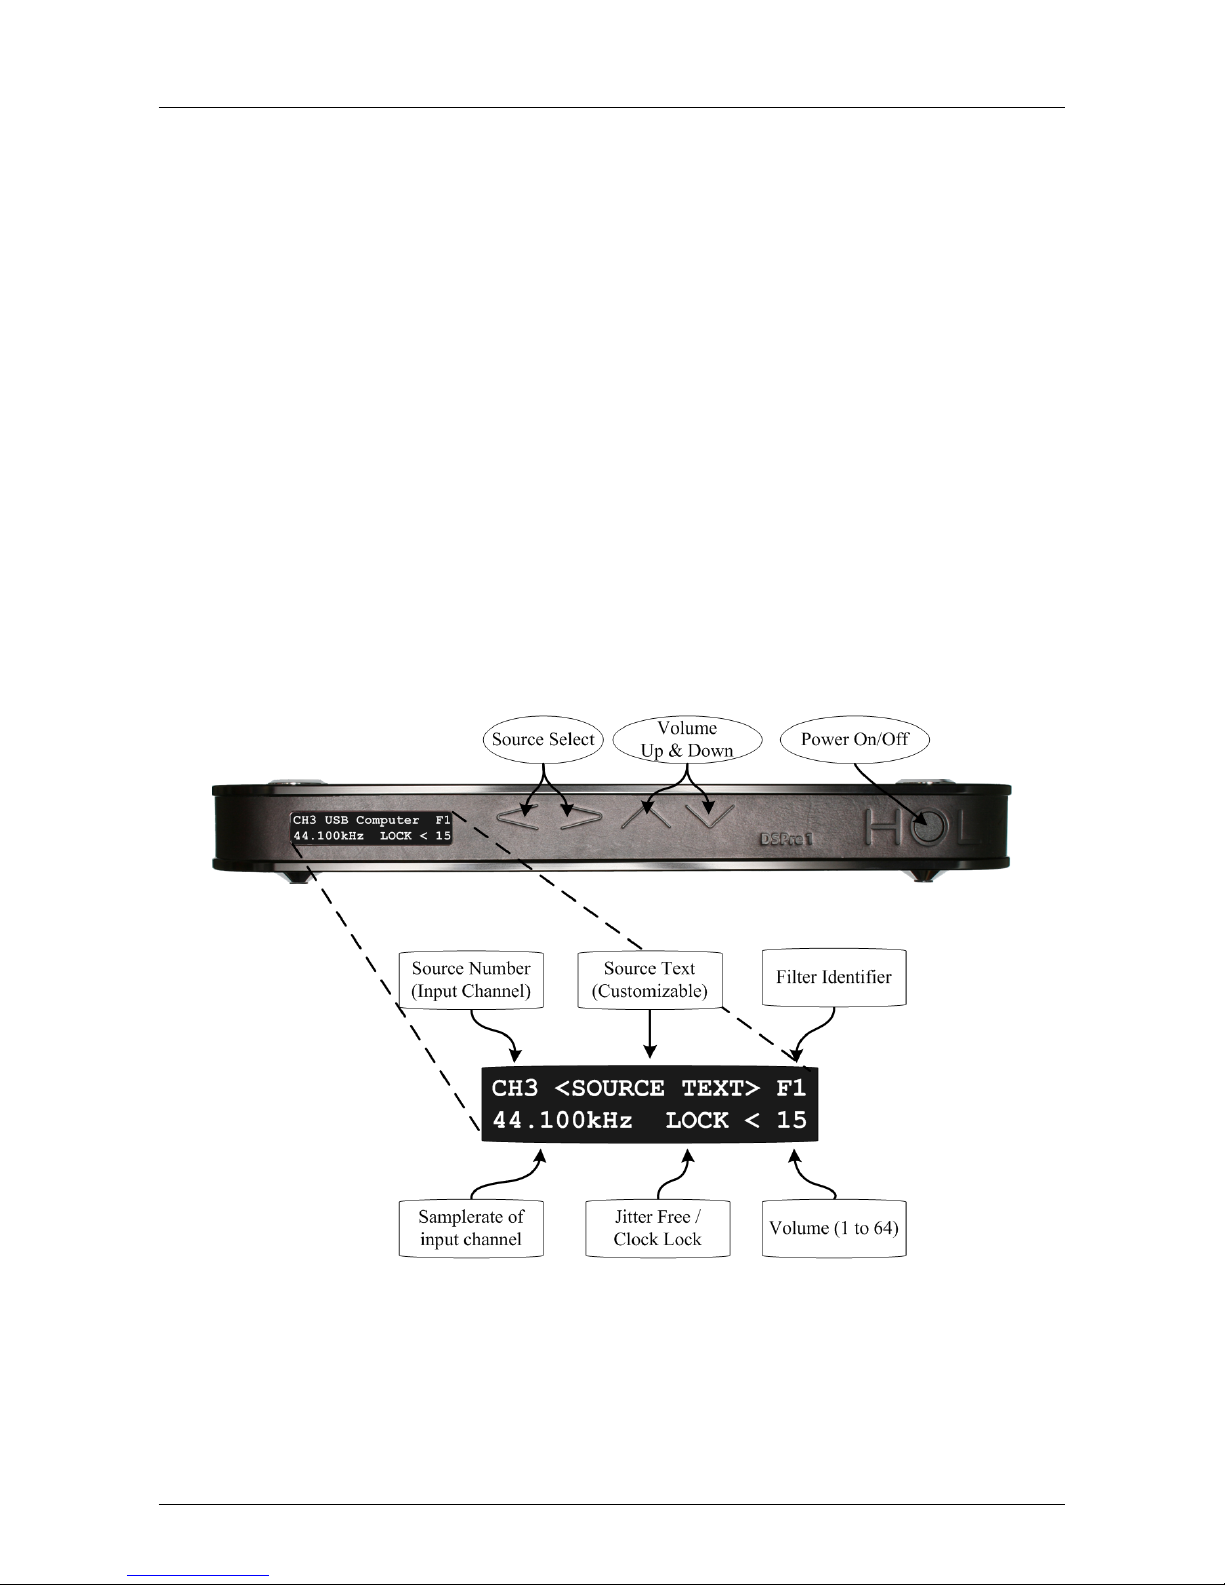
6.1 Source Text in the Display ............................ 24
6.2 DSPre Mixer (Windows XP) .......................... 25
6.3 DSPre Mixer (Windows Vista) ......................... 26
6.4 Playing Music via USB .............................. 27
6.5 Analog Input Gain ................................ 28
7 Customization (Look and Feel) 29
7.1 Linewidth ..................................... 29
7.2 Colors ....................................... 30
II HOLMFIR in Advanced Mode 31
8 Introduction to Advanced Mode 32
8.1 Functionality ................................... 32
8.2 Configuring the DSPre with Full Correction .................. 32
9 Get Ready to Measure 33
9.1 Microphone Connection ............................. 33
9.2 Microphone Calibration File ........................... 34
9.3 The Measurement Chain ............................. 35
9.4 Protect Your Ears ................................ 35
9.5 DSPre Volume and Surroundings ........................ 35
9.6 What is Measured - and How? .......................... 36
10 Control Measurements 37
10.1 Target Frequency & Impulse Response ..................... 37
10.2 Making a measurement .............................. 38
10.3 Customization and Presentation Options .................... 40
10.3.1 Impulse Response Axis .......................... 40
10.4 Measurement Quality .............................. 41
10.5 Errors and Warnings ............................... 42
10.6 Compare Different Measurement Conditions .................. 42
11 Automatic Driver Alignment 43
11.1 Time Alignment ................................. 44
11.2 DSPre-2-way Automatic Alignment ....................... 45
11.3 DSPre-3-way Automatic Alignment ....................... 46
12 Driver Correction 48
12.1 Extended Range ................................. 48
12.1.1 DSPre-1-way Extended Range ...................... 49
12.1.2 DSPre-2-way Extended Range ...................... 49
12.1.3 DSPre-3-way Extended Range ...................... 50
HOLM Acoustics HOLMFIR User Guide v0.4.4

CONTENTS iii
12.1.4 Uploading the Extended Range Filters ................. 50
12.2 Customization and Presentation Options .................... 51
12.3 Correcting a Bass/Subwoofer (DSPre-2,3-way) ................. 52
12.3.1 Verification ................................ 54
12.3.2 Limit the Maximum Gain ........................ 54
12.4 Correcting a Midtone Driver (DSPre-2,3-way) ................. 56
12.5 Correcting a Tweeter (DSPre-2,3-way) ..................... 56
12.6 Correcting a Bookshelf Speaker (DSPre-1-way) ................ 56
III Appendices 57
A Support 58
A.1 The Forum at www.holmacoustics.com ..................... 58
A.3 Remote Assistance ................................ 59
B Frequently Asked Questions 60
C Troubleshooting 61
D Technical Note - Measuring Response 62
D.1 Frequency Response ............................... 62
D.2 Nonlinearities ................................... 62
E Technical Note - Fourier Transforms 63
E.1 The Time Window ................................ 63
Index 64
HOLM Acoustics HOLMFIR User Guide v0.4.4

1 of 65
Part I
HOLMFIR in Basic Mode
HOLM Acoustics HOLMFIR User Guide v0.4.4

Introduction 2 of 65
Chapter 1
Introduction
The HOLMFIR application allows you to configure the DSPre using bleeding edge algo-
rithmens, but to begin with you just want to get the DSPre playing.
HOLMFIR in ’Basic Mode’ lets you configure the DSPre as a digital active crossover (2,3-
way) with equalization option.
The ’Basic Mode’ makes it easy to configure the DSPre as the cornerstone of your personal
setup with amplifiers and speakers. The Quick Start (Chapter 2) guides you through the
initial setup of the DSPre, which can be done in just a few minutes.
1.1 How to use this User Guide
Please note that throughout the text the following nomenclature is used:
HOLMFIR The application HOLMFIR developed by HOLM Acoustics. Version 1.0.8.x
DSPre The DSPre 1 manufactured by HOLM Acoustics
DSPre-1-way A set of fullrange speakers
DSPre-2-way A set of bi-wired speakers with or without analog crossover
DSPre-3-way A set tri-wired speakers with or without analog crossover
HOLMFIR can be used to setup 1,2,3-way systems, so skip the pages not relevant for you
- hence do you have a DSPre-2-way system then skip the DSPre-1-way and DSPre-3-way
chapters/sections.
Typical usage of this user guide in ’Basic Mode ’is:
•Chapter 2Quick Start: Get the DSPre playing within a few minutes
•Chapter 3Crossover & Target: Tune the Crossovers and/or target for your system
•Chapter 4Equalizing: Experience some of the cababilities in a DSPre
•Chapter 5,6,7: Use these chapters when needed
When you are familiar with HOLMFIR in ’Basic Mode’ and would like to take the DSPre a
step further regarding perfection of sound, then continue to Part II: HOLMFIR in Advanced
Mode.
HOLM Acoustics HOLMFIR User Guide v0.4.4

Quick Start 3 of 65
Chapter 2
Quick Start
The purpose of this chapter is to get the DSPre playing in your setup, i.e. get sound out
of your speakers within a few minutes.
2.1 The DSPre
The DSPre interface with display fields is very simple:
HOLM Acoustics HOLMFIR User Guide v0.4.4

Quick Start - Installing HOLMFIR 4 of 65
All connections are kept on the back panel of the DSPre:
2.2 Installing HOLMFIR
HOLMFIR is installed using a Microsoft installer package. It is recommended to
download the latest version found at www.holmacoustics.com/holmfir.php
HOLMFIR-1.0.8.x-wxp.msi Installer package for Windows XP (32 bit)
HOLMFIR-1.0.8.x-wvista.msi Installer package for Windows Vista (32 bit)
When executing the installer package you can safely answer ’Run’ to below security
question
Note when upgrading HOLMFIR then just execute the new installer package - it is not
necessary to uninstall the previous version.
HOLM Acoustics HOLMFIR User Guide v0.4.4

Quick Start - Installing HOLMFIR 5 of 65
2.2.1 Computer Requirements
HOLMFIR is a lightweight application, but does require some computer power. HOLMFIR
will work if your computer is from an older date, but updating the graphs might take a
while.
Hardware requirements:
•Minimum 1 GHz CPU
•Minimum 512 MB RAM
•Minimum 50 MB free disk space
•USB port
Software requirements:
•Windows XP or Windows Vista
•.Net 2.0 platform (Standard free library for Windows XP and Vista )
Note, that when the DSPre once has been configured you can use ANY computer to play
sound via USB without having to install HOLMFIR - that is any computer supporting
the USB 1.1 audio standard. The most commonly used operative systems support this as
Plug’n’Play without installing any special drivers: Windows 2000, Windows ME, Windows
XP, Windows Vista, Mac OS X, Linux (Ubuntu, fedora, RedHat, ...) .
See Section 6.4 ’Playing Music via USB’ for further details.
HOLM Acoustics HOLMFIR User Guide v0.4.4

Quick Start - DSPre-1-way Setup 6 of 65
2.3 DSPre-1-way Setup
In a DSPre-1-way setup the DSPre basically acts as a pre-amplifier with digital correction
and equalization options.
To use the DSPre-1-way setup you need:
1. A DSPre 1
2. A stereo amplifier (or two mono amplifiers)
3. Two full range speakers
4. Signal and speaker cables
5. A computer running Windows XP or Vista (only needed to configure the DSPre)
Connect the Cables
Connect the cables as shown in the diagram below.
Input sources available: 1 USB, 2 analog and 5 digital
HOLM Acoustics HOLMFIR User Guide v0.4.4

Quick Start - DSPre-1-way Setup 7 of 65
Configure the DSPre using HOLMFIR
Turn on the DSPre and start the HOLMFIR application. The DSPre can easily be config-
ured using the setup wizard found in the menu: ’Help’ →’Setup Wizard’
Click ’Done’ and answer ’Ok’ to overwrite the current configuration
Upload these settings to the DSPre by clicking ’Upload Filters to DSPre’ in the
’Crossover & Target’ tab
After uploading, the DSPre is ready to play!
HOLM Acoustics HOLMFIR User Guide v0.4.4

Quick Start - DSPre-2-way Setup 8 of 65
2.4 DSPre-2-way Setup
In a DSPre-2-way setup the DSPre basically acts as a pre-amplifier and active crossover
with digital correction and equalization options.
To use the DSPre-2-way setup you need:
1. A DSPre 1 with 2 output modules
2. Two stereo amplifiers (Can be of different kind)
3. Two speakers with two inputs (Bi-wire - with or without analog crossovers)
4. Signal and speaker cables
5. A computer running Windows XP or Vista (only needed to configure the DSPre)
Connecting the cables
Connect the cables as shown in the diagram below.
Input sources available: 1 USB, 2 analog and 5 digital
HOLM Acoustics HOLMFIR User Guide v0.4.4

Quick Start - DSPre-2-way Setup 9 of 65
Configure the DSPre using HOLMFIR
Turn on the DSPre and start the HOLMFIR application. The DSPre can easily be config-
ured using the setup wizard found in the menu: ’Help’ →’Setup Wizard’
Click ’Done’ and answer ’Ok’ to overwrite the current configuration
Upload these settings to the DSPre by clicking ’Upload Filters to DSPre’ in the
’Crossover & Target’ tab.
HOLM Acoustics HOLMFIR User Guide v0.4.4

Quick Start - DSPre-2-way Setup 10 of 65
After uploading, the DSPre is ready to play!
2.4.1 Adjusting Gain Levels
If the sensitivity of the amplifers or drivers are not the same - the gain levels can easily be
aligned in the ’DSPre Settings’ tab.
You can now align the levels of the outputs while playing music.
If you want to align levels using a microphone, please refer to ’Advanced Mode’ Chapter
11 Section 11.2 ’DSPre-2-way Automatic Alignment’
HOLM Acoustics HOLMFIR User Guide v0.4.4

Quick Start - DSPre-3-way Setup 11 of 65
2.5 DSPre-3-way Setup
In a DSPre-3-way setup the DSPre basically acts as a pre-amplifier and active crossover
with digital correction and equalization options.
To use the DSPre-3-way setup you need:
1. A DSPre 1 with 3 output modules
2. Three stereo amplifiers (Or two HOLM Acoustics AMP 1 with three outputs)
3. Two speakers with three inputs (Tri-wire - with or without analog crossovers)
4. Signal and speaker cables
5. A computer running Windows XP or Vista (only needed to configure the DSPre)
Connecting the cables
Connect the cables as shown in the diagram below.
Input sources available: 1 USB, 2 analog and 5 digital
HOLM Acoustics HOLMFIR User Guide v0.4.4

Quick Start - DSPre-3-way Setup 12 of 65
Configure the DSPre using HOLMFIR
Turn on the DSPre and start the HOLMFIR application. The DSPre can easily be config-
ured using the setup wizard found in the menu: ’Help’ →’Setup Wizard’
Click ’Done’ and answer ’Ok’ to overwrite the current configuration
Upload these settings to the DSPre by clicking ’Upload Filters to DSPre’ in the
’Crossover & Target’ tab.
HOLM Acoustics HOLMFIR User Guide v0.4.4

Quick Start - DSPre-3-way Setup 13 of 65
After uploading, the DSPre is ready to play!
2.5.1 Adjusting Gain Levels
If the sensitivity of the amplifers or drivers are not the same - the gain levels can easily be
aligned in the ’DSPre Settings’ tab.
You can now align the levels of the outputs while playing music.
If you want to align levels using a microphone, please refer to ’Advanced Mode’ Chapter
11 Section 11.3 ’DSPre-3-way Automatic Alignment’
HOLM Acoustics HOLMFIR User Guide v0.4.4

Crossover & Target 14 of 65
Chapter 3
Crossover & Target
Before the digital era one had to solder a new analog crossover with new components to
try out a new configuration. With the DSPre you can change the frequency and steepness
with a huge degree of freedom via a simple interface.
3.1 Crossovers (Only for DSPre-2,3-way)
A HOLMFIR digital crossover is defined by a crossover frequency and a transition band.
The HOLMFIR digital crossover is a FIR (Finite Impulse Response) filter customized
especially for HighEnd audio by HOLM Acoustics.
This digital filter can not be directly comparred with a classical analog filter due to the
completely separated frequency domains. When playing tones away from the transition
band the tone is only represented in one driver - this corresponds to an analog filter with
an infinite order.
HOLM Acoustics HOLMFIR User Guide v0.4.4

Crossover & Target - Low Frequency Rolloff 15 of 65
3.2 Low Frequency Rolloff
The low frequency rolloff can be used to limit how low tones that are sent to your bass
driver. Often bass drivers do not play tones below 30 Hz and small bookshelf speakers
useally do not play tones below 40 Hz. When music consists of tones below this natural
limit of the speaker you get heareable distortion. When the lower frequencies are damped
this will not happen.
The amplifier will often also distort when playing low-frequencies at a high volume which
also validates the need to damp low frequencies.
In the above example frequencies above 40 Hz are not affected and frequencies below 25
Hz are simply not played.
Motivations for Low Frequency Rolloff
•Less distortion from the driver/speaker
•Less excursion of driver/speaker - hence can prevent no blown drivers
•Less power consumption from the amplifier - hence less distortion
•Less low frequency room-modes
•Less wide range deep sound presure for your nabo
HOLM Acoustics HOLMFIR User Guide v0.4.4

Crossover & Target - High Frequency Rolloff 16 of 65
3.3 High Frequency Rolloff
The high frequency rolloff can be used if the tweeter of your system is poor - some fulltone
drivers do not have a pleasant sound in high frequencies, or if you have tinnitus, which is
triggered by high frequencies.
In the above example frequencies below 10 kHz are not affected and frequencies above 15
kHz are simply not played.
Motivations for High Frequency Rolloff
•Damp sharp and unpleasant high frequency sound
HOLM Acoustics HOLMFIR User Guide v0.4.4
This manual suits for next models
4
Table of contents