HOMCOM CM5411A-GS User manual

ASSEMBLY INSTRUCTION
INcsb013_UK
800-078
MODEL: CM5411A-GS
COFFEE MAKER
IMPORTANT, RETAIN FOR FUTURE REFERENCE: READ CAREFULLY

Page 1of 21
Contents
IMPORTANT SAFEGUARDS......................................................................................................................2
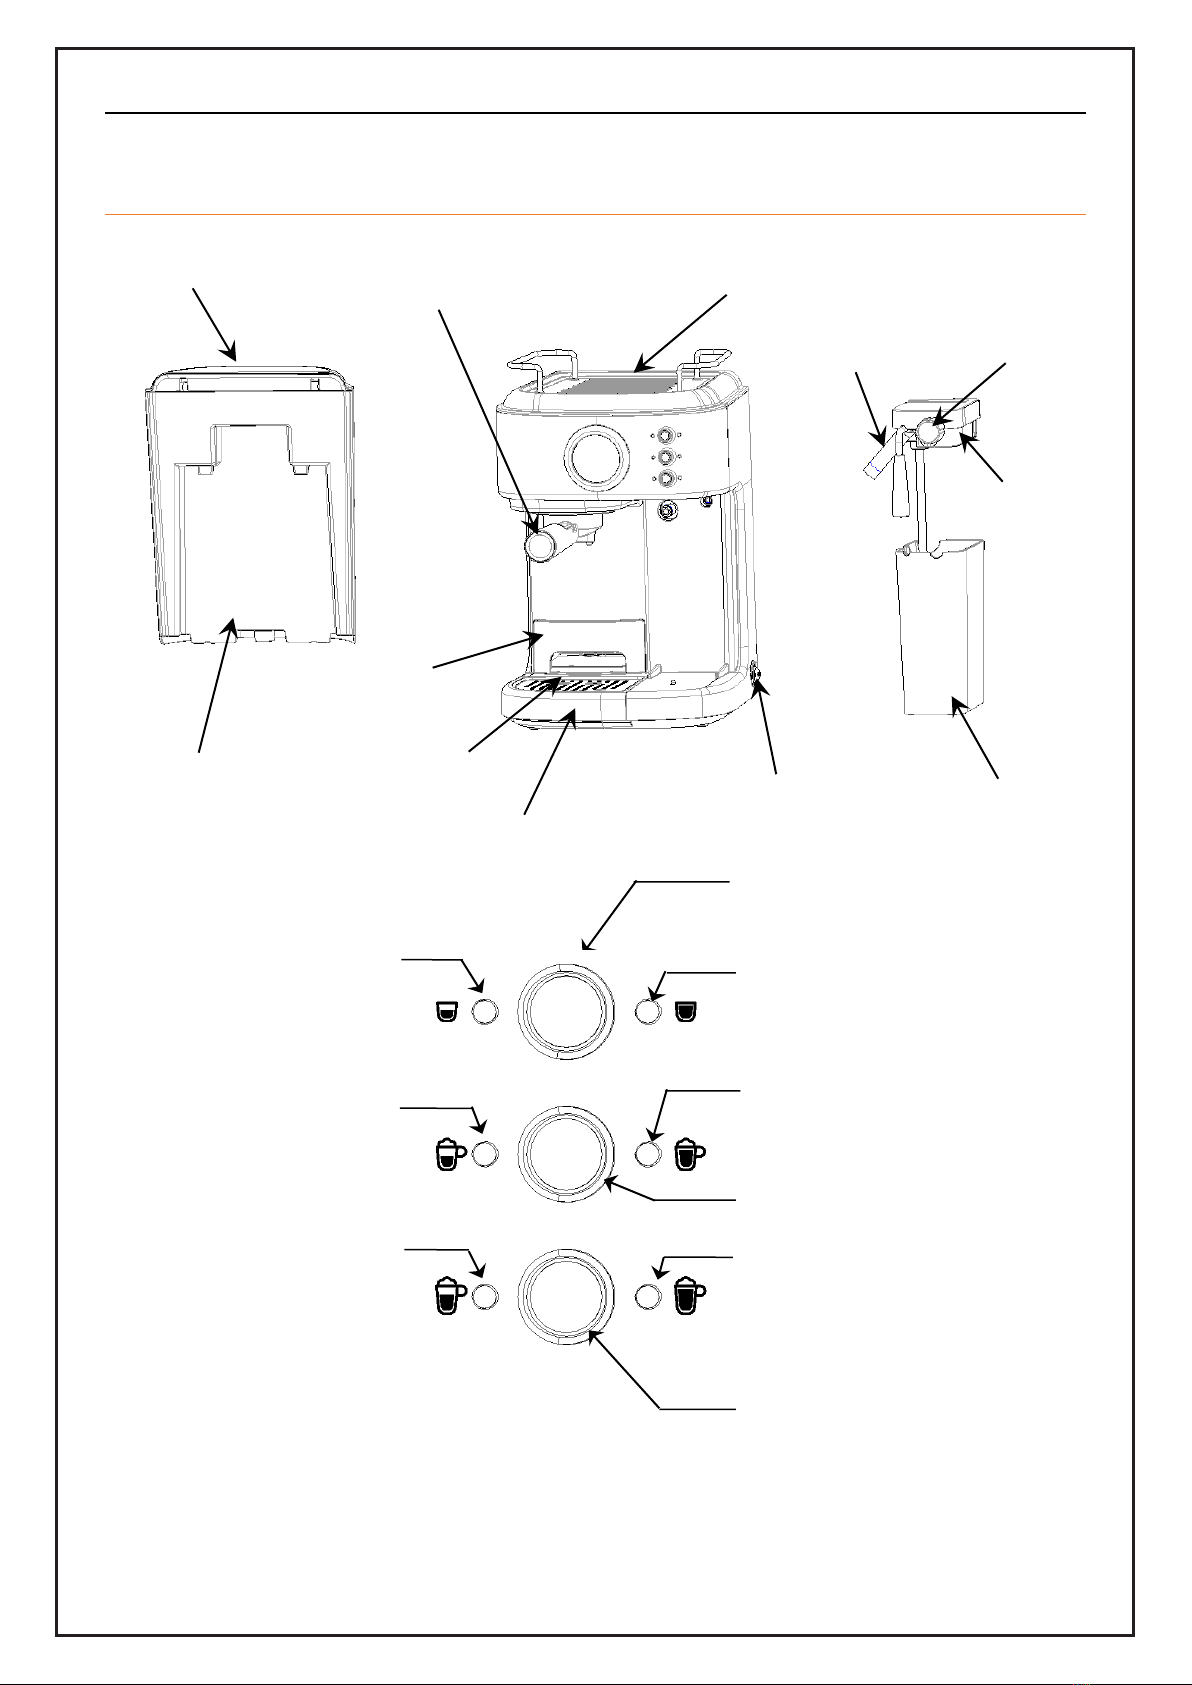
KNOW YOUR COFFEE MAKER.................................................................................................................4
BEFORE FIRST USE..................................................................................................................................5
IMPORTANT –PRIME THE UNIT...............................................................................................................5
SELECTING THE RIGHT CUP.................................................................................................................... 6
SELECTING THE RIGHT COFFEE.............................................................................................................6
The coffee................................................................................................................................................. 6
The grind................................................................................................................................................... 6
OPERATING INSTRUCTIONS.................................................................................................................... 7
Filling the water tank................................................................................................................................. 7
Filling the milk tank...................................................................................................................................7
Choosing the filter.....................................................................................................................................7
Inserting the filter......................................................................................................................................8
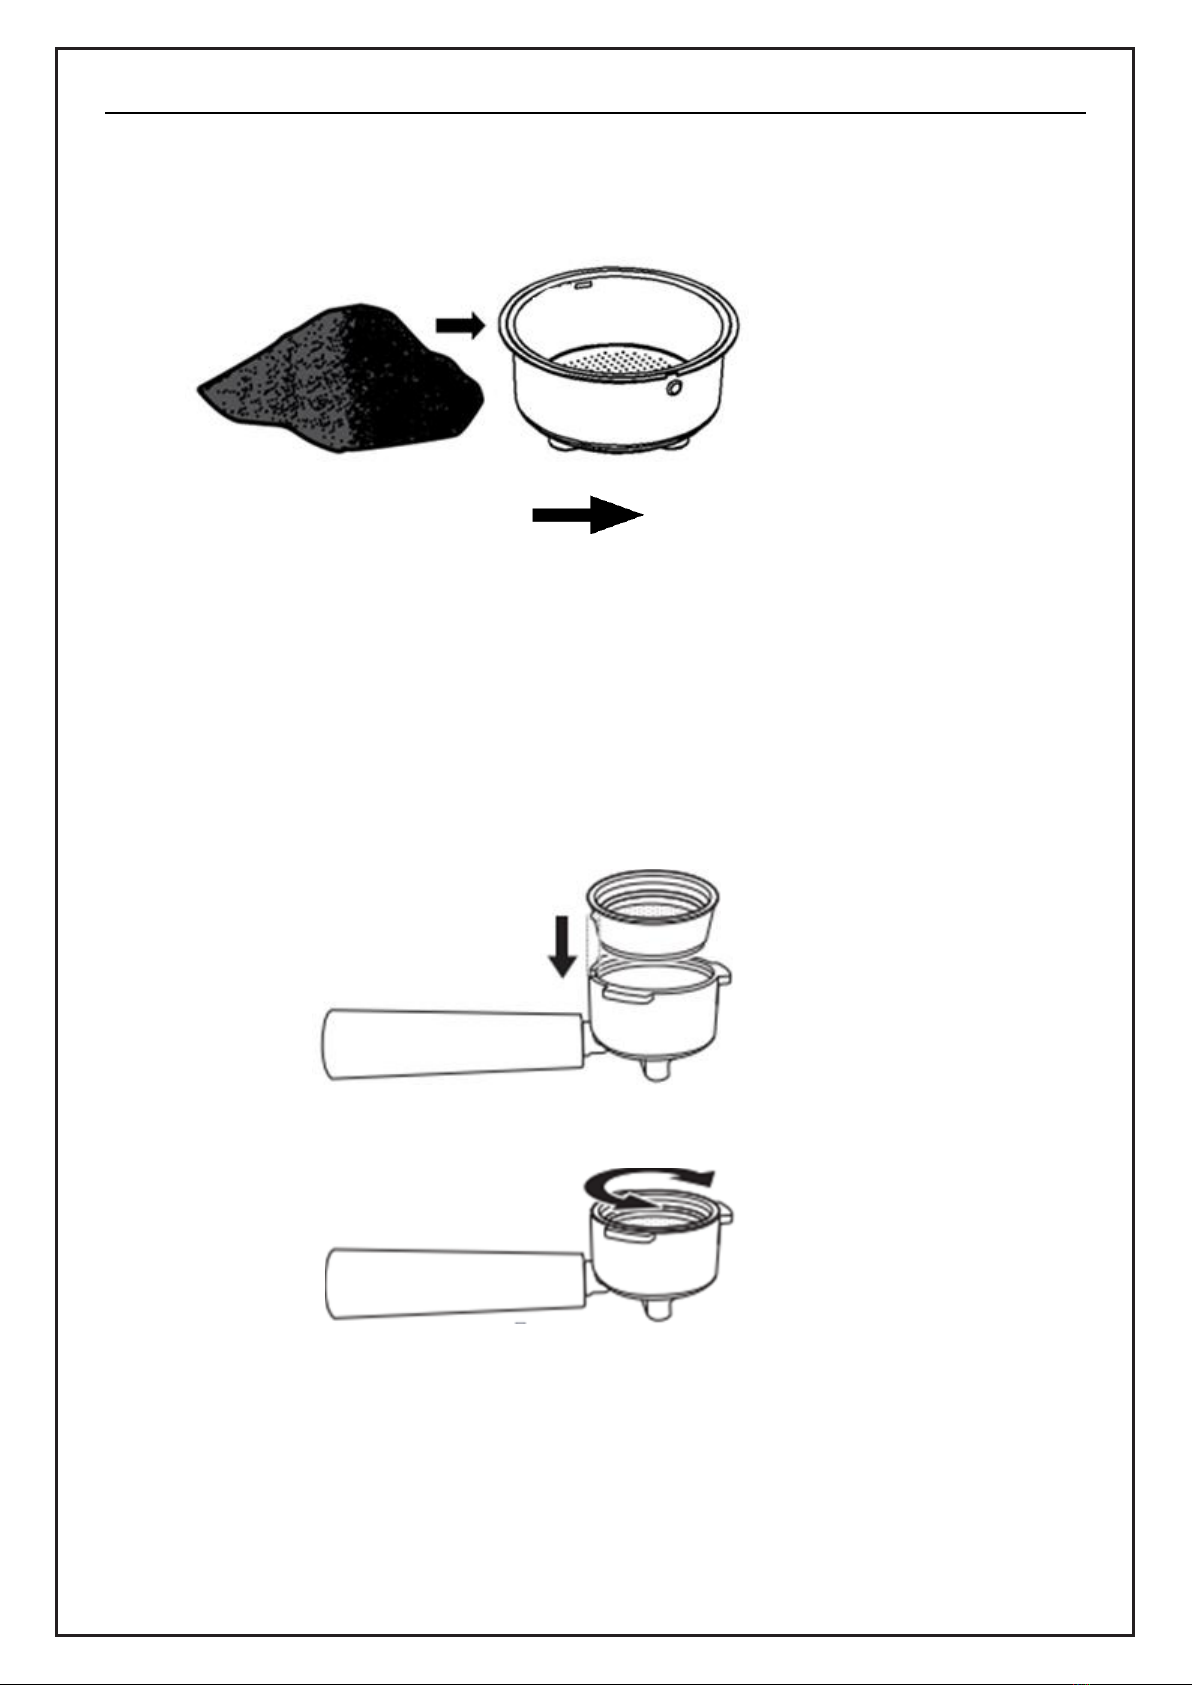
Filling with coffee......................................................................................................................................9
For ground coffee..................................................................................................................................... 9
PLACE THE PRESSURIZED FUNNEL....................................................................................................... 9
SELECT THE FUNCTION......................................................................................................................11
Preparing espresso.............................................................................................................................11
Preparing a cappuccino...................................................................................................................... 11
Preparing a latte..................................................................................................................................12
Preparing froth milk.............................................................................................................................12
After preparing your beverages with milk........................................................................................... 12
CLEANING................................................................................................................................................. 13
Descaling................................................................................................................................................ 13
Cleaning the milk reservoir and frothing tube......................................................................................... 14
Cleaning the brew head, the porta-filter and filter.................................................................................. 16
Cleaning the water reservoir...................................................................................................................16
Cleaning the unit.....................................................................................................................................16
Deliming.................................................................................................................................................. 17
To delime the water reservoir:................................................................................................................ 17
To delime internal parts:.........................................................................................................................17
Manual descaling mode..........................................................................................................................18
TROUBLESHOOTING............................................................................................................................... 19
Coffee Maker
TURNING THE UNIT ON ...........................................................................................................................11
INTRODUCTION TO COFFEE...................................................................................................................13
ENVIRONMENT FRIENDLY DISPOSAL................................................................................................... 20

Page 2of 21
IMPORTANT SAFEGUARDS
When using electrical appliances, basic safety precautions should always be followed to reduce the
risk of fire, electric shock and/or injury to persons, including the following:
Read all instructions.
Make sure the voltage of your electrical system corresponds to the voltage stated on the
rating label of the machine.
To protect against fire, electrical shock, and injury to persons, do not immerse cord, plug or
unit in water or other liquid.
Close supervision is necessary when any appliance is used by or near children.
Unplug from outlet when not in use and before cleaning. Allow to cool before replacing or
removing any parts, and before cleaning the appliance.
Do not operate any appliance with a damaged cord or plug or after the appliance
malfunctions or has been damaged in any manner. Return the appliance to an authorized
service facility for examination, repair, or adjustment.
The use of accessory attachments not recommended by the appliance manufacturer may
result in fire, electric shock, or injury to persons.
To disconnect, turn any control to the off position then remove plug from wall outlet。
Do not touch any hot surfaces, use handles or knobs.
Do not use outdoors or for commercial purposes.
Do not let cord hang over edge of table or counter or touch hot surface.
Use on a hard, flat level surface only, to avoid interruption of airflow underneath the
appliance.
Always be sure to place the water reservoir tightly back in the unit with its lid closed and fill
with water on or above the minimum level before turning appliance on.
Do not remove the porta-filter while brewing coffee. Please ensure the three lights are on
before you remove the porta-filter to make additional coffee. Caution should also be taken
while removing the porta-filter as the metal parts will be hot, and there may be hot water
floating on the top of the filter. Please make sure you hold it by the handle and to use the
filter retention clip to dispose the grounds. Caution should be taken when moving unit with hot
liquids.
Do not remove the water reservoir until the unit is turned off.
This appliance is not intended to be operated by means of an external timer or separate
remote-control system.
The appliance can be used by children aged from 8 years and above and persons with
reduced physical, sensory, or mental capabilities or lack of experience and knowledge if they
have been given supervision or instruction concerning use of the appliance in a safe way and
understand the hazards involved. Children shall not play with the appliance. Cleaning and
user maintenance should not be carried out by children unless they are older than 8 and
supervised.
Keep the appliance and its cord out of reach of children less than 8 years.
Coffee Maker

Coffee Maker
Page 3of 21
Before removing any of the parts and accessories, make sure the three lights are on, press
the power button to the off position “O” and unplug the appliance.
If coffee does not drip, the filter is blocked. Turn off the appliance and allow it to cool down.
The blockage may be caused by the coffee being too finely ground. See the “PROBLEMS
AND CAUSES” section.
WHEN CLEANING THE FROTHED MILK DISPENSING TUBE: Place a large cup under the
tube. Fill the milk reservoir with water and place it back on the unit. Turn the Froth Control
Knob clockwise to the clean position “ ” then press and hold the latte/clean button for 3
seconds and release to activate the clean function. Let the unit dispense the water through
the tube for approximately 30 seconds and then press the Latte/Clean Button once to stop
the process.
Do not place on or near a hot gas or electric burner, or in a heated oven.
Do not use appliance for anything other than its intended use.
Do not leave the appliance unattended when in use.
This appliance is intended to be used in household and similar applications such as:
–Staff kitchen areas in shops, offices, and other working environments.
–Farm houses.
Never submerge the appliance in water or other liquids!
Danger of electric shock!
CAUTION: PRESSURE
To avoid possible burns to body parts and/or other injury from hot steam and water or damage to the
unit, never remove the water reservoir or the porta-filter while your espresso/cappuccino maker is
brewing coffee or frothing. Make sure the three lights are on before you can remove the porta-filter
to make additional cups of coffee. If you need to add more water or milk to the reservoirs, please
make sure the three lights are on and ensure to switch off the unit by pressing the red button on the
side of the unit to the off position “O”.

Coffee Maker
Page 4of 21
KNOW YOUR COFFEE MAKER
Water tank cover
Water tank
Drip tray bracket
Drip plate
Drip tray
Pressurized funnel Top cover decoration
Froth nozzle Knob
Milk tank
cover
Milk tank
Switch
Big cup of coffee & manual coffee
button
Big cup of coffee and manual
coffee light
Small cup of latte and cleaning
button
Small cup of latte and cleaning
light
Big cup of cappuccino and milk
foam button
Big cup of cappuccino and milk
foam light
Small cup of latte and cleaning light
Small cup of coffee and manual
coffee light
Small cup of cappuccino and milk
foam light

Coffee Maker
Page 5of 21
BEFORE FIRST USE
Cleaning and priming the unit prior to first use.
Please refer to the “Know your Appliance” section and familiarise yourself with the product and
identify all parts.
1. Please make sure the unit is on the off “O” position by pressing the switch located on the side
of the unit. Ensure it is unplugged from the electrical outlet.
2. Remove stickers and labels from the unit.
3. Firstly, remove and wash the water tank, the milk tank, and the two filters, the pressurised
funnel and coffee scoop in a mixture of mild detergent and warm water. Rinse each part
thoroughly and place them back into the unit.
4. Refer to the instructions on “PLACING THE PORTA-FILTER” section before placing or
removing the filter from the unit.
5. To clean the inside of the appliance, follow the steps listed on the “PREPARING
CAPPUCCINO” section using water in both reservoirs and no coffee in the filter. Do not
immerse the appliance in water or attempt to reach any of its internal parts.
6. NOTE: For your unit to work properly please clean it after every use.
IMPORTANT –PRIME THE UNIT
To prime unit, run the steam cycle for 90 seconds by following the steps below:
1. Fill water tank between the “Min” and “Max” levels.
2. Fill the milk tank with water between the “Min” and “Max” levels.
3. Select one of the filters and place it on the pressurised funnel. Place the pressurized funnel
in the unit ensuring it is properly locked and place a cup under it. Ensure the tip of the frothed
milk dispensing tube is inside the cup.
4. Plug the appliance into the appropriate outlet.
5. Turn the switch on “I”.
Pressurized
funnel 1-cup filter 2-cup filter Coffee
spoon

Coffee Maker
Page 6of 21
6. The six control panel lights will start blinking. Once these lights become solid, press the
cappuccino button( ) twice.
7. Once this process is completed, the six control panels will turn on solid.
8. Now your unit has been primed and is ready to be used.
SELECTING THE RIGHT CUP
Before preparing your beverage, please make sure to select the right cup size according to the table
below:
BEVERAGE TYPE RATIO
Espresso Single( )
Double( )
60ml
119ml
Cappuccino Single( )
Double( )
178ml
355ml
Latte Single( )
Double( )
296ml
474ml
SELECTING THE RIGHT COFFEE
The coffee
The coffee should be freshly ground and dark roasted. You may want to try a French or Italian roast
ground for espresso. Pre-ground coffee will only retain its flavor for 7 –8 days, provided it is stored
in an airtight container and in a cool, dark place. Do not store in a refrigerator or freezer. Whole
beans are recommended to be ground just before use. Coffee beans stored in an airtight container
will keep its flavor for up to four weeks.
The grind
This is a vital step in the espresso making process if you are grinding your own coffee and takes
practice. The coffee must be of a fine grind and look like salt granules.

Coffee Maker
Page 7of 21
If the grind is too fine, the water will not flow through the coffee even under pressure. These grinds
look like powder and feel like flour when rubbed between fingers.
If the grind is too coarse, the water flows through the coffee too fast, preventing a full-flavored
extraction.
Be sure to use a quality grinder for uniform consistency.
OPERATING INSTRUCTIONS
Filling the water tank
a. Fill the water tank with water, you may either use a jar to fill it up or remove it from the unit and
then fill it up under the tap. If you have removed it from the unit to fill up with water, please
ensure you place it back tightly in its place. Fill the reservoir with the desired amount of water
ensuring it ranges within the “MIN” and “MAX” markings on the tank. Never use warm or hot
water to fill the water reservoir.
b. Close the water reservoir lid and place it back in the unit ensuring it fits tightly.
Filling the milk tank
If you plan to prepare a cappuccino or latte, remove the milk tank from the unit, open the lid and pour
the quantity of cold milk you estimate you will need between the “MIN” and “MAX” levels. When
done, place the milk tank back in the unit ensuring it fits tightly.
Note: You can use the of milk of your preference, i.e., whole, skimmed, semi-skimmed, organic or
soy milk.
Choosing the filter.
Select the filter to be used as follows:
A. FOR A SINGLE SHOT–use the filter for a single shot of espresso if using ground coffee.

Coffee Maker
Page 8of 21
B.FOR A DOUBLE SHOT OR TWO SINGLE SHOTS –use the filter for a double shot.
NOTE: The pod filter included with your unit has been designed to only work with ESE (45 mm) pods
Inserting the filter
a. To insert the selected filter in the pressurized funnel, make sure to align the notch on the filter
with the groove inside the pressurized funnel.
b. Turn the filter to the left or right to lock in place. This will help secure the filter in the pressurized
funnel.
NOTE: To remove and clean the filter, turn filter to the left or right to align the filter notch with the
groove inside the pressurized funnel.
WARNING: Make sure the filter has cooled before attempting to remove the filter.

Coffee Maker
Page 9of 21
Filling with coffee
Place selected filter on pressurized funnel as follows:
For ground coffee:
a. Fill the filter with fresh, fine ground espresso coffee (do not overfill).
Note: the ground coffee amount cannot exceed the MAX mark.
b. Tamp and compress firmly and evenly ground coffee.
c. Clean any excess coffee from the rim to ensure proper fit under brew head.
PLACE THE PRESSURIZED FUNNEL
a. Position pressurized funnel underneath the brew head, attach pressurized funnel by first moving
retainer clip back.
b. Position handle so that the handle lines up with the open lock icon “ ” on the unit and fits into
the groove.
c. Then, slowly turn it to the right until the retention clip is aligned with the closed lock symbol
“” on the unit.

Coffee Maker
Page 10 of 21
Note: The frothing tube will be extremely hot, please take care.
Placing the cup(s)
a. Pull out the drip tray bracket if you are using a small “demitasse” cup to brew espresso.
b. Keep the drip tray bracket inside its compartment if you are using a larger cup to brew
cappuccino.
c. Keep the drip tray bracket inside its compartment if you are using a larger cup to brew latte.
CAUTION: When brewing cappuccino or latte, please make sure to adjust the frothing tube lever
to position the froth milk dispensing tube inside the cup to be used, additionally, you can also
adjust the length of frothed milk dispensing tube by locking it into different positions of the frothing
tube lever to adapt to different size of cup. To clean it, remove by rotating it out, then replace.
See below figure:

Coffee Maker
Page 11 of 21
TURNING THE UNIT ON
a. Make sure unit is plugged in.
b. Turn unit on “I” position. The six control panel lights will start blinking during heating and until the
water reaches the perfect temperature. Once the six lights are solid, the unit is ready to use.
SELECT THE FUNCTION
Preparing espresso
a. Press coffee button once ( illuminate), brew single cup coffee.
b. Press coffee button twice ( illuminate), brew double cup coffee.
c. Press and hold the coffee button for 3s(illuminate at the same time), brew big cup coffee,
when coffee amount reaching your need, you can press any button to stop working.
The unit can brew espresso according to your setting, and it will stop automatically, when
light is solid, it means the machine has finished brewing, you can enjoy your espresso.
Warning: after machine has finished brewing, please do not take out the filter immediately,
please wait for 10 seconds.
Preparing a cappuccino
Before brewing cappuccino, turn the froth control knob to middle position, you can adjust the quantity
of frothed milk according to your preference by turning the Froth Control Knob to the right “ ”for
more froth and to the left “ ”for less froth.
NORMAL FROTH MORE FROTH

Coffee Maker
Page 12 of 21
Note: The froth intensity can be adjusted during the brewing cycle.
a. Press the Cappuccino Button once to brew a small cup of cappuccino.
b. Press the Cappuccino Button twice to brew a large cup of cappuccino.
The unit will start brewing the cappuccino according to your selection. Your delicious cappuccino is
ready to be enjoyed.
Preparing a latte
Prior to preparing your latte, adjust the quantity of frothed milk according to your preference by
turning the Froth Control Knob to the right “ ” for more froth and to the left “ ” for less froth.
a. Press the Latte Button once to brew a small cup of latte.
b. Press the Latte Button twice to brew a large cup of latte.
Preparing froth milk
The unit also allows you to prepare froth milk only. Press and hold the Cappuccino Button for 3 seconds
if you wish to add more foam to your beverage or to prepare froth milk for any other beverage, e.g.,
macchiato, hot chocolate, Tea latte, etc. When done, press the Cappuccino Button once again to stop it.
After preparing your beverages with milk
Once you are done preparing your beverage with milk, you can either store the unit’s milk reservoir
directly in the refrigerator (ready to be used for the next time) or dispose of the leftover milk.
If there is no operation for 15 minutes, the unit will enter sleep mode, you can press any
button to wake up the unit.
NORMAL FROTH LESS FROTH MORE FROTH

Coffee Maker
Page 13 of 21
INTRODUCTION TO COFFEE
Espresso
A unique method of coffee brewing in which hot water is forced through finely ground coffee. Popular
in Europe, it is a far richer and more full-bodied brew than regular filter coffee. Because of its
richness, espresso is usually served in 44 to 59 ml (1.5 to 2 oz.) portions, in demitasse cups.
Cappuccino
A drink made with about 1/3 espresso, 1/3 steamed milk, and 1/3 frothed milk.
Latte
A drink made with about 1/4 espresso and 3/4 steamed milk.
Please read ALL the instructions, cautions, notes and warnings included in this instruction manual
carefully before you begin to use this appliance. When this unit is used, some parts and
accessories get hot and need to cool down. Proper care and maintenance will ensure the long life
of the Automatic Espresso, Cappuccino, and Latte Maker and its trouble-free operation. Save
these instructions and refer to them often for cleaning and care tips.
CORRECT USE OF GROUND COFFEE FOR ESPRESSO MAKERS
Do not use sugar roasted ground coffee or sugar roasted coffee beans as these will clog the filter
and damage the appliance. If sugar roasted coffee is accidentally used, stop using the unit and
take it to the nearest service centre for maintenance. We recommend descaling the machine
periodically to keep it in good working condition. Contact our service centres to learn about this
process.
CLEANING
Descaling
When the six indicator lights flash sequentially, this indicates, the machine needs descaling. Follow
the steps below to complete the descaling process:
1. With the milk reservoir placed in position, fill the water tank with 600ml clean water and
dedicated descaler.
Important! Descaler contains acids which may irritate the skin and eyes. It is vital to
respect the manufacturer’s safety warning given on the descaler pack and the warning
relating to the procedure to follow in the event of contact with skin and eyes.
2. Press Espresso and Latte buttons simultaneously.
3. The appliance enters descaling condition automatically, and the six indicators will flash slowly
alternately, after working for about half an hour, the six indicators quickly flash alternately.

Coffee Maker
Page 14 of 21
4. Empty the water tank and refill it with 600ml clean water, and press Espresso and Latte
buttons simultaneously again and the appliance continues to perform descaling, at that time,
the six indicators slowly flash alternately, after working for about half an hour, the appliance
stops working and goes back to the standby condition.
NOTE:
1) You can press any functional buttons to perform the corresponding function when the appliance
reminds you to perform descaling. The appliance will continue to remind you to perform this task
after you complete the corresponding function.
2) The descaling process can be stopped at any time by pressing any button, then the appliance will
continue to remind the user to perform descaling. The appliance will enter normal standby
mode only after the whole descaling process has been completed.
Cleaning the milk reservoir and frothing tube
Even though you can store the milk reservoir with left over milk in the refrigerator, it is important to
clean the reservoir and frothing tube regularly to avoid clogging and building residues. To clean the
milk reservoir, please follow the instructions listed below:
1. Remove the milk reservoir from the unit and remove the lid of the reservoir.
2. The steam tube connector can be detached by rotating, you can clean it in tap water. After
cleaning, please fix it into the milk reservoir lid by rotating.
3. When cleaning the milk reservoir, you can open the silicon sheet (do not pull it out) and wash
it by tap water and place in back in the machine.
4. Pour any leftover milk out, rinse and wash the milk reservoir and its lid thoroughly with warm
soapy water, and dry well. Do not use abrasive cleaners and scouring pads, as they will
scratch the finish. The milk reservoir is also dishwasher safe (top rack). Do not place the lid
of the milk reservoir on the dishwasher.
5. Place a large empty cup under the frothing tube.
6. Turn the Froth Control Knob clockwise to the clean position “ ” then press and hold the
latte/clean button for 3 seconds and release to activate the clean function. The unit will start
releasing steam through the frothing tube, let it run for a few seconds until you do not see any
milk in cup. When done press the Latte/clean button once to stop the process.
7. Dispose any water left in the milk reservoir and place it back in the unit.
8. Note: For disassembling the milk reservoir, you should raise it up a little, then pull it out.

Coffee Maker
Page 15 of 21
Rinse with water

Coffee Maker
Page 16 of 21
Cleaning the brew head, the porta-filter and filter
1. Switch the power button on the side of the unit to the off position “O” and unplug the power cord
from the electrical outlet.
2. Some of the metal parts might still be hot. Do not touch them with your hands until they have
cooled.
3. Remove the porta-filter and discard the coffee grounds or used pod. Wash both the porta-filter
and filter with warm soapy water and rinse them well. Do not wash the porta-filter and filters in
the dishwasher.
4. Wipe lower part of the brew head in the unit with a damp cloth or paper towel to remove any
coffee grounds that might have been left.
5. Place the porta-filter (without any filter) back in the brew head in the unit.
6. Place an empty large cup under the porta-filter.
7. Press the espresso button once and let the unit brew with water only until it stops automatically.
Cleaning the water reservoir
Discard the remaining water by removing the reservoir and turning it upside down over the sink. It is
recommended to empty the water reservoir between uses. Wash the water reservoir with soapy
water, rinse it well and wipe dry. The water reservoir is also dishwasher safe.
Cleaning the unit
1. Wipe housing with a soft wet cloth. Do not use abrasive cleaners or scouring pads, as they will
scratch the finish.
2. Do not store the porta-filter in the brew head. This can adversely affect the seal between the
brew head and the porta-filter while brewing espresso. You can store the porta-filter and filter
as below figure.
CAUTION: Do not immerse appliance in water.

Coffee Maker
Page 17 of 21
Deliming
Mineral deposits built-up in the unit will affect the operation of the appliance. Your appliance must be
delimed when you notice an increase in the time required to brew espresso, or when there is excessive
steaming. Also, you may notice a build-up of white deposits on the surface of the brew head.
The frequency of cleaning depends upon the hardness of the water used. The following table gives the
suggested cleaning intervals.
To delime the water reservoir:
1. Fill the reservoir with fresh, undiluted white household vinegar.
2. Allow appliance to sit overnight with the vinegar solution in the water reservoir.
3. Discard vinegar by removing the reservoir and turning it upside down over the sink.
4. Rinse the water reservoir thoroughly with tap water by filling tank half with clean water and then
pouring the water back out into the sink, repeat this step twice.
To delime internal parts:
1. Make sure you delime the inside of the water reservoir first by following the “Deliming” steps above.
2. Ensure you switch the power button to the “O” position and the power cord is disconnected from the
electrical outlet. Fill the reservoir with white vinegar above the minimum level into reservoir.
3. Insert the porta-filter (with filter and no coffee) and place jar/carafe or regular cup on top of the drip tray
and under the porta-filter.
4. Plug the power cord into the electrical outlet.
5. Press the power button to switch the unit on “I”, once the six control panel lights turn solid blue, press
the Espresso Button twice. The vinegar will start flowing through the unit and it will stop automatically.
6. Place a pitcher or large cup (with at least 325ml/ 11-ounce capacity) under the tube. Fill the milk
reservoir with water and place it back on the unit. Turn the Froth control knob clockwise to the clean
position “ ”, then press and hold Latte Button for 3s to activate the clean function. Let the unit
dispense the water through the tube for approximately 30 seconds and then press Double Latte Button
once to stop the process.
7. Repeat Steps 1 –6 as necessary using only tap water to rinse any remaining traces of vinegar out of
the machine.

Coffee Maker
Page 18 of 21
Manual descaling mode
After the unit has worked for 500 cycles, it will enter descaling mode and sound an alarm. The
cappuccino and latte indicator lights will blink in turn. If you do not descale in time, the water way system
may become blocked.
Note: If you want to descale before 500 cycles, you can descale manually by following the
steps below:
Operation
1. Ensure the power switch is at the position of “O”, and the power cord is unplugged. Fill 400ml
white vinegar and 600ml water into the water tank. Assemble the milk tank into the unit, turn
frothing control knob clockwise to clean position.
2. Press the power switch to “I” position, Cappuccino and Latte indicator blink in turn. Press Espresso
button and Latte button at the same time, the unit will enter descaling mode automatically. 6
indicators blink by turning a circle anticlockwise, the frothed milk dispensing tube will flow out hot
water and steam, after 40 mins, the unit will enter standby mode, 6 indicators illuminate.
3. Discard the residual descaling solution, and clean the water tank, fill appropriate amount pure water,
brew two cups of Espresso continuously, then brew two cups of Latte continuously, the cleaning
finished. 6 indicators illuminate, the unit recover to standby mode, after the unit working for 500 cycles
again, the unit will remind descaling again.
Note: Under descaling reminding status, you still can operate the unit normally, and after
operation, it will return to descaling reminding status.

Coffee Maker
Page 19 of 21
TROUBLESHOOTING
PROBLEM CAUSES SOLUTIONS
Coffee does not come out. No water in reservoir.
Coffee grind is too fine.
Too much coffee in the filter.
Appliance was not turned on or
plugged in.
Coffee has been tamped/compressed
too much.
Add water.
Grind medium ground coffee.
Fill filter with less coffee.
Plug unit into electrical outlet
and turn it on.
Refill filter basket with coffee, do
not tamp too much.
Coffee comes out around
the edge of the porta-filter. Porta-filter not rotated to full lock
position.
Coffee grounds around the filter
basket rim.
Too much coffee in the filter.
Rotate filter holder to full lock
position.
Wipe off rim.
Fill with less coffee.
Milk is not foamy after
frothing or it is not coming
out of the frothing tube
Ran out of steam.
Milk is not cold enough.
Frothing tube is blocked.
Ensure there is enough water in
the reservoir.
Chill milk and frothing pitcher
prior to making cappuccino.
Follow the instructions to clean
the milk reservoirs &frothing
tube.
Coffee comes out too
quickly Ground coffee is too coarse.
Not enough coffee in filter.
Use a finer grind.
Use more coffee.
Coffee is too weak. Using small filter for double shot of
espresso
Ground coffee is too coarse.
Use large filter for double shot of
espresso.
Use a finer grind.
The three control panel
lights are flashing
alternatively
Water tank is out of water Add water to reservoir.
This manual suits for next models
1
Table of contents
Other HOMCOM Coffee Maker manuals