Home electric KS8880CD User manual

KS8880CD
Umluftbackofen
mit Grill
1300W
Bedienungsanleitung
Instruction manual

ZU IHRER SICHERHEIT
2
DEUTSCH
Vor dem Gebrauch dieses Gerätes sollten folgende Sicherheits-hinweise
beachtet werden:
1. Lesen Sie diese Bedienungsanleitung sorgfältig durch.
2. Die Netzspannung muß mit den Angaben auf dem Typenschild (auf der
Unterseite der Produkts) übereinstimmen.
3. Lassen Sie das Gerät nicht unbeaufsichtigt, während es benutzt wird.
4. Stecken Sie das Gerät aus, wenn es nicht verwendet wird oder gereinigt
werden soll. Lassen Sie das Gerät vor der Reinigung erst abkühlen.
5. Lassen Sie die Netzleitung nicht vom Tisch herunterhängen, nicht
einklemmen oder mit heißen Flächen in Berührung kommen.
6. Stellen Sie das Gerät auf einer ebenen Oberfläche auf. Stellen Sie das
Gerät nicht auf erhitzte Flächen.
7. Tauchen Sie das Gerät, Netzleitung oder Netzstecker nicht ins Wasser oder
in andere Flüssigkeiten. Dadurch besteht die Gefahr eines elektrischen
Schlages.
8. Lassen Sie Kinder nicht unbeaufsichtigt mit diesem Gerät umgehen.
9. Ihr Gerät, insbesondere die Glastür, wird während des Betriebes heiß.
Fassen Sie das Gerät daher nur an dem dafür vorgesehenen Türgriff an.
10. Berühren Sie nie die Glastür, da diese auch von außen heiß wird.
11. Spritzen Sie kein Wasser auf das Glasfenster, wenn es noch heiß ist. Dies
kann zu Rissen im Glas führen.
12. Der Ofen sollte mindestens 10cm von der Wand entfernt stehen.
13. Wenn die Anschlussleitung dieses Gerätes beschädigt wird, muss sie durch
den Hersteller oder seinen Kundendienst ersetzt werden, um Gefährdungen
zu vermeiden.
14. Dieses Gerät ist ausschließlich für den Haushaltsgebrauch bestimmt.
15. Dieses Gerät ist nicht für den Gebrauch im Freien bestimmt, verwenden Sie
es nur im Haus.
16. Bewahren Sie diese Bedienungsanleitung sorgfältig auf.

BEDIENUNG
3
DEUTSCH
Funktionsstufen: 0 - AUS
- Oberhitze und Drehspieß
- Unterhitze
- Ober- und Unterhitze
2. VOR ERSTER INBETRIEBNAHME
• Entfernen Sie das gesamte Verpackungsmaterial vom Gerät.
• Nehmen Sie alles Zubehör aus dem Garraum heraus.
• Wickeln Sie die Netzkleitung auseinander und stecken Sie sie in die Steckdose.
• Schalten Sie den Ofen auf 250°C ein und wählen Sie mit dem Funktionswahlknopf beide
Heizelemente. ( )
• Lassen Sie den Ofen mit eingeschalteter Umluftfunktion für ca. 15 Minuten laufen.
• Bei der ersten Benutzung kann es zu einer leichten Geruchs- und Rauchbildung kommen.
Dies ist normal und nur von kurzer Dauer. Achten Sie auf gute Ventilation.
1. BAUTEILE UND BEDIENELEMENTE
1. Türgriff
2. Glastür
3. Griff für Grillspieß
4. Backblech
5. Grillrost
6. Drehspieß
7. Griff für Backblech
8. Thermostatdrehknopf
9. Thermostat-
kontrolllampe
10. Funktionswahlknopf
11. Timerdrehknopf
12. Schalter für Umluft
6
5
4
7
1
2
8
9
10
11
12

3. Benutzung des Ofens:
3.1. Allgemeiner Rat
• Wenn Sie backen oder grillen, empfiehlt es sich den Ofen vorzuheizen um ein besseres
Ergebnis zu erzielen
• Die Kochzeit hängt von dem Lebensmittel, der Temperatur und dem individuellen Geschmack
ab. Die in Kochrezepten angegebenen Zeiten sind reine Garzeiten. Eventuelle Vorheizzeiten
sind zu berücksichtigen.
• Wenn Sie gefrorene Lebensmittel zubereiten, überprüfen Sie die angegebenen Garzeiten.
3.2 Essen warmhalten
• Stellen Sie den Funktionknopf auf die Position
• Stellen Sie die Umluftfunktion an an.
• Stellen Sie die Temperatur auf 100°C ein.
• Schieben Sie das Grillrost in den Ofen und stellen das Essen darauf.
• Wenn Sie das Essen länger als 20 bis 30 minuten Warm halten wollen, empfielt es sich es mit
Alufolie abzudecken, damit es nicht zu trocken wird.
Lassen Sie das Essen nicht solange im Ofen, da es sonst zu trocken werden kann.
3.3 Backen (mit Umluft)
Diese Funktion ist ideal für Obskuchen, Fruchtpudding oder Torten usw.
• Schieben Sie das Gitter auf die unterste Ebene.
• Stellen Sie den Funktionknopf auf die Position
• Stellen Sie die Umluftfunktion an.
• Stellen Sie das Thermostat auf die gewünschte Temperatur ein.
• Stellen Sie die Zeituhr auf die gewünschte Zeit ein.
• Warten Sie bis der Ofen die gewünschte Temeratur erreicht hat (die Anzeigelampe erlischt
dann). Stellen Sie erst danach die Speisen in den Ofen.
• Wenn das Essen vorher fertig sein sollte, stellen Sie bitte manuell die Zeitschaltuhr auf “O”
3.4 Backen (ohne Umluft)
Diese Funktion ist ideal für Pizzen, Lasagne, Aufläufe, kleines Geflügel, alle Arten von Fisch,
Gemüsegratin und unterschiedliche Arten von Kuchen.
• Schieben Sie das Gitterrost in den Ofen.
• Stellen Sie den Funktionsknopf auf die Position
• Stellen Sie das Thermostat auf die gewünschte Temperatur ein.
• Stellen Sie die Zeituhr auf die gewünschte Zeit ein.
• Warten Sie bis der Ofen die gewünschte Temeratur erreicht hat (die Anzeigelampe erlischt
dann). Stellen Sie erst danach die Speisen in den Ofen.
• Wenn das Essen vorher fertig sein sollte, stellen Sie bitte manuell die Zeitschaltuhr auf “O”
BEDIENUNG
4
DEUTSCH

BEDIENUNG
5
DEUTSCH
3.5 Grillen
Diese Funktion ist ideal für Hamburger, Würstchen, Kotelett, Würste usw. Außerdem kann diese
Funktion zum Anbraten der Gerichte verwendet werden
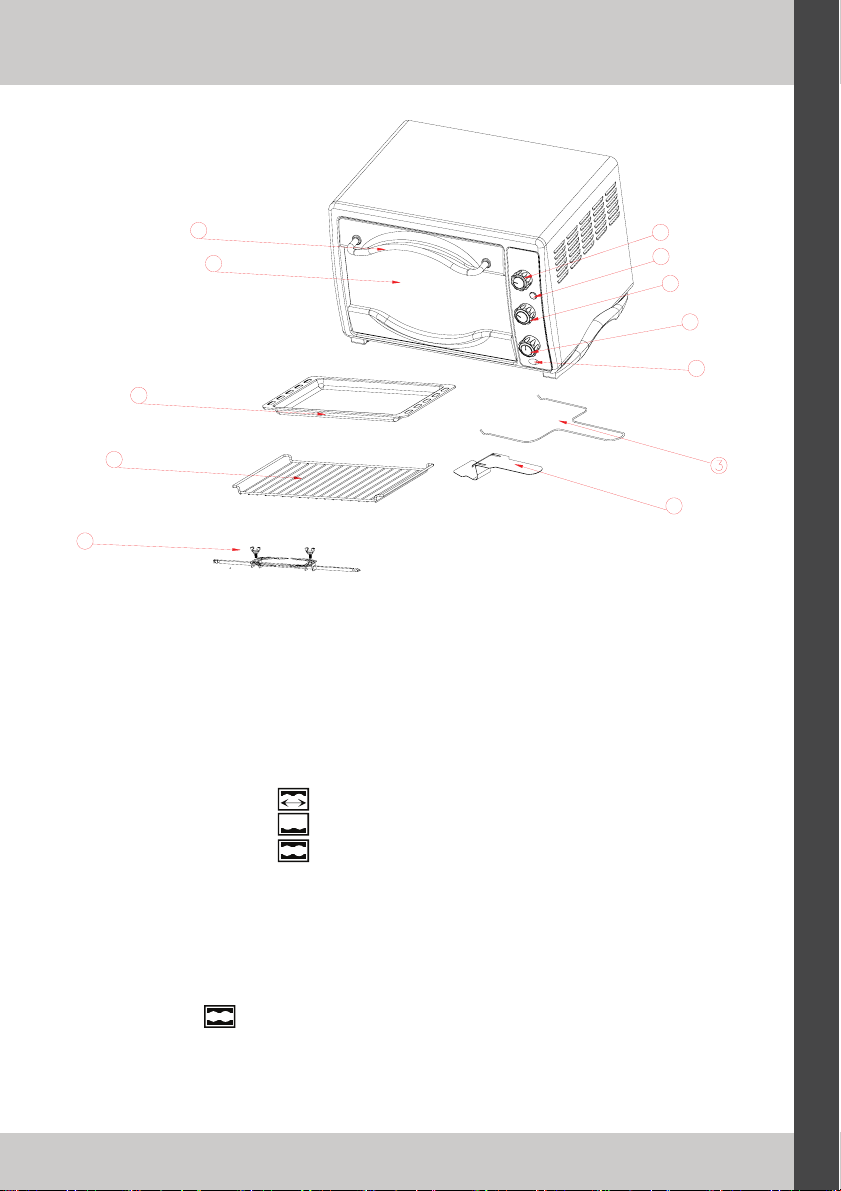
• Schieben Sie das Grillrost auf die obere Position und das Backblech direkt auf den unteren
Heizkörper ein.
Tipp: Gießen Sie 2 Glässer Wasser ins Backblech, um Rauch zu vermeiden, und um es leichter zu
reinigen
• Stellen Sie den Funktionsknopf auf die Position
• Stellen Sie das Thermostat auf die gewünschte Temperatur ein.
• Stellen Sie die Zeituhr auf die gewünschte Zeit ein.
• Heizen Sie den Ofen 5 Minuten mit leicht geöffneter Türe vor.
• Plazieren Sie das Essen auf dem Grillrost und lassen die Tür leicht geöffnet. Das Grillgut sollte
ab und zu gewendet werden.
• Wenn das Essen vorher fertig sein sollte, stellen Sie bitte manuell die Zeitschaltuhr auf “O”
3.6 Garen mit Umluft
Diese Funktion ist ideal für große pikante Torten zu kochen, alle Arten von Fleisch-basiertem Haupt-
gerichten ausgenommen Geflügel,Kartoffeln und Kuchen im allgemeinen zu braten. Diese ist auch
gut für gleichzeitig Kochen auf zwei unterschiedlichen Niveaus.
• Schieben Sie das Gitterrost in den Ofen.
• Stellen Sie den Funktionsknopf auf die Position
• Stellen Sie die Umluftfunktion an.
• Stellen Sie das Thermostat auf die gewünschte Temperatur ein.
• Stellen Sie die Zeituhr auf die gewünschte Zeit ein.
• Warten Sie bis der Ofen die gewünschte Temeratur erreicht hat (die Anzeigelampe erlischt
dann). Stellen Sie erst danach die Speisen in den Ofen.
• Wenn das Essen vorher fertig sein sollte, stellen Sie bitte manuell die Zeitschaltuhr auf “O”
3.7 Braten und Grillen mit dem Spieß
Diese Funktion ist ideal für Hähnchen auf dem Spieß, Geflügel im Allgemeinen, Braten, Schweine-
fleisch und Kalbfleisch.
• Setzen Sie das Essen auf den Spieß und fixieren es mit den beigefügten Gabeln.
• Setzen Sie das Kuchenblech auf den unteren Heizkörper um danach den Spieß in die Halte-
rung einzusetzen.
• Schließen Sie die Türe so das sie ein wenig anliegt bzw. halb offen ist.
• Der Ofen muss für diese Funktion nicht vorgeheizt werden.
• Stellen Sie den Funktionsknopf auf die Position
• Stellen Sie das Thermostat auf die gewünschte Temperatur ein.
• Stellen Sie die Zeituhr auf die gewünschte Zeit ein.
• Wenn das Essen vorher fertig sein sollte, stellen Sie bitte manuell die Zeitschaltuhr auf “O”
Der Garvorgang kann jederzeit vor Ablauf der eingestellten Zeit beendet werden, stellen Sie
dazu bitte die Zeitschaltuhr zurück auf "O".

4. REINIGUNG
• Stellen Sie den Timer nach der Benutzung wieder auf „0“, indem Sie den Drehknopf gegen den
Uhrzeigersinn drehen.
• Ziehen Sie den Stecker aus der Steckdose. Lassen Sie den Ofen wieder abkühlen.
• Nehmen Sie das Backblech oder das Bratgestell zum Waschen heraus.
• Das Grillrost und Kuchenblech können wie andere Küchengeräte mit der Hand oder in der
Spülmaschiene gereinigt werden
• Wischen Sie die Innenflächen mit einem feuchten Tuch oder Schwamm ab.
• Sie können immer einen feuchten Schwamm benutzen, um die äußeren Oberflächen zu
reinigen.
• Verwenden Sie keine Scheuermittel oder scharfe Reiniger, diese können die Oberfläche
beschädigen.
• Benutze Sie niemals Aluminiumkorrosive Produkte (Sprayreinigungsmittel), um den Innenraum
zu reinigen
Warnung: UNTER KEINEN UMSTÄNDEN darf Wasser in das Gerät gelangen.
REINIGUNG UND PFLEGE
6
DEUTSCH

TECHNISCHE DATEN
7
DEUTSCH
Technische Daten
Beschreibung: Minibackofen mit Umluft und Grill
Modell: KS8880CD
Garraum Kapazität: 20 L
Temperaturbereich: 100 - 250 °C
Timer: max. 60 Minuten
Leistungsaufnahme: 1300 Watt max.
Stromversorgung: 230V~ 50Hz
TECHNISCHE ÄNDERUNGEN JEDERZEIT OHNE ANKÜNDIGUNG
VORBEHALTEN
Hinweise zum Umweltschutz
Entsorgen Sie die Verpackung sortenrein.
Dieses Produkt darf am Ende seiner Lebensdauer nicht über den normalen
Haushaltsabfall entsorgt werden, sondern muss an einem Sammelpunkt für
das Recycling von elektrischen und elektronischen Geräten abgegeben
werden. Das Symbol auf dem Produkt, in der Gebrauchsanleitung oder auf
der Verpackung weist darauf hin.
Die Werkstoffe sind
g
emäß ihrer Kennzeichnun
g
wiederverwertbar. Mit der
Wiederverwendung, der stofflichen Verwertung oder anderen Formen der
Verwertung von Altgeräten, leisten Sie einen wichtigen Beitrag zum Schutze
unserer Umwelt. Bitte fragen Sie bei Ihrer Gemeindeverwaltung nach der
zuständigen Entsorgungsstelle.

GARANTIE & SERVICE
8
DEUTSCH
Wir gewähren Ihnen auf dieses HOME ELECTRIC Produkt
2 Jahre GARANTIE !
Für dieses Produkt übernehmen wir beginnend vom Verkaufsdatum 24 Monate Garantie für
Mängel, die auf Fertigungs- oder Werkstofffehler zurückzuführen sind. Ihre gesetzlichen
Gewährleistungsansprüche nach §439 ff. BGB-E bleiben hiervon unberührt. In der Garantie
nicht enthalten sind Schäden, die durch unsachgemäße Behandlung oder Einsatz entstanden
sind, sowie Mängel, welche die Funktion oder den Wert des Gerätes nur geringfügig
beeinflussen. Weitergehend sind Verschleißteile, Transportschäden, soweit wir dies nicht zu
verantworten haben, sowie Schäden, die durch nicht von uns durchgeführte Reparaturen
entstanden sind, vom Garantieanspruch ausgeschlossen. Bei berechtigten Reklamationen
werden wir das mangelhafte Gerät nach unserer Wahl reparieren oder gegen ein mängelfreies
Gerät austauschen. Offene Mängel sind innerhalb von 14 Tagen nach Lieferung anzuzeigen.
Weitere Ansprüche sind ausgeschlossen.
Zur Geltendmachung eines Garantieanspruches ist das Gerät frei Haus, mit dem Kaufbeleg
an unten stehende Adresse einzusenden.
Achtung! Setzen Sie sich vor einer Rücksendung immer mit uns in Verbindung, unfrei
eingesendete Pakete werden nicht angenommen!
Servicehotline für Produktreparaturen:
01805 - 22 17 84
( €0,14 / Min. Nur in Deutschland)
Falls das defekte Produkt in unser Servicecenter eingeschickt werden muß, wenden Sie
sich bitte an unsere Servicehotline zwecks Zusendung eines Retourenaufklebers.
E 2 Servicecenter GmbH
Max-Planck-Straße 13
50858 Köln

SAFETY PRECAUTIONS
9
ENGLISH
When using electrical appliance, the following basic safety precautions
should always be followed:
1. Read all instructions.
2. Before use check that the voltage power corresponds to the one shown on
the appliance nameplate.
3. Unplug from outlet when not in use and before cleaning. Allow to cool before
cleaning the appliance.
4. Do not let cord hang over edge of that table or counter, or touch hot surface.
5. Place the appliance on the flat surface. Do not place on the heated surface.
6. Close supervision is necessary when any appliance is used by or near
children.
7. Do not touch hot surface. Use handle or knobs only.
8. When in use, the oven is hot! Never touch the oven and the glass door.
9. Don’t sprinkle water on the glass window whilst it is still very hot, this could
cause the glass to crack.
10. A distance of at least 10cm should be maintained between the oven and the
wall.
11. Do not operate any appliance with a damaged cord or plug or after the
appliance malfunctions. Return the appliance to the nearest authorized
service center for examination, repair or adjustment.
12. If the supply cord is damaged, it must be replaced by the manufacturer or its
service agent in order to avoid a hazard.
13. Do not use outdoors.
14. Save these instructions.

OPERATION
10
ENGLISH
2. Before first time use:
• Remove all packaging material from the appliance
• Remove all accessories (rack, tray, etc.) from the oven.
• Wipe the oven and the accessories with a damp cloth and dry them.
• Fully unwind the power cord and plug it in the power socket.
• Set the function control to
• Switch on the CONVECTION.
• Set the temperature to 250°C.
• Use the timer to let the appliance run (without any food or accessories in it) for about
15 minutes.
• If the unit is used for the first time, it may slightly emit smell and smoke. This is normal and only
lasts for a short time. Make sure to use the appliance in a well ventilated area.
1. GUIDE TO THE PARTS
1. Door Handle
2. Glass Door
3. Rotisserie Handle
4. Baking Tray
5. Grill Rack
6. Rotisserie Spit
7. Tray & Rack Handle
8. Thermostat Control
9. Pilot Light
10. Function Selector
11. Timer Control
12. Convection Switch
6
5
4
7
1
2
8
9
10
11
12

OPERATION
11
ENGLISH
3. Using The Ovens:
3.1 General Advice
• When baking or grilling, it is advisable to always pre-heat the oven to the desired temperature,
to get the best possible cooking results.
• Cooking time depends on the food quality, the food temperature and individual taste. The time
shown in cooking recipes and tables is only indicative and doesn’t consider the time needed to
pre-heat the oven.
• When cooking freeze-dry foods, check the time suggested in the products’ packaging.
3.2 Keeping food warm
• Set the function selector knob to position
• Turn on the convection fan.
• Set the temperature to 100°C.
• Insert the wire rack, and place the food on top of it.
• If the food needs to be kept warm for longer than 20-30 minutes, it should be covered with
tinfoil, to prevent it from becoming too dry.
Do not leave the food in the oven for a long time as it may become too dry!
3.3 Baking
This function is ideal for flans, fruit puddings, quiche, pies, etc.
• Insert the wire rack to the bottom position.
• Turn the function selector knob to position
• Turn on the convection fan.
• Set the thermostat at required temperature.
• Set the timer knob to the required cooking time.
• Wait for the oven to reach the set temperature (the pilot light goes off), then put the food in.
• If cooking is completed before the end of the set time, please manually turn the timer knob to
position “O”.
3.4 Traditional oven cooking
This function is ideal for cooking great pizzas, lasagne, first courses au gratin, small fowl, all kinds
of fish, stuffed vegetables au gratin and different kinds of cakes.
• Insert the wire rack to the bottom position.
• Turn the function selector knob to position
• Set the thermostat at required temperature.
• Set the timer knob to the required cooking time.
• Wait for the oven to reach the set temperature (the pilot light goes off), then put the food in.
• If cooking is completed before the end of the set time, please manually turn the timer knob to
position “O”.

OPERATION
12
ENGLISH
3.5 Grilling
This function is ideal for grilling hamburgers, chops, frankfurters, sausages, etc. In addition, this
function may be used for browning foods: coquilles saint-jacques, etc.
• Insert the wire rack to the top position and the baking tray onto the bottom heating element.
Hint: We suggest pouring two glasses of water into the baking tray so as to avoid smoke and bad
stains resulting from burning fat, and for easy cleaning.
• Set the function selector knob to position
• Set the thermostat at required temperature.
• Set the timer knob to the required cooking time.
• Preheat the oven for about 5 minutes with slight ajar of the door.
• Place the food on the wire rack, and close the door, leaving it ajar, and remember to turn the
food half way during cooking.
• If cooking is completed before the end of the set time, please manually turn the timer knob to
position “O”.
3.6 Convection oven cooking
This function is ideal for cooking great savoury pies, all kinds of meat-based main dishes (except
small fowl), roast potatoes and cakes in general. It is also good for simultaneously cooking on two
different levels.
• Insert the wire rack to the bottom position.
• Turn the function selector knob to position
• Turn on the convection fan.
• Set the thermostat at required temperature.
• Set the timer knob to the required cooking time.
• Wait for the oven to reach the set temperature (the pilot light goes off), then put the food in.
• If cooking is completed before the end of the set time, please manually turn the timer knob to
position “O”.
3.7 Rotisserie with the spit
The function is ideal for cooking chicken on the spit, fowl in general, roast pork and veal.
• Place the food on the spit and hold it firm by using the forks (for best results, tie down the meat
using kitchen string).
• Place the baking tray onto the bottom heating element, then insert the spit on the spit mount
inside the oven.
• Close the door, leaving it slightly ajar (half-open).
• Then oven does not need to be preheated for this function.
• Turn the function selector knob to position
• Set the thermostat at required temperature.
• Set the timer knob to the required time.
Once cooking is completed, please manually turn the timer knob to position “O”.

CLEANING
13
ENGLISH
4. CLEANING
• After use, set timer knob counter counterclockwise to “0” position.
• Allow the appliance to cool completely before cleaning. Unplug cord from the socket.
• Remove the plug from the power socket.
• Cool the oven down to the room temperature.
• Remove all accessories from inside the oven.
• The wire rack, baking tray and diet grill may be washed as other kitchenware, either by hand or
by dishwasher.
• You can always use a moist sponge to clean the outside surfaces. Avoid using abrasive
products that could damage the finish. Ensure water or soap does not penetrate the oven
inside through the vents of the oven.
• Clean the oven surface and interior with a damp cloth or a sponge and take the tray, broil rack
out to wash.
• Never use aluminum-corrosive products(spray detergents) to clean the inside aluminum walls
and never scrape the walls with sharp or pointed objects.
Warning: ON NO ACCOUNT should water be allowed to get inside the oven.

SPECIFICATION
14
ENGLISH
Technical specifications
Description: Mini baking oven with convection
and rotisserie grill
Model: KS8880CD
Oven capacity: 20 L
Temperature range: 100 - 250 °C
Timer: max. 60 minutes
Power consumption: 1300 Watt max.
Power supply: AC 230V~ 50Hz
SPECIFICATIONS SUBJECT TO CHANGE WITHOUT NOTICE
Disposal
Dispose of the packaging in the proper manner.
If at any time in the future you should need to dispose of this
product please note that Waste electrical products should not be
disposed of with household waste. Please recycle where facilities
exist. Check with your Local Authority or retailer for recycling
advise.
(Waste Electrical and Electronic Equipment Directive)

WARRANTY & SERVICE
15
ENGLISH
For the HOME ELECTRIC product
we grant a Warranty of 2 years
For this appliance we grant a warranty of 24 months, starting with the date of sale
regarding defects due to faulty manufacture or material. Your legal warranty claims
according to §439 ff. BGB-E are not affected by this. This warranty does not accept
defects due to inappropriate treatment or use as well as defects which do not
influence the function or the value of the product essentially. Further on we do not
grant a warranty for wear parts or damage in transit as well as for defects due to
repairs which have not been effected by us. In case of legitimate claims we will
decide whether to repair the device or to send you a new one. Apparent defects have
to be indicated within 14 days after delivery. Additional claims will not be accepted.
In order to assert your warranty claims please send the device
together with the sales slip carriage paid to the below address.
Please contact us before sending the device to us as
any sending which is not prepaid will not be accepted.
Service hotline:
0180 5 - 22 17 84 (€ 0,14 / Min.) (Germany only)
If the product needs to be sent to the servicecenter, please call
service & support to obtain a return sticker
E 2 Servicecenter GmbH
Max-Planck-Straße 13
50858 Köln

HOME ELECTRIC
KS8880CD
VERSION SW01-2007 REV A01
HE-KS8880-D-E-A5.PDF (C) 2007
Hergestellt für:
Centor Warenhandels GmbH, 50603 Köln, Germany
Table of contents
Languages:
Other Home electric Oven manuals
Popular Oven manuals by other brands

NEFF
NEFF B1421N2GB How to connect

Electrolux
Electrolux E30EW75GPS - Icon 30" Professional Series Single Electric Wall... Specifications

Beko
Beko BDGC 680 user manual

Amica
Amica 10221 3QX Series instruction manual

Westinghouse
Westinghouse GOP474 owner's manual

Bosch
Bosch HBA2340 0J Series instruction manual