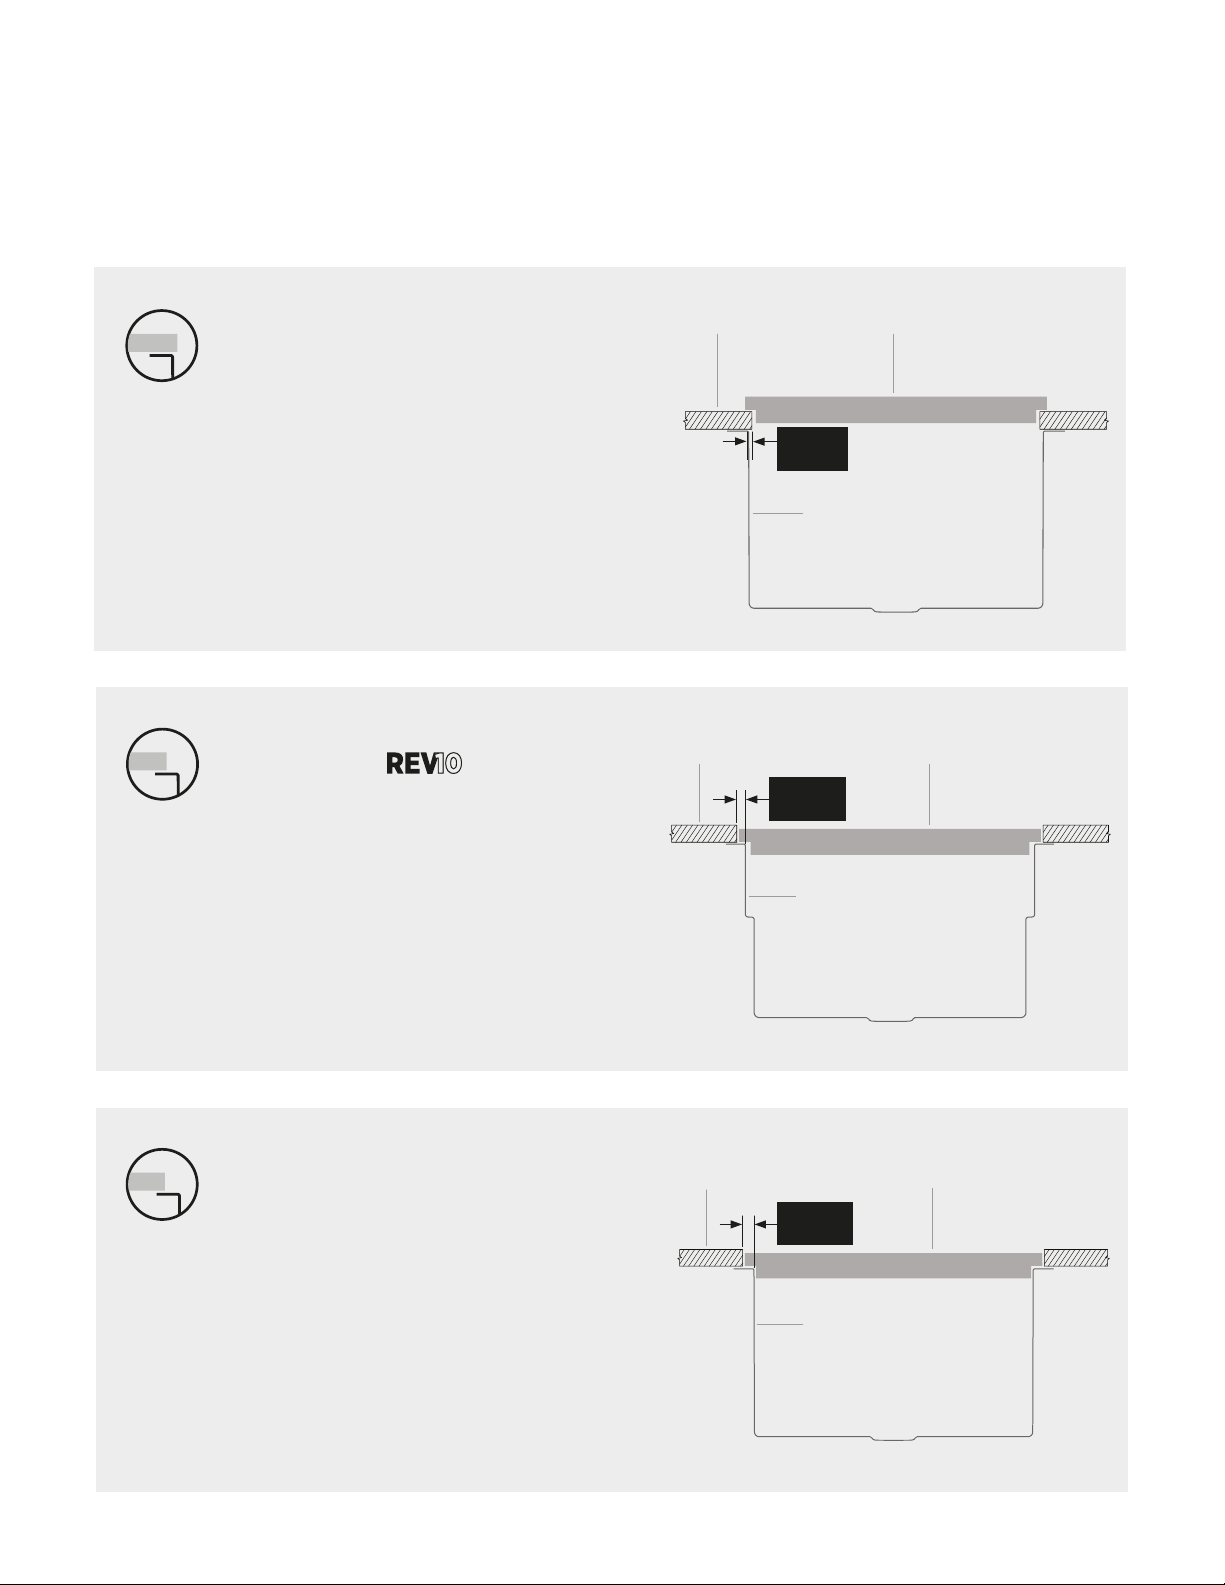
HOME REFINEMENTS JULIEN Assembly instructions

INSTALLATION AND CARE GUIDE
STAINLESS STEEL SINK FOR UNDERMOUNT INSTALLATION
EN


3
CONGRATULATIONS ON THE ACQUISITION OF YOUR NEW
HOME REFINEMENTS SINK.
At Home Refinements, all our products are manufactured with the greatest care and have been tested to ensure their highest quality. Each sink
model has been created to enhance the functionality and aesthetics of your kitchen.
FOR QUESTIONS REGARDING THIS SINK, ITS MAINTENANCE, ITS WARRANTY OR FOR ASSISTANCE DURING ITS
INSTALLATION, PLEASE CONTACT A MEMBER OF OUR CUSTOMER SERVICE.
1 866 901-5624
customerser[email protected]
IMPORTANT
This guide contains essential information about maintenance and warranty and should be kept,
even after your sink is installed.

4
BEFORE YOU START 5
INSTALLATION OF AN UNDERMOUNT SINK
PLAN AHEAD 6
COUNTERTOP SELECTION AND MOUNTING 7
INSTALLATION TYPE 8
STEPS 1 TO 5 9
INSTALLATION OF A SINK WITH A LA CARTE OPTIONS
APRONFRONT 12
BUILT-IN DRAINBOARD 14
BUILT-IN DRAWER 14
UNDERMOUNT REVEAL INSTALLATION 15
UNDERMOUNT REVEAL
FOR SMARTSTATION 15
TOPMOUNT / FLUSHMOUNT 16
HOLE(S) FOR FAUCET AND ACCESSORIE(S) 16
DIVIDER 17
ADA COMPLIANCE 17
POSITION OF THE DRAIN(S) 17
PRECAUTIONS 18
CLEANING 18
MAINTENANCE 19
WARRANTY 19
TABLE OF CONTENTS

5
Cutout
template*
*Included and available online at homerefinements.ca
Cloth Soft
cleaner
Sealant
(silicon)
Masking
tape
PencilSafety
glasses
Electric
drill
Measuring
tape
Mounting
hardware**
**Installation brackets (10) and self-tapping screws (10) included
BEFORE YOU START
PLEASE :
• Check local plumbing and building regulations for approved procedures and use of appropriate accessories.
• Inspect the sink for potential damage. If you are concerned about a specific area covered with a protective
film, remove it to verify the sink condition. After inspection, put the protective film back in place.
• Return the sink to its box until you are ready to install it.
• Determine the type of installation required (réf. page 28).
• If your countertop is made of marble, granite, quartz or a solid surface, you need to ask your manufacturer to
pre-drill holes underneath to allow the installation of threaded inserts. Please screw the mounting brackets
into these holes, ensuring that all brackets are used and evenly distributed between the sink's front, back,
and sides. Please refer to your countertop installer for the type of hardware to use.
WARNING
For best results, enlist the help of a professional installer to cut the countertop, install the sink, and connect it.
Improper installation will invalidate the warranty.
Julien recommends that the sink be installed in such a way that it can be removed without damaging the
countertop.
Please note that sinks with a front-to-back dimension of 18" may require a custom cabinet to ensure adequate
faucet clearance.
WHAT YOU WILL NEED

6
PLAN AHEAD
Make sure the inside width of the cabinet (side to side) is a minimum of the overall left-to-right sink dimension + 2"
to allow for bracket installation. Make sure enough space is left behind the sink for faucet clearance.
A printed cutout template is supplied with the sink and a digital format is available online at homerefinements.ca*.
We strongly recommend using the digital template to obtain the most accurate cutout possible. The dimensions
provided are designed for an overhang installation.
The cutout template supplied with our SmartStation REV10 sinks allows for a 3/8” (10 mm) reveal installation.
Refer to page 28 for more details on possible types of installations.
Sink left-to-right overall dimension
Minimum inner cabinet width = Sink left-to-right overall dimension + 2"
Installation brackets (10)** Required faucet clearance
INSTALLATION OF AN
UNDERMOUNT SINK
* Not available for A la Carte and Signature sinks
** The quantity included may vary in our A la Carte and Signature sinks.
WARNING
DID YOU CHOOSE A SINK WITH A LA CARTE OPTIONS?
If you have purchased a sink with one or more A la Carte options, you may need to make alterations to the cutout
template of your base sink. See pages 10 à 15 for details about the adjustments required for your options.

7
STONE, QUARTZ OR SOLID SURFACE
STONE, QUARTZ OR SOLID SURFACE WITH WOOD BACKING
BRACKET INSTALLATION
Pre-drilled hole
Pilot hole
Wood backing
Stone, quartz or solid surface
Bracket*
Bracket*
Sink
Sink
Threaded insert
Silicon
Silicon
Self-tapping screw
Washer
Self-tapping screws*
Overhanging countertop approx. 1/8" or
recessed installation REV10 (3/8")
Overhanging countertop approx. 1/8" or
recessed installation REV10 (3/8")
* Included
* Included
1-1/16"
[27 mm] Top view—bracket
2-1/16"
[53 mm]
1-1/16"
[27 mm]
11/16"
[18 mm]
COUNTERTOP SELECTION AND MOUNTING FOR

1/8''
3/8''
3/4''
8
INSTALLATION TYPE
Please make sure you select the appropriate installation type for the product you have chosen.
UNDERMOUNT OVERHANG 1/8"
This installation provides a 1/8” (3mm) overhang of
the countertop over the flange of the bowl and matches
the cut-out provided with your sink. All our undermount
sinks are designed for a 1/8” overhang installation with
the exception of the SmartStation REV10 collection. Our
standard installations will guarantee a perfect fit with our
sink accessories.
UNDERMOUNT REVEAL FOR
SMARTSTATION
The default installation for our SmartStation REV10 sinks
leaves a positive reveal of 3/8” (10mm) on the front and
back of the sink and a 1/8” (3mm) overhang on the sides.
This installation lets you place your sink accessories on
the exposed flange, allowing the countertop to act as a
stopper for the accessories. Our standard installations will
guarantee a perfect fit with our sink accessories.
UNDERMOUNT REVEAL OPTION**
Choosing the REV option will extend the flanges of 3/4"
at the front and back of the sink. During the installation,
a positive reveal of 3/4" (19 mm) on the front and back of
the sink must be created and we recommend a 1/8" (3 mm)
overhang on the sides.
This option is necessary if you intend to use your sink’s top
flange as an accessory rail. It can also be added to any of
our sinks that were originally designed for a standard 1/8”
overhang installation.
*Excludes À la Carte Home Refinements sinks ordered with the REV option. In this case, please refer to the cutout template supplied.
** Option not available for SmartStation and SocialCorner REV10 sinks that are already reveal installed.
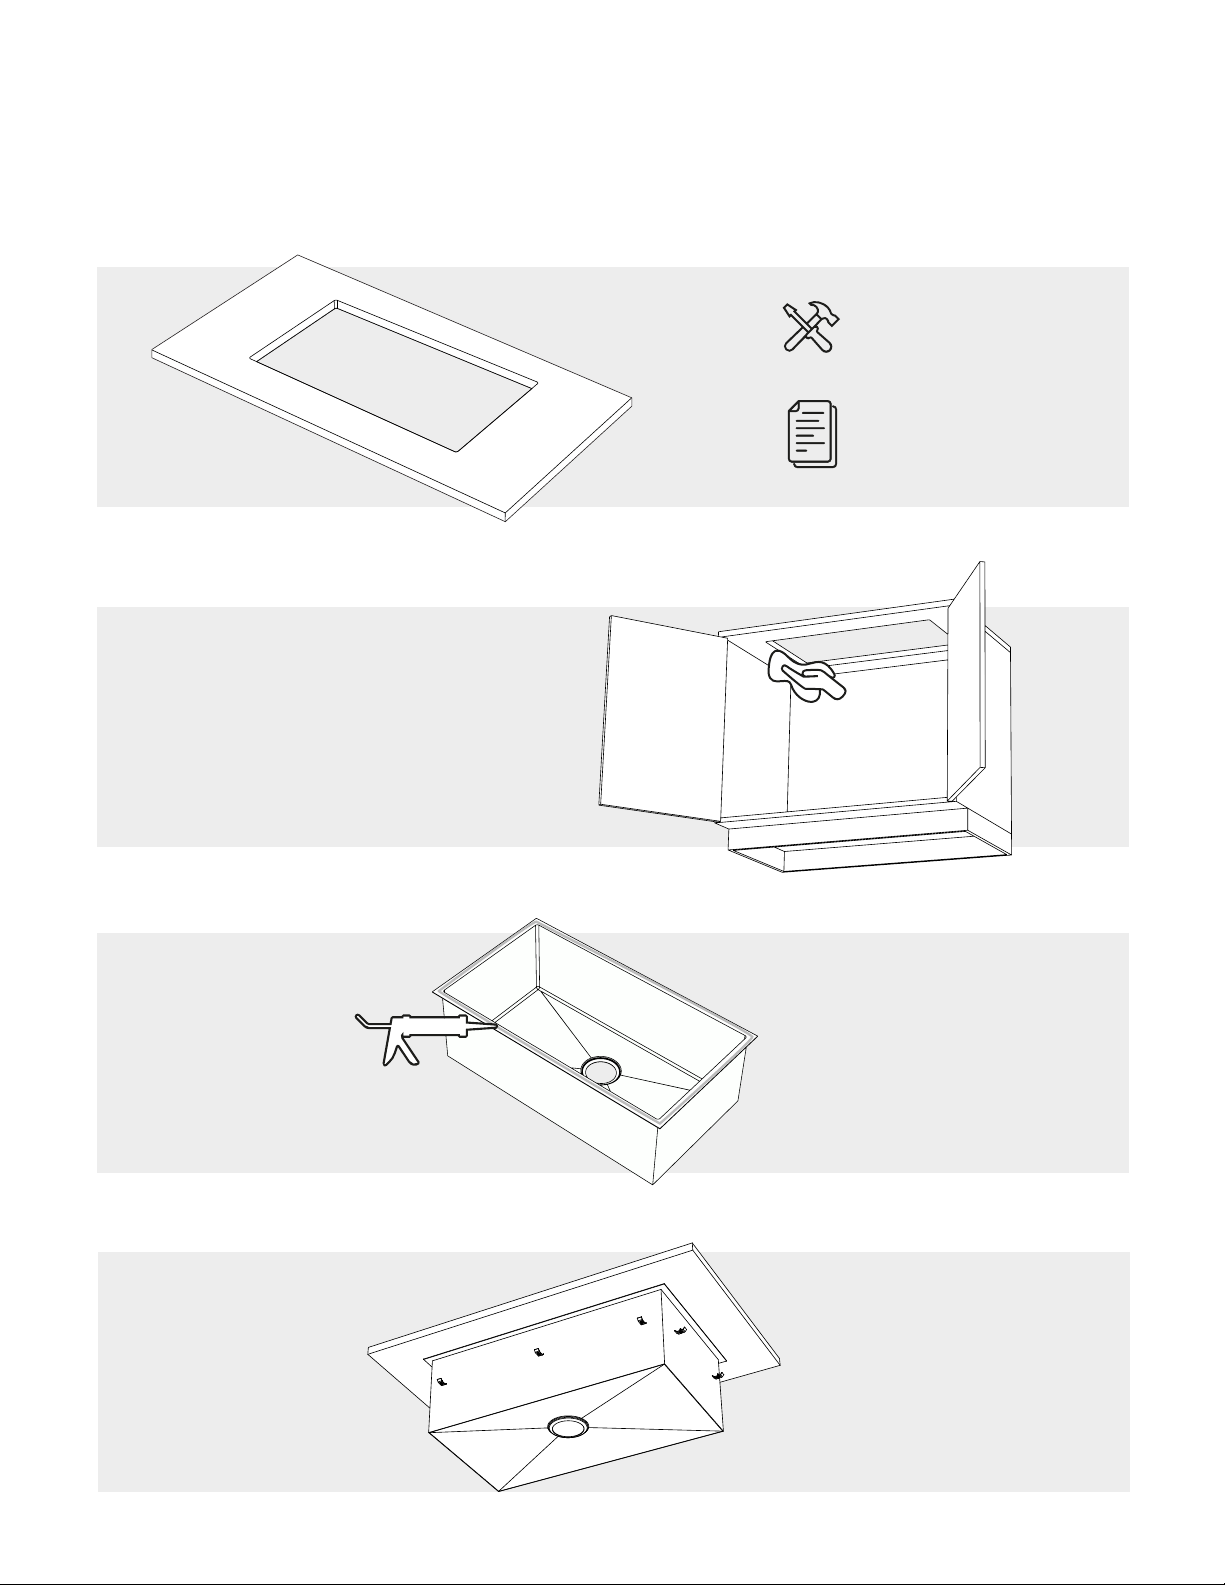
No cut-out template is provided for À la Carte and Signature sinks.
Confirm that your cabinet size will accommodate the bowl and faucet installation.
1/8''
[3 mm]
Sink
Sink accessories
Sink accessories
Countertop
Countertop
3/8''
[10 mm]
3/4''
[19 mm]
Sink
Sink accessories
Countertop
Sink

9
STEPS
2. Clean the underside of your countertop and the sink flange.
3. Apply a sealant to the upper sink flange, then place the sink in the desired location.
1. Cut your countertop according to the template*. Plan ahead for threaded insert holes if you are installing your sink in
a stone countertop. Consider using the digital template available on our website.
* Not available for A la Carte and Signature sinks
4. Install the anchors. Verify that you are using the appropriate hardware for the countertop material you’ve chosen.
To ensure you choose the right
countertop cutting tools, refer to
your supplier.
Use the provided
cutout template*.

10
5. If necessary, remove excess silicone and allow to dry.
FINISHING UP
The drains oered by Home Refinements are specially designed to ensure the sink optimum drainage. We also
oer a full range of faucets and accessories to complete your dream kitchen. Please refer to your sink dealer or visit
homerefinements.ca to discover our product oering.
Once you’ve finished, remove the protective film from your sink. And enjoy!

A
A B
B*
A
1/8''
3/4''
11
INSTALLATION OF A SINK
WITH A LA CARTE OPTIONS
If you have a sink with one or more A la Carte options, always start with the cutout template for your base sink, then
make the necessary adjustments according to your chosen options.
APRONFRONT
Home Refinements apronfront sinks are designed for a 3/4" reveal installation on the rear ledge, ensuring an optimal fit
of our Home Refinements accessories on the sink ledge.
* Method A can also be used on the rear ledge for installation without accessories.
UAF / UAC

12
INSTALLATION WITH SOLID SUPPORT
1. Make a 3-sided frame to support the flanges of the sink. The inner dimensions of the frame should be 1/2" larger than
the top of the bowl.
Measure the height of the apron, then install a support underneath.
Support
Frame
Apron height
INSTALLATION WITH BRACKETS
Follow the installation steps for a standard undermount sink on pages 29 à 30. Please note that À la Carte sinks do not
include cutout templates and as such, it is best to wait until you have your sink before cutting your countertop.
Apronfront sinks can be installed in several ways. If you decide to use a method other than the one recommended by
Home Refinements, the countertop cutout will be dierent from the one illustrated in this installation guide.
Minimum inside cabinet width = Sink left-to-right overall dimension + 2"
*It’s best to wait until the sink position in the cabinet has been finalized before measuring the countertop cutout.
Sink left-to-right overall dimension
Faucet clearance
Sink borders
Countertop cutout

13
2. Fasten the frame to the cabinet, leaving 1/16” free above it and ensuring it is level.
Frame
Cabinet
3. Place the sink on the frame.
4. Measure the countertop. Refer to the sink to determine the cutout required for your desired installation.
Sink
Sink with apronInner bowl of your base sink
model without options
1/16''
[1,5 mm]
1 1/2"
[38,1 mm]
1 1/2"
[38,1 mm]
3/4"
[19,1 mm]

14
Modèle d'évier sans options
DB124 / DB224
DB118 / DB218
DB112 / DB212
BUILT-IN DRAINBOARD
Use the diagram below to determine the dimension you need to add to the cutout template of the sink model you
chose depending on the width of the drainboard you selected. Only the width will be aected by this change. The
front-to-back dimension of the cutout will remain the same.
BUILT-IN DRAWER
If this is the only option added, use the cutout template of your base sink model as is. Refer to the technical sheet for
the recommended cabinet.
12"
[305 mm]
24"
[610 mm]
18"
[457 mm]
3-5/16''
[84.2 mm]
4-1/8''
[104.6 mm]
12-5/8"
[322 mm]
6-1/4"
[158 mm]
12" [305 mm]
3/4"
[19 mm]
7/8"
[22 mm]
1"
[25 mm]
18" [457 mm]
24" [610 mm]
Vues de coupe (face)
Section views (front)
Closed Open
DB1XX / DB2XX
DW1 / DW2
Gabarit de découpe

15
Cutout for 3/4”
REVEAL
Base sink
model cutout
Variable
7/8" [22 mm]
7/8" [22 mm]
UNDERMOUNT REVEAL INSTALLATION
If you’ve chosen a sink with a reveal option, add 7/8” (22 mm) to the front and back of the cutout template for your
base sink model. Center your sink in the cutout with a space of 3/4” at the front and back so you have room for your
Home Refinements accessories. The cutout width remains the same.
REV
3/4" [19 mm]
WARNING
IS YOUR SINK A SMARTSTATION ?
If you have a SmartStation REV10 sink, use the cutout template supplied to ensure proper installation. The
SmartStation sinks require a 3/8” reveal.
Front-to-back: Reveal 3/4” [19 mm]
Sides: Overhang 1/8” [3 mm]
Front-to-back: REVEAL 3/8” [10 mm]
Sides: Overhang 1/8” [3 mm]
Cutout template
3/8" [10 mm]
*Use the cutout template supplied

16
HOLE(S) FOR FAUCET AND ACCESSORIE(S)
Ensure you have your sink to validate the hole location before drilling your countertop.
HP1 HP2 HP3 HP4 HP5
3"
[76.2 mm]
3"
[76.2 mm] 4"
[101.6 mm] 4"
[101.6 mm]
HPX
TOP-MOUNT/FLUSHMOUNT
If you’ve chosen a sink with a top-mount installation option, add 5/8” to the front, back, and sides of your base sink
model’s cutout template.
Cutout for top-mount installation
Cutout template for sink model without options
Top-mount sink
5/8''
[16 mm]
5/8''
[16 mm]
TF

17
ADA COMPLIANCE
If you’ve chosen an ADA-compliant sink, follow the regular installation procedure for an undermount installation.
Before installing your plumbing, plan for a tank depth of 5 1/2".
DIVIDER
If you have chosen a sink with a 1"-wide divider option, follow the regular installation method for an undermount
installation.
For a 4"-wide divider, use the diagram below to modify the cutout template for your base sink model.
POSITION OF THE DRAIN(S)
If you’ve chosen a sink with a relocated drain option, follow the regular installation procedure for an undermount
installation. Plan your plumbing according to your chosen drain(s) location.
Cutout for 4" divider
Cutout template for base sink
model without options
Variable
3"
[76 mm]
4"
[102 mm]
3"
[76 mm]
DVX
ADA
DPX
Cutout template

18
PRECAUTIONS
Acidic-based or chloride-based products : Stainless steel is vulnerable to hydrochloric and sulfuric acid, as well as other strong acids and
chlorine-based products. Please do not use the following products :
• Construction chemicals
• Solvents (ex: plumbing PVC solvents, etc.)
• Photographic developing liquids
• Denture cleansers
• Grout and stone cleaners
• Silver cleaners
• Non-diluted bleach
• Household cleaners containing chlorine
• etc.
These products can cause discolouration or corrosion. If one of the above products comes into contact with stainless steel, wash it immediately
with plenty of water and dry it with a soft cloth.
Ordinary steel and carbon-based contaminants : Avoid leaving cans, steel wool, scouring pads (ex: S.O.S.), etc., in contact with stainless steel.
These can leave small steel particles on the surface and contaminate the stainless steel, causing rust stains.
Corrosive food : Citric fruit juices (ex: lemon), damp salt, and vinegar, among others, should not be left in contact with stainless steel for extended
periods as they can create corrosion.
Minerals : Saltwater can cause rusting on stainless steel that is not marine grade. It is recommended to use a 316 grade for marine applications.
Jullien oer this grade through its Signature concept. Do not hesitate to contact us for more information.
Rubber mat : Do not place a rubber mat under your sink. Food, water, and cleaning products can cling to it and create stains.
CLEANING
Daily cleaning : Julien recommends using Julien Cleaner and Polish, available at your sink retailer, for best results. Otherwise, use a well-wrung-out
damp cloth, previously soaked in soapy water, and wipe toward the metal grain. Rinse with clear water and dry.
NB : Home Refinements sinks are considered “flat-bottom bowls.” Even if their bottom surface is pitched toward the drain hole to ensure adequate
water draining, it is perfectly normal that some drops of water stay on the surface. Completely dry the sink to avoid water spots.
Oil or grease marks : Rub the surface with a cloth soaked in a mix of water and soap or water and detergent that is safe on stainless steel. Rinse
with clear water and dry. If a stain remains, consider adding a solvent such as acetone, methyl alcohol or mineral spirit to the mix. Review the
manufacturer's recommendations to ensure the solvent is safe on stainless steel.
Fingerprints : If a regular cleaning with soapy water cannot remove fingerprints, spray a glass cleaner or a household detergent on the surface and
rub it with a soft cloth. Rinse with clear water and dry.
Neglected surfaces, grime deposits, stubborn spots, light discolouration, light rust staining, and water spots : Use a non-abrasive cream or a
mild polish with a soft cloth or a sponge and rub in the direction of the metal grain. Rinse with clear water and dry. Be careful not to use abrasive
scouring powders or pastes, which can damage stainless steel.
Heat stains or heavy discolouration : Use a non-abrasive cream, a mild polish or a scu-free scouring pad such as “Scotch-Brit e®” (the blue one)
and rub in the direction of the metal grain. Rinse with clear water and dry.

19
MAINTENANCE
Regular cleaning : It is impossible to wear out stainless steel by cleaning it too often. It is even the best way to preserve its aesthetics and
corrosion resistance attributes. Ensure you clean your sink before it requires an aggressive cleaning due to accumulated grime deposits.
Scratching : Even if Home Refinements stainless steel is a very high-quality material, it is still susceptible to scratches. To prevent scus and
scratches, we recommend using a grid to protect the bottom of the bowl, available at your sink retailer. To mask scratches on stainless steel, gently
rub the surface toward the metal grain with a fine abrasive pad such as “3M Scotch-Brite®.” This will help align and blend the new scratch pattern
with the original finish.
WARRANTY
Julien may, at its sole discretion, repair, replace or make adjustments to the Product or components proven to be defective to restore them to
good working condition.
In no event, even if the Product or components are found to be defective, shall Julien's liability exceed the price paid for the Product. Julien
reserves the right to inspect the Product installation before the replacement or repair of the Product or its parts. Julien may, at its discretion,
require pictures before analyzing the claim. This limited warranty is null and void if the Product or components have been repaired, altered or
modified other than by Julien or under its supervision.
This limited warranty replaces any other warranties, expressed or implied, including implied warranties of merchantability or fitness for a particular
purpose. Laws governing product warranties may vary from one state or province to another. This warranty is not intended to contravene the
public order and shall not be so interpreted. This limited warranty extends only to the original owner/end-user in residential applications and is
not transferable to any subsequent purchaser. In the event of a warranty claim, original proof of purchase (sales receipt) will be required. Shipping
and handling costs (for returning the Product or its components for repairs or to replace the Product or its parts) are not covered under this
limited warranty. Also excluded from this limited warranty is any labour, workmanship or other costs incurred in connection with the Product or
components removal, repairs, replacement, adjustment or installation, and any incidental or consequential damages.
Attention
The warranty will be null and void for any damage resulting from an installation that does not comply with these instructions, and Julien will not be
held responsible for any costs incurred. In the event of a limited warranty claim, original proof of purchase will be required—save the original sales
receipt.
STAINLESS STEEL SINKS
Julien oer a limited LIFETIME warranty on the fixed components of its stainless steel sinks, ensuring them against defects of material and
workmanship. This warranty is limited to defects or damages from everyday residential use. Julien will not be held responsible for defects or
damages caused by improper installation.
This warranty does not cover the following points :
• Surface corrosion (chemical or natural)
• Scus or scratches
• Damage caused by misuse, abnormal or abusive use, neglect or negligence.
• Dents, deformations caused by the impact of any object
• Common signs of wear and tear
• Improper installation, care and maintenance
• Commercial use
• Damages caused by environmental factors
• Damages linked to shipping or freight
If you believe you have a warranty claim or for more information on the warranty of our products, please contact our customer service.
1 866 901-5624
serviceclientele@julien.ca

20
955, rue Lachance, Quebec (Quebec) Canada G1P 2H3
T 1 866 901-5624 · 418 687-3630 | F 1 866 397-9090 · 418 687-9129
homerefinements.ca
Product no. ⁄ N° produit : 991000972 © Julien 2023 – All rights reserved. ⁄ Tous droits réservés.
Other manuals for JULIEN
3
Table of contents
Popular Bathroom Fixture manuals by other brands

Vanico Maronyx
Vanico Maronyx FUZION installation guide

Whale
Whale INSTANT MATCH PREMIUM SDP303T Installation guidelines

Luxier
Luxier DKPL-6 quick start guide

Hans Grohe
Hans Grohe Metropol 32517 1 Series Installation/User Instructions/Warranty

Symmons
Symmons Unity S-6603 Operation & maintenance manual

BELLOSTA
BELLOSTA romina 0301/2/C installation instructions