Home Skinovations ToothWave H7001 User manual

™
DentalRF
Technology
ToothWave
H7001
Patent protected
technology by
USER MANUAL
MODE D’EMPLOI
MANUAL DEL USUARIO
EN
ES
FR
TM

Silk'n ToothWave
(i)
#1
#3
#4
#5
#8
#6
#7
#2

EN
1
Table of contents
1. Warnings and precautions .................................................2
2. Contraindications ...............................................................5
3. Get to know the device.......................................................6
3.1 Indications for use ...................................................................................................6
3.2 Clinical summary data .........................................................................................6
3.3 Package contents.....................................................................................................6
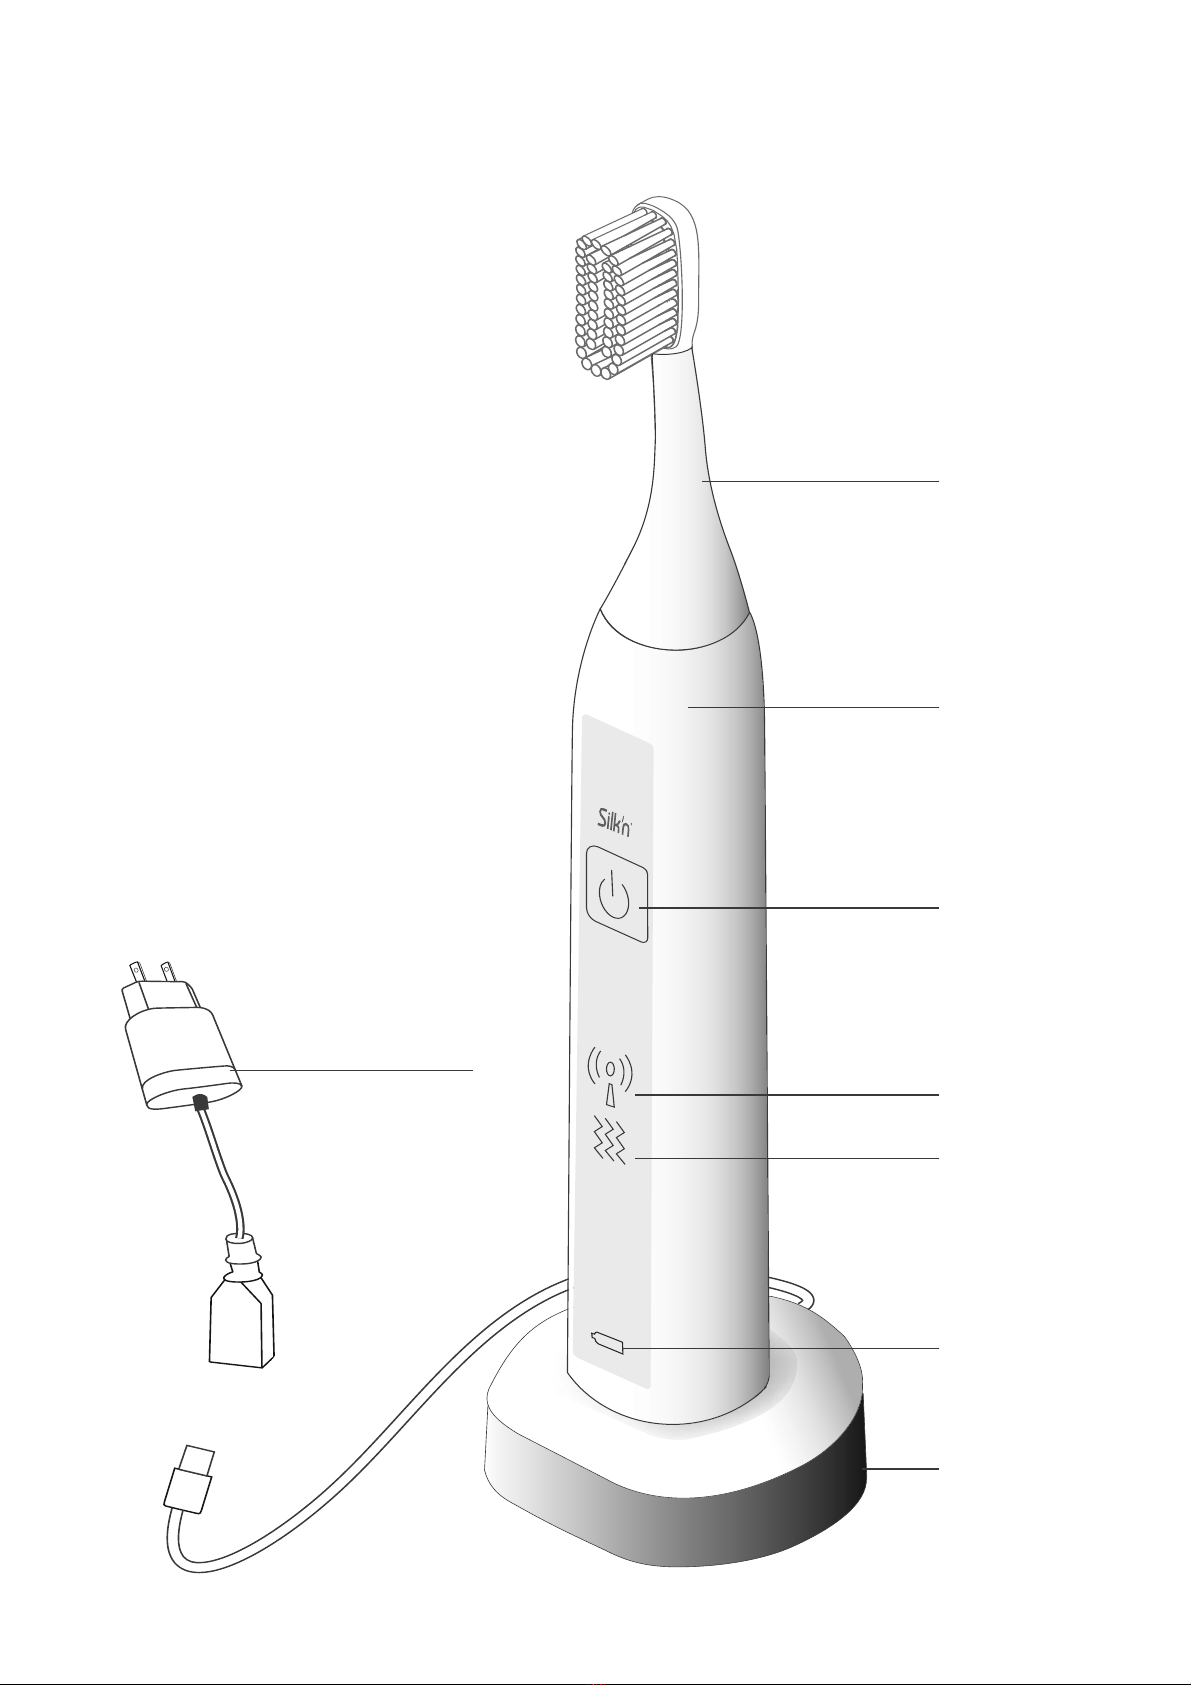
3.4 Device controls & settings..................................................................................7
3.5 The brush head .........................................................................................................8
3.6 Device charging........................................................................................................9
4. Treatment plan....................................................................9
5. What to expect with the device .......................................10
6. Get started!........................................................................10
7. Maintenance......................................................................11
7.1 Routine maintenance.........................................................................................11
7.2 Maintenance of the RF contact....................................................................11
7.3 Cleaning the charging cradle .......................................................................12
7.4 Replacing the brush head ...............................................................................12
8. Parts & consumables ........................................................13
9. Troubleshooting ...............................................................13
10. Customer service ..............................................................14
11. Warranty ............................................................................14
12. Disposal .............................................................................14
12.1 Battery removal......................................................................................................14
12.2 Packaging...................................................................................................................17
12.3 Device ..........................................................................................................................17
13. Specications ...................................................................17
14. Signs & symbols ...............................................................19
15. Labeling.............................................................................20
16. Output power curves .......................................................20
17. EMC Technical results .......................................................21
18. FCC Declaration of Conformity ........................................22
19. Legal notice .......................................................................23

EN
2
1. Warnings and precautions
URead the manual in full before use, and refer
to it if you are in any doubt about how to
use the device safely.
UThe device is for home-use. The handle
may be used by multiple persons, but for
reasons of hygiene, each user must use their
own brush head (see section 7.4 Replacing
the brush head).
UUse of this device is not a substitute for
regular visits to the dentist for routine
clinical care.
UThe device is not intended for use on
multiple patients in a dental practice or
institution. Do not use for any purpose
other than as described in this manual.
UAlways ensure that your hands are dry
before connecting the charging cradle to
the mains supply.
UDo not place or store the USB wall adapter
where it can fall, or be pulled into any liquid.
UDo not use the USB wall adapter if it has
fallen into liquid.
UFor the purpose of recharging the battery,
only use the USB wall adapter provided
with this device.

EN
3
UIf the charging cradle malfunctions, unplug
immediately.
UNever use the charging cradle or the USB
wall adapter if they are damaged or aren't
working properly.
UKeep the device, all parts and accessories
away from heated surfaces.
UDo not attempt to modify, open or repair
the device. You may expose yourself to an
electric shock.
UDo not use if the parts or accessories are not
supplied by the manufacturer as dened in
this manual, or if they are damaged in any
way, do not appear to be working properly,
or if you see or smell smoke. In such
cases, stop using the device, and contact
customer service.
UThe manufacturer accepts no liability for
damage or injuries caused by improper or
incorrect use.
UDo not clean any of the parts in the
dishwasher.
UKeep the device out of the reach of children
or pets.
UThis device contains batteries that are non-
replaceable.

EN
4
UDo not dispose of the device or the
battery with household waste! The law
requires that you dispose of this electrical
device (including all accessories and parts)
at a designated recycling collection point
for electrical devices.
UDispose of the battery safely.
UIf the product reaches its end of life, or you
no longer wish to use it, the battery must
be removed before disposal (see section 12.
Disposal).
Precautions
[Consult your physician before use if you:
Uhave concurrent conditions, such as heart
disorders, seizures, uncontrolled high blood
pressure, liver or kidney diseases.
Uhave poorly controlled hormone disorders,
such as diabetes or thyroid abnormalities.
[Consult your dentist before use if you:
Uhave had oral or gum surgery in the last
two months.
Uhave severely injured gums.

EN
5
[Additional precautions:
UDo not bite the brush head.
UDo not touch or apply pressure to the brush
head when you use, clean or maintain the
device.
UThe safety and eectiveness of the device
for uses other than those indicated are not
known.
2. Contraindications
This device including all its parts must not be used by the
following people: persons below the age of 18, those with
limited physical, sensory or psychological capacities, those
lacking experience or knowledge in how to use the device in a
safe way, or those who do not understand the hazards involved.
[Do not use the device if you:
Uhave a pacemaker, internal defibrillator, another active
implanted device, or if you have any medical concerns
about using this device.
Uhave a history of oral cancer, throat or oropharyngeal
cancer, or have any other type of cancer, or have pre-
malignant lesions.
Uhave an impaired immune system due to illnesses, or you
take medication that impairs the body's ability to fight
infection.
Uare pregnant or nursing.

EN
6
3. Get to know the device
3.1 Indications for use
ToothWave™ is a powered radiofrequency toothbrush intended
to promote good oral hygiene, including reduction of plaque
and the prevention and treatment of gingivitis. ToothWave™ is
intended for over-the-counter use.
3.2 Clinical summary data
In a 6 week clinical study, the control group of 42 subjects using
a powered ADA Accepted toothbrush (31,000 strokes/minute)
showed a 15% reduction in plaque, a 31% reduction in gum
inflammation and a 2.8% reduction in gum bleeding, while
the 45 subjects using the ToothWave™ (33,000 strokes/minute)
showed a 25% reduction in plaque, a 45% reduction in gum
inflammation and a 41% reduction in gum bleeding.
In the same study where patients began with a moderate
amount of visible tartar on the tongue side of their lower
anterior teeth, additional analysis showed a 14% accumulation
of tartar in the control group and a 2% accumulation of tartar in
the ToothWave™ users.
3.3 Package contents
Refer to the diagram on page (i) at the front of the manual.
y2x Brush heads (#1) y1x USB wall adapter (#8)
y1x Handle (#2) y1x Warranty booklet
y1x Charging cradle
with USB cable
+ transparent base (#7)
y1x User manual )

EN
7
3.4 Device controls & settings
Refer to the diagram on page (i) at the front of the manual.
Control Function / Mode
Control button
(#3) Long press: turns the device on or o
Short press: each press moves to the next
mode
DentalRF mode
indicator light
(#4)
DentalRF is active for all modes
Vibration mode
indicator light
(#5)
Mode 1: low vibration
Mode 2: medium vibration
Mode 3: high vibration
Recommended mode
Mode 4: No vibration
Battery indicator
light
(#6)
Green blinks: battery is charging
No light: battery is charged
Orange blinks: battery is low
Orange constant: battery is empty
ZWhen the battery is fully charged, the light will be constant
green for 30 seconds, then it will go out.

EN
8
3.5 The brush head
The brush head (#1) is an innovative and special feature of
the device. It contains bristles, 2 DentalRF electrodes and a
silicone strip that lies between the electrodes. The silicone strip
enables the DentalRF current to flow across the teeth. It also
ensures that the toothpaste and the DentalRF energy interact
effectively. For this reason, we recommend that the bristles are
always in good contact with the teeth.
[Always check that the brush head (#1) is not damaged.
Inspect the brush head (#1) for damage, excessive wear,
and/or biolm accumulation prior to each use, and replace
the brush head (#1) or handle (#2) if there are signs of
damage.
[If you are in any doubt about its condition, replace with a
new one. Naturally, contact Customer Service at any time
for specic queries or questions.
Signs of damage to the brush head (#1) include but are not
limited to:
Ua significant change in shape or appearance;
Uexcessive wear showing on the bristles;
Ua bend or tears in the silicone barrier.
Electrode
Electrode
Silicone strip

EN
9
[Do not use the brush head (#1) if the bristles, silicone strip,
or electrodes become loose, bent, damaged, or crushed.
Damaged electrodes, bristles or a damaged silicone strip
may break o while brushing. If it is damaged, replace with
a new brush head (#1). Refer to section 7.4 Replacing the
brush head.
3.6 Device charging
UCheck that the battery is not low before
each use.
4. Treatment plan
UUse for 2 minutes, morning and evening.
UClean between the teeth and gently
massage gums.
UBrush each section (1,2,3,4) for 30 seconds.
ZThe device is suitable for use with dental
implants.
For details, refer to section 6. Get started!.
First charge
Hours
1 1
4 4
2
3

EN
10
5. What to expect with the device
During or after using the device you may:
UFeel pain, if you have cavities or any teeth condition that
requires dental treatment. If you do feel pain, consult your
dentist.
ZStop using the device if you experience excessive bleeding
after use, or if bleeding continues after one week of regular
use.
6. Get started!
1. Rinse the bristles under lukewarm water.
2. For best results, apply a generous amount of toothpaste.
You can use any commercial toothpaste.
3. Hold the handle (#2) firmly, and turn on the device. Short
press the control button (#3) as many times as needed to
select your treatment mode.
4. Gently press the bristles against the teeth, and move the
brush in circular movements, slowly and systematically
from tooth to tooth, gently massaging the gums. Make
sure the bristles are always in good contact with your teeth.
ZThe device comes with soft bristles to protect your teeth
and gums. Brush gently, and apply only light pressure
when brushing. Do not scrub.
5. Brush all surfaces of the teeth for 2 minutes. You will feel a
slight vibration every 30 seconds (1 vibration at 30 seconds,
2 vibrations at 60 seconds and so on). After the vibration(s),
you can move to another section of the mouth (refer to
section 4. Treatment plan). After 2 minutes, the device will
shut down automatically.

EN
11
6. Clean the device with warm water, and store in open air
whilst it is wet.
7. Maintenance
7.1 Routine maintenance
UAfter use, wash the brush head under running water to
remove any toothpaste or debris.
[Do not wash with soap or chemicals.
UIf debris or toothpaste accumulates on the handle (#2),
wash under running water and dry with a clean dry cloth.
[Do not try to remove any stuck debris from the brush head
(barrier and/or electrodes). In such cases, replace the brush
head (#1). Refer to section 7.4 Replacing the brush head.
7.2 Maintenance of the RF contact
UOnce a month, remove the brush head
(#1) from the handle (#2). Clean the
groove in the handle (#2) to remove
any toothpaste or debris that may have
accumulated. Use a cotton bud, rinse and
dry with a clean dry cloth.
URemove debris and excess toothpaste
from the brush head (#1) and handle (#2). Clean the
underside of the brush head (#1) using a cotton bud.
UIf another person is going to use their brush head (#1), be
sure to rinse and wipe down the handle (#2), including the
connection between the brush head (#1) and the handle
(#2) before another person uses the device.

EN
12
7.3 Cleaning the charging cradle
1. First disconnect the charging cradle (#7) from the mains
supply and remove the toothbrush from the charging
cradle (#7).
2. Next, remove the transparent base. To do this, turn the
charging cradle (#7) upside down. Remove the transparent
base by pressing the clips outwards.
3. Clean both parts with a damp cloth and dry them. Place
the charging cradle (#7) back, and press down firmly. You
will hear it click into place.
7.4 Replacing the brush head
Replace the brush head (#1) when any of these apply:
Uanother person wishes to use the device, or
Uyou have used the same brush head (#1) for 3 months, or
Uthe bristles are damaged or worn.

EN
13
To replace, simply pull out the brush head (#1), remove the old
one and replace with a new one.
8. Parts & consumables
You can purchase replacements from where you purchased
the device, or online. Refer to the Customer Service section for
details.
9. Troubleshooting
Do not attempt to open or repair your device. You may expose
yourself to dangerous electrical components and cause serious
harm to yourself. It will also void your warranty.
Problem Checks
My device does not
start. Make sure the battery is not low. Refer to
section 3.6 Device charging.
The device is
charged but it does
not work.
Press the control button (#3) to restart
the device. If the problem persists, contact
customer service.
All indicator lights
(#4,#5, #6) blink. There is a system error. Press the control
button (#3) to restart the device. If the
problem persists, contact customer service.
ZFor problems or queries, please contact Silk'n Customer
Service.

EN
14
10. Customer service
See our website for more information: www.silkn.com.
This manual is also available as a PDF download from:
www.silkn.com\manuals. Contact Customer Service to report
unexpected operations or events, or any other problem with
your device. Our contact details are:
contact@silkn.com
1-877-367-4556 (toll-free in the US)
11. Warranty
Please refer to the separate product warranty booklet for
complete information.
ZThe manufacturer accepts no liability for damage or injuries
caused by improper or incorrect use.
12. Disposal
Be sure to follow your country’s laws for the disposal of electrical
items. Contact your local council for information on recycling
points and/or disposal services for lithium battries and electrical
devices.
12.1 Battery removal
At the product's end of life, you are required to remove the
battery before disposal. To do this, the device must be opened
up. The device will no longer function after this procedure, nor
can it be repaired. Any warranty will be void when the device
casing is opened and the battery is removed. Home Skinovations
Ltd is not liable for any physical or material damages as a result of
performing this procedure.

EN
15
Refer to the diagrams at the end of this section for steps 5-8.
1. Remove the device from the charging cradle (#7).
2. Make sure that the battery is completely empty. Turn on
the device to fully drain the battery.
3. Remove the brush head (#1) from the handle (#2).
4. As a protective measure, wear safety goggles for the rest
of the process.
5. Open the casing: Put the flat-head screwdriver into the
slot at the bottom of the handle (#2) and gently swing
the bottom cover gently until you see a gap - see diagram
step 5.
6. Place the flat-head screwdriver into the gap and pry the
bottom section out of the handle (#2) - see diagram step 6.
7. Remove the inner section: Place the handle (#2) upside
down on a sturdy table covered with a towel. Use the
flat-head screwdriver to move the clips inwards. As the
clips release, push down to release the inner part of the
handle (#2) - see diagram step 7.
8. Remove the battery:
[If the battery is damaged or leaking, wear rubber gloves
before touching it.
[Make sure the exposed red and black wires do not touch
each other. Cut each wire separately.
[If the red and black wires touch each other, separate them
immediately.
yWith cutters, cut the red wire of the battery close to
the printed circuit board (PCB). Seal the exposed end
(battery side) with insulating tape - see diagram step
8.

EN
16
yAgain with cutters, cut the black wire of the battery
close to the PCB. Seal the exposed end (battery side)
with insulating tape - see diagram step 8.
yCarefully remove the battery from the casing.
9. Place the battery in a plastic bag: This prevents the battery
from coming into contact with other items.
10. Dispose of the battery and the device as advised by your
local council.
Step 5 Step 6
Step 7 Step 8

EN
17
12.2 Packaging
Dispose of the packaging separated into single type materials.
Dispose of cardboard and carton as waste paper and film via the
recyclable material collection service.
12.3 Device
Do not dispose with household waste! The WEEE directive
requires that you dispose of this electrical device (including all
accessories and parts) at a designated recycling collection point
for electrical devices. This ensures that the device is recycled
professionally, and prevents the release of harmful substances*
into the environment. Remove the battery and dispose of it
safely before disposing of the device.
* Products labelled with Cd = cadmium, Hg = mercury, Pb = lead.
13. Specifications
Model no. H7001
Technology DentalRF™ and vibration
Vibration 0; 275Hz; 300Hz or 400Hz (± 5%)
Radio frequency 3MHz ±0.3MHz; up to 3W
Package size (W)165 (H)227 (D)80 [mm]
System weight 115g
Transport & storage
between uses and storage
condition
Temperature: - 40 to 70°C
Relative humidity : 10 to 90%rH
Atmospheric pressure: 500 to 1060hPa
Operating conditions Temperature: 5 to 40°C
Relative humidity: 15 to 90%rH
Atmospheric pressure: 700 to 1060hPa

EN
18
Time from minimum
storage temperature
between uses to
minimum operating
temperature with ambient
temperature of 20°C
30 minutes
Time from maximum
storage temperature
between uses to
maximum operating
temperature with ambient
temperature of 20°C
30 minutes
Protection against
electric shock Class I medical equipment
type BF applied part
Adapter YH-S06U0500600 (USA)
Input:
Output:
100 – 240V; 50/60Hz; 0.2A
5.0Vdc; 0.6A
Mode of operation Non-continuous
Waterfproof rating:
USB adapter (IPX4)
Charging cradle (IPX7)
Handle (IP67)
Protection assured against water
splashing
Protection assured against water
immersion at a depth of up to 1 meter,
for a maximum of 30 minutes.
Totally protects against dust and
protects in water up to 3 feet (1
meter).
The device was tested and
complies with IEC 60601-1 (Safety)
IEC 60601-2-2 (RF Safety)
IEC 60601-1-2 (EMC)
IEC 60601-1-11 (Environment)
Service life of the
equipment 5 years
Table of contents
Languages: