Home HME020234N User manual

40 Tower Fan
Before using your Tower Fan, please read this manual.


Important Satety Instructions
Operating Instructions
Cleaning and Maintenance
Troubleshooting
Warranty
Manufacturing Info
Warning
Contact Us
4
5-7
8
8
9
9
9
9
TABLE OF CONTENTS

4
When using your this appliance, basic safety precautions should always be followed to reduce
the risk of fire, electric shock, and/ or injury to person. Incorrect operation due to ignoring
instructions may cause harm or damage.
• Read all instructions before using the
appliance.
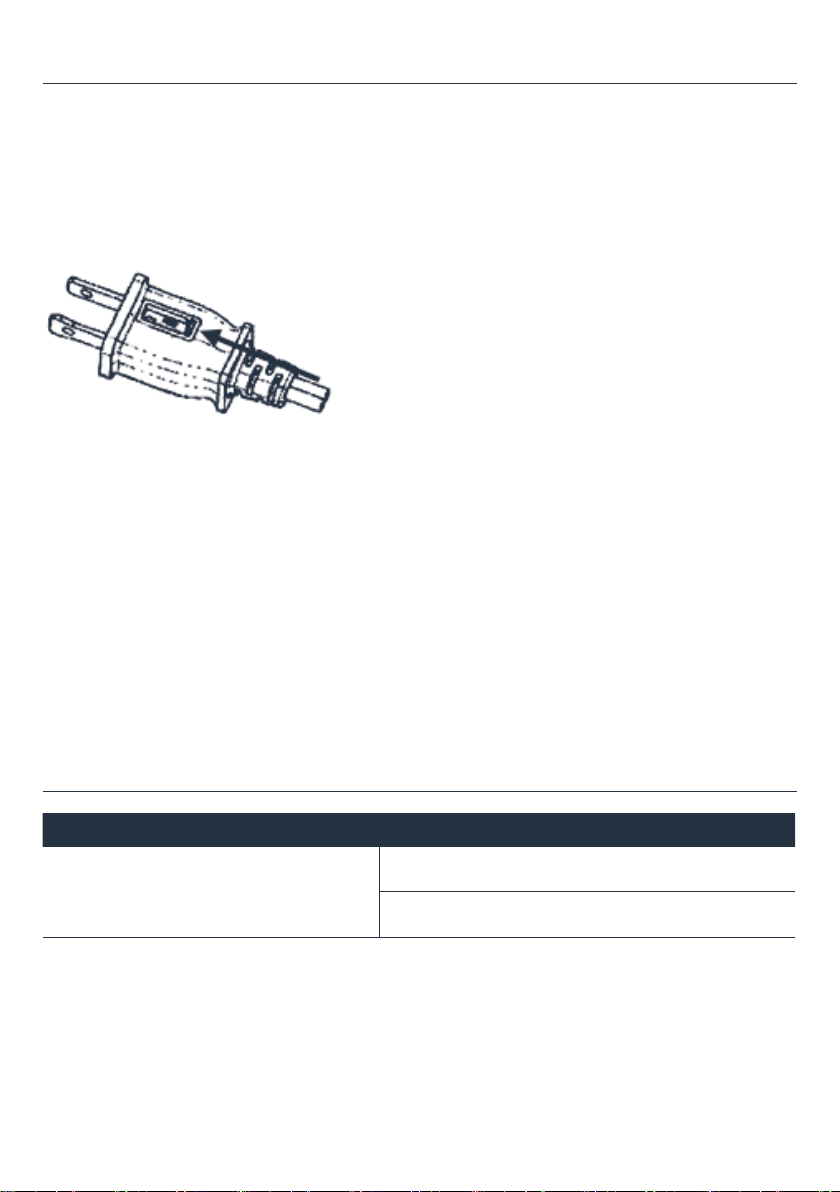
• This appliance has a polarized plug (one
blade is wider than the other). To reduce
the risk of electric shock, this plug is
intended to fit in a polarized outlet
only one way. If the plug does not fit
fully in the outlet, reverse the plug. If
it still does not fit, contact a qualified
electrician. DO NOT attempt to defeat
this safety feature.
• WARNING - To reduce the risk of fire or
electric shock, DO NOT use this fan with
any solid-state speed control device.
• DO NOT leave the fan running
unattended.
• Keep electrical appliances out of reach
from Children or infirm persons. DO NOT
let them use the appliances without
supervision.
• If the supply cord is damaged, it must be
replaced by manufacturer or its service
agent or a similarly qualified person in
order to avoid a hazard.
• This appliance is not intended for use
by persons (including children) with
reduced physical, sensory or mental
capabilities, or lack of experience and
knowledge, unless they have been given
supervision or instruction concerning use
of the appliance by a person responsible
for their safety. Young children should be
supervised to ensure that they DO NOT
play with the appliance.
• When the fan was assembled, the
rotor blade guard shall not be taken off
anymore.
- Unplug the fan for prior cleaning.
- The rotor guard shall not be
dissembled if you want to clean the
rotor blades.
- Wipe the fan enclosure and rotor blade
guard with a slightly damp cloth.
• This product employs overload
protection (fuse). A blown fuse indicates
an overload or short-circuit situation.
If the fuse blows, unplug the product
from the outlet. Replace the fuse as
per the user servicing instructions.
Follow product marking for proper fuse
rating. If the replacement fuse blows,
a short-circuit may be present and the
product should be discarded or returned
to an authorized service engineer for
examination and/or repair.
• a) DO NOT operate fan with a damaged
cord or plug. Discard fan or return
to an authorized service facility for
examination and/or repair.
• b) DO NOT run cord under carpeting. DO
NOT cover cord with throw rugs, runners,
or similar coverings. DO NOT route cord
under furniture or appliances. Arrange
cord away from traffic area so that it will
not be tripped over.
FOR SAFE OPERATION
• Never insert fingers, pencils, or any other
object through the grille when fan is
running.
• Disconnect fan when moving from one
location to another.
• Make sure the fan is on a stable surface
when operating to avoid overturning.
• DO NOT use fan near or under open
window. Rain may create electrical
hazard.
Important Satety Instructions
The appliance must be placed on a flat
firm surface.
SAVE THESE INSTRUCTIONS
For Household Use Only
WARNING

5
Control Panel
Display Window
Fan Body
Base
FOR SAFE OPERATION
Note:
Place the Tower Fan on the package foam or other
soft surfaces and invert it to avoid scratch mark
when install the base.
1 Take away the two parts of the base from
packaging box. Align the centers of the two parts
of the base and place them in a crossed form.
Rotate one of the two bases to align holes, then
match and lock.
2 Remove the four screws from the Fan body.
When the base and the Fan body are aligned
accurately, fix and tighten the base to the Fan
body with the screws.
Operating Instructions
PARTS DESCRIPTION

6
CONTROL PANEL
REMOTE
CONTROL
• Press buttons on the top of Fan body to set corresponding functions:
• Press “Speed” to adjust the speed from Low, Medium or High.
• Press “Timer” to adjust the time:
- Set timed power off as 1 hour, 2 hours, 4 hours, 8 hours in starting up mode.
- Set starting up as 1 hour, 2 hours, 4 hours, 8 hours in standby mode (power on but not starting up).
• Press “MODE” to adjust wind mode (Natural wind, Sleep wind, Oscillating wind).
• Press “SWING” to turn on or off the swing of the fan.
Display panel
Time
display
Natural
wind
Sleep
wind
Oscil-
lating
Fan
speed
8
Low Med Hi
Nat
Slp Osc
Operating Instructions

7
Operating Instructions
REMOTE CONTROLLER BUTTONS
Timer key
Swing key
Mode key
Start up/Standby key
“+” key
“-” key
+
-
Point the remote control toward the receptor on Fan body and press the desired button. The remote
control will work at distances of up to roughly 16 feet and an angle of 30 degrees left and right of the
control panel.
The buttons on the control panel such as ON/OFF, SPEED, TIMER, SWING have the same functions as
those of the corresponding keys on the Remote Control.

8
Cleaning and Maintenance
Troubleshooting
User Servicing Instructions
a) Grasp plug and remove from the receptacle or other outlet device. Do not unplug by pulling on cord.
b) Open fuse cover. Slide open fuse access cover on top of attachment plug towards blades.
c) Remove fuse carefully.
d) Risk of fire. Replace fuse only with 2.5 Amp, 125 Volt fuse.
e) Close fuse cover. Slide closed the fuse access cover on top of attachment plug.
NOTE:
1. When you replace the fuse, please don’t operate suddenly or overexert, or else the product will be
damage or cause accident.
2. When you feel it hard to be operated, please make sure you have got the right way.
Cleaning
1. Be sure to unplug from the electrical supply source before cleaning.
2. Plastic parts should be cleaned with mild soap and a damp cloth or sponge. Thoroughly remove soap
film with clean water.
3. Be sure not to make water or other liquid enter the inside of Fan body.
PROBLEMS SOLUTIONS
The fan does not respond to button
controls.
The appliance is not connected to the power. Plug into
the power socket completely before turning it on.
The fuse cover may be open. Disconnect the plug from
outlet and close the cover of the fuse.

9
hOme™offers a limited two-year warranty (“warranty period”) on all of our products purchased new
and unused from hOme Technologies, LLC or an authorized reseller, with an original proof of purchase
and where a defect has arisen, wholly or substantially, as a result of faulty manufacture, parts or
workmanship during the warranty period. The warranty does not apply where damage is caused by
other factors, including without limitation: (a) normal wear and tear; (b) abuse, mishandling, accident,
or failure to follow operating instructions; (c) exposure to liquid or infiltration of foreign particles; (d)
servicing or modifications of the product other than by hOme™ ; (e) commercial or non-household use.
The hOme™ warranty covers all costs related to restoring the proven defective product through
repair or replacement of any defective part and necessary labor so that it conforms to its original
specifications. A replacement product may be provided instead of repairing a defective product. hOme™
’s exclusive obligation under this warranty is limited to such repair or replacement.
A receipt indicating the purchase date is required for any claim, so please keep all receipts in a safe
place. We recommend that you register your product on our website, homelabs.com/reg. Although
greatly appreciated, the product registration is not required to activate any warranty and product
registration does not eliminate the need for the original proof of purchase. The warranty becomes
void if attempts at repair are made by non-authorized third parties and/or if spare parts, other than
those provided by hOme™ , are used. You may also arrange for service after the warranty expires at an
additional cost.
These are our general terms for warranty service, but we always urge our customers to reach out to
us with any issue, regardless of warranty terms. If you have an issue with a hOme™ product, please
contact us at 1-800-898-3002, and we will do our best to resolve it for you.
This warranty gives you specific legal rights, and you may have other legal rights which vary from state
to state, country to country or province to province. The customer may assert any such rights at their
sole discretion.
HME020234N
Warranty
Manufacturing Info
This manual is to be used with all items with the model number
SKU# : HME020234N
Rated voltage/Frequency: 120V~ 60Hz 0.4A
Keep all plastic bags away from children.
Warning
Contact Us
homelabs.com/chat
Mon–Fri 10AM–5PM EST
1-(800)-898-3002
Mon–Fri 10AM–5PM EST
Respond within twelve hours
CHAT W ITH US CALL U S EMAIL US


© 2016 hOme Technologies, LLC
37 East 18 Street, 7th Floor
New York, NY 10003
For household
Use Only
1-800-898-3002
homelabs.com/help
All rights reserved, hOme®. Printed in China.
Table of contents
Other Home Fan manuals
Popular Fan manuals by other brands

Panasonic
Panasonic Whisper Green-Lite FV-08VKL1 installation instructions

Yamagata
Yamagata YFT2012M instruction manual

HPM
HPM EF100SQWE instruction manual

RenewAire
RenewAire SL Series Installation, operation and maintenance manual

Maico
Maico FE 100 SG Mounting Instructions and Directions for Use

Ellington
Ellington E-VER54ABZ5LKRW installation guide