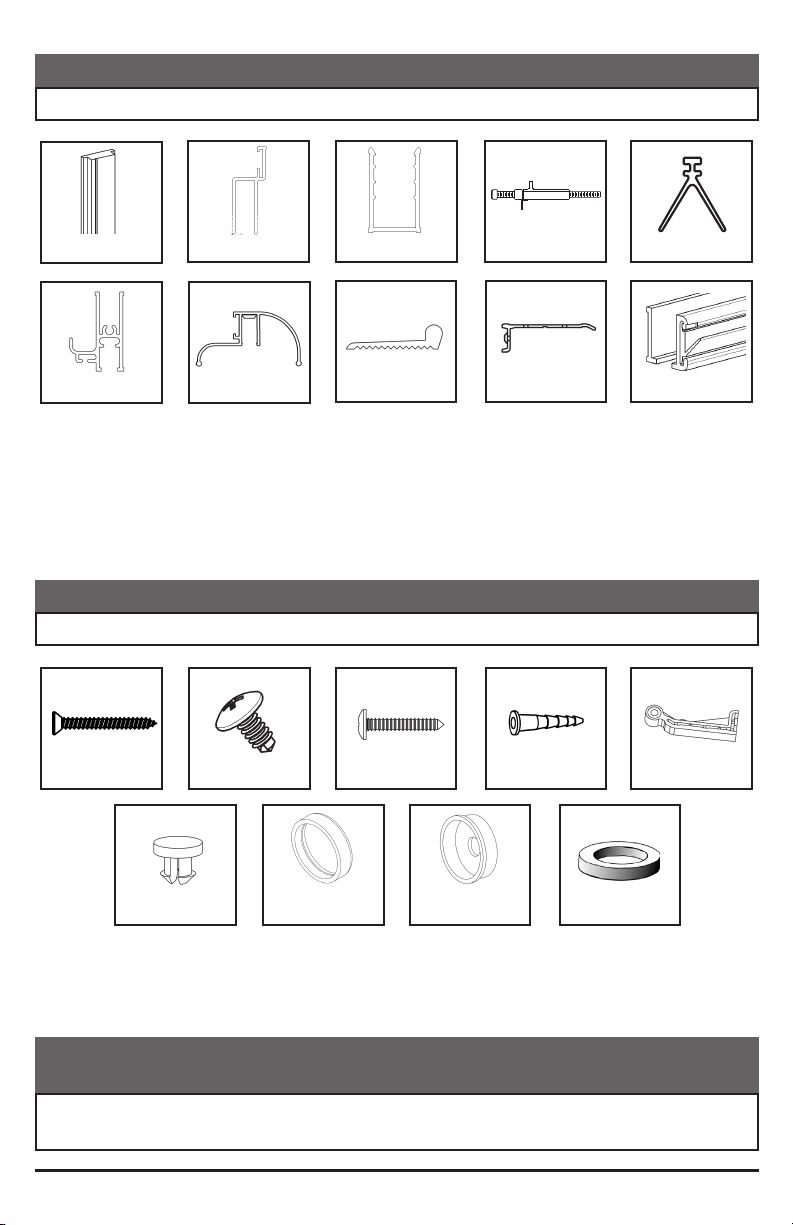
HOMEDEPOT 536635 User manual

J
GG
HH
II
FF
EE
DD
AA
DD
BB
CC
FF
EE
I
E
H
D
F
B
C
A
G
F
D
SAVE THIS GUIDE FOR FUTURE REFERENCE.
CONSERVE ESTE MANUAL COMO REFERENCIA.
Read all instructions carefully before proceeding.
Leer detenidamente todas las instrucciones antes
de comenzar la instalación.
Serial number • Número de Serie
IMPORTANT • Record the serial number
IMPORTANTE • Registre el número de serie
INSTALLATION INSTRUCTIONS
GUÍA DE INSTALACIÓN
For shower door
Para puerta de ducha
536635 • 536655

2
q Diseño no a escala
A10048207 B10041305 C10041045 D10017437 E10068501
J10041252I10041276H10041369
G10041121F10041084
AA 10047009 BB 10047235 CC 10047010 DD 10048201 EE 10048217
FF 10048219 GG
10048075 / 10048084 HH 10002880 II 10047146-20
ILLUSTRATION OF COMPONENTS
ILUSTRACIÓN DE COMPONENTES
HARDWARE BAG
BOLSO DE HERRAJES
q Drawings not to scale
Product specifications are subject to change without notice.
Use owner’s manual instructions supplied with product.
Las especificaciones del producto están sujetas a cambios sin previo aviso.
Use las instrucciones del manual del propietario suministradas con el producto.

3
PARTS DESCRIPTION
DESCRIPCIÓN DE PIEZAS
IMÁN
JUNTA MAGNÉTICA
JUNTA MURAL
PIN DEL PIVOTE
ESCUDO DE GOTEO PLÁSTICO
MARCO SUPERIOR / INFERIOR
MARCO REDONDO
UMBRAL
JUNTA PIVOTE
MARCO LATERAL
TORNILLO #6 X 1-1/4"
TORNILLO #8 X 1/2"
TORNILLO #8 X 1"
ENCHUFE
SOPORTE PIVOTE PLÁSTICO
TUERCA A PRESIÓN
TAPA A PRESIÓN NEGRA/BLANCA
ARANDELA
ESPACIADOR
BOLSO DE HERRAJES
ITEM
A
B
C
D
E
F
G
H
I
J
AA
BB
CC
DD
EE
FF
GG
HH
II
ITEM
QUANT.
1
1
1
2
1
2
1
1
1
1
5
3
3
8
2
3
3
3
2
QUANT.
# PIECE #
10048207
10041305
10041045
10017437
10068501-005-001
10041084
10041121
10041369
10041276
10041252
10047009
10047235
10047010
10048201
10048217
10048219
48075 / 48084
10002880
10047146-20
# PIECE #
PARTS DESCRIPTION
MAGNET
MAGNETIC JAMB
WALL JAMB
PIVOT PIN
PLASTIC DRIP SHIELD
TOP / BOTTOM FRAME
ROUND PULL FRAME
SILL
PIVOT JAMB
SIDE FRAME
#6 X 1-1/4”SCREW
#8 X 1/2”SCREW
#8 X 1”SCREW
PLUG
PLASTIC PIVOT SUPPORT
SNAPNUT
BLACK / WHITE SNAP CAP
WASHER
SPACER
HARDWARE BAG
Cuando haga un pedido de piezas de repuesto, consulte el número de pieza, la
descripción, dimensiones y color.
When ordering replacement parts, please refer to part number, description,
dimensions and color.
En la recepción, verifique si la puerta de la
ducha o el baño está en buenas condiciones y
asegúrese de que todas las piezas estén incluidas
en la bolsa de accesorios. Si tiene un problema,
contacte a su distribuidor inmediatamente.
Herramientas requeridas:
qDestornillador plano, cuadrado o Phillips # 1 y # 2
qLapiz
qTaladro
qCinta de enmascarar
qBroca de 1/8 “, 7/64”, 3/16 “o 7/32” (Según la
pared)
qCinta métrica
qNivel
qSilicona transparente
ADVERTENCIA:
Para un funcionamiento óptimo, es importante que la
puerta de la ducha se instale perfectamente nivelada en
paredes que también estén perfectamente niveladas.
Manipule las partes metálicas con cuidado.
BEFORE STARTING ANTES DE COMENZAR
Upon reception, verify if your shower or tub
door is in good condition and make sure that all
parts are included in the hardware bag. If you
have a problem, please contact your distributor
immediately.
Équipement requis:
qTournevis, plat, carré ou étoile #1 et #2
qCrayon
qPerceuse
qRuban à masquer
qMèche 1/8", 7/64", 3/16" ou 7/32" (selon le
mur)
qGallon à mesurer
qNiveau
qCalfeutrant au silicone clair
ATTENTION:
Pour un fonctionnement optimal, il est important que la
porte de douche soit installée de niveau sur des murs
également de niveau.
Manipulez les pièces de métal avec soin.

4
STEP 1 - Reversible door
I. Decide from which direction the door will open, taking into
consideration location of the shower head (this door is
reversible). Fig. A
II. Mark sill (H) location 1/8” (3mm) away from the interior
edge of the shower stall. Fig. B
H
Fig. B
Fig. A
1/8’’
(3mm)
INSTRUCCIONES ESPECIALES PARA LA INSTALACIÓN EN CABINAS PREFABRICADAS.
La construcción de fibra de vidrio o acrílico puede no ser lo suficientemente fuerte como
para soportar el cerramiento de la puerta de la ducha o bañera. Para proporcionar un
montaje seguro de esta puerta, es importante que utilice marcos de madera detrás del
borde frontal de su cabina. Aplique una gota de silicona entre las paredes y la base del
granero.
ANTES DE LA INSTALACIÓN :
Las juntas de la pared y la base se deben siliconar adecuadamente.
SPECIAL INSTRUCTIONS
INSTRUCTIONES ESPECIALES
SPECIAL INSTRUCTIONS FOR INSTALLATION IN PREFABRICATED STALLS.
Fiberglass or acrylic construction may not be of sufficient strength to support your
shower or tub door enclosure. To provide for a secure mounting of this door it is
important that you use wood framing behind the face edge of your stall. Apply a bead of
silicone between walls and base of stall.
BEFORE INSTALLATION :
Wall and base joints must be siliconed properly.
PASO 1 - Puerta reversible
I. Decida desde qué dirección se abrirá la puerta, teniendo
en cuenta la ubicación del cabezal de la ducha (esta
puerta es reversible). Fig. A
II. Marque la ubicación del umbral (H) a 1/8 “(3 mm) de
distancia del borde interior del gabinete de la ducha Fig. B
STEP 2 - Sill installation
I. Measure door opening along the mark made in step 1.
II. Cut sill (H) 1/16” (2mm) shorter than the opening.
III. Apply a light bead of silicone to the grooves underneath
the sill. Fig.C
IV. Install and hold in place with masking tape. Fig.D
H
Fig. D Masking tape
Cinta de enmarcarar
Fig. C
Silicone / Silicona
PASO 2 - Instalación del umbral
I. Mida la abertura de la puerta a lo largo de la marca hecha en
el paso 1.
II. Corte el umbral (H) 1/16 “(2 mm) más corto que la abertura.
III. Aplique un poco de silicona a las ranuras debajo del umbral.
Fig.C
IV. Instalar y mantener en su lugar con cinta adhesiva. Fig.D
Opening/Apertura
-1/16’’(2mm)

5
I. Insert plastic pivot support (EE) on bottom of pivot jamb (I).
II. Lock with snap nut (FF).
IMPORTANT: Before securing the wall jamb, make sure
you have a wood structure behind your wall. If it is not
the case, we suggest you fix the wall jamb with nylon or
spring toggle bolts or use proper anchor hardware (plug
DD). To ensure a solid wall anchoring.
III. Stand pivot jamb (I) upright against the exterior lip of the
sill (H).
IV. Level vertically.
V. Mark holes and side locations with pencil. Remove pivot
jamb (I) and drill holes at marked locations.
Drill bits: -For ceramic tile wall: 7/32” (6mm) carbide
-For plastic wall: 1/8” (3,2mm)
- For dry wall: 3/16” (4,8mm)
VI. Insert plastic plug (DD) except for prefab walls.
VI. Fasten with five screws (AA).
H
I
Level
Nivel
STEP 3 - Pivot jamb installation
I. Inserte el soporte de pivote de plástico (EE) en la parte
inferior de la jamba pivotante (I).
II. Bloquee con la tuerca de presión (FF).
IMPORTANTE: antes de asegurar la jamba mural, asegúrese de
tener una estructura de madera detrás de la pared. Si este
no es el caso, le sugerimos que fije la jamba de pared con
pernos de palanca de nylon o resorte o use las conexiones
de anclaje adecuadas (conector DD). Para asegurar un
anclaje de pared sólido.
III. Coloque la jamba pivotante (I) en posición vertical contra el
borde exterior del umbral (H).
IV. Nivele verticalmente
V. Marque los agujeros y las ubicaciones laterales con un lápiz.
Retire la jamba de pivote (I) y taladre los agujeros en las
ubicaciones marcadas.
Brocas: -Para la pared de baldosas de cerámica: 7/32 “(6 mm)
de carburo
-Para pared de plástico: 1/8 “(3.2 mm)
- Para pared seca: 3/16 “(4.8 mm)
VI. Inserte el tapón de plástico (DD) a excepción de las paredes
prefabricadas.
VI. Asegúrelo con cinco tornillos (AA).
PASO 3 - Instalación de la jamba del pivote
DD
AA
EE
I
FF
EE
1.
2.

I
Fig. B
ETAPA 4 - Instalación de la puerta
I. Inserte el protector de goteo de plástico (E) en la parte
inferior de la puerta y corte el exceso de plástico. Puedes
humedecer el goteo escudo para facilitar la inserción.
Fig. A
II. Inserte el pasador inferior del panel de la puerta en el
pivote de plástico inferior
soporte (EE). Fig. B
III. Sostenga en su lugar, inserte el soporte de pivote de
plástico superior (EE)
en la jamba pivotante (I) y el pasador del panel de la
puerta. Fig. C
IV. Bloquee con la tuerca de presión plástica (FF). (Ver el
paso 3)
I
Fig. C
Pin
Eje
Axe
Pin
STEP 4 - Door installation
I. Insert plastic drip shield (E) into the bottom of the door
and cut surplus plastic. You can dampen the drip
shield to facilitate insertion. Fig. A
II. Insert lower pin of door panel into lower plastic pivot
support (EE). Fig. B
III. Hold in place, insert upper plastic pivot support (EE)
onto pivot jamb (I) and pin of door panel. Fig. C
IV. Lock with plastic snap nut (FF). (See step 3)
6
E
Door
Puerta Fig. A
EE
1.
2.
EE
EE
I
FF
Door
Puerta
Door
Puerta

STEP 5 - Wall jamb installation
C
H
Level
Nivel
Pencil
Lápiz
7/16’’
IMPORTANT: Before securing the wall jamb, make sure
you have a wood structure behind your wall. If it is not
the case, we suggest you fix the wall jamb with nylon or
spring toggle bolts or use proper anchor hardware (plug
DD). To ensure a solid wall anchoring
I. Align the wall jamb (C) with the sill edge (H), leaving a
7/16” (11 mm) gab between the latter.
II. Level vertically.
III. Mark holes and side locations with pencil. Remove wall
jamb (C) and drill holes at marked locations.
IV. Insert plastic plug (DD) except for prefab walls.
V. Use screw (CC) to fit the wall jamb in place.
ETAPA 5 - Etapa de junta mural
IMPORTANTE: antes de asegurar la junta mural,
asegúrese de tener una estructura de madera detrás de
la pared. Si no es el caso, le sugerimos que fije la junta
de pared con pernos de palanca de nylon o resorte o
use los accesorios de anclaje adecuados (enchufe DD).
Para asegurar un anclaje sólido a la pared
I. Alinee la jamba de la pared (C) con el borde del umbral (H),
dejando un espacio de 7/16 “(11 mm) entre este último.
II. Nivelar verticalmente
III. Marque los agujeros y las ubicaciones laterales con un
lápiz. Retire la junta de la pared (C) y taladre los agujeros
en las ubicaciones marcadas.
IV. Inserte el tapón de plástico (DD) a excepción de las
paredes prefabricadas.
V. Use un tornillo (CC) para colocar la junta mural en su lugar.
7
CC
DD
C

8
STEP 6 - Door adjustement
I. Slightly incline the door towards the inside using adjustment
screws to permit proper water evacuation. Fig.A.
II. Insert the striker (B) inside the wall jamb (C) as shown in
the figure B.
III. Close the door and adjust the striker, leaving a 1/16” gap
between the striker and the pull frame (a minimum of 1/16”
(1,6mm) and a maximum of 1/4” (6,5mm). Fig.C
IV. Mark hole locations on the striker (interior of the shower)
and drill through the first wall of the striker (B) only. Use a
7/64” (3mm) drill bit.
V. Fasten it with three screws (BB) use the washer (HH) and
the snap cap (GG) with the screw (BB). Fig B
Fig. B
Door
Puerta
B
C
Minimum 1/16’’
(1,6mm)
Maximum 1/4’’
(6,5 mm)
Fig. C
ETAPA 6 - Ajuste de la puerta
I. Incline la puerta ligeramente hacia adentro con los tornillos
de ajuste para permitir una evacuación de agua adecuada.
Fig.A.
II. Inserte el martillo (B) en la junta mural (C) como se muestra
en la figura B.
III. Cierre la puerta y ajuste el percutor, dejando un espacio de
1/16 “entre el percutor y el marco de tracción (un mínimo
de 1/16” (1.6 mm) y un máximo de 1/4”(6.5 mm). Fig.C
IV. Marque las ubicaciones de los agujeros en el percutor
(dentro de la ducha) y taladre a través del primer muro de
fuego (B) solamente. Use una broca de 7/64 “(3 mm).
V. Asegúrelo con tres tornillos (BB) usando la arandela (HH) y
la tapa a presión (GG) con el tornillo (BB). Fig B
GG
HH
BB
Fig. A
EAdjustment
Ajuste
Door
Puerta

STEP 7 - Door adjustment (continued)
I. If the door does not open easily, remove the door (refer to
step 5).
II. Slip one or two spacers (II) as required to reduce the
friction between the plastic drip shield (E) and the door
frame.
III. Reinstall door as per step 5.
STEP 8 - Silicone
I. Apply silicone to exterior of unit only.
II. Allow 24 hours for silicone to cure before using.
Silicone
E
Pin
Eje
I
9
ETAPA 7 - Ajuste de puerta (continuación)
I. Si la puerta no se abre con facilidad, retire la puerta
(consulte el paso 5).
II. Deslice uno o dos espaciadores (II) según sea necesario
para reducir la fricción entre el protector de goteo de
plástico (E) y el marco de la puerta.
III. Vuelva a instalar la puerta de acuerdo con el paso 5.
ETAPA 8 - Silicona
I. Aplique silicona al exterior de la unidad solamente.
II. Espere 24 horas para que la silicona se cure antes de usarla.
Door
Puerta
II
EE
Silicona

10
TO CLEAN PARA LIMPIAR
Los limpiadores domésticos líquidos suaves
mantendrán la superficie de metal brillante y
limpia. Enjuague bien y seque con un paño
limpio.
No use limpiadores abrasivos, raspadores,
cepillos metálicos ni ningún artículo
o producto que pueda rayar o opacar la
superficie.
No permita que la superficie entre en
contacto con productos tales como acetona
(quitaesmalte de uñas), solución de limpieza
en seco, diluyente de laca, gasolina, etc.
Elimine el polvo con un paño suave y húmedo.
Limpie la grasa, el aceite, la pintura y la tinta
con alcohol.
Los arañazos accidentales o manchas rara
vez se muestran, y si lo hacen, se pueden
eliminar fácilmente con un líquido para el
automóvil.
Mild liquid household cleaners will keep the
metal surface bright and clean. Rinse well
and dry with a clean cloth.
Do not use abrasive cleaners, scrapers,
metal brushes, or any items or products that
could scratch or dull the surface.
Do not allow the surface to come into
contact with products such as acetone
(nail polish remover), dry cleaning solution,
lacquer thinner, gasoline, etc.
Remove dust with a soft, damp cloth.
Clean grease, oil, paint and ink with rubbing
alcohol.
Accidental scratches or stains will rarely
show, and if they do they can be easily
removed with a liquid automobile polish.

11
LIMITED WARRANTY
The manufacturer offers the following express limited warranty on each of its products. This warranty extends only
to the original owner/end-user for personal household use. For commercial uses, additional limitations apply.
The manufacturer warrants shower doors to be free from defects in workmanship and materials under normal
use and service for a period of ten (10) years from the initial date of purchase by the owner/end-user, contractor
or builder from an authorized dealer. Shower door sealing materials and gaskets are not covered by this warranty.
Any product reported to the authorized dealer or to the manufacturer as being defective within the warranty period
will be repaired or replaced (with a product of equal value) at the option of the manufacturer. This warranty extends
to the original owner/end-user and is not transferable to a subsequent owner.
Neither the distributor, authorized manufacturer dealer nor or any other person has been authorized to make any
affirmation, representation or warranty other than those contained in this warranty; any affirmation, representation
or warranty other than those contained in this warranty shall not be enforceable against the manufacturer or any
other person.
The manufacturer reserves the right to modify this warranty at any time, it being understood that such modification
will not alter the warranty conditions applicable at the time of the sale of the products in question.
Limitations
This warranty shall not apply following incorrect operating procedures, breakage or damages caused by fault,
carelessness, abuse, misuse, misapplication, improper maintenance, alteration or modification of the unit, as well
as chemical or natural corrosion, accident, fire, flood, act of God or any other casualty. This warranty shall not apply
to stains caused by ferrous water or hard water.
The owner/end-user of the product covered this warranty is entirely responsible for its proper installation and
electrical wiring. The manufacturer neither installs nor supervises the installation, nor hires a contractor for this
purpose, and consequently cannot be held responsible for any defect, breakage or damage caused thereby or
resulting thereof, either directly or indirectly. The owner/end-user must provide access to the components of the
product as described in the installation guide, so that the manufacturer can execute the warranty specified herein.
If such access is not available, all expenses to provide said access will be the responsibility of the owner/end-user.
This warranty does not apply to products or equipment not installed or operated in accordance with instructions
supplied by the manufacturer and all applicable rules, regulations and legislation pertaining to such installations.
The manufacturer strongly recommends that its products-for example, but without limitation, shower doors and
other items-be installed by professionals with experience in bathroom products. Installation of shower doors by an
inexperienced person may result in glass breakage and, consequently, cause personal injury or death.
The manufacturer is not liable for any costs, damages or claims resulting from the purchase of products that do not
fit through openings or existing structures. The manufacturer is not liable for any costs, damages or claims resulting
from defects that could have been discovered, repaired or avoided by inspection and testing prior to installation.
The manufacturer is not liable for personal injuries or death to any person or for any direct, special, incidental or
consequential damage, loss of time, loss of profits, inconvenience, incidental expenses, labor or material charges,
or any other costs resulting from the use of the product or equipment or pertaining to the application of the present
warranty, or resulting from the removal or replacement of any product or element or part covered by this warranty.
EXCEPT AS OTHERWISE PROVIDED ABOVE, THE MANUFACTURER MAKES NO WARRANTIES, EXPRESS
OR IMPLIED, INCLUDING WARRANTIES OF MERCHANTABILITY AND FITNESS FOR A PARTICULAR
PURPOSE OR COMPLIANCE WITH ANY CODE.
In any case, the manufacturer cannot be liable for any amount over and above the purchase price paid for the
product by the owner/end-user, contractor or builder.

12
Commercial Limitations
In addition to the above conditions and limitations, the warranty period for products installed for commercial
applications or used in commercial ventures is of one (1) year from the initial date of purchase by the owner/end
-user, contractor or builder from an authorized dealer. The manufacturer is not responsible for loss of use or profit
under any circumstances. If the product is used as a display, the warranty period begins when the product is placed
on display.
This warranty gives the owner/end-user specific legal rights. The owner/end-user may also have other rights which
vary from one state and/or province to another.
Warranty service
In order to obtain service provided under this warranty during regular business hours, contact the dealer or distributor
who sold the unit, or the manufacturer directly.
The manufacturer will provide the warranty service described above when the following conditions have been met:
(1) the failure is of the nature or type covered by the warranty;(2) the user has informed an authorized manufacturer
Agent or Warranty Service Department representative of the nature of the problem during the warranty period;
(3) conclusive evidence (e.g., proof of purchase or installation) is provided to the foregoing by the user proving
that the failure occurred or was discovered within the warranty period; and (4) an authorized independent service
person or company representative has been permitted to inspect the product during regular business hours within a
reasonable time after the problem was reported by the user.
The manufacturer’s warranty obligation shall be discharged upon tender of replacement or repair. The purchaser
refusal to accept the tender terminates the manufacturer’s warranty obligation.
The products are certified by one or more of the following certification agencies:
- CSA
- UL
- IAPMO
- ULI
- INTERTEK (ETL)
- WARNOCK HERSEY
- US TESTING
- NAHB
Certain models are pending approval.
Certification may be ended by the manufacturer or certification agencies without notice.

13
GARANTIA LIMITADA
El fabricante ofrece la siguiente garantía limitada expresa para cada uno de sus productos. Esta garantía se
extiende solo al propietario original / usuario final para el uso personal del hogar. Para usos comerciales, se aplican
limitaciones adicionales.
El fabricante garantiza que las puertas de ducha estarán libres de defectos de mano de obra y materiales bajo
uso y servicio normales por un período de diez (10) años a partir de la fecha inicial de compra por el propietario /
usuario final, contratista o constructor de un distribuidor autorizado . Los materiales de sellado de la puerta de la
ducha y las juntas no están cubiertos por esta garantía.
Cualquier producto reportado al distribuidor o fabricante autorizado como defectuoso dentro del período de
garantía será reparado o reemplazado (con un producto de igual valor) a opción del fabricante. Esta garantía se
extiende al propietario original / usuario final y no es transferible a un propietario posterior.
Ni el distribuidor ni el distribuidor autorizado del fabricante ni ninguna otra persona han sido autorizados para
realizar declaraciones, declaraciones o garantías distintas a las contenidas en esta garantía; Cualquier afirmación,
representación o garantía que no sean las contenidas en esta garantía no será exigible contra el fabricante o
cualquier otra persona.
El fabricante se reserva el derecho de modificar esta garantía en cualquier momento, entendiéndose que dicha
modificación no alterará las condiciones de garantía aplicables en el momento de la venta de los productos en cuestión.
Limitaciones
Esta garantía no se aplicará después de procedimientos operativos incorrectos, roturas o daños causados por falta,
descuido, abuso, mal uso, aplicación incorrecta, mantenimiento incorrecto, alteración o modificación de la unidad,
así como corrosión química o natural, accidente, incendio, inundación, acto de Dios o cualquier otra víctima. Esta
garantía no se aplica a las manchas causadas por agua ferrosa o agua dura.
El propietario / usuario final del producto cubierto por esta garantía es totalmente responsable de la instalación
adecuada y del cableado eléctrico. El fabricante no instala ni supervisa la instalación, ni contrata a un contratista
para este fin y, por lo tanto, no es responsable por ningún defecto, rotura o daño causado por él o como resultado
de ello, ya sea directa o indirectamente. El propietario / usuario final debe proporcionar acceso a los componentes
del producto como se describe en la guía de instalación, para que el fabricante pueda realizar la garantía
especificada en este documento. Si tal acceso no está disponible, todos los gastos para proporcionar dicho acceso
serán responsabilidad del propietario / usuario final.
Esta garantía no se aplica a los productos o equipos no instalados u operados de acuerdo con las instrucciones
proporcionadas por el fabricante y todas las reglamentaciones, regulaciones y legislación aplicables relacionadas
con dichas instalaciones.
El fabricante recomienda encarecidamente que sus productos, por ejemplo, puertas de ducha y otros artículos, sean
instalados por profesionales con experiencia en productos para el baño. La instalación de puertas de ducha por una
persona inexperta puede provocar la rotura del cristal y, en consecuencia, causar lesiones personales o la muerte.
El fabricante no es responsable de los costos, daños o reclamaciones que surjan de la compra de productos que
no quepan a través de aberturas o estructuras existentes. El fabricante no es responsable de los costos, daños o
reclamaciones que surjan de defectos que podrían haberse descubierto, reparado o evitado mediante inspección
y prueba antes de la instalación.
El fabricante no es responsable por lesiones personales o muerte a cualquier persona o por daños directos,
especiales, incidentales o consecuentes, pérdida de tiempo, pérdida de beneficios, inconvenientes, gastos
imprevistos, cargas laborales o materiales, o cualquier otro costo resultante de la uso del producto o equipo o
perteneciente a la aplicación de esta garantía, o resultante de la eliminación o reemplazo de cualquier producto o
artículo o parte cubierta por esta garantía.
CON EXCEPCIÓN DE LO ESTABLECIDO ANTERIORMENTE, EL FABRICANTE NO OTORGA NINGUNA
GARANTÍA, EXPRESA O IMPLÍCITA, INCLUIDAS LAS GARANTÍAS DE COMERCIABILIDAD E IDONEIDAD
PARA UN PROPÓSITO EN PARTICULAR O EL CUMPLIMIENTO DE CUALQUIER CÓDIGO.
En cualquier caso, el fabricante no puede ser responsable de ningún importe superior al precio de compra pagado
por el producto por el propietario / usuario final, contratista o constructor.

14
Limitaciones comerciales
Además de las condiciones y limitaciones anteriores, el período de garantía para productos instalados para
aplicaciones comerciales o utilizados en negocios comerciales es de un (1) año a partir de la fecha inicial de
compra por parte del propietario / usuario final, contratista o fabricante. un centro mercantil autorizado. El fabricante
no es responsable por la pérdida de uso o de ganancias bajo ninguna circunstancia. Si el producto se utiliza como
pantalla, el período de garantía comienza cuando se muestra el producto.
Esta garantía otorga al propietario / usuario final derechos legales específicos. El propietario / usuario final también
puede tener otros derechos que varían de un estado y / o provincia a otro.
Servicio de garantia
Para obtener el servicio provisto bajo esta garantía durante el horario comercial normal, comuníquese con el
distribuidor o distribuidor que vendió la unidad o directamente con el fabricante.
El fabricante proporcionará el servicio de garantía descrito anteriormente cuando se cumplan las siguientes
condiciones: (1) la falla es de la naturaleza o tipo cubierto por la garantía; (2) el usuario ha informado a un
representante autorizado del fabricante o del servicio de garantía del fabricante de la naturaleza del problema
durante el período de garantía; (3) el usuario proporciona evidencia concluyente (por ejemplo, comprobante de
compra o instalación) de lo anterior que demuestre que la falla ocurrió o fue descubierta dentro del período de
garantía; y (4) se le ha permitido a una persona de servicio independiente autorizada o un representante de la
compañía inspeccionar el producto durante horas hábiles regulares dentro de un tiempo razonable después de que
el usuario haya informado el problema.
La obligación de la garantía del fabricante debe ser descargada al momento del reemplazo o reparación. La
negativa del comprador a aceptar la oferta termina la obligación de la garantía del fabricante.
Los productos están certificados por una o más de las siguientes agencias de certificación:
- CSA
- UL
- IAPMO
- ULI
- INTERTEK (ETL)
- WARNOCK HERSEY
- US TESTING
- NAHB
Ciertos modelos están pendientes de aprobación.
La certificación puede ser finalizada por el fabricante o las agencias de certificación sin previo aviso.

15

2018-02-07 10038466
PRINTED IN CANADA / IMPRESO EN CANADA
Save this manual for future reference
Conserve este manual como referencia
This manual suits for next models
1
Table of contents
Other HOMEDEPOT Bathroom Fixture manuals
Popular Bathroom Fixture manuals by other brands

SANPLAST
SANPLAST PRESTIGE DJ/PRIII installation instructions

Porcelanosa
Porcelanosa noken Lounge 100165569 N199999311 instruction manual

Cornat
Cornat T319649 Assembly instruction

Kallista
Kallista P50060 installation instructions

Ponte Giulio
Ponte Giulio F47ANS01 Instructions for installation

Bradley
Bradley S19-125BF Installation