Homelec Premier SLK4C User manual

90-OM1867-P1
90-OM1867
90-OM1867-P4
14
Kingsway House, Laporte Way,
Luton, Bedfordshire LU4 8RJ
Tel: 01582 544 510
PREMIER
RANGE
Thank you for your purchase of Premier Lights.
The Premier garden lighting range offers the ideal
lighting effect to any garden and features
weatherproof transformers that can be positioned
outside safely. The transformer is equipped with
a photo-cell which switches the lights on at dusk
and off at dawn. Keep a copy of these
instructions for future reference.
Please read these instructions fully
before commencing the installation:
SAFETY INSTRUCTIONS
• These lights are only to be connected to a 12V
low voltage lighting system.
• Only use either lights provided with this kit or
compatible lights from the Homelec range.
• Only use the transformer supplied or a
transformer from the Homelec Premier garden
lighting range.
• Disconnect the power before changing a lamp
and ensure the lamp is cool before handling.
• Ensure the cable is routed so as not to be a trip
hazard.
• Ensure that the wattage of all the lights
combined does not exceed the rating of the
transformer.
• The transformer must be plugged in indoors.
• Only adjust the cable and lights when the power
is switched off.
• If in doubt, consult a qualified electrician.
INSTRUCTION MANUAL
CATALOGUE NUMBERS :
SLK4C ADLK4 PLK4AC
Light & Transformer Warranty
It is unlikely that this transformer and light
fittings will fail in normal use due to faulty
materials or workmanship within 5 years for the
transformer and within 10 years for the light
fittings. If it does, Homelec undertake to repair or
replace it provided it has been installed, used and
maintained correctly in accordance with these
instructions, such that the transformer has not
been subjected to repair, opened or taken apart.
This guarantee does not cover lamps and the
finish of any product. This does not affect your
statutory rights.
This product is subject to Homelec’s Standard
Terms & Conditions of Sale.
Problem Suggested RemedyPossible Cause
1. Lights will not switch on at
dusk.
No power. Ensure transformer is plugged in
and power is switched on.
2. Only some of the lights
switch on at dusk.
Terminal spikes in the light power
connector have not made contact
with the core of the cable.
Straighten the terminal spikes and
reattach the power connector to
the low voltage lighting cable.
Low voltage cable has not been
connected to the transformer.
Ensure the low voltage cable is
connected to the transformer.
Artificial light affecting the
sensor e.g. street lights.
Mount the sensor where the
artificial lights will not affect the
sensor.
Lamp not correctly fitted into the
lampholder.
Ensure the lamp is correctly
fitted.
The lamp has blown. Replace the lamp.
Trouble Shooting :
If you chose to extend the cable, use Homelec
catalogue number CBLI-10 only. The longer the
cable, the dimmer the lights will be. We
recommend a maximum cable length of 30m,
however even at this length the lights will not be
at their full brightness.
Specification :
Transformer
Input :
Output :
Light Fittings
Lamp Voltage :
Lamp rating :
Lamp type :
BH-6 and BH-8 BH-7
230V~50Hz
12V~96W, 8A
BH-6 and BH-8
12V~
12W max.
wedge
230V~50Hz
12V~96W, 8A
BH-7
12V~
12W max.
bayonet
SLK4C ADLK4 PLK4AC

90-OM1867-P390-OM1867-P2
32
4 Art Deco Lights
4 Threaded Caps
4 Inserts
4 Ground Spikes
2 Fixing Screw Packs
5 12W 12V Lamps
1 96W Transformer
15m approx. Cable
4 Path Lights
4 Threaded Caps
4 Inserts
4 Ground Spikes
2 Fixing Screw Packs
5 12W 12V Lamps
1 96W Transformer
15m approx. Cable
4 Copper Tier Lights
4 Threaded Caps
4 Inserts
4 Ground Spikes
2 Fixing Screw Packs
5 12W 12V Lamps
1 96W Transformer
15m approx. Cable
Kit Contents :
SLK4C ADLK4 PLK4AC
Installation :
1. Locate the transformer in a suitable position, considering that the transformer has to be plugged in
indoors.
2. Unwind and layout the cable to its full length along the line where the lights will be positioned, starting
at the position where the transformer is to be located.
Assembly of Lights - SLK4C - ADLK4 - PLK4AC
1. Slide the head of the light fitting onto the post and tighten retaining screw.
2. Slide the ground spike onto the post and tighten the retaining screw, ensuring the cable is poitioned in
the slot.
3. Repeat for the remaining lights.
4. At the point where you want to locate the lights, attach the light power connector by the following
method. Place the plastic insert in the wiring channel, aligning the holes with the terminal spikes. Lay
the cable in the plastic insert so that the
terminal spikes align with the centre of each
core of the cable. Whilst holding the cable in
place, screw on the threaded cap. The cap will
force the terminal spikes to pierce the cable,
holding it in place.
5. Repeat for the remaining lights.
Ensure you have followed all of the steps
above and the lights are fully assembled and
connected to the low voltage cable before
connecting the low voltage lighting cable to
the transformer.
Transformer Installation :
1. The recommended transformer mounting
location is a minimum of 30cm above the
ground and located where its power cord is
within reach of a standard 230V power socket
outlet located indoors, or a suitable
weatherproof socket if used outdoors.
The transformer is equipped with a photo-cell
which will automatically turn the lights on at
dusk and off at dawn. To accurately do this,
the photo-cell must be mounted (using the
screws provided) in an area where it will be
exposed to the natural light of the rising and
setting sun. Avoid heavily shaded areas or
areas where artificial light may shine onto the
photo-cell. Light from automobiles,
streetlights, porch light, etc. may cause your
lights to turn off prematurely.
Note : the photo-cell may be mounted
horizontally or vertically. If you chose to
mount the transformer indoors, the photo-cell
must be placed in a window.
2. You may hang the transformer indoors or
outdoors on a wall, fence, post etc. by using
the screws provided. The screw locations are
to be positioned so they will slide onto the
slots on the rear of the transformer.
There are not any user serviceable parts within
the transformer.
Wiring Instructions :
1. Strip away 15mm of insulation off of both wires
at one end only of the low voltage lighting
cable.
2. Remove the terminal cover at the bottom of the
transformer. Loosen the two terminal screws
and wrap one of the stripped wires around each
terminal screw. Tighten the screw ensuring that
all strands of the wire are captured under the
terminal screw heads. Replace the terminal
cover.
Do not loop the low voltage cable back to the
transformer.
The transformer may now be plugged into an
appropriate socket. Please note the lights will
not come on until dusk. If you require the lights
not to be operated by the photo-cell on the
transformer, it may be wrapped in insulation
tape to shut out the light from the sensor.
Lamp Replacement :
1. Switch off the power supply to transformer and
ensure the lamp is cool before handling.
2. Untwist the light head from the light fitting.
3. Replace the lamp with a lamp of the same style
and rating.
4. Reassemble in reverse order.
8 CM
Mounting Slots
Light
Head
Light
Head Fixture
Head
Setscrew
Setscrew
Setscrew
Post
Post
Post
Ground
Spike
Ground
Spike
Ground
Spike
Setscrew
Setscrew
Setscrew
PLK4ACADLK4SLK4C

90-OM1867-P390-OM1867-P2
32
4 Art Deco Lights
4 Threaded Caps
4 Inserts
4 Ground Spikes
2 Fixing Screw Packs
5 12W 12V Lamps
1 96W Transformer
15m approx. Cable
4 Path Lights
4 Threaded Caps
4 Inserts
4 Ground Spikes
2 Fixing Screw Packs
5 12W 12V Lamps
1 96W Transformer
15m approx. Cable
4 Copper Tier Lights
4 Threaded Caps
4 Inserts
4 Ground Spikes
2 Fixing Screw Packs
5 12W 12V Lamps
1 96W Transformer
15m approx. Cable
Kit Contents :
BH-6 BH-7 BH-8
Installation :
1. Locate the transformer in a suitable position, considering that the transformer has to be plugged in
indoors.
2. Unwind and layout the cable to its full length along the line where the lights will be positioned, starting
at the position where the transformer is to be located.
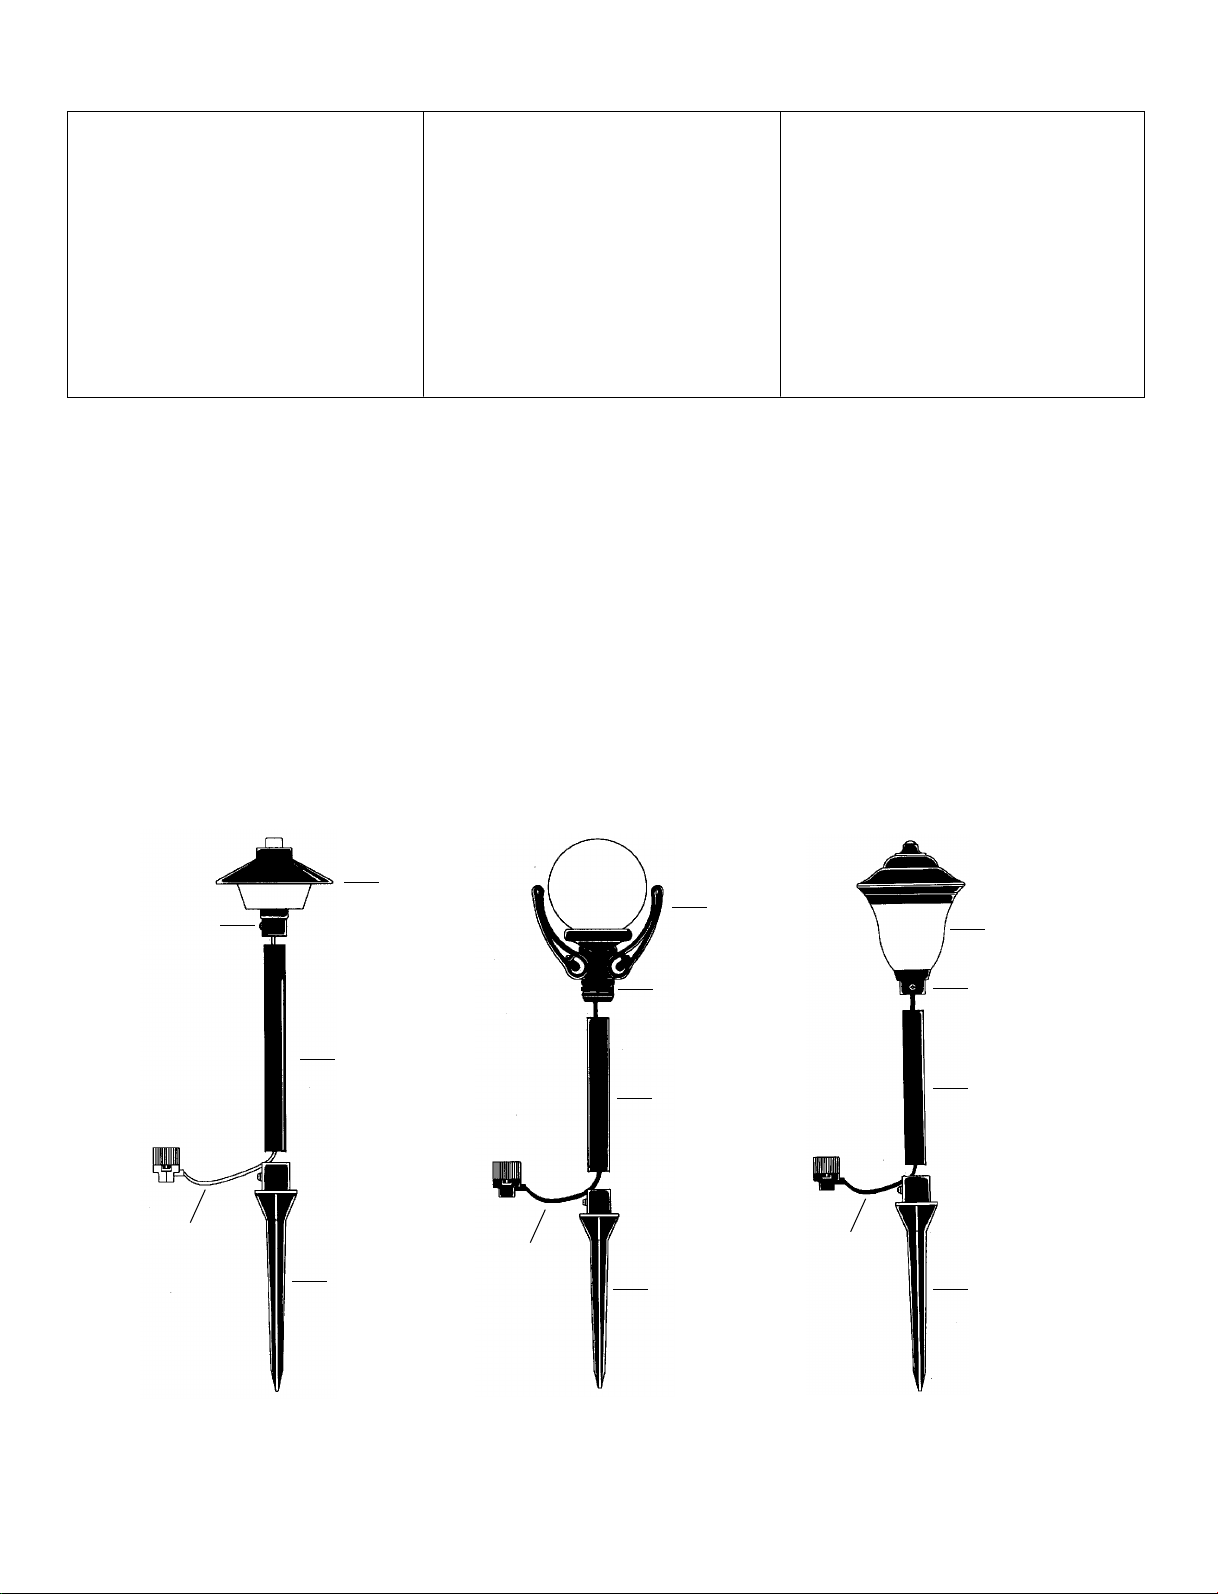
Assembly of Lights – BH-6, BH-7 and BH-8 :
1. Slide the head of the light fitting onto the post and tighten retaining screw.
2. Slide the ground spike onto the post and tighten the retaining screw, ensuring the cable is poitioned in
the slot.
3. Repeat for the remaining lights.
4. At the point where you want to locate the lights, attach the light power connector by the following
method. Place the plastic insert in the wiring channel, aligning the holes with the terminal spikes. Lay
the cable in the plastic insert so that the
terminal spikes align with the centre of each
core of the cable. Whilst holding the cable in
place, screw on the threaded cap. The cap will
force the terminal spikes to pierce the cable,
holding it in place.
5. Repeat for the remaining lights.
Ensure you have followed all of the steps
above and the lights are fully assembled and
connected to the low voltage cable before
connecting the low voltage lighting cable to
the transformer.
Transformer Installation :
1. The recommended transformer mounting
location is a minimum of 30cm above the
ground and located where its power cord is
within reach of a standard 230V power socket
outlet located indoors, or a suitable
weatherproof socket if used outdoors.
The transformer is equipped with a photo-cell
which will automatically turn the lights on at
dusk and off at dawn. To accurately do this,
the photo-cell must be mounted (using the
screws provided) in an area where it will be
exposed to the natural light of the rising and
setting sun. Avoid heavily shaded areas or
areas where artificial light may shine onto the
photo-cell. Light from automobiles,
streetlights, porch light, etc. may cause your
lights to turn off prematurely.
Note : the photo-cell may be mounted
horizontally or vertically. If you chose to
mount the transformer indoors, the photo-cell
must be placed in a window.
2. You may hang the transformer indoors or
outdoors on a wall, fence, post etc. by using
the screws provided. The screw locations are
to be positioned so they will slide onto the
slots on the rear of the transformer.
There are not any user serviceable parts within
the transformer.
Wiring Instructions :
1. Strip away 15mm of insulation off of both wires
at one end only of the low voltage lighting
cable.
2. Remove the terminal cover at the bottom of the
transformer. Loosen the two terminal screws
and wrap one of the stripped wires around each
terminal screw. Tighten the screw ensuring that
all strands of the wire are captured under the
terminal screw heads. Replace the terminal
cover.
Do not loop the low voltage cable back to the
transformer.
The transformer may now be plugged into an
appropriate socket. Please note the lights will
not come on until dusk. If you require the lights
not to be operated by the photo-cell on the
transformer, it may be wrapped in insulation
tape to shut out the light from the sensor.
Lamp Replacement :
1. Switch off the power supply to transformer and
ensure the lamp is cool before handling.
2. Untwist the light head from the light fitting.
3. Replace the lamp with a lamp of the same style
and rating.
4. Reassemble in reverse order.
8 CM
Mounting Slots
Light
Head
Light
Head Fixture
Head
Setscrew
Setscrew
Setscrew
Post
Post
Post
Ground
Spike
Ground
Spike
Ground
Spike
Setscrew
Setscrew
Setscrew
BH-8BH-7BH-6

90-OM1867-P1
90-OM1867
90-OM1867-P4
14
Kingsway House, Laporte Way,
Luton, Bedfordshire LU4 8RJ
Tel: 01582 544 510
PREMIER
RANGE
Thank you for your purchase of Premier Lights.
The Premier garden lighting range offers the ideal
lighting effect to any garden and features
weatherproof transformers that can be positioned
outside safely. The transformer is equipped with
a photo-cell which switches the lights on at dusk
and off at dawn. Keep a copy of these
instructions for future reference.
Please read these instructions fully
before commencing the installation:
SAFETY INSTRUCTIONS
• These lights are only to be connected to a 12V
low voltage lighting system.
• Only use either lights provided with this kit or
compatible lights from the Homelec range.
• Only use the transformer supplied or a
transformer from the Homelec Premier garden
lighting range.
• Disconnect the power before changing a lamp
and ensure the lamp is cool before handling.
• Ensure the cable is routed so as not to be a trip
hazard.
• Ensure that the wattage of all the lights
combined does not exceed the rating of the
transformer.
• The transformer must be plugged in indoors.
• Only adjust the cable and lights when the power
is switched off.
• If in doubt, consult a qualified electrician.
INSTRUCTION MANUAL
CATALOGUE NUMBERS :
BH-6, BH-7 and BH-8
Light & Transformer Warranty
It is unlikely that this transformer and light
fittings will fail in normal use due to faulty
materials or workmanship within 5 years for the
transformer and within 10 years for the light
fittings. If it does, Homelec undertake to repair or
replace it provided it has been installed, used and
maintained correctly in accordance with these
instructions, such that the transformer has not
been subjected to repair, opened or taken apart.
This guarantee does not cover lamps and the
finish of any product. This does not affect your
statutory rights.
This product is subject to Homelec’s Standard
Terms & Conditions of Sale.
Problem Suggested RemedyPossible Cause
1. Lights will not switch on at
dusk.
No power. Ensure transformer is plugged in
and power is switched on.
2. Only some of the lights
switch on at dusk.
Terminal spikes in the light power
connector have not made contact
with the core of the cable.
Straighten the terminal spikes and
reattach the power connector to
the low voltage lighting cable.
Low voltage cable has not been
connected to the transformer.
Ensure the low voltage cable is
connected to the transformer.
Artificial light affecting the
sensor e.g. street lights.
Mount the sensor where the
artificial lights will not affect the
sensor.
Lamp not correctly fitted into the
lampholder.
Ensure the lamp is correctly
fitted.
The lamp has blown. Replace the lamp.
Trouble Shooting :
If you chose to extend the cable, use Homelec
catalogue number CBLI-10 only. The longer the
cable, the dimmer the lights will be. We
recommend a maximum cable length of 30m,
however even at this length the lights will not be
at their full brightness.
Specification :
Transformer
Input :
Output :
Light Fittings
Lamp Voltage :
Lamp rating :
Lamp type :
BH-6 and BH-8 BH-7
230V~50Hz
12V~96W, 8A
BH-6 and BH-8
12V~
12W max.
wedge
230V~50Hz
12V~96W, 8A
BH-7
12V~
12W max.
bayonet
BH-6 BH-7 BH-8
This manual suits for next models
2
Popular Landscape Lighting manuals by other brands

Regent Lighting Solutions
Regent Lighting Solutions Voyager 1 installation instructions

Eaton
Eaton Cooper Lighting XNV2 installation instructions

Malibu Boats
Malibu Boats LZ10131P instructions

Malibu Boats
Malibu Boats LZ4HWGR instructions

AMP Lighting
AMP Lighting ASDL-2014-P-WH Installation & maintenance guide

Kichler Lighting
Kichler Lighting 15480CBR instructions