HomeSeer HT-SEL User manual

1EATON www.cooperwiring.com
Congratulations on your purchase! Your RFSEL Controller is ready to put you in control of your home. Please take a few minutes to read through
this guide to familiarize yourself with the steps required to set up your Z-Wave network and your controller.
STEP #1 – RFSEL Controller Initial Setup
To begin using HS3 you must setup your RFSEL. Follow these steps:
RFSEL Hardware Installation
a) Unpack the Controller and AC power supply.
b Connect a monitor, mouse, and keyboard for initial set up. (The unit is also accessible remotely using VNC or find.homeseer.com)
c) Connect an Ethernet cable to your Controller and to a network port on your internet router.
d) Connect the AC power adapter to your Controller to begin the boot process. Turn on the Controller on and allow the unit to boot fully.
Accessing the Controller Web Interface
Once the hardware is set up you will want to access the web interface to set up HS3. Please skip to Step 2 to access the Controller remotely if you
do not have a monitor and keyboard set up with the RFSEL.
The method below should work with any browser on any device (mobile or desktop).
a) Navigate to http://find.homeseer.com
b) Click the “Search” button. Your HomeSeer system should now appear at the bottom.
c) Click the IP address hyperlink to access your system’s web interface.
Set Your System Password
The system password screen will appear the first time you run your RFSEL. You MUST set a system password to prevent unauthorized access to
your unit. Please do this now by following the prompts on your screen. The default system
password is ‘hsthsths3’.
Registering Your Controller
You must register your unit to allow HS3 to boot up fully and automatically every time a
restart occurs. Your licenseID and password is located on the bottom of the unit. Note:
License codes are included on a sticker on the bottom of your RFSEL.
a) Go to the Tools dropdown navigation at the top and click on Setup.
b) Once the setup page loads, at the very top there is a License section. Click Register
Online.
c) Enter your License ID and Password located on the bottom of the unit.
d) Once completed fill out the form and proceed to your next step.
Changing the Username and Password for HS3 Users
The default username is: default and the default password is: default. It is highly
recommended that you change the username and password to something more secure.
Please make sure to save this information.
a) Go to the Tools menu and click Setup.
b) Click on the Network tab at the top and you will see a list under Web User Settings.
c) Enter a User Name and Password in to the respected fields and then choose the User
Rights.
d) Click Add User once all fields have been completed. Click Delete to remove a User.
Updating Your RFSEL
Be sure to check for updates and install any that are available. To do this, follow these steps:
a) From the RFHTZ web interface, use the pull down menus to navigate to the General Tab
of the Setup Area (TOOLS > Setup).
b) If an update is available, click the update button near to top of the page and wait for the
update to download and install. Your RFHTZ will automatically reboot once the update is installed.
Configuring the Wi-Fi Adapter
Wi-Fi is included with your RFSEL, follow these instructions for setting it up: (You must have HS set up with the Ethernet cable first)
a) Access the Network Tab of the Setup section. Locate the Wi-Fi Settings section.
b) Enter the SSID (Wi-Fi network name) of your Wi-Fi. (This is case sensitive)
c) Choose your encryption type and enter your Wi-Fi password. Keep ‘Use DHCP’ checked.
d) Go to Tools->System->Shutdown System. Once the system is shutdown. Unplug the power and then the Ethernet cable. Now reconnect the power and let the system boot.
e) If you go to find.homeseer.com now, it should show another RFSEL. This is your new IP address and are all set to use the Wi-Fi adapter.
Restoring back to Factory Default
The RFSEL comes with a built in restore drive. This restore will set your system back to exactly how you received it (factory default). Doing a system restore will reset your RFSEL back to factory
default and wipe all user data. WARNING: Make sure to make a backup of your HomeSeer HS3 folder (located C:\Program Files(x86)\HomeSeerHS3) if you want to save anything from your previous
HS3 install. All user data will be erased.
a) Attach a monitor and keyboard to your RFSEL.
b) Restart your Controller.
c) Upon restart wait for the HomeSeer Start / Restore Menu to show.
d) Select the System Restore option.
e) Press Enter when it prompts to you select the restore option (ie S6_SYSTEMRESTORE_XXXXXX)
f) Your Controller will restart once finished
STEP #2 – Local/Remote Remote Access
MyHS Remote is a free remote tool that will allow you to access the HS3 interface of the Controller from any remote computer via home network
(LAN) or the internet (WAN). The Controller can also be accessed locally via IP address and/or computer name. See below for instructions.
Accessing Your Controller Locally
HS3 can be accessed from any computer on the same local network just by typing in the IP Address (i.e. 192.168.1.10) of your Controller.
Using HomeSeer MyHS Remote Service
Welcome to the MyHomeSeer Remote. MyHS will allow you to access your HS3 system from anywhere without having to access your router.
There are requirements for MyHS to work. HS3 must be version 3.0.0.97 or later. HSTouch Android client requires 1.0.0.76 or later. Please make
sure to update to these versions. It is recommended that you uninstall the application and then reinstall it from the Play Store/iTunes Store. (This
guide assumes you have HSTouch Server already set up. If you do not, please refer to the HS3 Quick Start Guide on setting that up). Now, let’s get
started!
To begin using MyHSRemote you will need to register your HS3 software with the connected service.
ENGLISH
RFSEL (HT-SEL) GETTING STARTED GUIDE

2EATON www.cooperwiring.com
Registration
a) Once the HSTouch has finished installing, go ahead and open it up.
You will be prompted with a Log In to MyHS screen.
b) Click Register. Your default browser will come forward and load the
registration page.
c) Enter in the preferred email address you would like to use to be tied
to your MyHS for the Account Email Address. This will later be used
as your MyHS username.
d) Enter a preferred Account Password. You will use this as the
password to enter in your MyHS settings.
e) HTHS3 users, this is located on the bottom of your unit. For HS3
Software users, this information was emailed to you.)
f) Click Register. You will receive a confirmation on the next screen
unless errors are detected. You will also be emailed an email that
requires a confirmation. Click the link in the email.
STEP #3 – Installing Plug-ins
Your Controller works with many different protocols. All of these protocols require a plug-in to be installed. There are HomeSeer Tech plug-ins and many 3rd Party plug-ins. Please follow the
instructions below on installing a plug-in or you can click here to watch a video tutorial.
1. Locate the Plug-Ins drop down at the top of the screen. With that dropdown click Manage.
2. Click the yellow circle to right of the Additional Interfaces. This will present you with a list of categories. Each category has a list of plug-ins that can be installed.
3. Click on the circle next to the category that you wish to expand.
4. Once you see the list of plug-ins, click the check box to the left of the plug-ins that you want to
install. (You may check more than one at a time.)
5. After you have selected the plug-ins you wish to install, a Download and Install button will
appear. Click this button to proceed with the install.
6. You will be given a progress bar under the Installed Plug-ins section indicating the status of
the install.
7. You must now Enable your plug-ins to use them. Once they are enabled they will be available
to configure. Some plug-ins will require you to enter a COM port before going into the
configuration pages.
8. To get to the configuration pages, go back to the top where the plug-ins menu is and you will
see a list of your installed plug-ins. Within each plug-in there is another menu that has a link to
the configuration pages.

3EATON www.cooperwiring.com
STEP #4 – Adding a Z-Wave Controller
In order to control Z-Wave devices, such as light switches, thermostats, door locks and sensors, they must be added into a Z-Wave “network”. Follow the steps below to add your Z-Wave
controller and create a Z-Wave network. For a more visual walkthrough, click here.
a) Go to the Plug-ins drop down menu and hover over Z-Wave.
Select Controller Management.
b) Click the Add Interface button to begin the management
process.
c) You will now be prompted to add an interface name,
interface type, and the COM port of the interface. A good
naming scheme is either the name of the interface you are
using or the location of your Z-Wave controller (if you have
multiple). The interface type corresponds to the type of
Z-Wave controller you are using. If you have using an IP2SL/
WF2SL, select the Ethernet option.
d) Go ahead and click Add and let HomeSeer initialize the unit.
Once initialized, you will be brought to a new screen.
e) You must now enable the controller. Click the red circle with
a line through it (“No symbol”) to enable it. You will see a
green checkmark if the interface enabled correctly.
f) To add another Z-Wave interface simply follow these
instructions again.
STEP #5 - Z-Wave Network Setup
In order to control Z-Wave devices, such as light switches, thermostats, door locks and sensors, they must be added into a Z-Wave “network”. Follow the steps below to create your Z-Wave
network and to add devices. Note: the steps below assume you’ve already physically installed Z-Wave devices in your home.
Via Z-Tool+ (requires HS3 version 3.0.0.194 and Z-Wave version 3.0.1.23)
To begin using Z-Tool+, the app must be downloaded from within your App Store. Open either the Play Store, iTunes Store, or Windows Store and search for ‘Z-Tool+’. The search will return the
app and then just click Install. Click here for a more comprehensive guide to using Z-Tool+.
a) Z-Tool+ will automatically find your system(s). Click Select a System if you have more than one local system.
b) Select the Add or Remove action you wish you complete.
c) Activate the network button (or button sequence) on your Z-Wave device and observe the inclusion process in the log window.
Once removed a confirmation will show in the log.
d) Once the Add process is finished a window will pop up to name and change the location attributes of the device.
e) Your device can now be controlled via HSTouch or HS3 Web Control.
Via Web Control Page
Adding Z-Wave Devices (wall switches, receptacles, plug-in modules, sensors, door locks, etc)
a) From the web interface, use the pull down menus to navigate to the Z-Wave Controller Management page (PLUG-INS > Z-Wave
> Controller Management).
b) Locate the “Z-Wave Interfaces” area and expand your Z-Wave Controller section. Open the “Actions:” menu and choose “Add/
Include a Node”.
c) Click the ‘Start’ button below the Actions menu. Your Controller is now in Add mode and is ready to communicate with your
device.
d) Activate the network button (or button sequence) on your device and observe the adding process in the green log window.
When done, you’ll receive an acknowledgement such as “Finished.”. Your Z-Wave device is now removed from your Z-Wave
network!
Battery operated devices should be right next to the Z-Wave controller when adding. Door Locks should be no more than 10 feet
away when being added and should be removed first.
Removing Z-Wave Devices
Follow the procedure below to (a) reset the device to its factory settings or (b) remove the device from your Z-Wave interface.
e) From the web interface, use the pull down menus to navigate to the Z-Wave Controller Management page (PLUG-INS > Z-Wave > Controller Management).
f) Locate the “Z-Wave Interfaces” area and expand your Z-Wave Controller section. Open the “Actions:” menu and choose “Remove/Exclude a Node”.
g) Click the ‘Start’ button below the Actions menu. Your Controller is now in add mode and is ready to communicate with your device.
h) Activate the network button (or button sequence) on your device and observe the adding process in the green log window. When done, you’ll receive an acknowledgement such as “DONE
- Remove Node Operation is Complete.” Your Z-Wave device is now removed from your Z-Wave network!
STEP #6 – Importing, Editing and Controlling Your Z-Wave Devices
Importing devices is only necessary if you are using the Aeon Labs Z-Stick to configure your Z-Wave network, otherwise that step can be skipped. You’ll need to import that network into your
Controller, so that your devices can be monitored and controlled. Here’s how to do that:
Importing Z-Wave Devices
e) From the web interface, use the pull down menus to navigate to the Z-Wave Controller Management page (PLUG-INS > Z-Wave > Controller Management).
f) Locate the “Z-Wave Interfaces” area and expand the section of your Z-Wave Controller. Open the “Actions:” menu and choose “Import Node Info from Controller and Scan Devices”.
g) Click the ‘Start’ button below the Actions menu. Your Controller will now import your device information from the Z-Stick. When done, you’ll receive an acknowledgement such as “Finished
with Z-Wave device synchronization”. Your Z-Wave devices may now be monitored and controlled from the Controller!
Editing and Controlling Your Z-Wave devices
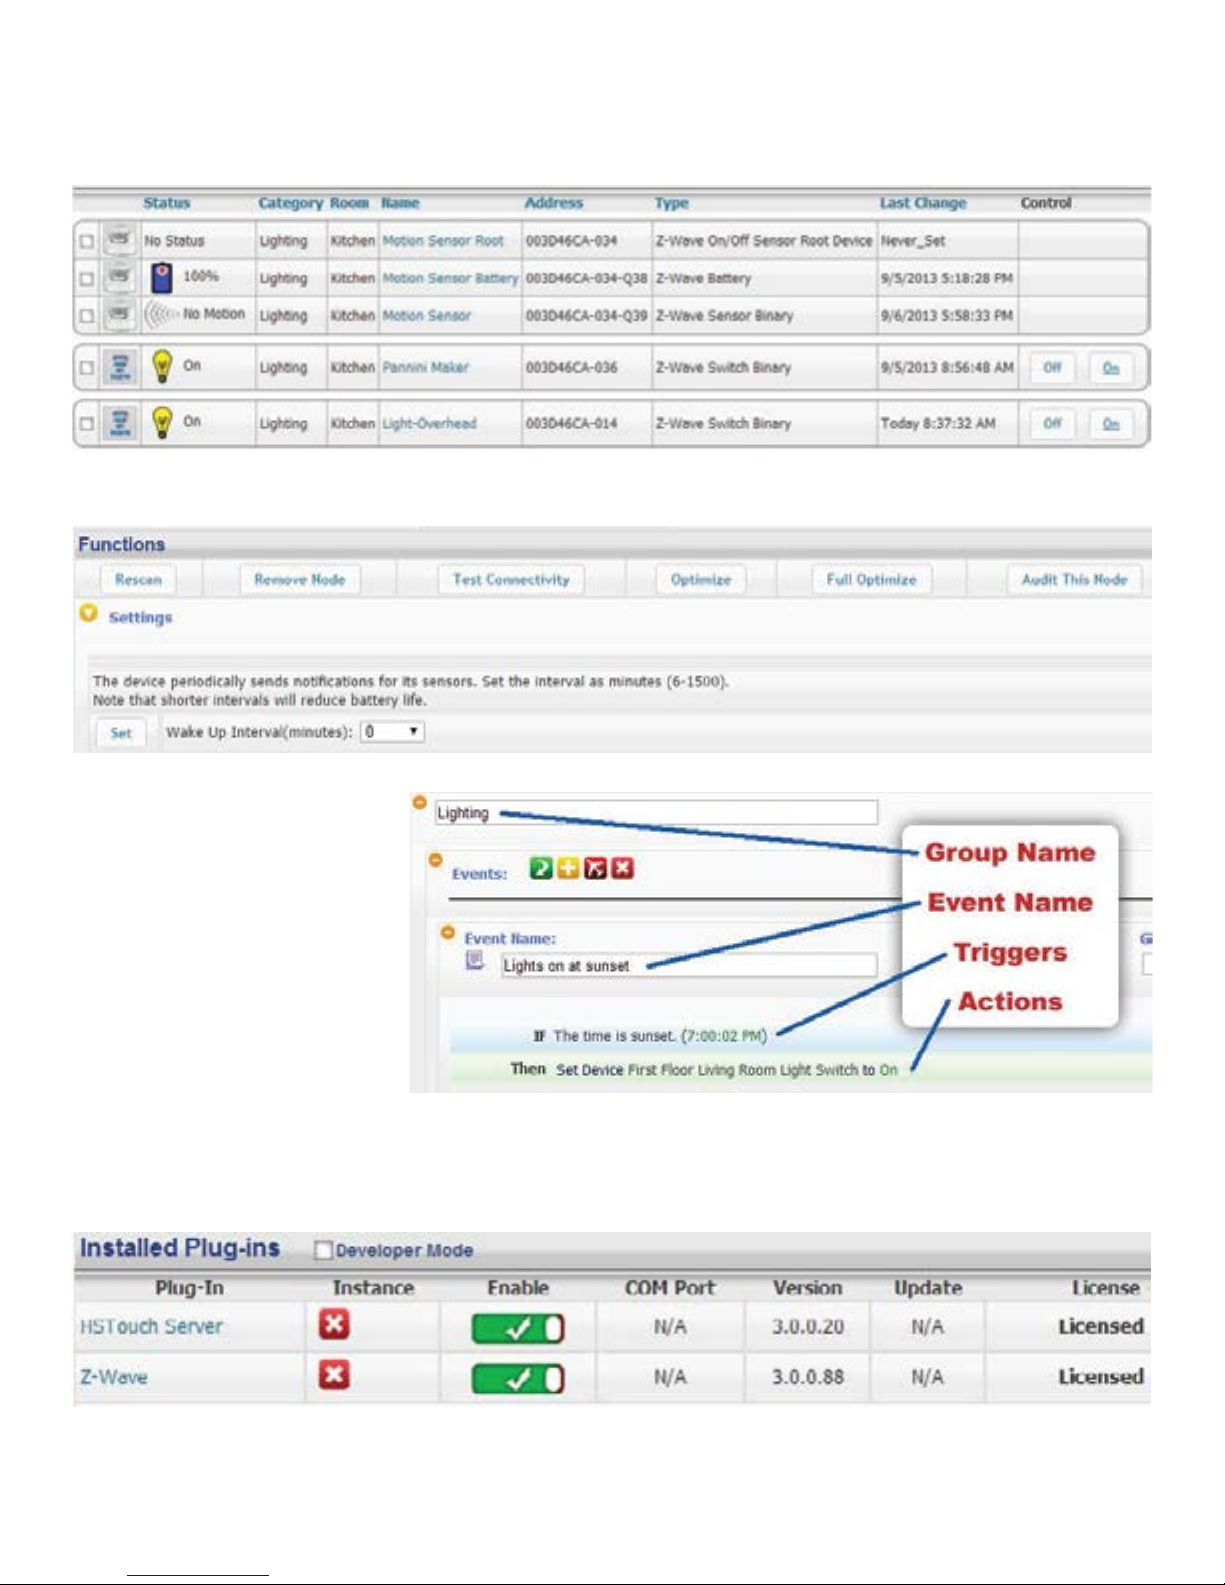
a) From the web interface, use the pull down menus to navigate to the Device Management Page (VIEW > Device Management). Click the “Show All” button in the upper right hand area of the
page. A list of all your devices will now be displayed.
b) To edit the name, location and other properties of any device, click the Name.
c) To control the device, use the buttons in the Control column.

4EATON www.cooperwiring.com
Configuring Device Settings
a) From the web interface, go to your Device Management page and click on the device you wish to configure.
b) Click on the Z-Wave tab.
c) Here you can Rescan, Remove, Test, Optimize, and Audit the node. Associations can also be set here.
d) Expanding the Settings section will allow you to change the wake-up interval for battery operated devices. Here you will also see many settings for different parameters depending on the
device.
e) Below the settings will be Associations which will be available for devices that support associations. Here you can set up companion switches to work with Z-Wave associated master
switches.
STEP #7 – Creating Automation Events
Simply put, an automation event consists of an action
(or actions) that are set into motion by one or more
triggers. Example: Turning on lights at sunset. Trigger =
sunset, Action = turning lights on. With Controller, you
can quickly and easily create all the events you need.
Here’s how to create the sunset event above:
Creating Events
a) From the web interface, use the pull down menus
to navigate to the Events page (VIEW > Events).
b) Change the event group name from “New Group”
to “Lighting”.
c) Now expand the “New Event” section and rename
the new event to “Lights on at Sunset”
d) In the shaded blue “Trigger” section, choose “The
Time Is…” and then select “The Time is Sunset”
e) If the shaded green “Actions” section, choose
“Control a Device” and then select the device
you wish to control and the method of control
(on / off) you wish to use. See image above for
resulting view.
STEP #8 – HSTouch Server Setup
After you have successfully connected to your Wi-Fi network, you must make sure HSTouch Server is properly set up before connecting the client to your HomeSeer system. Follow the
instructions below to set up HSTouch Server.
a) Go to the Plug-in’s menu within your HomeSeer Web Control and click on Manage.
b) If HSTouch Server is not installed follow these steps, otherwise skip to step f
c) Click on Additional Interfaces to expand the plug-in updater.
d) Scroll down to User Interfaces and expand that. Check the box next to HomeSeer HSTouch Sever.
e) Scroll back up and click on Download and Install.
f) Now that HSTouch Sever is installed, it must be enabled for mobile access. Underneath the Enable column, click on the red toggle. It should become green with a check mark in it.
g) HSTouch Server is now enabled. You can now go into HSTouch on your device to configure HSTouch.

5EATON www.cooperwiring.com
Setting Up IP Cameras
For setting up an IP Camera within HS3, follow the instructions below. Note that all Foscam IP Netcams will be automatically detected by HS3 whereas other cameras will not.
a) Now that HStouch is enabled you should be able to go to Plug-ins->HSTouch Server->HSTouch.
b) At the bottom you will see an IP Camera section. All Foscam cameras will automatically show up here. Yoou will need to enter the username and password for each camera.
c) For other branded cameras click the Green Plus to add a camera.
d) Here you can name the camera, add the snapshot url (this will include the username and password), and then set up pan/tilt controls.
STEP #9 – HSTouch Client Setup
Here you will configure your settings and connect to your
HomeSeer system to allow for control from your device. Follow
the instructions below to set up the HSTouch Client. For iOS,
please go to your Settings App first.
a) HSTouch will prompt you to select a server or settings. Click
settings. (The first launch will require an initial setup.) A
menu on the bottom right will pop up. Click Settings again.
(This menu can also be used to switch between servers, go
to settings, or exit the app.)
b) Within the settings you are given multiple options.
Servers 1-4 allow you to configure each server for different
locations.
c) Select the server you would like to have as your Home setup.
d) Configure a Label for that HomeSeer system. Click Address
to enter the IP Address or Domain of the HomeSeer System.
e) Now that you have set up the connection address, go ahead
and enter in your Username and Password for that server.
There is no need to change the port.
f) You can follow steps c-e for the remaining 3 connections.
g) If you go back to the main settings screen, there are other
options for setting up HSTouch.
h) Connection Mode allows you to choose a default connection
for each time you start HSTouch. (HSTouch will no longer
prompt to choose a connection at the beginning.)
i ) Dim Systembar allows for the bottom systembar to be
dimmed. Font Scaling allows for changing the scaling factor.
j) Auto Size allows for auto-sizing of the project being used for
your device. Client Name will allow you to change the name
of your device’s HSTouch Client. (For use with HSTouch
Designer). Zipcode is used for weather.
k) Now that your Client has been set up, go back to the Main
Screen and go to the settings menu on the bottom right. Click
Exit. Now go to your app drawer and click HSTouch. This will
allow for any changes to take place.
l) You are now ready to control your home via your device!
Setting Up MyHS Remote
The next step involves going into the HSTouch application and entering in your Account Username and Account Password.
a) Open up the HSTouch application. It will give you the same prompt as earlier to Log In to MyHS.
b) The email you used to register is your Username and the password you used will be used as the
Password.
c) Click Ok and HSTouch will now connect.
d) HSTouch will now always connect through MyHS when launching. This will work from any location and
any network.

Icon Legend for HS3
This is a list of the icons that are found in HS3 with a description of their function.
DESCRIPTION
Add / Delete
Copy Event
Standard Editing / Advanced Editing
Toggle Edit Mode
Enabled / Disabled
Error communicating
Expand / Collapse Section
Marked Devices Shown/Header and Menus Shown –
Marked Devices Hidden/Header and Menus Not Shown
Access Log Settings
Poll Devices for Status
Reset Layout to Default
Run Event
Devices Ungrouped / Grouped
Add a Keyword or Pair
Group Conditions are used / not being used
Expand Device Management Page / Collapse Device Management Page
Note: Some buttons are multi-functional.
*If you want to know what that button will do, just hover your cursor over the icon and small text will appear to provide definition.

Eaton
1000 Eaton Boulevard
Cleveland, OH 44122
United States
Eaton.com
Electrical Sector
203 Cooper Circle
Peachtree City, GA 30269
United States
Eaton.com
Cooperwiringdevices.com
© 2015 Eaton
All Rights Reserved
Printed in USA
Publication No.
IL610002EN
September 2015
Eaton is a registered
trademark.
All other trademarks
are property of their
respective owners.
TROUBLE SHOOTING RFSEL
Unit Won’t Power On Ac Adapter Unplugged
AC Adapter Bad
Power Cable Bad
Plug-In Adapter
Contact Homeseer
Unit Powers On But Won’t Boot USB Hardware Conflict
Software Failure
Hardware Failure
Detach USB Device And Reboot
Contact Homeseer
Z-Wave Devices Cannot Be Added Into Z-Wave Network
Device Was Previously Installed On Another Z-Wave Network
Device Failure
Z-Stick Failure
Use “Remove A Device” Procedure To Reset Device,
Then Try To Add
Replace Device
Contact HomeSeer
HSDiscover Cannot Locate Device RFSEL Not Powered On
RFSEL Not Fully Booted
RFSEL Not Connected To LAN
Power Unit On
Wait 2 Minutes For Unit To Boot
Connect Unit To Router And Reboot
Door Locks Won’t Include Or Can’t Be Controlled Adding Process Incorrect Or Incomplete Exclude Devices and Repeat Procedure Outline In
“Including Battery Powered Devices” Section
Sensors Won’t Include Or Can’t Be Monitored
All Other Problems
Contact HomeSeer
All customers have lifetime support. Initially you have 30 Day Priority Phone Support and after that you have support through our Help Desk (helpdesk.homeseer.com) and our community based
Message Board (board.homeseer.com).
*Note that Add = Include, Remove = Exclude, and Copy = Replicate
HomeSeer Technologies 10 Commerce Park North, Unit #10 Bedford, NH 03110 www.homeseer.com 603-471-2816
Other HomeSeer Network Router manuals