6
Homewerks.com
1. Cierre el agua en las válvulas
de suministro o en el suministro
de agua principal. Desconecte
las líneas de suministro. Retire
el conjunto de cabezal de ducha
existente.
Limpiar y secar la supercie
donde se instalará la nueva
ducha.
16 .
Usando adaptadores macho de
1/2 pulg., conecte las salidas de
agua fría y caliente. Caliente debe
ir del lado IZQUIERDO cuando
mira el cuerpo del grifo (E).
ADVERTENCIA: NO lo use
solo con una salida de agua
caliente. Se producirán
quemaduras graves.
2.
Mida la posición deseada del kit de
ducha para que las manijas estén a
una altura cómoda y el conjunto de
la manija tenga una supercie sólida
para montar. Por lo general, el cuerpo
del grifo (E) estará de 3 a 4 pies por
encima del suelo.
7. Monte el cuerpo del grifo (E)
en una supercie sólida a
través de las orejas de
montaje (7.1) utilizando
tornillos de montaje (D) y
anclajes para paneles de yeso
(F), si es necesario.
Fije la jabonera (C) a la pared
a la distancia deseada del
cuerpo del grifo (E) usando los
tornillos de montaje (D). Si no
se monta en un montante, use
los anclajes para paneles de
yeso (F).
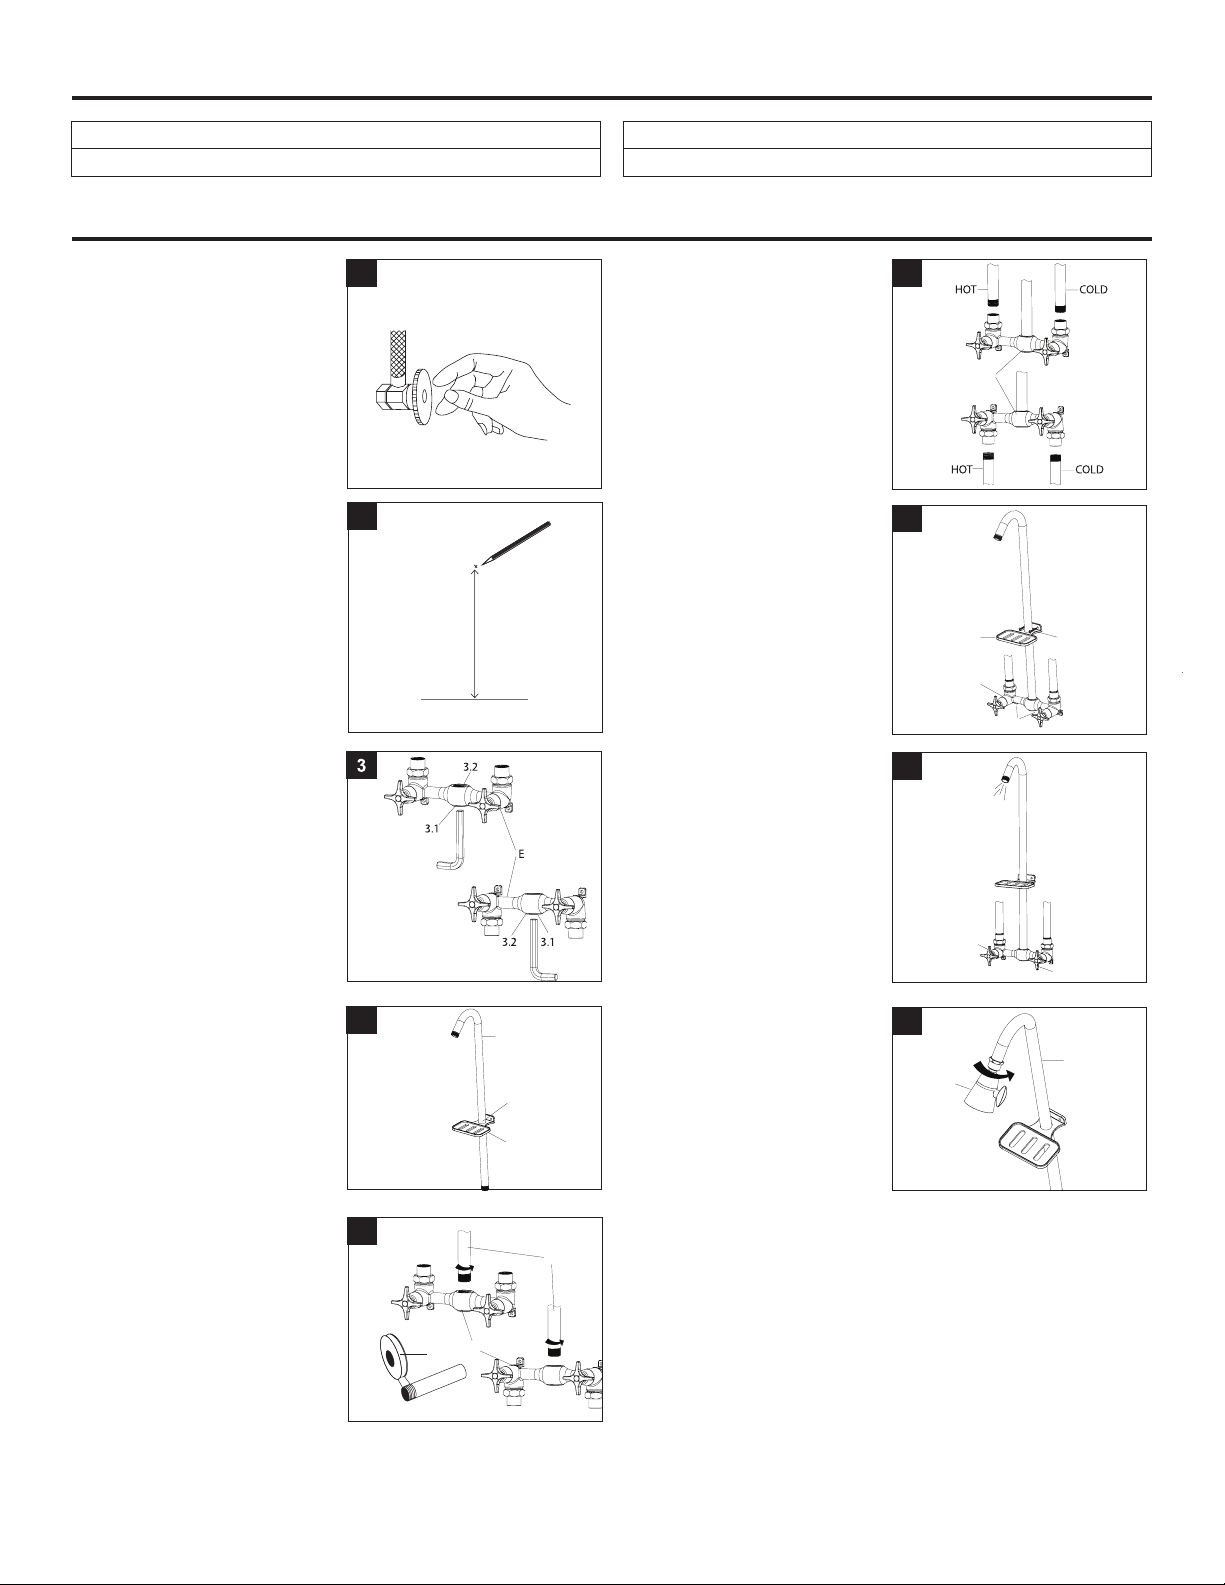
3.
Determine si el suministro de agua
proviene de arriba o de abajo del
cuerpo del grifo (E). Si viene de arriba,
continúe con el siguiente paso. Si
viene desde abajo, use una llave Allen
para quitar el tapón desviador (3.1)
en el cuerpo del grifo (E). Envuelva
las roscas del tapón desviador (3.1)
con cinta selladora de roscas (G).
Coloque el tapón desviador (3.1) en
la abertura del tapón opuesta (3.2).
Apriete rmemente.
8. Abra el suministro de agua a la
ducha. Gire ambas manijas
(8.1) para encender la ducha.
Enjuague las salidas de agua
fría y caliente durante 30
segundos para eliminar residuos
de los tubos. Compruebe si hay
fugas y apriete las áreas que
tengan fugas. Cierra la ducha.
4. Deslice la jabonera (C) sobre el
brazo de la ducha (B). Asegúrese
de que las pestañas de montaje
(4.1) en la jabonera (C) apuntan
frente a la curva del brazo de la
ducha (B).
4
B
C
4.1
9. Envuelva en el sentido horario
la cinta de sellado de roscas
(G) alrededor de las roscas en
el extremo del brazo de la
ducha (B). Enrosque el
cabezal de la ducha (A) en el
brazo de la ducha (B).
Apriete a mano. No apriete
demasiado.
5 . Con la base del brazo de la
ducha (B) mirando hacia usted,
envuelva en el sentido horario la
cinta de sellado de roscas (G)
alrededor de las roscas en la
base del brazo de la ducha.
Atornille la base del brazo de la
ducha (B) en el cuerpo del grifo
(E). Gire hasta que esté
apretado, asegurándose de que
la salida del brazo de la ducha
(B) esté apuntando lejos de la
pared.
ESPECIFICACIONES DEL PRODUCTO
INSTRUCCIONES DE INSTALACIÓN
2
6
A
B
9
8
5
C
E
7.1
D
8.1
8.1
Caudal de ujo máximo: 6,8 LPM (1,8 GPM) a 80 PSI
Cumple con la norma ASME A112.18.1-2018/CSA B125.1-18
Cartuchos cerámicos
Acabado en cromo, níquel cepillado o negro mate
B
E
FRÍACALIENTE
FRÍACALIENTE
E
G
3 ft. - 4 ft.
Nivel del suelo