Hommie j7-c User manual

EN
Hommie USB DIGITAL TESTER USER MANUAL
Thank you for purchasing the Hommie product. Please read this [User Manual] carefully before using the product, and retain it in for future use. If you have any
questions or suggestions about our products, please contact: hommiehk@hotmail.com.
Product overview:
Multi-interface LCD display:
How to use
Connect power supply equipment (Such as charger, power bank, USB cable,etc.) to the corresponding input interface of this USB tester. Then, connect your device,
such as Laptop, Tablet, Smartphone and more, to the corresponding output interface of this USB tester.
Note:
1. If you use the USB cable to connect (Such as charging your laptop), please pay attention to the quality and input of the cable, especially the maximum current.
2. While charging your smart phone or computer, please do not use Micro USB input interface.
Operation
1. Screen display settings.
Click the MFB to switch the display interface when the USB tester is power on: Chinese interface - English interface -Personalized interface 1-Personalized interface 2
- Personalized interface 3 - Over voltage protection - Low voltage protection - Over current protection - Off
Interfaces
Features
Operations
Chinese interface
English interface
Personalized interface1
Personalized interface 2
Personalized interface 3
Switch next interface.
Click MFB.
Reset capacity.
Double-click MFB.
Reset electric quantity.
Triple-click MFB.
Reset time.
Click MFB four times.
APO settings: Set AO../OFF/1-24 hours
AO.. - Smart monitoring the APO.
OFF - Turn off the APO.
1-24 hours - Auto power off when reaching the
setting time.
Click MFB five times to access the APO settings.
Click MFB to decrease the time(Click MFB and hold it to decrease quickly).
Double-click MFB to increase the time (Double-click MFB and hold it to increase
quickly).
Wait for 10s until the current value is confirmed.
Standard current
Click MFB seven times (Only allow to adjust current when there is no device to
be charged. After adjusting, the current is 0.00A. If you adjust the current during
charging device, please disconnect device and then adjust the current again.).
Flips the screen to 180°.
Hold MFB for 2s.
High voltage protection
Input voltage >the set value (1.00V-35.0V), the
tester will cut off its output and alarm to remind.
Click MFB to switch next interface.
Double-click MFB to increase the value, and hold it to increase quickly.
Triple-click MFB to decrease the value, and hold it to decrease quickly.
Low voltage protection
Input voltage <the set value (0.00V-34.0V), the
tester will cut off its output and alarm to remind.
Over current protection
Current >the set value (0.20A-15.0A), the tester
will cut off its output and alarm to remind.
Note: AO.. function. Detecting that the power is always less than 2W within 1 hour, the product will automatically cut off the output.
2. Background settings.
Turn on the USB tester while holding the MFB. It will enter into the interface of Background Settings. Click MFB to switch interfaces: Voltage adjustment - Current
adjustment - High voltage protection - Low voltage protection - Over current protection - Capacity compensation factor .
Note:
1. “Over voltage, Low voltage and Over current protection” is the same as the above mentioned function, whose only difference is the operation.
2. Do not adjust voltage and current if there is no accurate 5.00V power supply and 2.00A constant current load. If there is wrong adjustment due to your
misoperation, you can press and hold the MFB for 2s to reset the factory settings.
Interfaces
Features
Operations
Voltage adjustment
The externally connected 5.00V voltage as
calibration reference voltage.
Double-click MFB (If the externally connected 5.00V voltage itself is not
accurate, the calibration will affect the voltage accuracy of the tester.)
Current adjustment
The externally connected 2.00A load with the
constant current as calibration reference current.
Double-click MFB (If the externally connected 2.00A constant current load itself
is not accurate, the calibration will affect the accuracy of current of the tester.)
High voltage protection
Input voltage >the set value (1.00V-35.0V), the
tester will cut off its output and alarm to remind.
Double-click MFB to access the setting state:
Click MFB to decrease the value, and then hold it to decrease quickly.
Double-click MFB to increase the value, and then hold it to increase quickly.
Wait for 10s until the current value is confirmed.
The instruction of capacity compensation factor: For a example, when
monitoring the actual capacity of power bank, if the total internal loss is 35%,
the actual capacity is x(1+0.35) - that is x1.35.
Low voltage protection
Input voltage <the set value (0.00V-34.0V), the
tester will cut off its output and alarm to remind.
Over current protection
Current >the set value (0.20A-15.0A), the tester
will cut off its output and alarm to remind.
Capacity compensation
factor
The capacity of the current voltage multiply by
capacity compensation factor to get the final
displaying value (x0.50-x1.50).
RESET!
Screen displays RESET and restore to factory state.
Hold MFB for 2s.
Power Output
Power Input
Resistance; Temperature
Capacity
Electric quantity
Current; Power
APO
Current
Resistance
Capacity
APO
Voltage
Power/Temperature
Electric quantity
Time
Voltage of power lines and
data lines
Time
Type-C output
USB output
MFB (Multi-Function Button)
Type-C output
USB input
Micro USB input
Voitage
Power
Electric quantity
Capacity
Time
Current
Resistance
Temperature
capacity factor
APO (Automatic Power Off)
Voltage
Current
Time
Power
Electric quantity
Capacity
APO

FR
Hommie TESTEUR NUMERIQUE USB MANUEL D'UTILISATEUR
Merci pour l'achat du produit Hommie .Veuillez lire attentivement ce [Manuel de l'utilisateur] avant d'utiliser le produit. et conserver pour une utilisation ultérieure. Si
vous avez des questions ou des suggestions sur nos produits, Veuillez contacter: hommiehk@hotmail.com.
Présentation du produit:
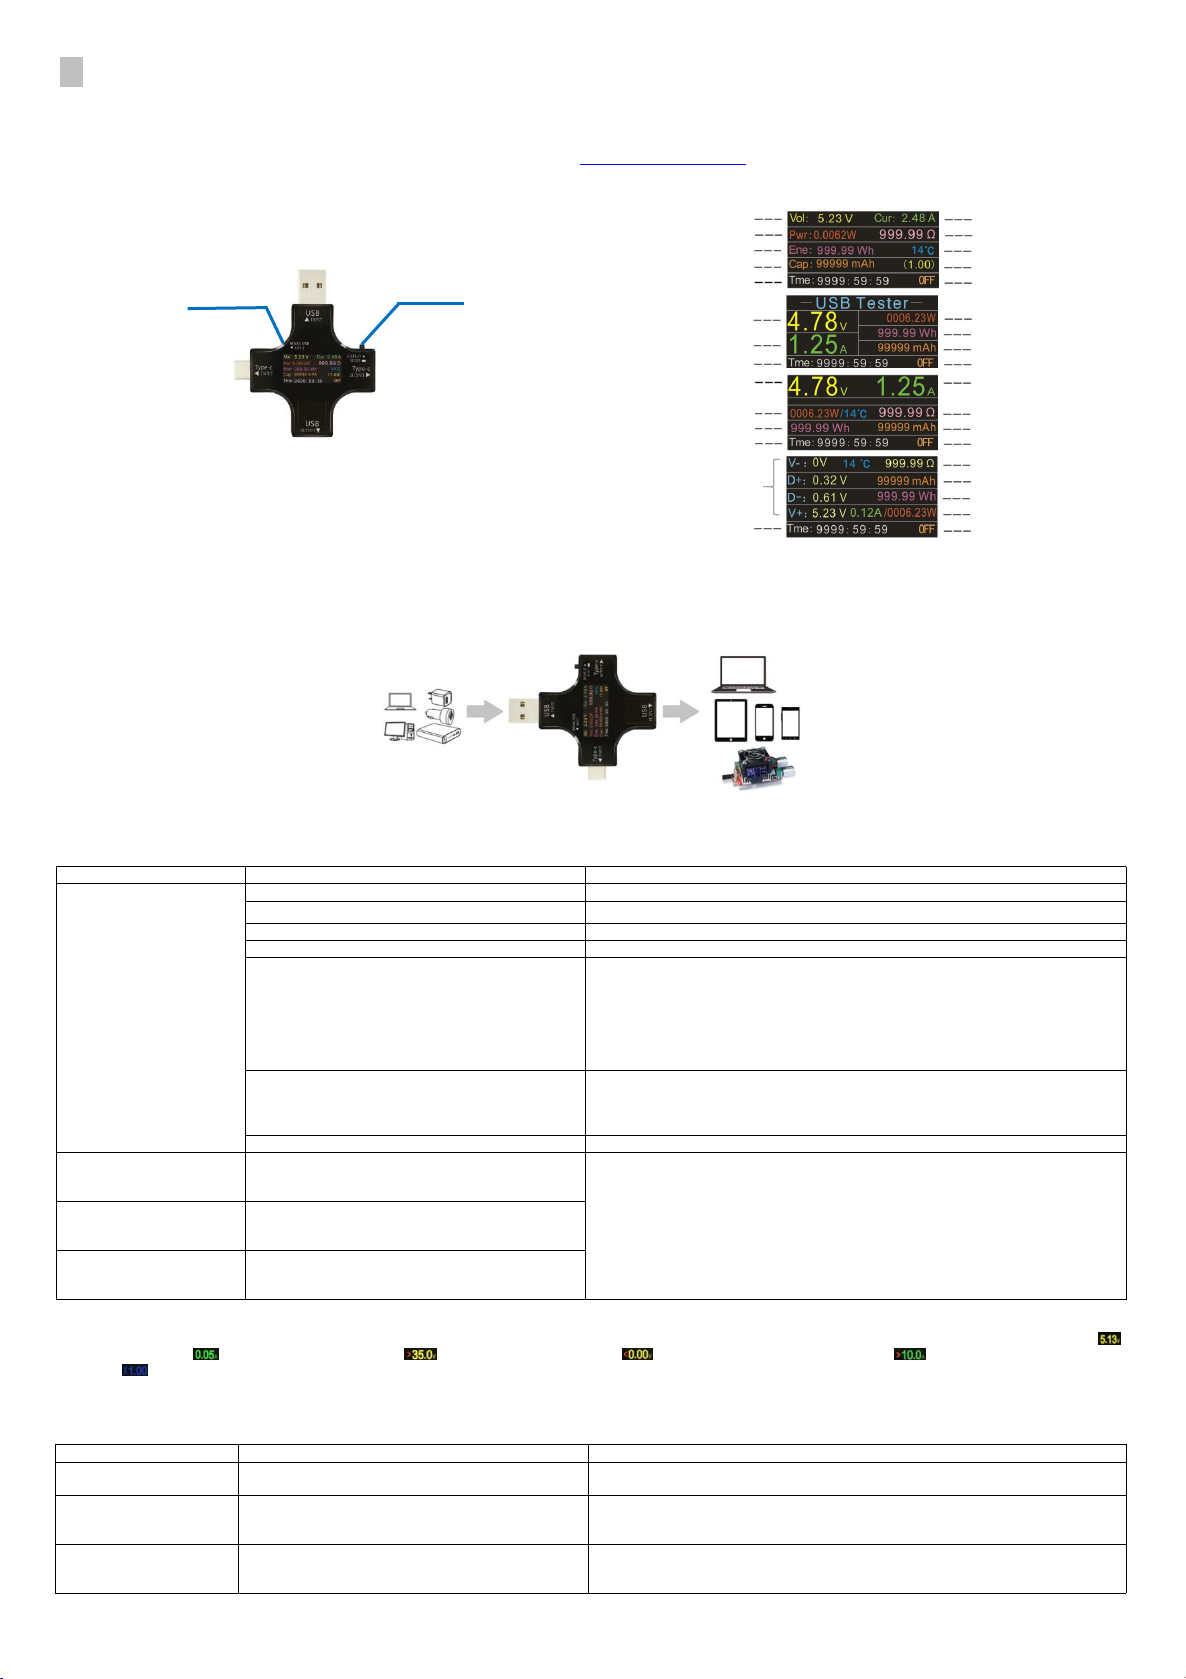
Affichage LCD multi-interface:
Comment utiliser
Connectez l'équipement d'alimentation (chargeur, banque de puissance, câble USB, etc.) à l'interface d'entrée correspondante de ce testeur USB. Ensuite, connectez
votre appareil, tel qu'un ordinateur portable, une tablette, un smartphone, etc., à l'interface de sortie correspondante de ce testeur USB.
Remarque:
1. Si vous utilisez le câble USB pour connecter (comme charger votre ordinateur portable), s'il vous plaît prêter attention à la qualité et l'entrée du câble, en particulier
le courant maximum.
2. Lors de la recharge de votre téléphone intelligent ou de votre ordinateur, veuillez ne pas utiliser l'interface d'entrée micro USB.
Opération
1. Paramètres d'affichage de l'écran.
Cliquez sur le MFB pour activer l'interface d'affichage lorsque le testeur USB est sous tension: Interface en chinois - Interface en anglais - Interface personnalisée 1 -
Interface personnalisée 2 - Interface personnalisée 3 - Protection contre les surtensions - Protection contre les surtensions - Protection contre les surintensités - Off
Interfaces
Caractéristiques
Opérations
Interface en Chinois
Interface en Anglais
Interface personnalisée 1
Interface personnalisée 2
Interface personnalisée 3
Basculez l'interface suivante.
Cliquez sur MFB.
Réinitialiser la capacité.
Double-cliquez sur MFB.
Réinitialiser la quantité électrique.
Triple-cliquez sur MFB.
Réinitialisez l'heure.
Cliquez quatre fois sur MFB.
Paramètres de mise hors tension automatique
(Réglé: AO/OFF/1-24 heures):
AO. -Surveillance intelligente de coupure de
courant automatique
OFF-éteindre la mise hors tension automatique
1-24 heures-coupure de courant automatique
après l'heure fixée
Cliquez cinq fois sur MFB pour accéder aux paramètres APO.
Cliquez sur MFB pour diminuer le temps (cliquez sur MFB et maintenez-le
enfoncé pour diminuer rapidement).
Double-cliquez sur MFB pour augmenter le temps (Double-cliquez sur MFB et
maintenez-le enfoncé pour augmenter rapidement).
Attendez 10 secondes que la valeur actuelle soit confirmée.
Courant standard
Cliquez sept fois sur MFB (Autorisez uniquement le réglage du courant en
l'absence d'appareil. Après le réglage, le courant atteint 0,00A. Si vous réglez le
courant pendant le chargement, déconnectez l'appareil, puis réglez-le à
nouveau.).
Retourne l'écran à 180 °.
Maintenez la touche MFB pour 2s.
Protection haute tension
Tension d'entrée > la valeur réglée (1.00 V-35,0
V), le testeur va couper sa sortie et l'alarme pour
rappeler.
Cliquez sur MFB pour basculer Next interface.
double-cliquez sur MFB pour augmenter la valeur, et maintenez-la pour
augmenter rapidement.
Triple-cliquez MFB pour diminuer la valeur, et maintenez-la enfoncée pour
diminuer rapidement.
Protection basse tension
Tension d'entrée < la valeur réglée (0.00 V-34,
5V), le testeur va couper sa sortie et son alarme
pour rappeler.
Protection contre les
surintensités
Current > la valeur réglée (0,20 A-15,0 A), le
testeur va couper sa sortie et l'alarme pour
rappeler.
Remarque: le Fonction AO... En détectant que la puissance est toujours inférieure à 2W en 1 heure, le produit coupe automatiquement la sortie
2. Paramètres de fond.
Allumez le testeur USB en tenant le MFB, Il entrera dans l'interface des paramètres de fond. Cliquez sur MFB pour changer d'interface: Réglage de la tension -
Réglage du courant - Protection haute tension - Protection basse tension - Protection contre les surintensités - Facteur de compensation de
capacité. .
Remarque:
1. «Protection contre les surtensions, les surtensions et les surintensités» est identique à la fonction susmentionnée, dont la seule différence est le fonctionnement.
2. Ne réglez pas la tension et le courant s'il n'existe pas d'alimentation 5,00 V précise ni de charge à courant constant de 2,00 A. Si le réglage est incorrect à cause de
votre mauvaise utilisation, vous pouvez maintenir le MFB enfoncé pendant 2 secondes pour réinitialiser les paramètres d'usine.
Interfaces
Caractéristiques
Opérations
Réglage de la tension
La tension de 5,00 V connectée extérieurement
comme tension de référence d'étalonnage.
Double-cliquez sur MFB (si la tension de 5,00 V connectée de manière externe
n'est pas précise, l'étalonnage affectera la précision de la tension du testeur.)
Réglage du courant
La charge de 2.00 A connectée extérieurement
avec le courant constant comme courant de
référence de calibrage.
Double-cliquez sur MFB (si la charge de courant constant de 2.00A connectée
de manière externe n'est pas précise, l'étalonnage affectera la précision du
courant du testeur.)
Protection haute tension
Tension d'entrée > la valeur définie
(1.00V-35.0V), le testeur coupera sa sortie et une
alarme à rappeler.
Double-cliquez sur MFB pour accéder à l'état du paramètre:
Cliquez sur MFB pour diminuer la valeur, puis maintenez-la enfoncée pour
diminuer rapidement.
Tension
Puissance
Électrique
quantité
Capacité
Temps
Courant
Résistance
Température
facteur de capacité
Mise hors tension
automatique
Tension
Courant
Temps
Puissance
Électrique
quantité
Capacité
APO
Puissance
Output
Puissance Input
Résistance; Température
Capacité
Électrique quantité
Courant; Puissance
Mise hors tension Automatique
APO
Courant
Résistance
Capacité
Mise hors tension
automatique
Tension
Puissance/Température
Électrique quantité
Temps
Tension des lignes
électriques et des lignes de
données
Temps
Type-C output
USB output
MFB (Bouton Multifonction)
Type-C output
Port USB
Micro USB input

Double-cliquez sur MFB pour augmenter la valeur, puis maintenez-la enfoncée
pour augmenter rapidement.
Attendez 10 secondes que la valeur actuelle soit confirmée.
L'instruction du facteur de compensation de capacité: par exemple, lors du
contrôle de la capacité réelle de la banque d'alimentation, si la perte interne
totale est de 35%, la capacité réelle est x (1 + 0,35), c'est-à-dire x 1,35.
Protection basse tension
Tension d'entrée < la valeur définie
(0,00V-34,0V), le testeur coupe sa sortie et
déclenche une alarme pour le rappeler.
Protection contre les
surintensités
Current > la valeur réglée (0,20 A-15,0 A), le
testeur va couper sa sortie et l'alarme pour
rappeler.
Facteur de
compensation de
capacité
La capacité de la tension actuelle multipliée par le
facteur de compensation de la capacité pour
obtenir la valeur d'affichage finale (x0,50-x1.50).
RÉINITIALISER!
L'écran affiche RESET et restaure à l'état d'usine.
Maintenez la touche MFB pour 2s.
Table of contents
Languages:
Popular Test Equipment manuals by other brands

Agilent Technologies
Agilent Technologies N4010A Application note

Schumacher
Schumacher BT-100 owner's manual

Elma Instruments
Elma Instruments Elma Paintcheck user manual

EXFO
EXFO Fiber Guardian FG-750 user guide

Agilent Technologies
Agilent Technologies XX3625 Service guide

Aeroflex
Aeroflex 3550 Maintenance manual