Horizon Hobby BLADE INDUCTRIX BLH8780 User manual

®
RTF/BNF
Instruction Manual
NOTICE
All instructions, warranties and other collateral documents are subject to change at the sole
discretion of Horizon Hobby, LLC. For up-to-date product literature, visit horizonhobby.com and
click on the support tab for this product.
MEANING OF SAFETY SIGNAL WORDS
The following terms are used throughout the product literature to indicate various levels of potential harm
when operating this product:
NOTICE: Instructions, which if not followed, create a possibility of property damage AND minor injury.
CAUTION: Instructions, which if not followed,create a probability of property damageAND a possibility of injury.
CAUTION: Read and follow all instructions and warnings in the manual prior to setup or
use. Failure to operate the product correctly can result in damage to the product, personal
property and/or injury.
This is a sophisticated hobby product. It must be operated with caution and common sense
and requires some basic mechanical ability. Do not attempt disassembly, use with incompatible
components or augment product in any way without the approval of Horizon Hobby, LLC.
Age Recommendation: Not for children under 14 years. This is not a toy.
Charging Warnings
WARNING: Failure to comply with the
following warnings could result in product
malfunction, electrical issues, excessive heat,
FIRE, and ultimately injury and property damage.
• NEVER LEAVE CHARGING BATTERIES
UNATTENDED OR CHARGE OVERNIGHT.
• Never charge damaged batteries. If the
battery begins to swell during charging or use,
discontinue immediately.
• Always use the included battery and charger.
Disconnect the battery after charging.
• Charge batteries away from flammable materials
in a well-ventelated area.
• Never charge, transport, or store batteries in
hot, cold, or very sunny places (recommended
between 40–120° F or 5–49° C).
EN
Specifications
Length 3.26 in (83mm) Propeller Diameter 2.56 in (65mm)
Height 1.10 in (28mm) Flying Weight .56 oz (16 g)
To register your product online, visit www.bladehelis.com
Components RTF BNF
Airframe – Blade®Inductrix™Included Included
Motors – 6mm Brushed Installed Installed
On-board Electronics – 3-in-1 mixer/ESCs/Gyro Installed Installed
Battery – 150mAh 1S 3.7V 25C Li-Po Included Included
Charger – 1S USB Li-Po Charger, 300 mAh Included Included
Transmitter – MLP4DSM Included Required
Install 4 AA batteries into the transmitter, noting
polarity. Replace the transmitter batteries when the
power LED flashes and the transmitter beeps.
We recommend using only alkaline AA batteries
in the transmitter, however, it is possible to use
rechargeable NiMH batteries.
CAUTION: If using rechargeable batter-
ies, charge only rechargeable batteries.
Charging non-rechargeable batteries may cause
the batteries to burst, resulting in injury to
persons and/or damage to property.
Charge the Flight Battery
Install the Transmitter Batteries (RTF)
Transmitter and Receiver Binding
NOTICE: Inspect the battery to make sure it is not damaged e.g., swollen, bent, broken or
punctured. Charge only batteries that are cool to the touch and are not damaged.
Insert the charger into a USB port.
Connect the battery to the charger.
CHARGING (Solid Red LED)
MAX CHARGE (LED OFF )
Disconnect the flight battery from the charger immediately upon completion of charging.
CAUTION: Only use chargers specifically designed to charge the included Li-Po battery.
Failure to do so could result in fire, causing injury or property damage.
CAUTION: Never exceed the recommended charge rate.
CAUTION: Once charging is complete, immediately remove the battery.
Never leave a battery connected to the charger.
Install the Flight Battery
12
The Inductrix™quadcopter requires no radio-specific setup for basic flight. If you are using a computer trans-
mitter, simply bind the quadcopter to your transmitter to a new model and with the model type set to“Acro” or
“Airplane” mode.
To bind or re-bind your aircraft to your chosen transmitter, please follow the directions below.
General Binding Procedure (BNF)
1. Disconnect the flight battery from the quadcopter.
2. Set the model type in your transmitter settings to “Acro” mode.
3. Center all trims on your transmitter.
4. Power off the transmitter and fully lower the throttle.
5. Connect the flight battery in the quadcopter.The LED on the 3-in-1 control unit flashes red during
initialization, then flashes blue when it is ready to bind.
6. Put the transmitter into bind mode while powering on the transmitter.
7. Release the bind button/switch after 2–3 seconds. The quadcopter is bound when the blue LED
on the 3-in-1 control unit turns solid.
8. Disconnect the flight battery and power the transmitter off.
CAUTION: When using a Futaba®transmitter with a Spektrum module, you must reverse the
throttle channel and rebind. Refer to your Spektrum module manual for binding and failsafe
instructions. Refer to your Futaba transmitter manual for instructions on reversing the throttle channel.
MLP4DSM Binding Procedure (RTF)
1. Disconnect the flight battery from the quadcopter.
2. Center all trims on your transmitter.
3. Power off the transmitter and fully lower the throttle.
4. Connect the flight battery in the quadcopter.The LED on the 3-in-1 control unit flashes red during
initialization, then flashes blue when it is ready to bind.
5. When the blue light is flashing, push in and hold down the left stick while powering on the trans-
mitter (you will hear a ‘click’ and a long tone).
6. Release the left stick. The transmitter will beep and the power LED will blink. The quadcopter is
bound when the blue LED on the 3-in-1 control unit turns solid.
7. Disconnect the flight battery and power the transmitter off.
If you encounter problems, obey the binding instructions and refer to the troubleshooting guide for
other instructions. If needed, contact the appropriate Horizon Product Support office. For a list of
compatible DSM transmitters, please visit www.bindnfly.com.
CAUTION: Always disconnect the Li-Po battery from the aircraft
when not flying to avoid over-discharging the battery. Batteries
discharged to a voltage lower than the lowest approved voltage may
become damaged, resulting in loss of performance and potential fire
when the batteries are charged.
Throttle down Power ON
Transmitter Control (RTF)
ABCDE F
Mode
1
Aileron (Left/Right)
Throttle (Up/Down)
Throttle
Trim
Aileron
Trim
Rudder
Trim
Elevator
Trim
Rudder (Left/Right)
Elevator (Up/Down)
Mode
2
Aileron (Left/Right)
Elevator (Up/Down)
Elevator
Trim
Aileron
Trim
Rudder
Trim
Throttle
Trim
Rudder (Left/Right)
Throttle (Up/Down)
Operating Safety Precautions
• As the user of this product, you are responsible for
operating it safely,not endangering yourself and others,
or damaging the product or the property of others.
• Operate your product in open spaces away from
people and property.
• Never operate your product with damaged
electrical components.
• Keep the transmitter powered on while model is
powered on.
• Let parts cool after use before touching, motors
will get hot in use.
• Remove batteries after use, as applicable.
General Product Safety Precautions
• Keep all batteries, chemicals, small parts and
anything electrical out of the reach of children. • Avoid water exposure to this product. Keep parts dry.
• Keep moving parts clean.
The LEDs on the Inductrix indicate the front and back of the quadcopter.The white LEDs indicate the front.
The red LEDs indicate the back.
Takeo
Increase the throttle until the model is approximately 2 ft. (600mm) off the ground in a low-level hover and
concentrate on balancing the throttle stick’s position so that the quadcopter holds a steady hover altitude.In
some cases, you may need to make a few short “hops” to an altitude of just a few inches until you become
familiar with the control inputs and trim settings required to maintain a steady hover and altitude.
Hovering
The Inductrix quadcopter requires minor throttle adjustments to maintain its altitude in hover. Remem-
ber to keep these throttle adjustments as minimal as possible. Large adjustments could result in a
loss of control or a possible crash.
NOTICE: Crash damage is not covered under warranty.
To prevent excessive wear to the motors, always allow the motors to cool between flights.
Fly the Quadcopter
Parts list
Revolutionary SAFE®(Sensor Assisted Flight Envelope) technology uses an innovative combination of
multi-axis sensors and software that allows model aircraft to know its position relative to the horizon.
This spatial awareness is utilized to create a controlled flight envelope the aircraft uses to maintain a safe
region of bank and pitch angles so you can fly more safely.
Technology
Low Voltage Cuto (LVC)
Once the battery reaches 3V under load, the ESC will continuously lower power supplied to the motor
until complete shutdown occurs. This helps prevent over-discharge of the Li-Po battery. Land immedi-
ately once the ESC activates LVC. Continuing to fly after LVC can damage the battery, cause a crash or
both. Crash damage and batteries damaged due to over-discharge are not covered under warranty.
Repeatedly flying the aircraft until LVC activates will damage the flight battery.
Disconnect and remove the Li-Po battery from the aircraft after use to prevent trickle discharge.
During storage, make sure the battery charge does not fall below 3V per cell.
3
4
Dual rate
selection
Bind
Rate Selection – RTF
The Inductrix™RTF quadcopter comes with the Blade®
MLP4DSM transmitter.
• When powered on, this transmitter is automatically high rate.
• Change rates by pressing and releasing the right control stick.
• In low-rate mode, the quadcopter is limited to a lower bank
angle and will self-level when the control sticks are released.
This mode is typically preferred by pilots looking for smoother/
easier control response during first time use.
• In high-rate mode, the quadcopter has a higer possible bank
angle and will self-level when the control sticks are released.
Dual rate selection
FCC Information
This device complies with part 15 of the FCC rules. Operation is subject to the following two condi-
tions: (1) This device may not cause harmful interference, and (2) this device must accept any interfer-
ence received, including interference that may cause undesired operation.
CAUTION: Changes or modifications not expressly approved by the party responsible for
compliance could void the user’s authority to operate the equipment.
This product contains a radio transmitter with wireless technology which has been tested and found
to be compliant with the applicable regulations governing a radio transmitter in the 2.400GHz to
2.4835GHz frequency range.
Note: This equipment has been tested and found to comply with the limits for a Class B digital device,
pursuant to part 15 of the FCC Rules. These limits are designed to
provide reasonable protection against harmful interference in a residential installation. This equipment
generates uses and can radiate radio frequency energy and, if not
installed and used in accordance with the instructions, may cause harmful interference to radio com-
munications. However, there is no guarantee that interference will not occur in a particular installation.
If this equipment does cause harmful interference to radio or television reception, which can be deter-
mined by turning the equipment off and on, the user is encouraged to try to correct the interference
by one or more of the following measures:
• Reorient or relocate the receiving antenna.
• Increase the separation between the equipment and receiver.
• Connect the equipment into an outlet on a circuit different from that to which the receiver is connected.
• Consult the dealer or an experienced radio/TV technician for help.
Antenna Separation Distance
When operating your product, please be sure to maintain a separation distance of at least 20 cm
between your body (excluding fingers, hands, wrists, ankles and feet) and the antenna to meet RF
exposure safety requirements as determined by FCC regulations.
IC Information
This device complies with Industry Canada license-exempt RSS standard(s). Operation is subject to
the following two conditions: (1) this device may not cause interference, and (2) this device must ac-
cept any interference, including interference that may cause undesired operation of the device.
Compliance Information for the European Union
Instructions for disposal of WEEE by users in the European Union
This product must not be disposed of with other waste. Instead, it is the user’s
responsibility to dispose of their waste equipment by handing it over to a designated
collections point for the recycling of waste electrical and electronic equipment. The
separate collection and recycling of your waste equipment at the time of disposal will
help to conserve natural resources and make sure that it is recycled in a manner that
protects human health and the environment. For more information about where you
can drop off your waste equipment for recycling, please contact your local city office,
your household waste disposal service or where you purchased the product.
EU Compliance Statement:
Horizon Hobby, LLC hereby declares that this product is in compliance with the essen-
tial requirements and other relevant provisions of the RED Directive.
A copy of the EU Declaration of Conformity is available online at: http://www.horizonhobby.com/
content/support-render-compliance.
Aileron
Elevator
Rudder
Understand the Primary Flight Controls
If you are not familiar with the controls of your Inductrix quadcopter, take a few minutes to familiarize
yourself with them before attempting your first flight.
Throttle
Aileron left Aileron right
Forward
Elevator down Elevator up Backward
Left Side View Left Side View
Rudder left Rudder right
Nose
Yaws
Right
Nose
Yaws Left
Throttle down
Throttle up
Left Side View Left Side View
Descend
Climb
Left
Rear View
Right
Rear View
D
E
F
Power LED indicator
C
B
A
D
se
USB Li-Po
Charger
EFLC1008
SOLID RED LED
–Charging
DC Input:5.0V 350mA
DC Output:4.2V 300mA
LED OFF
–Charge
Complete
Your RTF transmitter comes prebound to the Inductrix. If you need to re-bind,follow the directions below.
On/Off Switch
When pressed down, trim buttons make a sound that increases or decreases in pitch at each
pressing. The middle or neutral trim position is heard as a middle tone in the pitch range of the
sounds. The end of the control range is sounded by a series of beeps.
Part # Description
v Inductrix RTF
BLH8780 Inductrix BNF
BLH8701 3-in-1 Control Unit: Inductrix
BLH8702 Motor with Wire, Clockwise Rotation: Inductrix
BLH8703 Motor w/Wire, Counter-Clockwise Rotation: Inductrix
BLH8704 Canopy Set, Red & Blue: Inductrix
BLH8705 Prop Set (4), White: Inductrix
BLH8706 Main Frame: Inductrix
© 2015 Horizon Hobby, LLC. Blade,Inductrix, E-flite, SAFE, the SAFE logo and the Horizon Hobby Logo are trademarks or registered trademarks of Horizon Hobby, LLC. Patents pending. Created 06/2015 49816
Problem Possible Cause Solution
Will not respond to throttle Throttle too high and/or throttle trim
is too high
Reset controls with the throttle stick
and throttle trim at the lowest setting
Does not function and smells
burnt after connecting the
flight battery
Flight battery connected with the
wrong polarity
Replace the 3-in-1 board. Connect the flight battery
noting proper polarity
LED on receiver flashes
rapidly and quadcopter will
not respond to transmitter
(during binding)
Transmitter too near aircraft during
binding process
Power off the transmitter. Move the transmitter a
larger distance from the aircraft. Disconnect and
reconnect the flight battery to the aircraft. Follow the
binding instructions
Bind switch or button was not held
while transmitter was powered on
Power off transmitter and repeat bind
process
Aircraft or transmitter is too close to
large metal object, wireless source or
another transmitter
Move aircraft and transmitter to another
location and attempt binding again
LED on the receiver flashes
rapidly and the quadcopter
will not respond to the trans-
mitter (after binding)
Less than a 5-second wait between
first powering on the transmitter and
connecting the flight battery to the
quadcopter
Leave the transmitter powered on. Disconnect and
reconnect the flight battery to the quadcopter
The quadcopter is bound to a differ-
ent model memory (ModelMatch™
transmitters only)
Select the correct model memory on the transmitter.
Disconnect and reconnect the flight battery to the
quadcopter
Flight battery or transmitter battery
charge is too low Replace or recharge batteries
Aircraft or transmitter is too close to
large metal object, wireless source or
another transmitter
Move aircraft and transmitter to another
location and attempt connecting again
Crashes immediately upon
lift-off or doesn’t lift off Propellers in wrong locations Make necessary adjustments
Information IC
Le présent appareil est conforme aux CNR d’Industrie Canada applicables aux appareils radio
exempts de licence. L’exploitation est autorisée aux deux conditions suivantes : (1) l’appareil ne doit
pas produire de brouillage, et (2) l’utilisateur de l’appareil doit accepter tout brouillage radioélectrique
subi, même si le brouillage est susceptible d’en compromettre le fonctionnement.
Troubleshooting Guide

HINWEIS
Alle Anweisungen, Garantien und anderen zugehörigen Dokumente können im eigenen Ermessen
von Horizon Hobby, LLC jederzeit geändert werden. Die aktuelle Produktliteratur finden Sie auf
horizonhobby.com unter der Registerkarte „Support“ für das betreffende Produkt.
BEDEUTUNG DER SIGNALWÖRTER
Die folgenden Begriffe werden in der gesamten Produktliteratur verwendet, um auf unterschiedlich hohe
Gefahrenrisiken beim Betrieb dieses Produkts hinzuweisen:
HINWEIS: Wenn diese Anweisungen nicht korrekt befolgt werden,können sich möglicherweise
Sachschäden UND geringe Gefahr von Verletzungen ergeben.
ACHTUNG: Wenn diese Anwesiungen nicht korrekt befolgt werden,ergeben sich wahrscheinlich
Sachschäden UND die Gefahr von schweren Verletzungen.
ACHTUNG: Lesen Sie die GESAMTE Bedienungsanleitung, um sich vor dem Betrieb mit den
Produktfunktionen vertraut zu machen. Wird das Produkt nicht korrekt betrieben, kann dies zu
Schäden am Produkt oder persönlichem Eigentum führen oder schwere Verletzungen verursachen.
Dies ist ein hochentwickeltes Hobby-Produkt. Es muss mit Vorsicht und gesundem
Menschenverstand betrieben werden und benötigt gewisse mechanische Grundfähigkeiten.
Versuchen Sie nicht ohne Genehmigung durch Horizon Hobby, LLC das Produkt zu zerlegen, es
mit inkompatiblen Komponenten zu verwenden oder auf jegliche Weise zu erweitern.
DE
®
RTF/BNF
Bedienungsanleitung
Warnungen zum Laden
WARNUNG: Alle Anweisungen und
Warnhinweise müssen genau befolgt
werden. Falsche Handhabung von Li-Po-
Akkus kann zu Brand, Personen- und/oder
Sachwertschäden führen.
• LASSEN SIE DAS NETZGERÄT, LADEGERÄT UND
AKKU NIEMALS UNBEAUFSICHTIGT WÄHREND DES
BETRIEBES. LADEN SIE NIEMALSAKKUS ÜBER NACHT
• Laden Sie njemals beschädigteAkkus Sollte der
Akku zu einem beliebigen Zeitpunkt beginnen, sich
aufzublähen oder anzuschwellen, stoppen Sie die
Verwendung unverzüglich.
• Verwenden Sie immer das Ladegerät und denAkku
aus dem Lieferumfang.Trennen Sie nach dem Laden
den Akku.
• Laden Sie dieAkkus immer weit entfernt von
brennbaren in gut belüfteten Bereichen.
• Laden,transportieren oder lagern Sie niemals
Akkus in heißen, kalten oder Plätzen mit starker
Sonneneinstrahlung.
(Empfohlener Temperaturbereich 40 - 120°)
Sicherheitsvorkehrungen und Warnhinweise
• Als Nutzer dieses Produktes sind Sie allein für den
sicheren Betrieb ohne Gefährdung des Produktes,
ihrer selbst und dritter oder deren Eigentum
verantwortlich.
• Betreiben Sie ihr Produkt auf weiten,offenen Flächen
weg von Menschen und anderem Eigentum
• Betreiben Sie das Produkt niemals mit beschädigten
elektrischen Komponenten
• Lassen Sie den Sender eingeschaltet wenn das
Modell eingeschaltet ist
• Lassen Sie dieTeile abkühlen bevor Sie sie anfassen.
Die Motoren werden während des Betriebes heiß
• Allgemeine Sicherheitshinweise zum Produkt
• Halten Sie alle Batterien,Akkus, Chemikalien Kleinteile
und Elektronikkomponenten aus der Reichweite von
Kindern
Allgemeine Sicherheitshinweise zum Produkt
• Halten Sie alle Akkus, Batterien, Chemikalien und
Kleinteile und andere elektrische Komponenten aus
der Reichweite von Kindern.
• Vermeiden Sie mit diesem ProduktWasserkontakt.
Halten Sie die Teile trocken.
• Halten Sie die beweglichenTeile sauber.
Rechtliche Informationen für die Europäische Union
EU Konformitätserklärung
Horizon LLC erklärt hiermit, dass dieses Produkt konform zu den essentiellen Anforder-
ungen der RED Direktive.
Eine Kopie der Konformitätserklärung ist online unter folgender Adresse verfügbar : http://www.
horizonhobby.com/content/support-render-compliance.
Anweisungen zur Entsorgung von Elektro-und Elektronik-Altgeräten für
Benutzer in der Europäischen Union
Dieses Produkt darf nicht zusammen mit anderem Abfall entsorgt werden. Stattdessen
ist der Benutzer dafür verantwortlich, unbrauchbare Geräte durch Abgabe bei einer
speziellen Sammelstelle für das Recycling von unbrauchbaren elektrischen und
elektronischen Geräten zu entsorgen. Die separate Sammlung und das Recycling von
unbrauchbaren Geräten zum Zeitpunkt der Entsorgung hilft, natürliche Ressourcen zu
bewahren und sicherzustellen, dass Geräte auf eine Weise wiederverwertet werden,
bei der die menschliche Gesundheit und die Umwelt geschützt werden. Weitere
Informationen dazu, wo Sie unbrauchbare Geräte zum Recycling abgeben können, erhalten Sie bei
lokalen Ämtern, bei der Müllabfuhr für Haushaltsmüll sowie dort, wo Siedas Produkt gekauft haben.
Spezifikationen
Länge 83mm Propeller Durchmesser 65mm
Höhe 28mm Fluggewicht 16 g
Sie können Ihr Produkt online unter www.bladehelis.com registrieren.
Komponenten RTF BNF
Rumpf – Blade Inductrix Inklusive Inklusive
Motoren – 6mm Bürstenmotoren Eingebaut Eingebaut
On-Board Elektronik – 3-in-1 Mischer/ESCs/Gyro Eingebaut Eingebaut
Akku – 150mAh 1S 3.7V 25C Li-Po Inklusive Inklusive
Ladegerät – 1S USB Li-Po Ladegerät, 300 mAh Inklusive Inklusive
Sender – MLP4DSM Inklusive Erforderlich
Setzen Sie unter Beobachtung der Polarität die
Senderbatterien ein. Ersetzen Sie die Batterien
wenn die LED blinkt und der Sender piept.
Wir empfehlen AA Alkaline Batterien in dem Sender
zu verwenden. Sie können auch wiederaufladbare
NiMH Akkus verwenden.
ACHTUNG: Wenn Sie wiederaufladbare
Akkus verwenden, laden Sie nur diese.Das
Laden von nicht wiederaufladbaren Batterien kann die
Batterien zur Explosion bringen, was Körperverletzung
und Sachbeschädigung zur Folge haben kann.
Laden des Flugakkus
Einsetzen der Senderbatterien (RTF)
HINWEIS: Laden Sie Akkus nur, wenn sie auf Umgebungstemperatur abgekühlt sind. Schauen Sie sich
den Akku an und stellen Sie sicher, dass dieser nicht beschädigt oder aufgequollen ist.
Stecken Sie den Lader in den USB Port.
Schließen Sie den Akku an das Ladegerät.
Laden (LED rot )
Fertig geladen (LED aus)
Entnehmen Sie den Akku immer aus dem Lader, sobald der Ladevorgang beendet ist.
ACHTUNG: Verwenden Sie nur Ladegeräte, die für LIPO Akkus vorgesehen sind.
Nichtbeachtung kann zu Feuer, Beschädigungen oder Verletzungen führen.
ACHTUNG: Überschreiten Sie niemals die vorgesehene Ladezeit.
ACHTUNG: Entnehmen Sie den Akku aus dem Lader, sobald dieser fertig geladen ist.
Belassen Sie den Akku niemals im Lader.
Niederspannungabschaltung (LVC)
Die ESC versorgt den Motor durchgehend mit weniger Leistung, bis dieser sich vollständig abschaltet,
wenn der Akku unter Last unter 9 V entladen wird. Dadurch wird eine Tiefentladung des LiPo-Akkus
vermieden. Wenn die ESC die LVC aktiviert, setzen Sie sofort zur Landung an.Wenn Sie das Fluggerät
dennoch weiterfliegen, kann dies zu Akkuschaden, Absturz oder beidem führen. Absturzschäden und
Akkuschäden, die durch eine Tiefentladung bedingt sind, werden von der Garantie nicht abgedeckt.
Durch wiederholtes Fliegen des Helikopters bis zur LVC-Aktivierung wird der Akku des Helikopters
beschädigt.
Entfernen Sie den LiPo-Akku nach Gebrauch aus dem Fluggerät, um eine allmähliche Entladung zu ver-
hindern. Stellen Sie während der Lagerung sicher, dass die Akkuladung nicht unter 3 V pro Zelle abfällt.
Die LEDs des Inductrix zeigen die Vorder und Rückseite des Quacopters an.Die weisse LED zeigt die Front,
die rote LED zeigt das Heck.
Starten
Geben Sie Gas bis das Modell ca 60cm Höhe erreicht hat und konzentrieren Sich darauf mit dem
Gashebel eine stabile Schwebeflughöhe zu halten. In einigen Fällen braucht es nur ein paar kurze
Hüpfer um das Modell in einen niedrigen stabilen Schwebeflug zu bekommen.
Schwebeflug
Der Quadcopter braucht für das Halten des Schwebeflug nur minimale Gaseingaben. Halten Sie die
Gaseingaben so gering wie möglich, da große Gasbewegungen einen Verlust der Höhe und Kontrolle mit
möglichen Absturz bedeuten können.
Während Sie den Schwebeflug einsteuern können Sie auch überprüfen ob der Quadcopter in eine bestim-
mte Richtung driftet. Falls ja, landen Sie zur Einstellung das Modell. Zusätzliche Informationen über die
Funktion und Anordnung der Trimmung des Modells können Sie dem Abschnitt derVerstehen der Flugkon-
trollen in dieser Anleitung entnehmen.
• Sollte die Nase des Quadcopter nach links oder rechts drehen stellen Sie die Seitenrudertrimmung ein.
• Sollte der Quadcopter kontinuierlich vorwärts oder rückwärts driften stellen Sie die Höhenrudertrimmung
ein.
• Sollte der Quadcopter kontinuierlich nach links oder rechts driften stellen Sie die Querrudertrimmung ein.
Trimmen Sie das Modell so weit dass es im Schwebeflug sehr wenig driftet und dazu wenig Eingaben in die
Steuerung benötigt.
Üben Sie mit den korrekt getrimmten Copter im Schwebeflug die Wirkung von Seiten- Höhen- (Nick) und
Querruder (Roll), um sich mit den Reaktionen des Copters vertraut zu machen. Halten Sie die Ruderauss-
chläge dabei so gering wie möglich.
HINWEIS: Absturzschäden sind nicht durch die Garantie gedeckt.
Lassen Sie die Motoren zwischen den Flügen abkühlen um einen größeren Verschleiß zu vermeiden.
Fliegen des Quadcopters
Querruder
Höhenruder
Seitenruder
Erklärung der Flugkontrollen
Bitte nehmen Sie sich vor dem Erstflug des Inductrix Quadcopter Zeit um sich mit den Kontrollen
vertraut zu machen.
Gasgeber
Querruder
nach links Nach links Nach rechts
Rückansicht
Vorwärts Rückwärts
Seitenansicht Seitenansicht
Seitenruder
nach links
Nase dreht nach rechts
Nase dreht nach links
Gasgeber
nach oben
Seitenansicht Seitenansicht
Sinken
Aufsteigen
Rückansicht
Gasgeber
nach unten
Seitenruder
nach rechts
Höhenruder
nach unten Höhenruder
nach oben
Querruder
nach rechts
Dual Rate (RTF)
Der Glimpse RTF Quadcopter wird mit dem Blade MLP-
DDSM Sender geliefert.
• Wenn Sie den Sender einschalten, befindet sich im Dual
Rate in Max.
• Die Dual Rate Einstellung ändern Sie durch drücken des
rechten Knüppels.
• Im Low Rate Mode mit den kleinen Ruderausschlägen
ist der Copter in der Schräglage limitiert und richtet sich
selber aus wenn die Steuerhebel los gelassen werden.
Dieser Mode ist für Piloten geeignet die für die ersten
Flüge gutmütige Reaktionen und einfache Kontrolle erwarten.
• Im High Rate Mode ist die mögliche Schräglage größer, der Copter richtet sich aber noch selber auf
wenn die Steuerhebel losgelassen werden.
Dual Rate Auswahl
HABCDEF
Modus
1
Querruder
(links/rechts)
Gas (auf/ab)
Gastrimm Querruder-
trimm Seitenruder-
trimm Höhenruder-
trimm
Seitenruder
(links/rechts)
Höhenruder
(auf/ab)
Modus
2
Querruder
(links/rechts)
Höhenruder
(auf/ab)
Höhenruder-
trimm Querruder-
trimm Seitenruder-
trimm Gastrimm Seitenruder
(links/rechts)
Gas (auf/ab)
Einsetzen des Flugakkus
ACHTUNG: Trennen Sie den Li-Po-Akku immer vom Empfänger
des Flugzeugs wenn Sie nicht fliegen um eine Tiefentladung zu
vermeiden. Akkus die unter die zulässige Mindestspannung entladen wer-
den, können dadurch beschädigt werden, was sich in Leistungsverlust und
potentieller Brandgefahr bei dem Laden bemerkbar machen kann.
1 Gas nach unten 2 Einschalten 3
4
Binden von Sender und Empfänger
Der Inductrix Quadcopter erfordert zum Fliegen keine besondere Programmierung. Bei Verwendung
eines Computersenders binden Sie den Copter auf dem Modelltyp Acro oder Flugzeug an den Sender.
Um den Quadcopter zu binden folgen Sie bitte den unten stehenden Anweisungen.
ACHTUNG: Wenn Sie einen Futaba-Sender mit einem Spektrum DSM-Modul verwenden, müssen
Sie den Gaskanal reversieren (umkehren) und danach das System neu binden. Lesen Sie bitte für
den Bindevorgang und programmieren der Failsafeeinstellungen die Bedienungsanleitung des Spektrum
Modules. Zum reversieren des Gaskanals lesen Sie bitte in der Anleitung des Futaba Senders nach.
Wenn Probleme auftreten beachten Sie bitte die Bindeanweisungen und schauen in die Hilfestellung
zur Problemlösung. Kontaktieren Sie falls notwendig den technischen Service von Horizon Hobby. Eine
Liste der kompatiblen DSM Sender sehen Sie unter www.bindnfly.com.
Sendersteuerung (RTF)
Die revolutionäre SAFE Technologie von Horizon Hobby (SensorAssited Flight Envelope) verwendet eine
innovative Kombination aus Multi-Achs Sensoren und Software, die es erlauben, die relative Position des
Fluggerätes im Raum jederzeit zu bestimmen. Diese räumliche Information wird verwendet, um das Fluggerät
in einem kontrollierten Flugzustand in sicherem Abstand zum Horizont (Boden) zu bewegen. Dabei werden Roll-
und Nickwinkel beeinflusst und geregelt, um die Flugsicherheit zu erhöhen.
Auswahl
Dual Rate
Binden
Der Bindevorgang
1. Trennen Sie den Flugakku von ihrem Quadcopter.
2. Wählen Sie im Sender den Modelltyp Acro.
3. Zentrieren Sie im Sender alle Trimmungen.
4. Schalten Sie den Sender aus und reduzieren das Gas vollständig.
5. Installieren Sie den Akku im Quadcopter. Die LED auf der 3in1 Platine blinkt rot bei der Initialisierung
und dann blau, um Bindebereitschaft anzuzeigen.
6. Bringen Sie den Sender in den Bindemode während Sie ihn einschalten.
7. Lassen Sie den Bindeschalter nach 2 -3 Sekunden los. Der Quad-Copter ist gebunden wenn die blaue
LED auf der 3-in-1 Einheit leuchtet.
8. Trennen Sie den Flugakku und schalten den Sender aus.
MLP4DSM Bindeprozess
1. Trennen Sie den Flugakku vom Quadcopter.
2. Zentrieren Sie alle Trimmungen auf dem Sender.
3. Schalten Sie den Sender aus und reduzieren das Gas vollständig.
4. Installieren Sie den Akku im Quadcopter. Die LED auf der 3in1 Platine blinkt rot bei der Initialisierung
und dann blau, um Bindebereitschaft anzuzeigen.
5. Drücken Sie wenn die blaue LED blinkt den linken Steuerhebel ein während Sie den Sender ein-
schalten (Sie hören dabei ein Klick und einen langen Ton).
6. Lassen Sie den Stick los. Der Sender piept und die Power LED blinkt. Der Quad-Copter ist gebunden
wenn die LED auf der 3-in-1 Einheit blau leuchtet (nicht blinkt).
7. Trennen Sie den Flugakku und schalten den Sender aus.
Hilfestellung zur Problemlösung
Problem mögliche Ursache Lösung
Keine Reaktion auf Gas Gastrimmung oder Gasknüppel
zu hoch Bringen Sie Gashebel und Trimmung auf die
niedrigste Einstellung
Keine Funktion und
riecht nach Anschluss
des Flugakkus verbrannt
Flugakku ist mit der falschen
Polarität angeschlossen
Ersetzen Sie das 3-in-1 Kontrollboard.
Schließen Sie den Flugakku in richtiger
Polarität an
LED auf dem Empfänger
blinkt schnell , Quad-
copter reagiert wärend
des Bindens nicht auf
Sender
Sender war zu nah am Flugzeug
während des Bindevorganges
Schalten Sie den Sender aus. Stellen Sie den
Sender weiter vom Fluggerät weg. Trennen
und schließen Sie den Akku erneut an den
Quad-Copter an. Folgen Sie den Bindean-
weisungen
Bindeschalter wurde beim
Einschalten des Senders nicht
gedrückt
Schalten Sie den Sender aus und wiederho-
len Sie den Bindeprozess
Das Fluggerät oder der Sender ist
zu nahe an einem Metallkörper,
einer Strahlungsquelle oder einem
anderen Sender
Versuchen Sie den Vorgang noch einmal an
einem anderen Ort
LED auf dem Empfänger
blinkt schnell, Quadcop-
ter reagiert nach dem
Binden nicht auf den
Sender
Sie haben weniger als 5 Sekun-
den gewartet nachdem Sie den
Sender eingeschaltet und den
Flugakku angeschlossen haben
Lassen Sie den Sender eingeschaltet.
Trennen und schließen Sie den Flugakku
erneut an
Der nano QX ist an ein anderen
Modellspeicher gebunden. (Betrifft
nur Sender mit ModelMatch)
Wählen Sie auf dem Sender den richtigen
Modellspeicher.Trennen und schließen Sie
den Flugakku erneut an
Ladung des Flugakkus zu gering
oder Senderbattereien zu schwach Ersetzen oder laden Sie die Akkus
Das Fluggerät oder der Sender ist
zu nahe an einem Metallkörper,
einer Starhlungsquelle oder einem
anderen Sender
Versuchen Sie den Vorgang noch einmal an
einem anderen Ort
Hebt nicht ab oder stürzt
nach dem Start sofort ab Propeller falsch montiert oder
falscher Flug Mode gewählt Führen Sie die notwendigen Einstellungen
durch
Technologie
USB Li-Po
Charger
EFLC1008
SOLID RED LED
–Charging
DC Input:5.0V 350mA
DC Output:4.2V 300mA
LED OFF
–Charge
Complete
Ihr RTF Sender ist bereits an das Modell gebunden. Sollten Sie neu binden wollen folgen Sie bitte den
untenstehenden Anweisungen.
D
E
F
C
B
A
A
D
EIN/AUS-Schalter
Ein/Aus-LED
Wenn die Trimmtasten gedrückt werden, geben sie einen Signalton von sich, der bei jedem erneuten
Drücken höher oder tiefer wird. Die mittlere oder neutrale Trimmstellung erklingt in der mittleren
Tonhöhe. An den äußeren Enden des Steuerbereichs erklingt eine Tonfolge.
Teileliste
Teil # Beschreibung
BLH8700 Inductrix RTF
BLH8780 Inductrix BNF
BLH8701 3-in1 Kontrollboard: Inductrix
BLH8702 Motor mit Kabel RD: Inductrix
BLH8703 Motor mit Kabel LD: Inductrix
BLH8704 Kabinenset Rot & Blau:Inductrix
BLH8705 Propellerset weiss (4):Inductrix
BLH8706 Hauptrahmen: Inductrix
Nicht geeignet für Kinder unter 14 Jahren. Dies ist kein Spielzeug.
© 2015 Horizon Hobby, LLC. Blade,Inductrix, E-flite, SAFE, the SAFE logo and the
Horizon Hobby Logo are trademarks or registered trademarks of Horizon Hobby, LLC.
Patents pending.Created 06/2015 | 49816

REMARQUE
La totalité des instructions, garanties et autres documents est sujette à modification à la seule
discrétion d’Horizon Hobby, LLC. Pour obtenir la documentation à jour, rendez-vous sur le site
horizonhobby.com et cliquez sur l’onglet de support de ce produit.
SIGNIFICATION DE MOTS DE SIGNALISATION DE SÉCURITÉ
Les termes suivants sont utilisés dans l’ensemble du manuel pour indiquer différents niveaux de danger
lors de l’utilisation de ce produit:
REMARQUE: Les instructions, si elles ne sont pas suivies, peuvent entrainer des dommages matériels ET
blessures légères.
ATTENTION: Les instructions,si elles ne sont pas suivies, peuvent entrainer des dommages matériels ET blessures.
ATTENTION: Lire et suivre toutes les instructions et mises en garde du manuel avant le
réglage et l’utilisation. Une mauvaise utilisation du produit peut endommager ce dernier, vos
biens et/ou entrainer des blessures.
Ceci est un produit de loisirs sophistiqué. Il doit être manipulé avec prudence et bon sens et requiert
des aptitudes de base en mécanique. N’essayez pas de démonter le produit, de l’utiliser avec des
composants incompatibles ou d’en améliorer les performances sans l’accord d’Horizon Hobby,LLC.
FR
Information IC
Le présent appareil est conforme aux CNR d’Industrie Canada applicables aux appareils radio
exempts de licence. L’exploitation est autorisée aux deux conditions suivantes : (1) l’appareil ne doit
pas produire de brouillage, et (2) l’utilisateur de l’appareil doit accepter tout brouillage radioélectrique
subi, même si le brouillage est susceptible d’en compromettre le fonctionnement.
Informations de conformité pour l’Union européenne
Elimination dans l’Union Européenne
Ce produit ne doit pas être éliminé avec les ordures ménagères. Il est de la res-
ponsabilité de l‘utilisateur de remettre le produit à un point de collecte officiel des
déchets d’équipements électriques. Cette procédure permet de garantir le respect de
l’environnement et une meilleure gestion des ressources naturelles. Elle protège de
plus le bien-être de la communauté humaine. Pour plus d’informations quant aux lieux
d’éliminations des déchets d‘équipements électriques, vous pouvez contacter votre
mairie ou le service local de traitement des ordures ménagères.
Déclaration de conformité de l’union européenne :
Horizon Hobby, LLC déclare par la présente que ce produit est en conformité avec les
exigences essentielles et les autres dispositions de la directive RED.
Une copie de la déclaration de conformité Européenne est disponible à: http://www.horizonhobby.
com/content/support-render-compliance.
®
RTF/BNF
Manuel d’utilisation
Avertissements de charge
AVERTISSEMENT: Le non-respect
de ces avertissements peut entrainer
un mauvais fonctionnement du produit, des
problèmes électriques, une surchauffe, INCENDIE
et à terme blessures et dommages matériels.
• NE LAISSEZ JAMAIS DES BATTERIES EN CHARGE
SANS SURVEILLANCE OU EN CHARGE LA NUIT.
• Ne jamais mettre des batteries endommagées en
charge. Si la batterie commence à gonfler lors de la
charge ou l’utilisation, débranchez-la immédiatement.
• Utilisez toujours la batterie et le chargeur fournis.
Débranchez la batterie après charge.
• Chargez les batteries à l’écart de matières
inflammables dans un endroit bien aéré.
• Ne chargez,transportez ou stockez jamais dans un
endroit chaud, froid ou très ensoleillé (température
recommandée entre 5 et 49°).
Précautions de sécurité lors de l’utilisation
• En tant qu’utilisateur de ce produit,vous êtes
responsable de la sécurité lors de son utilisation, de
ne pas mettre en danger les autres et vous-même
ou des dommages causés à ce produit et aux biens
des autres.
• Utilisez ce produit dans un endroit ouvert à l’écart des
autres et des habitations.
• N’utilisez jamais ce produits avec des composants
électriques endommagés.
• Gardez l’émetteur sous tension quand le modèle est
sous tension.
• Laissez les pièces refroidir avant de les toucher, le
moteur chauffera lors de l’utilisation.
• Débranchez la batterie après utilisation ,si applicable.
Précautions de sécurité générales du produit
• Gardez toutes les batteries,produits chimiques,
petites pièces et système électriques hors de portée
des enfants.
• Ne pas mettre en contact avec l’eau.Gardez toutes
les pièces sèches.
• Gardez les pièces mobiles propres.
Spécifications
Longueur 83mm Diamètre du rotor principal 65mm
Hauteur 28mm Poids de vol 16 g
Pour enregistrer votre produit en ligne, veuillez visiter www.bladehelis.com
Éléments RTF BNF
Modèle – Blade®Inductrix™Inclus Inclus
Moteurs – 6mm Brushed Installés Installés
Electronique embarquée – Platine 3 en 1 Mixage/Vario/Gyro Installés Installés
Batterie – Li-Po 150mAh 1S 3.7V 25C Inclus Inclus
Chargeur – USB pour Li-Po 1S 300 mAh Inclus Inclus
Emetteur – MLP4DSM Inclus Requis
Installez les piles AA en respectant les polarités.
Remplacez les piles quand la DEL de l’émetteur
clignote et que le bip retentit.
Nous vous recommandons d’utiliser uniquement des
piles alcalines AA, cependant il est possible d’utiliser
des accus NiMH rechargeables.
ATTENTION: Ne rechargez que des
batteries rechargeables. Si vous tentez
de charger des piles non rechargeables, il y a un
risque d’incendie entraînant des blessures et des
dégâts matériels.
Charge de la batterie
Installation des piles de l’émetteur (RTF)
REMARQUE: Chargez uniquement des batteries froides au toucher et non endommagées. Contrôlez
l’état de la batterie pour être sûrt qu’elle n’est pas endommagée, gonflée, pliée ou percée.
Insérez le chargeur dans un port USB.
Connectez la batterie au chargeur.
CHARGE (Rouge fixe)
CHARGE MAX (OFF )
Toujours déconnecter la batterie du chargeur immédiatement après la fin de charge.
ATTENTION: Utilisez uniquement des chargeurs spécifiquement conçus pour charger la bat-
terie Li-Po incluse. Le fait de charger la batterie avec un chargeur non-compatible peut être
à l’origine d’un incendie provoquant des blessures corporelles ou des dégâts matériels.
ATTENTION: Ne jamais dépasser l’intensité de charge recommandée.
ATTENTION: Débranchez immédiatement la batterie une fois que la charge est terminée. Ne
jamais laisser une batterie connectée au chargeur.
Coupure par tension faible (LVC)
Le CEV (ESC) ne cessera de diminuer la puissance fournie au moteur jusqu’àla coupure complète
lorsque la batterie atteint une tension de 3Vsous charge. Ceci permet d’éviter que la batterie Li-Po
ne subisse une décharge trop «profonde». Posez-vous immédiatement lorsque le CEV active la
coupure par tension faible (LVC). Continuer àvoler après une coupure par tension faible (LVC = Low
Voltage Cutoff) peut endommager la batterie ou entraîner un écrasement au sol, voire les deux. Les
dommages suite àun écrasement au sol et des batteries endommagées suite àune décharge trop
profonde ne sont pas couvertes par la garantie.
Faire constamment voler l’hélicoptère jusqu’àce que la coupure par tension faible (LVC) s’active,
endommagera la batterie de l’hélicoptère.
Déconnectez et sortez la batterie Li-Po de l’avion après utilisation afin d’éviter une décharge au goutte
àgoutte. Pendant le stockage, assurez-vous que la charge de la batterie ne tombe pas en-deçà de
3Vpar cellule.
Les DELs sur l’Inductrix indique l’avant et l’arrière du quadcoptère. Les DELs blanches sont à l’avant. Les
DELs rouges sont à l’arrière.
Décollage
Mettez les gaz de façon à décoller à 60 cm au-dessus du sol et concentrez vous sur le manche des
gaz afin de garder cette altitude pour effectuer un vol stationnaire. Dans certains cas, vous devrez
faire quelques “sauts” de quelques centimètres de hauteur pour vous familiariser avec la commande
de gaz pour maintenir une altitude constante.
Stationnaire
Le quadcoptère Glimpse ne nécessite que de corrections mineures aux gaz pour maintenir une altitude
constante en stationnaire. Ne donnez pas de corrections trop brutales ou importantes qui risqueraient
d’entraîner une perte de contrôle pouvant causer un crash.
Avant de tenter un stationnaire au ras du sol, vous devez vérifier que le quadcoptère ne glisse pas,sinon
effectuer les corrections à l’aide des trims. Si vous trouvez que le modèle glisse trop sans agir sur le
manches, faites-le atterrir avant d’effectuer les corrections aux trims. Pour plus d’information concernant
le contrôle du modèle, référez-vous à la section “Apprentissage des commandes de base”.
• Si le nez du quadcoptère pivote vers la gauche ou la droite, ajuster le trim de dérive.
• Si le quadcoptère glisse vers l’avant ou l’arrière, ajustez le trim de profondeur.
• Si le quadcoptère glisse vers la gauche ou la droite, ajustez le trim d’ailerons.
Continuez d’effectuer de légères corrections aux trims en faisant un stationnaire à basse altitude. Si le
quadcoptère est votre premier quadricoptère, n’hésitez à demander l’aide d’un pilote expérimenté pour
effectuer ces réglages avant votre premier vol.
Avec votre quadcoptère correctement réglé et en stationnaire à basse altitude, entrainez-vous à
utiliser les commandes de dérive, de profondeur et d’ailerons afin de vous familiariser avec la réponse
du modèle. Toujours effectuer de petits mouvements avec les manches de commande.
REMARQUE: les dégâts causés par les crashs ne sont pas couverts par la garantie.
Pour éviter une usure excessive des moteurs, laissez toujours les moteurs refroidir entre les vols.
Vol du quadcoptère
Ailerons
Gouverne de profondeur
Gouverne de direction
Compréhension des commandes de vol de base
Si vous n’avez pas encore bien assimilé les commandes de votre quadcoptère Inductrix, prenez
quelques minutes pour vous familiariser avec elles avant de tenter votre premier vol.
Throttle (Gaz)
Aileron à gauche Aileron à droite
Vue arrière
Vers l’avant Vers l’arrière
Vue latérale Vue latérale
Gouverne de
direction à gauche
Le nez tourne vers la droite
Le nez tourne vers la gauche
Augmenter
les gaz
Vue latérale Vue latérale
Descendre
Monter
Vue arrière
Réduire
les gaz
Gouverne de
direction à droite
Gouverne de
profondeur baissée
Gouverne de
profondeur levée
Sélection du débattements (RTF)
Le quadcoptère Inductrix RTF est livré avec l’émetteur Blade
MLP4DSM.
• Quand l’émetteur est mis sous tension, il est
automatiquement placé en grands débattements.
• Changez de débattements en pressant puis relâchant le
manche de droite.
• En mode petits débattements, le quadcoptère a un angle
limité et s’auto-stabilisera lorsque vous relâchez les
manches. Ce mode est préférable pour les pilotes qui
veulent un contrôle plus doux lors de la première utilisation.
• En mode grands débattements, le quadcoptère a un angle plus grand et s’auto-stabilisera lorsque
vous relâchez les manches.
Sélection des
débattements
Installation de la batterie
ATTENTION: Toujours débrancher la batterie du modèle quand
vous ne l’utilisez pas, afin d’éviter une décharge trop impor-
tante. Des batteries déchargées à un voltage inférieur à celui
recommandé, seront endommagées, elles perdront en performance et
pourront entraîner un risque d’incendie durant la charge.
1 Gaz en bas 2 Mise sous tension 3
4
Aectation de l’émetteur et du récepteur
Le quadcoptère Inductrix nécessite aucune programmation radio particulière pour le vol basique.
Si vous utilisez un émetteur programmable, sélectionnez une mémoire modèle vierge, sélectionnez
«Acro» ou «Avion» en type de de modèle et effectuez l’affectation.
Pour affecter ou ré-affecter votre Inductrix à votre émetteur, suivez les instructions suivantes.
ATTENTION: Si vous utilisez un émetteur Futaba avec un module Spektrum DSM2/DSMX,il vous
faudra inverser la voie de la manette des gaz et effectuer à nouveau l’affectation. Référez-vous
au manuel d‘utilisation du module Spektrum pour les instructions d’affectation et de sécurité failsafe.
Référez-vous au manuel d’utilisation de l’émetteur Futaba pour les instructions d’inversion de voie de la
manette des gaz.
Si vous rencontrez des difficultés, référez-vous au guide de dépannage. Si nécessaire, contactez votre
revendeur ou le service technique Horizon Hobby. Pour consulter la liste des émetteurs compatibles,
veuillez visiter www.bindnfly.com.
Contrôle de l’émetteur (RTF)
La technologie révolutionnaire SAFE (Système d’entraînement assisté par capteurs) utilise la combinaison
de capteurs sur différents axes et un logiciel permettant au modèle de connaître sa position par rapport à
l’horizon. Cette reconnaissance de l’espace est utilisée pour générer un domaine de vol sécurisé en limitant
les angles afin de piloter en sécurité.
D
E
F
C
B
A
Sélection des
débattements
S
d
Affectation
Procédure d’aectation
1. Débranchez la batterie du le quadcoptère.
2. Sélectionnez dans votre émetteur "Acro" ou "Avion" comme type de modèle.
3. Mettez tous les trims de votre émetteur au neutre.
4. Mettez l'émetteur hors tension et placez le manche des gaz en position basse.
5. Connectez la batterie au quadcoptère. La DEL du module 4 en 1 clignote en rouge durant l'initialisation,
puis clignote en bleu quand il est prêt pour l'affectation.
6. Mettez votre émetteur en mode affectation (Bind).
7. Relâchez le bouton/interrupteur Bind après 2 ou 3 secondes. Le quadcoptère est affecté quand la DEL est fixe.
8. Débranchez la batterie et mettez l’émetteur hors tension.
Procedure d’aection de l’émetteur MLP4DSM
1. Débranchez la batterie du quadcoptère.
2. Mettez tous les trims au neutre.
3. Mettez l'émetteur hors tension et placez le manche des gaz en position basse.
4. Connectez la batterie au quadcoptère. La DEL du module 4 en 1 clignote en rouge durant l'initialisation,
puis clignote en bleu quand il est prêt pour l'affectation.
5. Lorsque la lumière bleue clignote, appuyez sur la manche gauche et maintenez-le appuyé lors de la mise
en marche de l’émetteur (vous entendrez un “click” et une longue tonalité).
6. Relâchez le manche de gauche. L’émetteur va se mettre à biper et la DEL d’alimentation à clignoter.Le
quadcoptère est affecté quand la DEL bleue devient fixe.
7. Débranchez la batterie et mettez l’émetteur hors tension.
Guide de résolution des problèmes
Problème Cause possible Solution
Aucune réponse aux gaz Le manche des gaz et/ou le trim
est également trop haut Baissez le manche des gaz et placez le
trim à la valeur la plus basse
Ne fonctionne pas et dégage
une odeur de brûlé après
avoir branché la batterie
La polarité de la batterie n’a pas
été respectée Remplacez le module 3 en 1. Branchez
la batterie en respectant la polarité
La DEL du récepteur clignote
rapidement et l’appareil ne
répond pas aux commandes
(durant l’affectation)
L’émetteur est trop près de
l’appareil durant l’affectation
Mettez l’émetteur hors tension.
Eloignez-le de l’appareil. Débranchez
puis rebranchez la batterie. Suivez les
instructions d’affectation
Le bouton ou l'interrupteur
d'affectation n'a pas été maintenu
durant la mise sous tension de
l'émetteur
Mettez l'émetteur hors tension et répé-
tez le processus d'affectation
L'appareil ou l'émetteur se trouve
trop proche d'un grand objet
métallique, d'un réseau sans fil ou
d'un autre émetteur
Placez l'avion et l'émetteur à un autre
emplacement et retentez l'affectation
La DEL du récepteur clignote
rapidement et l’appareil ne
répond pas aux commandes
(après l’affectation)
Moins de 5 secondes se sont
écoulées entre l’allumage de
l’émetteur et la connexion de la
batterie de vol sur le quadcoptère
Laissez l’émetteur sous tension.
Débranchez puis rebranchez la batterie
du le quadcoptère
Le quadcoptère est affecté à une
mémoire de modèle différente
(radios ModelMatch uniquement)
Sélectionnez la mémoire de modèle
correcte sur l’emetteur. Débranchez
puis rebranchez la batterie du le quad-
coptère
Charge des batteries de l’émetteur
trop faible Remplacez ou chargez les batteries
de l’emetteur
L'appareil ou l'émetteur se trouve
trop proche d'un grand objet
métallique, d'un réseau sans fil ou
d'un autre émetteur
Placez l'avion et l'émetteur à un autre
emplacement et retentez la connexion
Chute immédiatement après
le décollage ou ne décolle
pas du tout
Les hélice ne sont pas correcte-
ment placées ou vous n’avez pas
sélectionné la bonne configuration Effectuez les modifications nécessaires
Technologie
USB Li-Po
Charger
EFLC1008
SOLID RED LED
–Charging
DC Input:5.0V 350mA
DC Output:4.2V 300mA
LED OFF
–Charge
Complete
Lorsqu’ils sont enfoncés, les boutons de trim font un bruit qui augmente ou diminue en intensité
àchaque pression. La position intermédiaire ou neutre du trim utilise une tonalité de milieu de
gamme. Une série de bips sonores indique la fin de la plage de contrôle.
HABCDE F
Mode
1Ailerons (Gauche/Droit)
Gaz (Haut/Bas)
Trim des
gaz Trim
d’ailerons Trim de
dérive Trim de
profondeur Dérive (Gauche/Droit)
Profondeur (Haut/Bas)
Mode
2Ailerons (Gauche/Droit)
Profondeur (Haut/Bas)
Trim de
profondeur Trim
d’ailerons Trim de
dérive Trim des gaz Dérive (Gauche/Droit)
Gaz (Haut/Bas)
DEL d’alimentation
Commutateur ON/OFF
L'émetteur de la version RTF est livré déjà affecté au modèle. Si vous devez refaire l'affectation,
suivez les instructions ci-dessous.
Droite
Gauche
Liste des pièces détachées
Réf. pièce Description
BLH8700 Inductrix RTF
BLH8780 Inductrix BNF
BLH8701 Inductrix - Module 3 en 1
BLH8702 Inductrix - Moteur rotation horaire
BLH8703 Inductrix - Moteur rotation anti-horaire
BLH8704 Inductrix - Fuselage rouge et bleu
BLH8705 Inductrix - Set d’hélices (4), Blanches
BLH8706 Inductrix - Châssis
14 ans et plus. Ceci n’est pas un jouet.
© 2015 Horizon Hobby, LLC. Blade,Inductrix, E-flite, SAFE, the SAFE logo and the
Horizon Hobby Logo are trademarks or registered trademarks of Horizon Hobby, LLC.
Patents pending.Created 06/2015 | 49816

AVVISO
Tutte le istruzioni, le garanzie e gli altri documenti pertinenti sono soggetti a cambiamenti a totale
discrezione di Horizon Hobby, LLC. Per una documentazione aggiornata sul prodotto, visitare il sito
horizonhobby.com e fare clic sulla sezione Support del prodotto.
SIGNIFICATO DELLE AVVERTENZE DI SICUREZZA
Nella documentazione relativa al prodotto vengono utilizzati i seguenti termini per indicare i vari livelli di
pericolo potenziale durante l’uso del prodotto:
AVVISO: Istruzioni che, se non seguite, possono determinare la possibilità di danni alle cose E di lesioni
lievi alle persone.
ATTENZIONE: Istruzioni che, se non seguite, possono determinare la probabilità di danni alle cose E la
possibilità di lesioni alle persone.
ATTENZIONE: leggere e seguire tutte le istruzioni e avvertenze riportate nel manuale prima
dell’impostazione o dell’uso. Un uso improprio del prodotto può causare danni al prodotto
stesso, alle cose e/o lesioni alle persone.
Questo è un prodotto sofisticato per appassionati. Deve essere azionato in maniera attenta e responsabile
e richiede alcune conoscenze basilari di meccanica. Non usare componenti non compatibili o alterare il
prodotto in nessuna maniera al di fuori delle istruzioni fornite da Horizon Hobby LLC.
IT
RTF/BNF
Manuale di Istruzioni
®
Avvertenze e istruzioni per le batterie
AVVERTENZA: Non seguendo le
seguenti avvertenze potrebbero verificarsi
malfunzionamenti del prodotto, problemi elettrici,
un eccessivo sviluppo di calore, INCENDI e in
definitiva lesioni e danni materiali.
• NON CARICARE MAI LE BATTERIE DURANTE LA
NOTTE SENZA SUPERVISIONE.
• Non caricare mai le batterie danneggiate.Se durante
la carica o durante l’uso si forma un rigonfiamento
della batteria, interrompere direttamente l’uso/la
carica.
• Usare sempre la batteria e il caricabatteria inclusi nella
confezione. Sconnettere la batteria dopo la carica.
• Caricare sempre le batterie lontano da materiali
infiammabili in un luogo ben ventilato.
• Non caricare,trasportare o conservare mai le batterie
in ambienti estremamente caldi, freddi o esposti al
sole (la temperatura consigliata è compresa tra 5 e
49 °C).
Precauzioni per la sicurezza durante l’uso
• Come utenti di questo prodotto,siete responsabili
per un utilizzo sicuro del prodotto, non mettendo
in pericolo voi stessi o altri o non danneggiando il
prodotto o le cose di altri.
• Utilizzare il prodotto in spazi aperti,lontano da persone
e cose.
• Non usare mai il prodotto con delle componenti
elettriche danneggiate.
• Lasciare la trasmittente accesa quando il modello è
acceso.
• Lasciare raffreddare le componenti dopo l’uso prima
di toccarle, i motori si scalderanno durante l’uso.
• Rimuovere le batterie dopo l’uso,se possibile.
Precauzioni di sicurezza del prodotto generali
• Tenere tutte le batterie, le sostanze chimiche, le parti
piccole e tutte le componenti elettriche fuori dalla
portata dei bambini.
• Evitare il contatto con l’acqua di questo prodotto.
Mantenere asciutte le componenti.
• Mantenere pulite le parti mobili.
Istruzioni del RAEE per lo smaltimento da parte di utenti dell’Unione Europea
Questo prodotto non deve essere smaltito assieme ai rifiuti domestici. Al contrario,
l’utente è responsabile dello smaltimento di tali rifiuti che devono essere portati in un
centro di raccolta designato per il riciclaggio di rifiuti elettrici e apparecchiature elet-
troniche. La raccolta differenziata e il riciclaggio di tali rifiuti provenienti da apparec-
chiature nel momento dello smaltimento aiuteranno a preservare le risorse naturali e
garantiranno un riciclaggio adatto a proteggere il benessere dell’uomo e dell’ambiente.
Per maggiori informazioni sui centri di raccolta, contattare il proprio ufficio locale, il
servizio di smaltimento rifiuti o il negozio presso il quale è stato acquistato il prodotto.
Informazioni sulla conformità per l’Unione Europea
Dichiarazione di Conformità EU:
Horizon Hobby, LLCcon la presente dichiara che il prodotto è conforme ai requisiti es-
senziali e ad altre disposizioni rilevanti della direttiva RED.
Una copia della dichiarazione di conformità per l’Unione Europea è disponibile a: http://www.horizon-
hobby.com/content/support-render-compliance.
Specifiche
Lunghezza 83mm Diametro elica 65mm
Altezza 28mm Peso in volo 16 g
Per registrare il prodotto online, visitare il sito www.bladehelis.com
Componenti RTF BNF
Telaio – Blade Inductrix Incluso Incluso
Motori – 6mm Brushed Installato Installato
Elettronica di bordo – 3-in-1 mixer/ESCs/Gyro Installato Installato
Batteria – 150mAh 1S 3.7V 25C Li-Po Incluso Incluso
Caricabatteria – caricabatteria USB 1S LiPo, 300 mAh Incluso Incluso
Trasmittente – MLP4DSM Incluso Necessario
Inserire le pile AA nel trasmettitore facendo attenzi-
one alla polarità. Bisogna sostituirle quando il LED
lampeggia e si attiva un allarme sonoro (beep).
Noi raccomandiamo di usare solo pile alcaline AA
nel trasmettitore, comunque è possibile usare anche
batterie ricaricabili NiMH.
ATTENZIONE: se si usano batterie
ricaricabili, si raccomanda di ricaricare
solo queste. Se si tenta di ricaricare pile non
ricaricabili, si potrebbe provocarne lo scoppio con
conseguenti ferite alle persone e danni alle cose.
Carica della batteria di volo
Installazione batterie nella trasmittente (RTF)
AVVISO: caricare solo batterie che siano fredde al tatto e che non siano danneggiate. Controllare la
batteria per verificare che non sia gonfia, piegata, rotta o bucata.
Inserire il caricatore in una porta USB.
Connettere la batteria al caricabatteria.
Carica in corso (acceso rosso)
Carica massima (spento)
Scollegare sempre la batteria dal caricatore immediatamente dopo il termine della carica.
ATTENZIONE: usare solo caricatori progettati specificamente per queste batterie LiPo. In caso
contrario si potrebbero incendiare procurando danni.
ATTENZIONE: non superare le correnti di carica raccomandate.
ATTENZIONE: quando la carica è terminata,scollegare subito la batteria dal caricatore.
Taglio di bassa tensione (LVC)
Il controllo elettronico di velocità continuerà ad abbassare la corrente erogata al motore fino allo spe-
gnimento completo quando la batteria raggiunge i3Vsotto carico. Questo fa si che si possa evitare
una scarica eccessiva della batteria Li-Po. Effettuare immediatamente l’atterraggio quando il regola-
tore di velocità attiva il taglio di bassa tensione (LVC). Continuare afar volare il modello dopo che ha
raggiunto il taglio di bassa tensione (LVC) può danneggiare la batteria, causare lo schianto del velivolo
oentrambe le cose. Idanni della batteria oquelli dovuti allo schianto in seguito auno scaricamento
eccessivo non sono coperti dalla garanzia.
Far volare l’elicottero fino all’attivazione del taglio di bassa tensione (LVC) danneggia la batteria
dell’elicottero.
Dopo l’uso scollegare erimuovere dal velivolo la batteria Li-Po per evitare lo scaricamento passivo.
Durante la conservazione, assicurarsi che la carica della batteria non scenda sotto i3 Vper cella.
I LED dell’Inductrix indicando la parte anteriore e posteriore del quadricoptero. I LED bianchi indicano la
parte anteriore e i LED rossi indicano la parte posteriore.
Decollo
Agire sull’acceleratore finché il modello si alza di circa 60 cm da terra e concentrarsi sul comando
motore per fare in modo che il quadricoptero mantenga costante questa quota in volo stazionario.
Inizialmente ci sarà qualche piccolo salto di quota, finché non si familiarizza sui comandi necessari
per mantenere il modello in volo stazionario ad una quota costante.
Hovering
Lo Glimpse richiede degli aggiustamenti minimi sul comando motore per mantenere la quota. Bisogna
tenere ben presente che questi aggiustamenti devono essere il più possibile ridotti, perché i comandi
troppo ampi portano a perdere il controllo e, di conseguenza, a causare una caduta.
Mentre si tenta di stabilizzare il volo stazionario a bassa quota, conviene controllare se sono neces-
sarie delle regolazioni sui trim per evitare una deriva costante in varie direzioni. Se si notano queste
derive senza aver dato alcun comando direzionale, conviene far atterrare il modello prima di fare qual-
siasi regolazione con i trim. Altre informazioni sulla posizione e il funzionamento dei trim, si trovano
nella sezione “Capire i controlli primari di volo” su questo manuale.
• Se il naso dello nano QX ruota verso destra o sinistra, regolare il trim del timone.
• Se lo nano QX si sposta continuamente in avanti o indietro, allora bisogna intervenire sul trim
dell’elevatore.
• Se lo nano QX si sposta continuamente a destra o a sinistra, allora bisogna intervenire sul trim
dell’alettone.
Si continui a fare piccole regolazioni sui trim finché il modello resta in volo stazionario con una deriva
minima e controlli ridotti. Se questo è il vostro primo modello di quadricoptero, vi conviene chiedere
l’aiuto di un modellista esperto in questo campo, specialmente per il primo volo.
Quando il quadricoptero è trimmato correttamente e si trova in volo stazionario a bassa altezza,
provare ad usare i controlli di direzionale, elevatore e alettone per familiarizzare con le risposte del
quadricoptero ai vostri comandi. Ricordarsi di usare una quantità di comandi limitata.
AVVISO: I danni da incidente non sono coperti dalla garanzia.
Per prevenire un’usura eccessiva dei motori, lasciarli raffreddare sempre tra un volo e l’altro.
Volo del Quadricoptero
Alettone
Elevatore
Timone
Informazioni sui comandi di volo principali
Se non avete ancora familiarità con i comandi del vostro quadricoptero Glimpse è necessario dedicare
alcuni minuti per familiarizzarsi con essi prima di tentare il primo volo.
Throttle
Alettone a
sinistra Sinistra Destra
Vista posteriore
Avanti Indietro
Vista laterale Vista laterale
Timone
a sinistra
La fusoliera vira a destraLa fusoliera vira a sinistra
Throttle alzato
Vista laterale Vista laterale
Discesa
Salita
Vista posteriore
Throttle abbassato
Timone
a destra
Elevatore
abbassato Elevatore
alzato
Alettone a
destra
Scelta della corsa (RTF)
Il quadricoptero Inductrix nella versione RTF arriva con una
trasmittente Blade MLP4DSM.
• Quando si accende, il trasmettitore si trova in corse massime.
• Per cambiare di corsa premere e rilasciare lo stick di destra.
• Nella modalità low rate, l’angolo di virata del quadricoptero
è limitato e rilasciando entrambi gli stick, il quadricoptero si
auto-livella. Questa modalità tipicamente viene scelta da piloti
che preferiscono un controllo più semplice e docile durante
i primi voli.
• Nella modalità high rate, l’angolo di virata del quadricoptero è
più ampio e rilasciando entrambi gli stick, il quadricoptero si auto-livella.
Selezione dual rate
ABCDE F
Modalità
1
Alettone
(Sinistra/Destra)
Throttle
(Su/Giù)
Trim
del throttle Trim
dell’alettone Trim del
timone Trim
dell’elevatore Timone
(Sinistra/Destra)
Elevatore
(Su/Giù)
Modalità
2
Alettone
(Sinistra/Destra)
Elevatore
(Su/Giù)
Trim
dell’elevatore Trim
dell’alettone Trim del
timone Trim
del throttle Timone
(Sinistra/Destra)
Throttle
(Su/Giù)
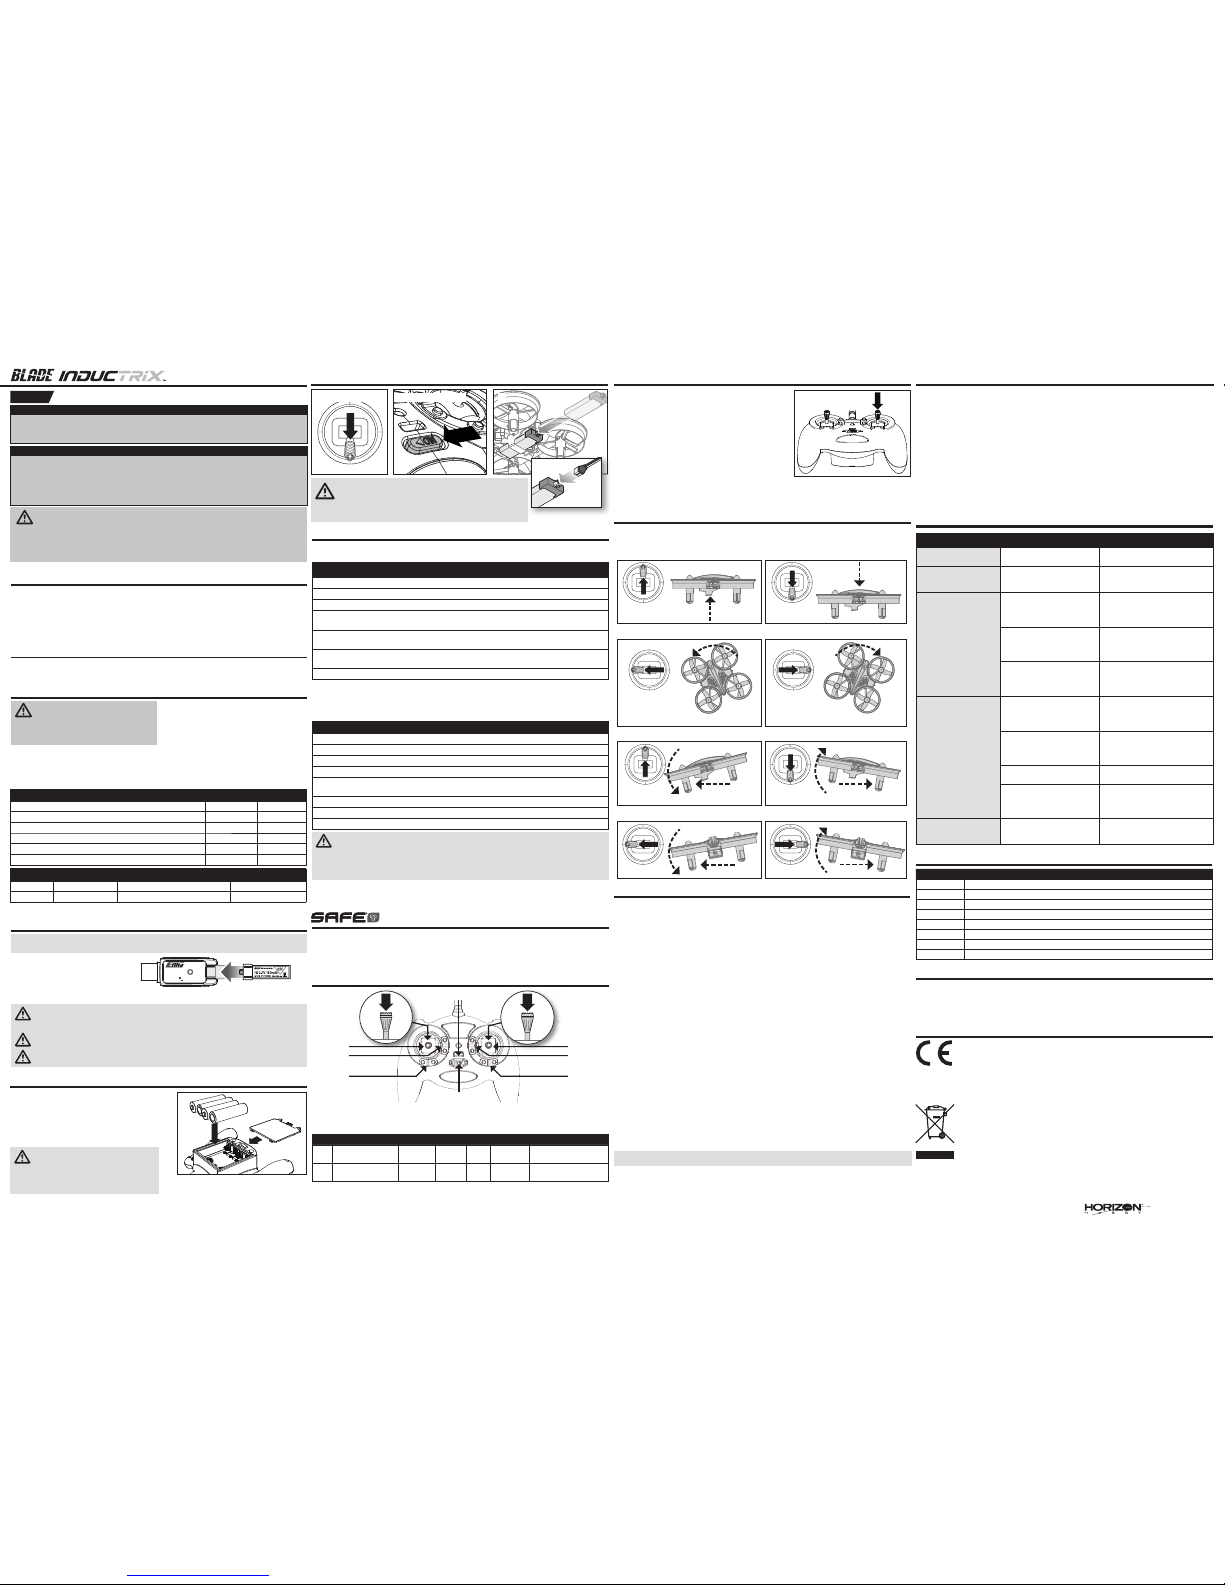
Installazione della batteria di volo
ATTENZIONE: scollegare sempre la batteria LiPo dall’aereo
quando non si deve volare, per evitare di sovrascaricarla. Le batterie
scaricate al di sotto della soglia minima approvata, si potrebbero danneggia-
re perdendo capacità o anche incendiarsi quando si tenta di ricaricarle.
1 Stick motore
in basso
2 Posizione ON 3
4
Connessione (binding) fra trasmettitore e ricevitore
Il quadricoptero Inductrix non richiede impostazioni specifiche della trasmittente per eseguire il volo
standard. Usando una trasmittente computerizzata, basta collegare (bind) il quadricoptero alla trasmit-
tente, selezionando il tipo di modello “Acro” o “Aereo.”
Per connettere (bind) le quadricoptero al trasmettitore scelto, si prega di seguire le indicazioni riportate
qui di seguito.
ATTENZIONE: Quando si utilizza un trasmettitore Futaba con un modulo Spektrum DSM,è necessario
invertire il canale del gas ed effettuare nuovamente il Binding. Consultare il manuale del vostro modulo
Spektrum per settare nuovamente il Bind ed il FailSafe. Consultate il manuale della vostra trasmittente per
effettuare l’inversione del canale del gas.
Se si incontrassero problemi, osservare le istruzioni per il “binding”e far riferimento alla guida per la soluzione
dei problemi per ulteriori istruzioni. Se necessario contattare il servizio assistenza Horizon. Per un elenco
completo dei trasmettitori DSM compatibili visitare il sito www.bindnfly.com.
Controllo trasmettitore (RTF)
La rivoluzionaria tecnologia SAFE usa una combinazione innovativa di sensori ad assi multipli e un software
che permette al modello di conoscere la sua posizione relativa all’orizzonte. Questo riferimento spaziale viene
utilizzato per creare un inviluppo di volo controllato che il velivolo usa per mantenersi con angoli di rollio tali da
permettere un volo più sicuro.
Tecnologia
Scelta della
riduzione di
corsa
Connessione
(bind)
Procedura generale per la connessione (binding)
1. Scollegare la batteria dal quadricoptero.
2. Selezionare "Acro" come tipo di modello nelle impostazioni della trasmittente.
3. Centrare tutti i trim sulla trasmittente.
4. Spegnere la trasmittente e portare lo stick motore completamente in basso.
5. Collegare la batteria di bordo al quadricottero. Il LED dell’unità di controllo 4 in 1 lampeggia in rosso
durante l’inizializzazione, poi lampeggia in blu quando è pronto per la connessione (bind).
6. Mettere il trasmettitore nel modo “bind” e accenderlo.
7. Rilasciare il pulsante/interruttore di “bind” dopo 2-3 secondi. Il quadricoptero è connesso quando il LED
blu sull’unità di controllo resta acceso con luce fissa.
8. Scollegare la batteria dal modello e spegnere il trasmettitore.
Procedura di “binding” con trasmettitore MLP4DSM
1. Scollegare la batteria dal quadricoptero.
2. Centrare tutti i trim sul trasmettitore.
3. Spegnere la trasmittente e portare lo stick del motore completamente in basso.
4. Collegare la batteria di bordo al quadricottero. Il LED dell'unità di controllo 4 in 1 lampeggia in rosso
durante l'inizializzazione, poi lampeggia in blu quando è pronto per la connessione (bind).
5. Quando il LED blu lampeggia, mantenere premuto lo stick sinistro mentre si accende la trasmittente
(si deve sentire un clic e un beep lungo).
6. Rilasciare lo stick di sinistra. Il trasmettitore emette un beep e il suo LED lampeggia. Il quadricoptero è
connesso quando il LED blu sull’unità di controllo resta acceso con luce fissa.
7. Scollegare la batteria dal modello e spegnere il trasmettitore.
Guida alla soluzione dei problemi
Problema Possibile causa Soluzione
Il quadricoptero non
risponde al comando
del gas
Stick e/o trim del motore troppo
in alto Resettare i controlli con stick e trim
completamente in basso
Il quadricoptero non
funziona ed emette odo-
re di bruciato dopo aver
connesso la batteria
Batteria di bordo collegata con
polarità invertita
Sostituire il circuito del 4-in-1. Collegare
la batteria di bordo facendo attenzione alla
polarità
ll LED sulla ricevente
lampeggia velocemente
e il qaudricoptero non
risponde alla trasmitten-
te (durante il “binding”)
Trasmettitore troppo vicino al
modello durante la procedura di
“binding”
Spegnere il trasmettitore. Allontanare il tra-
smettitore all’aereo. Scollegare e ricollegare
la batteria di bordo. Ripetere la procedura di
“binding” seguendo le istruzioni
Il comando per il "bind" non è
stato premuto all'accensione del
trasmettitore
Spegnere il trasmettitore e ripetere la
procedura
Il modello o il trasmettitore sono
troppo vicini a grossi oggetti me-
tallici, sorgenti WiFi o ad un altro
trasmettitore
Spostare il modello e il trasmettitore in un
altro posto prima di ripetere la procedura
Il LED della ricevente
lampeggia rapidamente
ed il quadricoptero non
risponde alla trasmitten-
te (dopo aver effettuato
il “binding)
Non sono passati 5 secondi
dall’accensione del trasmettitore
al collegamento della batteria di
bordo
Lasciare acceso il trasmettitore. Scollegare e
ricollegare la batteria allo quadricottero
Lo quadricottero è connesso ad
una memoria diversa (solo tra-
smettitori con ModelMatch)
Scegliere la memoria giusta sul trasmetti-
tore. Scollegare e ricollegare la batteria allo
quadricottero
Batteria di bordo o del trasmettitore
quasi scariche Sostituire o ricaricare le batterie
Il modello o il trasmettitore sono
troppo vicini a grossi oggetti me-
tallici, sorgenti WiFi o ad un altro
trasmettitore
Spostare il modello e il trasmettitore in un
altro posto prima di ripetere la procedura
Cade direttamente dopo
il decollo o non decolla Eliche nella posizione sbagliata o
modalità di volo scelta non corretta Effettuare le regolazioni necessarie
USB Li-Po
Charger
EFLC1008
SOLID RED LED
–Charging
DC Input:5.0V 350mA
DC Output:4.2V 300mA
LED OFF
–Charge
Complete
Il trasmettitore RTF viene fornito già connesso al modello. Se serve rifare la connessione, si prega di
osservare le seguenti indicazioni.
D
E
F
C
B
A
S
r
i
c
Se premuti, i pulsanti dei trim emettono un suono che aumenta o diminuisce di intensità a ogni
pressione. La posizione del trim intermedia o neutra è associata a un tono medio nell’intervallo di
passo dei suoni. La fine del campo di controllo è segnalata da una serie di beep.
Interruttore ON/OFF
LED di alimentazione
Elenco delle parti
Part # Descrizione
BLH8700 Inductrix RTF
BLH8780 Inductrix BNF
BLH8701 Unità di controllo 3-in-1: Inductrix
BLH8702 Motore con cavo, rotazione oraria: Inductrix
BLH8703 Motore con cavo, rotazione anti-oraria: Inductrix
BLH8704 Set capottine, rosso & blu: Inductrix
BLH8705 Set eliche (4), bianco: Inductrix
BLH8706 Telaio principale: Inductrix
Almeno 14 anni. Non è un giocattolo.
© 2015 Horizon Hobby, LLC. Blade,Inductrix, E-flite, SAFE, the SAFE logo and the
Horizon Hobby Logo are trademarks or registered trademarks of Horizon Hobby, LLC.
Patents pending.Created 06/2015 | 49816
Table of contents
Languages:
Other Horizon Hobby Quadcopter manuals

Horizon Hobby
Horizon Hobby Blade 350 QX3 Quadcopter Parts list manual

Horizon Hobby
Horizon Hobby Blade 350 QX3 Quadcopter User manual

Horizon Hobby
Horizon Hobby Blade 350 QX3 Quadcopter User manual

Horizon Hobby
Horizon Hobby rezo RTF User manual

Horizon Hobby
Horizon Hobby Blade 350 QX RTF User manual

Horizon Hobby
Horizon Hobby Blade 200QX User manual

Horizon Hobby
Horizon Hobby Blade 180QX HD Use and care manual

Horizon Hobby
Horizon Hobby Blade mQX User manual

Horizon Hobby
Horizon Hobby BLH8570 User manual

Horizon Hobby
Horizon Hobby Blade SAFE Glimpse BNF BLH2202MD User manual