Hornington WHR-HP-G300N User manual

WHR-HP-G300N Router Settings (For: Pccw, HGC PPPoE User)
LastUpdated28/11/2009 HorningtonKB: http://kb.hornington.com WHR-HP-G300N PPPoE Settings Page 1
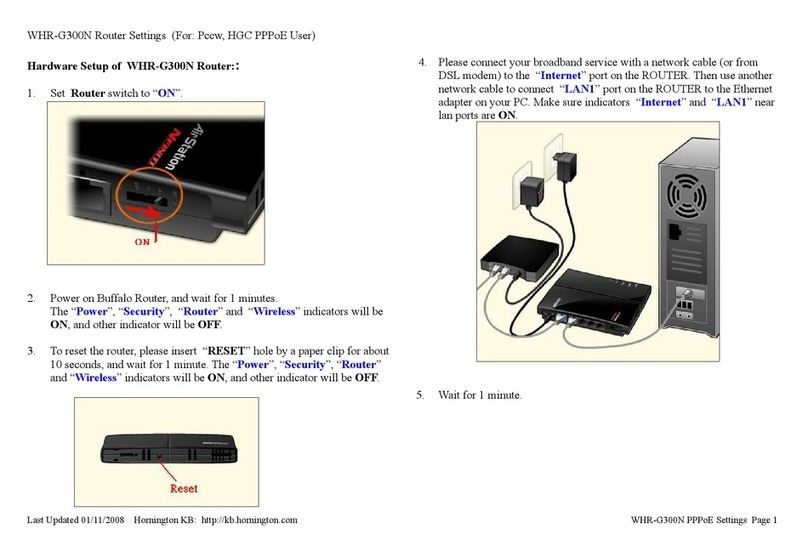
4. Please connect your broadband service with a network cable (or from
Hardware Setup of WHR-HP-G300N Router: cable modem) to the “INTERNET” port on the ROUTER. Then use
another network cable to connect “LAN1” port on the ROUTER to the
1. Set Router switch to “ON”. Ethernet adapter on your PC. Make sure indicators “INTERNET” and
“LAN1” near lan ports are ON.
2. Power on Buffalo Router, and wait for 2 minutes.
The “Power”, “Wireless” and “Router” indicators will be ON, and
“DIAG” will be OFF.
3. To reset the router, please insert “RESET” hole by a paper clip for about
10 seconds, and wait for 2 minutes. The “Power”, “Wireless” and
“Router” indicators will be ON, and “DIAG” will be OFF. 5. For i-cable user, please power off modem for 1 hour. Then power on
modem again.
. Wait for 2 minutes.

WHR-HP-G300N Router Settings (For: Pccw, HGC PPPoE User)
Last pdated28/11/2009 HorningtonKB: http://kb.hornington.com WHR-HP-G300N PPPoE Settings Page 2U
Prepare for Buffalo Router installation (Windows XP)
(Vista preparation
http://support.hornington.com/download/buffalo/vista_prepare/Vista_Prep_Eng.pdf)
1. Click “Start”
2. Click “Control Panel” or “Settings” -> “Control Panel”
3. Choose “Internet Options” or “Network and Internet Connections” ->
“Internet Options”
4. Click “Connections” tab, choose “Never dial a connection”, then click
“LAN Settings”
5. Under “Local Area Network (LAN) Settings”, please UNCHECK all
check boxes, then click “OK” twice, and go back to Control Panel

W RH
LastUpdated28/11/2009 HorningtonKB: http://kb.hornington.com WHR-HP-G300N PPPoE Settings Page 3
-HP-G300N Router Settings (For: Pccw, HGC PPPoE User)
6. Under Control Panel, please choose “Network Connections” or
“Network and Internet Connections” -> “Networks Connections”,
then right-click “LocalArea Connection”, and choose “Properties”
7. Highlight “Internet Protocol (TCP/IP)”, and then click “Properties”.
Under “Internet Protocol (TCP/IP) Properties”, choose “Obtain an
IP address automatically” and “Obtain DNS server address
automatically”, then click “OK” twice and go back to Network
Connections
8. Wait for 1 minute.

WHR-HP-G300N Router Settings (For: Pccw, HGC PPPoE User)
LastUpdated28/ 1/2009 HorningtonKB: http://kb.hornington.com WHR-HP-G300N PPPoE Settings Page 4
3. Router is now detecting Internet Connection.
Buffalo Router WHR-HP-G300NH Internet Connection Setup:
1
1. Launch Web Browser, enter http://192.168.11.1 in address bar and then
press Enter. Then type username as “root”, password leaves as blank
2. Click “Run the Internet Connection Wizard (Easy Setup)”
4. After a few moment, the following page will be displayed and asking
for“Username/Password”. Please input the login username (e.g.
xxxx@netvigator.com or [email protected]) and password
(twice) of your broadband service now. Then click “Next”

WHR-HP-G300N Router Settings (For: Pccw, HGC PPPoE User)
LastUpdated28/11/2009 HorningtonKB: http://kb.hornington.com WHR-HP-G300N PPPoE Settings Page 5
7. Return to “Setup” page, click “Internet/LAN”
5. Wait for about 2 minutes.
If “Check the Internet connection” process is successful, the following
page will be displayed. Click “Complete” to close the setup page.
6. If the login information is incorrect, the following page will be displayed.
Please confirm login information. Click “Back” button to return previous
page, re-enter login username/password (twice), and then click “Next” to
check internet connection again.

W RH
LastUpdated28/11/2009 HorningtonKB: http://kb.hornington.com WHR-HP-G300N PPPoE Settings Page 6
-HP-G300N Router Settings (For: Pccw, HGC PPPoE User)
8. Under “Method of Acquiring IP Address”, choose “Use PPPoE Client”.
Click “Apply”
Click “Wireless Config”, under page “WPS”, please UNCHECK
“enable” option behind “WPS”
Click “Apply” to save settings
9. Wait for 2 minutes
Wait for about 1 minute.

WHR-HP-G300N Router Settings (For: Pccw, HGC PPPoE User)
LastUpdated28/11/2009 HorningtonKB: http://kb.hornington.com WHR-HP-G300N PPPoE Settings Page 7
Click "Apply" again to confirm
10. Click "Basic (11n/g/b)"
- Wireless Channel, choose a channel used for the router.
.
In general, you are suggested to try channel 11, 6, or 1.You may use
each channel for a few days to test which channel is more stable in
your environment. Please do not use “Auto Channel”
-SSID, choose “Enter”, then type a new wireless network name
for the router. (You may use "0-9", "a-z" and "A-Z" as SSID.
Space between characters is NOT recommended)
-“Wireless authentication”, choose “WPA-PSK”
-“Wireless encryption”, choose “AES”
-“WPA-PSK (Pre-shared Key)”Enter an 8-63 characters wireless
password (wireless encryption key)
(* You may use 0-9, a-z and A-Z, the wireless password is
case-sensitive)
Then press "Apply".
Wait for about 2 minutes.

WHR-HP-G300N Router Settings (For: Pccw, HGC PPPoE User)
LastUpdated28/11/2009 HorningtonKB: http://kb.hornington.com WHR-HP-G300N PPPoE Settings Page 8
11. The orange “SECURITY” indicator will turn on to show the wireless
network is secured.
12. Setting Completed
Please write down the “Wireless Network Name” (SSID)and “Wireless
Encryption Key” you setup for the router in step 10 for future reference
For related topics about WHR-HP-G300N, please refer to Hornington
Knowledge Base:
http://support.hornington.com/kb/category.php?catID=125
Other Hornington Network Router manuals