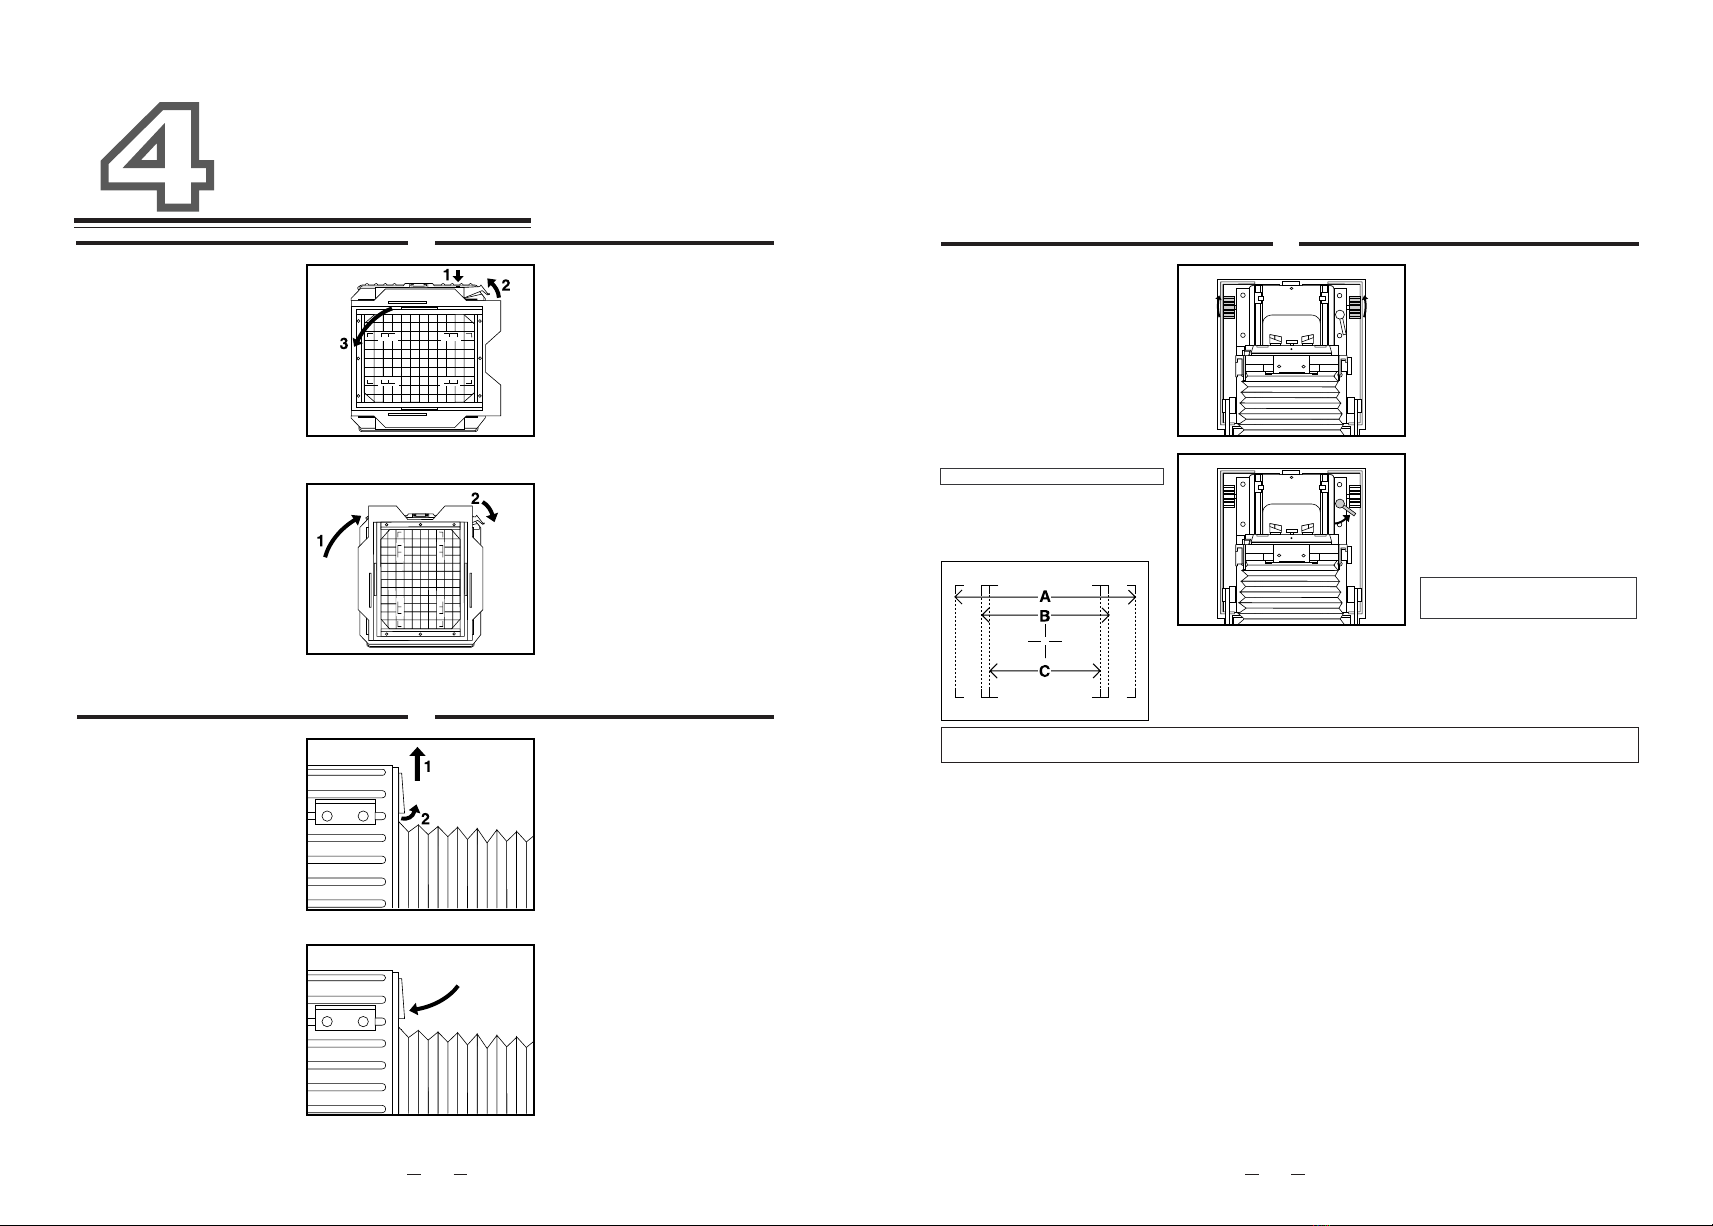
カメラ後部の取り外し:セーフ
ティロックボタン(14)を押しな
がら、カメラバックロックレバー
(15)を上方へ上げるとロックが解
除されます。次にカメラ後部枠(つ
なぎ枠20)を上方部からはずし、
さらに下方部を持ち上げるように
して本体側の爪からはずします。
カメラ後部の振替え取り付:カメ
ラ後部枠は4方向のどちらでも取
り付けが可能です。フィルムホル
ダーの差込み口が望みの方向にく
るように取り付けます。後部枠の
溝がカメラの本体の下方にある固
定爪にはまり込むように斜めから
差し込んで取り付け、カメラバッ
クロックレバー(15)を押し下
げてロックします。
1
カメラ後部の取り外し
RemovingthecameraBack
カメラ後部の振替え取り付
ResettingthecameraBack
2
本機は広角レンズ使用時にライジ
ング量を大きくとるためのフラッ
プ(1)が開く構造になっていま
す。
開き方:レンズスタンダード部を
カメラ本体に格納した状態で、フ
ラップロック(2)を押し下げ、さら
に上方へ開けロックします。
閉じ方:フラップを押し下げて閉
じます。この操作は必ずベッドを
閉じる前に行って下さい。
開き方 /ToOpen
閉じ方 /ToClose
Theswingableflap(1)onthe
45HD'sbodyallowstherise
movementtobeusedwithwide-
anglelenses.
ToOpen:Withthelensstandard
initsstoragepositioninsidethe
camerabody,pushdowntheflap
lock(2)(where45HDappears),
swinguptheflap,andsnapitinits
raisedposition.
ToClose:Swingdowntheflapand
lockitclosed.Besuretheflapis
closedandlockedbeforeclosing
thecamerabed.
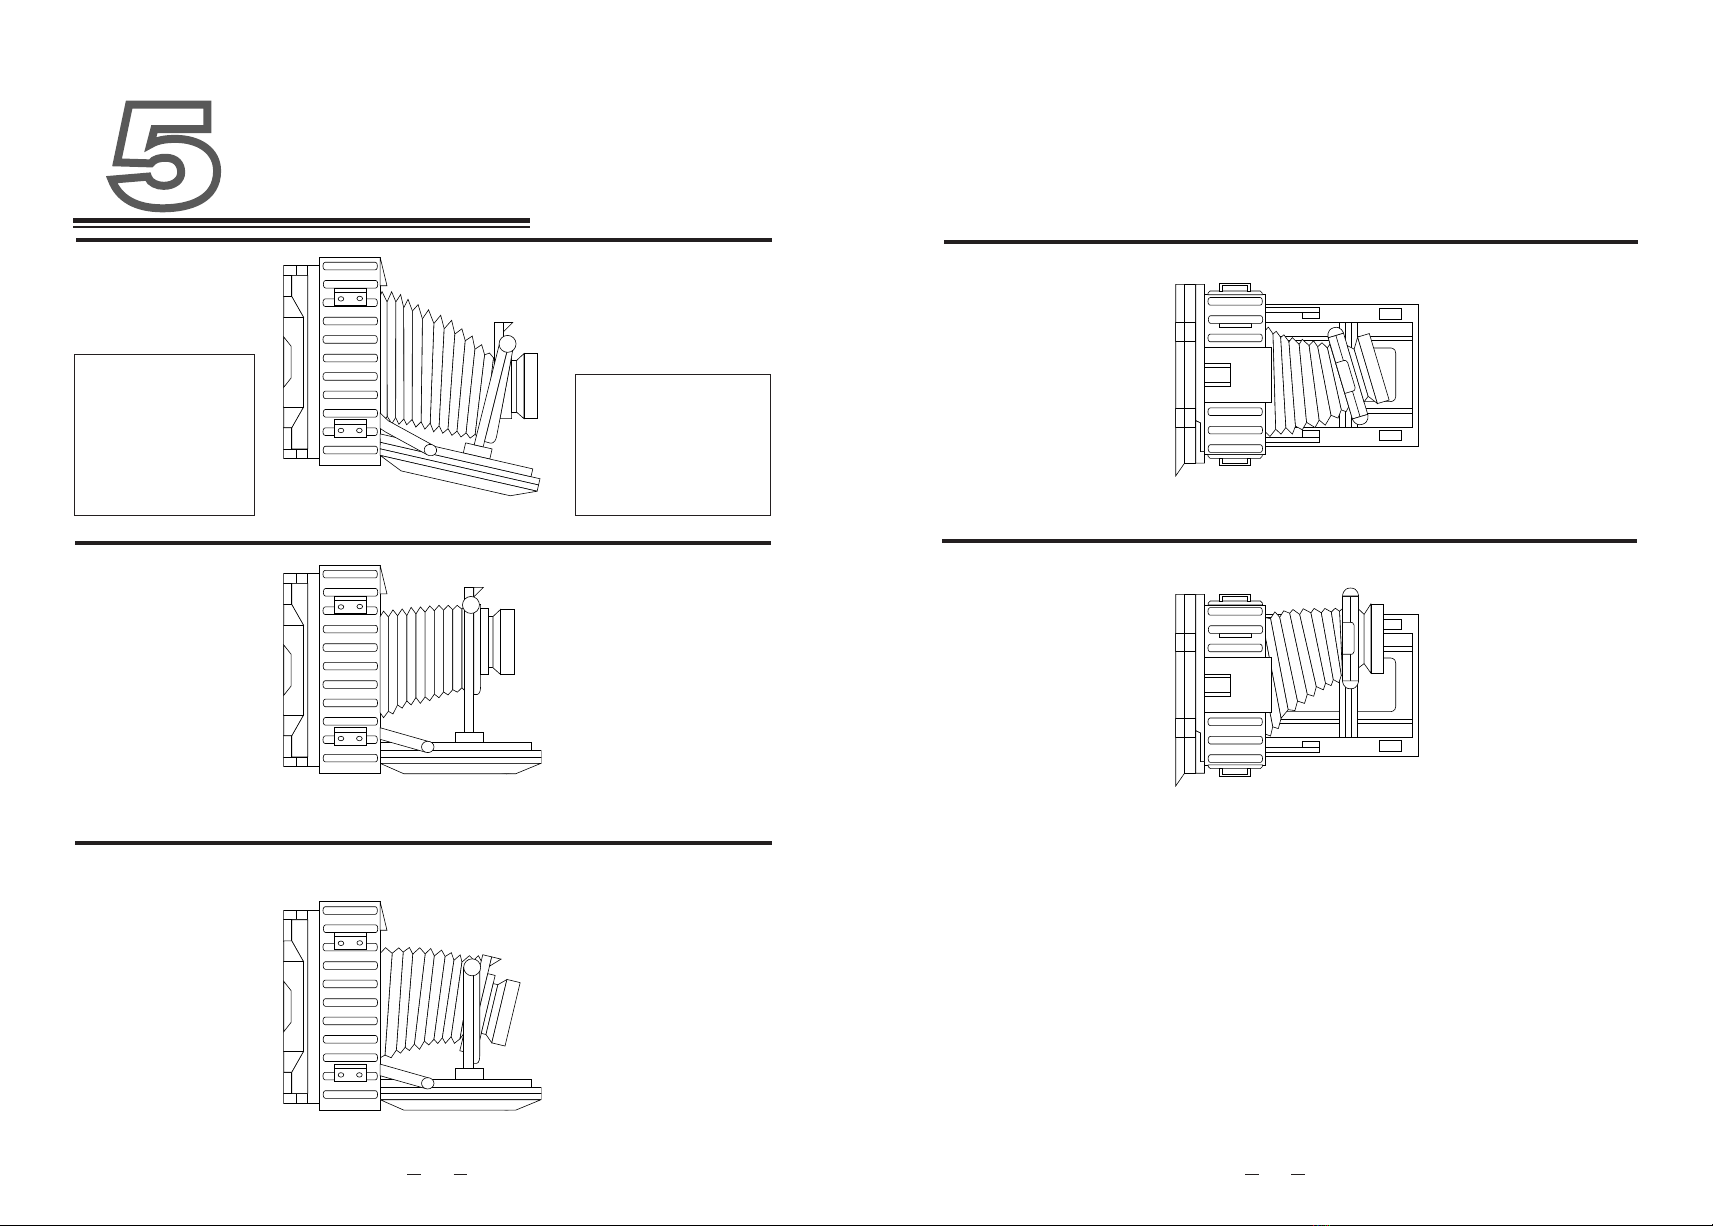
レール上の適当な位置へレンズス
タンダード部を引出し、フォーカシ
ングノブ(6)を回してピントを合わ
せます。ピントが合わないときは、
レンズスタンダード部を少し本体
側に押し戻して、再びピント合わ
せを行います。ピントが合ったら、
フォーカシングロックレバー(3)
でレールを固定してください。
Pulloutthelensstandardtoits
properlocationonthefocusing
track.Withthelensshutter
open,focusontheground
glass(preferablyusingaloupe)
byturningeitherofthefocusing
knobs(6).Iftheimagecannotbe
focused,movethelensstandard
backslightlytowardthecamera
bodyandtryfocusingagain.
Whensharpfocusisattained,lock
thefocusingtrackinplacewith
thefocuslock(3).
調整方法:必要に応じてレールの先端に取付けられた
付属のインフィニティストッパー(5)は次の要領で
無限遠調整をして使用できます。
1)カメラの各可動部を元の位置に戻して各ロックノブ
を締めます。レールも本体側に完全に戻しフォーカ
シングロックレバー(3)で固定します。
2)カメラにレンズを取付けた後三脚にセットしフォー
カスレバーでシャッター羽根を開きます。絞りも開
放にしてピントガラスを見やすくします。
3)500メートル以遠にある煙突、鉄塔、アンテナ等を選
びピントガラスの中心にその像がくるようにセット
します。
4)引出しつまみ(10)を指で強くはさみレンズスタン
ダードをレンズの上で前後させてピントを合わせます。
5)一対のインフィニティストッパーのネジをゆるめ、
コマを立てレンズスタンダード部に突き当てゆるめ
たネジを固定します。この時にはレンズスタンダー
ド部がフィルム面に平行になるように充分に注意を
払って下さい。
Infinitystops(5)canbeadjustedasfollows:
1.Returnalllensstandardmovementstotheirneutralposition,
includingthefocusingtrack,andtightenalllocks.
2.Withalensinplaceandthecameraonatripod,openthelens
shutterandthelensdiaphragm(toitsmaximumaperture).
3.Selectsometall,distantobjecttofocuson(atleast500metersor
1,500feetaway),suchasachimneyorantenna.Aimthecamera
sothattheobjectappearsonthecenterofthegroundglass.
4.Whilesqueezingthelensstandardpull-outgrips(10)togetherso
thatthelensstandardmovesfreelyonthefocusingtrack,find
thepointofsharpestfocusforthedistantobject.Leavethelens
standerdatthatlocation.Donotusethefocusingknobsforthis
operation.
5.Loosenthesetscrewsforonepairofinfinitystops,swing
upthestops,andslidethepairtightlyagainstthelens
standard.Tightenthesetscrewstoholdtheinfinitystopsatthat
location,whilemakingsurethelensstandardisperfectlyparallel
tothefilmplane.Thelensinusewillnowbefocusedatinfinity
whenthelensstandardispulledouttothoseinfinitystops.
3
Todeterminetheareaon
groundglass
4 × 5″
6 × 12cm
6 × 9cm
6 × 7cm
RemovingthecameraBack:
Whilepushingthesafetylock
button(14),liftupthecameraback
locklever(15),swingthetopofthe
backconnectingframe(20)away
fromthecamerabody,thenliftthe
backoutofthelowercatcheson
thecamerabody.
ResettingtheCameraBack:The
camerabackmaybesetsoasto
receiveafilmholderinanyof
fourdirections.Withthecamera
backlockleverup,setthebase
ofthebackconnectingframe
intothelowercatchesonthe
camerabody,swingthetopinto
place,thenpushdownthecamera
backlocklever(15).
1.カメラバックの
タテ・ヨコ振替え
1.SettingtheCameraBackfor
Vertical/HorizontalFormats
3.ピントの合わせ方
2.フラップの開閉操作 2.UsingtheFlap
3.Focusing
・・・・・・・・・・・・・・・・・・・・・・・・・・・・
・・・・・・・・・・・・・・・・・・・・・・・
・・・・・・・・・・・・・・・・・・・・・・・・・
・・・・・・・・・・・・・・・・・・・・・・・・・
wholearea
A
B
C
・・・・・・・・・・・・・・・・・・・・・・・・・・・・
・・・・・・・・・・・・・・・・・・・・・・・
・・・・・・・・・・・・・・・・・・・・・・・・・
・・・・・・・・・・・・・・・・・・・・・・・・・
全視野
A の枠
B の枠
C の枠
ピントガラス上の視野の設定
4 × 5″
6 × 12cm
6 × 9cm
6 × 7cm
インフィニティストッパー /UsingtheInfinityStops
HOWTOUSE
基本操作