Horst Gruhle MWT-01 User manual

0
MIDI Wave-Theremin
MWT-01
Draft Only - 15 Apr 2012
© 2010 Horst Gruhle
horst midi theremin controller / advanced theremins

1
Wave Theremin – main features at a glance …................................... 2
Wave Theremin – where to begin … ..................................................... 4
Control pannel features – at a glance … ............................................... 5
Kick-starting the Theremin: ..................................................................... 8
Making the first sounds with the Wave-Theremin: ............................ 9
The Instrument and Mode Selector in more detail:........................... 10
Midi Theremin Operation:...................................................................... 14
Setting up the Theremin:......................................................................... 18
Instrument-configuration Save / Recall:.............................................. 20
Instrument Selection elements:.............................................................. 21
Mode Selection elements:....................................................................... 22
Wave MIX elements:.............................................................................. 23
MIDI messages configuration: .............................................................. 24
MODE SELECTION MATRIX ......................................................... 25
SETUP MODE MATRIX .................................................................... 26
TEST MODE MATRIX ....................................................................... 27

2
Wave Theremin – main features at a glance …
• Stereo Theremin – play up to 3 notes at the same time with over
eight different wave forms from a perfect Sinewave to traditional
rectified Sinewave, Triangle, Squarewave and more …
• Panorama Theremin Sound – create your individual theremin sound
by using 2 additional oscillators to create ‘sub-harmonics’ and
‘overtones’ to your main oscillator. Pan the sub-harmonics and
overtones to the left / right to obtain a rich panorama theremin sound.
Adjust each oscillator volume to create the perfect harmonic balance.
• Midi Theremin – take advantage of the endless range of synthetic
sounds, sampled sounds and instruments, available on existing
keyboards, samplers and software-sound-generators. Play the sounds
like a Theremin, a touchless keyboard or like a drum with pitch-bend
and more.
• Midi Theremin controller – control a vast array of Keyboards,
computer software-sound-generators and other instruments (i.e.
Tracktion, FL7, NI Reactor etc. ) using MIDI Note-ON/OFF,
Pitchbend and 14 bit control-messages.
• Drum trigger interface - trigger midi notes and theremin sounds
from analog input, internal oscillator or trigger button and use
Theremin to modulate midi-pitch or other midi-parameters.
• Finger Drum Theremin – using our Drum Trigger Pad, you can
trigger analog and midi sounds by just lightly tapping your finger on
the pad and then control the sound with the theremin. The perfect
electronic finger drum with ultra fast response and excellent accuracy
for pitch and velocity control.
• Manual Trigger button to puls theremin sounds when output is
muted or to trigger midi-notes while playing the Theremin.

3
Other features:
• Huge Theremin frequency-range from 1 Hz to over 15 KHz.
• Extreme settings for circuit-bending style operation
• Automatic antenna tuning (auto tune)
• Automatic antenna-tuning stabilisation (auto re-tune)
• Plug in your guitar, microphone, keyboard etc…
• Save and recall your settings in internal flash memory
• Stereo in and stereo out – High Quality 24 bit stereo interface codec
with 96KHz sample rate max (DAC with max 100dB SN ratio)
• Theremin handmade from Polished Aluminium – wooden sides made
from Australian Spotted Gum – removable antenna rod.
Future optional Software Update:
• Theremin controlled moog style resonant filter
• Theremin controlled wah filter
• Theremin controlled Ring-modulator
• Theremin controlled Tremolo / chopper
• Additional effects: Rectifier, Ueber-gain, Multi-divide

4
Wave Theremin – where to begin …
At first glance it seems overwhelming just looking at all the knobs and
buttons. Let us have a look at the overall structure of the Theremin.
The Wave-Theremin is in fact 3 Theremins in one:
(1) It can be played like a normal Wave-Theremin producing audio output
from within the Theremin itself, using a variety of build in oscillators, wave-
forms and modulators, to create a multitude of different sounds and effects.
(2) It is also a MIDI-Theremin, capable of producing a stream of midi
messages, to control some other midi-capable instrument that, in turn,
produces the desired audio output or controls external filters etc….
(3) After an optional software upgrade (in the future) it may also be used as
a theremin controlled modulator, processing signals from the audio input and
sending the resulting wave form to the audio output. Examples of this would
be the Ring-Modulator, where the Theremin produces the ring modulation
frequency, which is then applied to the input signal etc …
Note: For the sake of simplicity, only the most important functions are
marked on the front panel. When setting up the Theremin, it is necessary to
have the ‘MODE SELECTION MATRIX’ and the ‘SETUP MODE
MATRIX’ handy or use the ‘user-manual’ as a guide.

5
Control panel features – at a glance …
• Instrument-select knob ( 12 positions – INSTRUMENTS, SETUP)
• Mode-select knob ( 12 positions – GLOBAL, MIX, MIDI )

6
• Trigger / accept button ( momentary )
• Red Status LED ( ON, OFF, flash )
• Auto re-tune ON/OFF switch (UP position is ON)
• Wave A/B toggle switch and wave A/B indicator LED
• Theremin mute switch ( mute audio and midi output )
DOWN position is MUTE
• Parameter knobs ( P1 - volume, P2 - tone, P3 – octave )
Note: When changing the Instrument-knob position or the Mode-knob
position, the Parameter-knobs are kind of disconnected from the actual
parameters (ignored) until they are moved a little (unlocked). When a
parameter has been unlocked, the parameter will first “align itself” with the
current position of the Parameter-knob and then follow the movement of the
Parameter-knob.

7
• Stereo audio out
• Stereo audio in (wave / Trigger audio in )
• MIDI out
• DC external power 12 Volt / 400 mA (regulated)
• Connector for removable antenna

8
Kick-starting the Theremin:
Connect Leads: Connect a mono or stereo lead from the Theremin output to the
Amplifier or Mixing Desk etc… This is important – it provides a ground path for
the Theremin ! Hook up midi and external trigger (input) as required.
Connect Power: Use the 12 VDC (400 mA) power supply (as supplied) and
connect it to the 12 Volt D/C input of the Theremin first. Only then (!) connect the
switch-mode power supply to your power point.
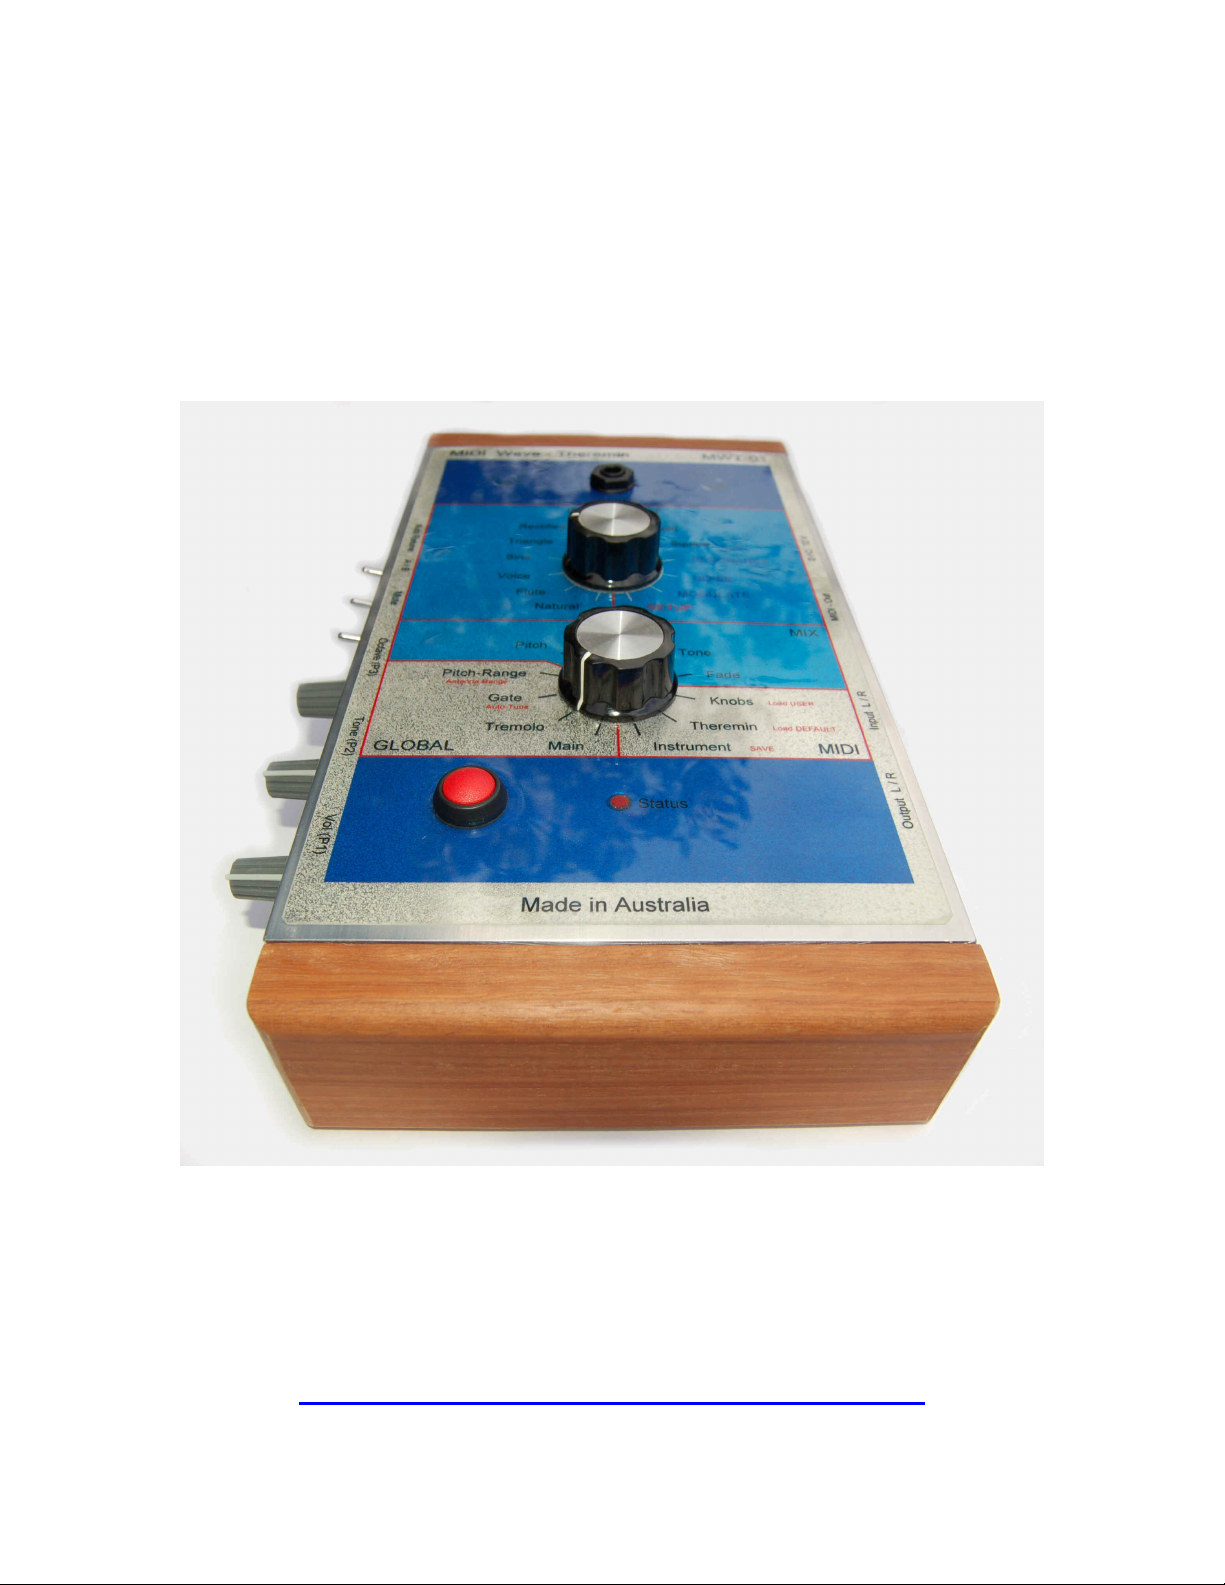
Connect Antenna: If you have not plugged in the antenna yet, the antenna LED’s
(blue) will be flashing until the antenna has been plugged in. You will also notice
the red status LED flashing slowly, waiting for you to initiate the auto-tune
process.
Start Antenna Auto Tune: After the Theremin has been setup where you intend
to play it (preferably away from any metal objects and noisy electrical equipment)
and the antenna has been plugged in, push the trigger button next to the red
status LED, to start the antenna auto tune procedure. The red status LED now
stays ON (no flashing) until the auto-tune cycle is completed.
Wait until Completed: Once auto-tune has been started, you have one second to
move away from the antenna. The antenna LED’s will turn ON and after a few
seconds the status LED will turn OFF, indicating that tuning has been completed
successfully. (NOTE: If the instrument select knob is set to ‘SETUP’ (!) the LED
will flash fast after the tuning has been completed successfully).
Auto Retune: The Theremin may need some time to stabilize after the initial
antenna tuning. We recommend to have the Auto Retune switch turned ON (UP
position) and to allow the Theremin to settle in for 5 minutes or as required.
(Ideally move away from the antenna for a while, to allow the Theremin to check
for drift etc…)
Unsuccessful Tuning: If the LED is still flashing slowly – the antenna could not
be tuned correctly. Check if the correct antenna has been inserted fully into the
antenna socket, maybe rotate the antenna in the socket once or twice, in case some
corrosion has build up on the antenna or the connector. Check for any interfering
objects etc… Push trigger button again.

9
Making the first sounds with the Wave-Theremin:
Initial Setup:
• Make sure the amp is working
• Point the Wave-select knob (INSTRUMENT) to ‘Sine’ and
• Set the Mode-knob (GLOBAL) to position ‘Main’.
• Make sure the ‘Mute’ switch is in the UP position (audio on) and
• the ‘Auto-Retune’ switch is in the UP position too.
• Turn all 3 potentiometer knobs (Volume,Tone,Octave) to 12 o’clock
(you need to actually move the knobs to “unlock” them)
• You should be hearing some sound when approaching the Theremin
antenna (20 … 30 cm).
• If not, try to push the ‘Trigger’ button next to the LED
• make sure the “Gate” is disabled (see Gate)
No sound yet ? If you can’t hear anything yet, try to use the build in tuner
to generate a sound (Sine-wave at approx 440 Hz) :
• Point the Wave-select knob (INSTRUMENT) to ‘SETUP’
• The red status LED is now flashing fast.
• Set the Mode-knob to position ‘Pitch’ (MIX).
• Adjust the volume of the tuner.
• You should be hearing a sine-wave 440 Hz
• You can ‘fine-tune’ the oscillator frequency with the ‘Tone’ knob
Still no sound yet ? Is the Amp turned ON ? Audio lead buggered ?
Antenna Retune: To retune the antenna during use
• Point the Wave-select knob (INSTRUMENT) to ‘SETUP’
• The red status LED is now flashing fast.
• Set the Mode-knob to position ‘Auto-Tune’ (GLOBAL).
• Push the red ‘Trigger’ button next to the LED
• Step back and wait for tuning to finish
• Check tuning (you should hear a sine wave when approaching the
Theremin antenna (20 … 30 cm).

10
The Instrument and Mode Selector in more detail:
The Instrument Selector: Each of the instrument settings of the Instrument
Selector (natural, flute, … square) has 3 oscillators associated with. They are
capable of producing the waveform of the selected Instrument (i.e. Sine
etc…) Each oscillator can be individually adjusted in pitch, volume, pan,
tone (low-pass) and fade via the Parameter Knobs and the Mode-Selector.
Setting the instrument selector to ‘SETUP’ allows you to customize your
Theremin, tune the Theremin again, adjust playing range, save and recall
user-settings etc…
The Mode Selector: The mode selector works in conjunction with the
instrument selector. If for example we have the instrument ‘sine’ selected
and we set the mode selector to ‘volume’ we are then able to change the
volume of each of the 3 internal oscillators individually. Parameter knob P1
will change ‘oscillator-1’ volume, P2 changes ‘oscillator-2’ volume and P3
for ‘oscillator-3’ volume. Likewise for ‘pitch’ , ‘pan’ , ‘tone’ etc…
Main Parameters: If we set the mode selector to position ‘main’, the
parameter knobs P1, P2 and P3 control the ‘main-volume’ , ‘main-tone’
(low-pass) and the ‘octave’ for all instruments (GLOBAL). The ‘octave’
feature allows you to transpose the whole Theremin pitch in octaves up and
down.
Turning the octave up to the extreme settings will allow you to create
aliasing effects and other strange and more or less random textures and
sounds. Using the ‘frequency-range’ adjust mode, allows you to zoom into a
particular aliasing sound and ‘stretch it’ over the Theremin playing range …
this will become clear once you gain a deeper understanding of the
Theremin.

11
The A/B Switch: With the ‘A/B switch’ , we can toggle between 2 different
settings of a particular instrument (3 oscillators each). If for example we
select position A and we turn only the volume of the main oscillator up
(oscillator-2 and oscillator-3 volume to zero) then we would have created a
simple sine wave Theremin sound at instrument ‘Sine A’ for example.
If we then switch to ‘Sine B’ with the A/B switch, we may decide to have
oscillator-1 at full volume and add a small amount of oscillator-2 and
oscillator-3 volume as well. We now hear 3 sine-waves when we play the
Theremin. Each of the oscillators can be individually panned in the stereo
field (left to right) to create a broader sound image (panorama sound).
Oscillator Pitch: The frequencies of oscillator-2 and -3 are ‘ratios’ of the
frequency of the main oscillator-1. This means whenever we change the
frequency of oscillator-1, the frequency of oscillator 2 and 3 will follow
according to their frequency-ratio setting.
First Harmonic: If we set the frequency-ratio of oscillator-2 to be ‘two
times oscillator-1 frequency’ then oscillator 2 acts like the first harmonic of
oscillator 1. If you would choose a random ratio, you are likely to get a more
dis-harmonic effect.
Sub Harmonic: If we set the frequency-ratio of oscillator-3 to be ‘half of
the oscillator-1 frequency’ then oscillator-3 acts like the first sub-harmonic
of oscillator-1. This would allow you to create a fuller Theremin sound.
Toggeling between A and B would then be like a ‘Tone Switch’ adding or
removing the harmonics (!). You may decide to set the pitch ratios to
resemble a cord or a more bell like harmonic structure etc....
Oscillator Fade: This is an experimental feature . It allows you to fade out a
particular oscillator with increasing ‘frequency’ similar to a low-pass filter
but instead of filtering, this is done by controlling the volume of the
oscillator. Try it … for some interesting sonic textures …

12
The Tremolo: Pointing the mode selector to the ‘tremolo’ position allows
you to turn on the build in tremolo / auto-trigger (midi) feature. The tremolo
is a global effect, it is not associated with any individual instrument directly,
but is saved / recalled with all the other settings.
Parameter P1 adjusts the ‘intensity’ (zero = Tremolo OFF), P2 selects the
tremolo ‘wave form’ from sine (left), triangle, rect. sine and saw to square
(right) and with P3 we select the tremolo ‘speed’ from slow to very fast.
The tremolo is also linked to the midi Theremin and acts as a auto trigger,
with trigger velocity controlled via the main-volume setting.
The Gate: Pointing the mode selector to the ‘gate’ position allows you to
enable the build in gate (and external volume control). The gate is also a
global effect and is not associated with any individual instrument directly,
but is saved / recalled with all the other settings.
The gate responds to a trigger pulse on the audio-input. This pulse can be
from a microphone, a drum trigger, a audio track or just a hum from
touching the other end of the lead (!) This enables you to create a beat for
the Theremin from external trigger sources or adjust the volume externally
i.e. just touching the end of the trigger lead intelligently, allows you to
perfectly control the Volume of the Theremin . The gate is in effect an
envelope follower (!) Pushing the trigger button will open the gate fully for
as long as the button is pushed.
Parameter P1 allows you to adjust the trigger input ‘gain’ (zero = OFF), P2
is ‘trigger-threshold’ (midi only) and P3 is ‘decay’.

13
Pitch Range: The starting pitch of the Theremin is primarily controlled by
the ‘octave’ setting and the ‘pitch’ setting of the main oscillator-1.
With the ‘pitch-range’ setting we can control the overall playing range of the
Theremin from ‘no range’ (pitch does not change) to a fraction of a semitone
(useful only for extreme aliasing settings) to multiple octaves (the more
octaves, the more difficult it will be to play a melody).
P3 is ‘coarse’ adjust and P2 is ‘fine’ adjust. P1 has a special feature
(experimental), it adjusts the ‘granularity’ of the Theremin pitch-control
(from smooth to grainy to odd semitones) … again … try it to find out.
!! The Pitch range is adjustable for each instrument (not global) !!

14
Midi Theremin Operation:
The Theremin can be set up in various ways to generate midi events, from
pitch-bend to note ON/OFF to control messages and program change
messages. Each “instrument” can be set up individually to perform in a
particular way.
Selection of midi channel and pitch bend mode is done globally via SETUP.
A midi monitor program like ‘MIDIMON’ or similar could come in handy.
Program Change: Whenever a new instrument is selected with the
instrument-select knob, and the midi ‘instrument select’ has been enabled for
this particular instrument, a program-change midi message is send out. To
setup the program change message, set the mode-select knob to ‘Instrument’
(MIDI) and adjust ‘instrument select / OFF’ with parameter knob P3. To
disable the program-change midi message again, just turn P3 to zero.
Hint: You need to have your midi-keyboard or computer hocked up to “see”
which Program you have selected.
Parameter knob control-message: Each parameter knob is able to send
14-bit midi-control messages. To setup the midi-control messages for a
parameter knob, set the mode-selector to ‘Knobs’ (MIDI). Adjust ‘control-
message / OFF’ with the parameter knob (P1, P2, P3) to select the desired
message ID.
To disable the message, just turn corresponding parameter knob to zero
again. Using parameter knobs to send midi messages is in conflict with the
non-midi operation of the Theremin. Be warned…

15
Theremin control-message: The Theremin is also able to send 14-bit midi-
control messages. The closer to the antenna we go, the higher the control
value will be. This can be used to control external filters with the Theremin.
To setup the midi-control messages for the Theremin, set the mode-selector
to ‘Theremin’ (MIDI) and adjust ‘control-msg-TH / OFF’ with parameter
P3 as required.
To disable the Theremin midi-control messages, just turn parameter P3 to
zero again. The Theremin control messages are disabled when in piano
mode (NOTE) or in Pitch-bend mode (BEND).
Theremin Piano mode: The Theremin is able to send note-on/off
messages when triggered with the trigger-switch, the internal auto-trigger or
via external trigger input. Pitch is controlled via the Theremin and the
‘octave’ parameter (Theremin-frequency * Octave + note-offset). When
triggered externally, note velocity is derived from the trigger signal. Internal
triggers derive the note velocity from the main-volume.
To setup the Piano-mode for the Theremin, set the mode-selector to
‘Theremin’ (MIDI) and adjust ‘NOTE ( offset ) / OFF’ with parameter knob
P2 as required. Setting the note-offset allows you to align the pitch of the
midi instrument with the pitch of the build in audio oscillators.
To disable the piano-mode, just turn parameter P2 to zero again. The piano-
mode (NOTE) is disabled when in Pitch-bend mode (BEND).
Glisanto mode: The glisanto-mode is only available in conjunction with the
piano-mode. When glisanto is enabled in piano mode, moving with your
hand through the active region of the antenna is like playing a harp. Each
change in pitch will trigger a new note-off/on midi message. The note
velocity is derive from the main-volume.
To setup the ‘NOTE glisanto’ for the Theremin, set the mode-selector to
‘Instrument’ (MIDI) and select ‘NOTE glisanto / OFF’ with parameter knob
P2. To disable the glisanto-mode, just turn parameter P2 to zero again.

16
Theremin Pitch-Bend mode: The Theremin is able to send Pitch-bend
messages and also note-on/off messages (when triggered with the trigger-
switch, the internal auto-trigger or via external trigger input). Note on/off
message pitch is controlled via the ‘octave’ parameter and the Pitch-Bend
offset (Octave * note-offset). When triggered externally, note velocity is
derived from the trigger signal. Internal triggers derive the note velocity
from the main-volume.
To setup the midi-note-on/off messages for the Theremin, set the mode-
selector to ‘Theremin’ (MIDI) and adjust ‘BEND ( offset ) / OFF’ with
parameter knob P1 as required.
To disable the pitch-bend mode, just turn parameter P1 to zero again. The
Theremin Pitch-bend mode has higher (highest) priority over piano-mode
and control-message mode.
Alternative Pitch-Bend note trigger: When not using the pitch-bend mode
in conjunction with any internal or external triggers, it is possible to
“automatically” trigger a midi-note-on message, whenever the active
Theremin region has been entered (hand near the antenna). In turn, a note-
off message will be send when exiting the active Theremin region (or
antenna mute). Additional note-on messages can be triggered via other
sources as well, if required.
To enable this automatic Note-ON/OFF trigger mode, set the mode-selector
to ‘Instrument’ (MIDI) and adjust ‘BEND note-on msg / OFF’ with
parameter P1. This mode is disabled with parameter P1 set to zero.

17
Using Pitch-Bend without trigger: It is not necessary to trigger a note via
the Theremin, when using pitch-bend. Just use the pitch-bend mode in
conjunction with a keyboard and play chords, scales, etc on the keyboard
itself and use the Theremin as a high resolution pitch-bend ‘lever’ . This
opens up an amazing new way of playing the keyboard “as a Theremin”. If
you are able to adjust the pitch-bend “range” on your KB, sampler etc. to
span several octaves, you would be able to bend several octaves of pitch
with the Theremin, whilest controlling the “root” note/chord and rhythm via
the KB. Very nice !
A number of different pitch-bend modes are possible:
o theremin mode: rest at the lowest position and go all the way up
o down only: rest in middle (neutral) position and go down only
o full bend: rest in middle (neutral) position and go down / up
o up only: rest in middle (neutral) position and go up only
To setup different pitch-bend modes, you need to go to the ‘SETUP’ section.
Set the instrument-selector to ‘SETUP’ and set the mode-selector to ‘midi-
setup’ (the volume position). The status light will flash fast. Push the trigger
button to enter the selected mode. The status light will stop flashing.
Adjust ‘pitch-bend-mode’ (global) with parameter P2. The default mode is
‘Theremin-mode’ with parameter P2 set to zero. When P2 is set to 10
o’clock, it is ‘down only’ , 12 o’clock is full bend and 3o’clock is up only.
Of course you need to enable pitch-bend mode first …
You may also set the midi-channel here (global) with P1 (!)

18
Setting up the Theremin:
The Theremin can be customized to suite your preferences.
To enter the (global) setup mode, point the Instrument-Selector to position
‘SETUP’. The red status LED should now be flashing fast. From here you
can initiate another Auto-tune, save and recall settings etc…
Initiate Auto Tune: Set the mode selector to ‘Auto-Tune’ and push the
trigger button. Wait for tuning to complete. Check the tuning. You may also
temporarily adjust the ‘volume’ with P1 if you like.
Adjust Antenna Range: The playing range of the Theremin can be
adjusted. Set the mode selector to ‘Antenna-range’ and push the trigger
button. Adjust the overall playing ‘far-distance’ (to the antenna) with
parameter P2. Adjust parameter P3 to change the ‘antenna-mute’ distance
to the antenna. You may also temporarily adjust the ‘volume’ with P1 if you
like.
Tune A440: The Theremin can be calibrated to 440 Hz. This may be useful
when trying to align MIDI pitch to the analog Theremin output. Set the
mode selector to ‘tune A440’ (pitch) and push the trigger button. Adjust the
frequency ‘A440-tune’ with parameter P2. You may also temporarily adjust
the ‘volume’ with P1 if you like.

19
Midi Setup: To setup various midi options, set the mode selector to ‘midi-
setup’ (vol) and push the trigger button.
P1 allows you to select a global ‘midi channel’ (1 .. 31). When adjusting P1,
every channel increment will send a note-off/note-on "click" message to the
midi output. Turn P1 to zero to set channel to zero (default).
P2 allows you to customize the ‘Pitch-bend-mode’. Adjusting P2 will send a
note-off/note-on message and a pitch bend message to the midi output. Turn
P2 to zero (default) to set to Theremin-mode (return pitch-wheel to low
position). All other modes will return pitch-wheel to center position. See
Pitch-bend-mode for other options.
P3 ( ‘Instrument Select / OFF’ ) allows you to adjust or disable the sending
of "click" messages. When adjusting midi parameters in SETUP, every
increment of a parameter will send a note-off/note-on "click" message to the
midi output. With P3, you can choose the “Instrument” for the "click"
message (i.e. piano). Turn P3 to zero to turn off the sending of "clicks".
Other Setup: To setup "other" midi options, set the mode selector to ‘other-
setup’ (tone) and push the trigger button.
P1 allows you to enable ‘midi monitor mode’. In this mode, the "audio"
output (not midi) will not be effected by tremolo or gate and will always (!)
be audible. This is useful when operating midi devices. The audio output can
then be used as a cue (via headphones) before triggering the midi note. Turn
P1 to zero to disable this mode.
P2 allows you to enable ‘always-trigger mode’. When triggering the midi
Theremin without your hand being in the "active region" of the antenna, a
note-off/note-on midi message is only send when ‘always-trigger mode’ is
enabled . Turn P2 to zero to disable this mode.
Hint: Enable ‘always-trigger’ when using the theremin as a finger drum.
Table of contents