hortiONE 368 User manual

hortiONE592
hortiONE368
J K
hortiONE GmbH
hortiONE 368 & 592 Manual
hortiOne
Deutsch - English

Index
English
Introduction ___________________________________________________________________________1
Important safety information _____________________________________________________________1
Security notice & warning ________________________________________________________________2
Installation and assembly ________________________________________________________________3
Technical Specification –Dimensions _______________________________________________________4
Cleaning instructions ____________________________________________________________________6
Warranty _____________________________________________________________________________6
Service and Support _____________________________________________________________________6
About hortiONE GmbH___________________________________________________________________6
Deutsch
Bedienungsanleitung - Deutsch ____________________________________________________________7
Einleitung _____________________________________________________________________________7
Wichtige Sicherheitshinweise _____________________________________________________________7
Sicherheitshinweis & Warnung ____________________________________________________________8
Installation und Montage ________________________________________________________________9
Technische Spezifikationen –Abmessungen _________________________________________________10
Reinigung ____________________________________________________________________________12
Garantie _____________________________________________________________________________12
Service and Support ____________________________________________________________________12
Über hortiONE GmbH___________________________________________________________________12
Document Name
Revision and Date
Name
hortiONE 592 Manual
V1.0, 12.2019
J. K.
hortiONE 368_592 V2 Manual
V2.0 09.2020
J. K.

hortiOne
592 & 368 manual, 2020
1 of 14
hortiONE GmbH
hortione.com
hortiONE_LED
hortiONE
Horti One
hortiONE
Usage Manual
Introduction
Thank you for purchasing a hortiONE 368 / 592 LED grow light. This manual explains how to install, run and maintain
your grow light. Mounting and installing of the LED fixture may be executed by certified service personnel only. Please
read and understand this manual completely before using the product. Only use the product as described in this
manual.
Important safety information
oPlease read this manual entirely before starting the installation or operation of any lighting solution
oInstallation must be carried out by qualified persons, and according to the electrical safety rules & regulations
applicable in your country!
ohortiONE 368 & 592 are high-performance light fixtures. Do not touch during operation.
oConnect the system only to the power sources of the right voltage using the correct AC plug type. Protect power
cables from being pinched, walked on, or otherwise damaged.
oDo not touch the diodes with your hands, even when powered off
oAll electrical work must be carried out by qualified persons.
oDo not stare directly at the light source.
oDispose of all waste in accordance with local regulations.
DO NOT STARE AT THE OPERATING LAMP.THIS IS HARMFUL TO THE EYE.THE HIGH
PORTION OF BLUE LIGHT CAN DAMAGE THE RETINA (EYE) –REFERRED TO AS
PHOTORETINITIS -
Delivery Content (LED-PANEL)
1. 1x hortiONE XXX LED Board including 2m DC Cable.
2. LED-Driver
3. 2x mounting brackets
4. Handbook
hortiONE 368
hortiONE 592

hortiOne
592 & 368 manual, 2020
2 of 14
hortiONE GmbH
hortione.com
hortiONE_LED
hortiONE
Horti One
hortiONE
Distance between lamp and canopy
The distance is depending on your environment and the cultivated plant. A minimum distance of 15cm should be
kept in any case!
Surrounding objects
No surrounding objects should touch the lamp or its components. Keep a minimum distance of 5cm to all
surrounding objects, including another lamp.
Scope of application
hortiONE LED lamps are designed for horticultural applications only. hortiONE 592 & 368 is only suitable for indoor
environments. The Light is suitable for all land-plants (no Algae) and all growing phases. Vegetative and generative
growth as well as hibernation and seedlings. Do not use in environments with high humidity like a greenhouse or
an aquaponic setup.
Environment
Indoor environment only
Temperature range: 0 to + 35C°
Less than RH90%
Security notice & warning
Keep a distance of min. 5 cm to all surrounding objects
Only use the supplied power converter (4). Other power converters may cause damage
If any damage to the module or other system components is detected, cease operation immediately and
unplug the main AC-plug
The LED Board and Ballast as well as all components, are not waterproof.
Secure the LED board against falling down and mechanical stresses of any kind
Power off the board and let it cool down for 10 minutes before touching.
Do not stare at the operating lamp. May be harmful to the eye. IEC/EN 62471 (Eye Safety) Group 2, Moderate
Risk
Photobiological safety notice, IEC/EN 62471 (eye safety)
hortiONE 592 and 368 LED grow lights are classified as Group 2 (Moderate-Risk) Retinal Blue-light 300-700 (weighted)
Does not pose a hazard due to aversion response to bright light or thermal discomfort. Do not stare at the operating
lamp. May be harmful to the eye. The high portion of blue light can damage the retina –referred to as Photoretinitis.

hortiOne
592 & 368 manual, 2020
3 of 14
hortiONE GmbH
hortione.com
hortiONE_LED
hortiONE
Horti One
hortiONE
Installation and assembly
Attaching the mounting brackets
1. Insert the hanger into the first hole and move it down
until the other side of the hanger reaches the second
hole
2. Push down the other side of the hanger inside the hole
3. Pull up the first side of the hanger and ensure that both
wings are looking out below.
4. Repeat the process on the other side of the board.
Electrical Connection
First, connect the LED-Board (1) with the DC-Power Cord (2) to the DC-Connector at the LED-Driver (3). Then, attach the
Driver(3) to the power outlet prior to powering on the module.
IMPORTANT:CONNECT THE BOARD(1) TO THE
DRIVER(3) BEFORE PLUGGING INTO THE POWER
SOCKET !
hort iO NE 368 hort iO NE 368
hort iO NE 368hort iO NE 368
UL 2464 18AW G / 2C
M15*1. 0
SR008
1
2
3

hortiOne
592 & 368 manual, 2020
4 of 14
hortiONE GmbH
hortione.com
hortiONE_LED
hortiONE
Horti One
hortiONE
Technical Specification –Dimensions
LED-Driver hortiONE 592
MEANWELL HLG 185
MEANWELL ELG 200
MEANWELL XLG 150
LED-Board hortiONE 592
Measures are in mm
Meanwell Datasheet:
https://www.meanwell.com/webapp/product/search.aspx?prod=HLG-185H
LED-Driver hortiONE 368
INVENTRONICS EUM 150
MEANWELL XLG 150
LED-Board hortiONE 368
Measures are in mm
Inventronics product-Information and Datasheet: https://www.inventronics-co.com/product/eum-150sxxxdg/

hortiOne
592 & 368 manual, 2020
5 of 14
hortiONE GmbH
hortione.com
hortiONE_LED
hortiONE
Horti One
hortiONE
Dimming
All hortiONE V2 LED DRIVERS are dimmable and have a preconnected Plug prepared for hortiONE LED DIMMER. The
Dimming-Input is 0-10V. A Potentiometer with 0-10V (1-100kΩ) can be used. The LED-Dimmer is not part of the delivery.
Below is the Information to connect your hortiONE LED Grow light with an existing and compatible Dim-Controller.
Manufacturer: TE-Connectivity
No. 2834055-1
Lighting Connectors REC, 3P LATCHED POKE-IN WTW CONN.NL
Female Plug, Preconnected at hortiONE xxx LED DRIVER
Manufacturer: TE-Connectivity
Nr: 2834054-1
Lighting Connectors PLUG, 3P LATCHED POKE-IN WTW CONN.NL
Male Plug
Connection Sample
Sample: Potentiometer: 100kΩ
Alternatively using dedicated resistors.
0-1Ω/ = 0% (maximum Dimming) , 25kΩ= 25%, 50 kΩ= 50%, 75kΩ= 75%, 100kΩ/ no contact = 100%
L1 –Dim +
L3 –Dim –
R1
100kΩ
L1
L3
1,5
1,7
1,9
2,1
2,3
2,5
2,7
2,9
0
50
100
150
200
250
300
350
25 75 115 130W
Efficacy
PPF
Consumption
Dimming-Curve (hortiONE 368)
PPF, µmol/s Efficacy, µmol/J

hortiOne
592 & 368 manual, 2020
6 of 14
hortiONE GmbH
hortione.com
hortiONE_LED
hortiONE
Horti One
hortiONE
Cleaning instructions
Ideally, cleaning by means of oil-free air (e.g. central supply or spray can) is recommended. The LEDs or the board
are blasted with clean air. If compressed air from a central supply is used, purified air must be used. Otherwise,
contaminants like outs may be sprayed onto the board. The simplest method is cleaning the LEDs with a clean, soft,
lint-free, dry cloth (cellulose or linen). The cleaning must be done without mechanical action! If this is not enough,
isopropyl alcohol can be used. Ultrasonic cleaning is not recommended. Ultrasonic cleaning can damage the LED
Warranty
All products have 2 Years full warranty. In case of damage, contact your supplier or retailer to check and claim the
warranty.
Service and Support
Please contact your supplier or retailer for technical assistance or support.
Take back and disposal
This product must not be discarded as household waste. Do not dispose of the
products via household waste. Contact your supplier to return the goods.
About hortiONE GmbH
hortiONE GmbH
6794 Partenen, Gafadura 43, Austria
Company register: FN519683s
Company Court: Feldkirch
UID.: ATU74784058
Mail: [email protected]
hortiONE on social media
Web: www.hortione.com
FB: facebook.com/hortiOne
IG: instagram.com/hortione_led
Twitter: twitter.com/HortiONE_LED

hortiOne
592 & 368 manual, 2020
7 of 14
hortiONE GmbH
hortione.com
hortiONE_LED
hortiONE
Horti One
hortiONE
Bedienungsanleitung - Deutsch
Einleitung
Vielen Dank für den Kauf einer hortiONE 368/592 LED-Pflanzenlampe. In diesem Handbuch wird erläutert, wie Sie
Ihr LED Board installieren, betreiben und warten. Die Montage und Installation der LED-Leuchte darf nur von
zertifiziertem Servicepersonal durchgeführt werden. Bitte lesen Sie dieses Handbuch vollständig, bevor Sie das
Produkt verwenden. Verwenden Sie das Produkt nur wie in diesem Handbuch beschrieben.
Wichtige Sicherheitshinweise
Bitte lesen Sie dieses Handbuch vollständig durch, bevor Sie mit der Installation oder dem Betrieb beginnen
Die Installation muss von qualifizierten Personen und gemäß den in Ihrem Land geltenden elektrischen
Sicherheitsregeln und Bestimmungen durchgeführt werden!
hortiONE 368 & 592 sind Hochleistungsleuchten. Während des Betriebs nicht berühren.
Schließen Sie das System nur mit dem richtigen Netzstecker an die Stromquellen mit der richtigen Spannung
an. Schützen Sie die Stromkabel vor Einklemmen oder sonstigen Beschädigungen.
Berühren Sie die Dioden nicht mit den Händen, auch nicht im ausgeschalteten Zustand
Alle elektrischen Arbeiten müssen von qualifizierten Personen durchgeführt werden.
Schauen Sie niemals direkt in die Lichtquelle.
Entsorgen Sie alle Abfälle gemäß den örtlichen Vorschriften.
STARREN
SIE
NICHT
AUF
DIE
BETRIEBSLAMPE.
D
IES IST SCHÄDLICH FÜR DAS
AUGE.DER HOHE TEIL DES BLAUEN LICHTS KANN DIE RETINA (AUGE)
BESCHÄDIGEN -BEZEICHNET ALS PHOTORETINITIS –
Verpackungsinhalt
1. 1x hortiONE XXX LED Board mit 2m Anschlusskabel
2. LED Treiber
3. 2x Aufhängungen
4. Handbuch
hortiONE 368
hortiONE 592

hortiOne
592 & 368 manual, 2020
8 of 14
hortiONE GmbH
hortione.com
hortiONE_LED
hortiONE
Horti One
hortiONE
Abstand zwischen Lampe und Pflanzendecke
Der Abstand hängt von Ihrer Umgebung und der Kulturpflanze ab. Ein Mindestabstand von 15cm sollte auf jeden
Fall eingehalten werden!
Umgebende Objekte
Keine umgebenden Gegenstände dürfen die Lampe oder ihre Komponenten berühren. Halten Sie einen
Mindestabstand von 5 cm zu allen umgebenden Objekten ein, einschließlich einer anderen Lampe.
Anwendungsgebiet
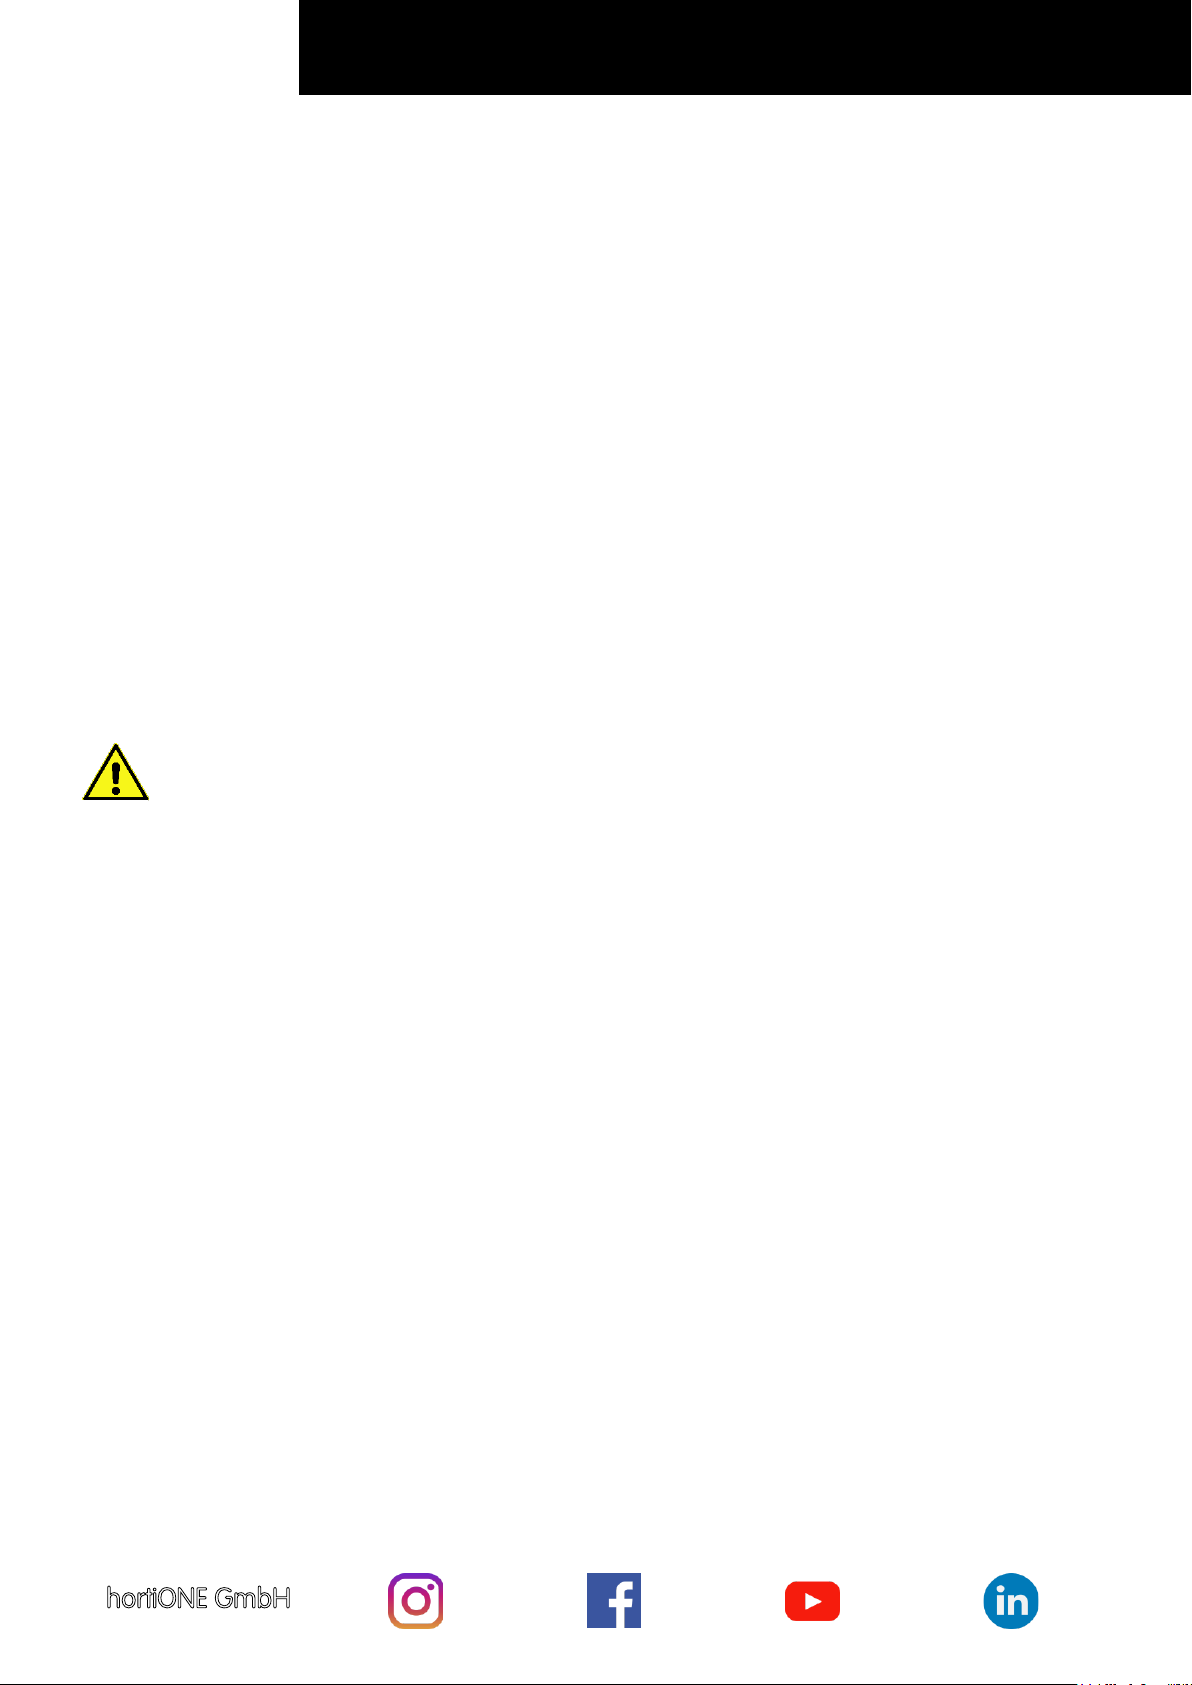
hortiONE LED-Lampen sind nur für gartenbauliche Anwendungen konzipiert. hortiONE 592 & 368 sind nur für
Innenräume geeignet. Das Licht ist für alle Landpflanzen (keine Algen) und alle Wachstumsphasen geeignet.
Vegetatives und generatives Wachstum sowie zur Überwinterung und Anzucht von Sämlingen. Nicht in
Umgebungen mit hoher Luftfeuchtigkeit wie Gewächshäusern oder Aquaponik-Anlagen verwenden.
Umgebung
Nur in Innenräumen
Temperaturbereich: 0 bis +35°C
Weniger als 90% relative Luftfeuchtigkeit (RH)
Sicherheitshinweis & Warnung
Verwenden Sie nur den mitgelieferten LED-Treiber. Andere Treiber können Schäden verursachen
Wenn das Modul oder andere Systemkomponenten beschädigt werden, stellen Sie den Betrieb sofort ein
und ziehen Sie den Netzstecker.
Die LED-Platine und das Vorschaltgerät sowie alle Komponenten sind nicht wasserdicht.
Sichern Sie die LED-Platine gegen Herunterfallen und mechanische Beanspruchungen jeglicher Art
Schalten Sie das Board aus und lassen Sie es 10 Minuten abkühlen, bevor Sie es berühren.
Schauen Sie nicht direkt in das Licht, da die hohe Belastung schädlich sein kann. IEC / EN 62471
(Augensicherheit) Gruppe 2, mäßiges Risiko
Photobiologischer Sicherheitshinweis,IEC/EN 62471 (eye safety)
Die LED-Wachstumslichter hortiONE 592 und 368 werden als Gruppe 2 (mittleres Risiko) klassifiziert. Netzhautblau-
Licht 300-700 (gewichtet) Stellt keine Gefahr dar, da die Abneigung auf helles Licht oder thermische Beschwerden
reagiert. Starren Sie nicht auf die Operationsleuchte. Kann für das Auge schädlich sein. Der hohe Anteil an blauem
Licht kann die Netzhaut schädigen - als Photoretinitis bezeichnet.

hortiOne
592 & 368 manual, 2020
9 of 14
hortiONE GmbH
hortione.com
hortiONE_LED
hortiONE
Horti One
hortiONE
Installation und Montage
Anbringen der Montagehalterungen
1. Setzen Sie den Bügel
in das erste Loch ein und
bewegen Sie ihn nach unten, bis die andere Seite des
Bügel das zweite Loch erreicht
2. Drücken Sie die andere Seite der Aufhängung in das
Loch.
3. Ziehen Sie die erste Seite des Bügels nach oben und
achten Sie darauf, dass beide Flügel nach unten
schauen.
4. Wiederholen Sie den Vorgang auf der anderen Seite
der Platine.
Elektrische Verbindung
First, connect the LED-Board(1) with the DC-Power Cord (2) to the DC-Connector at the LED-Driver (3). Then, attach the
Driver(3) to the power outlet prior to powering on the module.
WICHTIG: SCHLIEßEN SIE DIE PLATINE (1) AN DEN TREIBER
(3) AN,BEVOR SIE SIE IN DIE STECKDOSE STECKEN!
hort iO NE 368 hort iO NE 368
hort iO NE 368hort iO NE 368
UL 2464 18AW G / 2C
M15*1. 0
SR008
1
2
3

hortiOne
592 & 368 manual, 2020
10 of 14
hortiONE GmbH
hortione.com
hortiONE_LED
hortiONE
Horti One
hortiONE
Technische Spezifikationen –Abmessungen
LED-Treiber hortiONE 592
MEANWELL HLG 185
MEANWELL ELG 200
MEANWELL XLG 150
LED-Board hortiONE 592
Maße sind in Millimeter [mm]
Meanwell Datenblatt
https://www.meanwell.com/webapp/product/search.aspx?prod=HLG-185H
LED-Treiber hortiONE 368
INVENTRONICS EUM 150
MEANWELL XLG 150
LED-Board hortiONE 368
Maße sind in Millimeter [mm]
Inventronics Produkt-Informationen und Datenblatt: https://www.inventronics-co.com/product/eum-150sxxxdg/

hortiOne
592 & 368 manual, 2020
11 of 14
hortiONE GmbH
hortione.com
hortiONE_LED
hortiONE
Horti One
hortiONE
Dimmen
Alle hortiONE V2 LED-TREIBER sind dimmbar und verfügen über einen vorinstallierten Stecker, der für hortiONE LED
DIMMER vorbereitet ist. Der Dimm-Eingang ist 0-10V. Ein Potentiometer mit 0-10 V (1-100 kΩ) kann verwendet werden.
Der LED-Dimmer ist nicht im Lieferumfang enthalten. Nachfolgend finden Sie die Informationen zum Anschließen
Ihrer hortiONE LED Pflanzenlampe an einen vorhandenen und kompatiblen Dim-Controller.
Hersteller: TE-Connectivity
No. 2834055-1
Lighting Connectors REC, 3P LATCHED POKE-IN WTW CONN.NL
Female Plug, Angeschlossen an hortiONE xxx V2 LED DRIVER
Hersteller: TE-Connectivity
Nr: 2834054-1
Lighting Connectors PLUG, 3P LATCHED POKE-IN WTW CONN.NL
Male Plug
Anschluss Beispiel
Beispiel: Potentiometer: 100kΩ
Alternativ können dedizierte Widerstände verwendet werden
0-1Ω/ = 0% (maximale Dimmung), 25kΩ= 25%, 50 kΩ= 50%, 75kΩ= 75%, 100kΩ/ Kein Kontakt = 100%
L1 –Dim +
L3 –Dim –
R1
100kΩ
L1
L3
1,5
1,7
1,9
2,1
2,3
2,5
2,7
2,9
0
50
100
150
200
250
300
350
25 75 115 130W
Efficacy
PPF
Consumption
Dim-Kurve (Leistung und Effizienz)
PPF, µmol/s Efficacy, µmol/J

hortiOne
592 & 368 manual, 2020
12 of 14
hortiONE GmbH
hortione.com
hortiONE_LED
hortiONE
Horti One
hortiONE
Reinigung
Idealerweise wird eine Reinigung mit ölfreier Luft (z. B. Zentralversorgung oder Sprühdose) empfohlen. Die LEDs oder
die Platine werden mit sauberer Luft gestrahlt. Wenn Druckluft aus einer zentralen Versorgung verwendet wird, muss
gereinigte Luft verwendet werden. Andernfalls können Verunreinigungen auf die Platine gesprüht werden. Die
einfachste Methode ist die Reinigung der LEDs mit einem sauberen, weichen, fusselfreien, trockenen Tuch (Zellulose
oder Leinen). Die Reinigung muss ohne mechanische Einwirkung erfolgen! Wenn dies nicht ausreicht, kann
Isopropylalkohol verwendet werden. Ultraschallreinigung wird nicht empfohlen. Ultraschallreinigung kann die LED
beschädigen
Garantie
Alle Produkte haben 2 Jahre volle Herstellergarantie. Wenden Sie sich im Schadensfall an Ihren Lieferanten oder
Händler, um die Garantie zu überprüfen und geltend zu machen.
Service and Support
Bitte wenden Sie sich an Ihren Lieferanten oder Händler, um technische Unterstützung oder Unterstützung zu
erhalten.
Rücknahme und Entsorgung
Dieses Produkt darf nicht als Hausmüll entsorgt werden. Wenden Sie sich an
Ihren Lieferanten, um die Ware zurückzusenden.
Über hortiONE GmbH
hortiONE GmbH
6794 Partenen, Gafadura 43, Austria
Company register: FN519683s
Company Court: Feldkirch
UID.: ATU74784058
Mail: [email protected]
hortiONE on social media
Web: www.hortione.com
FB: facebook.com/hortiOne
IG: instagram.com/hortione_led
Twitter: twitter.com/HortiONE_LED

hortiOne
592 & 368 manual, 2020
13 of 14
hortiONE GmbH
hortione.com
hortiONE_LED
hortiONE
Horti One
hortiONE
Spektrum / Spectrum
CIE 1976 –Farbraum / Color Space

hortiOne
hortione.om
Other manuals for 368
1
This manual suits for next models
1
Table of contents
Languages:
Other hortiONE Lawn And Garden Equipment manuals
Popular Lawn And Garden Equipment manuals by other brands

SuperFish
SuperFish Pond Clear 3000 Filter user manual

Grizzly Tools
Grizzly Tools AGS 7280 D-Lion Translation of the original instructions for use

Simplicity
Simplicity 4560 parts manual

emsa
emsa Smart Garden 3 manual

GrownMax Water
GrownMax Water MEGA GROW 1000 instruction manual

Lifetime
Lifetime 60053 Assembly instructions