Hoshino Gakki Tama COBRA CLUTCH HH905XP User manual

COBRA CLUTCH INSTRUCTION MANUAL
COBRACLUTCH取扱い説明書
Thank you for your purchase of this TAMA Cobra Clutch Hi-hat attachment. To get
the most out of this product and ensure safety, please read this instruction manual
carefully before assembly. Store the manual in a covenient place for future reference.
この度は、TAMACOBRAクラッチをお買い上げ頂き、誠にありがとうございます。製品
の機能を十分に発揮して安全にお使いいただくために、組み立て前に本説明書を必ずお読み
ください。また、本書は大切に保管して下さい。
Howtosetup/セッティング
Locking Pedal (1)
ロッキング・ペダル(1)
Release Pedal (2)
ロック解除ペダル(2)
Footboard Locking Arm (3)
フットボード固定アーム(3)
Square Head Bolt (3-1)
角頭ボルト(3-1)
T-Nut (A)
T ナット(A)
T-Nut (B)
T ナット(B)
T-Nut (C)
T ナット(C)
Multi Clamp
マルチクランプ
Connecting Pipe
コネクティング・パイプ
Multi Clamp
マルチクランプ
Connecting Pipe
コネクティング・パイプ
(Photo.1 / 写真1 /2.otohP() 写真2 /3.otohP() 写真3 )
• After you find the desired position of your hi-hat stand, attach the Multi Clamp to the bottom section of the hi-hat
stand (Photo.2).
• Insert the Connecting Pipe in the Multi Clamp and tighten the T-Nut (Photo.3).
• Loosen the T-Nut (A) and engage the Cobra Clutch and the Connecting Pipe by sliding the Fixing Plate all the
way in (Photo.4).
• The three T-Nuts (A) - (C) must be loosened before adjusting the position of the Cobra Clutch. Then, make sure
the unit sits on the floor securely.
• Move the Cobra Clutch to the desired position. Then, holding the Base Plate (Photo.5), tighten the T-Nuts (A),
(B), then (C).
• It will save time in future set-ups if you able to leave the Multi-Clamp and the Connecting Pipe attached to the
hi-hat stand after teardown (Photo.6).
•ハイハットスタンドを任意の位置にセットし、付属のマルチクランプをスタンド下部に取り付けます。(写真 2)
•コネクティングパイプをマルチクランプのもう一方に仮に固定します。(写真 3)
•T ナット(A)を緩め、本体先端の固定プレートをラウンドワッシャーとコネクティングパイプの間に挟みこむようにして
前にスライドします。(写真 4)
•セッティング位置の微調整をします。T ナット(A)〜(C)を少し緩め、本体のベースプレートがしっかりと接地している
事を確認してください。
•
好みの位置が決まったら、ベースプレートを左手で下に押さえながら(写真 5)T ナットを
(A)〜(C)の順に締め付けます。
•マルチクランプとコネクティングパイプをハイハットスタンドに付けたままにしておけば、T ナット(A)を緩めるだけで
簡単に取り外しが出来ます。(写真 6)
Adjustments/各部の調整
1. Adjusting the tightness of the hi-hat cymbals
The tightness of the hi-hat cymbals can be adjusted to achieve the desired sound setting when the Cobra Clutch is locked.
• With the Square Head Bolt (3-1) loosened, adjust the height of the hi-hat cymbals as well as the clearance between top and bottom cymbal.
• Close and lock the Locking Pedal once. Next, close the hi-hat cymbals using the hi-hat pedal. Without releasing the hi-hat cymbals, push down the Footboard
Locking Arm (3) to lock-in the footboard and then tighten the Square Head Bolt (3-1) (Photo.8).
• Check the tightness of the hi-hat cymbals. If you prefer a tighter setting, turn the Fine Adjustment Knob (3-2) clockwise. If you prefer a looser setting such as half-
open, turn the Fine Adjustment Knob (3-2) counterclockwise (Photo.9).
• Check the Release Pedal to make sure it allows the hi-hat cymbals to open.
1.ハイハットシンバルの締まり具合の調整
CobraClutch でハイハットをロックした状態での、シンバルの締り具合を調整します。
•角頭ボルト(3-1)を緩めた状態で、ハイハットシンバルの高さと 2 枚のシンバルの間隔を好みの位置に合わせて下さい。
•ロッキングペダルを踏み込みます。次にハイハットスタンドのフットボードを踏み込み、シンバルを閉じて下さい。その状態でフットボード固定アーム(3)を指で押し下げ、角頭
ボルト(3-1)を締め付けます。(写真 8)
•
ロックされた状態のハイハットシンバルの締まり具合を、スティックで叩いて確認してください。タイトにしたい場合は、微調整ノブ(3-2)を右に回します。ハーフオープンのような
ルーズな状態にしたい場合はノブ(3-2)を左に回して調整してください。(写真 9)
•解除ペダルを踏み込んだ時にロッキングプレートが上がり、ハイハットが開くことを確認してください。
(Photo.6 / 写真6 )
(Photo.7 / 写真7 /8.otohP() 写真8 /9.otohP() 写真9 )
Footboard Locking Arm (3)
フットボード固定アーム(3)
Square Head Bolt (3-1)
角頭ボルト(3-1)
Fine Adjust Knob (3-2)
微調整ノブ(3-2)
Base Plate
ベースプレート
T-Nut (A)
T ナット(A)
(Photo.5 / 写真5 )
T-Nut (A)
T ナット(A)
Fixing Plate
固定プレート
Round Washer
ラウンドワッシャー
(Photo.4 / 写真4 )
M04JUN-CC.p65 04.4.8, 2:34 PMPage 1 AdobePageMaker6.5J/PPC

2. Adjusting angle of the Locking Pedal
The angle of the Locking pedal can be adjusted when it is released for easier lock/release action.
• By moving the Locking Pedal Adjust Ring (4) up or down, the angle of the Locking Pedal changes. If
you prefer opening the Locking Pedal more, loosen the Square Head Bolt (4-1) and move the Ring
higher. If you need the Locking Pedal less angled, move it lower. After you decide the desired angle,
tighten the Square Head Bolt (4-1).
• Please make sure that the bottom of Fine Adjust Knob (3-2) doesn't touch the footboard when the
Cobra Clutch is released. If it touches the footboard, move the Locking Pedal Adjust Ring (4) using
the Square Head Bolt (4-1) (see Photo.10&11).
• If the above adjustment changes the tone of the hi-hat cymbals, please repeat Process 1 and adjust
the tightness.
2.ロッキングペダルの高さ調整
ロック / 解除の切り替えをよりスムーズに行えるように、解除した状態でのロッキングペダルの高さを調整します。
•
ロッキングペダル調整リング(4)を下ろすと解除時のロッキングペダルの高さが下がり、リングを上げるとプレートも
上がります。角頭ボルト(4-1)を緩めて好みの高さに調整し、再びボルト(4-1)を締めます(シャフトの刻印が標準
位置です)。
•
ロック解除ペダル(2)を踏み、ハイハットシンバルを開いた時に、微調整ノブ(3-2)の下端がハイハットスタンドの
フット
ボードに触れないようにご注意ください(写真 10)。フットボードにラバーキャップが当たっている場合、
ロックを解除しても任意の位置までハイハットが開きません。接触している場合は角頭ボルト(4-1)を緩め、
ロッキングペダル調整リング(4)
を上に上げて下さい(写真 11)。
•ロッキングペダルの角度によって、ロック時のハイハットの音も若干変化する場合があります。必要に応じて
微調整ノブ(3-2)を回して再度調整してください。
(Photo.10 / 写真 10 )
(Photo.11 / 写真 11 )
Locking Pedal Adjust Ring (4)
ロッキングペダル調整リング(4)
Square Head Bolt (4-1)
角頭ボルト(4-1)
Howtoplay/演奏上の操作
• In order to close the hi-hat and fix it in place, use your heel to step on
the Locking Pedal and your toe on the footboard of Hi-hat stand
(Photo.12).
• A good way to achieve a smooth transition from open to closed set-
tings is locking the clutch on the last beat of the measure prior to one
where a closed setting is desired.
• In order to release the clutch, twist your heal slightly (Photo.13). The
Locking Pedal will be released easily (Photo.14).
実際の演奏は、写真 12 から写真 14 のような流れになります。
•
ハイハットシンバルをクローズしたい時には、爪先でハイハットスタンドのフット
ボードを踏んだまま、カカトでロッキングペダルを踏み込みます。(写真 12)
•スムーズに移行するには、ツインペダルを使う前の小節の 4 拍目でロッキング
ペダルを踏むとうまくいきます。
•
ハイハットシンバルのロックを解除するには、ハイハットスタンドのフットボードを
爪先で踏んだまま、カカトで解除プレートを踏みます(写真13)。ロックが解除
されるとロッキングペダルが上がり(写真14)、ハイハットのオープン/クローズが
可能になります。
(Photo.12 / 写真 12 ) (Photo.13 / 写真 13 ) (Photo.14 / 写真 14 )
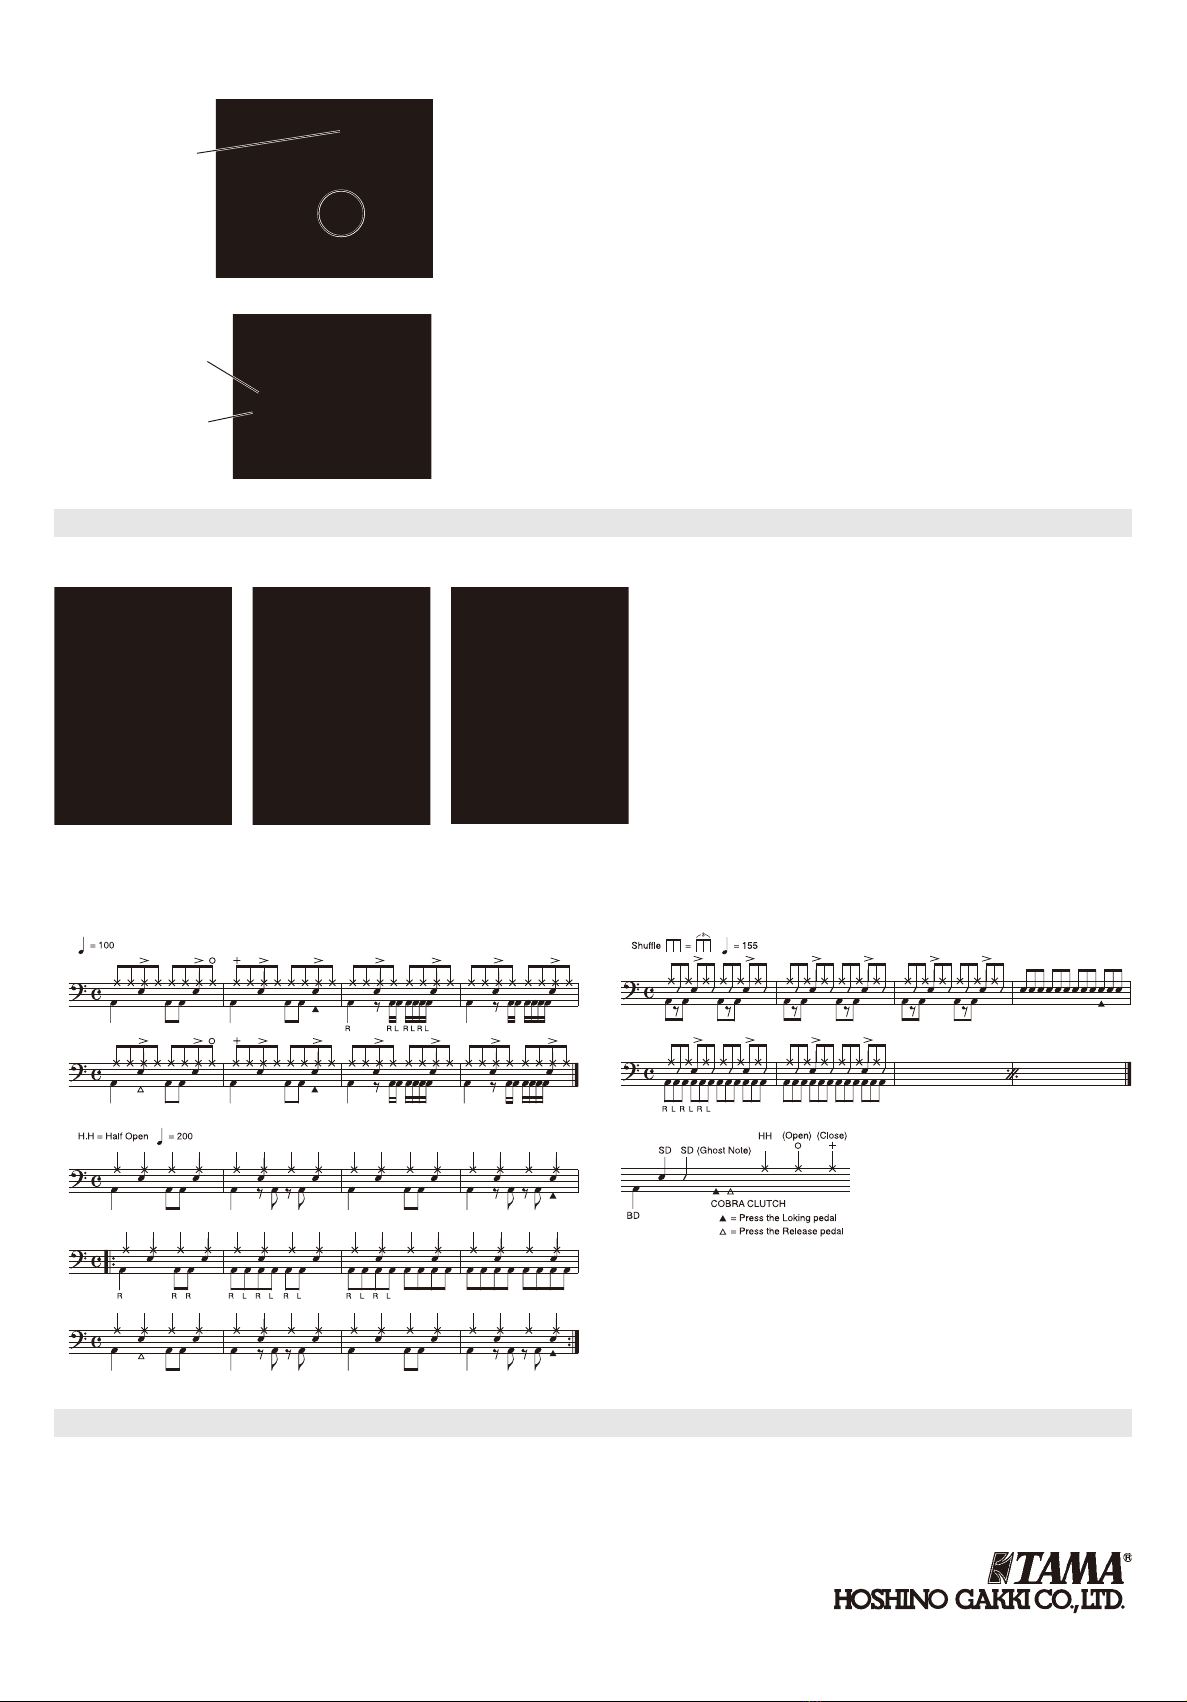
Please use the chart below for exercising the switching action.
実際の譜例を示しますので、練習してみて下さい。
Maintenance/メンテナンス
• To ensure parts move smoothly over time, periodically wipe off dust with a dry cloth, and periodically lubricate the movable points with TOL2 tune-up oil.
• The small fixing bolts may become loose during transport or playing. Please retighten using the phillips screwdriver or attached hex wrench.
•より長く滑らかなアクションをお楽しみ頂くために、時々乾いた布で埃を払い、可動部には時々オイル(TOL2 等)をさして下さい。
•各部を固定しているネジ類に緩みが無いか、時々確認してください。緩みがあった場合はドライバーや付属の六角レンチで増し締めして下さい。
This instruction manual was issued in Jun 2004. Specifications and design are subject to change without notice.
この取扱い説明書は 2004 年 6 月現在ものです。商品改良のため予告なく仕様を変更する事がありますので、あらかじめご了承下さい。
M04JUN-CC
1
2
3
Fine Adjust Knob (3-2)
微調整ノブ(3-2)
M04JUN-CC.p65 04.4.8, 2:34 PMPage 2 AdobePageMaker6.5J/PPC
星野楽器株式会社 〒461-8717 愛知県名古屋市東区橦木町3-22
http://www.tama.com/
Table of contents