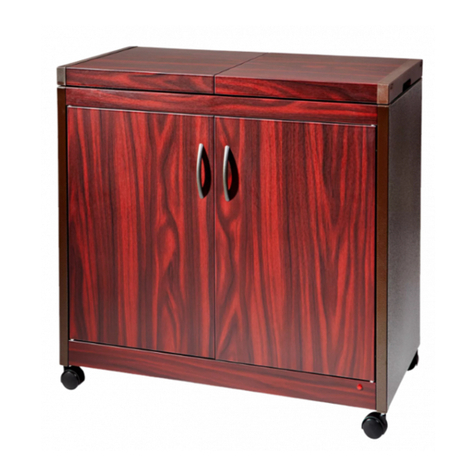
Hostess HL6232 User manual

HL Series
Instructions for use

IMPORTANT
Read these instructions carefully before you attempt
to use the appliance. Keep these instructions for
future reference.
The appliance is not intended for use by persons
(including children) with reduced physical, sensory
or mental capabilities, or lack of experience or
knowledge, unless they have been given supervision
or instruction in the use of the appliance by a person
responsible for their safety.
! This appliance must be earthed.
! Recommended for indoor use only.
! Before connecting the appliance, check that the
voltage indicated on the rating plate corresponds to
the mains voltage in your home.
! The appliance should be connected to an earthed
mains socket.
! If the supply cord is damaged, it must be replaced
by a special cord or assembly available from the
manufacturer or its service agent.
! Clean it only as advised in section “Cleaning”.
! When in use, the appliance is hot! Never leave
objects on, or leaning against, it after switching it on.
! Always allow sufficient space around the appliance.
! Avoid touching the hot parts of the appliance.
! Wear kitchen gloves or use a cloth when removing
the dishes, etc. from the appliance.
! Never touch the heating elements.
! Avoid scratching the inside of the appliance when
placing or removing plates or dishes.
! Children should be supervised to ensure they do not
play with the appliance.
! Do not allow the mains cord to touch the hot parts
of the appliance.
! Food should not be re-heated in this appliance.
! Do not cover with clothing, etc., any heating
appliance that is or has recently been switched on.
Overheating can cause damage and shorten the life of
your equipment.
! The top sliding leaves on trolley models are very
useful when carving or serving, but use a protective
mat below hot dishes or plates.
! The appliance must be positioned so that the plug is
accessible.
! If this product is made from a natural material,
colour /grain of panels will vary.
WHAT IS THE “HOSTESS”?
The “Hostess” has been designed to keep a meal
appetizingly hot from the time it is cooked until it is
convenient to serve, which provides complete flexibility
when entertaining or when the meal is to be kept hot for
late-comers.
BEFORE USING FOR THE FIRST TIME
(It is recommended that two people handle the trolley).
1. Remove the outer packaging.
2. Remove the pack of three glass dishes.
3. FITTING THE CASTORS (HL6200/HL6232)
Unpack the castors.
Carefully lay the trolley on its back.
Push the castors firmly into the castor inserts provided.
Carefully return the “Hostess” Trolley into an upright
position.
4. Fit the glass dishes into the trolley. (See section “Dish
Retainer - Removal and Refitting.)
PRE-HEATING
Plug in and pre-heat the “Hostess” whilst the food
is being cooked. (Allow 20 minutes).
To ensure that your “Hostess” operates efficiently and
also to avoid breakage due to ‘thermal shock’, it is
essential that dishes and plates are pre-warmed. You may
pre-warm empty plates or dishes inside the “Hostess”
while pre-heating the appliance.
USING THE “HOSTESS”
The “Hostess” Trolley will not operate until connected to
a mains supply. (The neon on the front of the trolley will
indicate that the power is on.)
To obtain the best results from the trolley, the food
should be placed in flat bottomed dishes with lids. Care
should be taken however, with dish bottoms having sharp
edges, as these could damage the trolley surfaces.
The three dishes under the sliding leaves should be used
for moist foods such as vegetables, etc. It is essential that
the sliding leaves are kept closed until the food is ready
to serve, and that the dishes are pre-heated before food is
placed in them.

The glass dishes are restrained in three removable
retainer panels.
The panels are removable to provide easy cleaning
and to allow you to place your own serving dishes in
this space, should you wish.
(The removal and fitting of these panels is detailed
below.)
DISH RETAINER – REMOVAL AND FITTING
Note: it is best to remove the middle retainer first
when removing the three retainers, and best to refit
the end retainers first when refitting them.
To remove the dish retainers, proceed as follows:
•Remove the dishes from their retainers.
•Remove the retainers by pulling them vertically out
of the trolley while keeping them as level as possible.
Once removed, the heated surface under the leaves
can be cleaned or used for you to place your own
serving dishes.
To refit a dish retainer:
•Insert it into the space, keeping it horizontal.
•Align the two lines on the retainer with those on the
vertical walls of the space (see figure 1 on back
page). The retainer is fully fitted when the tags on the
retainer are fully engaged with their respective
pockets.
Replacement dishes and retainer panels can be
purchased from:
The Manufacturer,Hostess
Lightcliffe Factory
Hipperholme
Halifax HX3 8DE
Telephone 01422 203963
Fax 01422 206652
DOOR ADJUSTMENT
Every effort is made in the manufacturing process to
ensure the doors are correctly aligned before
dispatch.
All models except HL 6200 and HL 6232 are fitted
with adjustable hinges to allow realignment of the
doors if necessary (e.g. when the trolley is being used
on uneven floors).
The hinges used are of a common construction to
those found on kitchen, bedroom and dining room
furniture.
Refer to figures 2 and 3 on the back page.
To adjust the door in the lateral (X) direction:
•Slacken screws “A” half a turn.
•Adjust the lateral movement of the door by adjusting
screw “B”.
Turning screw “B” clockwise forces the hinge away
from the side of the trolley and vice versa.
•Remember to retighten screw “A” after the
adjustment is complete.
To adjust the door in the frontal (Y) direction:
•Slacken screws “A” half a turn.
•Adjust the door to the desired position by pushing
the hinge towards the back of the trolley or pulling
the hinge towards the front of the trolley.
•Remember to retighten screw “A” after the
adjustment is complete.
To adjust the door in the vertical (Z) position:
•Slacken screw “C” on both hinges half a turn.
•Adjust the door to the desired position by lifting the
door up or pushing it down.
•Remember to retighten the screws after the
adjustment is complete.
CLEANING
Use a soft, damp cloth (with some detergent, if
required) and/or a squeezed out sponge for cleaning.
Do not use scratching and scouring cleaning agents,
scourers, wire wool etc.
Always remember the following points:
•Remove the mains plug from the wall socket before
cleaning the appliance.
•Prevent water from running into the appliance.
•Cleaning is easiest when the appliance has cooled
down but has not yet become really cold.
The removable retainers and the serving dishes can
be washed.
The serving dishes are safe to wash in a dishwasher.

This appliance is intended to be used in household and similar applications such as:
-Staff kitchen areas in shops, offices and other working environments.
-Farm houses.
-By clients in hotels, motels and other residential type environments.
-Bed and breakfast type environments.
0101 094 47076
Other manuals for HL6232
1
This manual suits for next models
2
Other Hostess Indoor Furnishing manuals
Popular Indoor Furnishing manuals by other brands

Sunjoy
Sunjoy L-DN2428SST-RC Assembly instructions

Martha Stewart
Martha Stewart Sloane Accent Bench Assembly instructions

Schüco
Schüco 170191.00.00 Assembly instructions

Space Seating
Space Seating 13-37P500D operating instructions

Legare
Legare FTA 48 x 22 Cottage Bookcase manual

Sauder
Sauder 411885 manual

Blockbau Design
Blockbau Design 80/100 Sideboard Assembly instruction

Birlea
Birlea Urban 1 Drawer Bedside Assembly instruction

Sauder
Sauder Costa 420654 Assembly instructions

Tecno Mobili
Tecno Mobili ME-4136 Assembly instructions

J.Burrows
J.Burrows JBHARVNBBK Assembly instructions

Multimo
Multimo A 520 Assembly instructions