HOT WATER HEAT PUMPS PERFORMANCE PLUS User manual

Heat Pump Manual


Hot Water Heat Pumps Ltd 3
Contents
1. Safety Precautions .................................................................................................................. 5
1.1. Operation Safety Information.......................................................................................... 5
1.2. Risk of Fire........................................................................................................................ 6
1.3. Refrigerant Safety Information ....................................................................................... 6
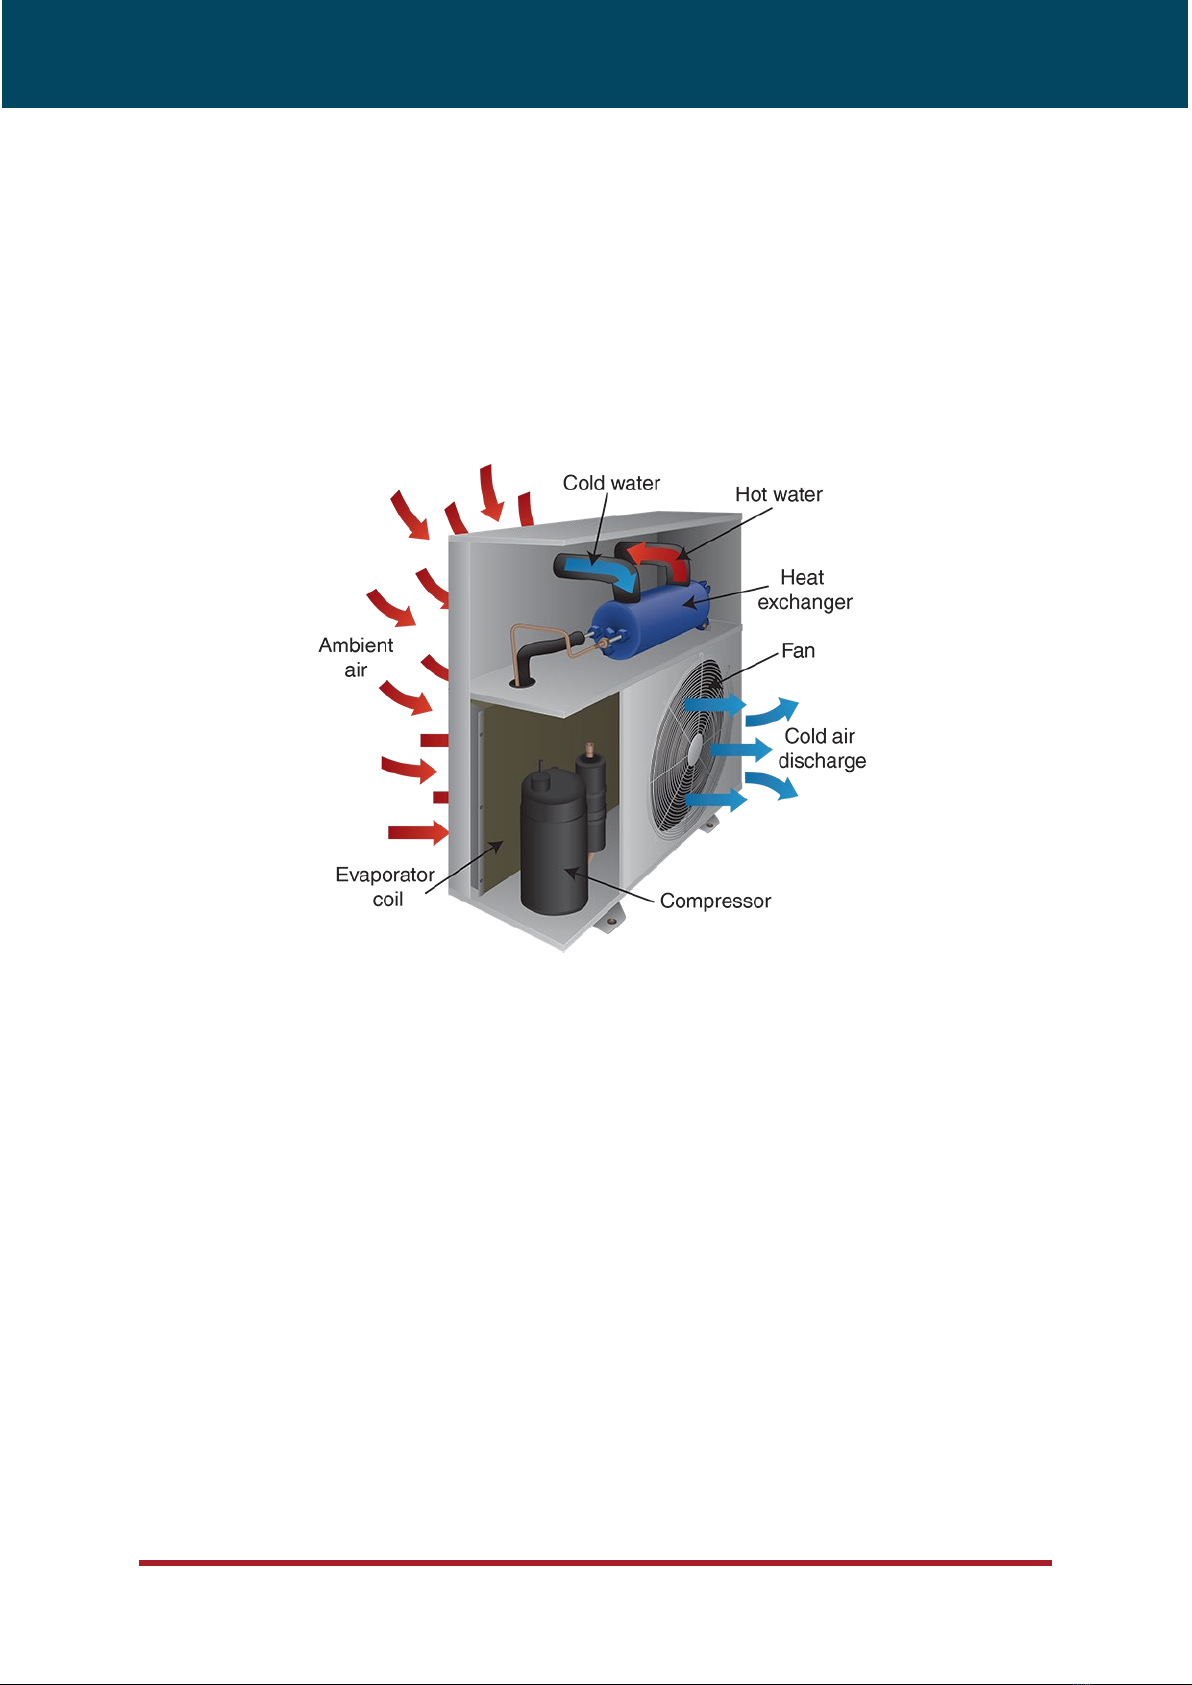
2. Performance Plus Basic Information..................................................................................... 7
2.1. Heat Pump Water Heater Operating Principles............................................................. 7
3. Installation and Transportation .............................................................................................. 8
3.1. Transportation requirements.......................................................................................... 8
3.2. Installation requirements ................................................................................................ 8
3.3. Noise considerations....................................................................................................... 8
4. Operating Instructions............................................................................................................. 9
4.1. Swimming Pool and Spa Heating Operating Instructions ............................................ 9
4.1.1. Start-Up Heat Pump ................................................................................................. 9
4.1.2. Setting Pool Temperature...................................................................................... 10
4.1.3. Shut Down the Heat Pump .................................................................................... 10
4.2. Underfloor Heating Operating Instructions.................................................................. 11
4.2.1. Start-Up Heat Pump ............................................................................................... 11
4.2.2. Configuring Underfloor Heating Temperatures ................................................... 14
4.2.3. Shut Down the Heat Pump .................................................................................... 15
4.3. Domestic Hot Water Heating Instructions................................................................... 16
4.3.1. Setting Domestic Hot Water Temperature........................................................... 16
5. Troubleshooting Guide.......................................................................................................... 17
5.1. Swimming Pool Heat Pump Troubleshooting ............................................................. 18
5.2. Underfloor Heat Pump Troubleshooting...................................................................... 20
5.3. Multi-Pass Domestic Hot Water Heat Pump Troubleshooting................................... 22
6. General Maintenance Notes ................................................................................................. 24
7. Decommissioning and Disposal........................................................................................... 25
8. Performance Plus Heat Pump Safety Features .................................................................. 26
9. Maintenance Sheet Sample.................................................................................................. 27
10. Warranty Terms ................................................................................................................. 29
10.1. Warranty Claims......................................................................................................... 29
10.2. Warranty Period.......................................................................................................... 29

4 Hot Water Heat Pumps Ltd
10.3. Warranty Registration ................................................................................................ 29
10.4. Warranty Terms.......................................................................................................... 29
10.5. Warranty Exclusions .................................................................................................. 30
Warranty Registration Installation Declaration ........................................................................... 31
Company Information
Hot Water Heat Pumps Ltd
0800 33 66 33 | 09 838 9444
PO Box 21586
Henderson
Auckland 0650

Hot Water Heat Pumps Ltd 5
1. Safety Precautions
1.1. Operation Safety Information
•DO NOT install or operate the unit before reading the user manual.
•The unit MUST be installed, commissioned, and serviced by a competent and
qualified person with the appropriate knowledge. The installations must comply with
the AS/NZS 5149 standards. The installation must comply with all applicable local
rules and regulations. Where necessary, the relevant electrical and plumbing work
must be certified to the satisfaction of the local regulatory authorities.
•The unit MUST be operated by a competent person. Persons without the ability or
knowledge to operate the unit SHOULD NOT operate it. Children MUST be supervised
around the unit.
•Any removal or alteration of any components or refrigerants in the unit MUST be
performed by a competent and qualified person. The unit contains high voltage
electrical components that can cause electric shock, serious injuries or death.
•The unit contains fan(s) with fast moving blades. DO NOT remove the fan grille or
attempt to touch the fan.
•AVOID touching the pipework connected to the unit while it is operating. The pipes
can be HOT enough to cause burns.
•DO NOT store items above the unit. DO NOT lean items against the unit.
•Ensure sufficient clearances around the unit to avoid impeding airflow.
•DO NOT operate the unit unless all of the covers are secured in place.

6 Hot Water Heat Pumps Ltd
1.2. Risk of Fire
Performance Plus Heat Pumps work with either R32 or R410A refrigerants. The R32 heat
pumps have a low risk of causing fires.
•R32 is an A2L refrigerant with a low risk of causing a fire. Therefore, units with R32
must be installed according to AS/NZS 5149 to prevent fires.
•R410A is an A1 refrigerant and is classed as non-flammable.
•If R32 leaks, there is a possibility of fire with an external ignition source.
•DO NOT store chemicals or flammable materials near the unit.
•DO NOT place the unit near any ignition sources.
•DO NOT use flammable sprays such as hair spray, aerosols, and spray paints near
the unit.
Note: The refrigerant type is specified on the product sticker on the unit.
1.3. Refrigerant Safety Information
Performance Plus Heat Pumps work with either R32 or R410A refrigerants. The table below
lists the safety information of these refrigerants according to AS/NZS 5149.1. Refer to the
online refrigerants’ Material Safety Data Sheet (MSDS) for more information.
Refrigerant Chemical
Formula
Safety
Group
Flammability Toxicity Maximum
Pressure (PSI)
Minimum
Pressure (PSI)
R410a
(R32/R125 mixture)
CH2F2/
CHF2CF3
A1 No Flame Low 650 20
R32 CH2F2 A2L Low Low 650 20
The Performance Plus Heat Pumps have high-pressure and low-pressure switches that
automatically turn off the unit if either of the pressure limits is breached.
Emergency Shut Down
In case of emergencies, shut down the unit by TURNING OFF the power switch or isolation
switch at the wall. The unit will shut down without the electrical supply.
For any enquiries, please contact Hot Water Heat Pumps Ltd (HWHP) at 0800 33 66 33

Hot Water Heat Pumps Ltd 7
2. Performance Plus Basic Information
Thank you for purchasing a Performance Plus Heat Pump Water Heater. This machine is
designed and manufactured in New Zealand to provide hot water for pools, domestic hot
water, and underfloor heating. The Performance Plus Heat Pump Water Heater heats your
water sustainably by transferring free energy from the ambient air to your hot water supply.
2.1. Heat Pump Water Heater Operating Principles
Figure 1: Heat Pump Operating Principles
A heat pump water heater heats the hot water supply by transferring energy from the
ambient air to the water using electricity, as shown in Figure 1. The heat pump has four key
components; the compressor, expansion valve, evaporator, and condenser. The compressor
uses electricity to pump the refrigerant around the cycle to transfer energy from the
evaporator to the condenser. In the evaporator, the refrigerant extracts energy from the
ambient air. Next, the condenser transfers the energy to the water supply to heat it.
Therefore, the Performance Plus Heat Pumps heat the water effectively using free energy
from the ambient air. In addition, the heat pump also works throughout the colder months
with lower ambient temperatures as the refrigerant in the evaporator will continue to extract
energy from the ambient air. The Performance Plus Heat Pumps will help you meet your hot
water needs sustainably at a low cost.

8 Hot Water Heat Pumps Ltd
3. Installation and Transportation
The Performance Plus Heat Pumps must be installed appropriately to ensure maximum
efficiency and reliability. The unit MUST be installed by a competent and qualified person
according to AS/NZS 5149 Units for domestic hot water must comply with NZBC G12. For
the R32 units, the installation must also comply with AS/NZS 5149.
3.1. Transportation requirements
•The unit MUST be kept in a near-vertical position at all times. During
transportation, DO NOT tilt the unit more than 30° from the vertical position.
•DO NOT remove the packaging during transportation.
•The unit MUST be moved by at least two people to avoid injuries and damages.
•The unit MUST be handled with care. DO NOT pierce or puncture any piping in
the unit.
3.2. Installation requirements
•The unit MUST be installed with sufficient clearances on all sides. Refer to the
unit’s technical brochure for its’ dimensions and clearances.
•The unit MUST be installed in a location with sufficient airflow. Good airflow is
crucial to ensure high operating efficiency and reliability.
•Ensure that the air inlet and outlet are free of obstructions.
•Avoid installation in areas with debris, such as leaves, that could block the air
intake.
•Ensure that pipework containing hot water is insulated to increase energy
efficiency.
•For installation in cold areas where the temperature falls below 0°C, care must
be taken to avoid frost and ice formation in the pipes connected to the unit.
•For installation in corrosive environments listed below or in NZS 3604, please
consult HWHP to inquire about suitable treatments.
oSeaside with salty air
oAir with high sulphur gas concentration
3.3. Noise considerations
•Ensure that the installation location complies with all local noise regulations
regarding neighbouring properties. In New Zealand, Section 16 of the Resource
Management Act 1991 can be referenced.

Hot Water Heat Pumps Ltd 9
4. Operating Instructions
This general user manual includes operating instructions for pool, underfloor, and domestic
hot water applications. The instruction includes starting up, setting, and shutting down the
heat pump.
A separate E-35 controller user manual is also provided for users wishing to access and
modify other operating parameters.
4.1. Swimming Pool and Spa Heating Operating Instructions
Note: The Spa Pool and Swimming Pool heat pumps have the same operating instructions.
The Performance Plus Swimming Pool Heat Pump is designed to function automatically
throughout the swimming season. The user only has to start up the unit at the start of the
swimming season and shut down the unit at the end of the swimming season.
Note: Once installed, the Performance Plus Heat Pump WILL NOT function if:
1. The isolation switch is turned OFF.
2. There is no water flowing through the heat pump.
3. The water is already up to the desired temperature.
To check if there is flow in the heat pump or if water is to temperature, refer to instructions
in the E-35 controller manual. Please ensure that the isolation switch remains ON
throughout its operating period.
4.1.1. Start-Up Heat Pump
The Performance Plus Swimming Pool Heat Pump must be turned on at the start of the
swimming season. The unit can be installed in a pool WITH OR WITHOUT a “Pool
Management” or “Timeclock Bypass” system that manages the filtration system. The heat
pump start-up process differs for these 2 scenarios. Please make sure to follow the
appropriate instructions.
WITH Pool Management/Timeclock Bypass
1. Turn ON the Performance Plus Swimming Pool Heat Pump at the isolation switch.
2. Set the time-clock settings for the desired filtration cycle on the Pool Management or
Timeclock Bypass System.
3. Turn ON the “AUTO HEAT” switch at the Pool Management or Timeclock Bypass System.
Your Pool Management or Timeclock Bypass System will now maintain your pool heating
without further alterations to the system.
For more detailed instructions or technical information, please see your Pool Management or
Timeclock Bypass System Manual.
WITHOUT Pool Management/Timeclock Bypass
1. Turn OFF the chlorination system completely.
2. Set the filtration system to run 24 hours/day.

10 Hot Water Heat Pumps Ltd
3. Turn ON the Performance Plus Swimming Pool Heat Pump at the isolation switch.
4. Turn ON the chlorination system manually for the required duration per day only.
5. Once the pool has reached its desired temperature, reduce the filtration cycle to
achieve the desired result. This process will take a few days of adjustment to achieve
the desired result. Our suggestions are:
(a) 12 hours cycle at the beginning of the swimming season while the ambient
temperatures are still low.
(b) Reduce the filtration cycle time as the swimming season progresses.
Caution: For water treatment systems that DO NOT actively monitor chemical
levels without a Time-clock Bypass or Pool Management system, turn the water
treatment system off during the initial heat-up period. Overriding the time clock
may cause excessively high chlorine levels.
4.1.2. Setting Pool Temperature
The swimming pool temperature can be adjusted if necessary. The default pool temperature
is 28°C, and the Performance Plus is designed to operate optimally at this temperature. To
adjust the temperature setpoint, follow the procedure below.
1. Locate the controller pictured on the right
Note: For Duoheat heat pumps, locate the controller labelled
POOL or SPA.
2. Press and hold the SET button for 3 seconds. The
display will change from reading the current water
temperature to reading the current set point.
3. Use the UP and DOWN arrow keys to change the
desired temperature setpoint.
4. Press SET to confirm the new value and resume
normal operation.
4.1.3. Shut Down the Heat Pump
The Performance Plus Heat Pump should be turned off at the end of the swimming season.
1. Turn OFF the Performance Plus Swimming Pool Heat Pump at the isolation switch.
2. The heat pump will shut down and remain idle until the next swimming season.
Caution: In regions where standing water can freeze, drain the water from the
Performance Plus Swimming Pool Heater at the end of the season to avoid the
risk of damage due to freezing.

Hot Water Heat Pumps Ltd 11
4.2. Underfloor Heating Operating Instructions
The Performance Plus Underfloor Heat Pump is designed to operate automatically
throughout the heating season. The user only needs to START-UP the heat pump at the start
of the heating season and SHUT DOWN the heat pump at the end of the heating season.
For optimal heating, please follow the instructions to set the temperature for your underfloor
heating system correctly.
4.2.1. Start-Up Heat Pump
The Performance Plus Underfloor Heat Pump must be turned ON at the start of the heating
season to operate. Carefully follow these steps and check if they are met before turning on
the heat pump.
1. Ensure that the buffer tank is full, as indicated in Figure 2 for the 7GU series and
Figure 3 for the 7GUB series.
2. Set any room thermostats (if available) to the desired temperature.
3. Turn ON the underfloor heating system according to your unit:
(a) Single Purpose (underfloor only) heat pump: Turn ON the unit at the isolation
switch.
(b) Duoheat Dual Purpose heat pump: Turn ON the switch labelled “Underfloor
Heating” at the control box (either on the heat pump OR mounted on the wall).
The isolation switch should already be ON.
Note: If unsure if the unit is a Single or Duoheat Dual Purpose heat pump, please refer to the
unit’s technical brochure.

12 Hot Water Heat Pumps Ltd
1. Locate the Buffer Tank and
Underfloor Controller. This will
normally be next to the underfloor
heating manifold.
2. Ensure that the underfloor controller
is switched OFF. (Refer to step 3 to
locate the control box)
3. Carefully fill the buffer tank with tap
water. This should take no more
than 10 Litres of water unless the
Low Water Level Light is on.
4. Turn the Underfloor Switch ON when
ready. Refer to steps 2 and 3.
Figure 2: 7GU Series Buffer Tank Filling Procedure

Hot Water Heat Pumps Ltd 13
1. Make sure the unit is turned OFF at
the isolation switch. Remove the 4
screws (pictured above) holding the
lid in place.
2. Locate the buffer tank inside the
unit and remove the black cap
located at the centre of the tank.
3. Carefully fill the buffer tank with tap
water. This should take no more
than 5 Litres of water unless the
Low Water Level Light is on.
4. Replace the lid and screw it back on.
Turn the isolation switch ON when
ready. Refer to steps 2 and 3.
Figure 3: 7GUb Series Buffer Tank Filling Procedure

14 Hot Water Heat Pumps Ltd
4.2.2. Configuring Underfloor Heating Temperatures
The Performance Plus Underfloor Heat Pump must be turned ON at the start of the heating
season to operate. Carefully follow these steps and check if they are met before turning on
the heat pump.
Heat Pump Controller Location
Figure 4: Onboard and Remote Controller Locations
Figure 4 (a) shows the location of the Onboard Controller on the heat pump unit.
Figure 4 (b) shows the location of the Remote Controller. This is normally wall-mounted near
the buffer tank or manifold location.
Note: ON/OFF Switch is only available on the Remote Controller. For heat pumps with
Onboard Controller, use the isolation switch instead.
Manual Tap Systems (no water solenoids on the manifolds)
1. Ensure all taps are fully open to the highest balanced water flow rate.
2. Set the desired water temperature to between 30 to 35°C. Follow the “Temperature
Control” steps below to set the temperature.
3. Adjust the water temperature UP or DOWN to achieve the highest room temperature
you require.
4. Once satisfied, adjust taps to achieve the desired temperatures in all zones.
Solenoid Systems (Air thermostats or Floor thermostats)
1. Set the thermostats to their uppermost SENSIBLE limit. DO NOT exceed 26°C.
2. Set the desired water temperature to between 30 to 35°C. Follow the “Temperature
Control” steps below to set the temperature.
Power Light
Low Water Level Failure
OFF
ON
(a) (b)

Hot Water Heat Pumps Ltd 15
3. Adjust the water temperature UP or DOWN to achieve the highest room temperature
you require.
4. Once satisfied, set room thermostats to the desired temperatures in all zones. The
heating system will adjust itself accordingly.
Temperature Control
1. Locate the controller pictured on the right
Note: For Duoheat heat pumps, locate the controller labelled
DOMESTIC or UNDERFLOOR.
2. Press and hold the SET button for 3 seconds. The
display will change from reading the current water
temperature to reading the current set point.
3. Use the UP and DOWN arrow keys to change the
desired temperature setpoint.
4. Press SET to confirm the new value and resume
normal operation.
4.2.3. Shut Down the Heat Pump
The Performance Plus Underfloor Heat Pump should be turned OFF at the end of the heating
season to avoid excessive energy consumption. To shut down the heat pump:
1. For Single Purpose (Underfloor only) Heat Pump: Turn OFF the unit at the isolation
switch.
2. For Duoheat Dual Purpose Heat Pump. Turn OFF the “Underfloor Heating” switch on
the control box. DO NOT turn OFF the isolation switch.
Note: Refer to the Configure Underfloor Heat Pump section if you cannot locate the control
box.

16 Hot Water Heat Pumps Ltd
4.3. Domestic Hot Water Heating Instructions
The Performance Plus Domestic Hot Water Heat Pump is designed to operate automatically
after it is turned ON.
Note: The installer completes the START UP procedures for Performance Plus Domestic Hot
Water Heat Pumps. The user does not have to turn it on manually.
Note: The SHUTDOWN procedures are not required for Performance Plus Domestic Hot
Water Heat Pumps. The unit operates all year round to supply hot water to the property.
4.3.1. Setting Domestic Hot Water Temperature
For legionella control purposes, your domestic hot water cylinder must maintain a minimum
temperature of 60°C or conform to one of the alternative control methods as per NZBC G12.
55°C is the maximum water temperature setting for the Performance Plus Heat Pump. For
temperatures above this, the electric element will be required to boost the temperature.
To change the hot water temperature setpoint, follow these steps.
1. Locate the controller pictured on the right
Note: For Duoheat heat pumps, locate the controller labelled
DOMESTIC or UNDERFLOOR.
2. Press and hold the SET button for 3 seconds. The
display will change from reading the current water
temperature to reading the current set point.
3. Use the UP and DOWN arrow keys to change the
desired temperature setpoint.
4. Press SET to confirm the new value and resume
normal operation.
Note: The controller should be wall-mounted near the Hot Water Cylinder.

Hot Water Heat Pumps Ltd 17
5. Troubleshooting Guide
This troubleshooting guide lists potential solutions for common user problems. This guide is
intended for end-users and operators. Please refer to the relevant sections for your heat
pump unit.
Note: Ice and frost formation on the heat pump in low ambient temperatures is normal. The
Performance Plus Heat Pumps have a built-in defrost system to de-ice the heat pump.
Please do not attempt to remove ice without a heat pump technician.
Note: If you suspect a serious fault not listed in the troubleshooting guide, please contact
HWHP at 0800 33 66 33 for servicing.
Warning:
In the event of suspected refrigerant leaks indicated by:
•The air around the heat pump smells bad or smells like chemicals.
•Hissing sound when the heat pump is not running.
•Heat pump pipes are noticeably punctured.
TURN OFF the heat pump at the isolation switch. DO NOT attempt to cover the leak yourself.
DO NOT have any open flames near the heat pump.
Please contact HWHP at 0800 33 66 33 or your local service agent to fix the leakage. The
service technicians will perform a thorough leakage test and repair/replace the faulty
components.

18 Hot Water Heat Pumps Ltd
5.1. Swimming Pool Heat Pump Troubleshooting
Fault Cause Potential Solution
No red power light No power supply. Check the fuse/circuit
breaker or isolating switch.
The red light is on, but the
display is not functioning
No water flow through the
heat pump.
Check if the filter pump is
running and if the flow is
directed through the heat
pump.
The pool never reaches
the desired temperature
The controller is set too low. Adjust the controller set
point.
The desired temperature is
higher than what the heat
pump was sized to achieve.
Keep the pool cover on for
longer periods.
The pool is hot, but the
heat pump fails to turn off
The probe is not properly
placed or seated.
Contact Hot Water Heat
Pumps Ltd or your nearest
service agent.
The controller set point is
above the required
temperature.
Adjust the controller set point
down to the required
temperature.
The water is cold No power supply. Check the fuse/circuit
breaker or isolating switch.
The controller is set too low. Adjust the controller set
point.
The heat pump has stopped
on a safety device.
Check water flow through the
heat pump flow switch.
There is ice on the fins at
the back of the heat pump
The ambient temperature is
very low.
This is a natural function in
cold weather. The active
defrost function should melt
the ice within minutes of the
de-ice control automatic
activation.
If the weather is warm, the
heat pump may be low on
refrigerant.
Contact Hot Water Heat
Pumps Ltd or your nearest
service agent.

Hot Water Heat Pumps Ltd 19
Fault Cause Potential Solution
There is water around the
heat pump
Condensation. Small puddles
around the heat pump.
This is a natural function of
the heat pump in humid
conditions; a drain tray could
be placed below the unit to
catch this water to be piped
away.
Possible water leak from
connections to the heat
exchanger at the top of the
unit.
Check under the lid of the
unit for any sign of water.
Condensation should only be
forming on the coil in the
lower part of the heat pump.
If there is A LOT of water in
the unit, contact Hot Water
Heat Pumps Ltd or your
nearest service agent.
This should be checked
immediately as prolonged
exposure to water could
cause damage to the unit.
Note: If you suspect a serious fault or the issue persists, please contact Hot Water Heat
Pumps Ltd at 0800 33 66 33 for servicing.

20 Hot Water Heat Pumps Ltd
5.2. Underfloor Heat Pump Troubleshooting
Fault Cause Potential Solution
No red power light No power supply. Check the fuse/circuit
breaker or isolating switch.
The red light is on, but the
display is not functioning
Low water level. Check to see if the low water
level light is on. If yes, top up
the water in the buffer tank.
The temperature in the
house is too low
The thermostat in the house
is set too low.
Set the thermostat
temperature higher.
The water temperature is set
too low.
Adjust the water setpoint 1–
2°C higher.
The low water flow rate
through the floor.
Make sure that valves are not
closed on the manifolds.
The underfloor system is
hot but the heat pump
fails to turn off
The probe is not properly
placed or seated.
Contact Hot Water Heat
Pumps Ltd or your nearest
service agent.
The controller set point is
above the required
temperature.
Adjust the water setpoint 1–
2°C lower.
There is ice on the fins at
the back of the heat pump
The ambient temperature is
very low.
This is a natural function in
cold weather. The active
defrost function should melt
the ice within minutes of the
de-ice control automatic
activation.
If the weather is warm, the
heat pump may be low on
refrigerant.
Contact Hot Water Heat
Pumps Ltd or your nearest
service agent.
There is water around the
heat pump
Condensation. Small puddles
around the heat pump.
This is a natural function of
the heat pump in humid
conditions; a drain tray could
be placed below the unit to
catch this water to be piped
away.
Table of contents
Other HOT WATER HEAT PUMPS Heat Pump manuals
Popular Heat Pump manuals by other brands

Nortek
Nortek GXH09LSK4DL Owner's manual and installation instructions

Carrier
Carrier 38YCC Series Installation and start-up instructions

Toshiba
Toshiba ESTIA HWS-802H-E installation manual

York
York GEYSIR VARIO RANGE user manual

welldana
welldana WMV instruction manual

Nortek
Nortek T4QE installation instructions

Gebwell
Gebwell Taurus Inverter Pro Installation, commissioning and maintenance manual

Honeywell
Honeywell THX9321 Prestige 2.0 System installation guide

Panasonic
Panasonic WH-MDF09C3E8 operating instructions

evoheat
evoheat Evo Fusion-i quick start guide

McQuay
McQuay LDD Installation & maintenance data

AIREDALE
AIREDALE StoreMaster STM50R-P Technical manual