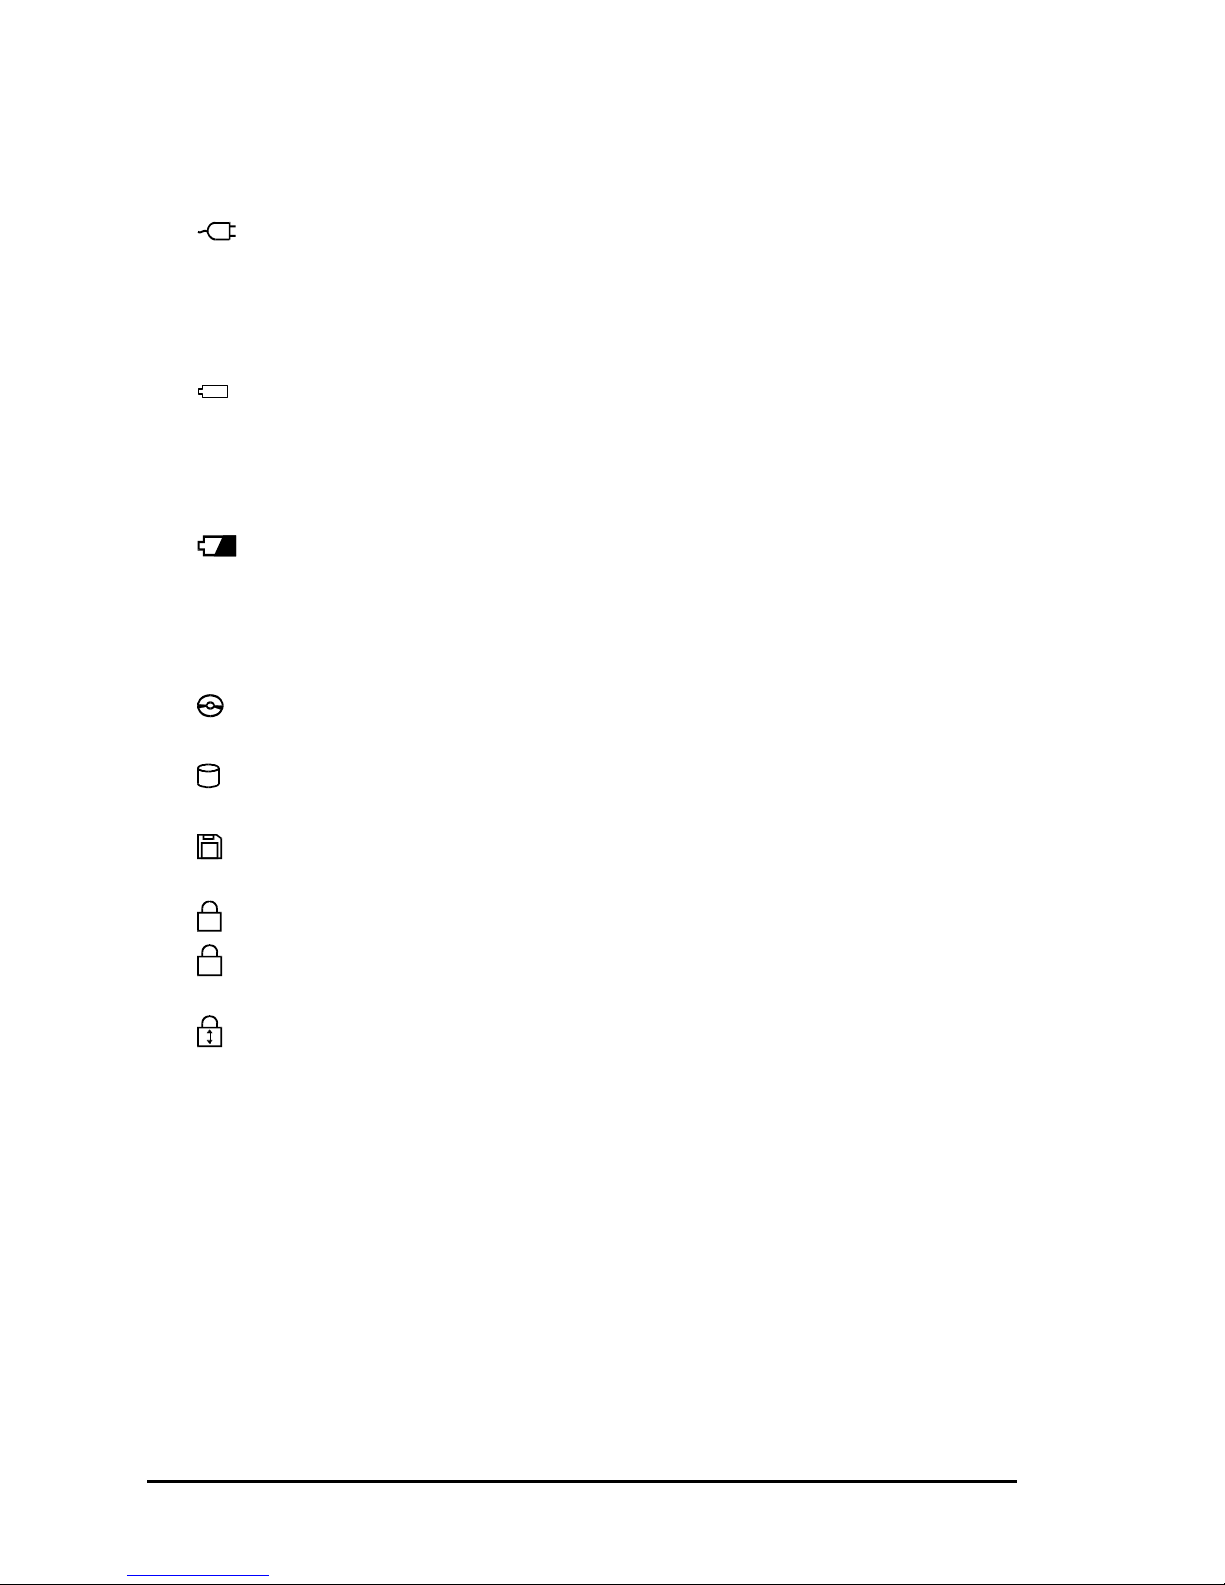
HP Compaq 100 User manual

COMPAQ CONFIDENTIAL - NEED TO KNOW REQUIRED
Writer: JAbercrombie Saved by: JAbercrombie Saved date: 01/07/00 11:19 AM
Pages: 2Words: 167 Template: c:\msoffice\templates\portables\ref-ntc.dot
Part Number: 174886-001 File name: Notice.doc
Notice
The information in this guide is subject to change without notice.
COMPAQ COMPUTER CORPORATION SHALL NOT BE LIABLE FOR
TECHNICAL OR EDITORIAL ERRORS OR OMISSIONS CONTAINED
HEREIN; NOR FOR INCIDENTAL OR CONSEQUENTIAL DAMAGES
RESULTING FROM THE FURNISHING, PERFORMANCE, OR USE OF
THIS MATERIAL.
This guide contains information protected by copyright. No part of this
guide may be photocopied or reproduced in any form without prior
written consent from Compaq Computer Corporation.
© 2000 Compaq Computer Corporation. All rights reserved. Published
in the U.S.A., U.K, Singapore, and Taiwan.
Compaq is registered in the U.S. Patent and Trademark Office.
Microsoft, MS-DOS, and Windows are trademarks or registered
trademarks of Microsoft Corporation.
Software described herein is furnished under a license agreement or
nondisclosure agreement. The software may be used or copied only in
accordance with the terms of the agreement.
Product names mentioned herein may be trademarks and/or registered
trademarks of their respective companies.
REFERENCE GUIDE
COMPAQ NOTEBOOK SERIES
First Edition March 2000
Part Number 174886-001
Compaq Computer Corporation

Getting Started 1-1
Chapter 1
Getting Started
This chapter introduces the features and components of the notebook and tells
you how to get the notebook up and running.
Features
Your notebook incorporates desktop computer capabilities into a compact
notebook-sized package.
Among the distinguished features are:
•Support for AMD K6-2, K6-2+, or K6-3 series microprocessor
Provides an advanced central processor for excellent ability of code
execution.
•Built-in audio system
Supports audio capabilities with 3D audio and acoustic effects.
•PCMCIA slot with CardBus support
Single slot supports one Type I, Type II, or Type III PC Card. This slot
accepts CardBus Cards that provide high-speed data transmission and
networking.
•Fast Infrared (IR) port support
With the IR port, wireless communications are possible between your
notebook and an IR device.
•Universal Serial Bus (USB) port support
The USB standard gives you the benefits of having one single interface for
multiple interfaces when low-to-medium speed peripherals are concerned.
•Power Management
You can automatically and manually conserve power by setting up the
Power Management capabilities of your notebook.
•Internal Modem (available on select models )
Supports fax and data communications functions that allow your notebook to
be connected to a network environment through normal telephone cables.
•System BIOS (Basic Input/Output) that supports the years beyond 2000

1-2 Getting Started
Other basic components of the notebook system are:
•3.5-inch, 1.44MB (Megabytes) diskette drive
•ATA3 IDE hard drive, Ultra DMA/33 supported
•24X CD-ROM drive
•32MB or 64MB of system memory, expanding up to 160MB or 192MB
SDRAM with a 128-MB memory module upgrade (model dependent)
•Internal 256KB L2 (only on models with a K6-3 processor) or internal 128KB
L2 (only on models with a K6-2+ processor) cache memory
•External 512KB cache memory only on models with a K6-3 processor
•Color TFT or HPA display with SVGA resolution (model dependent)
•Notebook keyboard
•TouchPad pointing device
•Built-in microphone and stereo speaker set
•Input/output connectors for external expansion
•AC adapter
•Standard NiMH or optional Li-ion rechargeable battery pack

Getting Started 1-3
Taking a Look at the Notebook
Right-Side View
Figure 1-1. Right-Side View
1. Hard Drive
Inside is the hard drive of your notebook, often referred as drive C. (See
“Hard Drive” in Chapter 2 for more information.)
2. Infrared Port
This infrared port complies with IrDA 1.0 and ASK standards. It allows you
to connect your notebook to an IR device wirelessly. (See “Connecting an
Infrared Device” in Chapter 4 for important notes.)
3. CD-ROM Drive
This is the CD-ROM drive of your notebook, often configured as drive D.
(See “CD-ROM Drive” in Chapter 2 for more information.)
4. Volume Control )!!!!!*
This controls the volume of the sound coming from the notebook.

1-4 Getting Started
Left-Side View
Figure 1-2. Left-Side View
1. Cable Lock Anchor ( )
This rectangular hole can be used as an anchor point for a security cable.
Use a cable to lock your notebook to an appropriate location for security.
2. Power Button )!!!!!*
Pressing this button turns the notebook power ON or OFF.
3. RJ-11 Connector ( ) (available on select models)
With the RJ-11 connector, the standard telephone line can be connected to
your notebook.
WARNING:
1. Never install telephone wiring during a lightning storm.
2. Never install telephone jacks in wet locations unless the jack is
specifically designed for wet locations.
3. Never touch uninsulated telephone wires or terminals unless the
telephone line has been disconnected at the network interface.
4. Use caution when installing or modifying telephone lines.
5. Avoid using the telephone function during an electrical storm. There
may be a remote risk of electric shock from lightning.
6. Do not use the telephone function to report a gas leak in the vicinity
of the leak.
4. PC Card Slot
Open the display to access the PC Card slot. (See “Installing a PC Card”in
Chapter 4 for more information.)
5. Battery Pack
Inside is the battery pack, which supplies power to your notebook when
external power is not connected. (See Chapter 3 for more information.)

Getting Started 1-5
Rear View
12 3 4 5 6 7 8
Figure 1-3. Rear View
1. Microphone Connector ( )
Connects to an external microphone for use in place of the notebook’s built-
in microphone.
2. Audio Output Connector ( )
Connects to a set of headphones, external speakers with amplifier or an
audio recording device.
3. USB Port ( )
The 4-pin Universal Serial Bus port is for connecting an USB device. (See
“Connecting an USB Device”in Chapter 4 for more information.)
4. Parallel Port ( )
This 25-pin port is for connecting a parallel device such as a parallel printer
or pocket LAN. (See “Connecting a Serial or Parallel Device”in Chapter 4
for more information.)
5. Serial Port ( )
This 9-pin port is for connecting a serial device such as a serial mouse,
modem, or printer. (See “Connecting a Serial or Parallel Device”in Chapter
4 for more information.)
6. VGA Port ()
This 15-pin analog port is for connecting an external monitor.
7. PS/2 Mouse/Keyboard Port ( )
This 6-pin mini-DIN port is for connecting a PS/2 keyboard or mouse.
8. Power Connector ()
This is for connecting the AC adapter.

1-6 Getting Started
Front View
Figure 1-4. Front View
1. Display Latch
The display latch keeps the notebook firmly closed.
2. Diskette Drive
This is the 3.5-inch diskette drive of your notebook, often referred as drive
A. (See “Diskette Drive”in Chapter 2 for more information.)
Top-Open View
To open the notebook, press the display latch toward the right, then lift the
display.
1
2
Figure 1-5. Opening the Notebook

Getting Started 1-7
1
2345
6
Figure 1-6. Top-Open View
1. Display
This is the display of your notebook.
CAUTION: Do not place heavy objects on top of the notebook when it
is closed as this can damage the display.

1-8 Getting Started
2. Indicators Panel
These are the indicators that show the status of your notebook.
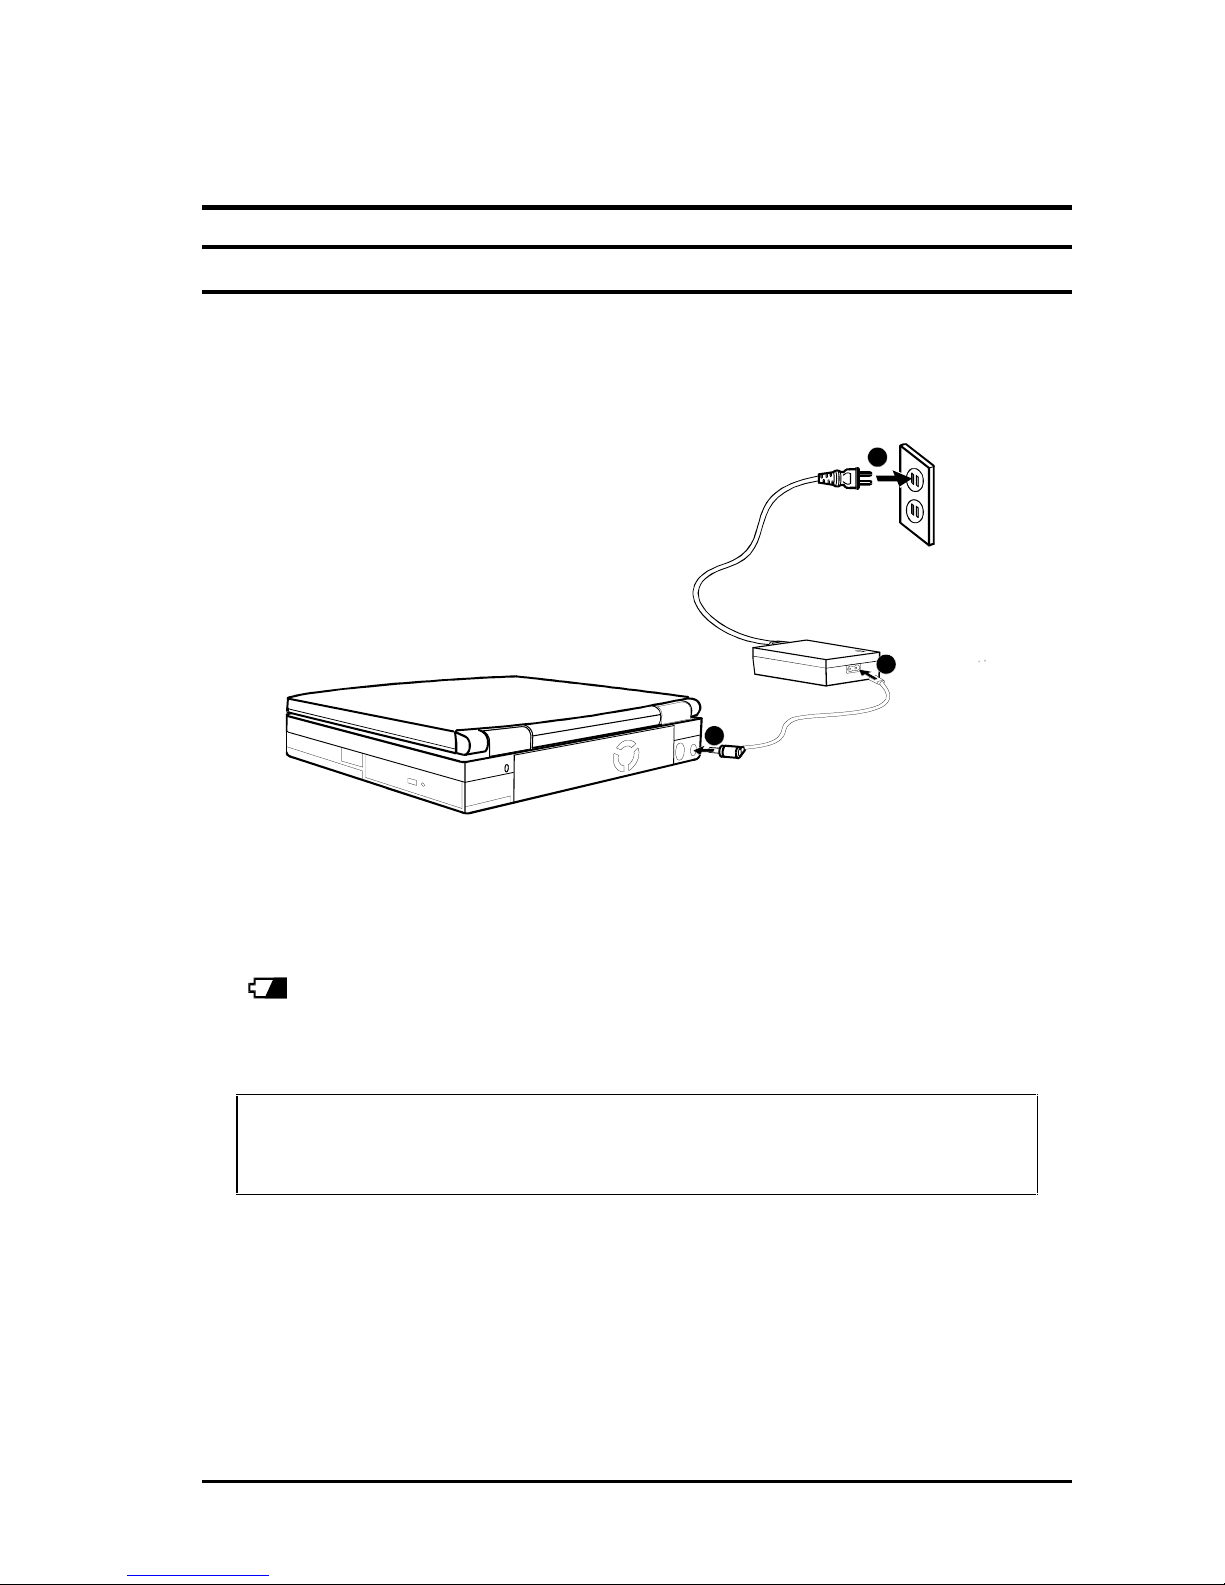
AC Power Indicator
•Turns on when the notebook is using AC power.
•Blinks when the notebook, using AC power, is in Suspend-to-RAM
mode. (See “Introducing Power Management”in Chapter 2 for
information on Suspend-to-RAM mode.)
Battery Power Indicator
•Turns on when the notebook is operating on battery power.
•Blinks when the notebook, using battery power, is in Suspend-to-
RAM mode. (See “Introducing Power Management”in Chapter 2 for
information on Suspend-to-RAM mode.)
Battery Charge Indicator
•Lights green when the battery is fully charged with the AC adapter
connected.
•Lights orange when the battery is being charged.
•Blinks red when the battery is low.
CD-ROM Drive In-use Indicator turns on when the notebook is
accessing the CD-ROM drive.
Hard Drive In-use Indicator turns on when the notebook is accessing
the hard drive.
Diskette Drive In-use Indicator turns on when the notebook is
accessing the diskette drive.
N
Num Lock Indicator turns on when the Num Lock function is activated.
A
Caps Lock Indicator turns on when the Caps Lock function is
activated.
Scroll Lock Indicator turns on when the Scroll Lock function is
activated.
3. Microphone
This is the built-in microphone of your notebook.
4. Keyboard
This keyboard provides all the functions of a full-size 101/102-key keyboard.
(See “Keyboard”in Chapter 2 for information.)
5. TouchPad
This is the pointing device of your notebook. (See “TouchPad”in Chapter 2
for information.)
6. Stereo Speaker Set
This is the built-in speaker set of your notebook.

Getting Started 1-9
Getting the Notebook Running
Connecting to AC Power
1. Plug the DC cord of the AC adapter into the power connector ➊on the rear
of the notebook.
2. Plug the AC cord ➋into the AC adapter and into the an electrical outlet➌.
1
3
2
Figure 1-7. Connecting the AC Adapter
When the AC adapter is connected, the indicator on the AC adapter lights
up, indicating that power is being supplied from the electrical outlet to the
AC adapter and onto your notebook. When the Battery Charge Indicator (
) on the notebook glows orange, the AC adapter is charging the battery.
3. To fully charge the battery, leave the notebook power off, and wait until the
Battery Charge Indicator glows green.
CAUTION: Whenever you disconnect the AC adapter, always unplug it
from the electrical outlet first before you unplug it from the notebook. A
reverse procedure may damage the AC adapter or notebook.
When the AC adapter is not connected, you can operate the notebook using
battery power only.

1-10 Getting Started
Using Battery Power
When the AC adapter is not connected, you can use battery power. To assure
optimum battery life, fully charge and discharge the battery at least once and
then fully charge the battery before you first use battery power. (For more
information on using battery power, see Chapter 3.)
Starting Up
The notebook starts up with an operating system preinstalled on the hard drive,
a CD-ROM, or a diskette. The notebook will automatically load the operating
system after you turn it on. This process is called booting. Follow these steps to
start the system.
1. Open the notebook by sliding the display latch toward the right and lifting up
the display.
2. Turn on the notebook by pressing the power button (Figure 1-2 #2) on the
left side of the notebook.
3. Tilt the display forward or backward to a comfortable viewing position.
You can also adjust the brightness of the display to attain display clarity. To
adjust brightness, press [Fn]+[F6] or [Fn]+[F7].
4. Each time the notebook is turned on, it performs a Power-On Self Test
(POST). This checks the status of major notebook devices including the
system board, memory, video, keyboard, and disk drive. Some status
messages from POST will appear on the screen.
If the POST has detected a mismatch between the actual hardware
configuration and the configuration information stored in CMOS RAM, you
will see error message(s) telling you to run the Setup Configuration Utility
(SCU) program. (See Chapter 5 for instructions on running SCU.)
NOTE: The SCU program allows you to enter the configuration
information and store it in CMOS RAM. The configuration information is
needed by the notebook to identify the installed devices. Under SCU,
you can also activate certain features such as Power Saving and
Security.
5. When POST successfully completes its check, the notebook first tries to
boot from drive A, C, or CD-ROM depending on the “Boot Sequence”setting
in the SCU program.
NOTE: To avoid viruses brought in by diskettes, boot the system from
the hard disk instead of a diskette. If you must boot up from drive A,
make sure the booting diskette is clean.

Getting Started 1-11
Booting with Windows 98
The notebook comes to you with the hard drive pre-formatted. However, you
may have to install the operating system. For details on how to install an
operating system, please consult the Microsoft operating system manual that
comes with your notebook. Use the following steps to configure your system
when booting up with Windows 98 for the first time.
1. When the system boots up for the first time, you will be prompted to enter
your name and password. If you don’t need a password, press OK.
2. When prompted, choose your time zone. Select the appropriate time zone
as well as the time and date.
3. Windows 98 will restart the system.
4. After the system boots up again, a Windows 98 Welcome screen appears.
You can browse the topic that interests you. If you don’t want the screen to
show up again, uncheck the “Show this screen each time Windows 98
starts”item.
Your notebook comes with a CD-ROM that contains software drivers you need
to install, thus enabling the special features of your notebook. (See Chapter 6
for information on the drivers.)

1-12 Getting Started
Turning Off the Notebook
CAUTION: Never turn off the notebook when the hard drive In-use
Indicator is on. You may lose your data by doing so.
1. If you are using a program, save your data and exit the program.
2. First make sure all hard drive in-use indicators are off, then remove any
diskette or CD-ROM from the drive.
3. If you are using an operating system such as Microsoft Windows 98 that has
the “Shut Down”command, simply select the command and the notebook
will turn off automatically.
Otherwise, turn off the notebook by pressing the Power Button.
4. Turn off the power to any connected external devices.
5. To close the notebook, tilt down the display until the display latch clicks into
place.
CAUTION: If you have to turn on the notebook again immediately after
turning it off, wait for at least five seconds. Turning the notebook off and
on rapidly may damage the system circuit.
6. To disconnect the AC adapter, unplug it from the electrical outlet first; then
unplug it from the notebook.

Using the Notebook 2-1
Chapter 2
Using the Notebook
This chapter provides operating basics on the notebook’s components such as
the diskette drive, hard drive, CD-ROM drive, keyboard, and TouchPad. It also
introduces power management and gives you tips in care and maintenance.
Diskette Drive
Your notebook comes with a diskette drive designated as drive A. A diskette
drive allows you to load new programs into your notebook, or to store data on a
removable diskette so you can transfer data from one notebook to another.
21
Figure 2-1. 3.5-inch Diskette
The diskette drive is compatible with either double-density (2DD) 720KB
diskettes or high-density (2HD) ➊1.44MB diskettes. Notice that both types of
diskettes have an arrow imprinted on the front upper left corner, and a slidable
write-protect tab ➋on the bottom left corner, as illustrated above. When slid
downward, the write-protect tab prevents data from being written to, or erased
from, the diskette.

2-2 Using the Notebook
Inserting and Ejecting Diskettes
To insert a diskette, hold it with the arrow facing up and towards the drive. Slide
the disk into the drive until it clicks into place.
Figure 2-2. Inserting a Diskette
To eject a diskette, make sure that the diskette drive in-use indicator is off, then
press the eject button on the drive. When the diskette pops out of the drive,
remove the diskette and store it properly.
Formatting Diskettes
A diskette must be formatted before it can store any data. For information on
how to format a diskette, please consult your operating system manual.
CAUTION:
1. Never turn off or reset the notebook while the diskette drive in-use
indicator is on.
2. Always store your diskettes in a safe, clean container, protecting
them from the dust and magnetic fields.

Using the Notebook 2-3
Hard Drive
Your notebook comes with a hard drive designated as drive C. A hard drive,
also called a fixed disk, is a storage device with non-removable, rotating,
magnetic storage platters. Compared with a diskette, a hard drive can retrieve
and record data much faster and has a much larger storage capacity.
.
CAUTION:
1. To avoid unexpected data loss caused by viruses or accidents,
regularly backup your files from the hard drive to diskettes.
2. Never turn off or reset the notebook while the hard drive in-use
indicator is on. In addition to possible data loss, the system and the
hard drive’s sensitive circuitry may be damaged.
CD-ROM Drive
Your notebook comes with a CD-ROM drive, which uses removable 5.25-inch
compact disks that look like standard music CD-ROMs. The compact disk is an
ideal medium for data storage or multimedia program because of its huge
amount of data capacity.
Inserting/Removing a CD-ROM
CAUTION:
1. When inserting a CD-ROM, gently insert it into the CD-ROM drive.
2. Make sure the CD-ROM is correctly inserted into the tray, then close
the tray.
3. Do not leave the CD-ROM tray open. Moreover, avoid touching the
lens in the tray with your hand. If the lens becomes dirty, the CD-ROM
may malfunction.
4. Do not wipe the lens with rough surfaced materials (such as paper
towel). Instead, use a cotton swab to wipe the lens gently.
FDA regulations require the following statement for all laser-based devices:
“Caution, Use of controls or adjustments or performance of procedures
other than those specified herein may result in hazardous radiation
exposure.”

2-4 Using the Notebook
Use the following procedure to insert or remove a CD-ROM.
1. Turn on the notebook.
2. Push the eject button ➊and the CD-ROM tray will slide out. If the tray only
slides out partially, gently pull it until fully extended.
3. To insert a CD-ROM, place the CD-ROM in the tray with its label facing up.
2
1
Figure 2-3. Inserting a CD-ROM
To remove a CD-ROM, hold the disc by its outer edge and lift it up from the
tray.
4. Slide the tray back into the drive bay.
Manually Releasing a CD-ROM
In the unlikely event that you are unable to release the CD-ROM tray by
pressing the eject button, you can manually release the tray as follows:
1. Turn off the system.
2. Insert a small rod into the manual eject hole ➋(see Figure 2-3) and push
firmly to release the tray.
3. Pull the tray out until the tray is fully extended, then remove the CD-ROM.
Keyboard
Your notebook keyboard has all the functions of a standard AT-enhanced
keyboard plus some keys specific to your notebook.

Using the Notebook 2-5
Fn Key
The [Fn] key, at the lower left corner of the keyboard, is used with other keys to
perform alternative functions.
Special Keys
Several keys are added such as the [Ctrl], [Alt], [Esc], and lock keys for special
purposes. When the lock keys are pressed, their corresponding indicators will
light.
•[Num Lock]
Pressing this key toggles the Num Lock on and off. When on, the Num Lock
activates the numeric keys.
•[Scroll Lock]
Pressing this key toggles Scroll Lock on and off. The Scroll Lock is defined
by individual programs.
•[Caps Lock]
Pressing this key toggles the Caps Lock on and off. When on, the Caps
Lock keeps the letter keys in uppercase.
Function Keys
On the top row of the keyboard are the function keys: [F1] to [F12]. Function
keys are multi-purpose keys which perform functions defined by individual
programs.
Hot key functions are assigned to [Fn]+[F5] through [Fn]+[F12] by your
notebook. (See “Hot Keys” later in this chapter for information.)

2-6 Using the Notebook
Cursor-Control Keys
At the lower right corner of the keyboard are four cursor-control keys: \↑^,!\↓^,
\←^,!and!\→^.These keys, also called arrow keys, control cursor movement.
On the right side of the keyboard are [Home], [PgUp], [PgDn], and [End] keys,
which control the screen or cursor movement.
Left to the arrow keys are the [Ins] and [Del] keys used for editing purposes.
Home
PgUp
PgDn
End
Figure 2-4. Cursor-Control Keys

Using the Notebook 2-7
Numeric Keypad
A 15-key numeric keypad is embedded in the typewriter keys as shown below:
Figure 2-5. Numeric Keypad
Numeric keys facilitate entering of numbers and calculations. When Num Lock
is on, the numeric keys are activated, meaning you can use these keys to enter
numerals.
NOTE:
1. When the numeric keypad is activated and you want to type the
English letter, you can either turn Num Lock off or hold down [Fn]
and press the key without turning Num Lock off.
2. If the “Keyboard Numlock” item in the Setup Configuration Utility
(SCU) program is set to Disabled, you can not directly use the
numeric keypad on the notebook keyboard even if Num Lock is on.
To use the numeric keys in this case, you can hold down [Fn] key
first.
3. Some software may not be able to use the numeric keypad on the
notebook. If so, use the numeric keypad on an external keyboard
instead.
Windows 95 Keys
On the Windows 95 keyboard, you can find one Windows Logo key ( ä) and one
Application Logo key ( ). The two keys are used with other keys to perform
software-specific functions. (See your Microsoft operating system manual.)
Table of contents
Other HP Laptop manuals

HP
HP Presario CQ50-100 - Notebook PC User manual

HP
HP OmniBook XE2 User manual

HP
HP ProBook 4440s User manual

HP
HP Compaq NX9040 User guide

HP
HP Pavilion zx5000 - Notebook PC Manual

HP
HP XT992UT User manual

HP
HP EliteBook Folio 1040 G3 Manual

HP
HP Folio 13-2000 Manual

HP
HP ProBook 4545s User manual

HP
HP Mini 1030 User manual

HP
HP ProBook 4740s Manual

HP
HP ENVY 17-n100 Manual

HP
HP 240 G7 Manual

HP
HP Compaq 6710b Manual

HP
HP Compaq NX7400 Installation guide

HP
HP Presario CQ20-100 - Notebook PC User manual

HP
HP Compaq 2510p User manual

HP
HP Dv7-2270us - Pavilion Entertainment - Core 2 Quad... User manual

HP
HP Compaq Presario User manual

HP
HP G72-100 - Notebook PC Manual