HP Indigo BID Washer User manual

illustration
HP Indigo BID Washer
User guide
Spanish version

BID Washer
User guide

Printed in Israel.
© 2005 Copyright
Hewlett-Packard
Development Company,
L.P.
Reproduction, adaptation,
or translation without prior
written permission is
prohibited, except as
allowed under the
copyright laws.
The information contained
herein is subject to change
without notice.
The only warranties for HP
products and services are
set forth in the express
warranty statements
accompanying such
products and services.
Nothing herein should be
construed as constituting
an additional warranty. HP
shall not be liable for
technical or editorial errors
or omissions contained
herein.
HP, HP Indigo Press,
HP Indigo Press RIP, and
HP ElectroInk are
trademarks or registered
trademarks of HP.
Adobe® PostScript® is a
trademark of Adobe
Systems Incorporated.
MS Windows® and
Windows® are U.S.
registered trademarks of
Microsoft Corp.
All other products or name
brands are trademarks of
their respective holders.
The HP Indigo press is a
Class 1 Laser Product
containing high voltage
power supplies and laser
light sources. There is no
danger to persons or
equipment when the
system is operated in
accordance with the
directions provided by HP
in this and other
publications. All high
voltage power supplies and
laser sources are located
behind protective covers.
Warning labels are
attached to each protective
cover. Do not remove
covers.
Part Number:
CA294-02500
Second Edition:
January 2005

EN 3
Contents
1 Safety
Overview . . . . . . . . . . . . . . . . . . . . . . . . . . . . . . . . . . . . . . . . . . . . . . . . . . . . . . . . 6
Emergency Power Cut-Off . . . . . . . . . . . . . . . . . . . . . . . . . . . . . . . . . . . . . . . 6
Interlocked Doors . . . . . . . . . . . . . . . . . . . . . . . . . . . . . . . . . . . . . . . . . . . . . . 7
Waste disposal . . . . . . . . . . . . . . . . . . . . . . . . . . . . . . . . . . . . . . . . . . . . . . . . . . . 7
Additional information . . . . . . . . . . . . . . . . . . . . . . . . . . . . . . . . . . . . . . . . . . . . . . 7
2 BID Washer
Overview . . . . . . . . . . . . . . . . . . . . . . . . . . . . . . . . . . . . . . . . . . . . . . . . . . . . . . . 10
Inside the BID Washer . . . . . . . . . . . . . . . . . . . . . . . . . . . . . . . . . . . . . . . . . 11
Operating the BID Washer . . . . . . . . . . . . . . . . . . . . . . . . . . . . . . . . . . . . . . . . . 13
The Control Panel . . . . . . . . . . . . . . . . . . . . . . . . . . . . . . . . . . . . . . . . . . . . . 13
Cleaning the BID Unit . . . . . . . . . . . . . . . . . . . . . . . . . . . . . . . . . . . . . . . . . . 14
Cleaning ink tank and pump . . . . . . . . . . . . . . . . . . . . . . . . . . . . . . . . . . . . . 17
Maintaining the BID Washer . . . . . . . . . . . . . . . . . . . . . . . . . . . . . . . . . . . . . . . . 18
Refilling the imaging oil tank . . . . . . . . . . . . . . . . . . . . . . . . . . . . . . . . . . . . . 18
Replacing the imaging oil filters . . . . . . . . . . . . . . . . . . . . . . . . . . . . . . . . . . 19
A Parts and Supplies
Imaging Products. . . . . . . . . . . . . . . . . . . . . . . . . . . . . . . . . . . . . . . . . . . . . . . . . 23
Operator Maintenance Parts . . . . . . . . . . . . . . . . . . . . . . . . . . . . . . . . . . . . . . . .23
Supplies. . . . . . . . . . . . . . . . . . . . . . . . . . . . . . . . . . . . . . . . . . . . . . . . . . . . . . . . 24
B Service and support

4 Contents ENWW

ENWW 5
1Safety
This chapter provides the following information:
●Overview
●Waste disposal
●Additional information

6 Chapter 1 Safety ENWW
Overview
The BID Washer is used to clean BIDs for HP Indigo 3000, 4000, and 5000 series
presses. The front view of the BID Washer is shown below.
WARNING! The BID Washer is to be operated and maintained only by properly trained personnel who are
thoroughly familiar with all the safety and maintenance procedures of the unit. Operators should
read and understand all operating safety procedures, including environmental safeguard
procedures, presented here, before attempting to use the unit. You should not attempt any
maintenance for which you have not been trained. Service and repairs should be referred to an
authorized HP Indigo service technician.
Emergency Power Cut-Off
Use the red Emergency Stop buttons to cut off power in an emergency.
●Emergency Stop Button — A red Emergency Stop button on a yellow
background is located at the top rear of the unit. When pressed, it stops all
motors and cuts off electrical power to all devices.
Figure 1-1. BID Washer unit
Front
Rear
Left Right
Open
left door
first
Sink

ENWW Waste disposal 7
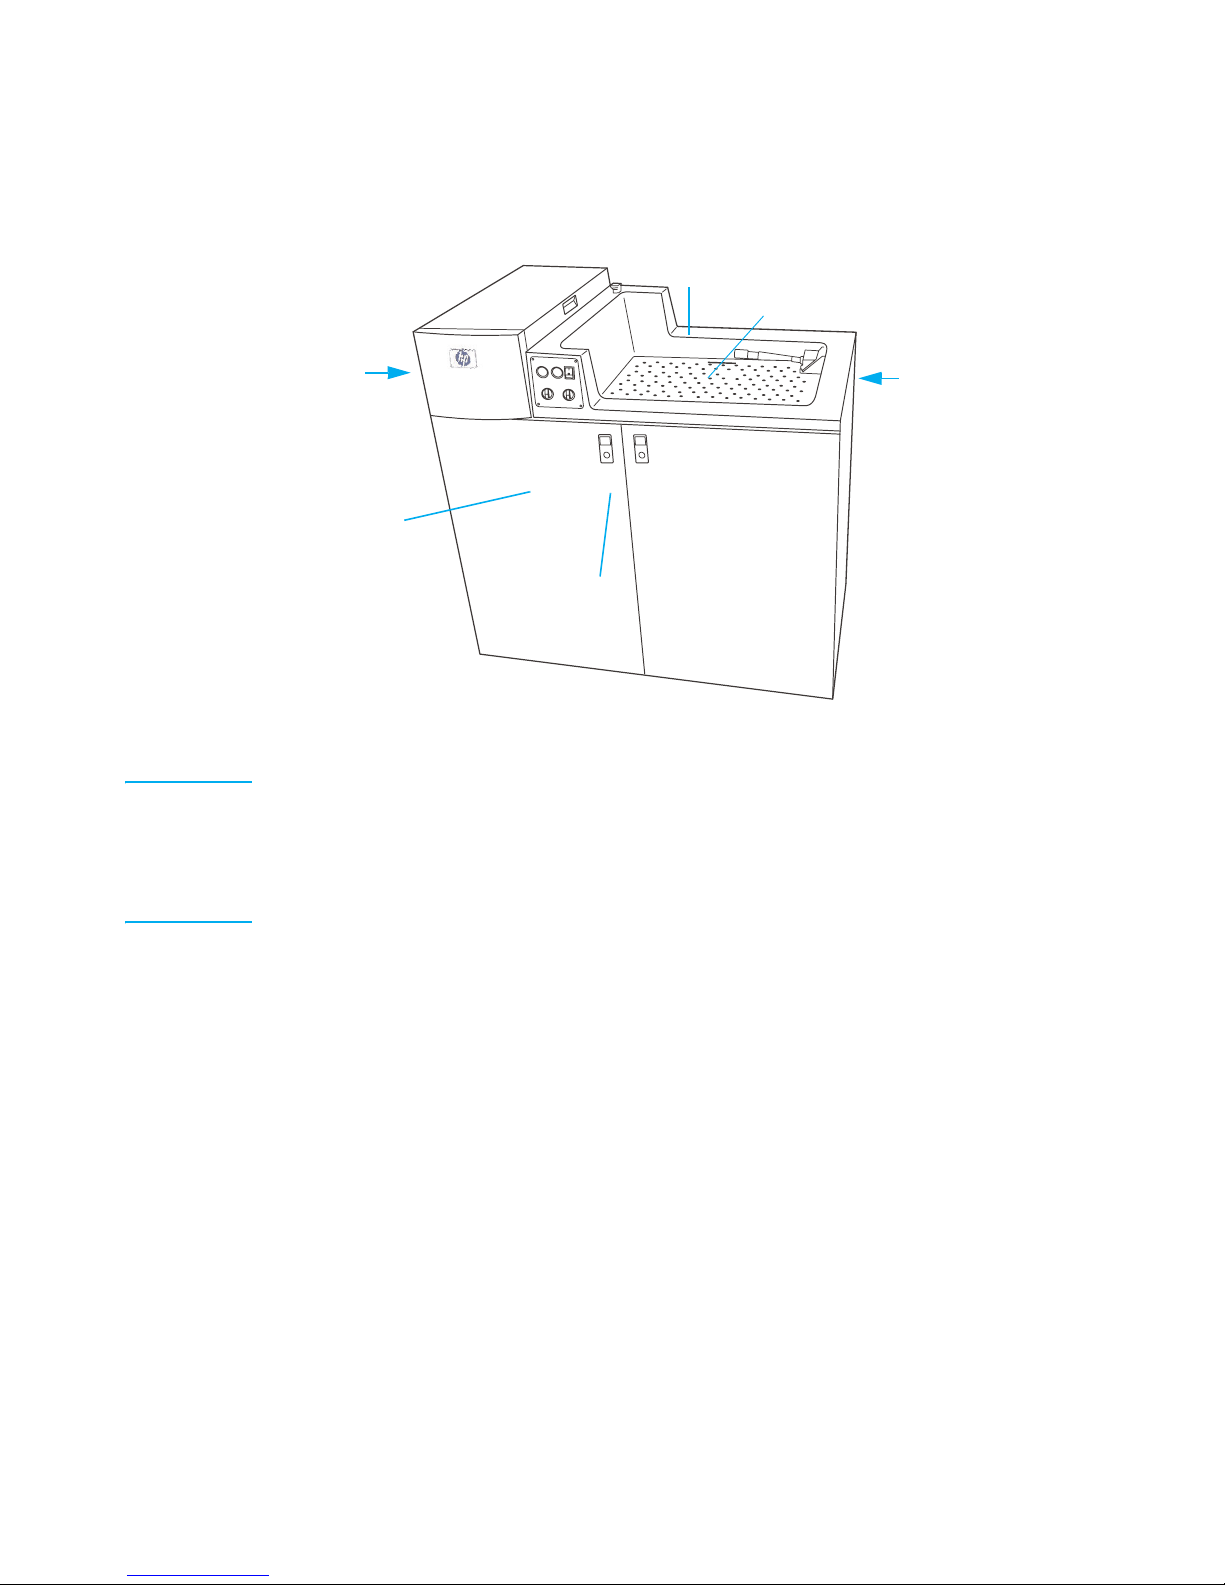
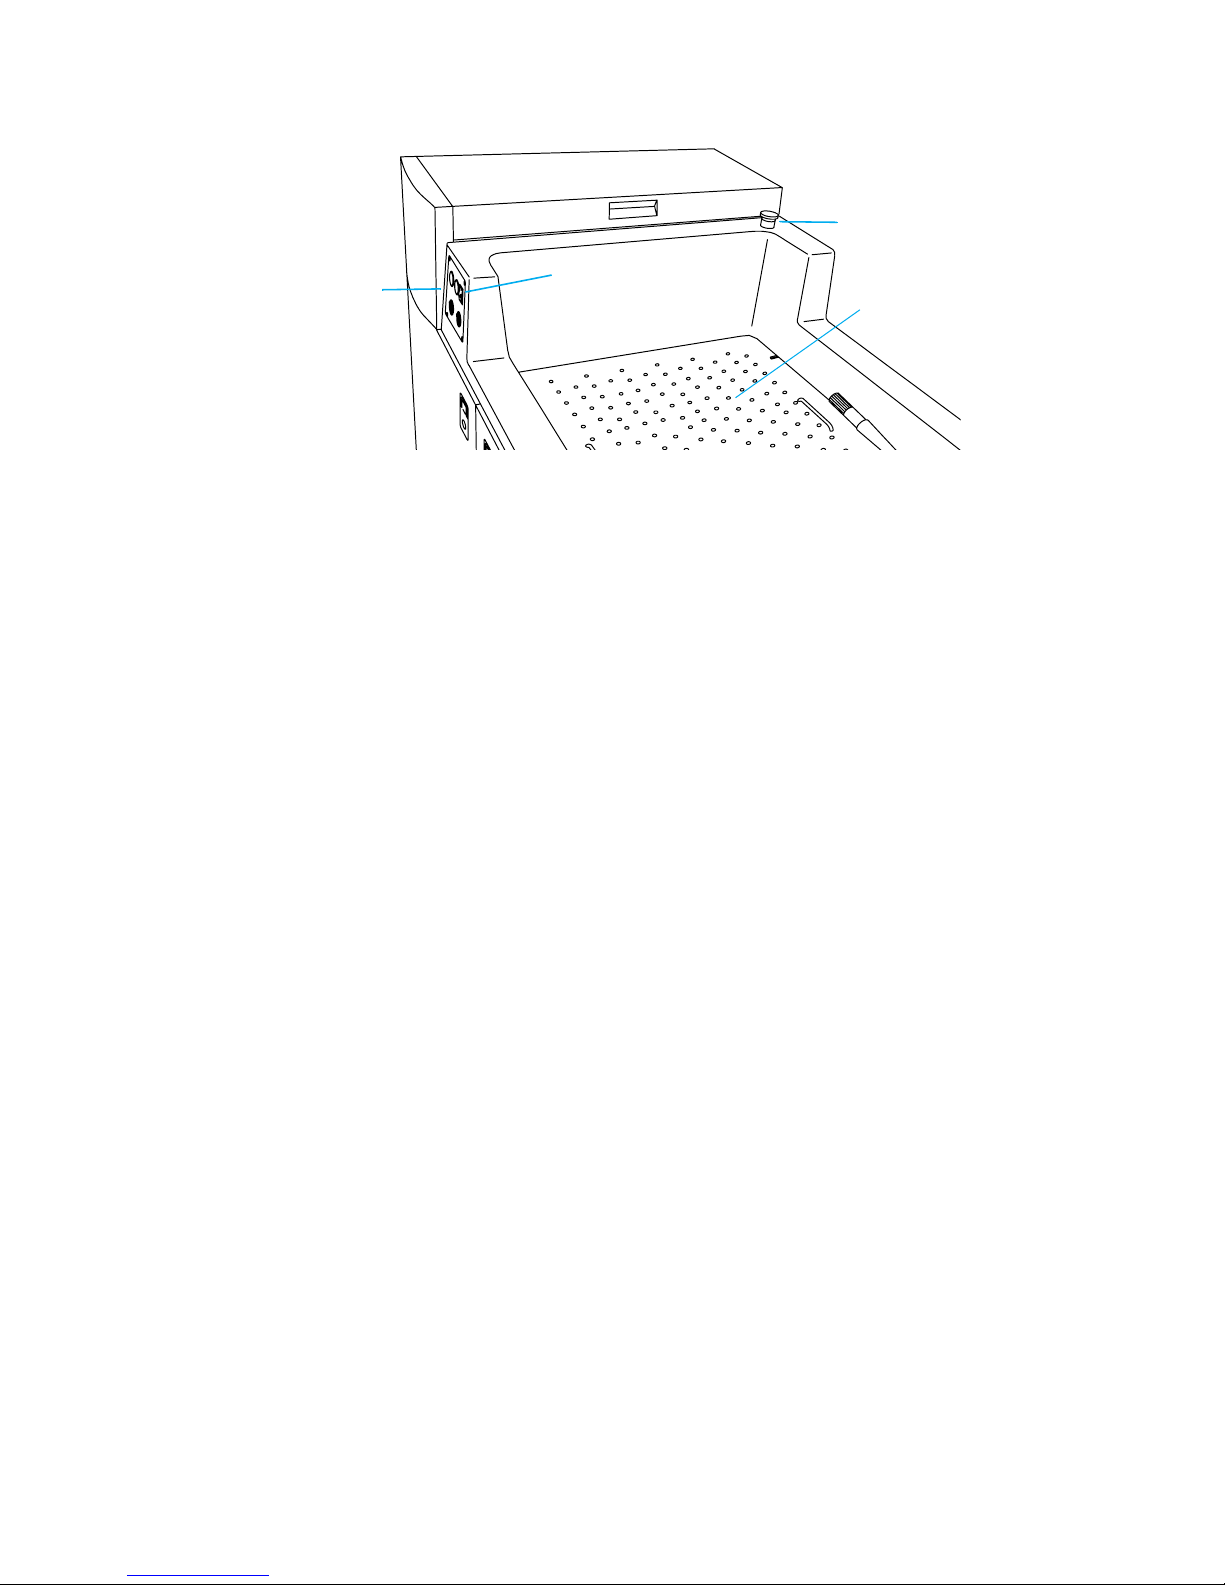
●Machine Circuit Breaker — The BID Washer circuit breaker is located on the unit’s
control panel (Figure 1-2.). Press the circuit breaker to the down position to cut power
to the BID Washer. Always maintain free access to the circuit breaker, to enable
immediate power cut-off in case of emergency.
Interlocked Doors
The BID Washer has door interlock safety devices that stop the unit whenever service
doors are opened and cut off electrical power to all system devices. Never disconnect or
override any of these safety devices when operating the system.
The following doors form part of the interlock chain: both front doors, the front BID door,
and the top BID door. When any of the doors are open, the interlock is activated and
prevents operation of the BID Washer, except for the BID inching mode, which can work
with the top BID door open.
Waste disposal
During the operation of the BID Washer, the operator will use imaging products and
cleaning materials that should be disposed of properly. Refer to local waste disposal
regulations to determine the correct manner in which to dispose of waste products listed
below.
●Imaging oil and ink
●Cleaning pads or cloths soaked in imaging oil
●Rags, pads, or tissue paper contaminated with ink
●Contaminated chemical-resistant gloves
●Empty imaging oil containers
Additional information
It you have any questions regarding safe operation of the BID Washer, cease operation
and contact HP Indigo Customer Support. Additional Material Safety Data Sheets are
available upon request from your local HP office.
Figure 1-2. Circuit breaker and Emergency Stop button
Emergency
Stop button
Circuit breaker
Control
panel Sink

8 Chapter 1 Safety ENWW

ENWW 9
2BID Washer
This chapter provides the following information:
●Figure Overview
●Operating the BID Washer
●Maintaining the BID Washer

10 Chapter 2 BID Washer ENWW
Overview
The BID Washer, with the HP Indigo part number shown on page 23, is a cleaning device
for cleaning BID units, ink tanks, and ink pumps. The BID Washer is an integral part of the
package supplied to purchasers of the HP Indigo ink mixing system.
Note Information on BID installation, removal, and re-use may be obtained from the appropriate HP
Indigo press User Guide.
When replacing ink, the BID, the ink pump, and the ink tank should always be cleaned
thoroughly. Remove all ink residue to avoid ink contamination.
WARNING! The BID Washer is to be operated and maintained only by properly trained personnel who are
thoroughly familiar with all the safety and maintenance procedures of the unit. See the Safety
chapter of this manual before operating the unit.
Turn on the circuit breaker to power the unit. When the unit is powered up, the control
panel indicators are illuminated. If there are any operational problems, the indicators will
flash.
Figure 2-1. BID Washer unit
Front
Rear
Left Right
Open left
door first
Sink

ENWW Overview 11
Inside the BID Washer
An internal view of the BID Washer shows an imaging oil tank, a pump, filters, and an
electrical cabinet (Figure 2-3). Open the left front cabinet door first to gain entry to the
lower BID Washer compartment.
Figure 2-2. BID Washer interlock doors
Front doors
Front BID
door
Control
panel
Top BID door Emergency Stop button
Circuit breaker
Cleaning brush

12 Chapter 2 BID Washer ENWW
Within the electrical cabinet are the components that supply power to the pump and the
BID Washer motor (Figure 2-4). Note that the fuses are located in the top left corner.
Figure 2-3. Inside the lower compartment
Figure 2-4. Inside the electrical cabinet
Electrical
cabinet
Imaging
oil filters
Pump
Imaging
oil tank
cap
Imaging oil bottle
Main
transformer
PLC
controller
Fuse box

ENWW Operating the BID Washer 13
Operating the BID Washer
The Control Panel
The control panel is located on the front BID Washer wall, facing the operator (see Figure
2-2). It contains the following:
●A circuit breaker
●The BID Wash Cycle rotary switch has Short and Long wash cycle positions, in
addition to a neutral center position. When either the Short or Long wash cycle is
selected, both the pump and the BID motor are turned on, and imaging oil flows to the
BID. The Long wash cycle is used when replacing a color. The switch contains a
green light that is on during normal operation, and which flashes if there is a problem
such as an open door or a low imaging oil level. Return the switch to the neutral
center position when the wash cycle is complete, which is indicated by the green light
turning off.
●A lit Tank Oil Level Low red light indicates that more imaging oil should be added.
After adding imaging oil, the red light will flash. Press the Tank Oil Level Low
push-button for three seconds to turn off the light.
●A lit Filter Congested push-button indicates that a filter needs to be replaced. After
replacing the filter, press the push-button for three seconds to turn off the light.
●Operating the unit in the Manual Wash mode turns the pump on and directs imaging
oil flow to the sink. The pump will continue to run until the switch is turned off. The
switch contains a green light that is lit during normal operation, and which flashes if
there is a problem. Return the switch to the neutral center position when the wash
cycle is complete, which is indicated by the green light turning off.
●When operating the unit in the BID Inching mode, the pump is off and the developer
roller in the BID is rotating as long as the BID Inching switch is in the on position. The
upper BID Washer door may remain open during this mode of operation. The BID
Inching switch contains a green light that is lit during normal operation, and which
Figure 2-5. BID Washer control panel
Circuit breaker
Change filter if lit
Refill imaging oil
tank if lit.
When activated, the
pump remains ON and
imaging oil flows to the
sink.
Imaging oil flows to
the BID and both
pump and BID
motor are on when
either Short or Long
is selected.
Lit if functioning
normally, flashes
if there is a
problem.
When held in the BID
Inching position, the
pump is off and the
developer roller in the
BID is rotating in the
inching mode.
momentary position fixed position
BID INCHING

14 Chapter 2 BID Washer ENWW
flashes if there is a problem. The switch will automatically return to the neutral center
position when released. The BID Inching mode is used for cleaning the developer
roller, and for inspecting the roller for scratches or defects.
Cleaning the BID Unit
The BID assembly should be cleaned when replacing ink in an ink tank, or performing the
HP Indigo ink mixing system procedure, which is required for adding a new or special
color to the press. The HP Indigo press User Guide also recommends weekly cleaning of
the BID units.
To clean the BID unit, follow these instructions.
1Press an Emergency Stop button on the press.
2Remove the required BID unit from the press (see the section on removing the BID in
the HP Indigo press User Guide). For the HP Indigo press 5000, remove the BID
fitting.
3Open the top and front BID doors on the BID Washer (see Figure 2-2).
4Slide the BID unit — motor side first — into the BID Washer. Insert one BID pin in the
left BID pin slot, and the other BID pin in the right BID pin slot (see Figure 2-7).
Figure 2-6. BID fitting for the HP Indigo press 5000 (shown on a BID stand)
BID fitting
Two screws fasten BID
fitting to BID housing

ENWW Operating the BID Washer 15
Figure 2-7. Inserting the BID into its housing
Right BID pin slot
BID
motor
BID
developer
BID unit (rear–right side)
Insert in BID rail Insert in BID pin slot
Left BID pin slot
BID Washer BID housing
BID rail

16 Chapter 2 BID Washer ENWW
5Make sure the BID latch is locked.
Figure 2-8. BID unit inserted in the BID Washer BID housing
BID
latch
Ink supply
latch
Set screw
Imaging oil inlet
Imaging oil outlet
BID unit
Top BID
door
BID latch
Ink coupling latch
Emergency
Stop button

ENWW Operating the BID Washer 17
6Remove the ink stopper and install the BID ink coupling. Lock the ink supply latch and
tighten its set screw.
7Close all BID Washer doors.
8Wait for the indicators on the control panel to turn on, without flashing.
9Tu r n t h e BID Wash Cycle dial to Long. The BID motor turns on and imaging oil flows
through the BID.
Note The Long BID Wash duration is about 20 minutes. The Short BID Wash duration is about 2.5
minutes.
10 When the BID Wash procedure ends, the BID Wash indicator is lit. Return the BID
Wash switch to the neutral center position.
11 Remove the BID by following the instructions above in reverse order. For the HP
Indigo press 5000, reinstall the BID fitting (Figure 2-6).
12 For BID installation, see the BID installation procedure in the HP Indigo press User
Guide.
13 For BID storage, see the section on reusing the BID in the HP Indigo press User
Guide.
Cleaning ink tank and pump
The ink tank and pump assembly should be cleaned when replacing ink in an ink tank, or
performing the HP IndiChrome Ink Mixing System procedure, which is required for adding
a new or special color to the press.
To clean the ink tank and pump assembly, follow these instructions:
1Press an Emergency Stop button on the press.
2Remove the required ink tank and pump assembly from the press.
3Wash the ink tank or pump assembly in the BID Washer sink.
• Operate the BID Washer in the Manual Wash mode. Imaging oil will flow via the
cleaning brush.
• Clean the ink tank and pump assembly thoroughly to remove all sludge residue.
Figure 2-9. BID ink coupling
Ink supply
latch
Set screw
Imaging
oil outlet
Imaging
oil Inlet
Ink stopper

18 Chapter 2 BID Washer ENWW
Maintaining the BID Washer
The BID Washer uses imaging oil for cleaning. The imaging oil system in the BID Washer
is a semi-closed system. Imaging oil flows from the imaging oil tank to the cleaning sink,
to the tank wash station, or to the BID Unit, and then returns to the imaging oil tank. Two
filters, located at the imaging oil tank outlet, filter out the imaging oil impurities. When the
imaging oil filters are too dirty to filter the imaging oil, they should be replaced.
The Tank Oil Level Low red light on the control panel indicates the imaging oil should be
replaced. After adding imaging oil, the red light will flash. Turn off the flashing red light by
pressing the Tank Oil Level Low push-button for three seconds.
Refilling the imaging oil tank
Requirements: Imaging oil (see the HP Indigo part number on page 23).
Frequency: When the Low Level light is on.
The BID Washer imaging oil tank capacity is about 15 liters (4 gallons). The imaging oil
tank supplies the sink (in Manual mode) and the BID (during the Long and Short BID
Wash and the Tank Wash) with fresh imaging oil. Once the imaging oil tank level goes
below 10 liters (2.5 gallons), the Tank Oil Level Low light turns on. Perform the following
procedure to refill the imaging oil tank.
1Open the BID Washer front doors (see Figure 2-2). Note that the lower left door must
be opened first, as the two lower front doors are mechanically interlocked.
Figure 2-10. BID Washer schematic
BID washing station
Manual washing station
Regulator
Regulator
Manifold
Solenoid
Valves - 3
Circulation line
Imaging
oil tank Pump
Imaging
oil
filters
Imaging oil return hose

ENWW Maintaining the BID Washer 19
2Remove the tank cap.
3Pour in one 4-liter (1.06-gallon) oil bottle (see the HP Indigo part number on page 23).
4Put the imaging oil tank cap on and then close it.
5Close the imaging oil tank door.
Replacing the imaging oil filters
Requirements:
●Filter extractor (HP Indigo part number on page 23)
●Two imaging oil filters (HP Indigo part number on page 23)
●Imaging oil (HP Indigo part number on page 23)
●Rubber gloves (HP Indigo part number on page 24)
WARNING! It is recommended that you wear rubber gloves while handling imaging oil.
There are two filters. Remove the inner one first and then the outer one. Mount the new
filters in reverse order.
Figure 2-11. Imaging oil tank
Figure 2-12. Four liter imaging oil bottle
Imaging oil tank cap
Table of contents
Other HP Other manuals

HP
HP v218g User manual

HP
HP LaserJet Pro M521 Operating instructions

HP
HP z553 Manual

HP
HP v260w User manual

HP
HP HC574-L User manual

HP
HP Photosmart Premium Fax e-All-in-One Printer -... User manual

HP
HP Officejet Enterprise Color MFP X585 Flow User manual

HP
HP Reverb Professional Edition User manual

HP
HP v265w User manual
Popular Other manuals by other brands

Nova LFS
Nova LFS DURHAM METROLINX LA50 Coach Wiring Diagram

Decagon Devices
Decagon Devices EM50G quick start guide

Honeywell
Honeywell r7284 Operator's manual

Custom Dynamics
Custom Dynamics GEN200-KIT-1157 Installation instructions manual

Kranzle
Kranzle quadro 1500 TST operating manual

GE
GE IAC66M instructions