Huawei ZTE MU500 User manual

Page 1 of 25
TELSTRA 5G WI-FI PRO HOTSPOT
MU500
USER MANUAL
CHECK YOUR SYSTEM REQUIREMENTS
Your 5G Wi-Fi Pro provides 5G internet connectivity to any Wi-Fi enabled device that supports Wi-Fi
802.11 b/g/n/ac/ax.
The 5G Wi-Fi pro also has a wired Ethernet (LAN) connection and USB connection for Windows (not
RT), and MAC operating systems:
Windows 10, 8 (not including RT) / 7 / XP / Vista
MAC OS X 10.7 and above

Page 2 of 25
GET TO KNOW YOUR DEVICE
INSERT YOUR SIM CARD
This device supports a nano SIM card ONLY (4FF).
The SIM card is pre-installed and needs to be activated. You may need this information if you need to
replace or check your SIM card.
1. Locate the SIM tray on the side of the device as shown above.
2. Push the ejector tool into the small hole to open the tray.
3. Insert your SIM card carefully in the rear of the tray.
4. Push the SIM tray back into the device.
5. Note: If you replace the SIM card with the device powered On it will restart.
TIPS
Remember to keep your plastic SIM card holder. It has a record of your SIM card details which you

Page 3 of 25
should keep handy.
The default Wi-Fi SSID and Password is shown on the device screen at Settings > Wi-Fi > Wi-Fi Name
& Password or press Device on the main screen as a shortcut to the Wi-Fi Name & Password screen.
You can also connect directly to a computer using the USB lead provided, log into the web interface
and access the Wi-Fi SSID and Password from the Wi-Fi Settings menu.
See Connect Devices via Wi-Fi (below) for more instructions.
CHARGE YOUR WI-FI HOTSPOT
Connect your charger. Your device uses a USB C charging port. Insert the lead carefully into the
charging port. Be careful not to pull sharply on the lead or trip over it when it is plugged in. Always
insert and remove with care as physical damage is not covered by your warranty.
Only use the genuine charger and USB C lead provided. Use of third party adaptors can damage your
device.
Typical charging time is 3-4 hours using the standard charger. Charging from a USB source (ie laptop)
will take longer.
During periods of high continuous activity with multiple users, high download rates or low network
signal, charging by USB will not have sufficient current to charge the device. In this situation the
battery will discharge so it is preferable to use the mains charger.
Always insert and remove the charging lead with care and take care not to trip or pull on the lead
harshly which could damage your device.
Physical damage to the charging port is not covered by warranty.
If the device is off while charging, press the power key as normal to switch on the device.
The device can be left always on and connected to the charger but after 16 hours of continuous
charging the device will switch to charge protection mode and the battery will drop to 65% capacity.
This is to protect the battery from over-charging. If you wish to charge to 100% remove and re-insert
the charging lead then stop charging the device when it reaches 100%.
During periods of high continuous activity, high download rates or low network signal it is normal for
the device to get hot.
If the internal temperature of the device exceeds 45C then the battery cannot be charged due to
safety limitations with Li-ion batteries.

Page 4 of 25
POWER UP YOUR WI-FI HOTSPOT
Press and hold the Power key for 1-2 seconds until the screen lights up.
The Wi-Fi hotspot will be available after about 30 seconds.
To switch your device Off, hold the power key then press OK to shut down.
TIPS
When running on battery during periods of inactivity it is normal for the screen to go out to preserve
battery life. Press the power key briefly to light up the screen if required.
CONNECT DEVICES BY WI-FI
Your Wi-Fi hotspot can connect up to thirty devices via Wi-Fi providing internet access for all your
devices on the go.
On the devices you wish to connect make sure Wi-Fi is switched on, then search for Wi-Fi
devices.
The Wi-Fi hotspot will show up as T5G_xxxxxx, select this to connect.
Enter the password which is shown on your hotspot screen at Settings > Wi-Fi > Wi-Fi Name &
Password
Connection example for Windows 7 computer:
1. On your task bar, next to the clock, click on the Network Interface icon
2. Click on the Wireless device called T5G_xxxxxx
3. Enter the password exactly as shown on your hotspot screen observing the correct case for all
letters
4. With Connect Automatically enabled your computer will remember the password and connect to
your Wi-Fi device when it is on and in range.
TIP
If you cannot log on via Wi-Fi, connect using the USB connection where you can check your Wi-Fi
settings, or update your password. See later for details.
QUICK REFERENCES
Browser home
page
http://m.home (or http://192.168.0.1)
Administrator login
Password
Default SSID
T5G_xxxxxx
This is shown on the device display.
Default Wi-Fi Key
10 characters which are case sensitive.
This is shown on the device display.
Restore defaults
With the device powered ON, open the rear battery cover
then locate the Reset switch next to the bar code label.
Press the Reset button until the screen switches off.
All passwords and settings will be restored to defaults and
the hotspot will reboot.
Use the default credentials from the Security Card or the
main screen to connect to your device.
CONFIGURE YOUR DEVICE
Your Wi-Fi hotspot can be further configured using the touch screen or the built in web interface. The
touch screen commands are intuitive and are also duplicated in the web interface. If you need
guidance with the functionality please consult the notes for the web interface for a full description of
the functions.

Page 5 of 25
USING THE TOUCH SCREEN
Press the power key to light up the display.
Touch and hold on the screen to unlock.
The screen shows your current data usage.
Devices indicates how many devices are connected to your modem. Press this to view the Wi-Fi
Name and Password.
Press the Settings icon to get to the Settings menu.
Press the Messages icon to get to Messages (SMS)
Press the Back Arrow or Home icon to go back or directly to the Home screen from other screens
and menus.
Main screen locked Main screen unlocked
CHARGING YOUR DEVICE
Your device supports fast charging mode when using the provided charger. During normal charge
mode, the battery icon will animate to show it is charging. Fast charging is indicated by the lightning
symbol in the battery icon.
This device can be left on charge permanently but the battery charge will be limited to 65% capacity.
This is to protect the battery from over-charging and is not a fault. If the unit is left on charge for
more than 16 hours then it will switch to protected charging mode limiting the battery to 65%
capacity.
Charging will be stopped when the device temperature is greater than 45C. This is to protect the
battery from over-temperature. When normal operating temperature is less than 45C then charging
will resume.

Page 6 of 25
DEVICE ICONS
Signal bars
Battery is fast charging
Battery temperature is above 45C and cannot charge.
Charging will resume when device cools down.
Data transfer is active
LAN port is connected
SMS Messages
Wi-Fi signal
Device is roaming. Higher data charges may apply
SIM card PIN is active. Please go to m.home to enter your
SIM PIN.
SETTINGS
Touch each icon to explore and set the device Settings:
SETTINGS > WI-FI
Switch Wi-Fi On or Off
Show the Wi-Fi Name and Password

Page 7 of 25
View Connected Devices. You can Block a device after viewing it.
Show the list of Blocked devices
Set the maximum number of Wi-Fi devices up to 15 x 2.4GHz and 15 x 5GHz connections.
2.4GHz connections are most commonly used but sometimes the Wi-Fi spectrum can be congested
which will slow down your 2.4GHz Wi-Fi speeds. If your connecting device supports 5GHz WI-FI then
this will potentially give faster speeds and better connectivity.
Set the Wi-Fi sleep timer.
SETTINGS > NETWORK
Switch International Roaming on or off (Note extra charges may apply when roaming)
Set the Network Selection mode, Automatic, 5G, 4G or 3G only.
SETTINGS > DEVICE
Set the Screen Brightness, Timeout, Sleep status display and set a security PIN on the Lock Screen

Page 8 of 25
SETTINGS > UPDATE
Check for firmware updates for your modem. Updates may be periodically released and also
automatic updates can occur for critical software updates.
SETTINGS > RESET
Reset the modem to factory conditions. All passwords will be reset, all Messages will be erased.
SETTINGS > ABOUT
View the device information, SIM card phone number (MSISDN), device IMEI number, Signal strength,
and Software version.
MESSAGES
SMS Messages will be displayed in the Messages section. Press each message to read or delete.

Page 9 of 25
HOW TO USE THE WEB INTERFACE
Connect any device to the modem and open a browser.
Enter m.home or 192.168.0.1 in the browser address bar to open the modem homepage.
The default administrator password is ‘password’
The home page shows a brief summary of the device status and your remaining data from Telstra.
Software update notifications (if applicable) will be shown on this page
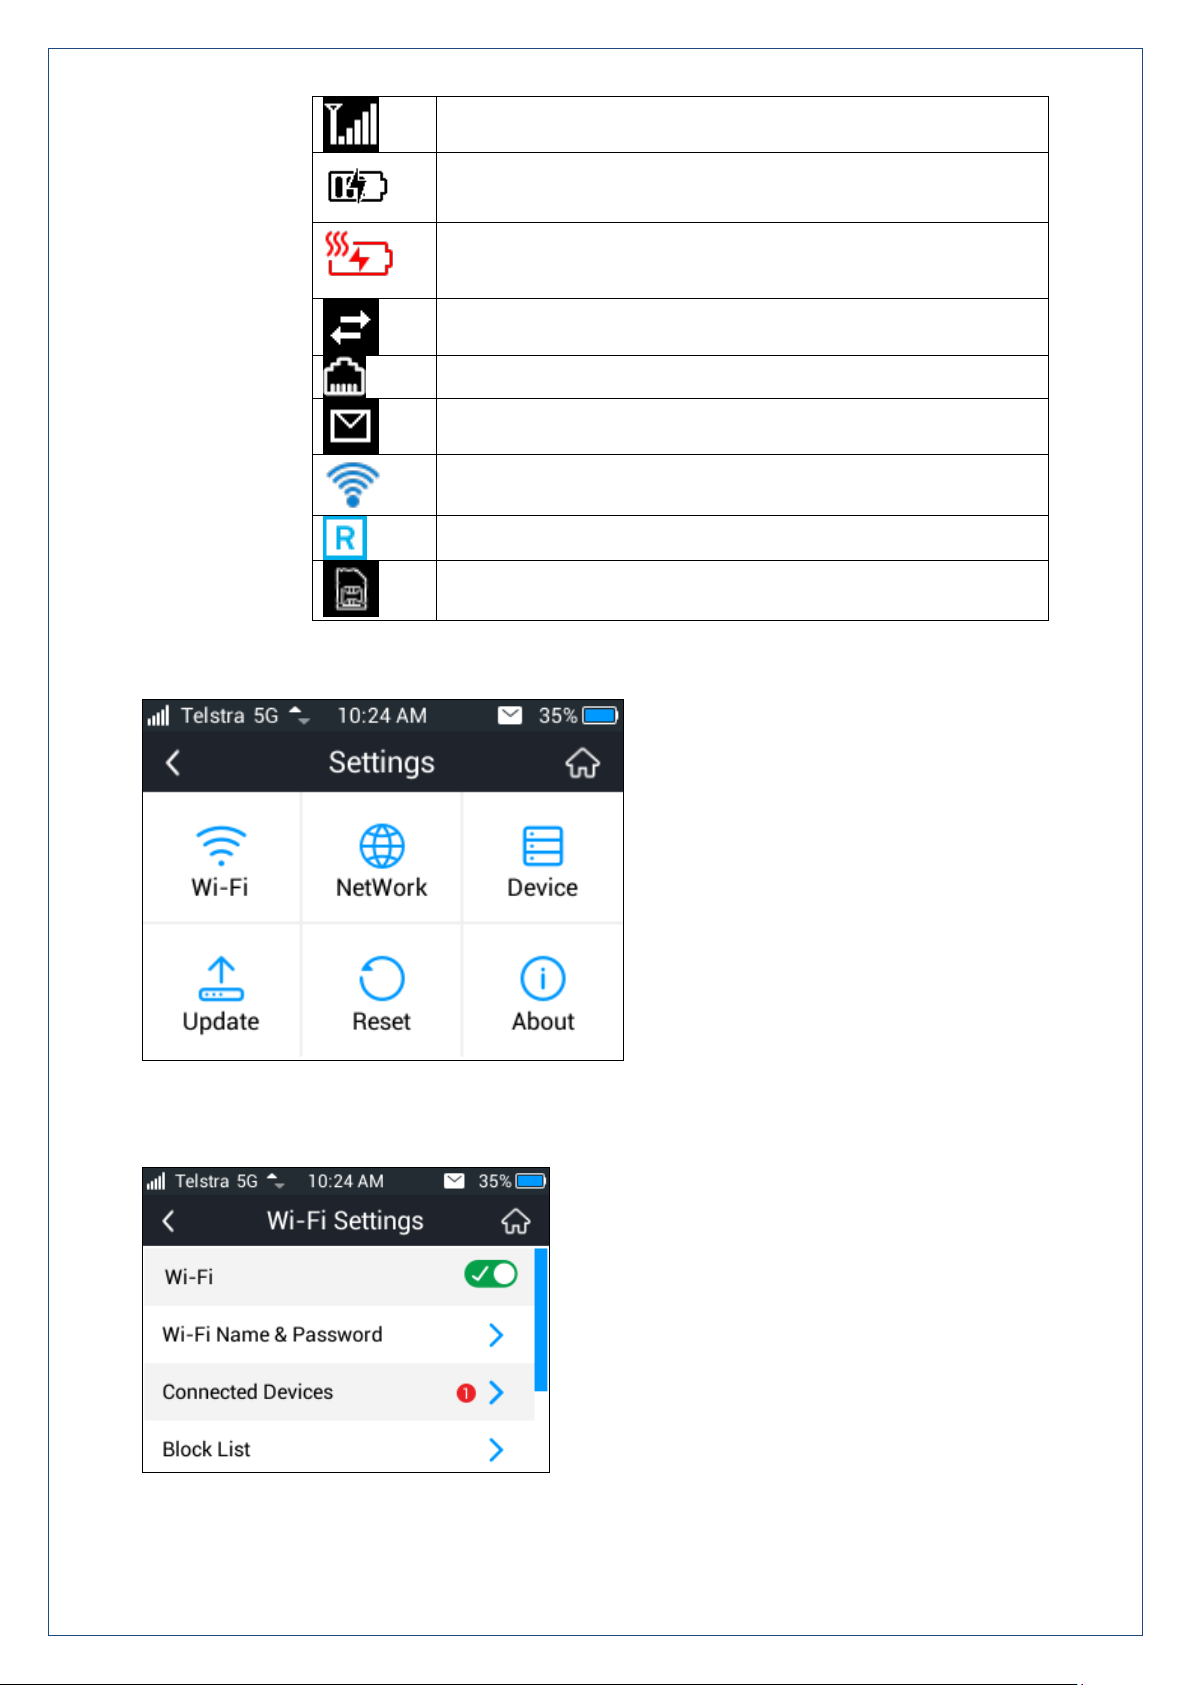
STATUS ICONS –WEB INTERFACE
NO NETWORK ACCESS
No Network Access can be any of the following conditions:
A missing, faulty or incorrectly inserted SIM. Check you have inserted your SIM card the right way and
pushed it fully home until it clicks into place.
A Non-Telstra SIM card. This device is not network locked to Telstra but using alternate carriers might
require you to set the new carrier APN. See Settings > Network Settings > APN for more details.
A PIN locked SIM card. Log into the web interface then enter the PIN code for your SIM card.
A PUK locked SIM card. You may have entered the wrong PIN code too many times. Contact Telstra to
obtain your PIN Unlocking Key (PUK) code. Log into the web interface to enter your PUK and PIN code
A PUK blocked SIM card. Contact Telstra to replace your SIM.
SIM card is not activated or you have no network coverage.
INTERNATIONAL ROAMING
The Roaming icon indicates you are connected to a foreign network.
If Roaming is enabled on your data plan then roaming data charges will apply when connected via a
roaming network.
Contact your carrier to discuss your data charges and roaming options.
PC INSTALLATION NOTES
If you connect a computer to the device using the USB connection then a virtual CDROM drive will
pop up on first installation.
Double-click Setup.exe to install the software.
The installation will create a new shortcut on your desktop and a new program listing under Start-
Programs.
If you have problems with the installation please contact your supplier or see our website,
ztemobiles.com.au for more assistance or call our hotline on 1300 789 475
(ZTE Support hotline is available during normal business hours, AEST 10am to 4pm)
If you can’t connect to the internet check your SIM card is inserted correctly, contact your service
provider and check your account is active.
To uninstall the application:

Page 10 of 25
Windows users: Start > All Programs > TELSTRA 5G WI-FI > Uninstall
MAC Users:
Double click the Telstra Modem CDROM on the desktop to install the modem.
To uninstall, go to Applications and run Uninstall TELSTRA 5G WI-FI
HOME TAB
The home tab shows you how many users are connected and shows your network connection state
and data usage summary.
The device will automatically connect to the 5G, 4G, and 3G networks. Some settings can only be
changed when the device is disconnected. Press Disconnect to terminate the network connection.
To change to manual connection press Disconnect first, then go to Settings > Network Settings > WAN
Connection Mode, and select Manual.
The number of devices connected to your Wi-Fi hotspot is displayed
You can click on Change to rename your hotspot SSID and enable or disable the SIM PIN
SETTINGS > QUICK SETTINGS
Step through the Quick Settings wizard to quickly review your current default settings.

Page 11 of 25
SETTINGS > NETWORK SETTINGS > WAN CONNECTION MODE:
The default connection setting will automatically connect to the network. The setting is greyed out if
you are connected.
Press the Disconnect button to change this setting and to enable International Roaming if required.
If you make any changes, press Apply to save the change
Press the Help icon to get in context tips.
SETTINGS > NETWORK SETTINGS > NETWORK SELECTION:
Network Selection is set to Automatic by default.
Press the Disconnect button to change this setting if required.
If you make any changes, press Apply to save the change
Press the Help icon to get in context tips.
There is no need to change these settings unless you change service provider or are instructed by
your carrier.
If you use a SIM card from another provider you may not be able to connect to their network.
Consult Telstra to obtain the unlock code for your device.

Page 12 of 25
SETTINGS > NETWORK SETTINGS > APN:
Press Disconnect to disconnect from the Network
Press Add New to create a new APN
Add the Profile Name, eg Telstra WAP
Enter the correct APN details eg telstra.wap
Press Save to save your new APN
Press the Profile drop down box
Select the new APN profile name
Click on ‘Set as default’ to set the new APN as your preferred setting
Press the Help icon to get in context tips.
There is no need to change these settings unless you change service provider or are instructed by
your carrier.
The modem is not locked to Telstra but If you use a SIM card from another provider you may not be
able to connect to the network.
Consult your new carrier to obtain alternate APN details for your device.

Page 13 of 25
SETTINGS > WI-FI SETTINGS > BASIC SETTINGS:
The Wi-Fi Name (SSID) is the Wi-Fi network name for your device
You can change the SSID to something more memorable or personal if preferred
You can hide the SSID broadcast so unknown users will not be able to see your network
You can change the security settings and password to suit your own preferences
You can set the number of available connections between 1 and 15
Press Apply to save your changes
Press the Help icon to get in context tips
The Wireless Network Name ( SSID) and Wireless Security key information can also be accessed using
the touch screen.

Page 14 of 25
SETTINGS > WI-FI SETTINGS > ADVANCED SETTINGS
You can change the Wi-Fi settings to suit your personal choices or for specific requirements of your
attached devices.
Press Apply to save your changes
Press the Help icon to get in context tips
SETTINGS > WI-FI SETTINGS > WPS
WPS uses the push button on the front panel to connect seamlessly to supported devices.
Press WPS to enable, compatible devices can connect to your Wi-Fi network without authorisation, or
you can set a PIN if required.
WPS is enabled for 2 minutes once pressed and the device LED’s will flash to indicate WPS mode.
If you have enabled PIN mode then you need to enter the same PIN on devices you wish to connect.
Press the Help icon to get in context tips

Page 15 of 25
SETTINGS > DEVICE SETTINGS > ACCOUNT MANAGEMENT
Use the Account Management settings to change the administrator password if required.
The default password is password. If you have changed and forgotten the password then you need to
restore the device to factory defaults:
1. With the device switched remove the battery cover and locate the reset button next to the bar
code sticker.
2. Press the “Reset” button until the screen starts to shut down
3. The device will re-start with factory default settings.
Press the Help icon to get in context tips
SETTINGS > DEVICE SETTINGS > USIM PIN MANAGEMENT:
Enter your current PIN code to change or disable the PIN
If you make any changes, press Apply to save the change
If you enter the incorrect PIN code three times in succession you will lock your SIM card.
Contact your service provider to obtain your PUK code
Press the Help icon to get in context tips

Page 16 of 25
SETTINGS > DEVICE SETTINGS > RESET
Press Reset to reset your device to factory defaults.
SETTINGS > DEVICE SETTINGS > RESTART
Press Restart to restart your device.
SETTINGS > DEVICE SETTINGS > POWER SAVE
If there is no Wi-Fi traffic detected then the device will switch off Wi-Fi as determined by the Wi-Fi
sleep setting.
Set Wi-Fi sleep time to Never Sleep to keep the Wi-Fi always on.
Press the Help icon to get in context tips
SETTINGS > DEVICE SETTINGS > SOFTWARE UPDATE
With Check for New Version enabled you are notified in the web user interface if there is an update
available.
You need to be in the Connected state to download new versions.
Press the Update Now button to see if there are software updates for your device.
Updates are disabled by default when roaming to minimize unwanted data charges. Check the
Roaming box to enable updates when roaming.
Press the Help icon to get in context tips

Page 17 of 25
Example software update notification:
SETTINGS > FIREWALL > PORT FILTERING
Select Enable to turn on the Port Filtering settings
You can apply filters based on MAC Address, Source IP Address, Destination IP Address and select the
action to drop or accept the packets.
Firewall settings are for advanced users and network administrators.
Press the Help icon to get in context tips

Page 18 of 25
SETTINGS > FIREWALL > PORT FORWARDING
Select Enable to turn on the port forwarding settings.
Port forwarding can be used to allow a specific external server or computer access to devices located
on your LAN side or to translate a specific incoming port into a different destination port.
The destination port and address is on your local LAN side.
Typical applications will be for on-line gaming requiring specific control and communications channels
between the remote server and the local machine.
Firewall settings are for advanced users and network administrators.
Press the Help icon to get in context tips
SETTINGS > FIREWALL > UPNP SETTINGS
Universal Plug and Play is a set of networking protocols that permits networked devices, such as
personal computers, printers, Internet gateways, Wi-Fi access points and mobile devices to
seamlessly discover each other's presence on the network and establish functional network services
for data sharing, communications, and entertainment.
UPnP is enabled by default on the LAN side (local) but if you require extra security you should disable
this setting.
UPnP is not enabled on the WAN (Network) side.
Firewall settings are for advanced users and network administrators.
Press the Help icon to get in context tips.

Page 19 of 25
SETTINGS > FIREWALL > DMZ
Enable the DMZ Setting to open up all ports from the WAN side (mobile network) to the LAN side for
this particular allocated IP address.
It is advisable to set a Static IP address for this device outside of the DHCP range eg 192.168.0.20
Press the Help icon to get in context tips.
SETTINGS > FIREWALL > SYSTEM SECURITY
Enable or Disable Remote Management (via WAN) and PING
Firewall settings are for advanced users and network administrators.
SETTINGS > ROUTER SETTINGS
Control the IP Range for your network and enable or disable DHCP is required.
IP Passthrough feature:
This is an expert level feature and should not be used unless you understand the implementation and
requirements for using this feature. Enabling IP Passthrough will alter the MU500 functionality to
behave as a bridge mode device. Enabling this feature will limit you to having only a single device
connection and it will be without the protection of the MU500. Use of this feature should only be
done using either Ethernet (preferred) or USB connection and not Wi-Fi. Wi-Fi should be disabled as
it is unlikely that you would use this feature in a Wi-Fi scenario.
NAT Off feature:
This is an expert level feature and should not be used unless you are directed by Telstra Business. This
feature is only used with Corporate / Enterprise networking and requires dedicated SIM cards and

Page 20 of 25
subscription services from Telstra. The configuration required for this feature includes many items
being configured on the MU500, your systems connected to the MU500 and the Telstra Business SIM
used in the MU500 before it will work. Telstra Business can explain the process and configuration
settings which are used for enterprise business connections via your MU500 back to your office
network.
Press the Help icon to get in context tips
SETTINGS > INTERNET WI-FI
Enable the Wi-Fi router to connect to another Hotspot to share that internet connection.
Internet Wi-Fi or the WAN side on your hotspot refers to the radio network connection.
When the Internet Wi-Fi Switch option is enabled, it is not possible to disconnect the RF WAN side.
The Disconnect button is greyed out. This is because the Wi-Fi Switch function over-rides the manual
disconnect feature. When you fully connect to another local Wi-Fi hotspot then the WAN side data
(RF connection to the network) is disabled.
When you connect to another Wi-Fi hotspot your local WAN is disconnected and your Wi-Fi hotspot
will receive its internet connection from the other hotspot and share this with all your connected
devices.
This could be useful at home where your wireless hotspot can connect to your home Wi-Fi when in
range, and it can be used to extend your home Wi-Fi range by locating the portable hotspot in
another location. The devices connected to your portable hotspot will get their internet connection
from the other connected Wi-Fi hotspot, eg your home network.
Table of contents
Other Huawei Wireless Router manuals

Huawei
Huawei E5186 User manual

Huawei
Huawei N5368X User manual

Huawei
Huawei ATOM GPS NE08E User manual

Huawei
Huawei B535-333 User manual

Huawei
Huawei B525 User manual

Huawei
Huawei ORANGE 4G CPE User manual

Huawei
Huawei B525 LTE CPE User manual

Huawei
Huawei B618 User manual

Huawei
Huawei Brovi E5576-325 User manual

Huawei
Huawei NE40E-X1 Guide

Huawei
Huawei E5573Cs User manual

Huawei
Huawei Wireless Router User manual

Huawei
Huawei E5730s-2 User manual

Huawei
Huawei L01s User manual

Huawei
Huawei E589 User manual

Huawei
Huawei E5885 User manual

Huawei
Huawei E5776s-32 User manual

Huawei
Huawei WS5800 User manual

Huawei
Huawei E5221 Technical specifications

Huawei
Huawei B535-232 User manual