4. Open Hubbell RGBW Connect App.
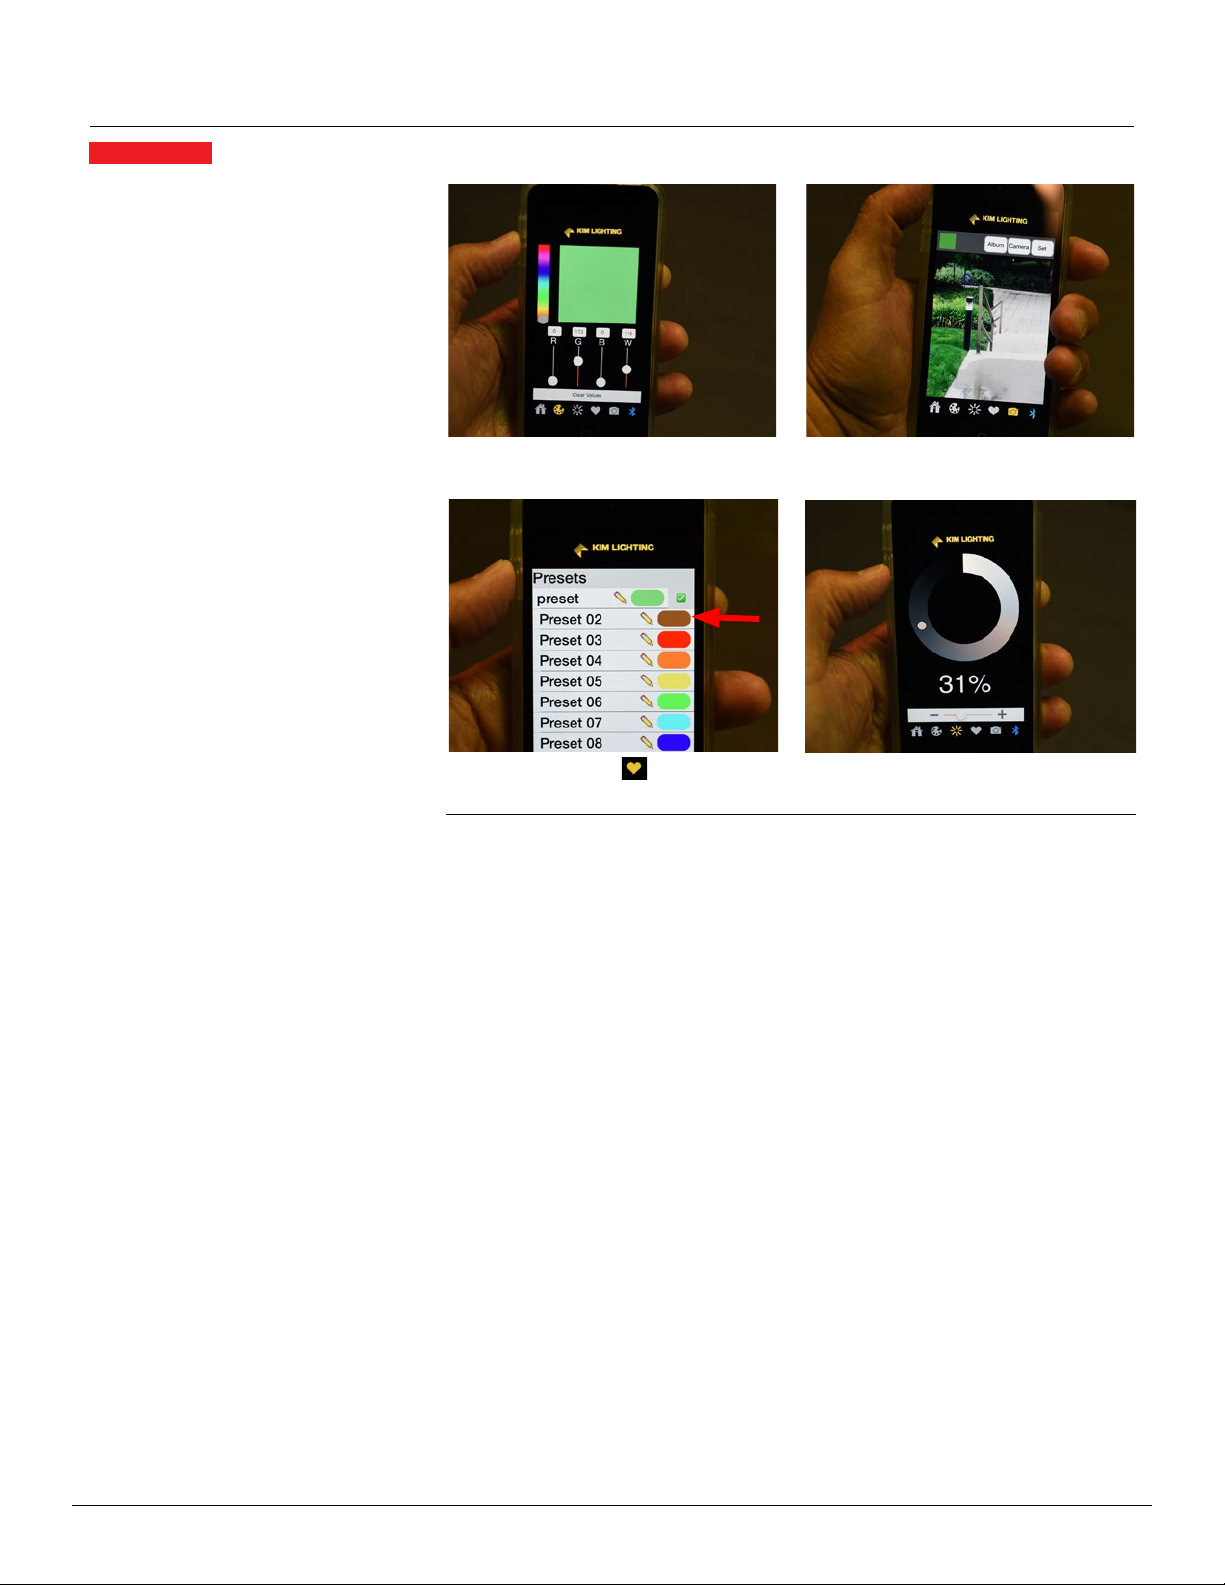
Kim Floodlight Software Instructions (For RGBW only)
2. Turn on Bluetooth.
5. Click the connect icon.
10. Swipe paired device left, tap satellite.
12. Tap pencil to rename group.
6. Select Device.
8. Change PIN and save.
APPLE iOS (Hubbell RGBW Connect App) - (Refer to device compatibility chart to insure that your device is compatible).
KFL RGBW luminaire can be controlled wirelessly via Bluetooth®using the Hubbell RGBW Connect App. The App requires an
Apple device supporting Bluetooth low energy (BLE). This includes iPhone 4S and above, iPad 3 and above and iPad mini.
To Set Up And Enable Wireless
Controlled Optics:
1. For Apple iOS devices, go to the Apple
App Store, search for Hubbell Lighting,
and download the Hubbell RGBW
Connect App.
2. Check your device “Settings” and make
sure your Bluetooth is turned on.
3. Plug-in/turn on power supply to your KFL
RGBW luminaire(s).
4. Open Hubbell RGBW Connect App
5. Tap on the Bluetooth symbol in the
bottom right hand corner of the screen
on the navigation bar.
6. Under “Available Devices” select/tap on
the device that you wish to pair up with.
The luminaire in your closest proximity
will be the highest on the list. Enter the
password: KIMLTG (all caps).
(Note: the maximum pairing range is 10
to 15 feet (3 m to 4.5 m) from luminaire.)
7. The fixture will pulse twice to confirm
your connection.
8. To change the default security PIN, swipe
to the left on the paired device and tap
on the lock/key symbol. A box will pop
up, allowing you to change/save a new
password.
(Note: If you change the password, it
is imperative that you write it down
for easy recall and keep it in a secure
place. Resetting the password will
require the fixture to be sent back to
the factory.)
Grouping Fixtures:
9. To create a group, first execute steps 6
and 7 above to pair up with as many
“Available Devices” as you would like.
Then, tap the (+) symbol to the right of
where is says “Groups” on the screen.
You will now see that there is a “Group
0” under the “Groups” section.
10. Next, swipe to the left over the first
paired device that you would like to
place into “Group 0”. There is an icon
that looks like a satellite. Tap on the
satellite and a dialogue box will pop up
asking which group you would like to
place the paired device in (Group 0 will
be your only option but as you create
new “Groups” they will all be listed
here). Tap on “Group 0” and that fixture
is now in that group.
11. Repeat step 10 to place each device that
you are paired up with into the group.
Note, the total number of devices in a
group are indicated next to the pencil
symbol to the right of the group name.
The first number indicated how many
fixtures in the group you are paired with
and the second number is the total
number of fixtures in a group. For
example, 10/12 would indicate that you
have 12 fixures in the group but you are
only paired to/in range with 10 fixtures.
12. To rename a group, simply tap the
“pencil” symbol to the right of the
group you would like to rename, delete
the default group name (i.e. Group 1,
Group 2, etc.), and type in the new
name.
13. To delete groups, swipe to the left over a
group and tap the “X” in the green box.
14. To add additional groups, tap the blue
“+” symbol to the right of the
“Groups” header and a new blank/
empty group will be added to the list.
Once you tap on a Group to “pair up”
with it, it will move from under the
“Groups” heading to under the the
“Paired Devices” heading indicating that
you are pairing up to all the fixtures
within the group that are within range.
14. Tap blue “+” symbol pencil to
add additional groups.
© 2019 KIM LIGHTING • 17760 Rowland Street • City of Industry, CA 91748 • 626-968-5666 Page 7