HuddleCamHD HC12X-HUDDLEVIEW User manual

Rev 1.2 –6/20
HuddleCamHD
HuddleView
Auto Framing Camera
Installation & Operation Manual

Rev 1.2 –6/20
i
Table of Contents .
Precaution……………………………………………………………………………………………………………………………………………
Page ii
Safety Tips………………………………………………………………………………………………………………………………………
Page ii
What’s in the Box………………………………………………………………………………………………………………………………..
Page ii
Supplied Hardware…………………………………………………………………………………………………………………………
Page ii
Physical Descriptions.…………………..………………………………………………….………..……………..………………………..
Page 1
Front View of Camera……………..……………..……………..……………..……………..…………………………………………
Page 1
Back View of Camera……………..………………....……………..……………..……………..……………………………………..
Page 2
Basic Connection Instructions.…………………..………………………………………………….………..………………………….
Page 3
Network Connections……………..……………..……………..……………..……………..……………..……………..….………
Page 3
SDI Connections……………..……………..……………..……………..……………..……………..………………..………………..
Page 3
USB Connection……………..……………..……………..……………..……………..……………..………………...……………….
Page 3
DVI Connection.…………………..………………………………………………….………..……………..………..…………………..
Page 3
Setting up the Camera…………………………………………………………………………………………………………................
Page 4
Connect Camera……………………………………………………………………………………………………………………………..
Page 4
Configure Tracking………………………………………………………………………………………………………………………….
Page 5
Interface Descriptions.…………………..………………………………………………….………..……………..……………………….
Page 8
Tracking Software.…………………..………………………………………………….………..……………..………………………..
Page 8
Device Management Interface……………..……………..……………..……………..……………..………………………
Page 8
Video Configuration Interface……………………………………………………………………………………………………
Page 9
Remote Playback……………………………………………………………………………………………………………………….
Page 10
Connect Camera……………..……………..……………..……………..………………………..………..……………………….
Page 11
Network Configuration……………..………………..……………..……………..……………..……………………………….
Page 12
Remote Configuration……………..……………..………………………..………………..…………………………………….
Page 12
Remove Camera……………..……………..……………..……………..………………………..………..……………………….
Page 17
Configure Video Settings……………..……………..……………..……………..………………………..…………………….
Page 18
Configure Tracking Settings……………………………………………………………………………………………………………
Page 19
Basic 1……………………………………………………………………………………………………………………………………….
Page 19
Basic 2……………………………………………………………………………………………………………………………………….
Page 20
Senior 1……………………………………………………………………………………………………………………………………..
Page 21
Senior 2……………………………………………………………………………………………………………………………………..
Page 21
Photobooth Functionality……………………………………………………………………………………………………………………
Page 22
Recording Video……………………………………………………………………………………………………………………………..
Page 22
Taking Photos…………………………………………………………………………………………………………………………………
Page 23
On Screen Display (OSD)……………………………………………………………………………………………………………………..
Page 25
Video……………..……………..………..……………..……………..……………..……………..…………..……………………………
Page 25
Exposure……………..……..……………..……………..………….……..……………..……………..…….……………………………
Page 25
Color……………..……..…………….…..……………..……………..……………..……………………………………………………….
Page 26
Pan Tilt Zoom…………………………………………………………………………………………………………………………………
Page 26
Systems……………..…………..…………..……………..……………..……………..……………..…………………………………….
Page 26
Using the IR Remote.…………………..………………………………………………….………..……………..…………………………
Page 23
IR Remote Shortcuts……………………………………………………………………………………………………………………….
Page 28
VISCA Commands.…………………..………………………………………………….………..……………..………..……………………
Page 29
ACK / Completion……………..……………..……………..……………..……………..……………..………..……………………..
Page 29
Error Messages……………..……………..……………..……………..……………..……………..……………..…………………….
Page 29
Commands……………..……………..……………..……………..……………..……………..……………………..…………………..
Page 30
Inquiry Commands……………..……………..……………..……………..……………..……………..…..…………………………
Page 33
Tips & Tricks……………..………..…..……………..……………..……………..……………..…………………………...………………..
Page 35
Care of the Unit……………..……………..…………....……………..……………..……………..……………………..…………………
Page 35
Troubleshooting……………..……………..……………..……………..……………..……………..…………………..………………….
Page 36
Notes……………………………………………………………………………………………………………..……………………………………
Page 37

Rev 1.2 –6/20
ii
Precautions .
Safety Tips .
•Please read this manual carefully before using the camera.
•Avoid damage from stress, violent vibration or liquid intrusion during
transportation, storage, or installation.
•Take care of the camera during installation to prevent damage to the camera
case, ports, lens, or PTZ mechanism.
•Do not apply excessive voltage, use only the specified voltage. Otherwise, you
may experience an electrical shock.
•Keep the camera away from strong electromagnetic sources.
•Do not aim the camera at bright light sources (e.g. bright lights, the sun, etc.) for
extended periods of time.
•Do not clean the camera with any active chemicals or corrosive detergents.
•Do not disassemble the camera or any of the camera's components. If problems
arise, please contact your authorized dealer.
•After long term operation, moving components can wear down. Contact your
authorized dealer for repair.
What’s in the Box .
Supplied Hardware .
•12X HuddleView Camera
•Power Supply
•3m / 9.8’ USB 3.0 A-B Cable
•User Manual
•IR Remote
•RS-232 control cable
•Software Installation Disk

Rev 1.2 –6/20
1
Physical Descriptions .
Front View of Camera .
1. Tracking Camera Head
2. Tracking Camera Lens
12X Optical Zoom
Field of View: 6.3°(Tele) ~ 72.5° (Wide)
3. Reference Camera Body
4. Reference Camera Lens
Fixed 2.4mm Lens
Field of View: 86° (Horizontal) / 52° (Vertical)
1
2
3
4

Rev 1.2 –6/20
2
Back of the Camera .
1. Audio Line in
a. Embeds over RTSP/RTMP Stream
2. Micro SD Card Slot
a. Allows for Photobooth Functionality
3. Network Connection
a. Allows for connection to LAN, software connection, & RTSP/RTMP Streaming
4. DVI-D Connection
5. 3G-SDI Connection
6. VISCA Connection
a. Allows for joystick control of camera
7. USB 3.0 Connection
a. Note: IP Stream, DVI-D, 3G-SDI, & USB 3.0 connections are all simultaneous
8. DC12V Power Connection
1
3
4
5
6
7
8
2

Rev 1.2 –6/20
3
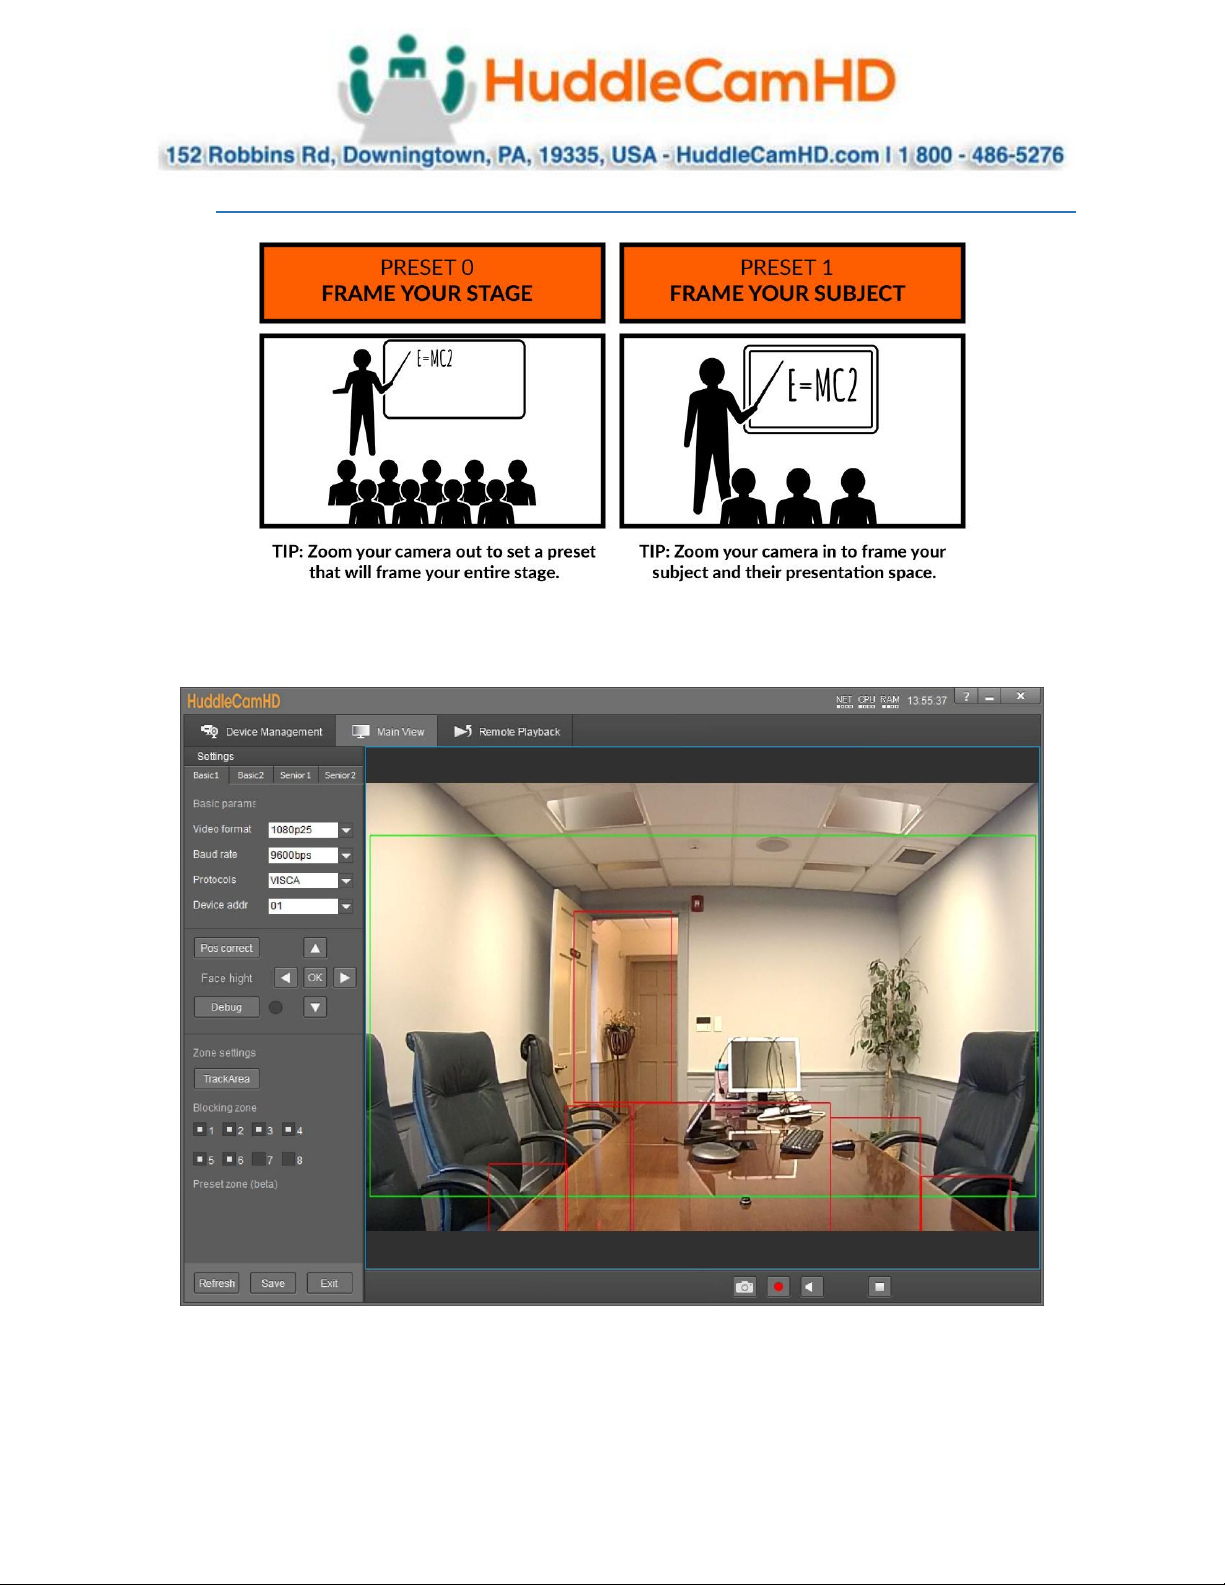
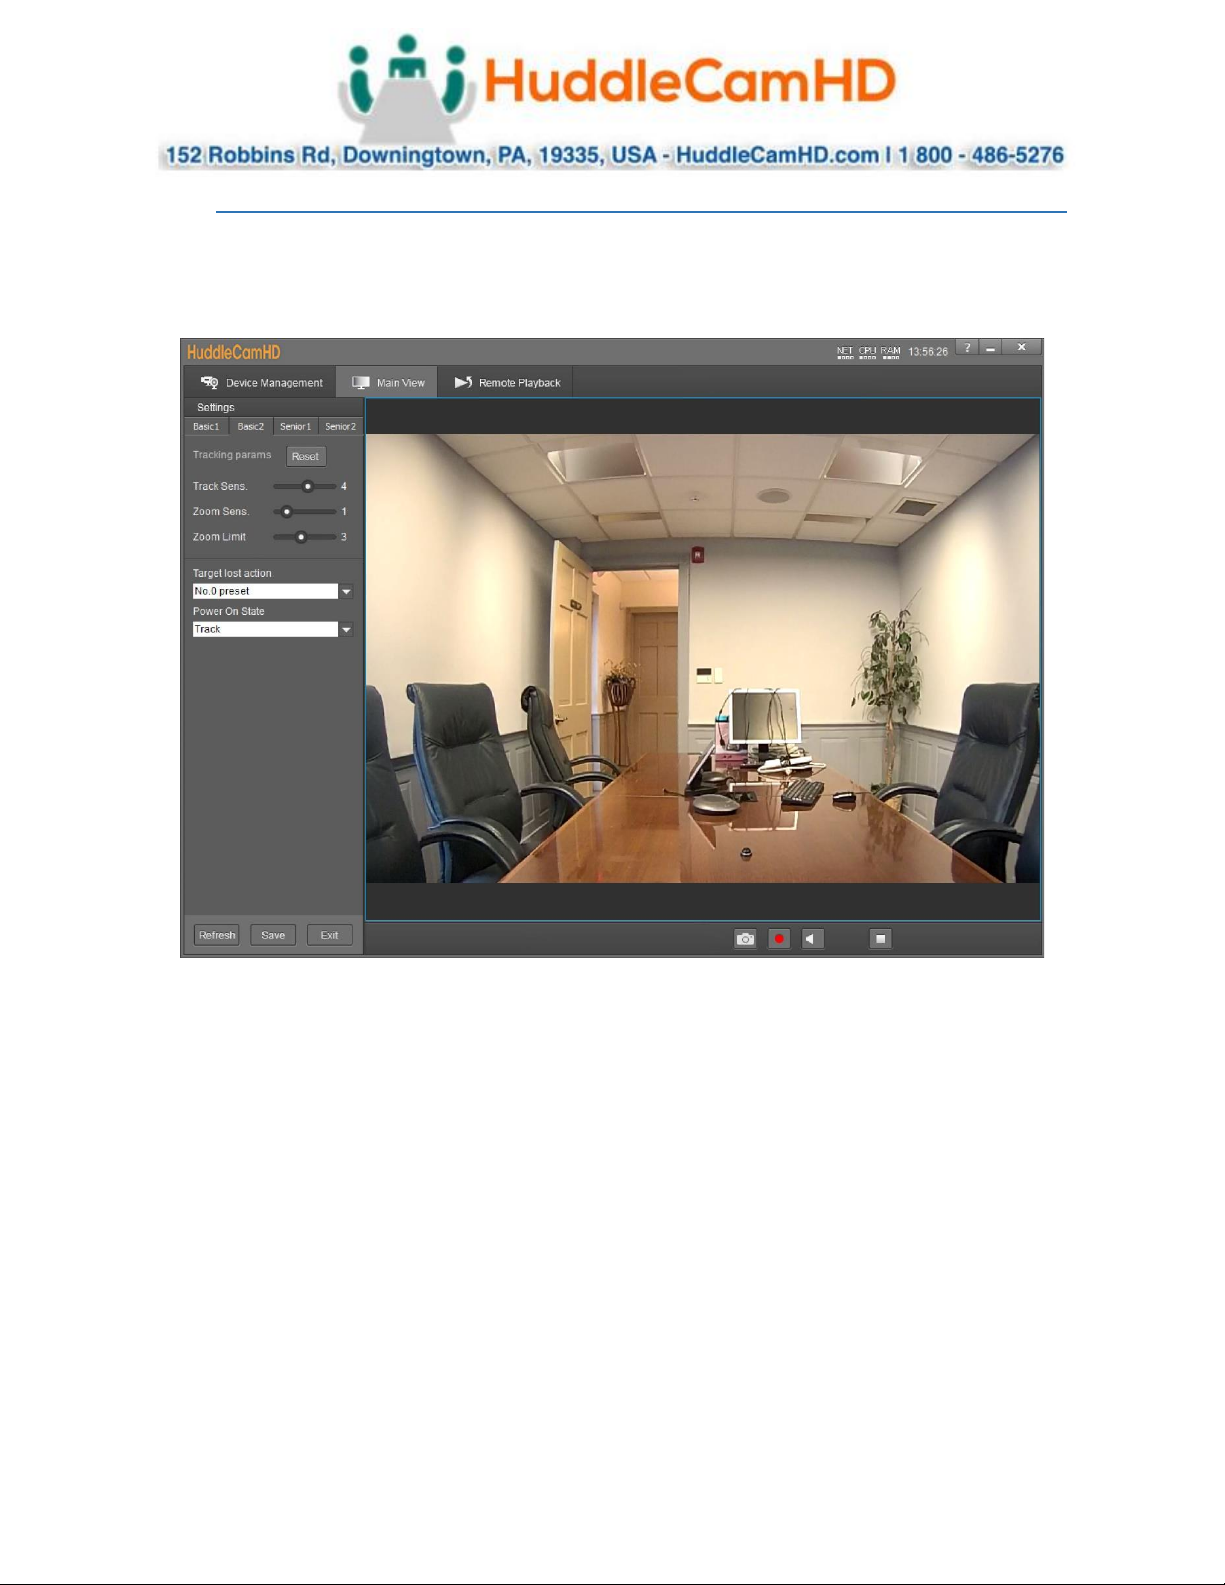
Basic Connection Instructions .
Network Connection ___ .
1. Connect a live network connection, from a network with a DHCP server, to the camera.
2. Connect the included Power Supply to the camera.
3. Wait for camera to come to Home Position.
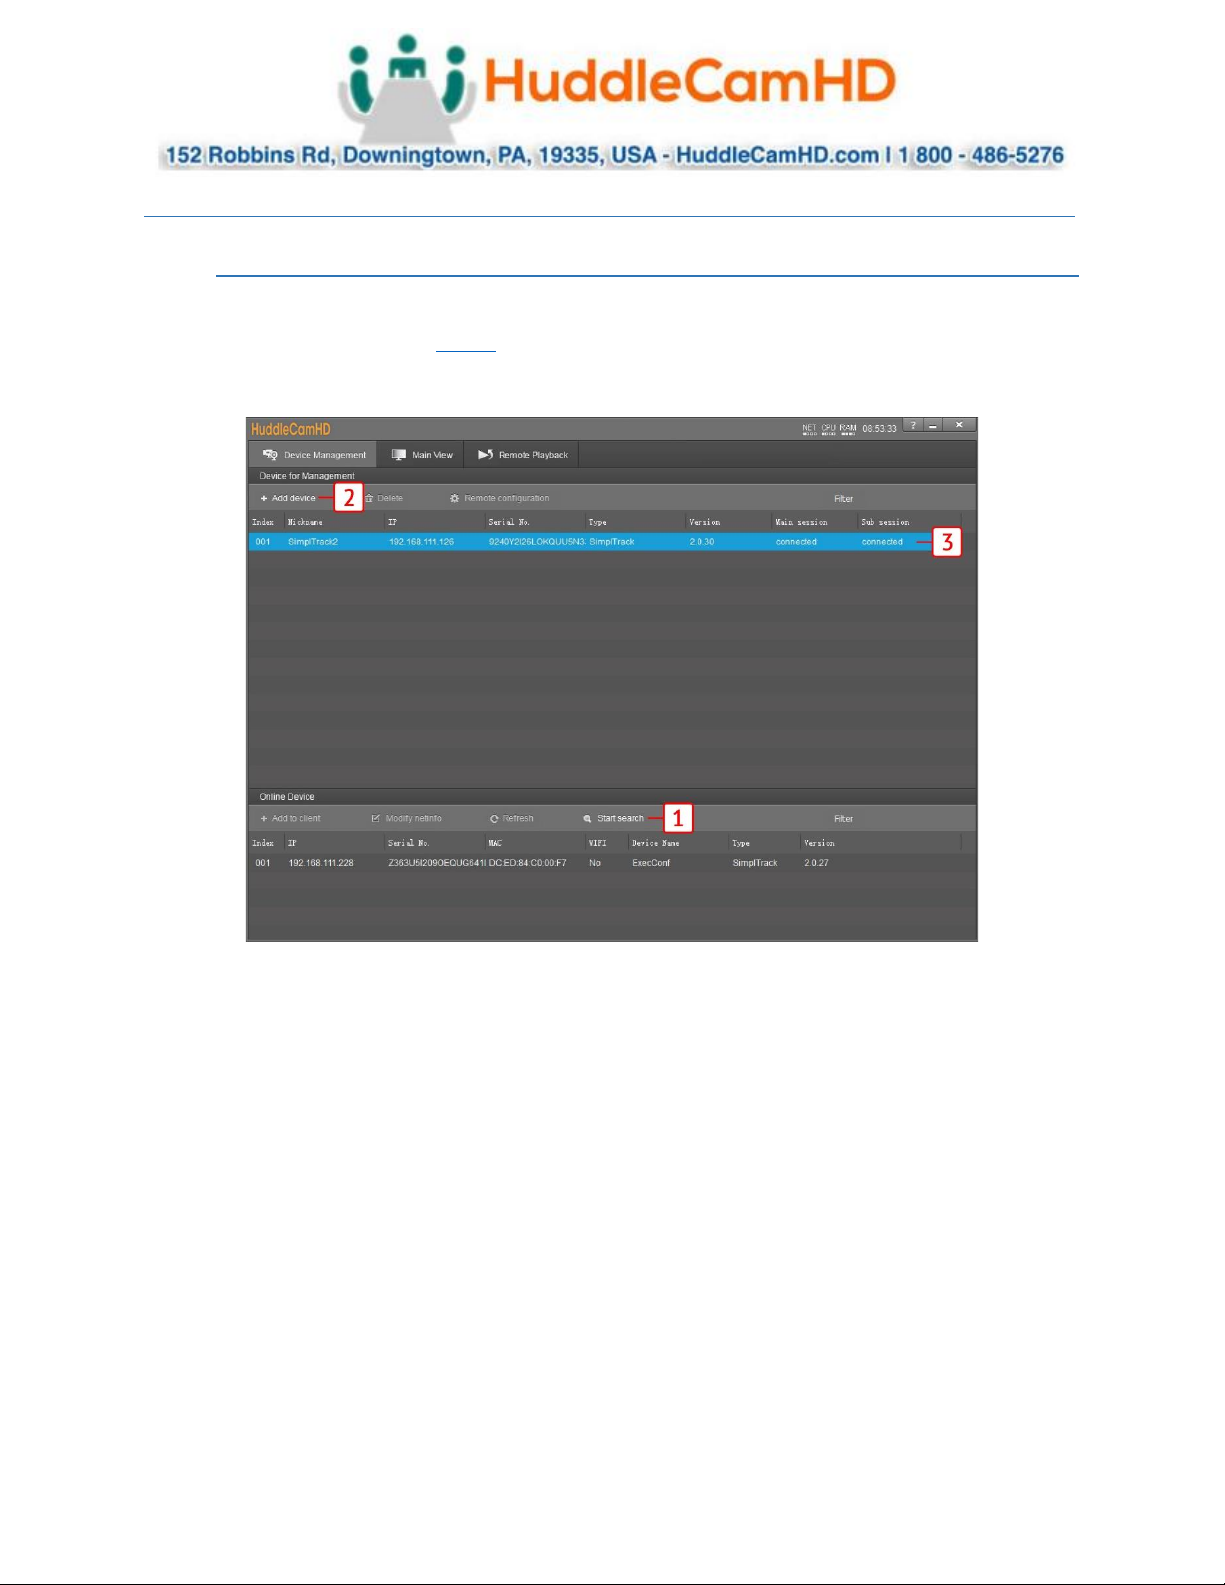
4. Install the HuddleView software on your Windows PC on the same network as the camera
5. Open the HuddleView software to connect to your camera
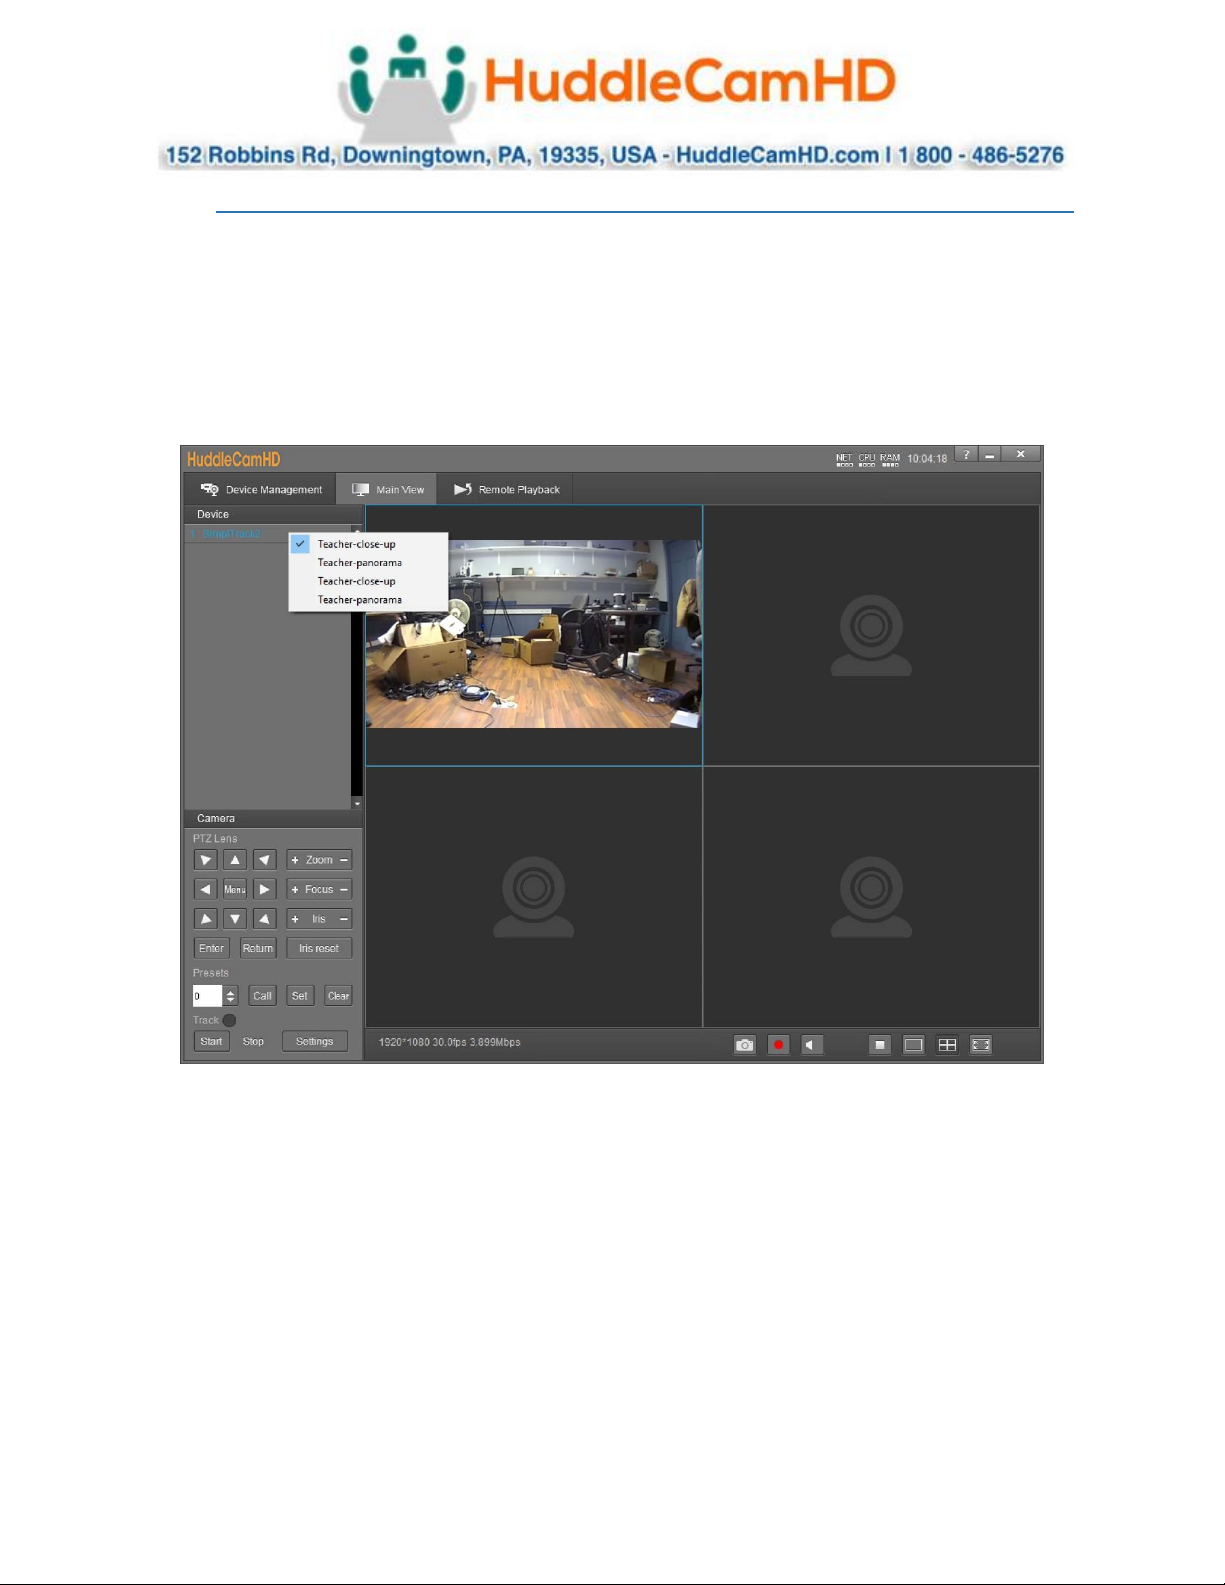
Note: To pull the main RTSP stream please use the following URL
rtsp://<camera ip>:<rtsp port>/main.h264
(example: rtsp://192.168.111.85:3750/main.h264)
Note: To pull the sub RTSP stream please use the following URL
rtsp://<camera ip>:<rtsp port>/sub.h264
(example: rtsp://192.168.111.85:3750/sub.h264)
Note: To pull the low quality 3rd or 4th RTSP stream please use the following URL
rtsp://<camera ip>:<rtsp port>/<3or 4>.h264
(example: rtsp://192.168.111.85:3750/<3 or 4>.h264)
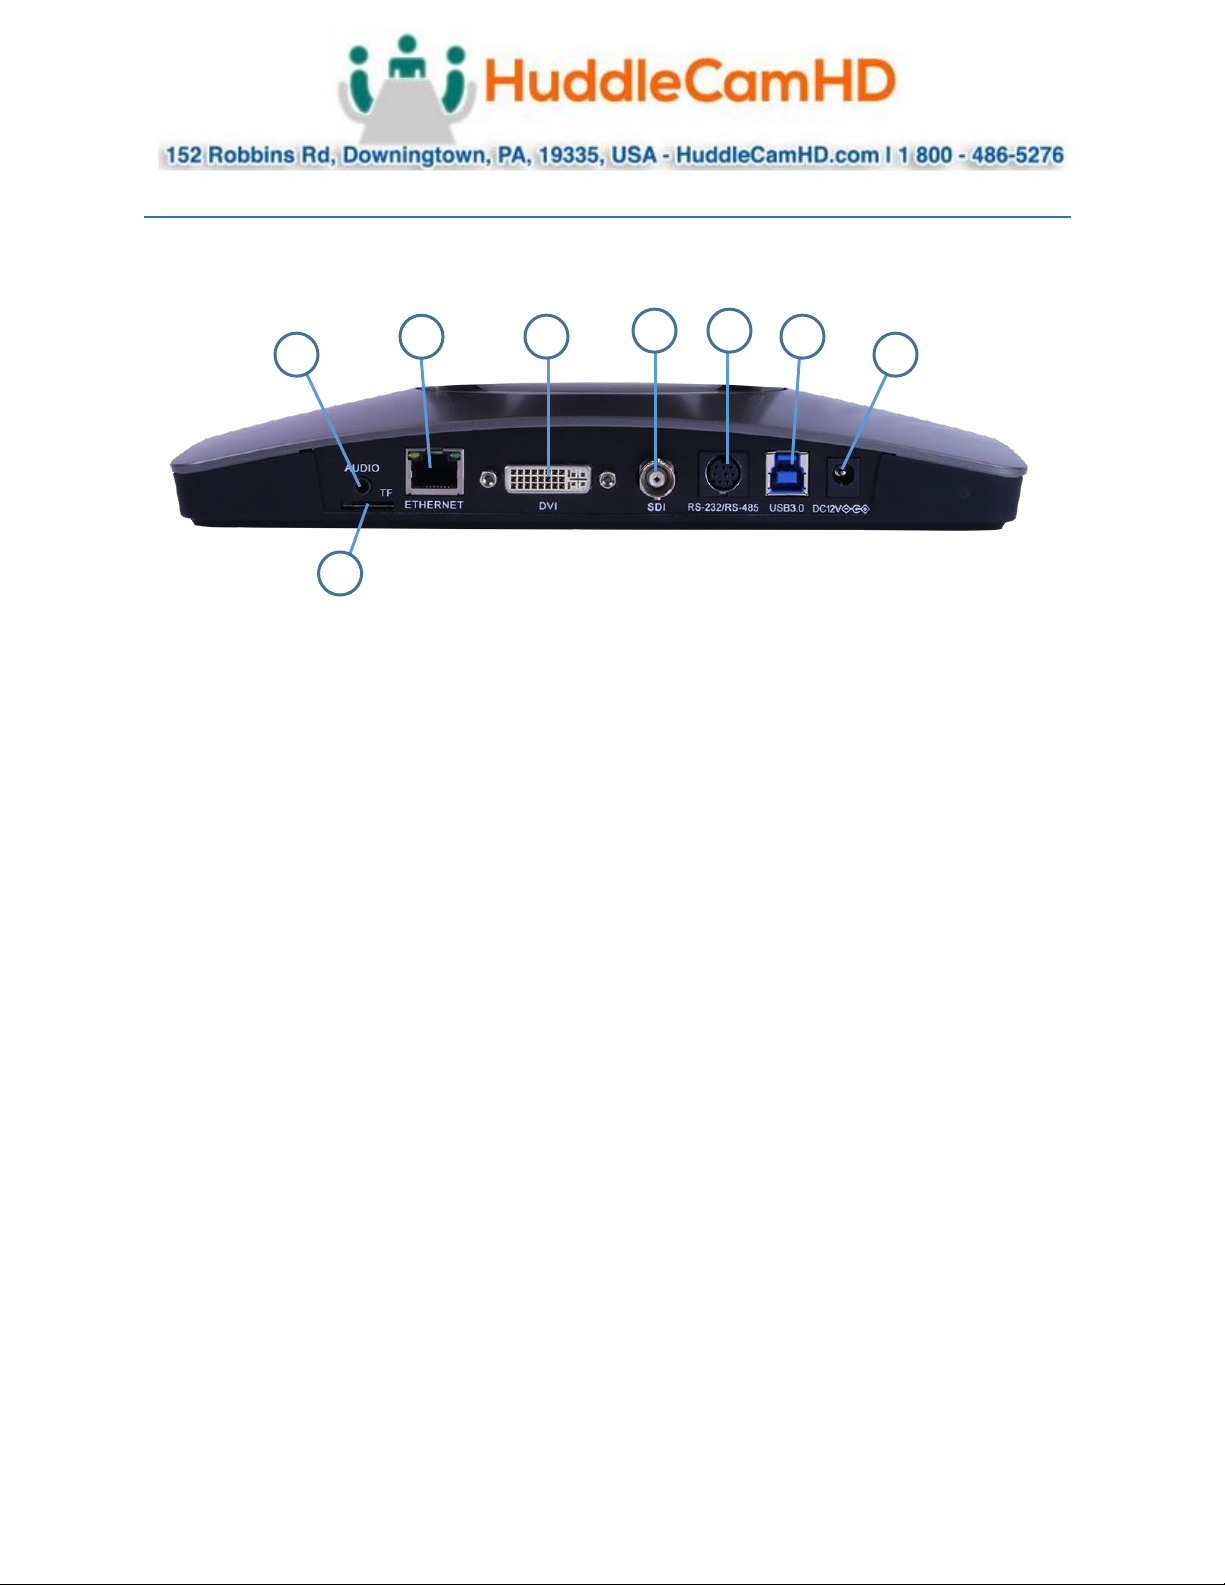
SDI Connection .
1. Connect an SDI cable to the SDI output on the camera.
2. Connect the SDI cable to your equipment with an available SDI input.
USB Connection .
1. Connect a USB 3.0 cable to the USB output on the camera.
2. Connect the USB 3.0 output to an available USB 3.0 port on your PC
a. Camera will auto adjust frame rate & resolution upon connecting to a video
software
DVI Connection .
1. Connect a DVI cable to the DVI output of the camera.
a. You can also connect a DVI to HDMI converter to the DVI output and run HDMI from
the camera.
2. Connect the DVI cable to your equipment with an available DVI input.
NOTE: The camera will auto power cycle upon connection to video software. It will auto scale the best
reolution.
Failure to follow these sequences may result in no connection.

Rev 1.2 –6/20
4
Setting up the Camera _ __
Connect Camera _____
Begin by physically connecting the camera to power, a Local Area Network (LAN), and USB, SDI, or DVI if
you plan on utilizing them. View page 6 for more information.
Now that your camera is connected to a LAN, open the tracking software to connect to your camera.
1. Click “Start Search” in the bottom section of the software to search for cameras on the same
subnet mask as your PC.
a. Note: The camera utilizes DHCP by default, if your PC is also utilizing DHCP this search
should find your camera.
2. Alternatively, you can use “+ Add Device” at the top to manually add a camera to the software
using the cameras IP address & Port (Default: 5000), or import using a *.csv
a. Note: Although not needed by default, the login credentials are Username: “admin”,
Password: “admin”
3. Now that your camera is connected, click “Main View” at the top of the software to begin
setting up the tracking parameters.

Rev 1.2 –6/20
5
Configure Tracking _____
Now that you have a camera connected, you can select an empty cell and right-click the camera to
select a video feed for that cell, as shown below.
•Teacher-close-up: Main RTSP feed (PTZ camera)
•Teacher-panorama: Sub RTSP feed (Reference camera)
•Teacher-close-up: RTSP stream 3 feed (PTZ camera)
•Teacher-panorama: RTSP stream 4 feed (PTZ camera)
1. The first thing you’ll want to do is set preset 0 & preset 1. Use the guide below to properly set
the preset positions.

Rev 1.2 –6/20
6
Configure Tracking (Continued) _ _____
2. From here, open “Settings” from the bottom left of the tracking software. This will open the
Basic 1 menu.
3. Set the tracking zone and blocking zones for your environment.
a. Note: As shown above, the tracking zone encompasses anywhere that may include a
face. The blocking zones are set anywhere that could be tracked that shouldn’t be, such
as individuals walking by the doorway, or faces reflected in the table.

Rev 1.2 –6/20
7
Configure Tracking (Continued) __ _ _____
4. Click “Save” to save the Tracking & Blocking zones.
5. Click “Basic 2” along the top left of the software to open the secondary page of tracking
parameters.
6. In Basic 2, you can adjust the Tracking Sensitivity, Zoom Sensitivity, & Zoom Limit as required by
your room. Click the “Target Lost Action” dropdown and select “No. 0 preset” to ensure the
camera is tracking properly. Set the Power On State to whatever works best for your
environment.
7. Click “Save” to save the adjusted settings.
8. When you’re finished adjusting the tracking parameters, click “Exit” to return to “Main View”.

Rev 1.2 –6/20
8
Interface Descriptions .
Tracking Software .
Device Management Interface .
1
Device Management interface
7
*Selected* device within Device
Management
2
Video configuration interface
8
Add selected camera from Online Device
section
3
View & download video and/or photos.
*Micro SD card required
9
Modify network settings of selected Online
Device
4
Manually add device using IP address, Port
number, Username & Password
10
Refresh Online Device list
5
Delete selected device from Device
Management list
11
Start/Stop searching for Online Devices
6
Configure network settings of camera
12
*Unselected* device from Online Device
section

Rev 1.2 –6/20
9
Video Configuration Interface .
1
Cameras connected to Device Management
7
Preset control
2
Camera video feed
8
Enable/Disable tracking & Tracking Status
3
PC performance & time
9
Open tracking settings
4
Pan, Tilt, & OSD Menu control
10
Connected camera resolution & frame rate
5
Lens control
11
Enable/Disable recording
6
OSD Menu enter/return
12
Stop video, full screen, and gallery view

Rev 1.2 –6/20
10
Remote Playback__________________________________________
To utilize Remote Playback you will need to install a Micro SD card into the Micro SD Card slot on the
back of the camera.
1
Device list
7
Pause/Play video feed
2
Video feed of recording
8
Currently selected time (in hours) for video
feed
3
Video feed playback speed
Options include: Fast, normal, & slow speed
9
Recorded video (in hours)
4
Recorded video dropdown date
10
Currently selected time (in minutes) for
video feed)
5
Takes a snapshot of the current video feed.
11
Current time of video feed (in seconds)
6
Opens a selection window for downloading
the recorded video

Rev 1.2 –6/20
11
Connect Camera .
To add a camera to the Device Management list, you can go about this by searching in the Online
Device section, or manually by using the + Add Device button in the Device Management section.
When utilizing the Online Device section, you can simply click Search, and the Tracking Software will
automatically search the subnet your network for any HuddleView & SimplTrack2 cameras. Select the
camera and click + Add to Client to add it to the Device Management list.
When utilizing the + Add Device button within the Device Management section, you can connect your
camera through it’s IP address, Port number, & optional Username & Password; or you can Import a
*.csv file.

Rev 1.2 –6/20
12
Network Configuration .
To configure the network settings, select the camera from the Online Device list and click Modify
Netinfo. You can also adjust the network settings of a connected camera by selecting it from the Device
Management list and clicking Remote Configuration, then traversing to the Network section.
Remote Configuration .
Remote Configuration includes: Streaming, Network, RTMP, Protocol, Upgrade, Username/Password,
& Record.
•Stream Type: Select the RTSP feed you wish to adjust.
oOptions include: Main stream, Sub stream, Stream 3, & Stream 4.
•Resolution: Change the resolution of the stream you wish to adjust.
oMain Stream resolutions: QVGA(320x240), D1(704x480), HD720, & 1080P
oSub Stream resolutions: QVGA, D1 & HD720
oStream 3 resolutions: QVGA, D1 & HD720
oStream 4 resolutions: QVGA & D1

Rev 1.2 –6/20
13
Remote Configuration (Continued) _
•Video Rate Type: Adjust the video rate type
oOptions include: CBR (Constant Bit Rate) & VBR (Variable Bit Rate)
•Max Rate (Kbps): Sets the maximum kilobytes per second of the Video Rate Type.
oRange: 0 - 16383
•Frame Rate: Adjust the frame rate of the RTSP feed
oOptions include: Full FPS, 1 - 30
•Key Frame Interval: Adjust the I Key Frame Interval
oRange 0 –255
•Video Coding Type: Adjust the Video Encoding type
oOptions include: H.264 & H.265
•Encode Level: Adjust the level at which the video is encoded
oOptions include: Base, Main & High
•Channels: Adjust the audio channel of the embedded audio
oOptions include: Mono & Stereo
•Encode Type: Adjust the Audio Encoding type of the embedded audio
oOptions include: AAC
•Sample Rate: Adjust the audio sample rate of the embedded audio
oOptions include: 16KHz, 44.1KHz, & 48KHz
•Audio Rate: Adjust the audio rate of the embedded audio
oOptions include: 48Kbps, 64Kbps, 96Kbps, & 128Kbps
•Input Pin: Adjust the audio connection type
oOptions include: LineIn & MicIn
•Volume: Adjust the audio level of the embedded audio
oRange: 0 –100
The Network category allows you to assign a dynamic or static IP address for the camera, in addition to
settings the port numbers for RTSP & control.
•Connect With: Adjust the network connection method
oOptions include: DHCP (Dynamic) & Static IP
Note: While in DHCP you can only adjust RTSP Port & App Port
•IP Address: Displays IP Address & allows for adjustment the IP address of your camera
oDefault value: DHCP; or 192.168.1.180 while in Static or no connection to a DHCP server

Rev 1.2 –6/20
14
Remote Configuration (Continued) _
•Mask: Adjust the Subnet Mask of your camera
oDefault value: 255.255.255.0
•Gateway: Adjust the gateway of your camera
oDefault value: 192.168.1.1
•DNS 1: Adjust the DNS 1 (Dynamic Name System)
oDefault value: 0.0.0.0
•DNS 2: Adjust the DNS 2 (Dynamic Name System)
oDefault value: 0.0.0.0
•RTSP Port: Adjust the RTSP connection port
oDefault value: 554
•App Port: Adjust the app control port
oDefault value: 5001
The RTMP category allows you to define a RTMP server.
•RTMP # Checkbox: This checkbox allows you to enable or disable a RTMP stream.
•Stream # Dropdown: Select the stream you would like to utilize
oOptions include: Main Stream, Sub Stream, Stream 3 & Stream 4
•RTMP Text Field: This field allows you to input the RTMP server address you wish to stream to.

Rev 1.2 –6/20
15
Remote Configuration (Continued) _
The Protocol category allows you to set the control parameters of the camera.
•Enable: Enable or disable 3rd party control to the camera
oOptions include: Enable & Disable
•Protocol: Adjust the control protocol method
oOptions include: TCP & UDP
•Camera as: Adjust whether the camera acts as a server or a controllable device
oOptions include: Server & Client
•IP: Adjust the IP address to which the camera sends commands to while in Server mode
oDefault value: 0.0.0.0
•Port: Adjust the Port number of the device you are connecting to while in Server mode
oDefault value: 5678
The Upgrade category allows you to upgrade the firmware of the camera.
•Upgrade File: Browse your computer for the firmware upgrade file
•File Version: Displays the version number of the file once selected
•Camera Version: Displays the version number of the camera currently connected
•Upgrade Status: Displays the status of the firmware upgrade

Rev 1.2 –6/20
16
Remote Configuration (Continued) _
The Username/Password category allows you to change the device name, password, and adjust the
time format.
•Old Password: Input the old password in order to change the login credentials
oDefault value: “admin”
•New Password: Input the new password in order to change the login credentials
•Confirm: Input the new password again in order to confirm the change in login credentials
•Camera Name: Adjust the camera device name
oDefault value: “HuddleView”
•Display Time checkbox: When enabled, displays the time in the main video feed
oDefault value: Unchecked (Off)
•Time Format: Adjust the time format
oOptions include: YYYY-MM-DD HH:mm:ss, MM-DD-YYYY HH:mm:ss, DD-MM-YYYY
HH:mm:ss, YYYY-MM-DD week HH:mm:ss, MM-DD-YYYY week HH:mm:ss, & DD-MM-
YYYY week HH:mm:ss
•Enable NTP checkbox: When enabled, support compatibility with Network Time Protocol
oDefault value: Unchecked (Off)
•TimeZone: Adjust the time zone for your location
oRange: +14:00 ~ -12:00
•NTP Server: Input the NTP server address you wish to utilize when using NTP

Rev 1.2 –6/20
17
Remote Configuration (Continued) _
The Record category allows you to set up and view the status of the Photobooth recording.
Note: A Micro SD card is required for use with the Photobooth feature.
•SD Card Record: Enable or disable recording to the Micro SD card
oDefault value: Unchecked (Off)
•Enable Record: After changing “SD Card Record” value, click “OK” to apply
•Status: Displays status of SD card recording
oOptions include: Black/Unlit: Not recording, Green: recording, Red: Can not record to SD
card
•Capacity of SD card(M): Displays total size of Micro SD card in kilobytes
•Use of SD card(M): Displays the number of kilobytes consumed on Micro SD card
•Remain of SD card(M): Number of kilobytes remaining on the Micro SD card
Remove Camera .
To remove a camera from the Device Management list, first select it, then click the Delete button above
the list. You will be prompted with a confirmation window to remove the camera. Click OK to remove
the device or Cancel to keep the current settings.
This manual suits for next models
1
Table of contents
Other HuddleCamHD Security Camera manuals

HuddleCamHD
HuddleCamHD NDI HX User manual

HuddleCamHD
HuddleCamHD HC10X-GY-G2 User manual

HuddleCamHD
HuddleCamHD 10X-USB2 User manual

HuddleCamHD
HuddleCamHD 10X-G3 User manual

HuddleCamHD
HuddleCamHD 3X-G2 User manual

HuddleCamHD
HuddleCamHD HuddleCam-HD 10X User manual

HuddleCamHD
HuddleCamHD 3X User manual

HuddleCamHD
HuddleCamHD 10X-G2 User manual

HuddleCamHD
HuddleCamHD 30X User manual