Hung DP-CAT2E User manual

DisplayPort Extender over Cat.6 40m
User’s Manual
DP-CAT2E
1
1. Introduction
The DisplayPort Extender over CAT.6 allows the installation of a Hi-Def display up to 40 meters away from a DisplayPort
source using two CAT.6 cables. Resolutions can be up to 3840 x 2160 @30Hz over two CAT. 6 24AWG cablings. HDCP is
also supported. The Receiver is powered by the 2nd CAT.6 cable that extends the DisplayPort signal from the Transmitter,
eliminating the need for an external power supply on the Receiver.
2. Features
Extends DisplayPort audio and video up to 40 meters over 2 CAT.6 24AWG cablings
Supports 8-Bit Deep Color; supports DisplayPort 1.1a
Supports resolutions up to 3840 x 2160 @30Hz; 2560 x 1600 @60Hz; 2560 x 1440 @60Hz; 1920 x 1200 @60Hz;
1920 x 1080 @60Hz over two CAT.6 24AWG cablings.
HDCP compliant; supports the Active DisplayPort adapters
16-position EQ rotary switch to compensate for cable skew, enables HPD auto calibration
Power On LED indicator; no external power supply requirement on the receiver
Supports 2.1 stereo audio out; Enables the DisplayPort signal transmitting to HD audio out.
Rugged & cambered shape’s Aluminum enclosures are prefect for professional and industrial applications;
surface-mountable
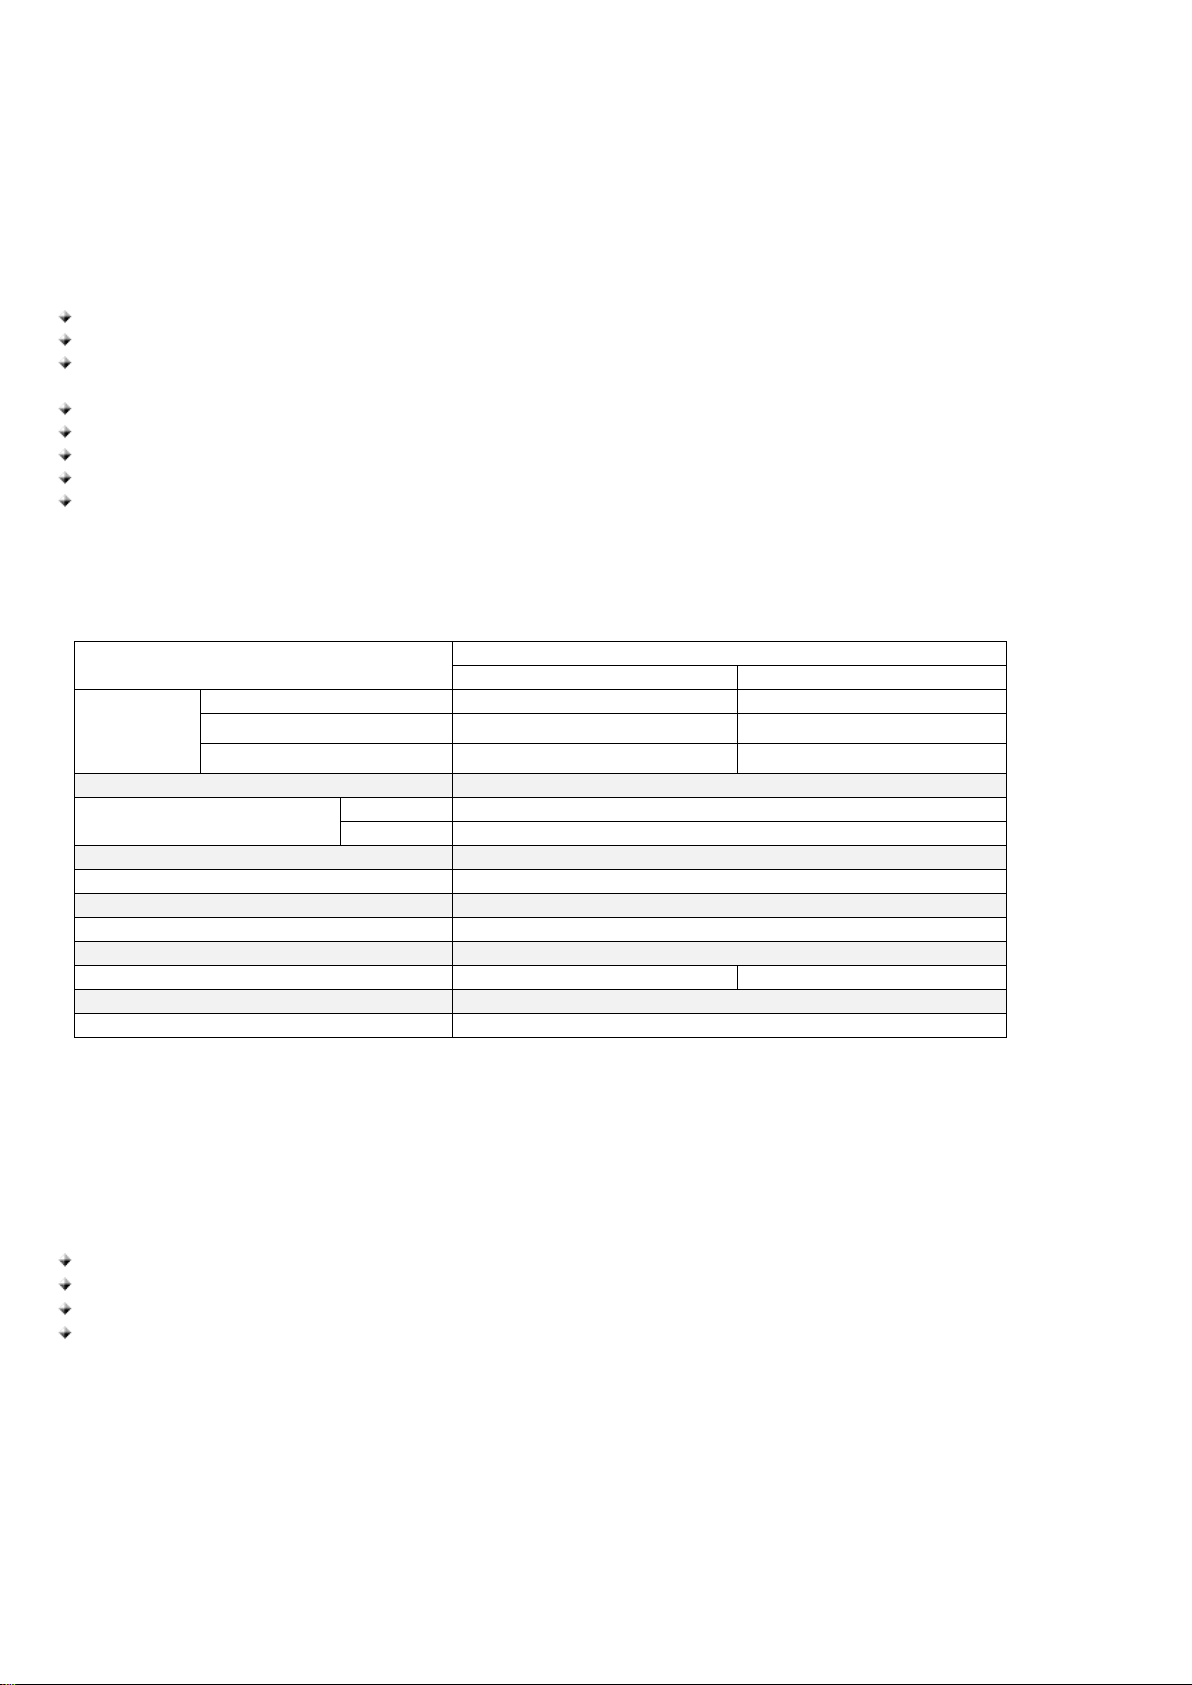
3. Specifications
Model No.
DP-CAT2E
Transmitter
Receiver
Connector
Upstream / Input
DisplayPort 20 Pin female
RJ-45 female x 2
Output / Downstream
RJ-45 female x 2 DisplayPort 20 Pin female
Audio
3.5mm Jack 3.5mm Jack
Interconnection Cable
CAT.6 24AWG Cabling
DisplatPort Cable ext.
length based on 4k @30Hz
Input
1m
Output
2m
Operating Distance
Up to 40m
Video Data Rate
Up to 2.7Gb/s
Resolution Range
Up to 3840 x 2160 @30Hz
LED
1
Operating Temperature
0°C to 40°C
Power Supply
5V1A
*optional
Housing
Aluminum
Dimension ( L x W x H )
90 x 73 x 31mm
Note: the receiver may have power provided from the transmitter upon CAT.6 cabling connection. When the receiver is
connected to an Active DisplayPort adapter, it requires an external power supply of 5V1A.
4. Package Contents
Transmitter
Receiver
5VDC Power adapter x 1
Rack mountable screws
2
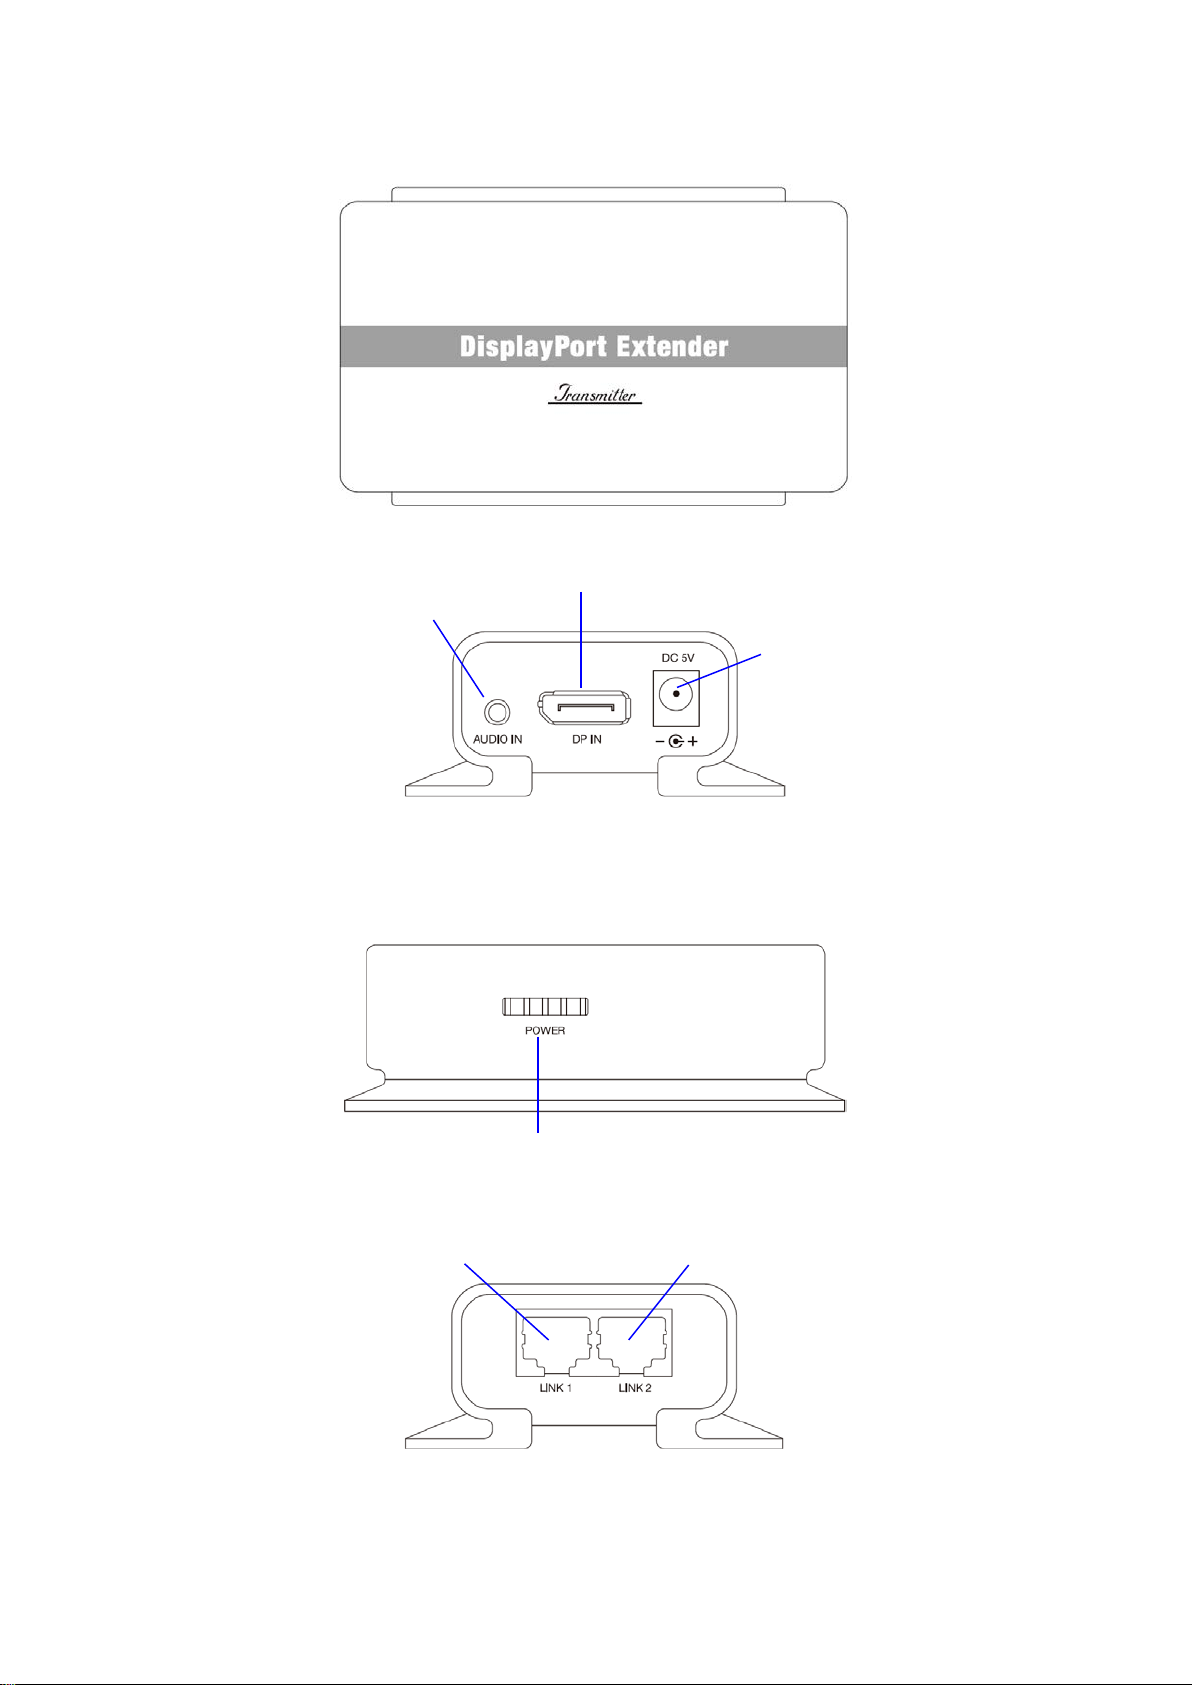
LINK 1 port (RJ45)
5. Physical Diagram
5.1 Transmitter (Local Unit)
Top view
Front view
Side view
Rear view
DP IN port
Power port (DC5V)
POWER LED (Orange)
AUDIO IN port
LINK 2 port (RJ45)
3
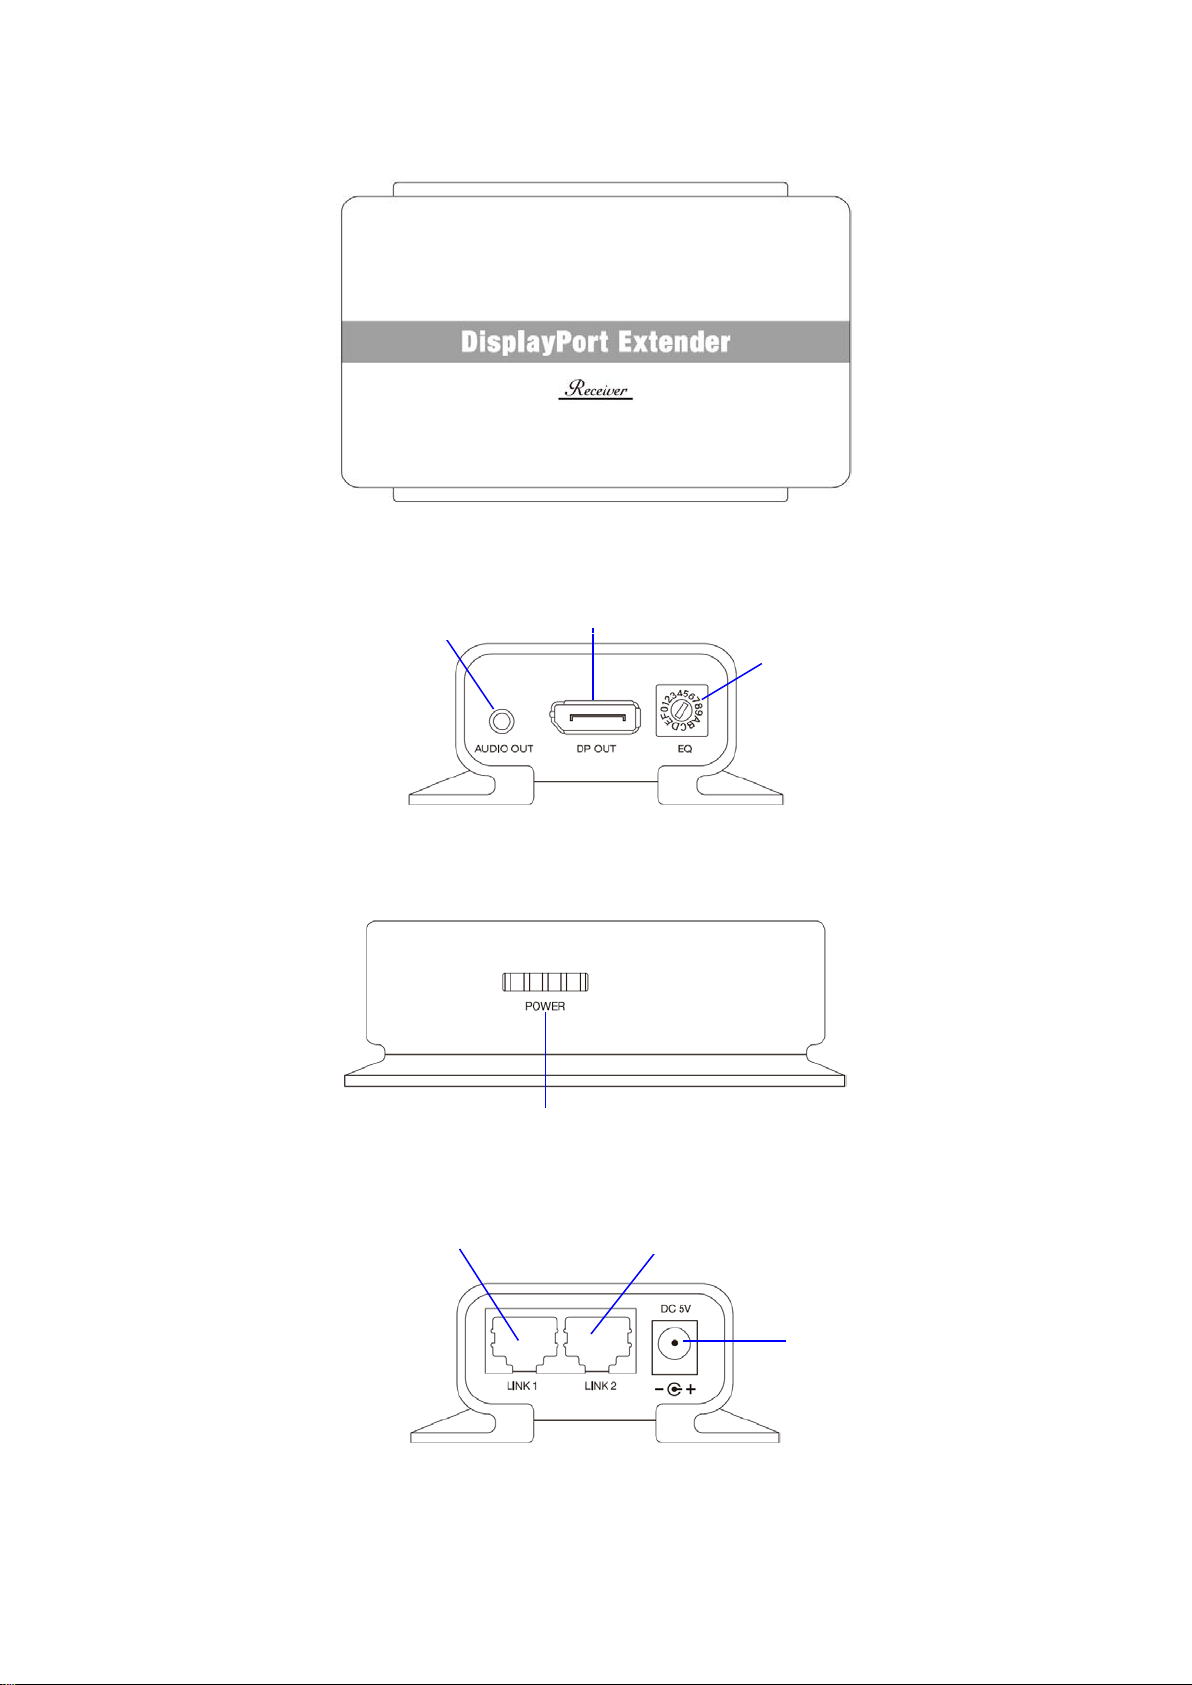
LINK 1 port (RJ45)
5.2 Receiver (Remote Unit)
Top view
Front view
Side view
Rear view
POWER LED (Orange)
EQ Rotary switch
DP OUT port
AUDIO OUT port
LINK 2 port (RJ45)
Power port (DC5V)

4
6. Connecting
6.1 Typical Application
The DisplayPort Extender is installed between the DisplayPort source and a connected Display device with speakers.
6.2 Installation
Installing the Transmitter (Local Unit)
1. Connect the video source to the DP IN on the DisplayPort Transmitter by using a DisplayPort cable.
2. Connect 2 Cat.6 cables to LINK 1/LINK 2 of DisplayPort Transmitter.
3. Connect the provided external power supply to the DisplayPort Transmitter.
Installing the Receiver (Remote Unit)
1. Connect the DP OUT of DisplayPort Receiver to the Display device by using a DisplayPort cable.
2. Connect the other ends of 2 CAT.6 cables to LINK 1/LINK 2 of DisplayPort Receiver.
*When connecting the CAT.6 cables, make sure that each CAT.6 cable is connected to the Transmitter and is
connected to the corresponding jack on Receiver (e.g. LINK 1 --> LINK 1, LINK 2 --> LINK 2).
3. It is a must to connect an external power supply (DC5V 1A) to the DisplayPort Receiver once if the receiver is connected
to an Active DisplayPort adapter.
4. Turn on the power to the video source and connected monitor.
LED
Status
Definition
Color
Power Orange
The 5VDC power adapter is plugged in. And the Receiver’s Power LED
lights firmly while the 2 CAT.6 cablings are connected properly.
Note:The DisplayPort Extender supports resolutions up to 3840 x 2160 @30Hz upon using two CAT.6 cablings. In order
to avoid bad signal transmitting, strongly recommends using the CAT.6 24AWG cable or higher grade; and the cabling work
should not be twisted (winded).
If there is no signal displayed, disable DisplayPort 1.2 mode from the OSD of display device and then check again.
Speakers
CAT.6 cable LINK 2
CAT.6 cable LINK 1
DP cable
DP cable
Audio cable
Audio cable
DP video source
Display device

5
6.3 Adjusting the Signal Quality
The DisplayPort Extender has an equalization (EQ) rotary switch on the front of the Receiver unit. This 16-position rotary
switch is used to adjust the boost level depending on the length of the CAT.6 cable.
Insert a small flat-headed tool into the notch on the rotary switch. The table below provides examples of various cable
types and lengths for CAT.6 cabling.
Cable type
Length
Rotary switch position
Remark
AMP CAT.6, UTP, 24AWG
66 feet (20 meters)
5 through 7
Based on 3840 x 2160 @30Hz
AMP CAT.6, UTP, 24AWG
130 feet (40 meters)
D through F
Based on 3840 x 2160 @30Hz
Note: Waits 5~7 seconds after adjusting the EQ rotary switch and check on the display. If the screen doesn’t satisfy you,
then backward/forward the EQ position again.
7. Category cable wiring
Take precaution selecting the CAT.6 wires before connecting; use a cable tester to check the wires are correctly
terminated. (Incorrect Termination may cause damage to the receiver unit). Recommend to use T568B wiring as shown
below
6
Regulatory Compliance
Disclaimer
Information in this document is subject to change without notice. The manufacturer does not make any
representations or warranties (implied or otherwise) regarding the accuracy and completeness of this document
and shall in no event be liable for any loss of profit or any other commercial damage, including but not limited to
special, incidental, consequential, or other damages.
No part of this document may be reproduced or transmitted in any form by any means, electronic or mechanical,
including photocopying, recording or information recording and retrieval systems without the express written
permission of the manufacturer.
All brand names and product names used in this document are trademarks, or registered trademarks of their
respective holders.
Table of contents


