manuals.online logo
Brands
  1. Home
  2. •
  3. Brands
  4. •
  5. Hutech
  6. •
  7. Water Pump
  8. •
  9. Hutech CM50FS User manual

Hutech CM50FS User manual

CM50FS Dry Air / Vacuum Pump System
11/30/2001 Rev. 3
Hutech Corporation & ScienceCenter.Net © 2001
1
CM50FS Dry Air / Vacuum Pump System
The CM50FS Dry Air / Vacuum
Pump System is designed to provide
a low flow of dry air to an astro
camera system and optionally to
provide a low vacuum for vacuum
film holders. The dry air is
generated by pulling air through
silica gel packets and then pumping
it into the camera system. If vacuum
hold is also required, a hose may be
inserted into the intake port of the
CM50FS. The pump system
operates off unregulated 12VDC and
typically draws less than 0.4 A.
Configuring Your System
While the CM50FS may be
immediately used by attaching
its output to the camera or
telescope system air intake, it
is best to first route the air
hoses properly along the
telescope mount and tube.
Take care to insure that an
adequate length is provided
and that the tubing is not
kinked and will not be
snagging on anything no
matter how the mount is
positioned.
Camera
Scope
Hood
Desiccant
Chamber Pump
CM50FS sample configuration (simple dry air flow only)
CM50FS Dry Air / Vacuum Pump System
11/30/2001 Rev. 3
Hutech Corporation & ScienceCenter.Net © 2001
2
If the vacuum side of the system will be used, insert the second hose into the intake (lower hole)
and route it up to the camera, again taking care to avoid kinks and loops which may snag on the
mount.
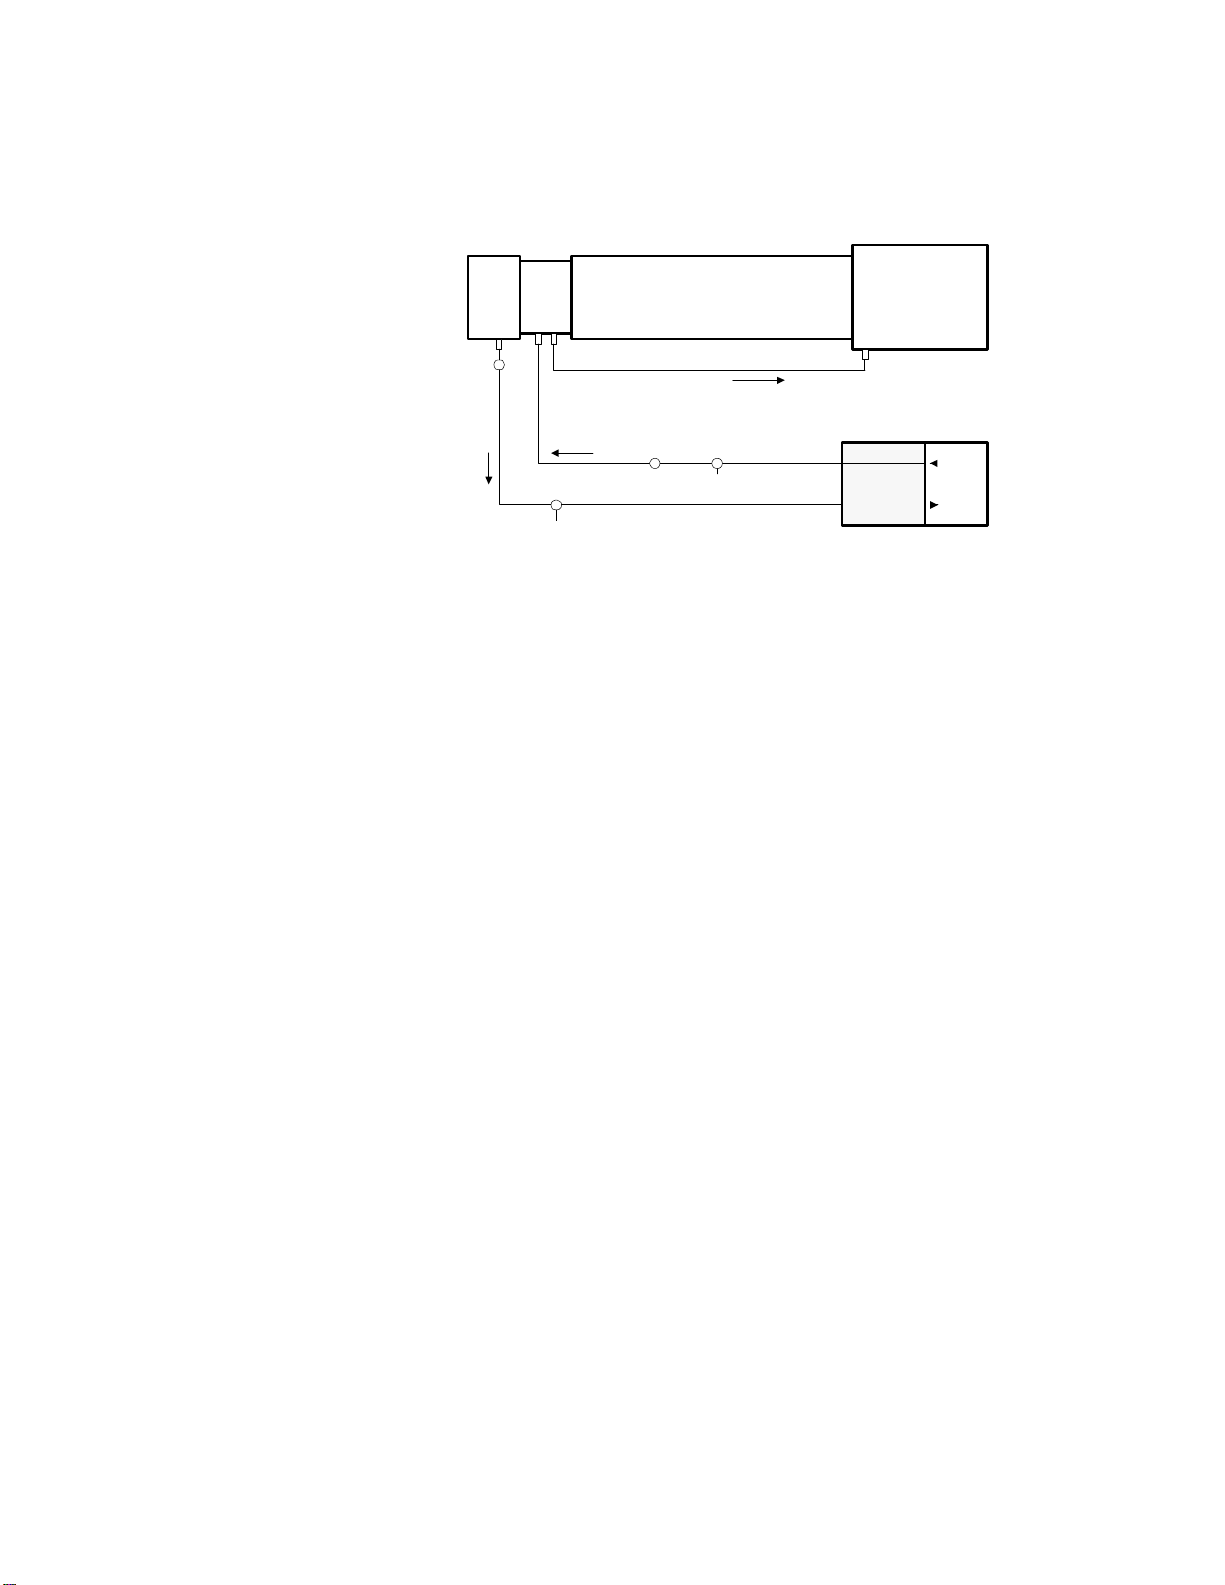
Once the tubing is cut to the
proper length and attached
to the camera, on the
vacuum side, if the flow is
too great, adjust the
recirculation flow valve
inside the pump box. This
may be done with the cover
off the pump box. If further
control is desired, insert “T”
sections to divide the flow
between the camera system
and the open air. An
external valve in the line on
the camera/scope side as
shown in the diagram at right can be used to further adjust the flow until it is at the desired rate.
Couplers and hose sections are compatible with aquarium air supply parts and can be commonly
found at pet stores.
Using the CM50FS
In normal operation, simply attach the hoses to the appropriate camera connections and turn on
the pump. In a very humid climate, allow a few minutes for the dry air to fill the camera system
before starting exposures. In drier climates, it may not be necessary to continuously run the dry
air system.
When using the vacuum side of the system, be sure to turn off the pump and bleed air into the
camera before advancing the film. Simply turning off the pump may not be adequate when
advancing the film as the vacuum hold system may maintain the pull on the film for several
minutes. If a ‘T’ section has been installed as shown in the sample configuration above, simply
turning the pump off will be adequate as the ‘T’ allows air to enter and release the film hold.
Camera Scope
Hood
Desiccant
Chamber Pump
Vacuum
control
valve (optional flow for objective)
Air inlet
'T'
CM50FS sample configuration with vacuum camera
Dry air
control
valve
Excess pressure
bleed 'T'
CM50FS Dry Air / Vacuum Pump System
11/30/2001 Rev. 3
Hutech Corporation & ScienceCenter.Net © 2001
3
Recharging the Desiccant
Periodically (depending on your climate), the silica gel desiccant will need to
be “recharged,” as indicated by a humidity indicating card. This is placed
inside the CM50FS enclosure where it can be seen without opening the unit.
Recharging the desiccant is accomplished by placing the silica gel packets in
low heat (~245 F) on a tray in an oven. For full recharging, 16 hours is
recommended, but it is not necessary to strictly follow this as a rule. Note
that when removing the desiccant packets, the enclosure must not be turned
upside down as the pump is not tightly fastened to the enclosure (to minimize
vibration coupling).
To reset the indicator card, place the card in an oven for less than 1 minute.
When placing the card back in the CM50FS enclosure, place it where it will
be visible from the outside, and insure that its rear is exposed to the air inside
the enclosure. Replace the cover on the enclosure as soon as possible after
recharging to minimize exposure to outside humidity.
Notes:
1. Enclosure power connector specification:
♦12VDC (unregulated), center positive
♦5.5mm OD
♦2.1mm ID

Popular Water Pump manuals by other brands

GEA Hilge HYGIA ADAPTA Operating	 instruction

GEA

GEA Hilge HYGIA ADAPTA Operating instruction

Renkforce 1275340 operating instructions

Renkforce

Renkforce 1275340 operating instructions

Waterhouse XC-SP08301 User guide manual

Waterhouse

Waterhouse XC-SP08301 User guide manual

Ingersoll-Rand MP PUMPS CHEMFLO 2 Operator's manual

Ingersoll-Rand

Ingersoll-Rand MP PUMPS CHEMFLO 2 Operator's manual

Pfeiffer Vacuum HiPace 700 Plus operating instructions

Pfeiffer Vacuum

Pfeiffer Vacuum HiPace 700 Plus operating instructions

Grundfos MTB Series Service instructions

Grundfos

Grundfos MTB Series Service instructions

BOC Edwards E1M175S instruction manual

BOC Edwards

BOC Edwards E1M175S instruction manual

CVS VacuStar WR 2500 operating instructions

CVS

CVS VacuStar WR 2500 operating instructions

BUSCH COBRA NC 1000 B instruction manual

BUSCH

BUSCH COBRA NC 1000 B instruction manual

MagnaFuel ProTuner MP-4301 Installation and operating instructions

MagnaFuel

MagnaFuel ProTuner MP-4301 Installation and operating instructions

Lincoln G Series manual

Lincoln

Lincoln G Series manual

baxter Auto Syringe AS50 Service manual

baxter

baxter Auto Syringe AS50 Service manual

FLOJET G70C Series Installation & Operation Information

FLOJET

FLOJET G70C Series Installation & Operation Information

Becker KDX 3.140 operating instructions

Becker

Becker KDX 3.140 operating instructions

KSB Calio-Therm S NC/NCV Installation & operating manual

KSB

KSB Calio-Therm S NC/NCV Installation & operating manual

Bestway Built-in Sidewinder P3041 owner's manual

Bestway

Bestway Built-in Sidewinder P3041 owner's manual

StormPro 2100DC Operation manual

StormPro

StormPro 2100DC Operation manual

Atlas Copco DWS VSD+ instruction manual

Atlas Copco

Atlas Copco DWS VSD+ instruction manual

manuals.online logo
manuals.online logoBrands
  • About & Mission
  • Contact us
  • Privacy Policy
  • Terms and Conditions

Copyright 2025 Manuals.Online. All Rights Reserved.