HydroCare 10 litre User manual

1
Fitting Instructions and User Guide
Unvented Electric Water Heater
10/15 litre Undersink

2
1.0 INTRODUCTION
Thankyou for purchasing our 10/15 litre unvented water heater. The water
heater has been manufactured to the highest standards and has been designed
to meet all the latest relevant safety specications.
1.1 IMPORTANT POINTS
This 10/15 litre unvented water heater must be installed (Section 3.0),
commissioned (Section 4.0) and maintained (Section 6.0) by a competent
person. Please read and understand these instructions prior to installing your
water heater.
Following installation and commissioning, the operation of the heater should
be explained to the user (Section 5.0) and these instructions left with them
for future reference.
This appliance is not intended for use by persons (including children)
with reduced physical, sensory or mental capabilities, or lack of
experience and knowledge, unless they have been given supervision or
instruction concerning the use of the appliance by a person responsible
for their safety. Children should be supervised to ensure that they do
not play with the appliance.
1.2 PACK CONTENTS
Water heater, pressure relief valve, electrolytic connectors, wall xings, tting
instructions and warranty card.
CONTENTS
SECTION PAGE
1.0 INTRODUCTION 2
2.0 TECHNICAL SPECIFICATION 3
3.0 INSTALLATION 4
4.0 COMMISSIONING 9
5.0 EXPLANATION TO USER 10
6.0 MAINTENANCE 11
7.0 FAULT FINDING 13
8.0 SPARE PARTS 14
9.0 GUARANTEE 15
10.0 ENVIRONMENTAL INFORMATION 15
11.0 WARRANTY & SPARES ENQUIRIES 16

3
2.0 TECHNICAL SPECIFICATIONS
Electrical rating .............................................220-240V~ 50Hz 2kW.
Temperature range ....................................... 12 to 72°C
Capacities......................................................10 or 15 litres
Weight (empty) ..............................................10 litre - 6.5kg
.............................................. 15 litre - 7.5kg
Weight (full) ................................................... 10 litre - 16.5kg
................................................... 15 litre - 22.5kg
Maximum working pressure...........................0.6MPa (6 bar)
Pressure Relief Valve ....................................0.6MPa (6 bar)
Ingress protection ..........................................IP21
B
F
D
EC
G
H
A
FIG.01: INSTALLATION DIMENSIONS
MODEL A B C D E F G H
10 litre 415 265 264 73 140 100 380 102
15 litre 445 295 296 93 140 100 420 102
The heater can be used to supply multiple hot water outlets via conventional
taps. It is not recommended for supplying a shower.
Individual site demands should be considered when choosing capacity and
the number of outlets to be served.
10 litre - 1 to 2 hand basins
15 litre - 2 to 3 basins or 1 kitchen sink + 1 hand basin

4
3.0 INSTALLATION
Warning: this appliance must be earthed. It is suitable for a.c. supply only.
Electrical installation must be carried out by a competent electrician and be
in accordance with the latest IEE wiring regulation.
3.1 LOCATION
3.1.1 National Wiring rules may contain restrictions concerning the
installation of these units in bathrooms.
3.1.2 The unit should be located in close proximity to its outlet in order to
minimise heat losses in the pipework. The unit should be wall-mounted,
using the xing hooks and plugs supplied. The wall xing hooks should
be orientated such that the lugs engage with the mounting slots in the
rear of the unit (see Figure 01, page 3 for mounting hole dimensions).
The water connections must always be to the top of the unit. Ensure
the wall can support the full weight of the unit (see Section 2) and that
wall hooks are securely xed.
3.1.3 Enough space should be left above the unit for pipe connections and
access to the Pressure Relief Valve (see Figure 01, page 3 for unit
dimensions to determine a suitable position for the heater).
3.1.4 Ensure that there are no hidden services (electricity, gas or water) below
the surface of the wall.
3.1.5 DO NOT install where the unit may freeze.
3.2 PLUMBING
3.2.1 The water connections are for 15mm diameter copper tubes suitable
for compression ttings. Do not use solder joints as this will damage
the heater and may prevent servicing.
3.2.2 The electrolytic connectors supplied are tted between the inlet/outlet
threaded pipe ends and the 15mm compression ttings attached to the
supply/outlet pipework to prevent galvanic corrosion.
3.2.3 The INLET is marked BLUE, the OUTLET is marked RED. A WRAS
listed isolating valve (not supplied) should be tted on the cold water
supply to the heater. Several hot outlets can be served.
3.2.4 Plumbers Paste must not be used as it can impair the operation of the
valves.

5
3.3 IMPORTANT INSTALLATION POINTS
3.3.1 This unvented water heater MUST be tted with the Pressure Relief
Valve supplied. FAILURE TO PROVIDE ADEQUATE PRESSURE
RELIEF WILL INVALIDATE ANY GUARANTEE AND LEAD TO A
DANGEROUS INSTALLATION.
3.3.2 Expansion can take place within the cold water supply PROVIDED
THAT BOTH :
(a) Backow in the main is not prevented by any stop valve with loose
jumper, check valve, pressure reducing valve or similar AND
(b) Hot water expansion does not enter a branch to a cold water outlet
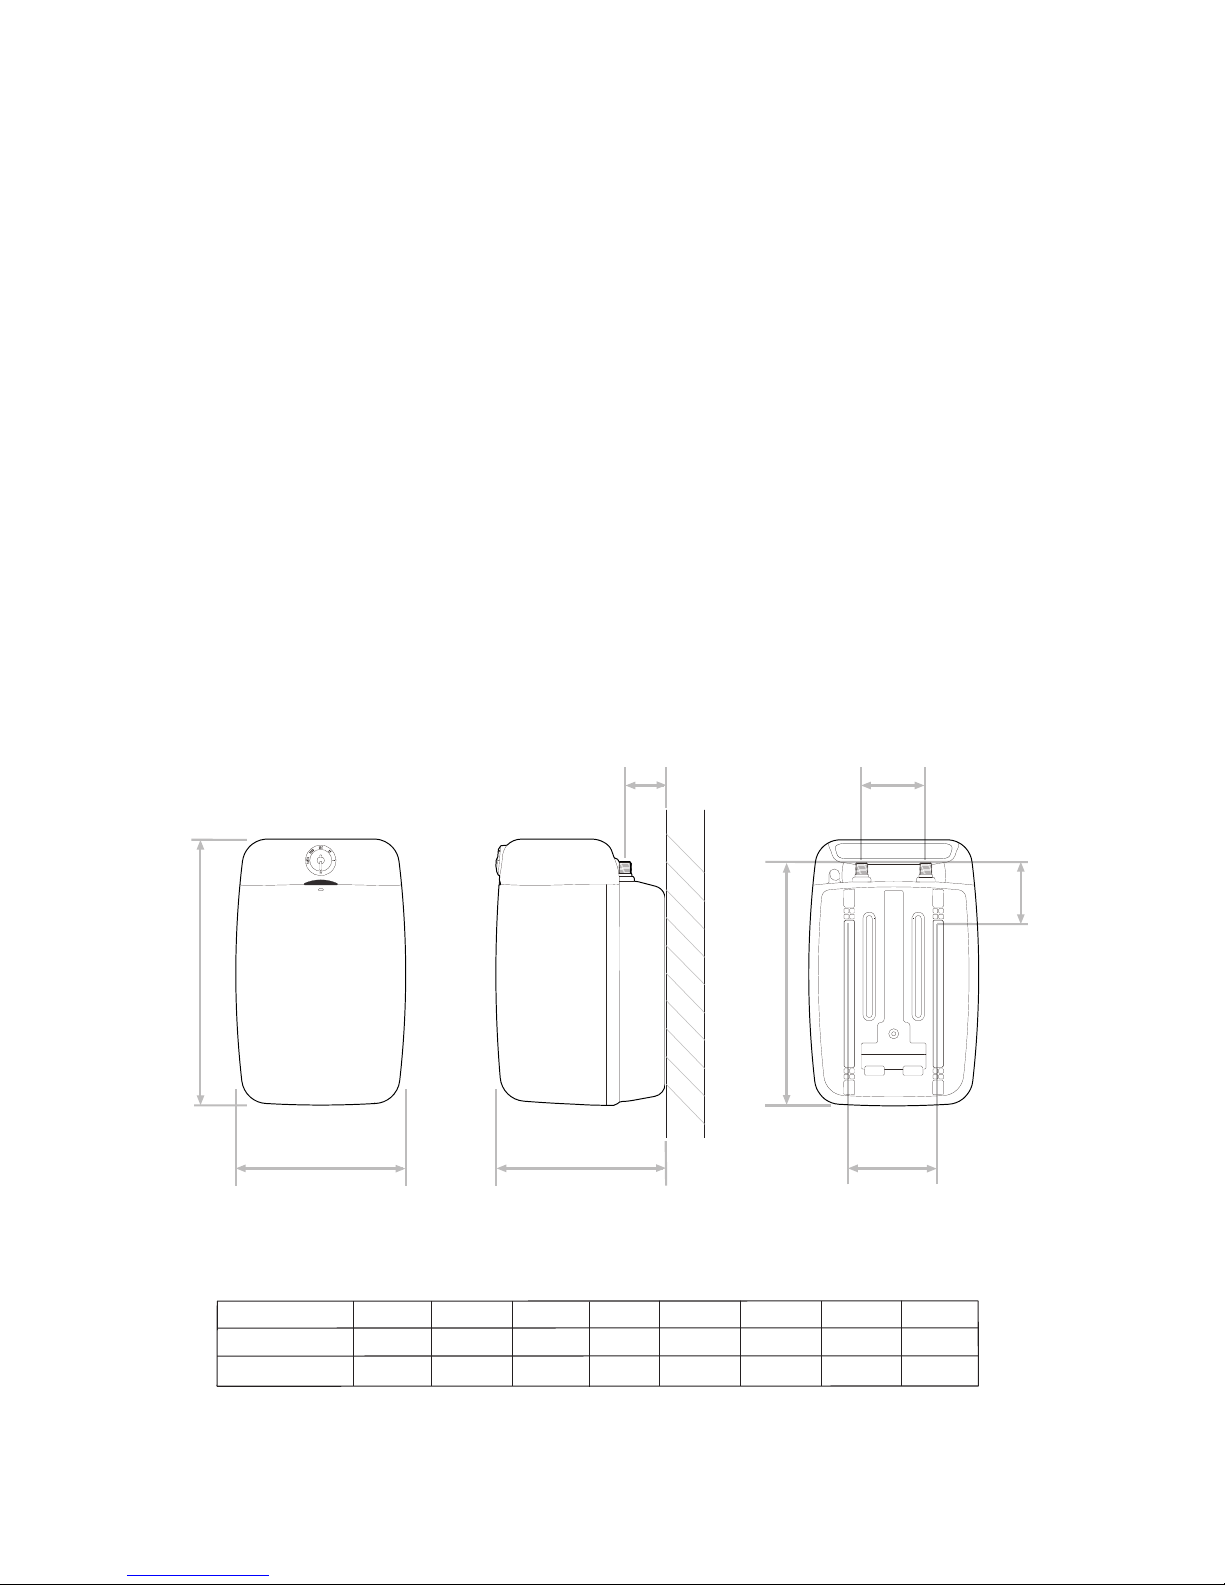
(see Figure 02, page 6 for expansion pipe lengths).
N.b. Both the above conditions must be met. Additionally expansion
within the cold water supply will not be possible if the static supply
pressure exceeds 0.41 MPa (4.1bar).
3.3.3 If any of the conditions in 3.3.2 cannot be met, expansion must be
accommodated using an Expansion Vessel. To ensure all expansion
takes place in the vessel, a check valve must also be tted together
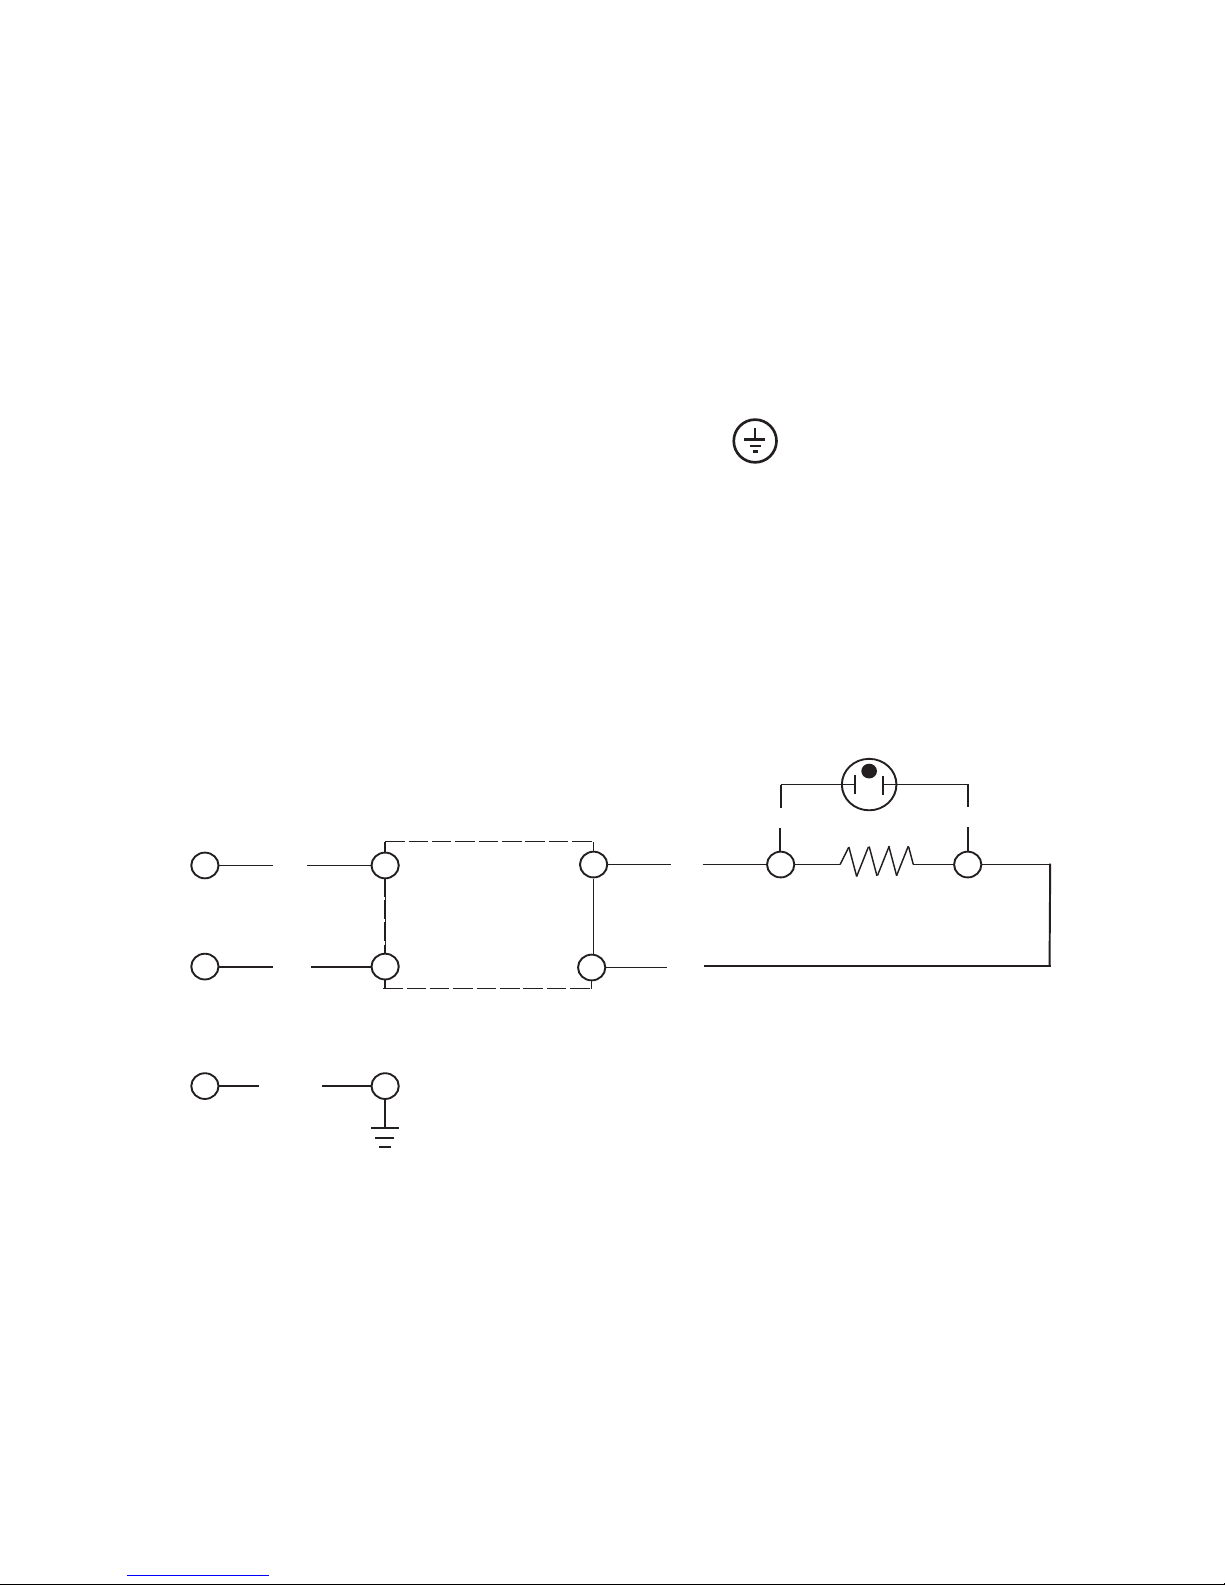
with the Pressure Relief Valve supplied (see Figure 03, page 6).
3.3.4 If the static supply pressure exceeds 0.41 MPa (4.1 bar), a Pressure
Reducing Valve must be tted to the cold main supply. If a Pressure
Reducing Valve is used, an Expansion Vessel must also be used (see
Figure 04, page 6).
3.3.5 The installation must be carried out in accordance with the relevant
requirements of:
• The appropriate Building Regulations either The Building
Regulations, The Building Regulations (Scotland) or Building
Regulations (Northern Ireland).
• The Water Fittings Regulations or Water Byelaws in Scotland.
WARNING: IF WATER FLOWS FROM THE PRESSURE RELIEF VALVE,
THE ELECTRICITY SUPPLY MUST BE SWITCHED OFF IMMEDIATELY.
CONTACT A COMPETENT INSTALLER FOR UNVENTED WATER HEATERS
TO CHECK THE SYSTEM.

6
FIGURE 04: For inlet pressures above 0.41 MPa (4.1 bar)
Pressure relief valve
Check
valve
Expansion
vessel
Pressure
reducing
valve
Note: If Pressure Reducing
Valve is used, expansion down
the mains is possible.
FIGURE 03: For inlet pressures up to 0.41 MPa (4.1 bar)
where expansion in mains supply is not possible.
Pressure relief valve
Check
valve
Expansion
vessel
FIGURE 02: For inlet pressures up to 0.41MPa (4.1 bar)
Pressure
relief
valve

7
3.4 DISCHARGE
3.4.1 The discharge outlet from the Pressure (expansion) Relief Valve must
be connected to a discharge pipe. It is recommended that a tundish
be installed in the discharge pipe to give a visible indication that the
valves are operating.
3.4.2 The discharge pipe must fall continuously from the valve outlets and
be unobstructed and in a frost-free environment.
3.4.3 The pipe from the valves to the tundish should be 15mm o/dia
minimum. From the tundish to the point of discharge the pipe should
be 22mm o/dia minimum and have a resistance to ow equivalent to
9 metres of straight pipe. Long discharge pipe runs should have an
increased internal diameter.
3.4.4 The water may drip from the discharge pipe of the pressure relief
device and this pipe must be left open to the atmosphere. The pressure
relief device is to be operated regularly to remove lime scale deposits
and to verify that it is not blocked.
3.4.5 The pipe material should be capable of conveying water/steam at
100°C.
3.4.6 The nal discharge point should be in a safe, visible position.

8
3.5 ELECTRICAL
WARNING: This appliance must be earthed. It is suitable for a.c. supply only.
Disconnect the electrical supply before removing the terminal cover. Installation
must be in accordance with the current I.E.E. Wiring Regulations.
3.5.1 The unit is supplied tted with a 0.75m 3 core 1mm2 exible cable. The
electricity supply should be fused 13 Amp and be via a double pole
isolating switch with a contact separation of at least 3mm in both poles.
Refer to the schematic wiring diagram Figure 05 below.
3.5.2 The wires are colour coded as follows:
Green and Yellow EARTH
Brown LIVE (L)
Blue NEUTRAL (N)
BN
BL
BN
BL
BK
NEON
ELEMENT
COMBINED THERMOSTAT
& OVER TEMPERATURE
CUT-OUT
GN/YL EARTH POINT
L
N
E
FIGURE 05: WIRING DIAGRAM
4
3
2
1
BK

9
4.0 COMMISSIONING
4.1 PLUMBING
4.1.1 Do not switch on the electrical supply until the unit has been lled with
water and checked for leaks.
4.1.2 Check that all installation, electrical and discharge pipe requirements
have been met.
4.1.3 Check that all water and electrical connections are tight.
4.1.4 Open a hot water tap, turn on mains water supply to the heater.
4.1.5 Allow unit to ll and leave hot tap running for a short while to purge any
air and ush out the pipework. Close the hot tap and check the system
for leaks.
4.1.6 Manually test the operation of the Pressure (expansion) Relief Valve.
Ensure water ows freely from the valve and through the discharge
pipes.
4.2 ELECTRICAL
4.2.1 Switch on the electrical supply. The indicator light will illuminate during
heating. When the set temperature is reached, the indicator light will
go out.
4.2.2 The set temperature can be adjusted by rotating the knob on the
front face of the unit. Rotate clockwise to increase temperature, anti-
clockwise to reduce temperature. Setting 2 on the temperature control
knob equates to a water temperature of approx 45°C.
4.2.3 Water may drip from the discharge pipe of the pressure relief device
- this pipe must be left open to atmosphere.

10
5.0 EXPLANATION TO USER
Following Installation and Commissioning of the water heater, the operation
should be fully explained to the user.
5.1 HOT WATER
5.1.1 Indicate the location of the water heater and identify the outlets to which
it is connected.
5.1.2 Explain that the temperature is set upon installation and conrm the
temperature which the water is set at.
5.2 SYSTEM MALFUNCTION
5.2.1 Explain how to isolate electrical and water supplies in case of a fault.
5.2.2 Explain that a qualied plumber and/or electrician should be contacted
if there is a fault.
5.2.3 Explain how to identify/check basic faults (Section 7.0).
5.3 SYSTEM MAINTENANCE
5.3.1 Explain the necessity to carry out regular maintenance of the water
heater to ensure its continued safe and efcient operation.
5.4 LITERATURE
5.4.1 Hand over the Installation and user instructions.
5.5 IMPORTANT NOTES TO USER
5.5.1 This unvented heater stores water at the temperature set on the
adjustable thermostat. This can be set to give temperatures in the
range of 12 to 72°C. To avoid any risk of freezing when the heater is
not in use for long periods during the winter months, do not switch off
the electrical supply and set the thermostat to its minimum position.
N.b. This will not protect other system pipework.
5.5.2 The indicator light will only be illuminated when the unit is heating.
5.5.3 Do not block or restrict the discharge from any safety valve tted.
5.5.4 Do not tamper with any safety valve tted.
5.5.5 If water discharges from any safety valve tted, switch off the electrical
supply to the unit immediately. Do not turn the electrical supply on again
until the unit has been checked and approved by a qualied installer.

11
6.0 MAINTENANCE
Warning: disconnect from all electrical supplies before beginning any work on
the unit. Water contained within the unit may be very hot!
Maintenance should be carried out by a competent person and any replacement
parts should be authorised Supplier spare parts.
It is recommended that maintenance is carried out regularly and should include
the checks detailed in the sections below.
6.1 Little maintenance is required, however in hard water areas the unit
will require descaling approximately every two years to ensure efcient
operation. The magnesium anode should be replaced every two
years.
To carry out this operation:
6.1.1 Switch off and disconnect the electrical supply. Turn off the water
supply to the unit.
6.1.2 Open a hot tap to relieve any system pressure. Disconnect the
plumbing connections to the unit and remove from the wall (note full
weights of units in Section 2). Empty unit by tipping through 90° over
a sink.
6.1.3 Remove the top cover by removing the two recessed self-tapping
screws on the top of the unit.
6.1.4 Prise off the front temperature control knob which is attached to the
thermostat spindle.
6.1.5 The top cover can now be removed by lifting vertically.
6.1.6 Carefully remove retaining plug and both capillary sensors from the hole
in the circular element plate but avoid kinking or straining the capillary
tubes.
6.1.7 Remove the earth wire from the element plate.
6.1.8 Remove the element plate assembly by removing the four securing
nuts. Remove any loose scale from the container. Carefully clean off
any scale from the element and thermostat pocket. DO NOT clean
scale from interior container walls.
6.1.9 To replace the magnesium anode, unscrew from the element assembly.
Fit the new anode as a reversal of this procedure.
6.1.10 Ret the element plate assembly, tting a new sealing gasket if required.
Note the correct orientation of the element plate by reference to Figure
06, page 12. Ret the capillary sensors, retaining plug and earth wire.
Ret the cover, insert the two self-tapping screws to secure and ret
the temperature control knob.

12
6.1.11 Re-commission the unit following the INSTALLATION and
COMMISSIONING instructions.
The Pressure (expansion) Relief Valve should be regularly
checked. This is to remove limescale deposits and to verify that it is
not blocked. To check the valve:
6.1.12 Manually operate the valve by twisting the cap. Ensure water
ows freely from the valve and through the discharge pipes.
Ensure the valve re-seats correctly when released.
The Expansion Vessel, if tted, should have a pre-charge
pressure of 0.41 MPa (4.1 bar). This can reduce over time and
eventually require re-charging. To do this:
6.1.13 Turn off water supply to the unit; open a hot tap to relieve system
pressure.
6.1.14 Remove dust cap from top of Expansion Vessel
6.1.15 Check pre-charge pressure using a tyre pressure gauge. If the
pressure is lower than 0.41 MPa (4.1 bar) it should be recharged
using a tyre pump (Schraeder Valve type). DO NOT OVER
CHARGE.
6.1.16 Re-check pressure and when correct replace dust cap.
6.1.17 Turn on mains water supply and close hot tap.
EARTH POINT FIXING
FIGURE 06: CORRECT ORIENTATION OF ELEMENT PLATE
(VIEWED FROM TOP WITH COVER REMOVED)
COLD WATER INLET
(BLUE)
HOT WATER OUTLET
(RED)

13
7.0 FAULT FINDING
Disconnect the electrical supply before removing the terminal cover. It is
recommended that any service operations on the heater are carried out by
a competent person.
FAULT POSSIBLE CAUSES ACTION
Water not heating 1. Electrical supply fault Check electrical supply
2.Thermal cut-out tripped Check cut-out, if operated,
reset and check thermostat
operation. If necessary replace
thermostat/thermal cut-out
(see Wiring Diagram Fig. 05, page 8)
3.Thermostat fault Check thermostat operation.
Replace if necessary.
Discharge of water from Excessive mains water Fit Expansion vessel, check valve
pressure relief valve pressure and pressure reducing valve.
Discharge of water from 1. Expansion in mains not Fit Expansion vessel and check
pressure relief valve possible. valve (see IMPORTANT
(intermittently). INSTALLATION POINTS SECTION 3)
2. Mains pressure exceeds Fit Expansion vessel, check valve
0.41 Mpa (4.1 bar) and pressure reducing valve.
3. Pressure Relief Valve Fault Replace Pressure Relief Valve
4. Loss of pressure from Check and, if necessary,
Expansion Vessel re-charge Expansion Vessel
pre-charge pressure
(see section 6.1.12)
Discharge of water from Thermostat and Replace thermostats and
Temperature/Pressure thermal cut out fault thermal cut outs
relief valve and/or
water/steam from
pressure relief valve
No water flow 1. Inlet valves incorrectly Check all valves are correctly
fitted installed in accordance with
flow direction arrows
2. Mains water supply not Check mains water supply
turned on is on
3. Blockage in main water Check for obstructions. If
supply pressure reducing valve with
strainer is fitted, check strainer is
not blocked
"Milky water" Oxygenated water Water from a pressurised
system releases oxygen
bubbles when flowing.The
milkiness will disapear
after a short while

14
8.0 SPARE PARTS
The following list of spare parts is available for your water heater. Please refer
to the Rating Label on the top of your heater before ordering to ensure the
correct spare part is obtained.
DO NOT REPLACE WITH PARTS NOT RECOMMENDED BY THE
MANUFACTURER - THIS WILL INVALIDATE YOUR GUARANTEE AND MAY
RENDER THE INSTALLATION DANGEROUS.
DESCRIPTION CODE NO.
Element assembly 2kW .......................................95606906
Magnesium anode (10/15l) ..................................95607957
Thermostat/over temp cut-out ..............................95612718
Pressure relief valve ............................................95605896
Temperature control knob ....................................95605895
Element plate gasket ...........................................95611022
Neon ....................................................................95607942

15
9.0 GUARANTEE
This water heater is guaranteed for parts only for a period of one year from
the date of purchase provided:
1. The unit has been installed in accordance with these instructions.
2. The unit has not been tampered with and has been regularly
maintained as detailed in these instructions.
3. The unit has been used only for heating potable water.
The unit is not guaranteed against damage by frost and the inner container
with integral immersion heater is not guaranteed against excessive scale
build up.
This guarantee does not affect the statutory rights of the consumer.
Please attach proof of purchase to all correspondence relating to
warranty claims.
10.0 ENVIRONMENTAL INFORMATION
This product is manufactured from many recyclable materials. At the end of
its useful life it should be disposed of at a Local Authority Recycling Centre
to realise the full environmental benets.

16 36006105 issue_01
11.0 WARRANTY & SPARE PARTS ENQUIRIES
Hydrocare
Brooks House
Coventry Road
WARWICK
CV34 4LL
Tel: 0844 871 1532
The policy of Hydrocare is one of continuous product development and as
such, we reserve the right to change specication without notice.
© 2011
This manual suits for next models
1
Table of contents
Popular Water Heater manuals by other brands

Whale
Whale WH0822 Installation & user's instructions

EBA
EBA Thermo 90 installation instructions

A.O. Smith
A.O. Smith Innovo IR 12-160 Installation, user and service manual

Whale
Whale Grey Waste Tank manual

Rinnai
Rinnai RH180 Operation and installation manual

Bradford White
Bradford White LD-WH6U3-1 Specifications

Viessmann
Viessmann VITOCELL 300V Technical data manual

Kenmore
Kenmore 153.31702 owner's manual

Black & Decker
Black & Decker BD-18-DWH manual

Viking
Viking CCS operating & maintenance manual

TESY
TESY GCH 1004420 B12 TSRC Instructions for use and maintenance

OSO HOTWATER
OSO HOTWATER Triton Marine - TM manual