Hyundai H-DEH2-20L-UI008 User manual

RU
.
.
Dehumidier
Instruction manual.
Warranty card.
EN
/ Models H-DEH2-20L-UI008
www.hyundai-hvac.com

2. Dehumidier
EN
CONTENTS
1.Important information
2.Safeguards
3.Specications
4.Appliance description
5.Appliance control
6.Maintenance
7.Troubleshooting
8.Service life
9.Utilization rules
2
2
3
4
5
8
9
9
9

3.
Dehumidier
EN
Dear Customer!
We thank you for your happy choice and buying of an air drier Hyundai. It will serve you for a long
time.
1. IMPORTANT INFORMATION
The appliance is designed for drying of air in domestic conditions.
The manufacturer reserves the right to introduce changes in design, conguration and process-
ing of the article with a view to improve its properties without any prior notication of customers.
There may be some misprints in text and digital notations of the present manual.
If aer reading of this manual you have any questions concerning work and operation of the
appliance, please, refer to a shop assistant or to a specialized service center for further explana-
tions.
The article has a label with all the needed technical data and other useful information about the
appliance.
Use the appliance only for its intended purpose indicated in this manual.
To avoid damaging of the appliance and cancellation of your warranty, before beginning of work
aer transportation, please, set the drier upright (as depicted on the cover) at least 2 hours
before operation.
2. PRECAUTIONS
1. DON’T CLOSE VENTS! Make sure that vent inlet and outlet are free.
2. Don’t insert foreign objects in air-outlet grille of the drier. It is very dangerous, since the fan
revolves at high speed.
3. Install the appliance only on a horizontal surface to avoid water leakage.
4. Don’t install the appliance in the following locations:
- where it is exposed to direct sunlight;
- near sources of open ame;
- near other working heating appliances;
- where the appliance may be exposed to water splashes or steam.
5. Don’t use the appliance in explosive or corrosive environment. Don’t keep petrol and other
volatile ammable liquids near the drier – it’s very dangerous
6. Don’t use the appliance only for drying (reducing of humidity level) of air in domestic prem-
ises.
7. Clean the lter occasionally to ensure ecient work of the appliance.
8. To ensure reliable work of the compressor, don’t incline the appliance.
9. To avoid electric shock, a damaged power cord should be replaced only in authorized service
centers by qualied specialists.
10. Connect the appliance only to 220-230V 50Hz network. If needed, nd out characteristics of
your network from power suppliers.

4. Dehumidier
EN
3.TECHNICAL CHARACTERISTICS
Tab.1
Capacity of draining (L/d)
Water tank volume (L)
Rated input (W)
Voltage V/Hz
Rated current A
Air circulation m3/h
Noise level dB(A)
Refrigerant
Electrical protection class
Degree of protection against moisture
Net weight (kg)
Gross weight (kg)
Net dimensions (mm)
Packing dimensions (mm)
20
3
460
220~240/50
2.0
220
51
R410
I
IPX0
11.5
12.5
350x233x508
405x270x534
Model H-DEH2-20L-UI008

5.
Dehumidier
EN
4. APPLIANCE DESCRIPTION
The appliance setup is described in the scheme below.
1. Handle for transporation
2. Control panel
3. Air lter
4. Aperture for permanent conbensate removal
5. Power cord and plug
6. Water level window
7. Condensate tank
8. Air outlet grille
Completed set of the appliance:
Appliance (air drier) - 1 piece
Appliance packing - 1 piece
User manual -1 piece
Guarantee slip -1 piece
Fig. 1
1
8
6
7
4
5
3
2

6. Dehumidier
EN
5. APPLIANCE CONTROL
1. Maxi button. Using this button you may turn on or o Maxi mode. In this mode the dehumidi-
er shows the dehumidication maximum mode
2. Power button. Use this button to turn the appliance on or o
3. Buttons Set. Using this buttons you may set the following operations mode:
35% - maintaining humidity of 35%
40% - maintaining humidity of 40%
45% - maintaining humidity of 45%
50% - maintaining humidity of 50%
55% - maintaining humidity of 55%
60% - maintaining humidity of 60%
65% - maintaining humidity of 65%
70% - maintaining humidity of 70%
75% - maintaining humidity of 75%
80% - maintaining humidity of 80%
4. LED display. During humidity setup, the appliance displays the set value and then it is
switched to the current indoor humidity indication mode with accuracy of ±5%.
5. Indicator Maxi Mode
6. Indicator of tank fullness with condensate – Water Full
Fig. 2
3
3
42
5
6
1

7.
Dehumidier
EN
Condensate removal
In the course of air drying, the appliance shall accumulate the condensate (water recovered
from air). As soon as the condensate tank is full, the TANK FULL indicator will ash on and the
appliance will stop working. In order to resume working it is necessary to remove the tank and
pour water (see a scheme below).
The appliance may also work in constant mode without the necessity of occasional pouring of
water from the tank. For that the user should insert a special drainage hose (not included in
the delivery set) into a special aperture for constant condensate removal and direct water to a
prepared tank or drainage system (see a scheme).
Fig. 3 Fig. 4
NOTE:
1. If the moisture level in the room is 3% lower than the one set by
the user, the compressor will stop working. As soon as air moisture
level exceeds the set one by 3%, the compressor wick start working
again.
2. If the Tank Full indicator is ashing on, it is necessary to pour water
from the tank.
3. The drier will stop working, if the set moisture level is higher than
the current air moisture level in the room.
4. Range of operating temperatures for this appliance is 5-32°
5. If the drier does not work (the Power indicator does not ash on) or
if the appliance makes long pauses in its work, wait for 10 minutes
and then try to turn it on again. If the appliance will not resume
working, refer to a shop assistant or to a service center.
6. If the appliance is turned o, it can be turned on only in 3 minutes.
The view is to protect the compressor from damaging.
7. If the Defrost indicator is ashing on, it means that the evaporator
has supercooled and needs automatic defrosting. In this mode
the compressor will stop working and the fan will continue its
operation.

8. Dehumidier
EN
Fig. 5
6. MAINTENANCE
To avoid electric shock, unplug the appliance before cleaning.
To avoid damaging of the appliance and electric shock, don’t pour water on it.
Clean the appliance with so cotton cloth moistened with warm soap solution. Don’t use other
chemical solutions for cleaning.
Dust may accumulate on air-inlet and outlet grilles, therefore it is necessary to perform the
appliance cleaning regularly.
If the air lter is contaminated with dust, the air consumption and the appliance capacity de-
crease. It is recommended to check and clean the air lter once per 2 weeks.
To clean the appliance, perform all the actions indicated in the scheme:
Error codes
E1 - humidity sensor error. Remove the plug from the socket and insert it again. If the error does
not disappear, contact the service center.
E2 - temperature sensor error. Remove the plug from the socket and insert it again. If the error
does not disappear, contact the service center.
Protection codes
P1 - defrost mode. Allow time to the appliance for automatic defrost. Upon completion of the
process, the appliance will resume operation.
P2 - the bottom tank is full or inserted improperly. Drain water and insert the tank properly.

9.
Dehumidier
EN
• The plug is not inserted or
incompletely inserted to the
socket
• Electrical power interruptions
• The set humidity level is
achieved
• The tank is full
• Too short time aer energi-
zation
• Air inlet/outlet of the appliance
is blocked
• Insuciently low humidity is set
• Windows or doors in the room
are not closed
• Temperature in the room is
below 5°C
• A wax heater or another source
of water vapor works in the
room
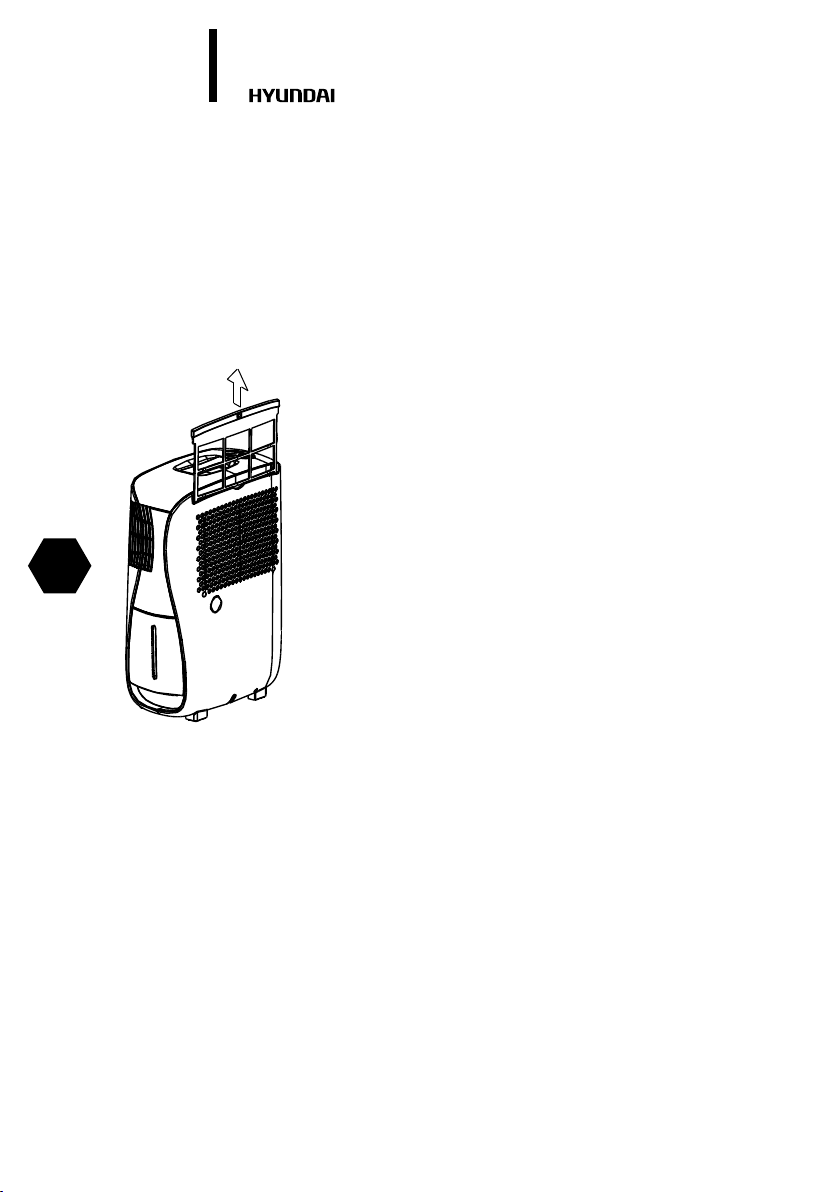
• The air lter is clogged
• The appliance is not installed
vertically
• The oor is not horizontal
• This is normal. The appliance
has an automatic thawing
system
• Malfunction of the temperature
sensor or humidity sensor
7. TROUBLESHOOTING
8. SERVICE LIFE
Service life of the appliance is 10 years provided that the respective installation and operation
rules are observed. Date of the conditioner manufacture is shown in a serial number of the
device. For more details, please, ask a shop assistant.
9. UTILIZATION RULES
Upon expiration of the service life, the appliance should be utilized in accordance with norms,
regulations and procedures eective in the place of utilization.
The appliance does
not work
Insucient output
The appliance works
too loudly
There is hoar frost on
the heat exchanger
The power indicator
blinks at the rate of 5
times per second
• Check connection to the mains
• Wait for recovery of electrical
power supply, contact the power
supplier
• Wait for increase of humidity in
the room
• Drain water from the tank
• Make sure that there are no
obstacles for air ow
• Select lower humidity on the
control panel
• Close windows and doors
• Wait until temperature rises
• Wait until the water vapor source
stops
• Flush the lter
• Install the appliance vertically
• Level the oor or move the appli-
ance to another location
• The appliance will automatically
switch to the thawing mode,
when necessary
• Remove the plug from the
socket and insert it again. If the
malfunction does not disappear,
contact the service center.
Failure Reason Remedy

10.
RU
1.
2.
3.
4.
5.
6.
7.
8.
9.
10.
11
11
12
13
14
16
17
18
18
18

11.
RU
!
Hyundai.
.
1.
.
,
.
.
,
.
,
.
, .
(
) 2 .
2.
1. ,
.
2. .
, .. .
3.
.
4. :
- ;
- ;
- ;
- , .
5. .
6. ( )
.
7. .
8. .
9. ,
,
.
10. 220-230 / 50 .
.

12.
RU
3.
1
(/)
()
()
/
3/
()
()
()
()
()
20
3
460
220~240/50
2.0
220
51
R410
I
IPX0
11.5
12.5
350x233x508
405x270x534
H-DEH2-20L-UI008

13.
RU
4.
.
1.
2.
3.
4.
5.
6.
7.
8.
:
( ) – 1 .
– 1 .
– 1 .
– 1 .
. 1
1
8
6
7
4
5
3
2

14.
RU
5.
1. Maxi. Maxi.
2. Power. , .
3. Mode (Set).
( ) :
35 - 35
40 - 40
45 - 45
50 - 50
55 - 55
60 - 60
65 - 65
70 - 70
75 - 75
80 - 80
4. LED . ,
±5
5. Maxi
6. Water Full
. 2
3
3
42
5
6
1

15.
RU
, (,
). , WATER
FULL . , ,
(. ).
.
( )
(.
).
. 3
:
1.
3 ,
.
3 ,
.
2.
Water Full, .
3. ,
,
.
4. 5-32°.
5. ( Power )
, 10
, .
,
.
6. ,
3 .
.
7. Defrost, ,
.
, .
. 4

16.
RU
6.
, ,
.
.
,
. .
,
.
,
.
2 .
:
E1 – . .
.
E2 - . .
.
P1 – . .
.
P2 - . .
. 5

17.
RU
7.
5
•
•
•
•
•
•
•
•
•
5
•
•
•
•
• .
•
•
•
,
•
•
• ,
•
•
•
•
•
•
•
•
•
.
-

18.
RU
8.
10
.
.
.
9.
, , .
11.
,.

19.
RU
!
, , Hyundai
.
www.btpart.ru,
.
www.h-hvac.ru

RU
:
. 32
2014
Table of contents
Other Hyundai Dehumidifier manuals