I-gotU GT-820 SERIES User manual

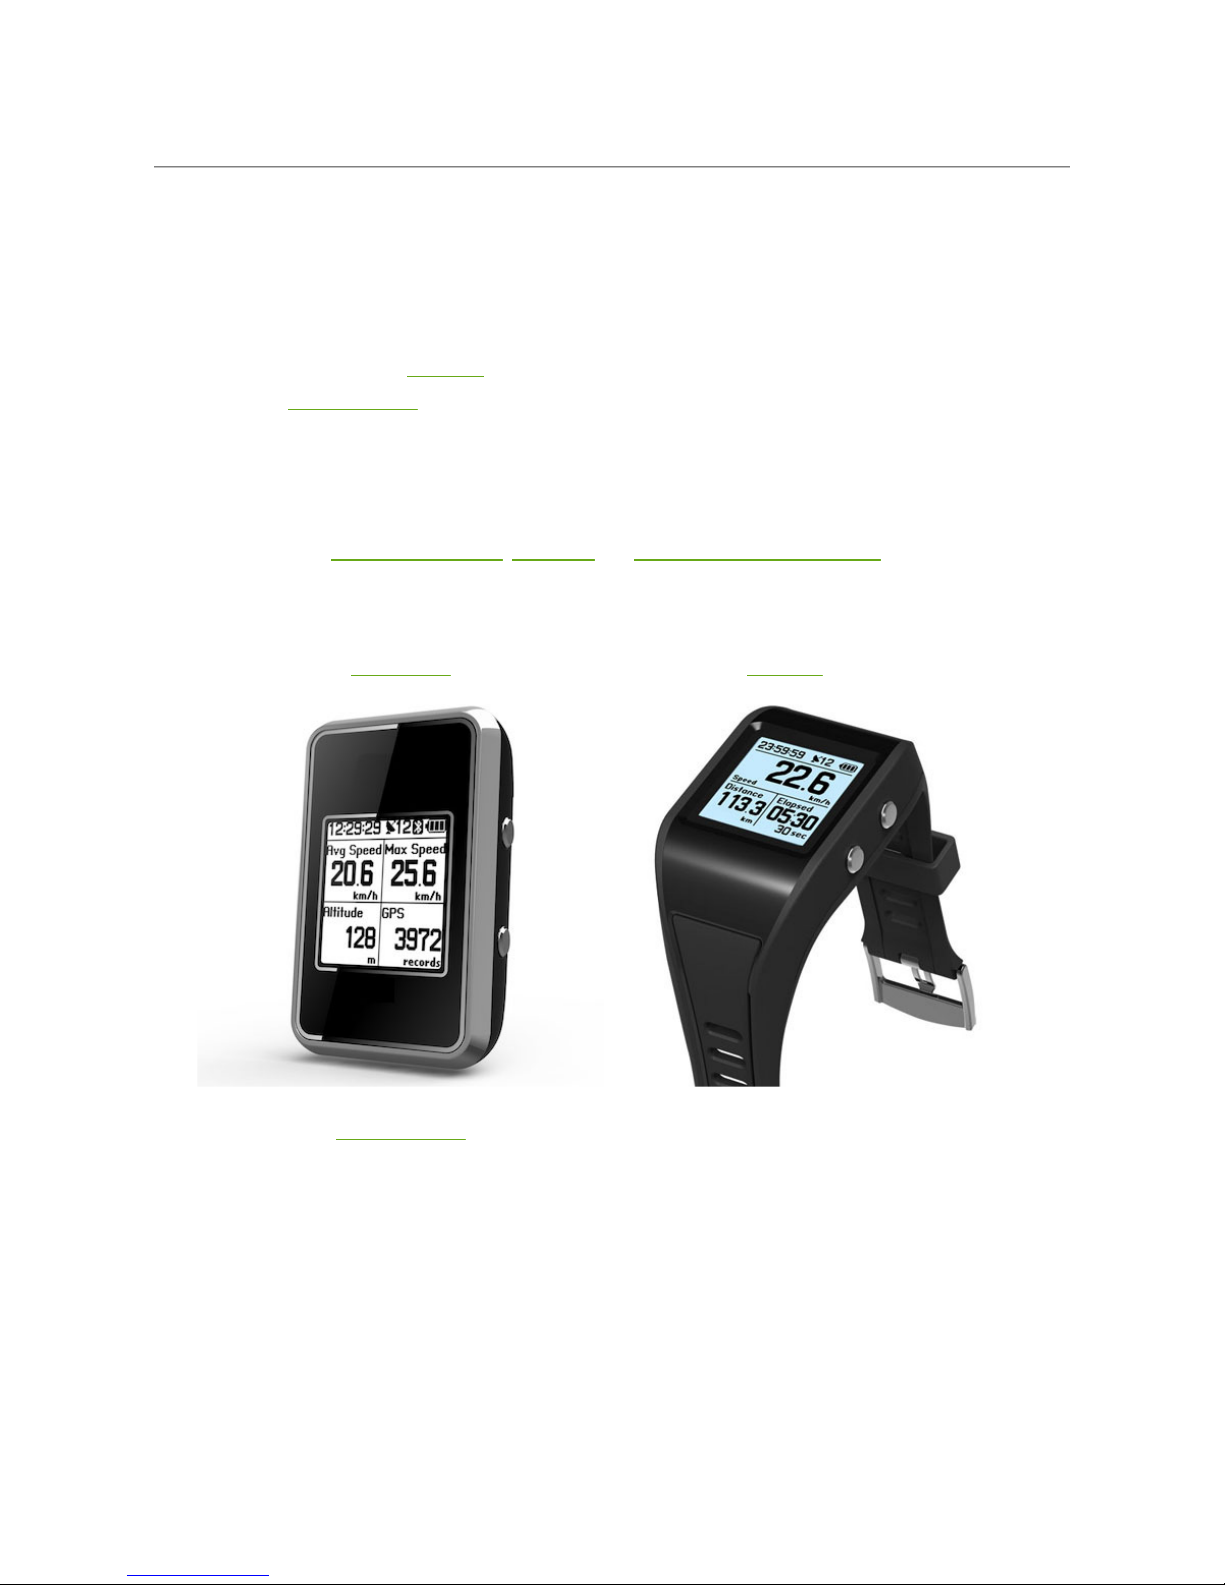
GPS Computer
1. Up
2. Down
3. Menu
4. USB Port
5. GPS
6. Carrying Strap Hole
7. Spea er
Note: Please ma e sure USB port is securely sealed to prevent unexpected water inlea age.
Power/Menu button
Buttons
Front view Back view
Bike Mount
Attach to a bike mount Dettach from a bike mount
1. Press down the wrench on the bi e mount.
2. Slide out the GPS Computer as directed.
Page
1
of
2
GPS Device Overview
2012/10/13
mk:@MSITStore:C:\Documents%20and%20Settings\Paul1106\
桌面
\
Travel%20&%2
...

1. When the GPS device is turned off or in Cloc mode, pressing the Power/Menu button for 2 seconds turns N the GPS
device.
2. When the GPS device is turned on, pressing the Power/Menu button for 2 seconds brings up the main menu. Selecting
Mode & Power > Power Off option from the main menu allows you to turn FF the GPS device.
3. When the GPS device is powered on, long pressing the Power/Menu button for 2 seconds brings up the main menu. To
select an option shown on the main menu, press the Power/Menu button again.
Up and Down buttons
1. Pressing either one of the buttons toggles between different menu pages.
2. Pressing the Down button for 2 seconds on main display turns ON/OFF the bac light.
3. Pressing the Up button for 2 seconds on the main display sets up a POI of your current location.
Power N/ FF
1. The GPS device automatically turns on when connected to external power via a power adapter, or connected to PC via USB.
2. The GPS device automatically re-starts logging (counter/pedometer/GPS data resets, etc.) at 00:00:00 everyday.
Hardware Reset
Pressing down both the Up and Down buttons simultaneously for 5 seconds resets hardware settings.
Next
Page
2
of
2
GPS Device Overview
2012/10/13
mk:@MSITStore:C:\Documents%20and%20Settings\Paul1106\
桌面
\
Travel%20&%2
...
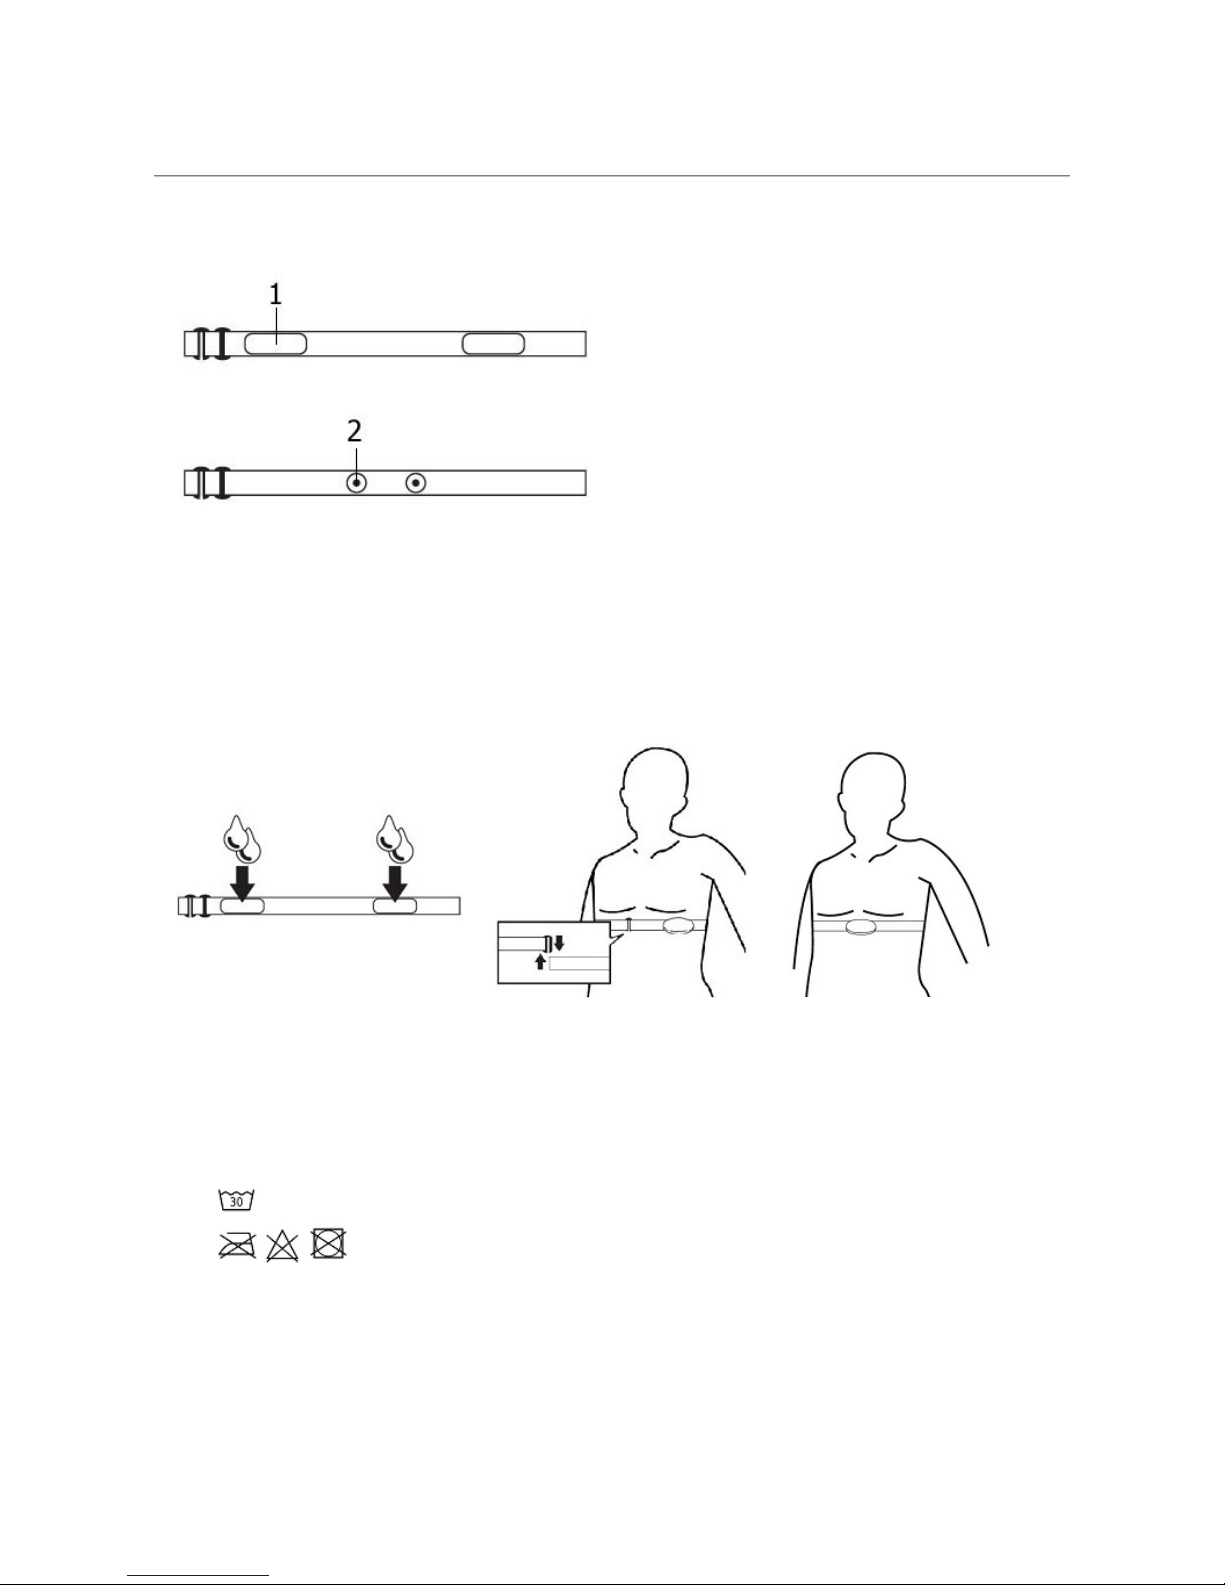
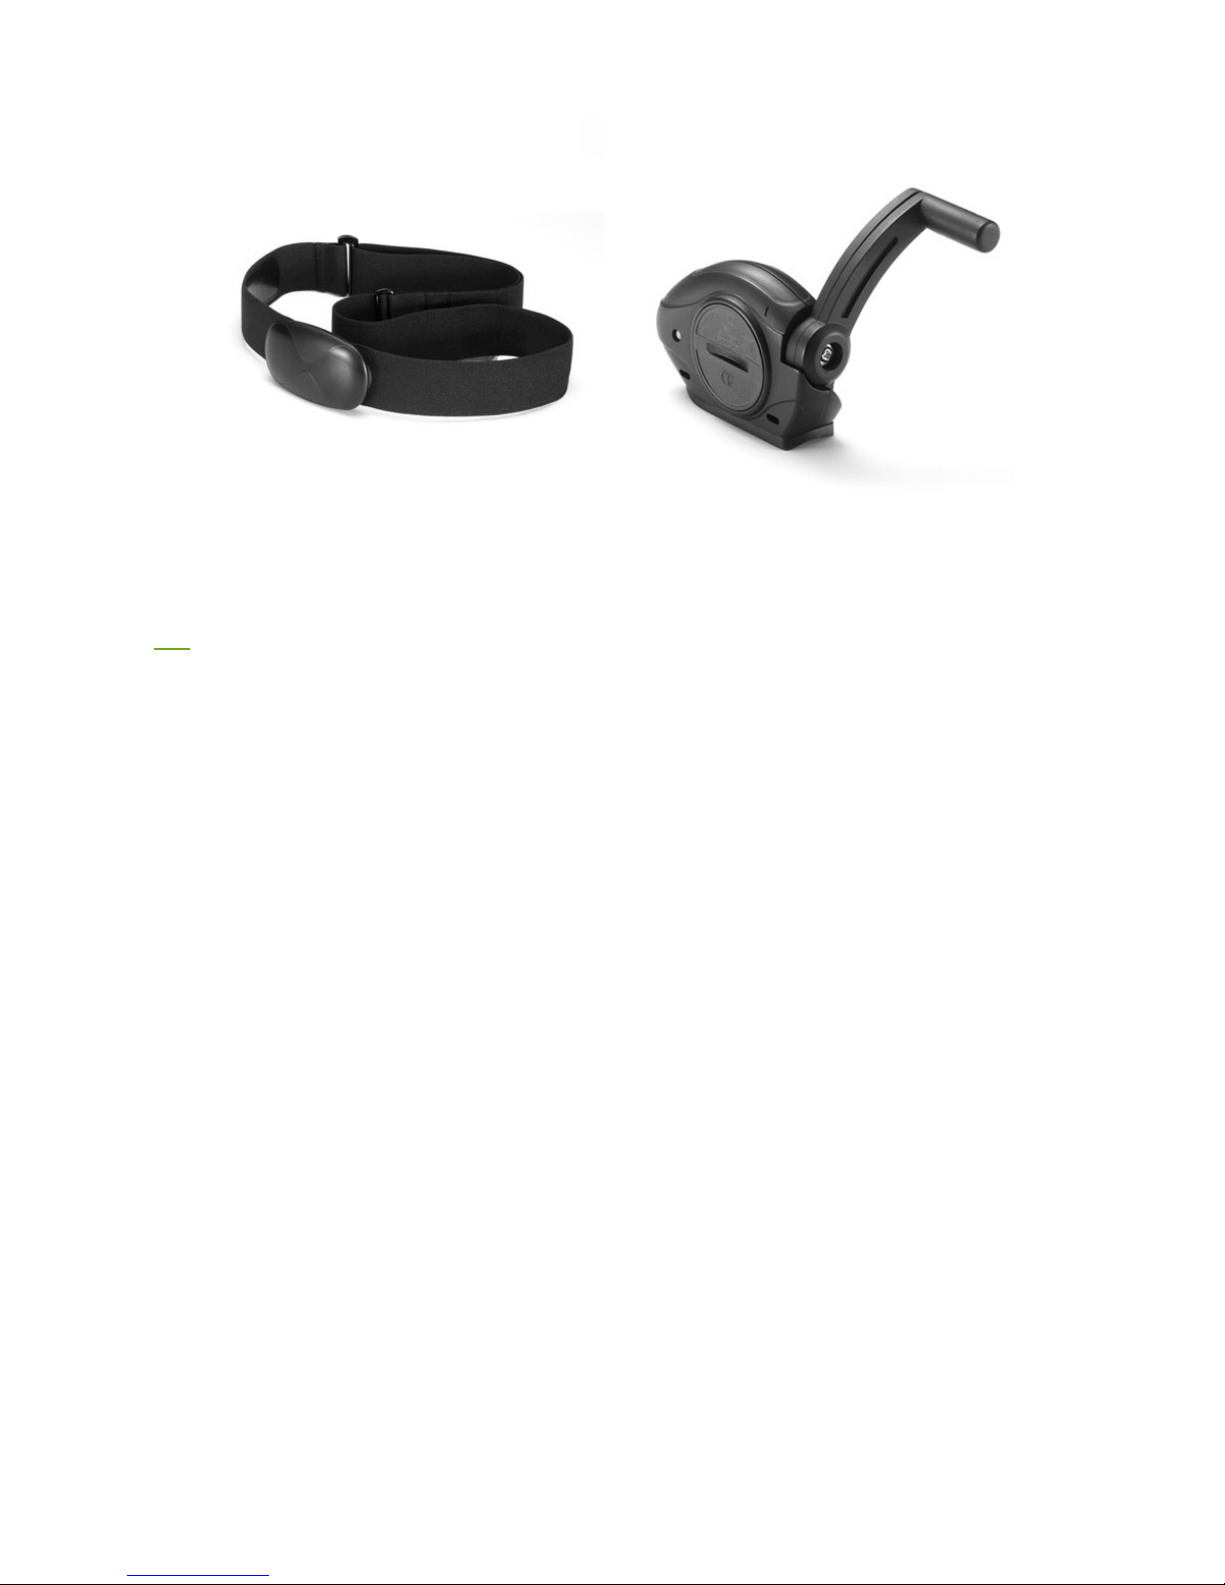
Heart Rate Monitor
Note: This is an accessory available for purhcase optionally.
1. Electrodes
2. Fastening buttons
How to wear the Heart Rate Monitor
1. Wet the electrodes as shown above.
2. Fasten up with the clips on both ends. Adjust the strap to assure it's not too tight or loose so as to detect
accurate heart rate data.
3. Wear it slightly below your chest. Adjust the sensor position to the center of your body while electrodes must
be pressed against your skin.
Note:
- Before washing the device detach the main part of Heart Rate Monitor where electrodes are located. This part is not washable.
- : While washing the straps make sure water is no higher than 30°C.
- : Ironing bleaching or heating is prohibited.
How to assemble and change battery
1. 2. 3.
Page
1
of
2
Heart Rate Monitor Overview
2012/10/13
mk:@MSITStore:C:\Documents%20and%20Settings\Paul1106\
桌面
\
Travel%20&%2
...

1. Detach the Heart Rate Monitor from the strap.
2. Use a coin to unclinch the back cover.
3. Remove the battery inside with a new one.
4. Close the back cover onto the device.
Note: Please make sure the back cover is securely sealed to prevent unexpected water leakage.
Next
Page
2
of
2
Heart Rate Monitor Overview
2012/10/13
mk:@MSITStore:C:\Documents%20and%20Settings\Paul1106\
桌面
\
Travel%20&%2
...
Getting Started with GPS Device
To get started with the GPS device, please follow the steps described below:
1. Install Travel & Sports Suite software from the CD.
. Connect the GPS device to your PC using the USB cable.
3. Keep the GPS device connected to PC and charge for at least 4 hours prior to first use.
4. Unplug the GPS device from PC once fully charged, and press the Power/Menu button for seconds to power on.
5. On the GPS device, enter your user profile for calculation of Maximum Heart Rate and Calories burned.
6. Connect with Heart Rate Monitor:
- On the main menu, select: Bluetooth > Scan.
- Once paired, select Connect.
Note:
- This step is only necessary for those who purchased Heart Rate Monitor. Make sure Heart Rate Monitor is properly worn before proceeding this step.
- Heart Rate Monitor is an optional accessory for purchase.
- Pairing is only necessary for the first time.
7. On the GPS device, select a display language, set the time, and select a measurement unit standard.
Note: Before setting time, please go outdoors to obtain a GPS fix first.
GPS Computer GPS Watch
Heart Rate Monitor Cadence/Speed Sensor
Page
1
of
2
GT800_get started
2012/10/13
mk:@MSITStore:C:\Documents%20and%20Settings\Paul1106\
桌面
\
Travel%20&%2
...
Ne t
(Available for purchase optionally)
Page
2
of
2
GT800_get started
2012/10/13
mk:@MSITStore:C:\Documents%20and%20Settings\Paul1106\
桌面
\
Travel%20&%2
...
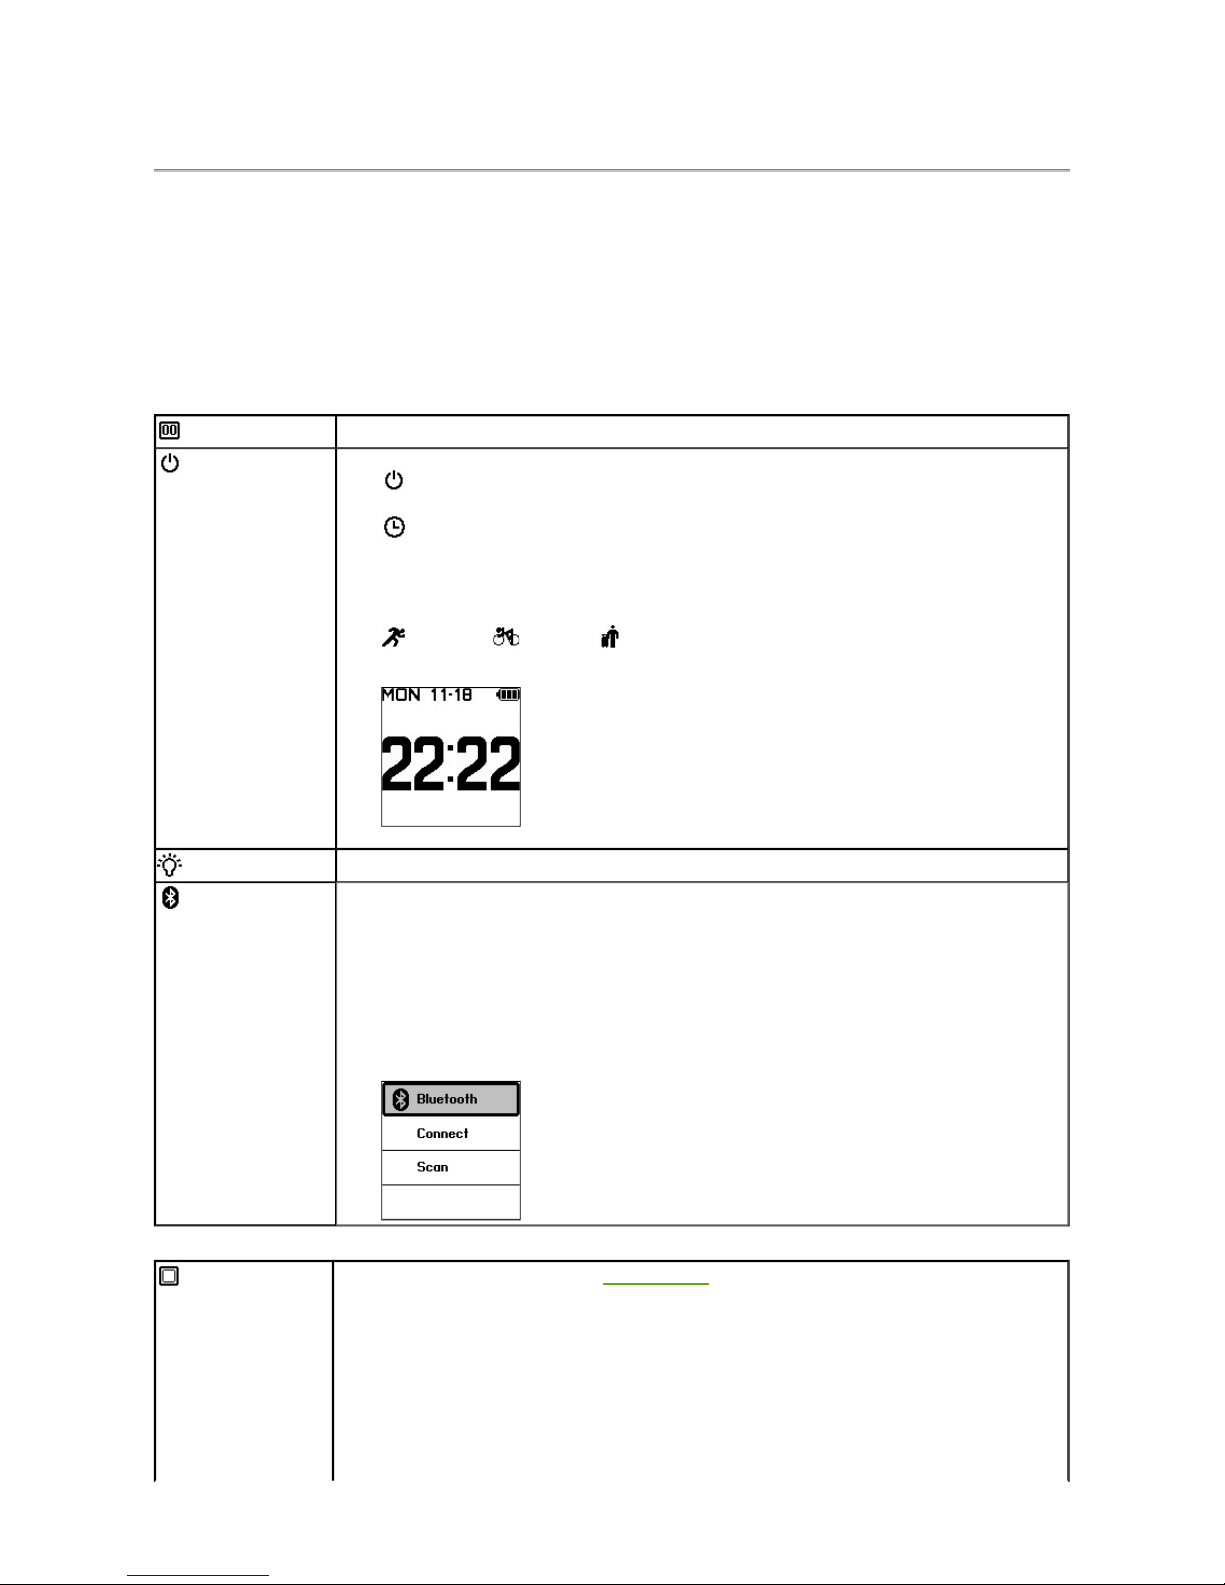
Main Menu
1. On the main display, long press the Menu button for 2 seconds to return to the main menu.
2. Use the Up and Down buttons to toggle between menu pages, and then press the Menu button once to
select your option.
3. To exit the main menu without selecting any option, long press the Menu button for 2 seconds.
Note: Menu pages will ary upon different models and firmware ersions.
Menu Settings
Counter Reset
This resets the counter on specific GPS main displays, such as Stopwatch, Lap, GPS and etc.
Mode & Power
This allows you to choose a sports mode, or turn off the GPS de ice.
Power Off
: This turns off the de ice. When de ice is turned off or in clock mode, pressing
the menu button for 2 seconds will turn on the de ice.
Clock: While in clock mode, pressing on the Up or Down button turns on the backlight,
and turns it off while button is let go.
Note: The screen will be turned off automatically to sa e power when the de ice is left motionless.
Running/ Cycling/ ravel: Each mode indicates the type of your current
acti ity in process. Calories consumed are calculated differently in each mode.
Backlight
This allows you to turn ON/OFF the backlight display.
Bluetooth
This function can be used to connect and pair with Heart Rate Monitor. Make sure Heart Rate
Monitor has been well set before connecting for the first time. Press Scan and the de ice will
start searching and getting paired automatically.
If pre iously paired, simply press Connect to complete connection ia Bluetooth.
When the GPS de ice is turned on and start logging, it will attempt to connect with de ices
pre iously paired automatically.
Note: In order to sa e power, if Heart Rate Monitor was still being used after de ice was powered off, the
de ice will automatically establish bluetooth connection when de ice is powered on again. Otherwise,
siimply press Connect to start connection manually.
Display Setup
This allows you to customize 6 function pages on the main display, including self-defined
measurement data.
1. Press the Menu key to enable/disable the screen.
2. After enabled, press the Up or Down button to toggle between different data fields.
3. At the highlighted data field, press the Menu key, and the field will start blinkng, indicating
ready for further setting.
4. When the field is blinking, use the Up or Down button to switch between arious data
information, and press the Menu key to set the selected data to be displayed.
5. Repeat the steps abo e to set another function page if needed, or press the Up
button to scroll
back to the last function page defined, and press the Menu
key to sa e settings and exit. (See
the illustration shown below for more details.)
Page
1
of
6
GT800_menus
2012/10/13
mk:@MSITStore:C:\Documents%20and%20Settings\Paul1106\
桌面
\
Travel%20&%2
...

General Setup
Language
This allows you to choose a language for screen display.
User Profile
This allows you to input your basic information, including Gender, Height, Weight and Age.
Log Interval
This allows you to set the log inter al by using the Up and Down buttons.
Power Saving
This allows you to acti ate/de-acti ate the power sa ing feature. When power sa ing is ON,
GPS precision will be lower, while GPS precision is higher when it is OFF.
ime Settings
This allows you to set the time of the GPS de ice. Before setting time, please go outdoors to
obtain a GPS fix first.
Pressing the menu key allows you to choose a time format for display: 24 hour or 12 hour.
Page
2
of
6
GT800_menus
2012/10/13
mk:@MSITStore:C:\Documents%20and%20Settings\Paul1106\
桌面
\
Travel%20&%2
...

Unit Options
This allows you to select either Metric (km) or Imperial (mile) standard as the measurement
unit.
Sound
This allows you to turn On/Off the sound alert.
Device Reset
This resets all the de ice settings back to factory default alues, while all data stored in
memory will also be cleared.
Alert Setup
Heart Rate
Alert
This allows you to set up a maximum and a minimum heart rate alue (bpm) for alert.
Duration
This allows you to set up an alert when time duration (min) has reached the alue configured.
Distance
This allows you to set up an alert when the distance (km) tra elled has reached the alue
configured.
Page
3
of
6
GT800_menus
2012/10/13
mk:@MSITStore:C:\Documents%20and%20Settings\Paul1106\
桌面
\
Travel%20&%2
...
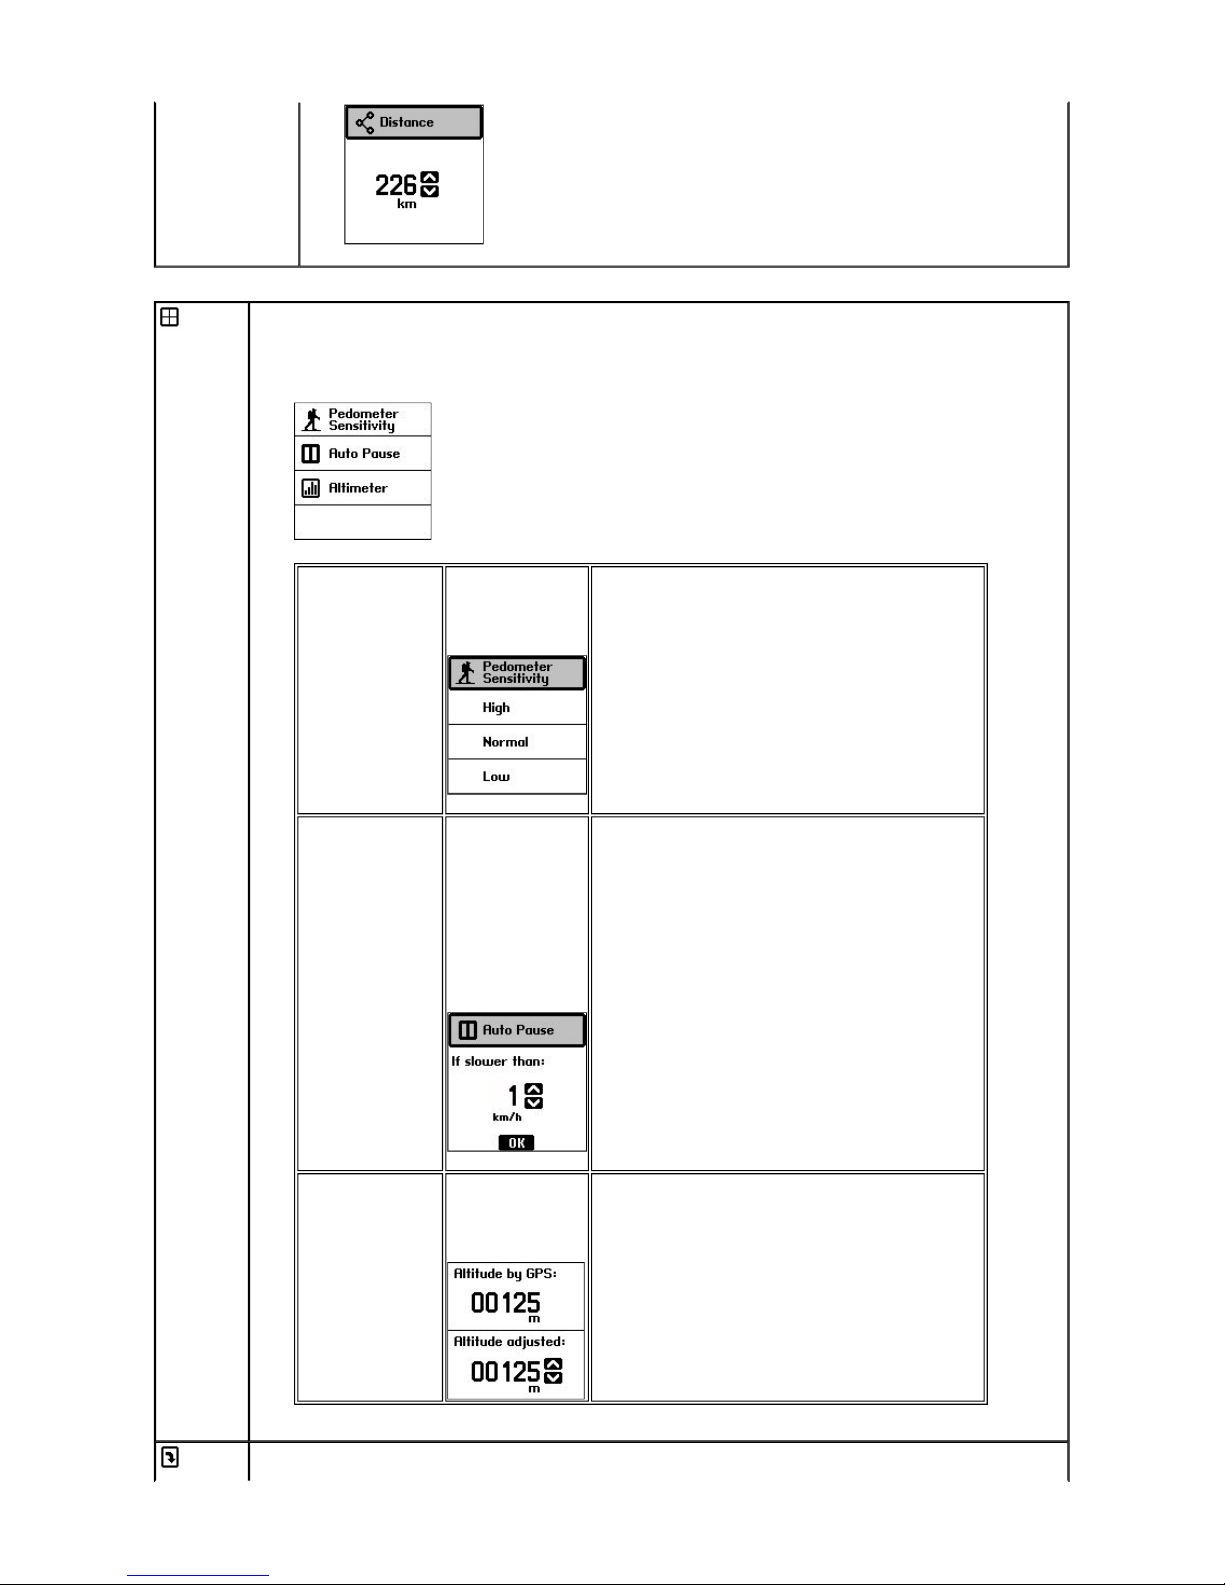
Calibration
This allows you to calibrate Pedometer Sensiti ity, Auto Pause, and Altimeter.
Note: Altimeter option is only a ailable in "Pro" models where barometric altimeter is a ailable.
Pedometer
Sensitivity
Adjust the
sensiti ity of the
pedometer
function.
Auto Pause Use the Up and
Down buttons to
set a speed alue
in km/h.
Mo ements or
waypoints slower
than the
configured speed
will not be included
in GPS statistics.
Note:
1. Configuration of 0 km/h will disable Auto Pause
function.
2. When Auto Pause is enabled, elapsed time will not be
counted, unless the de ice obtains a GPS fix with a
faster speed than the one configured here.
3. Stopwatch and Lap functions will not be affected when
Auto Pause is enabled.
Altimeter Use the Up and
Down buttons to
adjust the altitude
if needed:
Note: The altitude detected by Altimeter may ary upon the
change of barometric pressure and temperature daily.
Howe er, the adjusted altitude after calibration will be more
accurate and stable than the one detected by GPS.
Screen
This allows you to rotate the screen display to either a ertical or horizontal iew.
Page
4
of
6
GT800_menus
2012/10/13
mk:@MSITStore:C:\Documents%20and%20Settings\Paul1106\
桌面
\
Travel%20&%2
...

Rotate
History
This allows you to look up a list of history logs.
Press the Power/Menu button and select History to see more options.
Fi e types of history logs are a ailable for selection: Laps, Odometer, Pedometer, GPS Records, and
Calories.
Each history log page displays different GPS data:
Laps Odometer Pedometer GPS Records Calories
Laps: This page includes the data of Lap ime, Distance, and Speed logged
for each lap.
Odometer: This page includes the data of total ime and Distance accumulated
e eryday.
The first row shows the total time and distance accumulated to date.
D: This row shows the total time and distance accumulated within
today.
-1: This row shows the total time and distance accumulated within
yesterday, and so on.
Pedometer: This page includes the data of total Steps accumulated e eryday.
The first row shows the total steps accumulated to date.
D: This row shows the total steps accumulated within today.
-1: This row shows the total steps accumulated within yesterday,
and so on.
GPS
Records:
This page includes the data of total GPS Records accumulated e eryday.
The first row shows the total GPS Records accumulated to date.
D: This row shows the total GPS Records accumulated within today.
-1: This row shows the total GPS Records accumulated within
yesterday, and so on.
Calories This page includes the data of total Calories accumulated e eryday.
The first row shows the total calories accumulated to date.
D: This row shows the total calories accumulated within today.
-1: This row shows the total calories accumulated within yesterday,
and so on.
Exit
This exits the main menu and get you back to the pre ious main screen.
Page
5
of
6
GT800_menus
2012/10/13
mk:@MSITStore:C:\Documents%20and%20Settings\Paul1106\
桌面
\
Travel%20&%2
...

Next
Page
6
of
6
GT800_menus
2012/10/13
mk:@MSITStore:C:\Documents%20and%20Settings\Paul1106\
桌面
\
Travel%20&%2
...

GPS Main Display
Icon Illustration
Current time
Number of satellites detected
Battery power indication
Bluetooth (solid: connected; gray: connecting or scanning; invisible: turned off)
Function Page
Self-defined function page
To create your own page, you may use the following available data fields:
Speed, Distance, Elapsed, Avg. Speed, Max. Speed, Pace, Pedometer, Altitude, Grade, Ascent Total Ascent), Descent
Total Descent), GPS, POI, Calories, Heart Rate, Avg. HR, HR %Max, Avg. %Max, and HR Zone
Note: Grade is only available in "Pro" models
General function page
Compass
This main display shows directional information
The compass function here can be either GPS Compass or Digital
Compass, depending upon different models
GPS
Compass
The direction shown here is simulated by GPS
for reference Without GPS fixes, GPS Compass
will become unavailable
The direction detected will be more precise
when the GPS device is on the move, but
jiggling around when it's moving in low speed
or stays motionless
Digital
Compass
This is only available with the "Pro" models With
Digital Compass, you'll be prompted to calibrate the
compass by waving the device twice in a figure 8
Satellite
The upper half of the display includes information like Satellite ID (numbers)
and corresponding signal strength (bar chart)
The lower half of the display includes information like GPS precision and
coordinates of current position
Note: The solid bar indicates a valid satellite detected, while the hollow bar indicates an invalid
satellite detected
Location Navi
This main display includes POI information uploaded from Route Planner, such
as current distance (e g 16 83 km), estimated time of arrival (e g 20:49),
Page
1
of
3
GT800_display
2012/10/13
mk:@MSITStore:C:\Documents%20and%20Settings\Paul1106\
桌面
\
Travel%20&%2
...

Next
and altitude difference (e g 165 m)
Press Menu button once, and press down either the Up or Down button to
scroll/browse through all POI records Don't let go of the button until you find the
POI you want to start navigation with
To return to previous display screen, press the Menu button once
001 ~ 100 indicate those POI records uploaded from Route Planner; 101 ~ 999
indicate those POI records logged in the device
Long press the Menu button to further call out a menu page that includes more
options:
Clear POI: This allows you to clear all existing POIs when the number of POI
records has reached the maximum value
Track
This main display includes the track drawn upon recorded waypoints
The point of flag shown on the path indicates a POI
The solid square point shown on the path indicates your current position
Press the Menu button once, and you can adjust the size of the scale by pressing
the Up or Down button Press the Menu button again to complete changes
When returned to the main menu from this main display, you'll be given one
more option - Restart Track, which allows you to restart tracking
Stopwatch
This main display includes information like Stopwatch (sec), Speed
(km/h), and
total Distance (km)
Press Menu button to start the stopwatch Press again to pause counting time,
and press again to resume
Long press the Menu button to return to the main menu, and selecting the
Counter Reset option from the main menu also resets the counter
Lap
This main display includes information like Lap Time
(the time taken to complete
one lap in seconds), number of laps taken (laps), and Distance (km)
Press the Menu button once, and the GPS device will start counting laps as 1
Press the Menu button again, laps will be counted as 2, and so on To reset laps,
press Menu button for 2 seconds to return to the main menu, and select
Counter Reset
While on this main display, you may press the Up button for 2 seconds to pause
counting laps, and then press it again for 2 seconds to resume counting laps
Altimeter
This main display shows a chart that indicates the corresponding altitudes as you
move
Press the Menu button once, and then use the Up and Down buttons to scroll
right and left as distance increases
Press the Menu button again to return to the main display
Page
2
of
3
GT800_display
2012/10/13
mk:@MSITStore:C:\Documents%20and%20Settings\Paul1106\
桌面
\
Travel%20&%2
...

Page
3
of
3
GT800_display
2012/10/13
mk:@MSITStore:C:\Documents%20and%20Settings\Paul1106\
桌面
\
Travel%20&%2
...

Heart Rate
Heart Rate is the avearge number of heart beats per minute. It is important to know more about heart rate measurements and use the heart
rate charts to understand and help improve your overall cardio fitness.
1. What is Maximum Heart Rate
A Maximum Heart Rate (Max HR) is the highest number of beats your heart contracts within a minute. Max HR is useful when measuring
training intensity and level of exercise.
2. What is Resting Heart Rate
A Resting Heart Rate is the number of heart beats within a minute while you're at a completely rest state. This indicates your basic
overall heart health and fitness level.
3. What is a Heart Rate Zone
A Heart Rate Zone is a heart rate range that helps you maintain an intensity level while you work out. Different heart rate zones are for
different types of athletes and level of exercise you are following.
Next
Heart Rate Zone Intensity % of Maximum Heart Rate
1 Relaxed, easy pace; rhythmic breathing 50% - 60%
2 Comfortable pace; slightly deeper breathing, conversation
possible 60% - 70%
3 Moderate pace; more difficult to hold conversation 70% - 80%
4 Fast pace a bit uncomfortable; breathing forcefully 80% - 90%
5 Sprinting pace, unsustainable for long period of time; labored
breathing 90% - 100%
Page
1
of
1
GT800_get started
2012/10/13
mk:@MSITStore:C:\Documents%20and%20Settings\Paul1106\
桌面
\
Travel%20&%2
...

FCC Compliance and Advisory
Statement
This device complies with Part 15 of the FCC rules. Operation is subject to the following two
conditions: 1) this device may not cause harmful interference, and 2) this device must accept
any interference received, including interference that may cause undesired operation.
This equipment has been tested and found to comply with the limits for a Class B digital device,
according to Part 15 of the FCC rules. These limits are designed to provide reasonable
protection against harmful interference in a residential installation. This equipment generates,
uses and can radiate radio frequency energy and if not installed and used in accordance with
the instructions, may cause harmful interference to radio communications. However, there is no
guarantee that interference will not occur in a particular installation. If this equipment does
cause harmful interference to radio or television reception, which can be determined by turning
the equipment off and on, the user is encouraged to try correct the interference by one or more
of the following measures:
1. Reorient the receiving antenna.
2. Increase the separation between the equipment and receiver.
3. Connect the equipment into and outlet on a circuit different from that to which the
receiver is connected.
4. Consult the dealer or an experienced radio/TV technician for help.
Any special accessories needed for compliance must be specified in the instruction manual.
Warning: A shielded-type power cord is required in order to meet FCC emission limits and also
to prevent interference to the nearby radio and television reception. It is essential that only the
supplied power cord be used. Use only shielded cables to connect I/O devices to this
equipment.
CAUSION: Any changes or modifications not expressly approved by the party responsible for
compliance could void your authority to operate the equipment.
Next
Page
1
of
1
FCC Warning
2012/10/13
mk:@MSITStore:C:\Documents%20and%20Settings\Paul1106\
桌面
\Travel%20&%2
...
This manual suits for next models
1
Table of contents
Other I-gotU GPS manuals


