5
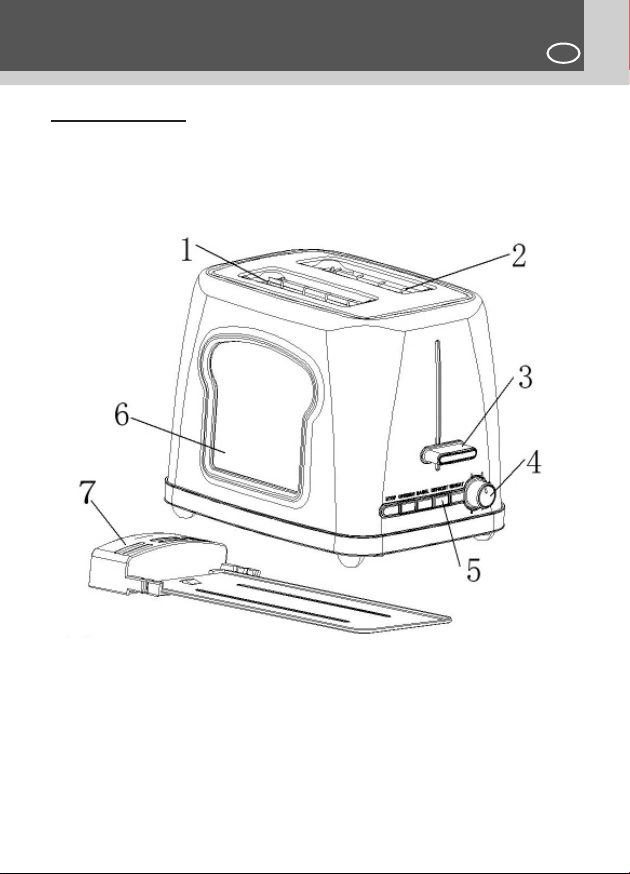
TOASTER MANUALE DI ISTRUZIONI ITA
ISTRUZIONI DI SICUREZZA
Si prega di leggere attentamente le istruzioni prima di utilizzare l’apparecchio,
e seguire sempre le istruzioni di sicurezza e di funzionamento.
Questo apparecchio può essere utilizzato da bambini al di sopra degli 8 anni di età e
da persone con ridotte capacità siche, sensoriali e mentali o con scarsa esperien-
za e conoscenza SOLO SE supervisionati o istruiti adeguatamente sull’uso sicuro
dell’apparecchio stesso e se sono in grado di comprendere i pericoli insiti. Questo
apparecchio non è un giocattolo per bambini. La manutenzione e la pulizia non
devono essere eseguite da bambini. Tenere l’apparecchio e il suo cavo al di fuori
dalla portata dei bambini al di sotto degli 8 anni.
ATTENZIONE: IL SACCHETTO DI RIVESTIMENTO NON è UN GIOCO. TENE-
RE AL DI FUORI DELLA PORTATA DEI BAMBINI PER EVITARE IL RISCHIO DI
SOFFOCAMENTIO.
Controllare che la tensione di rete corrisponda a quella indicata sull’apparecchio.
Non lasciare mai l’apparecchio incustodito quando è in uso.
IMPORTANTE: Se la leva delle griglie si blocca durante l’uso (ad esempio perché le
fette di pane sono troppo spesse) e il pane inizia a bruciare, scollegare immediata-
mente l’apparecchio e lasciarlo raffreddare prima di svuotarlo e pulirlo.
• Controllare il cavo dopo ogni utilizzo. Non utilizzare l’apparecchio se il cavo o
l’apparecchio mostra segni di danneggiamento. Se il cavo risulta danneggiato,
l’apparecchio deve essere riparato da un centro autorizzato.
• Utilizzare l’apparecchio solo nel modo indicato in queste istruzioni d’uso.
• Non immergere mai l’apparecchio in acqua o altri liquidi. Non lavare in lavastovi-
glie.
• Non utilizzare l’apparecchio in prossimità di fonti calore.
• Prima della pulizia, staccare sempre la spina dalla presa di corrente.
• Non utilizzare l’apparecchio all’esterno e conservarlo in un ambiente asciutto.
• Non utilizzare accessori non in dotazione. Essi potrebbero costituire un pericolo
per l’utente con il rischio di danneggiare l’apparecchio.
• Non spostare l’apparecchio tirando il cavo. Assicurarsi che il cavo non possa impi-
gliarsi in alcun modo. Non avvolgere il cavo intorno all’apparecchio e non piegarlo.
• Tenere l’apparecchio in posizione orizzontale su un tavolo o una supercie piana.
• Assicurarsi che l’apparecchio si sia raffreddato prima di pulirlo e riporlo.
• Assicurarsi che il cavo non entri mai in contatto con le parti calde dell’apparecchio.