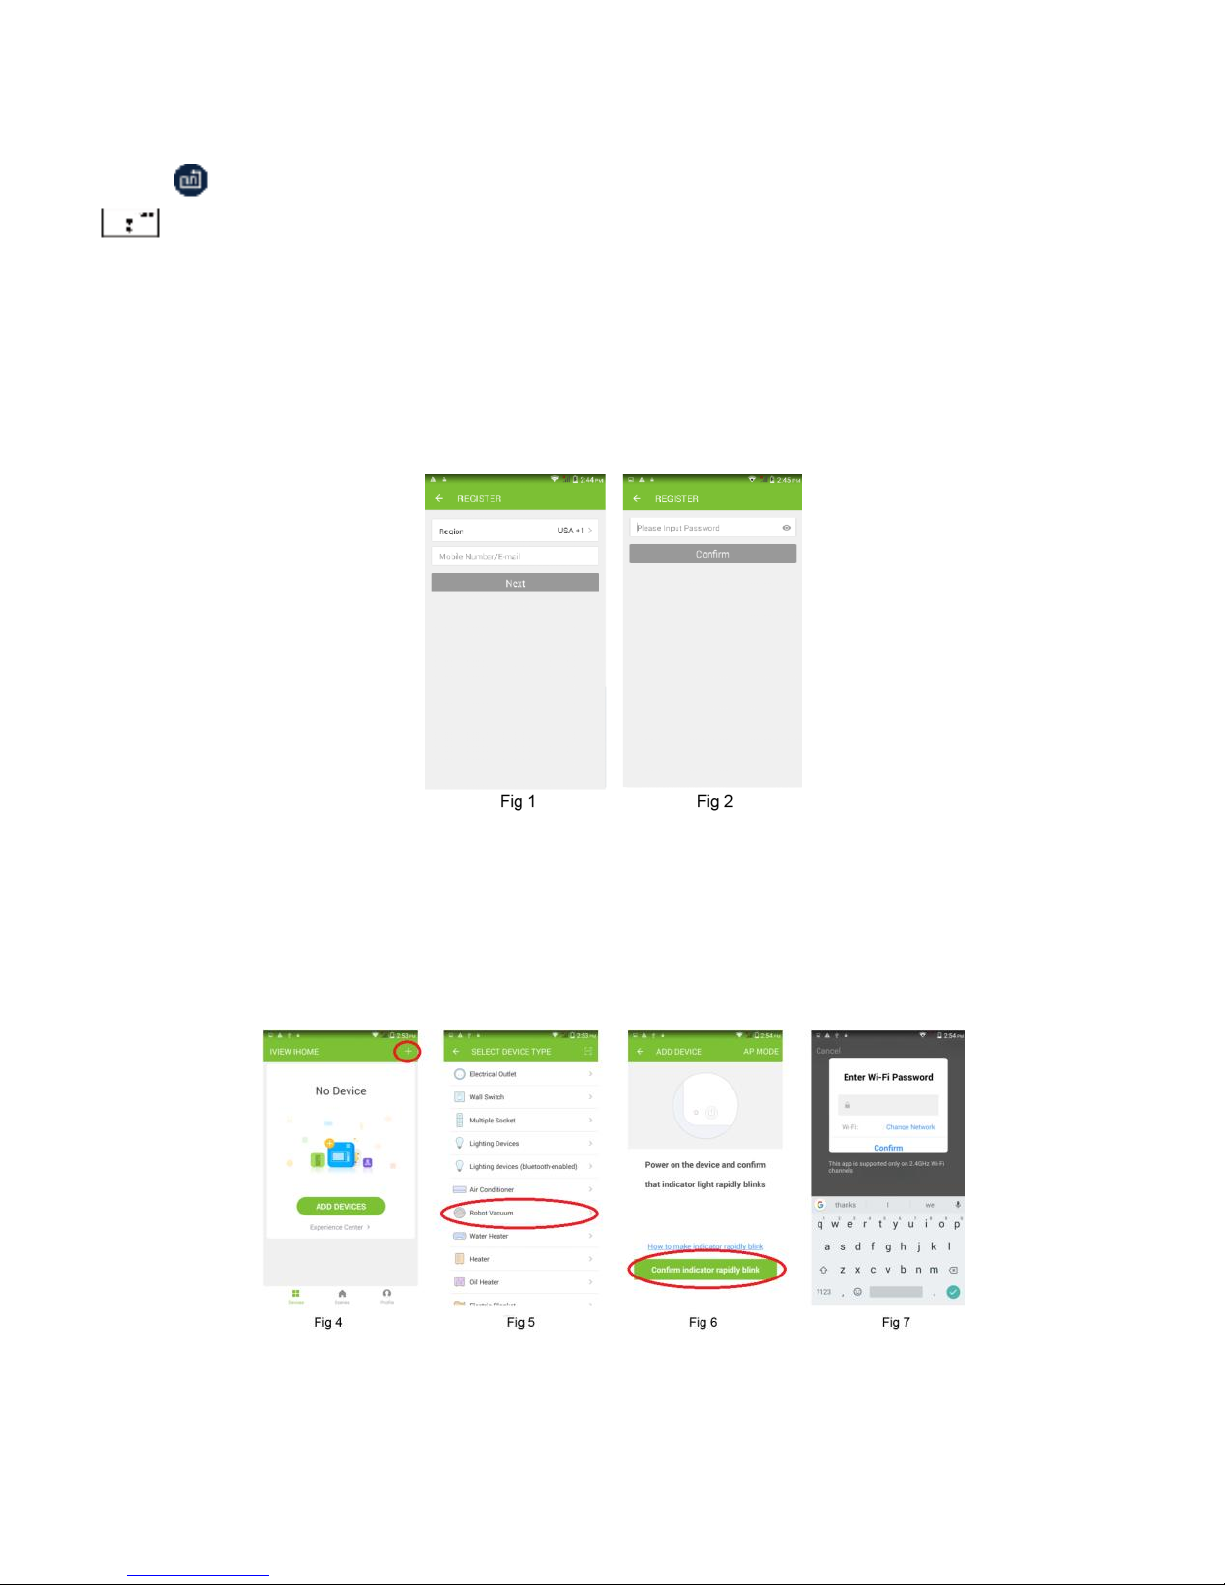
I-View Smart Vacuum User manual

User Manual
Smart Vacuum
To assure the product to work in best status
please read the guide carefully before operation and keep it well for future use

To save time and relax after a hard day’s work, iView is pleased to introduce our new product –
iView 2-in-1 Smart Vacuum. With the most advanced wireless technology, you can control the
vacuum with ease by using the remote, your smart phone, or by voice command (thanks to its
compatibility with Amazon Alexa). Connecting with our iView iHome APP allows you to control the
vacuum anytime anywhere or schedule a cleaning in just few clicks. Powerful suction delivers
optimal cleaning results on short carpets. This vacuum also comes with an innovative water tank
enabling the ability to mop hard wood/laminate/tile floor. Thanks to its slim design, this vacuum
can clean under furniture with little to no trouble. If you are looking for a versatile robotic vacuum,
the iView 2-in-1 Smart vacuum is a must buy!
*** Please make sure that your smart vacuum, your router, and your phone are in close proximity
of each other before you start APP connection.
Router
Suggested distance: less than 15 ft.

Quick Start Guide
***Important*** Before connecting your vacuum, make sure it is powered on. Press and hold
AUTO button on the robot for at least 3 seconds until it beeps. If the LED panel displays
, your robot ready to be connected..
1. IView iHome App
Download and install the iView iHome APP from the Apple or Google Play store.
Register an account using either your email or your cell phone number [Fig 1].
Enter a password and select “Confirm” [Fig 2]
Tap +on the top-right corner to add a new device [Fig 4]. Scroll down and select Robot Vacuum [Fig 5];
Make sure the Wi-Fi icon on your vacuum is blinking rapidly and select Confirm [Fig 6]; Enter your Wi-fi
password and select Confirm [Fig 7]. Vacuum will begin connecting to your network [Fig 8]; Connection
will reach 100% when finished.[Fig 9];

You can select the Rename Icon to rename your Vacuum [Fig 10]; Once device is listed, select it
to access app functions.[Fig 11];

2. APP Controls
In your iHome App, you can manually control your vacuum using
the directional controls at the top of the screen
Additionally, you have the following controls for automatic
functions located near the bottom of the screen:
[Auto]: Vac will clean the entire room in a zigzag pattern
[Spot]: Vac will spot clean in a circular pattern
[30min]: Vac will go into Auto-Clean mode for 30 minutes.
[Edge]: Vac will go into Edge-Cleaning mode and clean the edges
of a room.
[Dock]: Vac will search for the nearest charging station.
[Full Go]: Enable/Disable High-Power cleaning mode.
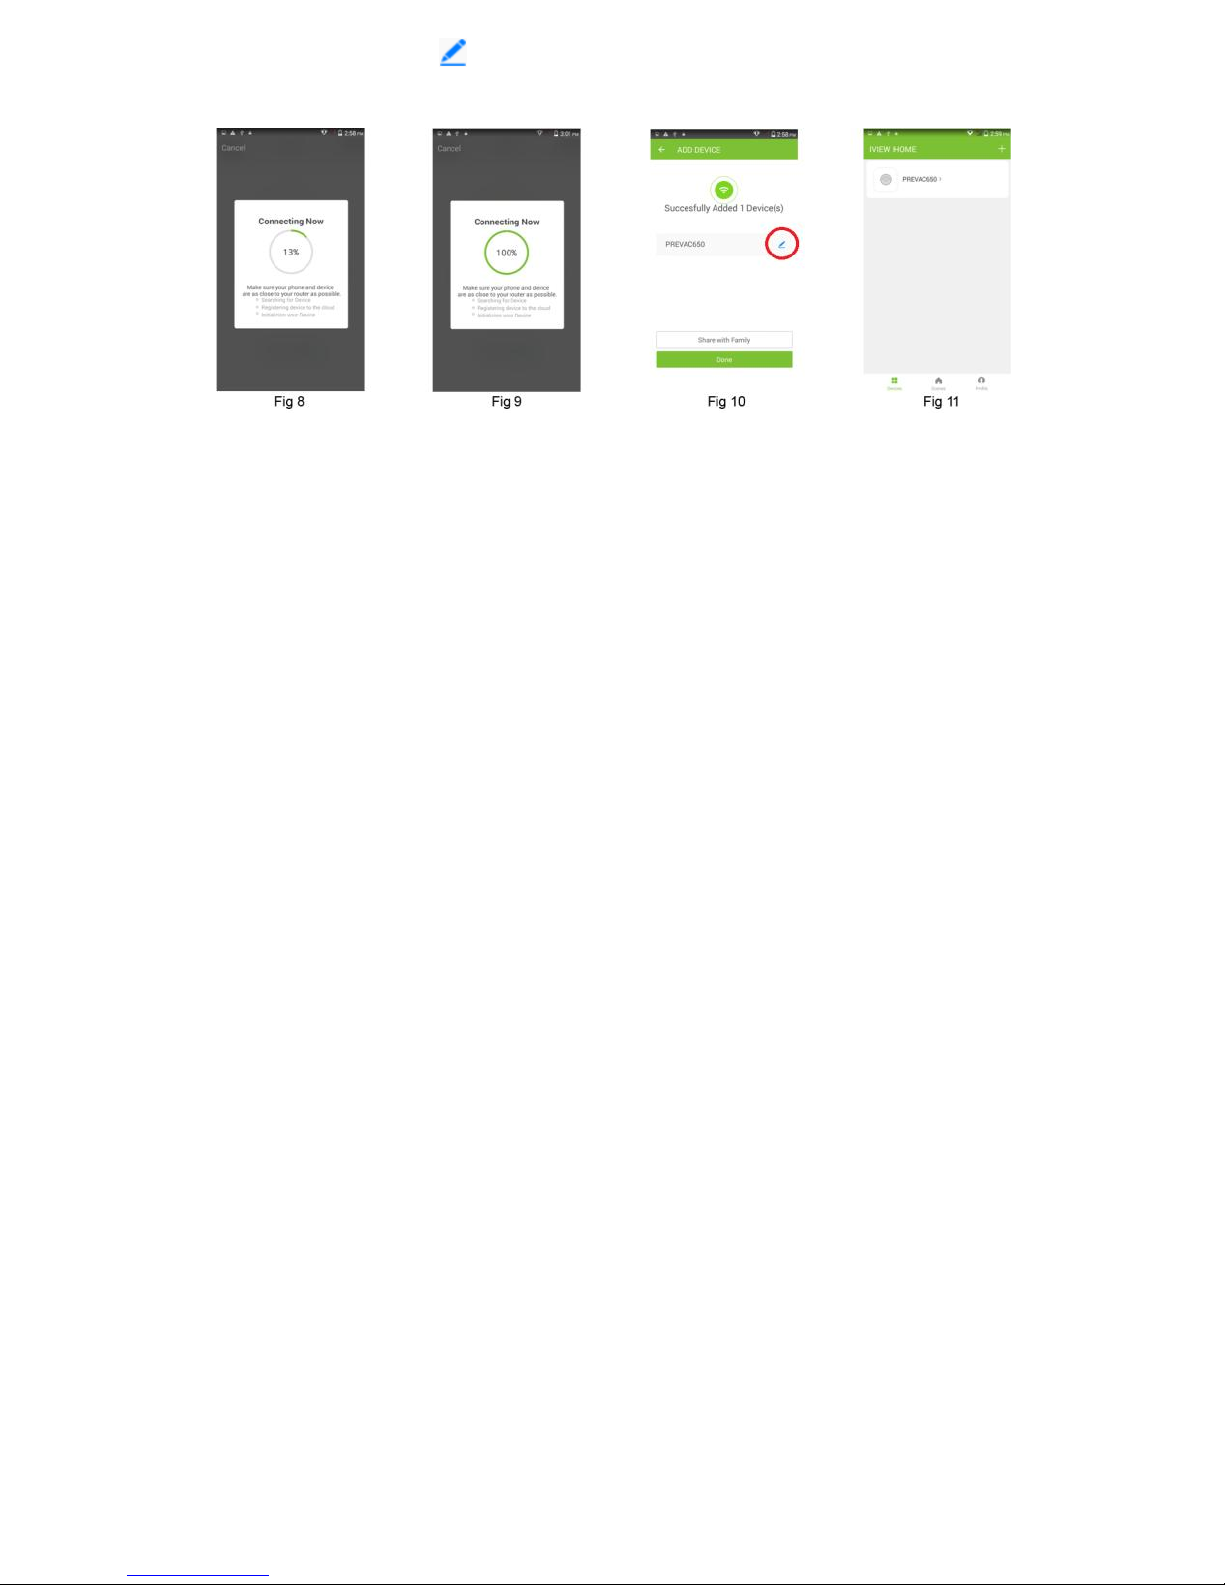
3. Schedule
If you scroll down in the App controls, there will be an option labeled “Schedule”. Here, you can
schedule how your vacuum behaves. First, select “SCHEDULE” [Fig 12]. Then select the option
“ADD TIMER” located at the bottom of the screen. Here, you have the option of setting what time
your vacuum will act [Fig 13]. You can select REPEAT to select which days will repeat this action [Fig
13]. You can then select MODE, to decide what your vacuum will be doing at that time. Select SAVE
when finished.
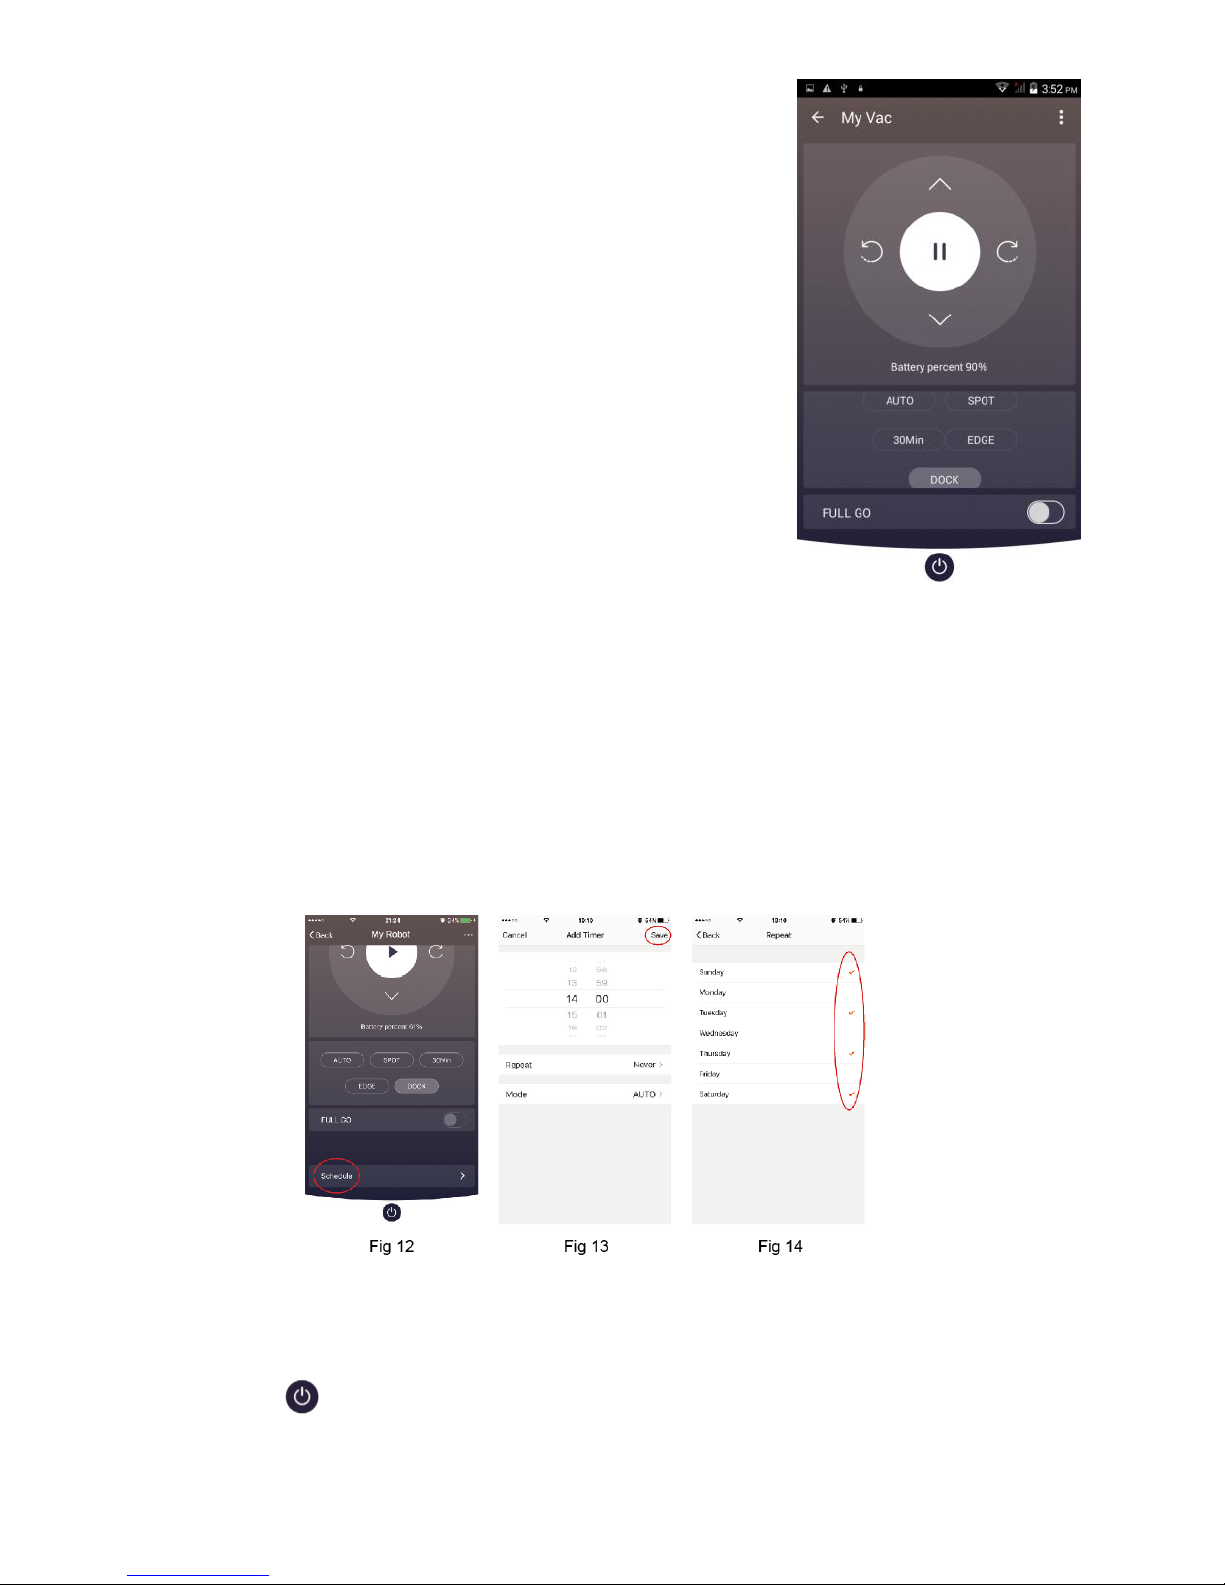
4. Wake Up / Sleep Mode
Press the On/Off symbol, at the bottom of the screen to enter Sleep Mode on your robot;
Note: App controls will darken when robot is in Sleep Mode;
Press the On/Off symbol again to awaken the robot.

5. Device Sharing
By default, only one user has access to the Smart Vac. However, if you want to share the vacuum
with other family members, select the options icon on the top right corner of the App controls
[Fig 19], Select Add Sharing [Fig 20], Enter the Email or Cell Phone number of anyone you wish to
share access with [Fig 21] and select CONFIRM.
Note: All other users MUST register an IView iHome ID before using.
6. Wi-Fi Reset
To reconnect your vacuum to a different network, press and hold the AUTO button on the
device for 3 seconds to reset it. The robot will beep and the Wi-Fi icon will begin blinking. Follow
the steps in the Quick Start section to reconnect your robot.

Table of Contents
1. Important Safety Information ············································································· 1
2. Product Overview································································································ 2
2.1 Iview SmartVac ·························································································· 2
2.2 Charging station ························································································ 2
2.3 Display panel ····························································································· 3
2.4 Remote control·························································································· 3
3. Product Functions ······························································································· 4
3.1 Remote Control Functions········································································· 4
3.2 SmartVac Functions··················································································· 5
3.3 Charging your SmartVac ············································································ 7
4. Assembly & Maintenance ··················································································· 8
4.1 Side Brushes ······························································································ 8
4.2 Main brush and Roller ··············································································· 8
4.3 Dustbin and Filter······················································································ 8
4.4 Water Tank and Mop Attachment ····························································· 9
4.5 Additional Maintenance············································································ 9
5. Troubleshooting ································································································ 10
6. Device Specifications························································································· 10

- 1 -
1. Important Safety Information
Please read the following safety instructions before using this product to avoid damage.
Warning! To avoid risk of product damage or personal injury, please obey the following guidelines.
To avoid risk of shock or fire, do not bend or
apply pressure to the power cord.
To avoid risk of shock or fire, always use the
provided charger when charging the vacuum.
To avoid risk of shock, keep both the vacuum
and it’s charger out of water.
Keep the product away from heat or
flammable objects.
While in use, keep device away from clothing,
hair, or items that that may become entangled
in the brushes.
To avoid personal injury, do not attempt to
disassemble or alter the device.
To avoid electric shock, or short circuit, make
sure the charger is firmly plugged into the
socket.
Do not use the product to vacuum stones,
metals, large pieces of waste, or heated
objects like cigarette butts.
To avoid product damage or personal injury, do
not sit or stand on product.
To avoid product damage, do not use in
elevated areas (IE, stairs, balconies, etc.),
where it may fall.
To avoid product damage, clear up all fragile,
braided fabrics, glasses or bottles before use.
Use the provided mopping attachment when
cleaning liquid spills.
To avoid injury, be careful when operating this
product around children.
This product is meant for indoor use only. Do
not operate outdoors.
Please switch the product off when not in use
for long periods of time.
Do not use it in public or commercial places.
Children and people with disabilities should not operate this product without direct supervision.

- 2 -
2.Product Overview
2.1 Iview SmartVac
1 Anti-falling Sensor
2 Charging sensor
3 Side brush
4 Wheel
5 Main brush
6 Dustbin or water tank
7 Anti-collision sensors
8 Tape
9 Universal wheel
10 Charging port
11 Power switch
12 Tank removal switch
13 Display panel
14 Home button
15 Auto-clean button
16 Spot-Clean button
2.2 Charging station
1 Signal receiving window
2 DC Charging port
3 Charging sensor

- 3 -
2.3 Display panel
Status Display:
Aside from displaying the time, SmartVac will also display one of the following, showing its current
status.
2.4 Remote Control
1 WIFI display
2 Battery Status
3 Time/Plan display
1 On/Off button
2 Auto-Clean button
3 OK button
4 Edge clean button
5 Clock button
6 Turbo Mode
7 Plan button
8 Spot clean button
9 Full-Go Mode
10 Directional buttons
11 Auto-charge button

- 4 -
3. Product Functions
3.1 Remote Control Functions
Basic remote functions for your SmartVac. For
additional information on your SmartVac’s
functions, see Section 3.2.
1 Power
Press once to put the robot into Sleep Mode.
Press again to awaken robot from Sleep Mode.
2 Auto button
Robot will enter Auto-Clean mode.
3 OK button
When setting the time or a schedule, press to
confirm changes.
4 Edge Cleaning
Robot will enter Edge Cleaning mode.
5 Clock button
Manually set the device clock.
6 Turbo Mode
While robot is cleaning, press to activate Turbo
Mode. Robot will increase its movement speed.
Press again to disable Turbo Mode.
7 Plan button
Press to schedule a time to clean. Robot will
clean daily during the scheduled time.
8 Spot Cleaning
Robot will enter Spot Cleaning mode.
9 D mode button
Enables and disables Full-Go Mode. During
Full-Go mode, robot will increase cleaning
efficiency.
10 Direction button
1 Forward
Moves the robot forward. Increases the hour
and minute values when setting the time or
cleaning schedule.
2 Backward
Moves the robot backwards. Decreases the
hour and minute values when setting the time
or cleaning schedule.
3 Left Arrow
Rotates the robot counter-clockwise. Will also
skip between hour and minutes when setting
the time or schedule.
4 Right Arrow
Rotates the robot clockwise. Will also skip
between hour and minutes when setting the
time or schedule.
11 HOME Button
Manually tells the robot to charge. Robot will
automatically locate the nearest charging
station.

- 5 -
3.2 SmartVac Functions
Cleaning Modes
Before initiating any of the following cleaning
modes, make sure the robot is currently
powered on, via the power switch.
Note: If the robot is in Sleep mode, press the
Power button on your vacuum remote to
awaken the robot. Robot will be ready to clean
Auto Clean Mode
The robot vacuum uses an advanced
navigation system that calculates the best path
to efficiently clean your room. While it’s in
Auto Clean mode, it will clean rooms
automatically in a zigzag pattern and adjust its
path according to its environment.
You can activate Auto Clean mode by pressing
the AUTO button on the remote, robot, or via
the app.
Auto Clean mode can be terminated at any
time, by pressing any of the cleaning job
buttons on the robot itself or on the remote.
2 Spot Clean Mode
Place the robot in the desired area to spot
clean. Press the Spot cleaning button on the
remote, robot, or via the app to activate spot
cleaning mode.
Robot will begin cleaning in a spiral pattern
and will stop once the job is complete. Spot
cleaning mode can be terminated at any time,
by pressing any of the cleaning job buttons on
the robot itself or on the remote.
Edge Cleaning Mode
Place the robot close to a wall and press the
Edge Cleaning button. The robot will clean the
edges of the room. Edge cleaning mode can be
terminated at any time, by pressing any of the
cleaning job buttons on the robot itself or on
the remote.
4 Full-Go Mode
During any cleaning mode, press the D button
on the remote to activate Full-Go Mode. While

- 6 -
in Full-Go Mode, the robot will increase
cleaning efficiency during any cleaning job.
Press the D button again to disable Full-Go
mode. Full-Go mode can also be enabled and
disabled during Standby mode.
Standby mode
The robot will enter standby mode when
in-between jobs. It will remain in standby
mode until a new job is assigned or until
powered off.
During a cleaning job, you can put the device
into standby mode by pressing any of the
cleaning job buttons on the device or the
remote.
Sleep Mode
If the device is left in Standby mode longer
than 45 seconds, it will enter Sleep Mode.
Device will enter a low-powered state and the
LED display will be turned off.
You can manually put the device in Sleep
Mode, by pressing the Power button on the
remote, while the robot is in Standby Mode.
When the device is in Sleep Mode, it can be
awakened by pressing the Power Button on
the Remote or via the app.
Setting Time/Schedule
The time can be manually set on the device
using the remote. You can also use the remote
to manually set a scheduled time to clean.
1 Setting the Time
1 Make sure your robot is turned on and in
Standby Mode.
2 Press the CLOCK button on your remote to
manually adjust the time. The left side of the
panel will begin blinking. Press the Up or
Down arrow on your remote to adjust the
hour and press OK. The right side will begin
blinking. Press the Up or Down arrow on your
remote to adjust the minutes and press OK.
3 Vacuum clock will be set. If connected to the
IView iHome app, clock will be set
automatically.
2 Scheduling a Cleaning Time
A scheduled time can be set on the vacuum
using the remote. The vacuum will clean at the
scheduled time daily.
1 Make sure your robot is turned on and in
Standby Mode.
2 Press the PLAN button on your remote to set
a daily schedule. The left side of the panel will
begin blinking. Press the Up or Down arrow on
your remote to adjust the hour and press OK.
The right side will begin blinking. Press the Up
or Down arrow on your remote to adjust the
minutes and press OK.
SmartVac Reset
If at any time, you need to reset your
SmartVac, simply switch the power to OFF for
10 seconds, and switch it back on again.
To reset your robot’s Wi-Fi connection, press
and hold the AUTO button on your robot
for 5 seconds, or until the Wi-Fi icon begins
blinking rapidly. Once the connection as been
reset, you can reconnect your robot using the
IView iHome app on your smart phone.

- 7 -
3.3 Charging Your SmartVac
Manual charging
While the robot is powered off, connect the
power plug directly to the DC socket. (As
shown below)
Charging Station Assembly
1. Place charging station against wall and
remove any obstacles within a 2 meter radius
of the charging station (as shown below).
2. Connect the adapter to DC charging socket
on charging station.
Auto Charging
When the robot is low on battery power, the
LED display will read FIND and it will
automatically begin searching for the nearest
charging station.
You can command it to search for a charging
station by pressing HOME button on either the
remote or the robot, or by selecting DOCK in
the App controls.
Charging Status
While charging, LED display will read CHRG.
Once fully charged, LED display will read FULL.
Battery Safety
To preserve battery health, please consider the
following:
- Do not manually charge your robot while it is
powered on.
- When not in use for long periods of time,
switch SmartVac off and store in a cool dry
area

- 8 -
4. Assembly & Maintenance
You can use the provided brush tool to help
clean and maintain your IView robot, shown
below:
4.1 Side brushes
The side brushes can be removed by
unscrewing them from the main unit.
Once removed, side brushes can be cleaned
using the brush-side of your brush tool.
Re-attach when finished.
4.2 Main Brush & Roller
Underneath the vacuum, press lever and pull
upwards to open. Main brush and roller can be
removed.
Roller can be cleaned using the brush side of
the tool.
The Claw-side of the tool can be used to clean
the Main brush by digging out entangled string
or hair, as well as large deposits of lint.
Re-attach, when finished.
4.3 Dustbin and Filter
On the back of the vacuum, press the button
on the dustbin and pull to remove from
vacuum.
Open dustbin by pulling the tabs on both sides,
as shown above. Dispose of contents in the
garbage.

- 9 -
To clean the Filter, open dustbin by pulling the
tabs on both sides, as shown before. Remove
filter cover as well as felt filter, as shown below.
Dust off both before re-inserting.
Note: Do NOT clean filter or cover with water.
Dustbin can be cleaned with a damp cloth.
When finished, re-insert filter and filter cover
and close the dustbin. Reinstall, by pushing
dustbin back into place until it clicks.
4.4 Water Tank and Mop Attachment
The Iview robot comes with a specialized water
tank and mop attachment to mop up spills
Before installation, connect the mop
attachment by inserting the sides of the water
tank into the specialized holes on the
underside of the mop shown below. Press
down firmly onto the water tank.
On the reverse side of the water tank, open the
tank by pulling on the rubber seal, shown below.
Pour a small amount of cleaning solution into the
tank and fill the rest with water.
Note: Do not use excessive amounts of
cleaning solution as it may ruin the robot.
On the back of the vacuum, press the button
on the dustbin and pull to remove from
vacuum, as shown on Section 4.3. Insert water
tank into the rear of the vacuum until it clicks.
Maintenance
Before cleaning water tank, empty out dirty
water from the tank and remove mop
attachment.
Water tank can be cleaned by pulling open the
rubber seal and lightly rinsing out the inside with
water. Mop attachment is machine-washable.
Allow tank to dry before reusing
4.5 Additional Maintenance
- Clean all sensors using a soft cloth.
- Clean the charging poles on the robot with a
damp cloth.
- Keep wheels and roller clean of any hair and
animal dander or string.

- 10 -
5. Troubleshooting
If the robot detects any issues, they will be displayed as an Error code on the LED Panel.
You can use the table below to troubleshoot the issue and find the correct solution
Error
Codes
Causes
Solutions
Error
Codes
Causes
Solutions
Er 01
Right side
brush stuck
Remove objects
wrapped around brush
Er 05
Right wheel
fault
Clean the right
wheel of blockage
Er 02
Left side
brush stuck
Remove objects
wrapped around brush
Er 06
Vacuuming
motor fault
Remove objects
wrapped around roller.
Er 03
Main brush
stuck
Remove objects
wrapped around brush
Er 07
Anti-falling
sensor fault
Clean the
anti-falling sensors
Er 04
Left wheel
stuck
Clean the left wheel
of blockage
Er 08
Wheel off the
ground
Put the robot on
solid ground
If above solutions do not work, reset the robot by switching of the unit and then turn it on and
check for errors again.
Note: If it still doesn’t work after device reset, contact after-sales or local distributor.
6. Device Specifications
Mechanical Specification
Diameter
320mm
Height
88mm
Weight
3.0KGS
Electrical Specification
Rated Power (W)
14.8
Rated Voltage (V)
18
Rated Output Voltage (V)
19
Rated Output Current (A)
0.6
Battery
2600mAh Lithium
Remote Control
Input Voltage (V)
3
Other Parameters
Dust Box
600ml
Water Tank (Optional)
300ml water box + 600ml dust box
Cleaning Modes
Auto (with Zigzag), Spot, Edge, Schedule
Charging Time
180-240min
Cleaning Time
80-120min

Basic Warranty Statement
This product is warranted to the original purchaser ONLY, to be free from defects in materials and
workmanship under normal use, for ninety (90) DAYS (parts and labor) and one (1) YEAR (parts
only) from the date of original purchase. We agree under the warranty period to replace product if
it is determined to be defective at 'No Charge" This limited warranty does not cover any loss or
damages that occur as result of:
Cosmetic damage.
Shipping or improper installation or maintenance.
Misuse.
Neglect.
Any cause other than ordinary commercial or industrial
application.
Adjustment by non-authorized source or any of the
Product’s firmware or hardware that you or any third party have modified or altered
Improper environment
Excessive or inadequate heating or air conditioning or electrical power failures, surges,
connection to improper voltage supply or settings or other irregularities
Accidents, or acts of God
In the United States and Canada contact Customer Service at www.iviewus.com.
Please note that in order to have your merchandise repaired and replaced by warranty, you
must contact our customer service representatives by phone or email, and get RMA number.
To obtain factory service, the original purchaser MUST present the following:
1. A sales receipt/proof of purchase indicating date of purchase
2. Your name, place of purchase, address, unit model and description of problem.
3. Send the unit pre-paid to the address below in the original packaging or reasonable substitute to
prevent damage. No return will be shipped back to a PO BOX.
4. All of the accessories that came with the product package must be sent along with the main unit
5. Please include your check or money order in the amount of $30.00 to cover handling and return
shipping charges we will not be responsible for delays or unprocessed claims resulting from
purchaser's failure to provide any or all of the necessary information
6. There is Additional Shipping Charge for areas outside of United States. For shipping charge please
consult with our customer service.

Please review your user
Guide carefully before
Using this product.
Additional troubleshooting information
can also be found on the web at:
www.iviewus.com and click on “Support”
Other manuals for Smart Vacuum
1
Table of contents
Other I-View Vacuum Cleaner manuals
Popular Vacuum Cleaner manuals by other brands

Clatronic
Clatronic BS 1303 instruction manual

Parkside
Parkside PNTS 1300 C3 Translation of the original instructions

Neato Robotics
Neato Robotics botvac connected Troubleshooting and maintenance guide

Hoover
Hoover U5753900 manual

Samsung
Samsung VS15A6032R5 user manual

Premier
Premier AS-4480 instruction manual