IBM 7316 - TF1 Rack Console Product manual

7316-TF3
17-Inch
Flat
Panel
Rack-Mounted
Monitor
and
Keyboard
Installation
and
Maintenance
Guide
SA38-0643-00
ERserver


7316-TF3
17-Inch
Flat
Panel
Rack-Mounted
Monitor
and
Keyboard
Installation
and
Maintenance
Guide
SA38-0643-00
ER s e r v e r

First
Edition
(May
2004)
Before
using
this
information
and
the
product
it
supports,
read
the
information
in
“Safety
Notices”
on
page
v
and
Appendix
C,
“Notices,”
on
page
33.
A
reader’s
comment
form
is
provided
at
the
back
of
this
publication.
If
the
form
has
been
removed,
address
comments
to
Information
Development,
Department
H6DS-905-6C006,
11501
Burnet
Road,
Austin,
Texas
78758-3493.
To
send
comments
electronically,
use
this
commercial
internet
address:
Any
information
that
you
supply
may
be
used
without
incurring
any
obligation
to
you.
©
International
Business
Machines
Corporation
2004.
All
rights
reserved.
Note
to
U.S.
Government
Users
Restricted
Rights--Use,
duplication
or
disclosure
restricted
by
GSA
ADP
Schedule
Contract
with
IBM
Corp.

Contents
Safety
Notices
.
.
.
.
.
.
.
.
.
.
.
.
.
.
.
.
.
.
.
.
.
.
.
.
.
.
.
.
.
.
.
.
.
.v
Rack
Safety
Instructions
.
.
.
.
.
.
.
.
.
.
.
.
.
.
.
.
.
.
.
.
.
.
.
.
.
.
.
.
.
.v
Relocating
the
Rack
.
.
.
.
.
.
.
.
.
.
.
.
.
.
.
.
.
.
.
.
.
.
.
.
.
.
.
.
.
.
.vi
Electrical
Safety
.
.
.
.
.
.
.
.
.
.
.
.
.
.
.
.
.
.
.
.
.
.
.
.
.
.
.
.
.
.
.
.
.vi
Data
Integrity
and
Verification
.
.
.
.
.
.
.
.
.
.
.
.
.
.
.
.
.
.
.
.
.
.
.
.
.
.
.ix
About
This
Book
.
.
.
.
.
.
.
.
.
.
.
.
.
.
.
.
.
.
.
.
.
.
.
.
.
.
.
.
.
.
.
.xi
References
to
AIX
Operating
System
.
.
.
.
.
.
.
.
.
.
.
.
.
.
.
.
.
.
.
.
.
.
.
.
.xi
Highlighting
.
.
.
.
.
.
.
.
.
.
.
.
.
.
.
.
.
.
.
.
.
.
.
.
.
.
.
.
.
.
.
.
.
.
.xi
Related
Publications
.
.
.
.
.
.
.
.
.
.
.
.
.
.
.
.
.
.
.
.
.
.
.
.
.
.
.
.
.
.
.
.xi
Trademarks
.
.
.
.
.
.
.
.
.
.
.
.
.
.
.
.
.
.
.
.
.
.
.
.
.
.
.
.
.
.
.
.
.
.
.xi
Chapter
1.
Introduction
.
.
.
.
.
.
.
.
.
.
.
.
.
.
.
.
.
.
.
.
.
.
.
.
.
.
.
.
.
.1
Check
Your
Inventory
.
.
.
.
.
.
.
.
.
.
.
.
.
.
.
.
.
.
.
.
.
.
.
.
.
.
.
.
.
.
.1
Chapter
2.
Installing
the
7316-TF3
17-Inch
Flat
Panel
Rack-Mounted
Monitor
and
Keyboard
.
.
.3
Safety
Considerations
.
.
.
.
.
.
.
.
.
.
.
.
.
.
.
.
.
.
.
.
.
.
.
.
.
.
.
.
.
.
.3
Installing
the
Monitor
and
Keyboard
Tray
into
a
Rack
.
.
.
.
.
.
.
.
.
.
.
.
.
.
.
.
.
.
.
.4
Installing
the
Optional
Console
Switch
.
.
.
.
.
.
.
.
.
.
.
.
.
.
.
.
.
.
.
.
.
.
.
.
.10
Chapter
3.
Using
the
Monitor
.
.
.
.
.
.
.
.
.
.
.
.
.
.
.
.
.
.
.
.
.
.
.
.
.
.
.13
User
Controls
.
.
.
.
.
.
.
.
.
.
.
.
.
.
.
.
.
.
.
.
.
.
.
.
.
.
.
.
.
.
.
.
.
.13
Technical
Specifications
.
.
.
.
.
.
.
.
.
.
.
.
.
.
.
.
.
.
.
.
.
.
.
.
.
.
.
.
.
.14
Chapter
4.
Hardware
Maintenance
Information
.
.
.
.
.
.
.
.
.
.
.
.
.
.
.
.
.
.
.
.
.15
Customer-Replaceable
Unit
Part
Numbers
.
.
.
.
.
.
.
.
.
.
.
.
.
.
.
.
.
.
.
.
.
.
.15
Replacing
the
Display
and
Keyboard
.
.
.
.
.
.
.
.
.
.
.
.
.
.
.
.
.
.
.
.
.
.
.
.
.15
Replacing
the
Keyboard
.
.
.
.
.
.
.
.
.
.
.
.
.
.
.
.
.
.
.
.
.
.
.
.
.
.
.
.
.
.20
Appendix
A.
Communications
Statements
.
.
.
.
.
.
.
.
.
.
.
.
.
.
.
.
.
.
.
.
.
.23
Federal
Communications
Commission
(FCC)
Statement
.
.
.
.
.
.
.
.
.
.
.
.
.
.
.
.
.
.23
Avis
de
conformité
aux
normes
du
ministère
des
Communications
du
Canada
.
.
.
.
.
.
.
.
.
.23
Canadian
Department
of
Communications
Compliance
Statement
.
.
.
.
.
.
.
.
.
.
.
.
.
.23
Australia
and
New
Zealand
Class
A
statement
.
.
.
.
.
.
.
.
.
.
.
.
.
.
.
.
.
.
.
.
.
.23
United
Kingdom
Telecommunications
Safety
Requirements
.
.
.
.
.
.
.
.
.
.
.
.
.
.
.
.
.23
European
Union
EMC
Directive
Conformance
Statement
.
.
.
.
.
.
.
.
.
.
.
.
.
.
.
.
.
.24
Electromagnetic
Interference
(EMI)
Statement
-
Taiwan
.
.
.
.
.
.
.
.
.
.
.
.
.
.
.
.
.
.24
Chinese
Class
A
warning
statement
.
.
.
.
.
.
.
.
.
.
.
.
.
.
.
.
.
.
.
.
.
.
.
.
.
.24
VCCI
Statement
.
.
.
.
.
.
.
.
.
.
.
.
.
.
.
.
.
.
.
.
.
.
.
.
.
.
.
.
.
.
.
.
.24
Radio
Protection
for
Germany
.
.
.
.
.
.
.
.
.
.
.
.
.
.
.
.
.
.
.
.
.
.
.
.
.
.
.
.25
International
Electrotechnical
Commission
(IEC)
Statement
.
.
.
.
.
.
.
.
.
.
.
.
.
.
.
.
.25
Appendix
B.
Environmental
Notices
.
.
.
.
.
.
.
.
.
.
.
.
.
.
.
.
.
.
.
.
.
.
.
.
.27
Product
Recycling
and
Disposal
.
.
.
.
.
.
.
.
.
.
.
.
.
.
.
.
.
.
.
.
.
.
.
.
.
.
.27
Environmental
Design
.
.
.
.
.
.
.
.
.
.
.
.
.
.
.
.
.
.
.
.
.
.
.
.
.
.
.
.
.
.
.31
Ergonomic
Information
.
.
.
.
.
.
.
.
.
.
.
.
.
.
.
.
.
.
.
.
.
.
.
.
.
.
.
.
.
.32
Appendix
C.
Notices
.
.
.
.
.
.
.
.
.
.
.
.
.
.
.
.
.
.
.
.
.
.
.
.
.
.
.
.
.
.
.33
Index
.
.
.
.
.
.
.
.
.
.
.
.
.
.
.
.
.
.
.
.
.
.
.
.
.
.
.
.
.
.
.
.
.
.
.
.
.35
iii

iv
7316-TF3
17-Inch
Flat
Panel
Rack-Mounted
Monitor
and
Keyboard:
Installation
and
Maintenance
Guide
Safety
Notices
A
danger
notice
indicates
the
presence
of
a
hazard
that
has
the
potential
of
causing
death
or
serious
personal
injury.
A
caution
notice
indicates
the
presence
of
a
hazard
that
has
the
potential
of
causing
moderate
or
minor
personal
injury.
Note:
For
a
translation
of
these
notices,
see
System
Unit
Safety
Information,
order
number
G229-9054-00.
Rack
Safety
Instructions
Follow
these
general
safety
instructions
when
initially
installing
the
rack
at
your
site:
DANGER
v
Always
lower
the
leveling
pads
on
the
rack
cabinet.
v
Always
install
stabilizer
brackets
on
the
rack
cabinet.
v
To
avoid
hazardous
conditions
due
to
uneven
mechanical
loading,
always
install
the
heaviest
devices
in
the
bottom
of
the
rack
cabinet.
Always
install
servers
and
optional
devices
starting
from
the
bottom
of
the
rack
cabinet.
v
Rack-mounted
devices
are
not
to
be
used
as
a
shelf
or
work
space.
Do
not
place
any
object
on
top
of
rack-mounted
devices.
v
Each
rack
cabinet
might
have
more
than
one
power
cord.
Be
sure
to
disconnect
all
power
cords
in
the
rack
cabinet
before
servicing
any
device
in
the
rack
cabinet.
v
Connect
all
devices
installed
in
a
rack
cabinet
to
power
devices
installed
in
the
same
rack
cabinet.
Do
not
plug
a
power
cord
from
a
device
installed
in
one
rack
cabinet
into
a
power
device
installed
in
a
different
rack
cabinet.
v
An
electrical
outlet
that
is
not
correctly
wired
could
place
hazardous
voltage
on
the
metal
parts
of
the
system
or
the
devices
that
attach
to
the
system.
It
is
the
responsibility
of
the
customer
to
ensure
that
the
outlet
is
correctly
wired
and
grounded
to
prevent
an
electrical
shock.
CAUTION:
v
Do
not
install
a
unit
in
a
rack
where
the
internal
rack
ambient
temperatures
will
exceed
the
manufacturer’s
recommended
ambient
temperature
for
all
your
rack-mounted
devices.
v
Do
not
install
a
unit
in
a
rack
where
the
air
flow
is
compromised.
Ensure
that
air
flow
is
not
blocked
or
reduced
on
any
side,
front,
or
back
of
a
unit
used
for
air
flow
through
the
unit.
v
Consideration
should
be
given
to
the
connection
of
the
equipment
to
the
supply
circuit
so
that
overloading
of
the
circuits
does
not
compromise
the
supply
wiring
or
overcurrent
protection.
To
provide
the
correct
power
connection
to
a
rack,
refer
to
the
rating
labels
located
on
the
equipment
in
the
rack
to
determine
the
total
power
requirement
of
the
supply
circuit.
v
(For
sliding
drawers.)
Do
not
pull
out
or
install
any
drawer
or
feature
if
the
rack
stabilizer
brackets
are
not
attached
to
the
rack.
Do
not
pull
out
more
than
one
drawer
at
a
time.
The
rack
may
become
unstable
if
you
pull
out
more
than
one
drawer
at
a
time.
v
(For
fixed
drawers.)
This
drawer
is
a
fixed
drawer
and
should
not
be
moved
for
servicing
unless
specified
by
manufacturer.
Attempting
to
move
the
drawer
partially
or
completely
out
of
the
rack
may
cause
the
rack
to
become
unstable
or
cause
the
drawer
to
fall
out
of
the
rack.
R001
v

Relocating
the
Rack
When
relocating
the
rack,
make
sure
you
follow
these
guidelines:
CAUTION:
Removing
components
from
the
upper
positions
in
the
rack
cabinet
improves
rack
stability
during
relocation.
Follow
these
general
guidelines
whenever
you
relocate
a
populated
rack
cabinet
within
a
room
or
building:
v
Reduce
the
weight
of
the
rack
cabinet
by
removing
equipment
starting
at
the
top
of
the
rack
cabinet.
When
possible,
restore
the
rack
cabinet
to
the
configuration
of
the
rack
cabinet
as
you
received
it.
If
this
configuration
is
not
known,
you
must
do
the
following:
–
Remove
all
devices
in
the
32U
position
and
above.
–
Ensure
that
the
heaviest
devices
are
installed
in
the
bottom
of
the
rack
cabinet.
–
Ensure
that
there
are
no
empty
U-levels
between
devices
installed
in
the
rack
cabinet
below
the
32U
level.
v
If
the
rack
cabinet
you
are
relocating
is
part
of
a
suite
of
rack
cabinets,
detach
the
rack
cabinet
from
the
suite.
v
Inspect
the
route
that
you
plan
to
take
to
eliminate
potential
hazards.
v
Verify
that
the
route
that
you
choose
can
support
the
weight
of
the
loaded
rack
cabinet.
Refer
to
the
documentation
that
comes
with
your
rack
cabinet
for
the
weight
of
a
loaded
rack
cabinet.
v
Verify
that
all
door
openings
are
at
least
760
x
230
mm
(30
x
80
in.).
v
Ensure
that
all
devices,
shelves,
drawers,
doors,
and
cables
are
secure.
v
Ensure
that
the
four
leveling
pads
are
raised
to
their
highest
position.
v
Ensure
that
there
is
no
stabilizer
bracket
installed
on
the
rack
cabinet
during
movement.
v
Do
not
use
a
ramp
inclined
at
more
than
ten
degrees.
v
Once
the
rack
cabinet
is
in
the
new
location,
do
the
following:
–
Lower
the
four
leveling
pads.
–
Install
stabilizer
brackets
on
the
rack
cabinet.
–
If
you
removed
any
devices
from
the
rack
cabinet,
repopulate
the
rack
cabinet
from
the
lowest
position
to
the
highest
position.
–
If
a
long
distance
relocation
is
required,
restore
the
rack
cabinet
to
the
configuration
of
the
rack
cabinet
as
you
received
it.
Pack
the
rack
cabinet
in
the
original
packaging
material,
or
equivalent.
Also
lower
the
leveling
pads
to
raise
the
casters
off
of
the
pallet
and
bolt
the
rack
cabinet
to
the
pallet.
R002
Electrical
Safety
Observe
these
safety
instructions
anytime
you
are
connecting
or
disconnecting
devices
attached
to
the
system,
or
handling
electrical
components
within
the
system:
vi
7316-TF3
17-Inch
Flat
Panel
Rack-Mounted
Monitor
and
Keyboard:
Installation
and
Maintenance
Guide

DANGER
Electrical
voltage
and
current
from
power,
telephone,
and
communication
cables
are
hazardous.
To
avoid
a
shock
hazard:
v
Do
not
connect
or
disconnect
any
cables
or
perform
installation,
maintenance,
or
reconfiguration
of
this
product
during
an
electrical
storm.
v
Connect
all
power
cords
to
a
properly
wired
and
grounded
electrical
outlet.
Ensure
outlet
supplies
proper
voltage
and
phase
rotation
according
to
the
system
rating
plate.
v
Connect
any
equipment
that
will
be
attached
to
this
product
to
properly
wired
outlets.
v
When
possible,
use
one
hand
only
to
connect
or
disconnect
signal
cables.
v
Never
turn
on
any
equipment
when
there
is
evidence
of
fire,
water,
or
structural
damage.
v
Disconnect
the
attached
power
cords,
telecommunications
systems,
networks,
and
modems
before
you
open
the
device
covers,
unless
instructed
otherwise
in
the
installation
and
configuration
procedures.
v
Connect
and
disconnect
cables
as
described
below
when
installing,
moving,
or
opening
covers
on
this
product
or
attached
devices.
To
Disconnect:
1.
Turn
everything
OFF
(unless
instructed
otherwise).
2.
Remove
power
cords
from
the
outlet.
3.
Remove
signal
cables
from
connectors.
4.
Remove
all
cables
from
devices.
To
Connect:
1.
Turn
everything
OFF
(unless
instructed
otherwise).
2.
Attach
all
cables
to
devices.
3.
Attach
signal
cables
to
connectors.
4.
Attach
power
cords
to
outlet.
5.
Turn
device
ON.
D005
Safety
Notices
vii

viii
7316-TF3
17-Inch
Flat
Panel
Rack-Mounted
Monitor
and
Keyboard:
Installation
and
Maintenance
Guide

Data
Integrity
and
Verification
IBM
computer
systems
contain
mechanisms
designed
to
reduce
the
possibility
of
undetected
data
corruption
or
loss.
This
risk,
however,
cannot
be
eliminated.
Users
who
experience
unplanned
outages,
system
failures,
power
fluctuations
or
outages,
or
component
failures
must
verify
the
accuracy
of
operations
performed
and
data
saved
or
transmitted
by
the
system
at
or
near
the
time
of
the
outage
or
failure.
In
addition,
users
must
establish
procedures
to
ensure
that
there
is
independent
data
verification
before
relying
on
such
data
in
sensitive
or
critical
operations.
Users
should
periodically
check
the
IBM
support
websites
for
updated
information
and
fixes
applicable
to
the
system
and
related
software.
ix

x
7316-TF3
17-Inch
Flat
Panel
Rack-Mounted
Monitor
and
Keyboard:
Installation
and
Maintenance
Guide

About
This
Book
This
book
provides
information
on
how
to
install
the
IBM
®
7316-TF3
17-Inch
Flat
Panel
Rack-Mounted
Monitor
and
Keyboard.
References
to
AIX
Operating
System
This
document
may
contain
references
to
the
AIX
operating
system.
If
you
are
using
another
operating
system,
consult
the
appropriate
documentation
for
that
operating
system.
This
document
may
describe
hardware
features
and
functions.
While
the
hardware
supports
them,
the
realization
of
these
features
and
functions
depends
upon
support
from
the
operating
system.
AIX
provides
this
support.
If
you
are
using
another
operating
system,
consult
the
appropriate
documentation
for
that
operating
system
regarding
support
for
those
features
and
functions.
Highlighting
The
following
highlighting
conventions
are
used
in
this
book:
Bold
Identifies
commands,
subroutines,
keywords,
files,
structures,
directories,
and
other
items
whose
names
are
predefined
by
the
system.
Also
identifies
graphical
objects
such
as
buttons,
labels,
and
icons
that
the
user
selects.
Italics
Identifies
parameters
whose
actual
names
or
values
are
to
be
supplied
by
the
user.
Monospace
Identifies
examples
of
specific
data
values,
examples
of
text
similar
to
what
you
might
see
displayed,
examples
of
portions
of
program
code
similar
to
what
you
might
write
as
a
programmer,
messages
from
the
system,
or
information
you
should
actually
type.
Related
Publications
The
following
publications
contain
related
information:
v
System
unit
documentation
for
information
specific
to
your
hardware
configuration
v
Operating
system
documentation
for
information
specific
to
your
software
configuration
Trademarks
The
following
terms
are
trademarks
of
International
Business
Machines
Corporation
in
the
United
States,
other
countries,
or
both:
v
AIX
v
Eserver
v
IBM
v
Netfinity
v
OS/400
v
pSeries
Microsoft
is
a
trademark
of
Microsoft
Corporation
in
the
United
States,
other
countries,
or
both.
Other
company,
product,
and
service
names
may
be
trademarks
or
service
marks
of
others.
xi

xii
7316-TF3
17-Inch
Flat
Panel
Rack-Mounted
Monitor
and
Keyboard:
Installation
and
Maintenance
Guide
Chapter
1.
Introduction
The
IBM
Eserver
7316-TF3
17-Inch
Flat
Panel
Rack-Mounted
Monitor
and
Keyboard
is
a
flat-panel
monitor
and
keyboard
tray.
A
special
keyboard,
available
for
a
variety
of
languages,
fits
inside
the
front
of
the
keyboard
tray.
The
monitor
and
keyboard
tray
occupy
1
EIA
(Electronics
Industries
Association)
unit
1
of
space
in
a
rack
cabinet.
You
can
install
a
console
switch
behind
the
tray
to
attach
more
than
one
server
to
the
flat
panel
monitor
and
keyboard.
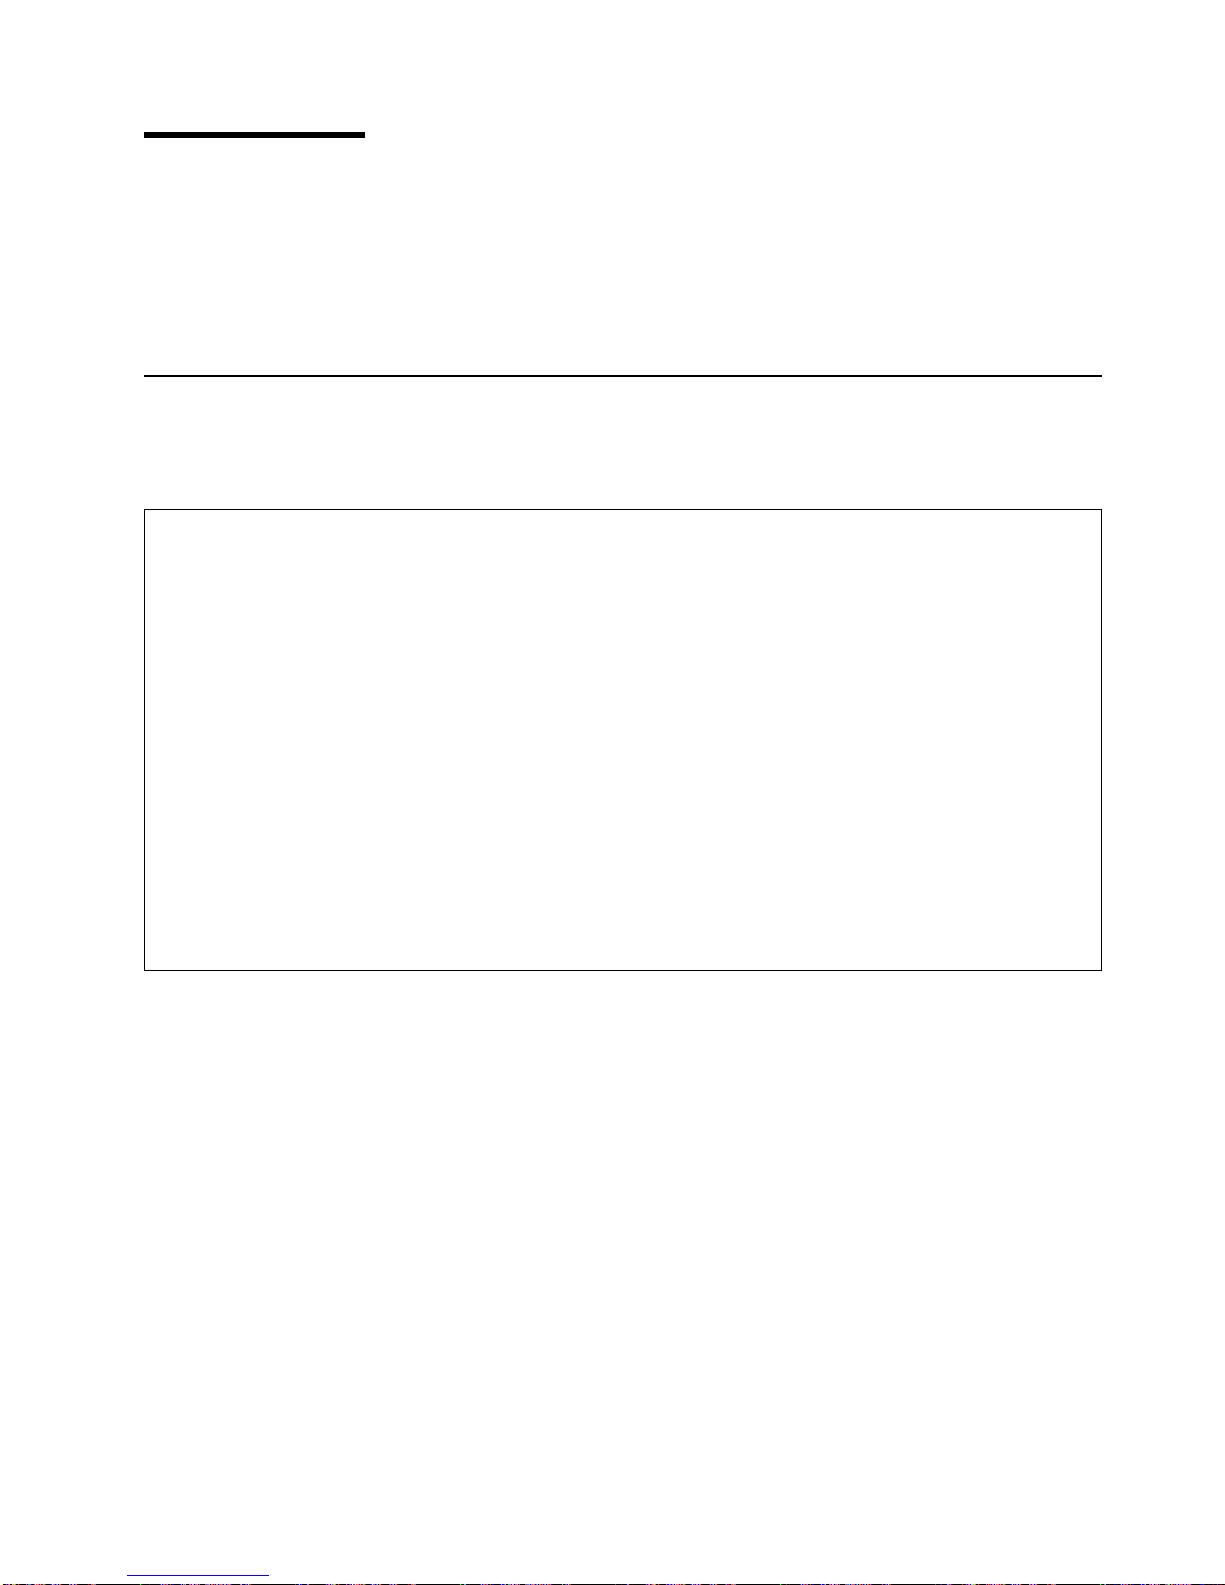
Check
Your
Inventory
As
you
unpack
the
kit,
ensure
that
you
have
the
following
items:
h
Miscellaneous
Hardware
Kit
contains:
12
cage
nuts
12
clip
nuts
10
Phillips
screws
4
8-32
screws
2
thumbscrews
h
One
keyboard
tray
with
built-in
flat-panel
monitor
h
Two
outer
rails
h
One
rail
alignment
spacer
h
One
right-side
console-switch
mounting
bracket
h
One
left-side
console-switch
mounting
bracket
(for
routing
video,
keyboard,
and
mouse
cables
when
a
console
switch
is
installed)
1. Racks
are
measured
in
vertical
increments
of
1.75
inches
each.
Each
1.75-inch
increment
is
called
an
“EIA.”
In
some
countries,
the
same
increment
may
be
referred
to
as
a
“U.”
1

h
One
1.8
m
(6
ft)
power
cord
h
One
2.4-m
(8-ft)
IEC
connector
power
cable
h
One
thin
keyboard
with
built-in
pointing
device
Fn Ctrl Ctrl
Alt Alt
A
Z
S
X
D
C
F
V
G
B
H
N
J
M
K
<
,
L
>
.
:
;?
/
“
‘
Enter
Shift
Shift
Caps Lock
Esc
F1 F2 F3 F4 F5 F6 F7 F8 F9 F10 F11 F12 Delete
Insert
PrtSc
End
Home
ScrLk
PgDn
PgUp
Pause
1
Q
2
W
3
E
4
R
5
T
6
Y
7
U
8
I
9
O
0
P{
[}
]|
\
Backspace
Tab
~
`
_
-
+
=
h
Keyboard
extension
cable
h
Mouse
extension
cable
h
One
CD
containing
Windows
keyboard
and
mouse
drivers
(not
for
use
with
Eserver
pSeries
systems
or
any
AIX,
Linux,
or
OS/400-based
system)
h
Monitor
and
keyboard
documentation
(including
this
document)
You
might
need
the
following
tools
to
install
the
7316-TF3
17-Inch
Flat
Panel
Rack-Mounted
Monitor
and
Keyboard:
v
Scissors
v
Phillips
screwdriver
v
Flat-blade
screwdriver
For
further
information,
refer
to
the
documentation
provided
with
your
rack
cabinet
or
console
switch.
2
7316-TF3
17-Inch
Flat
Panel
Rack-Mounted
Monitor
and
Keyboard:
Installation
and
Maintenance
Guide

Chapter
2.
Installing
the
7316-TF3
17-Inch
Flat
Panel
Rack-Mounted
Monitor
and
Keyboard
The
IBM
7316-TF3
17-Inch
Flat
Panel
Rack-Mounted
Monitor
and
Keyboard
occupies
1.75
inches
(1
EIA)
of
rack-mounting
space
in
a
rack
cabinet.
You
can
use
the
brackets
that
are
provided
with
this
kit
to
install
an
optional
console
switch
in
the
same
rack-mounting
space
as
the
monitor
console
kit.
Safety
Considerations
Observe
the
following
safety
precautions
when
installing
this
monitor
and
keyboard.
DANGER
Electrical
voltage
and
current
from
power,
telephone,
and
communication
cables
are
hazardous.
To
avoid
a
shock
hazard:
v
Do
not
connect
or
disconnect
any
cables
or
perform
installation,
maintenance,
or
reconfiguration
of
this
product
during
an
electrical
storm.
v
Connect
all
power
cords
to
a
properly
wired
and
grounded
electrical
outlet.
Ensure
outlet
supplies
proper
voltage
and
phase
rotation
according
to
the
system
rating
plate.
v
Connect
any
equipment
that
will
be
attached
to
this
product
to
properly
wired
outlets.
v
When
possible,
use
one
hand
only
to
connect
or
disconnect
signal
cables.
v
Never
turn
on
any
equipment
when
there
is
evidence
of
fire,
water,
or
structural
damage.
v
Disconnect
the
attached
power
cords,
telecommunications
systems,
networks,
and
modems
before
you
open
the
device
covers,
unless
instructed
otherwise
in
the
installation
and
configuration
procedures.
v
Connect
and
disconnect
cables
as
described
below
when
installing,
moving,
or
opening
covers
on
this
product
or
attached
devices.
To
Disconnect:
1.
Turn
everything
OFF
(unless
instructed
otherwise).
2.
Remove
power
cords
from
the
outlet.
3.
Remove
signal
cables
from
connectors.
4.
Remove
all
cables
from
devices.
To
Connect:
1.
Turn
everything
OFF
(unless
instructed
otherwise).
2.
Attach
all
cables
to
devices.
3.
Attach
signal
cables
to
connectors.
4.
Attach
power
cords
to
outlet.
5.
Turn
device
ON.
D005
CAUTION:
This
product
is
equipped
with
a
3-wire
(two
conductors
and
ground)
power
cable
and
plug.
Use
this
power
cable
with
a
properly
grounded
electrical
outlet
to
avoid
electrical
shock.
C018
Note:
The
ac
power-interface
connector
is
considered
the
main
power
disconnect
device.
3

Installing
the
Monitor
and
Keyboard
Tray
into
a
Rack
Removing
rack
doors
and
side
panels
might
make
installation
easier.
For
additional
information
about
removing
the
doors,
refer
to
the
documentation
that
was
provided
with
your
rack
cabinet.
To
install
the
tray
into
the
rack:
1.
Select
a
location
in
the
rack
for
the
monitor
and
keyboard
tray.
2.
Using
the
following
illustration
as
a
guide,
install
4
cage
nuts
(on
square-holed
rack
flanges)
or
4
clip
nuts
(round-holed
rack
flanges)
in
the
same
EIA
positions
on
the
front
and
rear
of
the
rack.
Note:
If
you
are
planning
to
install
the
optional
console
switch,
also
install
a
cage
nut
or
clip
nut
in
the
center-rear
position
as
shown
in
the
following
illustration.
4
7316-TF3
17-Inch
Flat
Panel
Rack-Mounted
Monitor
and
Keyboard:
Installation
and
Maintenance
Guide
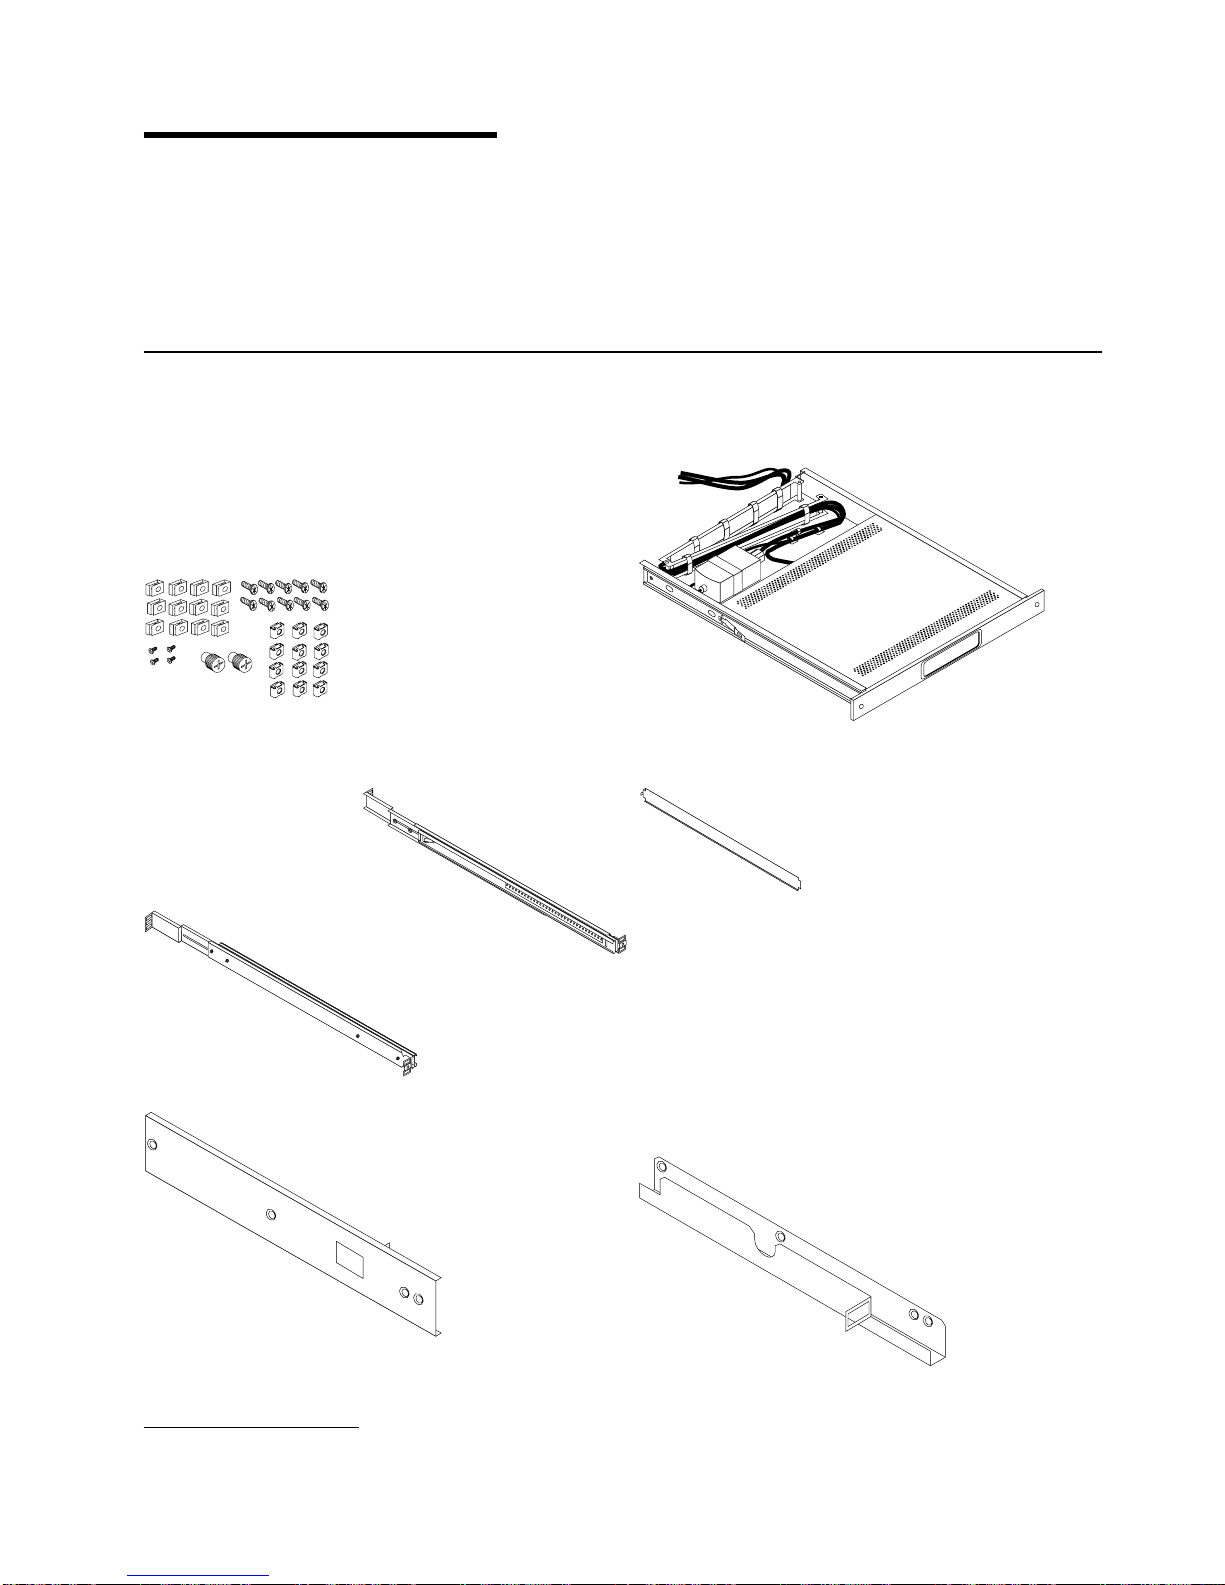
3.
Loosen
the
two
rail-adjustment
screws
on
each
of
the
outer
slide
rails.
Then,
extend
the
rails
to
their
maximum
outward
adjustment.
Rail-adjustment
screws
4.
Adjust
the
outer
slide-rail
brackets
to
fit
the
depth
of
the
rack
cabinet.
Then,
loosely
attach
the
front
of
the
slide-rail
brackets
to
fit
the
depth
of
the
rack
cabinet
using
four
screws
from
the
miscellaneous
hardware
kit.
The
screws
should
be
finger-tight
to
allow
adjustment
of
the
rails.
Note:
Make
sure
that
the
slide-rail
brackets
extend
outside
of
the
rack-cabinet
mounting
flanges.
Do
not
install
screws
in
the
middle
holes
on
the
front
or
rear
of
the
slide-rail
brackets.
These
holes
will
be
used
to
attach
thumbscrews
or
optional
console-switch
mounting
brackets,
respectively,
later
in
this
procedure.
5.
Loosely
attach
(finger-tight)
the
back
of
the
slide-rail
brackets
to
the
rack
cabinet
using
four
screws
from
the
miscellaneous
hardware
kit.
Make
sure
that
the
slide-rail
brackets
extend
outside
of
the
Chapter
2.
Installing
the
7316-TF3
17-Inch
Flat
Panel
Rack-Mounted
Monitor
and
Keyboard
5

rack-cabinet
mounting
flanges.
6.
Tighten
the
two
rail-adjustment
screws
on
each
of
the
outer
rails
that
you
loosened
in
step
3
on
page
5.
7.
Insert
the
rail-alignment
spacer
into
the
slide-rail
middle
holes.
The
rail-alignment
spacer
must
wrap
around
the
rails
(top
and
bottom
of
the
front
of
the
rail)
to
align
them
correctly.
Tighten
the
front
four
screws;
then,
remove
the
spacer.
Note:
Do
not
tighten
the
four
rear
slide-rail
bracket
screws
yet.
Rail-alignment spacer
8.
Extend
the
inner
part
of
the
rails
mounted
in
the
rack,
then
slide
the
ball-bearing
assemblies
forward
to
the
front
of
the
rails.
6
7316-TF3
17-Inch
Flat
Panel
Rack-Mounted
Monitor
and
Keyboard:
Installation
and
Maintenance
Guide
This manual suits for next models
1
Table of contents
Other IBM Music Mixer manuals


