iCartech Aurora GX730E User manual

DVD/CD/VCD/MP3/WMA/SD/MMC/USB PLAYER
BLUETOOTH/TV/GPS WITH FM/MW TUNER
Operation Instructions aurora GX730E


1. Only connect this unit to a 12V DC power
supply with negative grounding.
2. Never install this unit where the operation
for safety driving is restrained.
3. Never use the video display function in the
front when driving to prevent the violation
of laws & regulations and also to reduce
the risk of trafc accident except using the
rear view video camera.
4. Never expose this unit, amplier, speakers
to moisture or water to prevent electronic
sparks or res.
Warnings
5. Please don't change the fuse in the power
cord without professional guidance,
improper fuse may cause damage to this
using unit or even cause re.
6. Please power off this unit at once and send
it back to the after-sales service center or
the dealer / distributor you purchased from
if one of the following symptoms is found:
(a) No audio output;
(b) No image output;
(c) Water or other obstacle enters the unit;
(d) Smoking;
(e) Peculiar smell.
7. To ensure safe driving, please adjust the
volume to a safe and comfort level in case
of emergency situations.
1
2
3
4
5
6

Precautions
1. Never disassemble or adjust the unit
without any professional guide. For
details, please consult any professional car
shop / dealer for inquiry.
2. If the front panel or TFT monitor is squalid,
please use a clean silicone cloth and
neutral detergent to wipe off the spot.
Using a rough cloth and non-neutral
detergent such as alcohol for cleaning may
result in scratching or decoloration to the
applicant.
3. If any abnormal behavior of the unit is
found, please refer to trouble shooting
guide of this manual. If no relevant
information is found,please press the
[RESET] key on the front panel to resume
factory default.
4. If you have parked the car in hot or cold
weather for a long time, please wait until
the temperature in the car becomes normal
before operating the unit.
5. Using in-car heater in low temperature
environment may result in beads coagulate
inside the unit, DO NOT use the unit in
this situation, eject the disc and wipe off
the bead on the disc. If the unit still doesn't
work after a few hours, please contact with
after-sales service center.
6. No erce impact to the LCD monitor when
it is in open position for preventing the
damage to any mechanisms inside.
7. To prevent the damage to the screen,
avoid touching it with sharp objects.
8. The monitor employs auto motorizing
mechanism, please don't push, pull, or
swivel the monitor manually to prevent
damage to the core mechanism.
9. To provide a clear demonstration and an
alternative for easy understanding to the
operation of this unit, graphic illustrations
areused.However, these illustrations are
some different from the actual images
displayed on the screen.
10.During operating the unit, “ ” will
display if the current operation is not
available or illegal.
11.Operate the unit correctly according to this
manual to prevent unnecessary problem.
The guarantee won't be valid if the problem
is caused by inappropriate operation.
Declaration
This product incorporates copyright
protection technology that is protected
by U.S patents and other intellectual
property rights. Use of this copyright
protection technology must be authorized
by Macrovision, and is intended for home
and other limited viewing uses only unless
otherwise authorized by Macrovision.
Reverse engineering or disassembly is
prohibited.

Contents
Before using
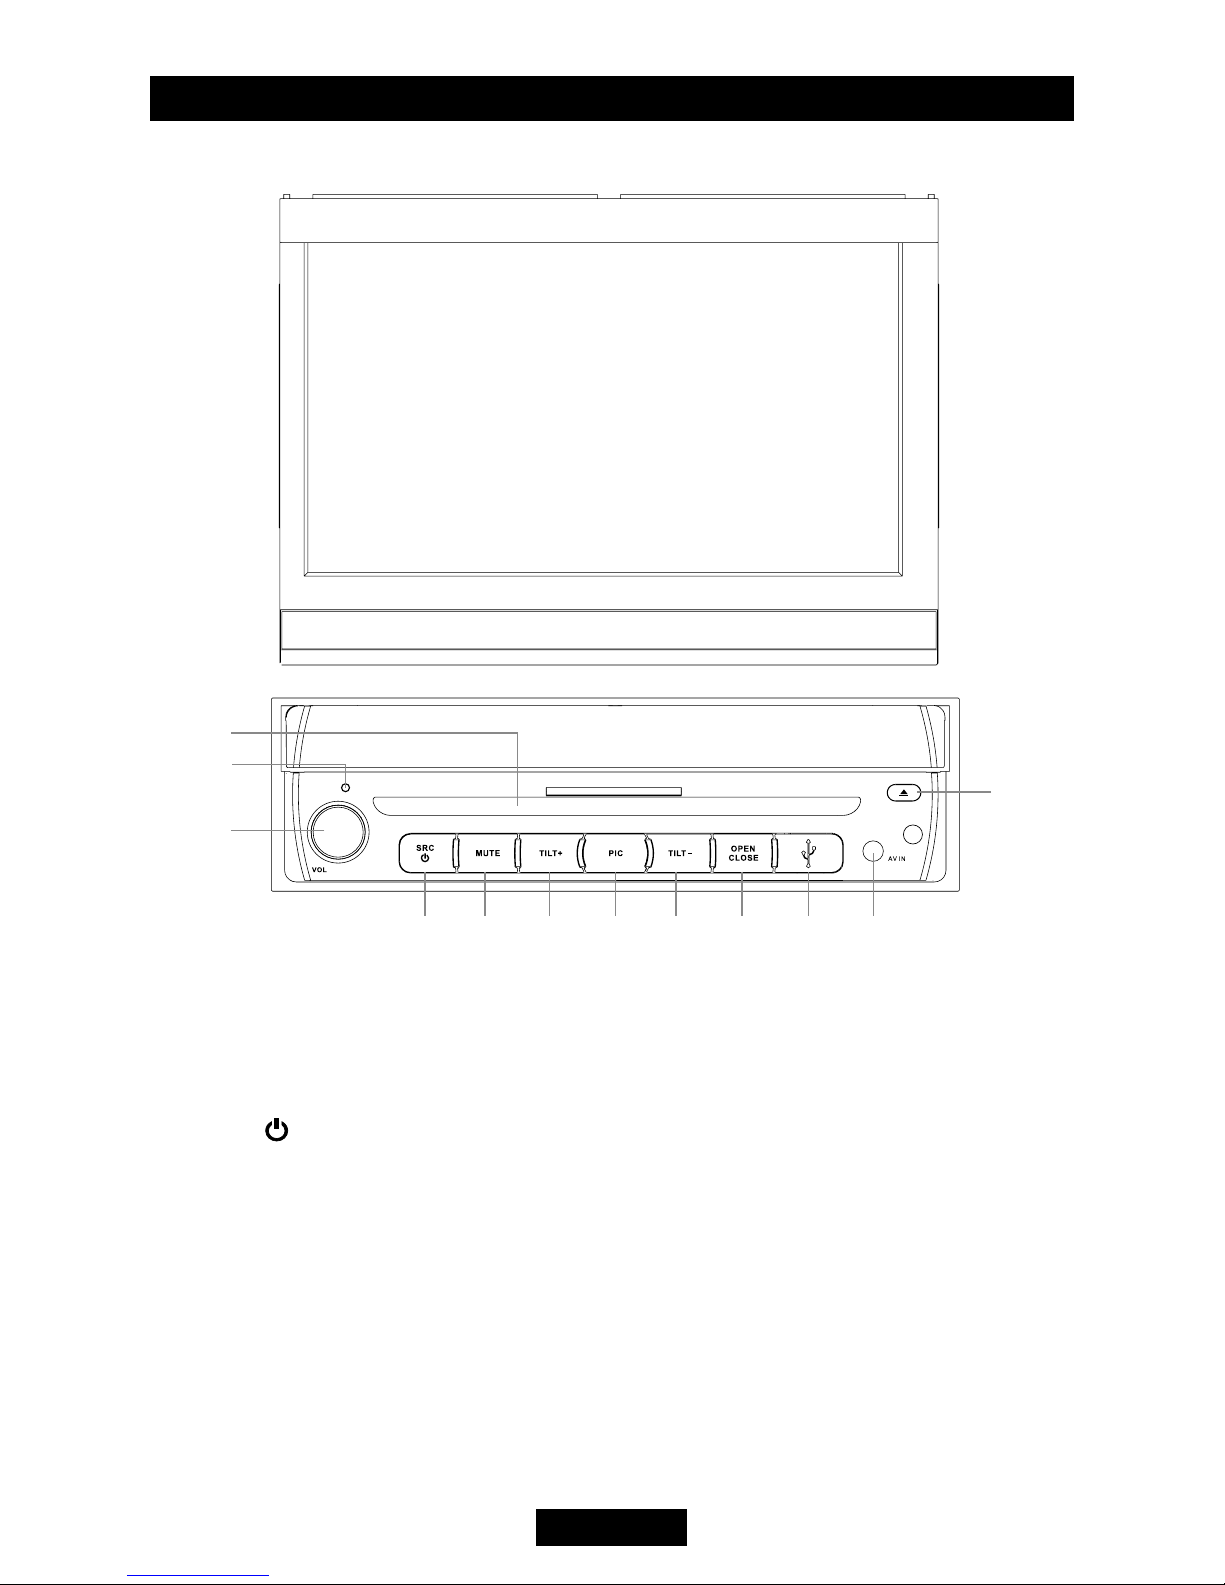
Front panel ............................................. 1
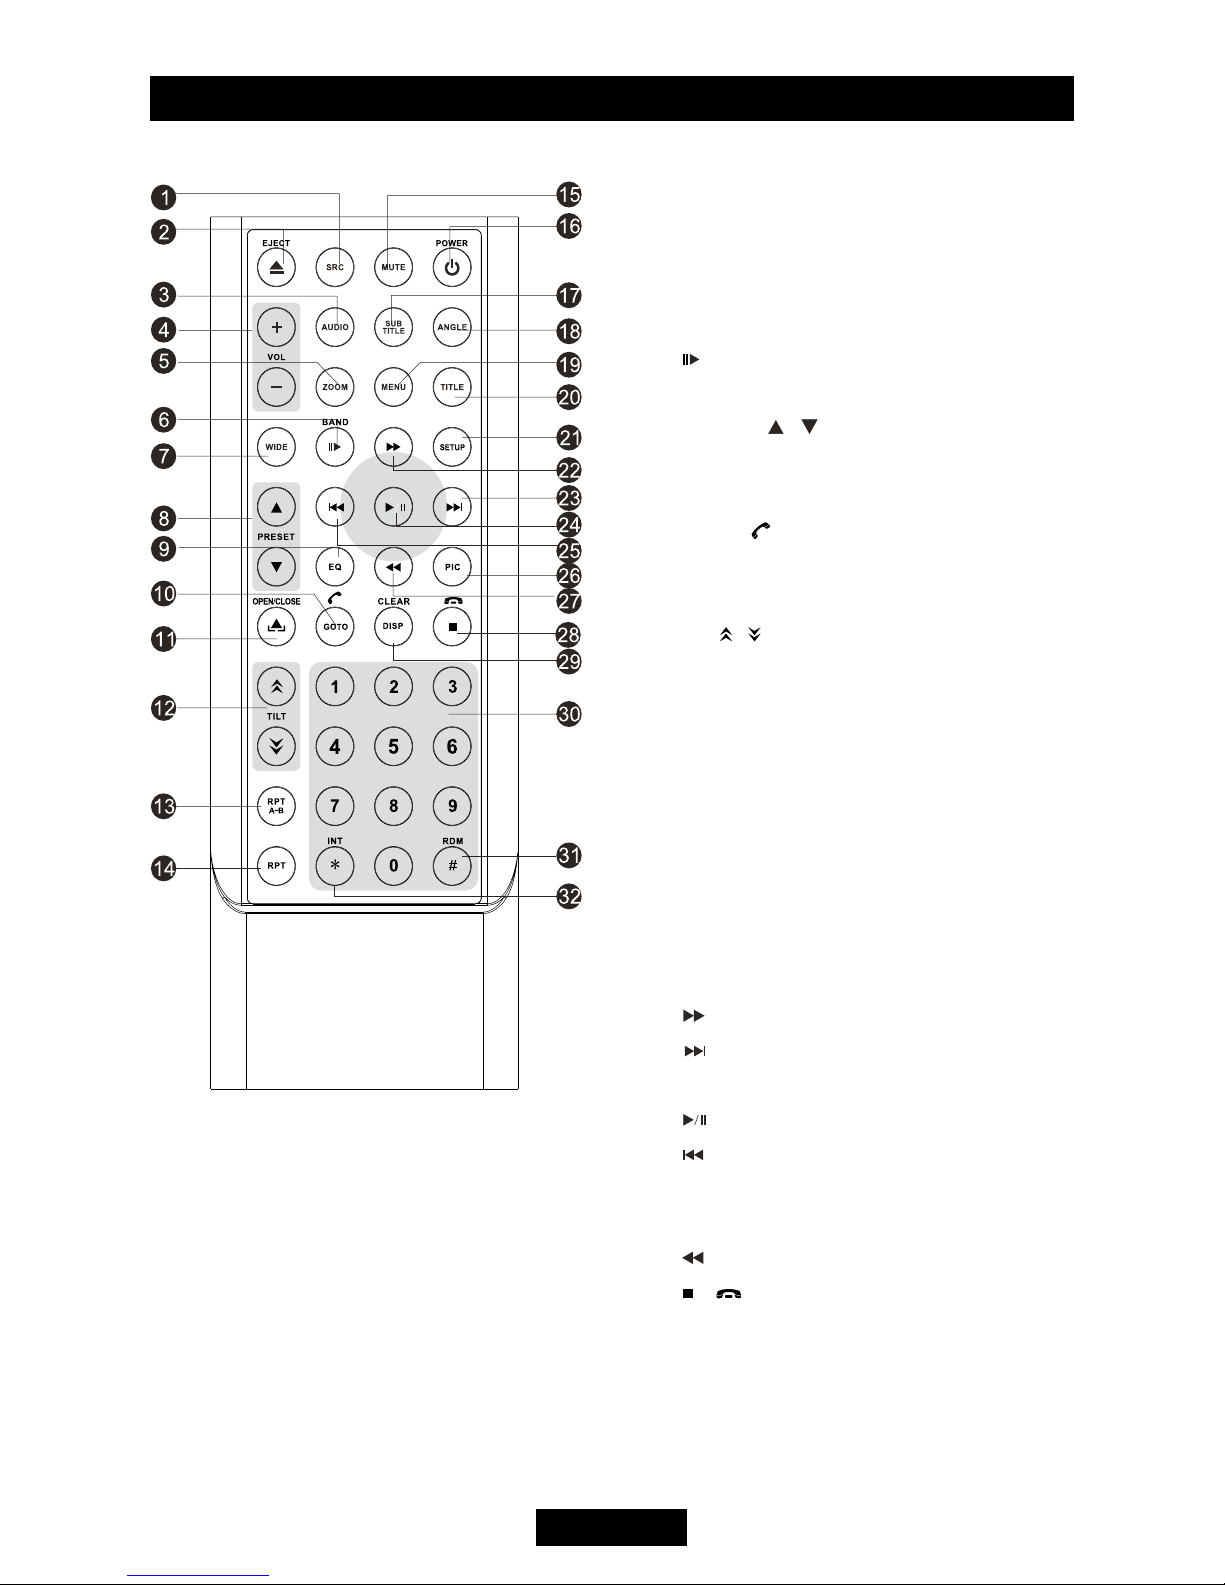
Remote Control ...................................... 2
Basic operations
Power on / off......................................... 4
Mute ....................................................... 4
Volume adjustment................................. 4
Open SOURCE MENU .......................... 4
Playing source selection ........................ 4
Using the TFT Monitor ........................... 4
Reset the unit......................................... 4
RDS operations
PTY function........................................... 5
Program Service (PS) ........................... 5
CT (Clock Time) ..................................... 5
RT (Radio Text) ...................................... 5
Radio mode
Select radio as playing source ............... 5
Select one radio band ............................ 5
Auto tuning ............................................. 5
Manual tuning......................................... 5
Auto save ............................................... 5
Manual save........................................... 6
Preview scan ......................................... 6
Recall the stored stations....................... 6
Local seeking ......................................... 6
Disc mode
Insert a disc............................................ 6
Eject the disc.......................................... 6
Touch screen controls ............................ 6
Onscreen control buttons....................... 7
Suspend playback.................................. 8
Stop playback ..................................... 8
Display le list ........................................ 8
Fast playback ......................................... 8
Previous / next ....................................... 8
Change folder......................................... 8
Repeat playback .................................... 8
Repeat A-B............................................. 8
Random playback .................................. 8
Intro playback......................................... 8
Direct search ......................................... 9
GOTO search......................................... 9
MENU and TITLE................................... 9
Select subtitle language......................... 9
Select multi-angle views ........................ 9
Select audio channel ............................. 9
PBC function ......................................... 9
Zoom in/out ......................................... 10
Rotate picture....................................... 10
Playback information............................ 10
SD/USB mode
Select SD/USB as playing source.........11
Using the touch screen controls............11
Onscreen control buttons......................11
Stop playback temporarily.....................11
Stop playback entirely...........................11
Display le list .......................................11
Fast forward/Fast reverse .....................11
Play the next or previous le ................11
Repeat playback ...................................11
Random playback .................................11
Intro playback........................................11
Search for a particular le .....................11
GOTO search........................................11
Zoom in/out ..........................................11
Rotate picture........................................11
Select picture slide mode .....................11
Playback information display.................11
Bluetooth mode ........................................ 12
TV mode .................................................... 13
Other modes
AUX...................................................... 14
Camera ................................................ 14
Navigation ............................................ 14
SWC..................................................... 14
Setup
Setup procedures................................. 15
General ................................................ 15
Language ............................................. 15
Audio.................................................... 15
Bluetooth.............................................. 15
Rating .................................................. 16
Hardware.............................................. 16
P.VOL ................................................... 16
TS CAL................................................. 16
EQ .............................................................. 17
Troubleshooting ....................................... 18
Device connections
Notes of connection ........................... 20
Control Cables ..................................... 20
Parking Brake Cable Connections ..... 21
Reverse Driving Cable Connections .... 21
Installation and uninstall
Notes of installation.............................. 22
Unit Installation..................................... 22
Trim Ring installation............................ 23
Uninstall .............................................. 23
Specications
Appendix
Region Code ....................................... 25
Cautions of disc using.......................... 25
Wiring Diagram .................................... 25

EN - 1
Before using
Front panel
1. Eject disc
2. Reset the unit
3. [VOL] Knob: Adjust volume
Play / Pause(short press)
4. [SRC/ ] Key:Switch to the current source and the main menu
5. [ MUTE] Key: Mute audio outputs
6. [TILT+] Knob: Increase the display angle
7. [PIC] Key: Adjust the bright the contrast of the TFT monitor
8. [TILT-] Knob: Decrease the display angle
9. [OPEN/CLOSE] Key: Open / Close the TFT monitor
10.USB Slot
11. AUX IN jack
12.Eject disc
13.Disc slot
ཱ
ི
ཱི ཱུ ྲྀ ཷ ླྀ ཹ ེ
ཻ
ུ

EN - 2
Before using
Remote Control
Note:
Your remote control may differ
slightly from the one pictured here.
The above diagram is for illustrative
purpose only.
1. [SRC]Key:select playing source
2. [EJECT]Key: Eject disc
3. [AUDIO] Key: Select DVD dialogue
language
4. [VOL+/-] Key: Adjust volume
5. [ZOOM] Key: Image zoom in/out
6. [ /BAND] Key: Select radio band
7. [WIDE] Key: Change display mode
8. [PRESET / ] Key: Select preset radio
station
9. [EQ] Key: Enter/Exit the EQ setting
10.[GOTO/ ] Key: GOTO search/Call
11.[OPEN/CLOSE] Key: Open / Close the
TFT monitor
12.
[TILT / ] Key: Adjusting display tilting angle
13.[REPT A-B] Key: A-B repeat
14.[REPT] Key: Repeat playback
15.[MUTE] Key: Mute audio outputs
16.[POWER] Key: Unit power
17.[SUBTITLE] Key: Select DVD subtitle
language
18.[ANGLE] Key: Select view angle
19.[MENU] Key: DVD MENU / PBC
20.[TILT ] Key: DVD TITLE
21.[SETUP] Key: Setup menu
22.[ ] Key: Fast Forward / Move cursor up
23.[ ] Key: Auto search / Previous / Move
cursor to the left
24.[ ] Key: Play / Pause / Enter
25.[ ] Key:Auto search / Next / Move cursor
to the right
26.[PIC] Key: Image setting
27.
[ ] Key: Fast Reverse/ Move cursor down
28.[ / ] Key: Stop Playback/Hangup
29.[DISP] Key: Display information
30.[0~9] Key: Numeric keys
31.[RDM] Key: Random playback
32.[CLEAR] Key: Clear information

EN - 3
Before using
Notes of remote control using
1) Aim the remote control at the remote
sensor on the unit.
2) Remove the battery from the remote
control or insert a battery insulator if the
battery has not been used for a month or
longer.
3) DO NOT store the remote control under
direct sunlight or in high temperature
enviro nment, or it may n ot fun ction
properly.
4) The battery can work for 6 months under
normal condition. If the remote control can't
work, please change the battery.
5) Use “button shaped” lithium battery
“CR2025” (3V) only.
6) DO NOT recharge, disassemble, heat or
expose the battery in re.
7) Insert the battery in proper direction
according to the (+) and (-) poles.
8) Store the battery in a place where children
cannot reach to avoid the risk of accident.
Uninstall Battery
Slide out the battery compartment
tray at the bottom on the back of the
remote control.
Install Battery
Use button-shaped lithium battery
“CR2025 (3V)” only. Insert the
battery to the battery tray with proper
direction according to the (+) and (-)
poles.

EN - 4
Basic operations
Power on / off
Press any key on the front panel or the
[POWER] key on the remote control to turn
on the power under standby mode. The unit
goes back to the last status after power on.
Press and hold the [SRC] key on the front
panel or press the [POWER] key on the
remote control to turn off the power under
work mode.
Mute
Press the [MUTE] key on the front panel or
remote control to mute the volume from the
unit.
Notes:
Doing the operation above again or
adjusting volume will release muting.
Mute icon winks on the TFT during muting.
Volume adjustment
Turn the volume knob on the front panel or
press the [VOL] key on the remote control.
The adjustable range of volume is 0 to 40.
Open SOURCE MENU
Press the [SRC] key on the front panel or
remote control or touch the top left corner of
the screen to open the SOURCE MENU.
Do the above operation again to return to the
original source.
Playing source selection
Open the SOURCE MENU, and then touch
the source you desired or select one source
by moving the cursor and then conrm.
Notes:
Playing source selection means selecting
work mode, such as DVD mode, Radio
mode, Camera mode, etc.
When some devices are not ready, they
cannot be selected.
Display system time
Press and hold the [DISP] key on the remote
control to switch the display information
between system time and playing source
when the TFT monitor is closed.
Using the TFT Monitor
Open / Close monitor
Press the [OPEN/CLOSE] key on the front
panel or remote control topush the display
panel out or in.
Change the monitor tilt angle
Due to the inherent character of LCD, you
will get different vision impressions when you
watch it from different angles.
The display angle of this unit can be changed;
hence you can select the best angle where
you can get the best vision impression.
Press the [TILT] key on the display panel or
the remote control to adjust the tilt angle one
step at a time.
Press and hold the [TILT] key on the display
panel or the remote control to adjust the tilt
angle continuously.
Change aspect ratio
Press the [WIDE] key on the display panel or
remote control to adjust the aspect ratio.
Image setting
(1) Enter image setting mode
Press the [PIC] key on the front panel.
(2) Select one item to adjust
Press the [ ]/[ ] keys on the remote
control.
(3) Adjust the value
Press the [ ] / [ ] keys on the remote
control.
(4) Exit image setting mode
To exit image setting mode, repeat the rst
step or stop operation for some seconds.
Reset the unit
If the unit can not work correctly, you should
reset the unit by pressingthe [RESET] button
on the front panel.

EN - 5
RDS operations
PTY function
PTY is the abbreviation for Program Type
which is a code dening the type of program
being broadcast (e.g. News or Rock).
Six PTY options will display on the screen. To
view more PTY options, touch the scroll bar
and arrows on the screen.
When one PTY option is touched (e.g.
News), auto search for next available PTY
by increasing tuning frequency until the PTY
of the next station matches the current. If no
matched PTY has been found, the unit will
return to the original radio frequency.
Program Service (PS)
Used for receiver displays of an 8 character
alpha numeric Program Service name which
may use Upper or Lower case characters, e.g.
{BBC_4_FM}, {Classic_}.
CT (Clock Time)
Some stations broadcast the time and date
within the encoded RDS signal. The clock
time is automatically adjusted when 'CT' is set
to 'On'.
RT (Radio Text)
When this function is activated, the unit will
display short message data transmitted from
the provider, such as station information, the
name of the current broadcasting song and
the artist name.
Radio mode
Select radio as playing source
Open the SOURCE MENU and then touch RADIO.
Select one radio band
Press the [BAND] key on the display panel or
remote control or touch the [BAND] icon on
the user interface to select one radio band
among FM1, FM2, FM3, MW1 and MW2.
Auto tuning
Press the [ ] / [ ] key on the display
panel or remote control or touch the [ ]
/ [ ] icon on the user interface to seek a
higher / lower station.
To stop searching, repeat the operation above
or press other keys having radio functions.
Note:
When a station is received, searching stops
and the station is played.
If the unit receives a stereo broadcasting, the
indicator light of stereo ‘ST’ on the TFT or
LCD display will be lighted.
Manual tuning
During manual tuning, the frequency will be
changed in steps.
Press the [ ] / [ ] key on remote control
or touch the [ ] / [ ] icon on the user
interface to tune in a higher / lower station.
Touch the numeric keypad icon( ) and then
touch the numeric buttons to input the radio
station frequency numbers.
Auto save
Only stations with sufficient signal strength
will be detected and stored in the memory.
When the monitor is closed, press and hold
the [AS] key on the display panel.
When the monitor is opened, touch the [AS]
icon on the user interface.
To stop auto save, press other keys having
radio functions.
Notes:
After auto save, the previous saved
stations will be overwritten.
The unit has 5 bands, such as FM1, FM2,
FM3, MW1, MW2, and Each band can
store 6 stations; hence the unit can store
30 stations in all.

EN - 6
Manual save
When one expected radio station has been
detected……
(1) Press the [MEM] icon on the user interface
and the preset menu will be opened.
(2) Press one preset button among P1~P6.
(3) If you want to abort, press the [Exit] button.
Preview scan
Preview scan searching is such a process
that the searching pauses
when a station is received and then played
for 5~10 seconds. After being played, the unit
continues the process until the whole band is
detected.
When the monitor is closed, press the [AS]
key on the display panel.
When the monitor is opened, touch the [PS]
icon on the user interface.
To stop the process, press other keys having
radio functions.
Recall the stored stations
Press one numeric key among 1 to 6 on the
remote control or touch an onscreen station
button to select the corresponding stored
station.
Local seeking
When LOCAL seeking is on, only those radio
stations with strong radio signal could be
received.
To open or close LOCAL function, press and
hold the volume knob on the front panel.
Notes:
When the local radio station searching
is on, the indicator light ‘LOC’ lights up;
whereas the light goes off.
The number of radio stations that can
be received will decrease after the local
seeking mode is on.
Disc mode
Insert a disc
Upon inserting a disc, the unit will switch to
disc mode automatically.
Notes:
Please conrm whether there is a disc in
the unit before you insert another one.
Some recorded discs, such as CD-R, CD-
RW, DVD-R, DVD+R, DVD-RW, DVD+RW
cannot be played back because of
different recording status. Otherwise, the
discs without being closed could not be
played back.
About the cautions of disc using, please
refer to the appendix.
Eject the disc
Press the [ ] key on the front panel or
remote control to eject the disc.
Touch screen controls
The touch key areas for DVD playback are
outlined below:
A - Return the last menu
B - Display playback information
C - Display onscreen control menu
B
C
A
Radio mode

EN - 7
Disc mode
Onscreen control buttons

EN - 8
Repeat playback
Press the [RPT] key on the remote control
repeatedly or open the onscreen control
buttons menu and then touch the [ ] button
repeatedly to alter repeat mode according to
the following table.
Notes:
When a VCD is played back, this function
is prohibited if the PBC is on.
Turning off the power or switching playing
source to other modes and back will
cancel this function.
Repeat A-B
When a DVD, VCD or CD disc is played back,
you can play back the contents between the
time points from A to B repeatedly.
Press the [RPT A-B] key on the remote
control or open the onscreen control buttons
menu and then touch the [RPT A-B] button to
set the start point (A) of the repeated section.
Do the above operation again to set the end
point of the repeated section.
The selected portion will repeat continuously.
Do the above operation for the third time to
cancel this function.
Random playback
When this function is on, the contents in the
disc will be played back randomly.
Press the [RDM] key on the remote control
repeatedly or open the onscreen control
buttons menu and then touch the [ ] button
repeatedly to alter random playback mode
among ‘Random on’, ‘Random off’.
Intro playback
When this function is on, the unit will play
back the first 10 seconds of each track of a
VCD or CD disc. You can search the le you
desired using this function.
Press the [SCN] key on the remote control to
activate this function.
Repeat chapter ėRepeat title ėRepeat off
DVD
VCD(PBC off)
Repeat single ėRepeat all ėRepeat off
MP3/WMA
Disctype Repeatmode
Picture
CD
MPEG
Repeat single ėRepeat folder ėRepeat allėRepeat off
Suspend playback
Press the [ ] key on the remote control or
open the onscreen control buttons menu and
then touch the [ ] button.
To resume normal play, repeat the above
operation.
Stop playback
To stop playback, press the [■] key on the
remote control or open the onscreen control
buttons menu and then touch the[■] button.
When the above operation is executed for
the rst time, the current playback is paused
and the break point is memorized and the
playback will resume when you start playback
again or switch back from other playing
sources. The current playback will cancel if
the above operation is executed twice and
the playback will start over when you start
playback again.
Display le list
To display the file list of one recorded disc,
stop current playback.
Fast playback
Press the [ ]/[ ] key on the remote
control repeatedly or open the onscreen
control buttons menu and then touch the
[ ]/[ ] button repeatedly to change the
rate of fast forward/fast reverse.
Previous / next
Press the [ ]/[ ] key on the display
panel or remote control or open the onscreen
control buttons menu and then touch the
[]/[ ] button to play the next or previous
le.
Change folder
Press the [DIR+]/[DIR-] icon on the user
interface (you should stop playback first if a
video or picture le is played back) to change
folder during the playback of one recorded
disc containing more than one folder.
Disc mode

EN - 9
Disc mode
Do the above operation again to cancel this
function.
Direct search
When a DVD, VCD or CD disc is played back,
you can search for a particular chapter / track
by pressing the numeric keys of the remote
control. For example, if you want to select the
15th track, you should press numerical key [1]
and [5].
GOTO search
(1) Enter GOTO search mode Press the
[GOTO] key on the remote control to
open search menu.
For DVD, you can search according to
title, chapter and time.
For VCD, if PBC function is off, you can
search according to time; if PBC function
is on, you can search according to track,
time and Disc time.
For CD, you can search according to
track.
For MPEG les, you can search according
to track and time.
For record discs containing MP3 and/or
JPG files, you can search according to
track(le number).
(2) Enter search information
Select items by pressing the direction keys
on the remote control and enter search
information by pressing the numeric keys,
such as title, chapter and time.
(3) Conrm
Press the [Enter] key on the remote
control to conrm.
(4) Exit GOTO search mode
Repeat the above operation until the
search menu disappeared or touch the
[Exit] button on the menu.
MENU and TITLE
This function is only available for the DVD
discs having “MENU / TITLE”.
Press the [MENU] key on the remote control
or open the onscreen control buttons menu
and then touch the [MENU] button to open
DVD MENU.
You can select audio language, subtitle
language and so on for playback.
Press the [TITLE] key on the remote control
or open the onscreen control buttons menu
and then touch the [TITLE] button to open
DVD TITLE.
You can select a different title for playback.
Select subtitle language
Press the [SUBTITLE] key on the remote
control repeatedly or open the onscreen
control buttons menu and then touch the
[SUBTITLE] button repeatedly to choose a
subtitle language.
Select multi-angle views
Press the [ANGLE] key on the remote control
repeatedly to choose a shooting angle during
the playback of a DVD disc or video file
containing multi-angle views.
Select audio channel
For DVD containing multi-language audio
files, press the [AUDIO] key on the remote
control repeatedly or open the onscreen
control buttons menu and then touch the
[AUDIO] button repeatedly to change dialogue
language.
For VCD and CD, press the [AUDIO] key on
the remote control repeatedly or open the
onscreen control buttons menu and then
touch the [AUDIO] button repeatedly to alter
audio channel modes among Left vocal, Right
vocal, Mono left, Mono right, Stereo.
Note:
Left channel and right channel cannot work
properly if the audio files are not recorded
correctly.
PBC function
This function is available for the VCD discs
with PBC function (Ver 2.0 or higher).
Press the [MENU] key on the remote control
to activate this function.
Press again to cancel.
Notes:
When PBC is on, playback goes back to
the track list and starts from the rst track.
When PBC is on, fast motion playback,
slow motion playback or skip search
is available but repeat playback and
searching for a particular chapter or track
is prohibited.

EN - 10
Disc mode
If you do the operation of random
playback, scan playback or searching
playback when PBC is on, PBC will be off
automatically.
Zoom in/out
To zoom in/out the image being played, press
the [ZOOM] key on the remote control or
open the onscreen control buttons and then
touch the [ ] icon.
Rotate picture
When one picture le is played back, you can
rotate the picture to get proper view angle
by pressing the [ ] icon on the onscreen
control buttons.
Playback information
Touch the top center area of TFT LCD when
playing back DVD and VCD discs and the
playback information will be displayed on the
top area of the TFT.
For DVD
(1) Disc type.
(2) Elapsed time of the current title.
(3) DVD Title information. “5/8” indicates that
this DVD has 8 titles and the title playing
back now is the fth title.
(4) DVD Chapter information. “2/16” indicates
that current title has 16 chapters and the
chapter playing back now is the second
chapter.
(5) Indicates that the subtitle of this DVD has
been recorded in 6 languages and the
language displayed now is the second,
that is English.
(6) Touch the [SUB TITLE] button repeatedly
+
to choose a subtitle language.
(7) Multi angle.
(8) Bitrate.
For VCD
(1) Disc type.
(2) Elapsed time of the current track.
(3) PBC function indicator. "PBC On" indicates
that PBC function has been activated.

EN - 11
Select SD/USB as playing
source
Method 1:
Method 2:
Open the 'SOURCE MENU' and then select
'SD'.
Notes:
The unit will switch to SD card mode or
USB mode after a SD card or USB device
has been inserted.
The unit supports hot swap.
Using the touch screen controls
The operation is the same as DVD mode.
Onscreen control buttons
Onscreen control buttons under USB mode
are the same as disc mode.
Stop playback temporarily
The operation is the same as disc mode.
Stop playback entirely
The operation is the same as disc mode.
Display le list
The operation is the same as disc mode.
Fast forward/Fast reverse
The operation is the same as disc mode.
Play the next or previous le
The operation is the same as disc mode.
Repeat playback
The operation is the same as disc mode.
Random playback
The operation is the same as disc mode.
Intro playback
T
he operation is the same as disc mode.
Search for a particular le
The operation is the same as disc mode.
GOTO search
The operation is the same as disc mode.
Zoom in/out
The operation is the same as disc mode.
Rotate picture
The operation is the same as disc mode.
Select picture slide mode
The operation is the same as disc mode.
Playback information display
The operation is the same as disc mode.
SD/USB mode

EN - 12
Bluetooth mode
Bluetooth is a wireless transmission way
for short distance operating at 2.4GHz.
The bluetooth module can connect with the
mobile phones having bluetooth function.
After connecting, you can control your mobile
phone through the unit.
As different mobile phones provide different
bluetooth functions, so not all of the functions
undermentioned are available to different
phones. Please read through the operation
manual of the mobile phone in use at rst.
Select Bluetooth as playing
source
Open the SOURCE MENU and then touch
BT.
Function icons
The function icons of BT are outlined as
below.
Work modes of Bluetooth
module
The bluetooth module has two work modes,
which are phone mode and music mode.
Touch the mode switch icon to switch to its
corresponding mode. Under phone mode,
hand-free, call and other phone functions are
available. Under music mode, you can enjoy
the music played back by your mobile phone
through the speakers in your car and you can
control the playback.
Phone mode
Pairing
Use this function to establish a connection
between the Bluetooth module and your
mobile phone.
Switch the work mode of the Bluetooth
module to phone mode, open the SETUP
menu and select the Bluetooth sub-menu
and then set the 'Bluetooth' option to 'On'.
Turn on the Bluetooth function of your
mobile phone and start to search Bluetooth
devices.
After the name of the Bluetooth module
appears on the pairing list on your mobile
phone, you should select it. At this time,
a pairing code is required. The Bluetooth
module will exit pairing mode if there is no
pairing instruction from your mobile phone
during the pairing time (90s) and 'Phone
Pairing Fail' is displayed on the screen.
Enter the pairing code (1234 by default)
to initiate the pairing process. The paired
mobile phone name will display on the
screen.
Browse call numbers
The Bluetooth module will download phone
book and call records from your mobile phone
after pairing.
Touch the [MENU] icon to display the Menu
list. There are some options on the menu list,
including missed calls, received calls, dialed
calls and phone book. When you press one
of them, the Bluetooth module will get its
corresponding information from your mobile
phone.
Make an outgoing call
Browse through the Phone book or call
records, touch the number you want to dial
and then touch the dial icon to make an
outgoing call.
Touch the Dial Panel icon to open dial
panel and then touch the numeric buttons
to input phone numbers. Touch the [Clear]
icon to clear the last digit. Touch the
hangup icon to clear the entire numbers or
end the conversation. Touch the Ans icon
to make an outgoing call.
Answer an incoming call
The Bluetooth module will switch to phone mode
automatically when there is an incoming call and
the incoming call number will be displayed on the
screen.
If the 'Auto Answer' option of the 'Bluetooth' sub-
menu under the SETUP MENU is set to 'On',
the unit will answer incoming calls automatically,
otherwise you should answer them manually.
The call duration will be displayed on the screen
after the incoming call has been put through.
Hangup
While talking, press the hangup key on your
mobile phone or touch the hangup icon on the
screen to end the conversation.

EN - 13
Voice transfer
While talking, touch the 'Voice transfer' icon
on the screen to transfer audio from the unit
to your mobile phone, and touch again to
transfer audio from your mobile phone to the
unit.
Note: Some mobile phones will transfer audio
from the unit to themselves once the incoming
call is answered.
Microphone mute
While talking, press the microphone mute icon
on the screen to mute the microphone built in
the unit. Under this condition, the one talking
over the telephone with you can not hear
what you are saying. Touch the mute icon
again to resume microphone functionality.
Music mode
Pairing
Before pairing, switch the work mode of
the Bluetooth module to music mode. The
procedures of pairing under music mode is
the same as the phone mode.
A2DP
A2DP is short for Advanced Audio Distribution
Profile. The mobile phones supporting this
function can transmit stereo audio, whereas
the ones not supporting this function can
transmit mono audio only.
After pairing, open the audio player of your
mobile phone and set the transmit mode to
Bluetooth. At this time, the speakers of your
mobile phone will close automatically.
To set the transmit mode of mobile phones
to Bluetooth, please refer to the user manual
or help document of the mobile phone in use
or the audio player software because the
audio players of different mobile phones vary
greatly.
AVRCP
AVRCP is short for Audio/Video Remote
Control Prole. The mobile phones supporting
this function can control the playback of a
Bluetooth audio player.
After pairing, touch the corresponding icon
to control current playback, such as Play,
Pause, Stop, Previous, Next.
Bluetooth mode
Select TV as playing source
Open the SOURCE MENU and then select TV.
Auto search
To search for a higher/lower TV channel,
press and hold the [ ]/[ ] key on the
display panel or remote control.
Notes:
To stop auto searching, press other keys
having TV functions.
When a TV channel is received, searching
stops and the TV channel is played. If no
TV channel is detected, the tuning channel
stops at the very beginning channel when
the searching process is nished.
Manual search
Press the [ ]/[ ] key repeatedly on the
display panel or remote control to change TV
channel in steps.
Auto save
Search all TV channels in the whole range
and storing the available TV channels
automatically.
Press and hold the [ ] key on the remote
control to start auto save.
To stop this process, press any other keys to
save TV functions.
Preview scan
Scan the stored TV channels and play each
channel for 5 seconds.
Press the [ ] key on the front panel or
remote control to start preview scan. To stop
this process, press any other keys having TV
functions.
Change TV channel
Play the previous / next stored channel.
To play the previous / next stored TV channel,
press the [Up] / [Down] key on the remote
control.
Play a particular channel To play a particular
TV channel, press the numeric keys of remote
control continuously.
TV mode

EN - 14
AUX
External peripheral devices with RCA audio
and video outputs can be connected with the
unit.
To enter AUX IN mode, open the SOURCE
MENU and then touch AUX IN.
Camera
This player is “camera ready”. Before
accessing any camera features, you must
purchase and install a rear video camera.
Once the rear camera is connected and
operating properly, the CAMERA source
mode will become active. While the camera
is not installed, the CAMERA option appears
gray, indicating the function is not available.
The playing source will change to 'CAMERA'
mode automatically when you reverse your
car.
Navigation
The suited navigation device can be
connected to the unit.
For more details, please refer to <Wiring
Diagram >.
To enter [NAVI ]mode:
Method 1:
Method 2:
Restore the ‘SOURCE MENU' and then
select 'NAVI’.
Notes:
For the operations under navigation mode,
please refer to the user manual of the
navigation device.
Touch screen function is available under
NAVI mode.
Other modes
SWC
Press the [SETUP] key on the remote control
or touch the setup icon [ ] on the user
interface, and touch the desired function key
of the list to the control button of the SWC.
By the setting, you can use the button of the
steering wheel to control volume,select track
etc.
Setting below:
To connect your steering wheel control
device to the unit.
Enter the setting menu.
Touch the anyone key from“KEY 1" to
"KEY 8",and the opposite function key
turns bright.
for example:
Touch“KEY 1”function ;
And long-touch the function key from the
car,the screen display: " MUTE"/" VOL+"/"
VOL-" /" SEEK DOWN" /"SEEK UP " /"
SOURCE" /"BAND" /" NULL"
Touch the anyone key that you want ,and
the setting is success.
Touch the nether left corner of the screen to
exit, the setting of the other keys as the same
as the above.

EN - 15
Setup
Setup procedures
(1) Enter setup mode
Press the [SETUP] key on the remote
control or touch the setup icon [ ] on
the user interface.
The following menu appears after entering
the setup mode.
The GENERAL sub-menu is highlighted by default.
(2) Select one sub-menu
Press the direction keys on the remote control.
(3) Select one item
Press the [ ] / [ ] key on the remote
control to select one item and then press
the [ ] key to conrm.
(4) Select one value
Press the [ ] / [ ] key on the remote
control to select one suitable value and
then press the [ ] key to conrm.
Note:
All following settings can be done by
touching the option directly.
General
● Clock mode
12Hr: the clock displays in the type of 12
hours such as 11:18 AM.
24Hr: the clock displays in the type of 24
hours such as 20:18.
● Clock
Adjust the clock displayed on the top right
corner of the TFT screen.
● Tuner Region
The unit provides several radio systems
and you can select a correct radio system
according to your country.
● Beep
On: Background sound of key-press is on.
Off: Background sound of key-press is off.
Language
● Language
Select one language of system menu display.
● Subtitle
Select one subtitle language of DVD disc.
Note:
If the DVD disc does not contain the
selected language, the subtitle will be
displayed in default language.
● Audio
Select one dialogue language of DVD disc.
Note:
If the DVD disc does not contain the
selected language, the dialogues you
listening to will be in default language.
● DVD menu
Select one language of DVD MENU
display.
Note:
If the DVD disc does not contain the
selected language, the DVD MENU will be
displayed in default language.
Audio
● Loudness
On: Loud mode is on.
Off: Loud mode is off.
● Subwoofer
On: Subwoofer mode is on.
Off: Subwoofer mode is off.
Bluetooth
● Bluetooth
On: Turn on the power of the Bluetooth
module.
Off: Turn off the power of the Bluetooth
module.
● Connect
Auto: Bluetooth module connects with
the bluetooth device automatically after
disconnecting.
Manual: Bluetooth module connects
with the bluetooth device manually after
disconnecting.
● Auto Answer
Manual: Answer manually when one call is
coming in.
Auto: Answer automatically when one call
is coming in.
● Pairing code
You should enter the pairing code when the
bluetooth module is pairing with another
bluetooth device. The original paring code
is 1234 and you can change the paring
code when the bluetooth module is on.
Table of contents
Other iCartech Car Receiver manuals
Popular Car Receiver manuals by other brands

Tuvva
Tuvva KSD6270B installation manual

Kenwood
Kenwood KRC-2100 instruction manual

Blaupunkt
Blaupunkt MIAMI DJ operating instructions

Sony
Sony CDX-R3300 - Fm/am Compact Disc Player operating instructions

JVC
JVC KD-AVX11 - EXAD - DVD Player Installation & connection manual

Sony
Sony XAV-65 operating instructions

Sony
Sony CDX-GT100 - Fm/am Compact Disc Player operating instructions

Blaupunkt
Blaupunkt MODENA MP54 7 644 262 310 operating instructions

Alpine
Alpine PKG-RSE3HDMI installation manual

VDO
VDO CD 4203 - user manual

Sony
Sony CDX-SW200 - Fm/am Compact Disc Player Installation/connections

Sony
Sony CDX-MP70 Installation/Connection Installation/connections