icon 7 D500 User manual


User's Manual
Table of Contents
Welcome ...................................................................1
Features ............................................................ 1
Specifications ...................................................... 1
Functions & Indicators ..................................................2
Indicators ........................................................... 3
Setting Up..................................................................3
Installing the iConfig™ Software.......................................4
Customizing Settings ....................................................5
Launching the iConfig™ Software ............................... 5
Assigning Button Functions....................................... 6
Adjusting the Scroll Speed ....................................... 9
Adjusting the Mouse Speed ...................................... 9
Configuring Advanced Settings .................................10
Uninstalling the iConfig™ Software ............................10
Troubleshooting ........................................................ 11


User's Manual
1
Welcome
Congratulations on your purchase of this mouse. This product features a
revolutionary design and customizable function buttons that allow you to navigate
your favorite programs with ease and comfort. Read the following sections for
information and instructions on how to set up and use your mouse. Should you
experience any problems while using the mouse, refer to “Troubleshooting” on
page 11 for assistance.
Features
• FastFind™ for quick Internet search
• Advanced wireless LaserStream™ technology
• Efficient 4-way Scrolling
• Ergonomic design for comfortable handling
• iConfig™ software for configuring and managing mouse settings
Specifications
Sensor Resolution Laser 800 dpi
Connectivity Wireless 2.4 GHz RF
Number of Buttons 4
Receiver USB micro receiver
Battery Life Up to one year with two AA batteries
Compatibility Windows 2000, XP, Vista

2
Functions & Indicators
See the following for descriptions of the mouse’s main features and default button
functions. To change these functions to better suit your preferences and needs,
see “Customizing Settings” on page 5 for details.
No. Name Function
1 Left Button Press to activate the left button
function
2 Top Button Press to activate the top button
function
Power LED LED illuminates when mouse is
turned on
3 Right Button Press to activate the right button
function
4 Middle Button /
Scroll Wheel
Press to activate the middle button
function, and move to scroll up,
down, left and right (Vista
compatible)
5 Power Switch Switch to turn the mouse on and off
6 Laser Sensor Navigation on surface
7 Connect Button Press to establish a connection
between the mouse and USB
receiver
8 Battery
Compartment
Houses two AA batteries
1
2
4
3
5
6
7
8

User's Manual
3
Indicators
Setting Up
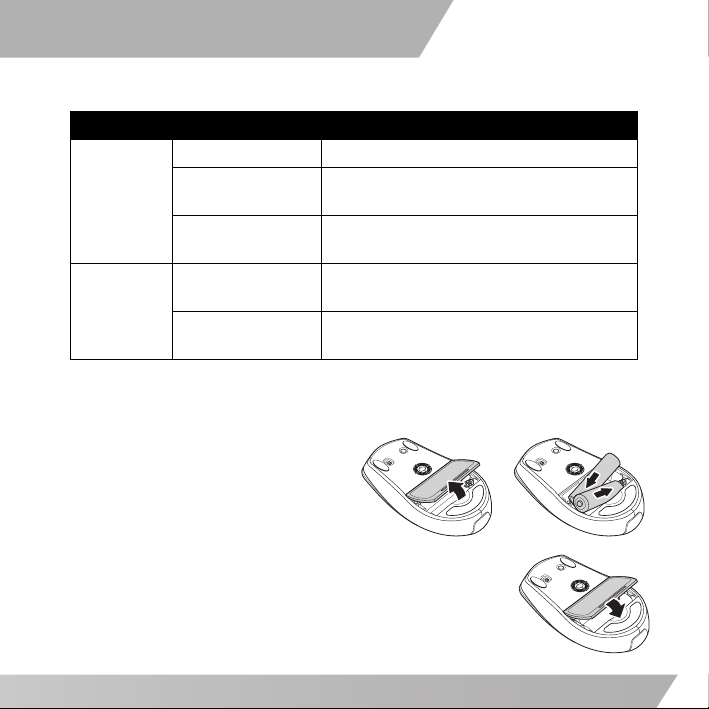
Before you can use your mouse, you must first insert two AA batteries.
1. Turn over the mouse and open the
battery cover as shown.
2. Insert two AA batteries, observing
the polarity markings, as shown.
3. Replace the battery cover so it
clicks into place.
LED Color Battery Status
D500 LED Orange Battery level normal
Orange, blinking
slowly
Battery level running low
Orange, blinking
rapidly
Battery level critically low
USB
Receiver
LED
Green Battery level normal (steady)
Detecting mouse movement (flashing)
Red Low battery (flashing)
Channel has been changed (flashes once)

4
4. Insert the USB micro receiver into a free USB
port on your PC.
5. Turn on the mouse by using the switch on the
bottom of the mouse. The mouse will connect
automatically and is now ready to use.
NOTE: If the mouse does not connect automatically,
press to establish a connection between the mouse and USB
receiver.
Installing the iConfig™ Software
Insert the supplied software CD into your CD-ROM drive. The driver and software
installation program should load automatically.
If it does not, click Start > Run, enter the path of your CD-ROM drive (D: for
example) and browse for the setup.exe file. Double-click the file to load.
1. Click Next to continue.
1
2
ON
OFF

User's Manual
5
2. Specify the location of your mouse; whether it is to
the right or the left of the keyboard. Click Next to
begin installation.
3. Installation begins. Click Cancel to quit at any time.
4. Click OK to complete the installation.
Customizing Settings
You can select functions for each button, set scroll speed, mouse speed and
configure other advanced settings through the iConfig™ software.
Launching the iConfig™ Software
You can open the iConfig™ software in three different ways:
• Double-click the Icon7 iConfig icon in the system taskbar.
• Double click the Icon7 iConfig shortcut icon on your desktop.
• Click Start > Settings > Control Panel > Icon7 iConfig.
Once the main screen opens, click the Mouse tab at the top of the screen, and
click the D500 icon.

6
Assigning Button Functions
You can assign functions to each of the mouse buttons under the Select Function
section in the iConfig™ software.
Aside from traditional button functions, such as performing a left-click or right-
click action, you can also configure a specific button to act as a shortcut to a
frequently used program or application, such as Internet Explorer.
To assign a function to a button, do the following:
1. Click the drop down menu and select the function you wish to assign to the
button.
NOTES:
•A star symbol *denotes that a function has been assigned to a button that is different from its allocated default.
Displays remaining
battery power
Displays remaining
battery power
Click the drop down
menus to assign a
specific function to each
mouse button
Move the sliders to
adjust the mouse speed
Click to save and apply
any changes
Click to exit
without applying
any changes
Click to
confirm a
setting
change
Click to
restore all
settings to
defaults
Click to configure
advanced settings
Move the sliders
to adjust scroll
speed

User's Manual
7
2. Click Apply to save and apply any changes.
See the following table for all available functions, and to which buttons they can
be assigned.
Button Description
Function Left Right Middle Top
None 333 3
Primary Mouse
Button
Default 33 Functions as the primary mouse
button for selection and dragging
Context Menu /
Alternate
3Default 3Opens the context menu
Middle Mode
Button
333 Performs the assigned middle mode
button function
Quick / Auto
Scroll
33Default Scrolls up and down the page
automatically when held and the
mouse is moved
Double-click 333 Performs a double-click action
Drag lock 333 Pressing the button will enable the
drag lock feature of the primary
mouse button. Pressing again will
disable drag lock
Maximize
window
333 Maximizes the active window
Minimize
window
333 Minimizes the active window
My Computer 333 3Opens the My Computer screen
Control Panel 333 3Opens the Control Panel
Start Button 333 3Opens the Windows Start menu
Internet
Explorer
3Opens Internet Explorer
Page Forward
(Alt+Right)
3Moves forward one page
Page Backward
(Alt+Left)
3Moves backward one page

8
IE7 QuickTab
(Ctrl+Q)
3Opens the Internet Explorer 7
QuickTab feature
Save (Ctrl+S) 333 Saves the current document or file
Copy (Ctrl+C) 333 Copies the selected item or text to
the clipboard
Cut (Ctrl+X) 333 Cuts the selected item or text to the
clipboard
Paste (Ctrl+V) 333 Pastes the item or text from the
clipboard
Undo (Ctrl+Z) 333 Undo the previous action
WMP / Play &
Pause
3Opens Windows Media Player / Plays
and pauses tracks during playback
Launch Program 3Opens a specified program
FastFind™ Default Opens a specified Internet search
engine to search online websites,
pictures, or blogs
Application
Switch (Alt+Tab)
333 3Switches to another open application
Vista Flip-3D
(Windows+Tab)
333 3Launches the Vista Flip-3D function
to help you change between open
windows
Button Description
Function Left Right Middle Top

User's Manual
9
Adjusting the Scroll Speed
You can configure the speed at which you can scroll horizontally and vertically
around the screen.
1. Under the Scroll Speed section, move the Vertical slider to the right to
increase vertical scrolling speed, or to the left to decrease vertical scrolling
speed. The number of lines at which the screen will scroll vertically is
displayed under the slider.
2. Move the Horizontal slider to the right to increase horizontal scrolling speed,
or to the left to decrease horizontal scrolling speed. The number of
characters at which the screen will scroll horizontally is displayed under the
slider.
3. Click Apply to save and apply all changes.
Adjusting the Mouse Speed
You can configure the speed at which the mouse cursor moves around the screen,
as well as response time when you double click a button.
1. Under the Mouse Speed section, move the Double Click slider to the right to
increase the double-click speed, or to the left to decrease the double-click
speed.
2. Move the Cursor slider to the right to increase the response time when you
double-click a button, or to the left to decrease the response time.
3. Click Testing Area to test out your new settings.
4. Click Apply to save and apply all changes.

10
Configuring Advanced Settings
Click Advanced to view the advanced settings screen.
Here you can adjust settings for display icons and
notification messages. To adjust more advanced settings,
click the Control Panel and then Mouse Setting from the
window that appears.
Show iConfig in Taskbar Notification Area
Check this option to display the iConfig icon in the system taskbar.
1. Check Show iConfig in Taskbar Notification Area to display the icon in the
system taskbar.
2. Click OK to save the setting.
Show low battery alert pop-up box
1. Check this option to display a notification message when battery power is low.
2. Click OK to save the setting.
Uninstalling the iConfig™ Software
1. Click Control Panel.
2. Double-click Add or Remove Programs.
3. Locate the iConfig™ program in the program list.
4. Click Remove.
5. A confirmation message will appear. Click Yes to uninstall or No to cancel.

User's Manual
11
Troubleshooting
If you have any problems with your mouse, please check the following:
• Check the system requirements to make sure that your system is compatible.
• Check to see if the USB micro receiver is securely connected to your PC via a
USB port. A loose connection may cause the mouse to malfunction.
• When the mouse LED is lit orange, it indicates battery power is low. Replace
with new batteries immediately.
• If the mouse fails to work, check the USB mouse function in your system’s
BIOS. The function should be enabled for normal use.
• If your PC BIOS setup has mouse options, make sure they are set to default
settings. Refer to your PC’s manual for more information on your PC BIOS.
• Only use the mouse on a clean, flat, non-slippery surface in order to ensure
smooth and accurate cursor action. If you use a mouse-pad, darker colors
require more battery power.
For further assistance with any other questions you may have, please contact your
dealer for technical support.


Español
Tabla de contenido
Bienvenido.................................................................1
Características ..................................................... 1
Especificaciones técnicas ........................................ 1
Funciones e indicadores ................................................2
Indicadores ......................................................... 3
Preparar el ratón para su uso..........................................3
Instalar la aplicación iConfig™ .........................................4
Personalizar la configuración..........................................5
Iniciar la aplicación iConfig™ .................................... 5
Asignar funciones a los botones ................................. 6
Ajustar la velocidad de desplazamiento ....................... 9
Ajustar la velocidad del ratón................................... 9
Definir la configuración avanzada .............................10
Desinstalar la aplicación iConfig™ .............................10
Solucionar problemas ................................................. 11


Español
1
Bienvenido
Felicidades por la compra de este ratón. Este producto cuenta con un
revolucionario diseño y botones de función que puede personalizar para navegar
por sus programas favoritos con facilidad y comodidad. Lea las siguientes secciones
para obtener información e instrucciones sobre el modo de configurar y usar el
ratón. Si tiene problemas al usar el ratón, consulte la sección “Solucionar
problemas” en la página 11 para obtener ayuda.
Características
• Función FastFind™ para agilizar la búsqueda en Internet
• Tecnología LaserStream™ inalámbrica avanzada
• Desplazamiento eficaz en 4 direcciones
• Diseño ergonómico que proporciona un manejo cómodo
• Aplicación iConfig™ para ajustar y administrar la configuración del ratón
Especificaciones técnicas
Resolución del sensor 800 ppp láser
Conectividad Radiofrecuencia inalámbrica de 2,4 GHz
Número de botones 4
Receptor Receptor diminuto USB
Autonomía de las
pilas
Hasta un año con dos pilas AA
Compatibilidad Windows 2000, XP y Vista

2
Funciones e indicadores
Consulte la tabla siguiente para obtener las descripciones de las principales
funciones del ratón y de las funciones predeterminadas de los botones. Si desea
cambiar estas funciones a su gusto y según sus necesidades, consulte la sección
“Personalizar la configuración” en la página 5 para obtener más detalles.
Nº Nombre Función
1 Botón izquierdo Presiónelo para activar la función
del botón izquierdo
2 Botón superior Presiónelo para activar la función
del botón superior
LED de
encendido El LED se ilumina cuando el ratón
está encendido
3 Botón derecho Presiónelo para activar la función
del botón derecho
4Botóncentraly
rueda de
desplazamiento
Presiónelo para activar la función
del botón central y muévalo para
desplazarse hacia arriba, hacia
abajo, hacia la izquierda y hacia la
derecha (compatible con el sistema
operativo Vista)
5 Conmutador de
alimentación Conmútelo para encender y apagar
el ratón
6 Sensor láser Navegación por la superficie
7 Botón Conectar Presiónelo para establecer conexión
entre el ratón y el receptor USB
8Compartimento
para las pilas Aloja dos pilas AA
1
2
4
3
5
6
7
8
Table of contents
Languages:
Other icon 7 Mouse manuals