icon 7 Twister 1000 MT01 User manual


User's Manual
Table of Contents
Welcome to the World of Twister™...................................1
Features ............................................................ 1
Specifications ......................................................1
Functions & Indicators ..................................................2
Indicators ........................................................... 2
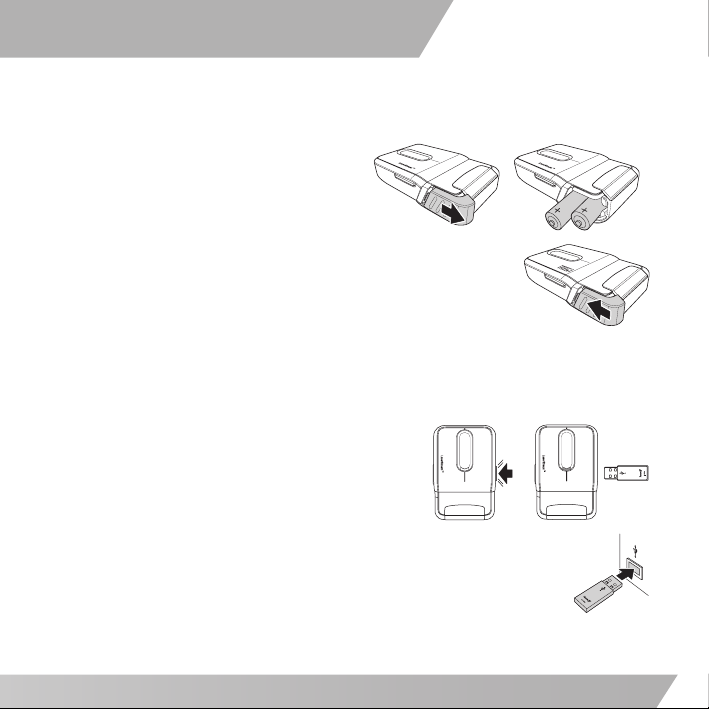
Setting Up..................................................................3
Connecting to your PC ............................................ 3
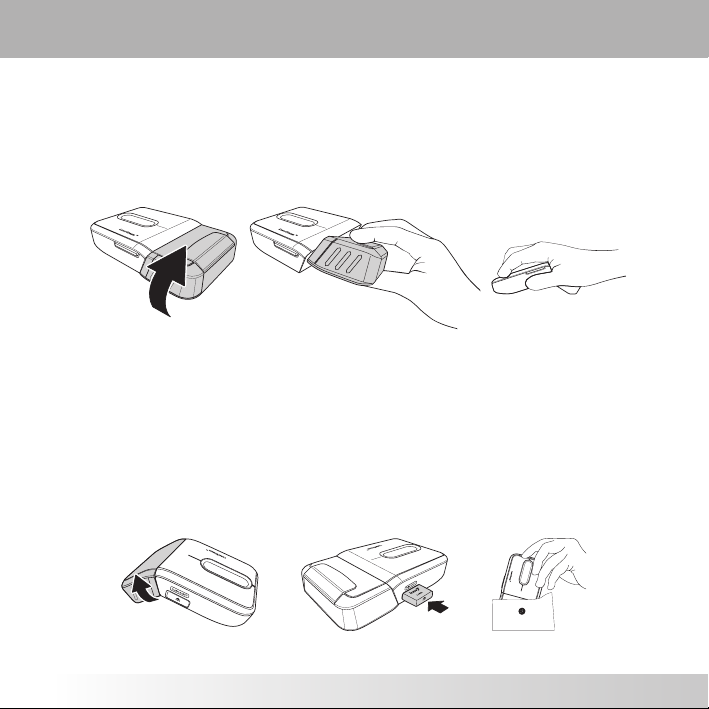
Time to Twist! ..................................................... 4
Storing and Transporting Your Twister™ 1000 ................4
Installing the iConfig™ Software.......................................5
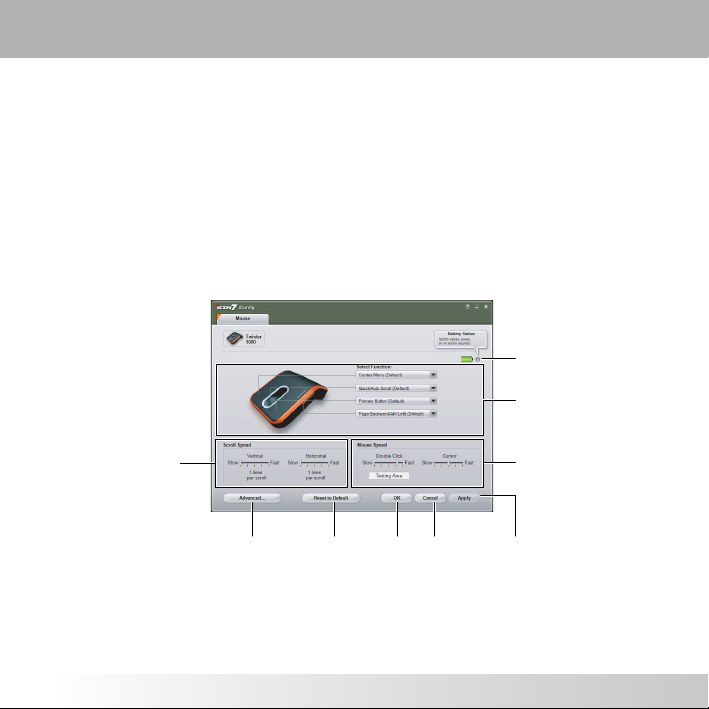
Customizing Settings ....................................................6
Launching the iConfig™ Software ...............................6
Assigning Button Functions.......................................7
Available Button Functions ...................................... 7
Adjusting the Scroll Speed ....................................... 9
Adjusting the Mouse Speed ...................................... 9

User's Manual
1
Welcome to the World of Twister™
Welcome to the wonderful world of the Twister™ 1000 wireless laser pocket mouse.
The Twister 1000 features a revolutionary design and customizable function
buttons that allow you to navigate your favorite programs with ease and comfort.
Designed for people on the move, Twister™ 1000 is the latest in a range of portable
wireless peripheral solutions.
Features
• SmartTwist™ for ultra portability
• Advanced wireless LaserStream™ technology
• EasyTouch™ glide panel for smooth scrolling
• Programmable side button for horizontal scrolling
• iConfig™ software for configuring and managing mouse settings
Specifications
Model No. MT01
Sensor Resolution Laser 800 dpi
Connectivity Wireless 2.4GHz RF
No. of Buttons 4
Receiver Push-push storable USB micro receiver
Batteries AAA x 2
Compatibility Windows 2000, XP, Vista

2
Functions & Indicators
Indicators
No. Name
1RightButton
2MiddleButton
3LED
4 USB Receiver Storage
5SideButton
6LeftButton
7 Connect Button
8PowerSwitch
LED Color Description
Twister LED Green Mouse is turned on, battery level normal
Red Low battery (flashing rapidly)
USB
Receiver LED Green Battery level normal (flashing steady)
Detecting mouse movement (flashing)
Red Low battery (flashing rapidly)
Channel has been changed (flashes once)
1
2
3
4
5
6
7
8

User's Manual
3
Setting Up
Before you can use your Twister™ 1000, you must first insert two AAA batteries.
1. Press and slide open the
battery door to insert two AAA
batteries as shown.
2. Slide back the battery door.
Connecting to your PC
After you have installed the batteries, you can attach the USB receiver to your PC
so you can begin using the mouse.
1. Push the panel housing the receiver on the
right side of the mouse. The receiver will
pop out, and the mouse will turn on.
2. Insert the USB receiver into a free USB port
on your PC. Your PC will detect the USB receiver automatically.
NOTE: If your PC detects the USB receiver but the mouse does not
respond, press the CONNECT button on the bottom of the mouse.
The connection should then be established and you can use the mouse.

4
Time to Twist!
In order to use your Twister™ 1000, you must first twist it from the flat position to
the arched position. So, its time to twist!
1. Twist clockwise 180 degrees as shown.
2. Position the mouse on a flat surface, and you are ready to go!
Storing and Transporting Your Twister™1000
You can store and transport your Twister™ 1000 easily.
1. Twist counter-clockwise 180 degrees to flatten the mouse.
2. Remove the USB receiver from your PC and insert into the mouse. The mouse
will power off.
3. Now, you’re ready to go!

User's Manual
5
Installing the iConfig™ Software
Insert the supplied software CD into your CD-ROM drive. The driver and software
installation program should load automatically.
If it does not, click Start > Run, enter the path of your CD-ROM drive (D: for
example) and browse for the I7setup.exe file. Double-click the file to load.
1. Click Next to continue. 2. Specify the location of your mouse;
whether it is to the right or the left of the
keyboard.Click Next to begin installation.
3. Installation begins.
Click Cancel to quit at
any time. 4. Click OK to complete the installation.

6
Customizing Settings
You can select functions for each button, set scroll speed, mouse speed and
configure other advanced settings through the iConfig™ software.
Launching the iConfig™ Software
You can open the iConfig™ software in two different ways:
• Double-click the Icon7 iConfig icon in the system taskbar.
• Click Start > Settings > Control Panel > Icon7 iConfig.
Once the main screen opens, click the Mouse tab at the top of the screen, and
click the Twister 1000™ icon.
NOTES:
• A star symbol *denotes that a function has been assigned to a button that is different from its allocated default.
Displays remaining
battery power
Click the drop down
menus to assign a
specific function to each
mouse button
Move the sliders to
adjust the mouse speed
Click to save and apply
any changes
Click to exit
without applying
any changes
Click to
confirm a
setting
change
Click to
restore all
settings to
defaults
Click to configure
advanced settings
Move the sliders
to adjust scroll
speed

User's Manual
7
Assigning Button Functions
Your Twister™ 1000 features four customizable buttons which can be assigned
specific functions.
1. Click the drop down menu and select the function you wish to assign to the
button.
2. Click Apply to apply the function or Cancel to exit without making changes.
Available Button Functions
Certain functions can only be applied to specific buttons:
Button Description
Function Left RighttMiddle Side
None 33 3 3
Primary Mouse Button Default 33 Functions as the primary mouse button for selection
and dragging
Context Menu /
Alternate
3Default 3Opens the context menu
Middle Mode Button 33 3 Performs the assigned middle mode button function
Quick / Auto Scroll 33Default Scrolls up and down the page automatically when
held and the mouse is moved
Double-click 33 3 Performs a double-click action
Drag lock 33 3 Pressing the button will enable the drag lock feature
of the primary mouse button. Pressing again will
disable drag lock
Maximize window 33 3 3
Maximizes the active window
Minimize window 33 3 3
Minimizes the active window
My Computer 33 3 3
Opens the My Computer screen

8
Control Panel 33 3 3Opens the Control Panel
Start Button 33 3 3
Opens the Windows Start menu
Internet Explorer 3Opens Internet Explorer
Page Forward
(Alt+Right)
3Moves forward one page
Page Backward
(Alt+Left)
Default Moves backward one page
Save (Ctrl+S) 33 3 3
Saves the current document or file
Copy (Ctrl+C) 33 3 3
Copies the selected item or text to the clipboard
Cut (Ctrl+X) 33 3 3
Cuts the selected item or text to the clipboard
Paste (Ctrl+V) 33 3 3
Pastes the item or text from the clipboard
Undo (Ctrl+Z) 33 3 3
Undo the previous action
Launch Program 3Opens a specified program.
Horizontal Scroll
Activation
3Activates horizontal scroll function.
Application Switch
(Alt+Tab)
3Switches to another open application.
Vista Flip-3D
(Windows+Tab)
3Launches the Vista Flip-3D function to help you
change between open windows.
Button Description
Function Left RighttMiddle Side

User's Manual
9
Adjusting the Scroll Speed
You can configure the speed at which you can scroll horizontally and vertically
around the screen.
1. Under the Scroll Speed section, move the Vertical slider to the right to
increase vertical scrolling speed, or to the left to decrease vertical scrolling
speed.The number of lines at which the screen will scroll vertically is
displayed under the slider.
2. Move the Horizontal slider to the right to increase horizontal scrolling speed,
or to the left to decrease horizontal scrolling speed.The number of characters
at which the screen will scroll horizontally is displayed under the slider.
3. Click Apply to save and apply all changes.
Adjusting the Mouse Speed
You can configure the speed at which the mouse cursor moves around the screen,
as well as response time when you double click a button.
1. Under the Mouse Speed section, move the Double Click slider to the right to
increase the double-click speed, or to the left to decrease the double-click
speed.
2. Move the Cursor slider to the right to increase the response time when you
double-click a button, or to the left to decrease the response time.
3. Click Testing Are a to test out your new settings.
4. Click Apply to save and apply all changes.

10
Configuring Advanced Settings
Click Advanced to view the advanced settings screen.
Here you can adjust settings for display icons and
notification messages.
To adjust more advanced settings, click the Control
Panel and then Mouse Setting from the window that
appears.
Show iConfig in Taskbar Notification Area
Check this option to display the iConfig icon in the system taskbar.
1. Check Show iConfig in Taskbar Notification Area to display the icon in the
system taskbar.
2. Click OK to save the setting.
Show low battery alert pop-up box
1. Check this option to display a notification message when battery power is low.
2. Click OK to save the setting.
Uninstalling the iConfig™Software
1. Click Control Panel.
2. Double-click Add or Remove Programs.
3. Locate the iConfig™ program in the program list.
4. Click Remove.

User's Manual
11
5. A confirmation message will appear. Click Yes to uninstall or No to cancel.
Troubleshooting
If you have any problems with your mouse, please check the following:
• Check the system requirements to make sure that your system is compatible.
• Check to see if the USB receiver is securely connected to your PC via a USB
port. A loose connection may cause the mouse to malfunction.
• When the mouse LED is lit red, it indicates battery power is low. Replace it
with a new battery immediately.
• If the mouse fails to work, check the USB mouse function in your system’s
BIOS. The function should be enabled for normal use.
• If your PC BIOS setup has mouse options, make sure they are set to default
settings. If you are not familiar with the BIOS, refer to your PC’s manual for
more information.
• Only use the mouse on a clean, flat, non-slippery surface in order to ensure
smooth and accurate cursor action. If you use a mouse-pad, darker colors
require more battery power.
For further assistance with any other questions you may have, please contact your
dealer for technical support.

12

Español
Tabla de contenido
Bienvenido al mundo de Twister™....................................1
Características..................................................... 1
Especificaciones técnicas ........................................1
Funciones e indicadores ................................................2
Indicadores ......................................................... 2
Preparar el ratón para su uso..........................................3
Establecer conexión con su PC .................................. 3
¡El la hora de darle la vuelta! ...................................4
Almacenar y transportar el ratón Twister™ 1000............. 4
Instalar la aplicación iConfig™ .........................................5
Personalizar la configuración..........................................6
Iniciar la aplicación iConfig™ ....................................6
Asignar funciones a los botones.................................7
Funciones disponibles de los botones ..........................7
Ajustar la velocidad de desplazamiento .......................9
Ajustar la velocidad del ratón...................................9

Español
1
Bienvenido al mundo de Twister™
Bienvenido al maravilloso mundo que le ofrece el ratón láser inalámbrico de
bolsillo Twister™ 1000.
El ratón Twister 1000 cuenta con un revolucionario diseño y botones de función que
puede personalizar para navegar por sus programas favoritos con facilidad y
comodidad.
Diseñado para la gente que viaja, el ratón Twister™ 1000 es la última novedad de
una amplia gama de soluciones de periféricos inalámbricos portátiles.
Características
• Tecnología SmartTwist™ que ofrece lo máximo en portabilidad
• Tecnología LaserStream™ inalámbrica avanzada
• Panel de deslizamiento EasyTouch™ que permite un desplazamiento perfecto
• Botón lateral programable para desplazamiento horizontal
• Aplicación iConfig™ para ajustar y administrar la configuración del ratón
Especificaciones técnicas
Nº de modelo MT01
Resolución del sensor 800 ppp láser
Conectividad Radiofrecuencia inalámbrica de 2,4 GHz
Número de botones 4
Receptor Receptor diminuto USB portátil con diseño
Push-Push
Pilas AAA x 2
Compatibilidad Windows 2000, XP y Vista

2
Funciones e indicadores
Indicadores
Nº Nombre
1 Botón derecho
2 Botón central
3LED
4Compartimento para
el receptor USB
5 Botón lateral
6 Botón izquierdo
7 Botón Conectar
8Conmutador de
alimentación
LED Color Descripción
LED
Tw i s t e r Verde El ratón está encendido y la carga de las pilas
es normal
Rojo Carga baja de las pilas (parpadea rápidamente)
LED del
receptor
USB
Verde
Carga normal de las pilas (parpadea forma
constante)
Detección de movimiento (parpadea)
Rojo Carga baja de las pilas (parpadea rápidamente)
El canal se ha cambiado (parpadea una vez)
1
2
3
4
5
6
7
8
Table of contents
Languages:
Other icon 7 Mouse manuals