iCON Pro Audio V1-M User manual

User manual
The future of DAW controllers has just arrived.
Welcome to the revolution!
Presenting the new standard in MIDI DAW control surfaces – the agship
V1-M DAW controller, featuring a large 7" 24-panel, programmable digital
touch screen, a beautifully designed meter bridge, multiple simultaneous DAW
control, highly advanced software, easy plug-in control and intuitive,
intelligent
design.

Important Safety InstructionsImportant Safety Instructions
1. Read this manual thoroughly before using this unit.
2. Keep this manual for future reference.
3. Take notice of and comply with all warnings included in the user's manual or indicated on the
appliance.
4. Follow all instructions included in this manual.
5. Do not expose this unit to rain or moisture. Avoid having water or other liquids spilled on this
unit.
6. When cleaning the cabinet or other parts of this appliance, use only a dry or slightly damp soft
cloth.
7. Do not block any ventilation openings or interfere with the proper ventilation of this unit. Install
in accordance with the manufacturer's instructions.
8. Do not use or store near any heat sources such as radiators, heat registers, stoves, or other heat-
producing appliances.
9. Do not interfere with plugs in any way. Do not open the unit. ALWAYS consult an
electrician for any proposed electrical work and NEVER attempt any remedial work yourself.
10. Protect the power cord from being walked on or otherwise damaged by items placed on or
against them. Particular attention should be given to the plugs, receptacles, and the point where
the cord exits the appliance.
11. To avoid the risk of electrical shock, do not touch any exposed wiring while the unit is in
operation.
12. Only use attachments/accessories specified by the manufacturer.
13. Unplug this unit and all connected electrical equipment during lightning storms or when left
unused for a long period of time.
14. Refer all servicing to qualified service personnel. Servicing is required when the appliance has
been damaged in any way or fails to operate normally.
WARNING: To reduce the risk of fire or electric shock, do not expose this unit to rain or moistureWARNING: To reduce the risk of fire or electric shock, do not expose this unit to rain or moisture
The lightning ash with an arrowhead
symbol within an equilateral triangle is
intended to alert the user to the presence
of uninsulated hazardous voltage within
the device's enclosure, which may be of
sucient magnitude to induce a risk of
electric shock to persons.
The exclamation point within an equilateral
triangle is intended to alert the user to
the presence of important operating and
maintenance (servicing) instructions in the
literature accompanying the device.

3
Introduction.................................................................................... 4
What's in the package? ................................................................. 4
Register your ICON Pro Audio product to your personal account . 5
Features Pt. 1................................................................................ 6
Features Pt.2................................................................................. 8
Top Panel Layout Diagram ........................................................... 9
Top Panel Layout(cont.)............................................................... 10
Rear Panel Layout ...................................................................... 16
Getting Started with the V1-M ..................................................... 17
Launching the V1-M in Every Day Use........................................ 22
Ableton Live ................................................................................ 23
Audition........................................................................................ 24
Bitwig........................................................................................... 25
Cakewalk .................................................................................... 26
Cubase/Nuendo .......................................................................... 27
Digital Performer 11..................................................................... 28
FL Studio .................................................................................... 29
Logic Pro ..................................................................................... 30
Luna............................................................................................. 32
Mixbus 32C ................................................................................. 34
Pro Tools...................................................................................... 35
Reaper......................................................................................... 36
Reason ........................................................................................ 38
Samplitude .................................................................................. 39
Studio One................................................................................... 40
Tracktion Waveform..................................................................... 41
Installing iMapTM for the Mac ...................................................... 42
Installing iMapTM for Windows...................................................... 43
The iMAPTM ................................................................................. 45
Other Functions in iMap™........................................................... 55
Firmware upgrade ....................................................................... 56
Hardware Connections................................................................ 59
Fitting a V1-X Extender Unit........................................................ 61
Fitting the V1-M to mastering desk.............................................. 62
Especicaciones.......................................................................... 63
Services....................................................................................... 64
Contents

4
Introduction
What's in the package?
●V1-M USB C - MIDI Controller x 1pc
●Quick Start Guide x 1
●USB C Cable x 1
Firstly, congratulations on your purchase of the ICON Pro Audio V1-M MIDI DAW
controller! In these pages, you'll nd a detailed description of the features of the
V1-M and a full list of specications.
Please register the product on our website at the link below
my.iconproaudio.com/registration/
As with most electronic devices, we strongly recommend you retain the original
packaging. In the unlikely event that the product is returned for servicing, the original
packaging (or reasonable equivalent) is required. With proper care and adequate air
circulation, your V1-M MIDI DAW controller will operate awlessly for many years to
come.
We trust that this product will provide years of excellent service and in the unlikely
event that your product does not perform to the highest standard, every eort will be
made to address the issue.

5
Register your ICON Pro Audio product to
your personal account
1. Check the serial number of your device
Please go to my.iconproaudio.com/registration/ or scan the QR code below.
Input your device’s serial number and the other information on the screen. Click
“Submit”.
A message will pop up showing your device information such as model name and
its serial number - Click “Register this device to my account”. If you see any other
message, please contact our after-sales service team
2. Log in to your personal account page for existing users or sign
up as a new user
Existing user: Please log into your personal user page by inputting your
user name and password.
New user: Please click “Sign Up” and ll in all the information.
3. Download all useful materials
All your registered devices under your account will show on the page. Each
product will be listed along with all its available les such as drivers, rmware, user
manuals in dierent languages and bundled software etc. for download.

6
Features Pt. 1
The world of MIDI DAW controllers has just changed.
This outstanding and let's be frank, beautiful machine will nd its way to the heart
of studio operations throughout the world, no matter the size or scope of the facility.
Equally suited to full scale, state-of-the-art professional studios as it is to the project
studio owner, never before has a DAW controller featuring this level of capability,
value for money and expandability been available. This truly is a revolution in the
world of DAW controllers.
The V1-M is the leading of a new generation of super-stable DAW controllers
from iCON Pro Audio, with ground-breaking functionality at your ngertips via a
programmable 24 panel electronic touchscreen, which features all the functions you
would ever need in a recording, mixing or mastering session.
A total of 120 DAW functions can be assigned per DAW, (an incredible 360 functions
in total!) to this attractive and color-coded touchscreen display - via 5 color modes,
(blue, green, orange, purple and red), which can in turn be adjusted (i.e. for EQ or
a plug in) with the eight noiseless, smooth and rened rotary encoders, which also
function as PAN knobs.
The stunning meter bridge oers 9 clear, bright and accurate LED meters as well as
a 2 inch TFT display showing values such as track names, channel colors etc. as
communicated by the selected DAW.
With the V1-M, you can now connect up to three DAWs at the same time! If your
main project is in, say Pro Tools, but you need to quickly shoot back to Cubase - no
problem! The V1-M will allow this to happen literally at the touch of a button without
any delay or fuss, which means no interruption to you or your workow.
By pressing 'Focus', you can now select a plug-in parameter* with the mouse and
adjust values with the smooth, gliding action of the large, high specication jog
wheel. This feature is likely to become a favorite of those who love hands-on,
interactive control of their plug-ins and EQ (and who doesn't?!).
*Every parameter may not be supported by every plug in
A new and highly advanced user-friendly generation of iMAPTM software supports the
V1-M. This allows you to completely re-arrange how DAW functions appear (via 'drag
and drop') in the 5 color modes of the 24 panel touchscreen (a total of 120 possible
functions). Additionally, users can map MIDI functions and keyboard hotkeys within
the software. All in real time! At the time of production, no other DAW controller of
this type boasts this level of functionality.

7
Traditionally, the features page would have ended on the last page, with a one page
limit. However, there is TOO MUCH to talk about and draw your attention to!
Let's spend a moment discussing the very impressive looking jog wheel. This is a
VERY high specication optical encoder, tted with a large metal cap for ease of
use. It is built to very exacting standards and is extremely precise and smooth which
makes accurately navigating through your project eortless. Press 'Shue' to VERY
quickly navigate through your channels with the jog wheel, (very useful if you have
an over abundance of tracks in a project). This, coupled with the 'Focus' button
functionality as already mentioned, makes this multi-functional, high grade jog wheel
extremely desirable and a main feature of the V1-M.
The ARM chip (Cortex-M7 @500 MHz), now used in all new iCON Pro Audio control
devices may not ring any particular bells - and lets face it - it's not the most exciting
thing to talk about....but it is signicant and worth mentioning here. Why? Because,
it is an extremely stable chip and will ensure the dependability of your machine for
years to come.
Another feature to be aware of is the ability of the V1-M to show track colors on the
upper TFT display. This could be extremely useful when you group tracks according
to color, (i.e. drum tracks in red, guitar tracks in yellow etc.).
The newly designed fader caps are designed to ergonomically t your ngers and
provide a more comfortable mixing experience.
Whilst on the subject, take a step back and admire the design of the V1-M. It is a
thing of beauty, I'm sure you'll agree. No matter if you are running a home studio,
professional facility or you are a home studio enthusiast, having a V1-M in your set
up will denitely impress your visitors!
This intelligent, intuitive and highly attractive unit will suit anyone's aesthetic and
feature requirements. The highly professional feel, design and functionality of the
V1-M will bring you closer to your music, improve your workow and heighten your
experience; form and function working in perfect and exacting harmony.
There's still more we could talk about, (the V1-M has THAT many features!), but I
will leave you here and say to you......
....Welcome to the revolution!

8
Features Pt.2
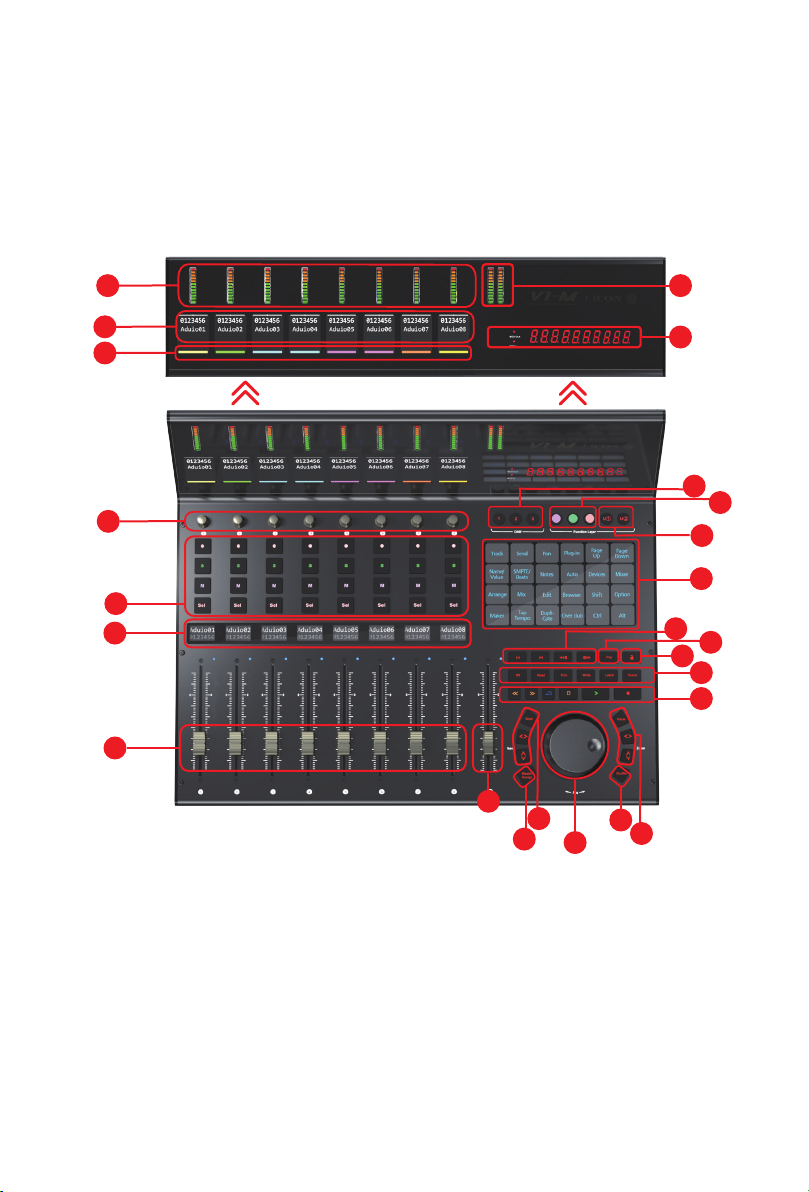
●9x touch-sensitive motorized faders with 12-bit resolution
●Large, programmable 7 inch, 24 panel digital touch screen display showing DAW
functions per 5 color modes - a potential total of 120 displayable and actionable
functions
●Organize DAW functions in the 24 panel touchscreen easily via 'drag and drop' in
the iMAPTM - changes made in real time
●Capability of connecting to 3 DAWs at one time via the DAW select buttons
●Extremely hardwearing, durable and versatile
●On-board 2 inch TFT display showing channel name, control values, channel colors
etc., (DAW dependent)
●Attractive, modern meter bridge, featuring precise, clear and eye-catching LED
meters
●Additional lower 1.14 inch TFT display for each channel (some DAW’s are equipped
to display additional information on this screen)
●Extremely high quality, large optical encoder jog wheel with very precise, smooth
control for fast search, scrub etc.
●8 smooth action dual-function encoder knobs (Rotate and Enter)
●10 segment LED display shows timecode or location of your project in either
SMPTE or beat clock (bars:beats:ticks) formats
●Illuminated function buttons for 'Read', 'Write', 'Touch', 'Latch', 'Trim'; and 'O' -
activated/de-activated as required per DAW
●Illuminated buttons for channel control including Mute, Solo and Record
●6 illuminated transport buttons including Play, Stop, Record, Rewind, Fast Forward
and Loop
●Dedicated ‘Master/Assign’ button for quick switching the Master fader from the
master channel to a pre-designated track
●Illuminated “Zoom” button with 2 directional keys (Left/Right & Up/Down), also used
in combination with the jog wheel
●Illuminated 'Focus' button which allows the user to "focus" in and adjust plug-in,
EQ parameters etc. via the smooth-action jog wheel
●2 illuminated “Track” buttons for selecting individual channels
●2 illuminated “Bank” buttons for shifting 8-channels at a time
●Supports Universal Mackie Control and HUI protocols for seamless integration with
compatible music production software
●Supports Ability, Audition, Ableton Live, Bitwig, Cakewalk, Cubase/Nuendo, Digital
Performer, FL Studio, Mixbus 32C, Pro Tools, Logic Pro, Luna, Reaper, Reason,
Samplitude, Studio One and Tracktion Waveform
●iMapTM software included
●USB C high-speed connectivity
●Firmware upgrade available via USB C connection and iMap TM software
●1/4 inch inputs for connecting footswitch pedals
●Class-compliant with MacOS 10.15 or above & Windows 10 or above
●Superior build quality and robust metal casing with Kensington lock port

9
Top Panel Layout Diagram
4
1a
5a
13
5c
15
7
1b
1d
4a
3a
2
9
6
14 12
4b
10
1c
5b
5d
8a
11
8b
3b

10
Top Panel Layout (cont.)
1. Upper on-board Display
1a) TFT Display
The generously proportioned 2 inch TFT on-board display shows the parameter
values as you adjust them and also provides feedback about channel selections,
operating modes, PAN values and more. The display is also capable of reecting the
color modes of the DAW channels. The information displayed is dependent on the
DAW.
1b) Time display
An LED display shows the timecode or location of your project in either SMPTE or
beat clock (bars:beats:ticks) formats.
1c) Channel meters (mono)
Eight 12-segment LED meters showing the associated channel level.
1d) Master channel meter (stereo)
A 12-segment LED meter showing the associated level of the stereo out channel.
Please note that some DAWs do not support this function.
2. Lower on-board Display
A second TFT 1.14 inch display of 8 windows, suitable for DAWs equipped to
communicate information via a second display.
3. Faders
3A) 8 channel faders
The eight motorized faders are generally used for controlling the track
volume of the DAW. Depending on your DAW, you may use the “Flip” button to
swap the rotary encoders and the fader functions. This may be useful if making very
intricate moves for PAN or plug-in parameter values commonly executed using the
rotary encoders. The 12 bit resolution faders are capable of very detailed movement.
Any automation recorded in a project will be reected by the fader positions. Any
parameter adjustments made with the fader will be displayed directly above on the
upper TFT display. All faders are touch sensitive and allow the user to override
automation the moment a fader is touched.
3b) Master fader
This touch sensitive fader is used to adjust the Master channel. It can also be
assigned to any channel via the iMAPTM software.
Note: Except Pro Tools – Pro Tools software is designed in such a way that the master fader is
assigned by the user within the session like any other fader. Pro Tools does not send master
fader data separately from other faders through Mackie HUI Protocol. Therefore, the Pro Tools
master fader will not respond when the master fader is in Master mode. However, with the V1-
M's assignment feature, you may assign the master fader to the V-1M's ninth fader if you wish
to.
NOTE: The V1-M is a universal DAW controller (i.e. not designed for one specic DAW).
Functions will operate slightly dierently between DAWs. Please refer to your DAW manual for each function.

11
4. Control buttons
4a) Recording channel control buttons section
REC button - Activate and deactivate the recording state of the
associated channel. The switch will light red when the channel is armed.
SOLO button - Activate/de-activate the solo state of the associated channel. The
switch will light green when the channel solo state is on and other channels will be
muted.
MUTE button - Activate and deactivate the mute state of the associated
channel. The switch will light blue when the channel is muted.
SEL buttons - Used to select the channel
4b) Motorized fader control buttons section
Fader left button - Shift “one” channel down for all faders (except the
master channel).
Fader right button - Shift “one” channel up for all faders (except the
master channel).
BANK left button - Shift “eight” channels down for all faders (except the
master channel).
BANK right button - Shift “eight” channels up for all faders (except
the master channel).
5. Jog wheel section
5a) Zoom/Focus control buttons section
Zoom UP/DOWN button - The Zoom UP/DOWN button is used to change the
vertical size of the channels on the user interface using the jog wheel or the UP/
DOWN arrow buttons.
Zoom LEFT/RIGHT button - The LEFT/RIGHT button is used to change the
horizontal size of the user interface using the jog wheel or the LEFT/RIGHT arrow
buttons.
Focus - Press 'focus' and hover over a plug-in parameter with your mouse and use
the jog wheel as a device to change the parameters.

12
5b) Navi and directional buttons
Press the "Navi" button and rotate the high specication jog wheel to navigate
through the channels, one at a time. Select directional buttons to determine
the direction of travel for navigating up and down your tracks in your DAW's
arrangement window and left and right across the tracks in the Mixer view using
the jog wheel. You may also use these buttons in combination with the jog wheel to
navigate elements of your DAW, for example audio segments in the arrangement
window.
5c) Shue button
Press this button and rotate the large, high specication jog wheel to navigate
through the tracks in banks of 8 channels at a time. This will result in high speed
navigation through the channels - especially helpful in projects with many tracks.
7. Knobs
The eight smooth, noiseless, endless rotary encoder knobs are generally used for
controlling the track pan position, aux send levels and EQ of your DAW. You may
also use them to adjust specic parameters within plug-ins and virtual instruments,
(as your DAW software allows). The push-button action of the knob can be used
to change modes of operation within the DAW (this is DAW dependent) and the
rotating action of the knob can be used to change parameters of PAN, EQ, plug-in
values etc.
Example: in Cubase, select Edit on the 24 panel touchscreen, to load the channel
settings of the selected track, then the EQ button on the touchscreen to alter the
channel EQ setting. Use PAGE UP and PAGE DOWN to navigate through the
parameter pages and the rotary encoders to change the value of Gain, Frequency
and Q.
6. Transport control buttons section
PLAY button - Activate the play function of the DAW.
STOP button - Activate the stop function of the DAW.
REC button - Activate the record function of the DAW.
REWIND button - Activate the rewind function of the DAW.
FAST FORWARD button - Activate the fast forward function of the DAW.
LOOP button - Activate the loop function of the DAW

13
8. Color-coded function buttons (5 buttons)
8a) - This section of 3 control buttons are LED color-coded for dierent
functions on each layer. Switch between the color modes (along with those
in 8b) for dierent functions which appear in the 24 panel touch screen. The
functions can be rearranged in the iMAPTM to your own conguration.
8a) - This section of 2 control buttons are LED color-coded for dierent functions
on each layer. Switch between the color modes (along with those in 8a) for
dierent functions which appear in the 24 panel touch screen. The functions can be
rearranged in the iMAPTM to your own conguration.
By default, purple and red modes (Labelled ‘U1’ (User 1) and’ U2’ (User 2)) are set
in the touchscreen, to hotkey functions, (i.e. Ctrl+C). The other three modes are
set to ‘MIDI’ functions (i.e. ‘Pan’)).
Users who wish to store their own ‘hotkey’ functions can do so in purple and red
modes, (using the U[ser] 1 and U[ser] 2’ buttons) and also store MIDI functions of
their choice in blue, green, and orange modes.
This is to help users organize their programming. You can, if you prefer, assign any
MIDI function to any color mode and any hotkey to any color mode. It’s up to you!
9. Dedicated function buttons
Read - Read automation function enabled/disabled
Write - Write automation function enabled/disabled
Touch - Touch automation function enabled/disabled
Latch - Latch automation function enabled/disabled
Trim - Trim automation function enabled/disabled
O - O automation function enabled/disabled
As the V1-M is a universal controller, these will illuminate or not depending on your
DAW. For example, in Cubase, the latter four buttons will not illuminate, (Touch,
Latch, Trim and O), whereas in Bitwig, the latter two will not illuminate, (Trim and
O). This is part of the intelligent design of the V1-M.

14
5 color modes
24 panel keypad
11. DAW selector buttons
Select the DAW you would like to connect to, by selecting DAW buttons 1-3. The
DAW must be set up and congured previously, (see 'Getting Started with the V1-
M'). You may change which DAWs you connect to in the iMAP, (see 'How to Allocate
the DAWs to the DAW Buttons').
10. 24 panel touchscreen display
The pièce de résistance of the V1-M. This large, 7 inch 24 panel touchscreen
features an illuminated display of DAW control functions for easy access by the
user. The 24 panel display allows for functions to be displayed in ve dierent
color modes, (section 8). That means 120 functions can be easily accessed via the
touchscreen. These can be left in their default state or loaded, arranged and re-
arranged by the user in the iMAP software so that you can have all the functions you
need, at your ngertips, where you want them!

15
12. Flip
Use this button to 'ip' the functions of your fader and the given channel's
rotary controller. This is ideal when you need to make very intricate changes to
PAN or plug-in parameter values using the fader, rather than the rotary encoder.
13. Master/Assign button
Select this button to toggle between the Master fader and a pre-selected
channel which has been assigned via the iMAPTM software or the MIDI learn
functionality of the chosen DAW. CC, Note, Pitch-bend values as well as MIDI
channels can also be assigned to the fader via the iMAPTM. When the button is
lit, the fader is in 'Assigned' mode. When disengaged, it is in Master fader mode.
14. Lock
Pressing this button will ensure that the unit's fader levels will not change regardless
of the movement of the physical faders. The user must press this button to 'unlock'
the faders again in order to aect a change. If using V1-X extenders, the Lock button
will communicate in real time via the iMAPTM - which acts as a 'bridge' between the
units - faders on the V1-X will be similarly aected.
15. Color display
Lower ‘bar’ display showing color modes of the DAW channels. This is useful if you
wish to group instrument tracks according to a certain color, i.e. guitar tracks as
purple, drum tracks as yellow etc.). *

16
Rear Panel Layout
1. USB C port
Functions as a MIDI port to your computer and compatible software.
2. 1/4 inch inputs
These 1/4 inch inputs are used to connect to foot pedals to activate selected
functions in your DAW.
3. 12V/2.5A power adapter port
Connect the power adapter provided, here.(Note: the V1-M is not able to work
without the provided power adaptor connected. USB bus power from a computer is
insucient).
2 31

17
Win Mac
DAW#1 DAW#2 DAW#3
1. Connect the V1-M to your Mac/PC via the USB port & select
the system
Choose a USB port on your Mac/PC and insert the USB C cable. Connect the cable’s
other end to the V1-M.
When switching on for the rst time, press down rotary encoder #4 (4th from left).
Now, turn on the V1-M whilst pressing the encoder. This will launch the system
selection interface on the V1-M’s screen.
‘Windows or Mac. Select your system.’ will be displayed on the screen. Please select
the relevant system and continue. You do not need to repeat this step unless you
wish to change the system, (i.e. if you select Mac now, but wish to select Windows
in the future).
2. Set up the 3x DAWs you wish to connect to in the iMAP
A) See installing the 'iMAP' section.
B) Following the diagrams below. Let's use these examples as the DAWs we want to set
up on the V1-M.
Getting Started with the V1-M
DAW #1 Bitwig
DAW #2 Cubase
DAW #3 Logic
1
In order to allocate the right DAW to the right DAW button (above), we're going to
need to use the iMAP. It is always best to always have the iMAP running in tandem
with the V1-M. In this way on-the-y changes can be made with immediate eect.
First, make sure the iMAP is downloaded and installed, then read the following
section.
Press down the 4th rotary encoder
and switch on the V1-M V1-X. Press the corresponding button at
the bottom of thescreen according
to the system you need to select.
Select your system.
When turning on for the 1st time

18
How to Allocate DAWs to the DAW buttons in the iMAP
This is covered in more detail in the iMAP section of this manual, but here's a general
introduction.
Just so we understand the general principle, we are going to allocate button 1, 2 and 3 on
the V1-M, to Bitwig, Cubase and Logic Pro respectively.
So, you've downloaded, installed and opened the iMAP. You will see the three
DAW buttons on top of the iMAP. These correspond to the three DAW buttons on
the V1-M.
Simply select the corresponding button of choice and select a DAW from the drop
down list.
The DAW will be automatically allocated. There is no need to send data, or perform
any special function.
You may do this for all three buttons on the iMAP/V1-M.
Please go to the iMAP section for further details on this .
Remember that, in everyday use, YOU MUST ENSURE YOU LAUNCH
THE CONTROLLER FIRST, then the iMAP, before launching the DAWs
you wish to work with;
(You may wish to associate a phrase that will make this easy to remember
i.e. “Consider it Done!”)
Remember
Step 1:Controller
Step 2:iMAP
Step 3:DAW
Every time you launch the V1-M

19
How to Allocate DAWs to the DAW buttons in the iMAP
Note: MIDI port 4 is used by the iCON Pro Audio software, iMAPTM, to change the
three DAWs you use, to update rmware and to program the 24 panel touchscreen
with the functions of your choice.
These four options will appear as a menu from which you can select your chosen
DAW when you are conguring your DAW.
So, remembering our examples of;
DAW #1 Bitwig
DAW #2 Cubase
DAW #3 Logic
We know that we need to select 'V1-M V1.01' (or whichever rmware version it is*),
in Bitwig because that is the DAW we have chosen to be DAW #1. When you press
DAW #1 on the unit, the V1-M will automatically go into Bitwig mode.
In our example, Cubase is our second DAW, so when we are conguring our DAW
to work with the V1-M, we will need to select 'MIDIIN2 (V1-M V1.01)' or whichever
rmware version it is*) in the menu. When the V1-M is set up as a Mackie control
device in Cubase, whenever we press '2' in the DAW Controller selection section,
the V1-M will automatically select Cubase.
The same applies for Logic, although this time we are going to select 'MIDIIN3 (V1-M
V1.01)' (or whichever rmware version it is*) and use button '3' in the DAW controller
selection area to automatically select this DAW.
*rmware versions are updated over time
Now that we have allocated our 3 DAWs within the iMAP, we will need to congure
our DAWs so that the V1-M recognizes them and the DAW/s recognize the V1-M.
This is how it works;
Setting up the V1-M in the DAWs
iCON V1-M V1.01 DAW #1
DAW #2
DAW #3
IMAP
MIDIIN2(iCON V1-M V1.01)
MIDIIN3(iCON V1-M V1.01)
MIDIIN4(iCON V1-M V1.01)
x

20
Here's an example of how it is set up in Cubase.
As you can see, when conguring the device as a Mackie controller, there is a choice
of 4 possible options.
Because we have set up Cubase to respond to DAW control button '2' on the V1-M,
we are going to select 'MIDIIN2 (V1-M V1.01)'.
Please also note, (although this is specic to Cubase), that users should use Mackie
Control to set up their devices in Cubase 12 onwards and not Cubase's MIDI
Remote Manager.
Regardless of the supported DAWs you are using, the principle will be largely the
same.
Note: If you are using the V1-M without V1-X extender units, please ensure that
the REC light is illuminated on the rst channel after starting up the device, (you
can set it in this position by pressing the REC button on channel 1, after powering
up the device). This will ensure the V1-M is identied as being in the '1st' position,
(this is important if you are using the V1-M as your sole V series device). If you have
one or more V1-X extenders in use, please refer to the V1-X manual, ('Allocating
Extenders') or visit the Help Center and read ‘FAQ: How to Allocate Extender
Positions(https://support.iconproaudio.com/hc/en-us/articles/22005003653901).
iCON V1-M V1.01
(iCON V1-M V1.01)
(iCON V1-M V1.01)
(iCON V1-M V1.01)
(iCON V1-M V1.01)
Table of contents
Other iCON Pro Audio Recording Equipment manuals

iCON Pro Audio
iCON Pro Audio Mobile-U Live User manual

iCON Pro Audio
iCON Pro Audio PLATFORM U32 User manual

iCON Pro Audio
iCON Pro Audio Uports4 Live User manual

iCON Pro Audio
iCON Pro Audio Upod-Live User manual

iCON Pro Audio
iCON Pro Audio LIVE-CONSOLE User manual

iCON Pro Audio
iCON Pro Audio ProDrive III Cube6nano User manual

iCON Pro Audio
iCON Pro Audio MobileR Live User manual

iCON Pro Audio
iCON Pro Audio Platform Nano Air User manual

iCON Pro Audio
iCON Pro Audio MobileR Dyna User manual

iCON Pro Audio
iCON Pro Audio Platform X+ User manual