IconBiT HDR21DVD User manual

IconBiT HDR21DVD
USER MANUAL

English 2
CONTENTS
1. Introduction 4
1.1 Preface 4
1.2 Packing List 5
1.3 Cautions 5
1.3.1 Usage Cautions 5
1.3.2 Power 5
1.3.3 Radio Interference 5
1.3.4 Repair 6
1.3.5 Disposing of the Player 6
1.3.6 Hard Disk Cautions 6
1.3.7 Others 6
1.4 Connection 7
1.4.1 Connecting the Power Supply 7
1.4.2 Connecting to a PC 7
1.4.3 Connecting a USB Device 8
1.4.4 Connecting a Memory Card 8
1.4.5 Connecting to a TV 9
1.4.6 Connecting to a Digital Amplifier 12
1.4.7 Connecting to a LAN 13
1.4.8 Connecting to a WLAN 14
1.5 Power On / Off 14
1.6 Menu Language 14
1.7 HDD Format 14
2. About the Player 16
2.1 Remote Control 16
2.2 Front Panel 18
2.3 Rear Panel 18
2.4 Left Panel 19
2.5 Right Panel 19
3. Setup Menu 20
3.1 Changing TV Settings 20
3.2 Changing Audio Settings 21

English 3
3.3 Changing Video Settings 22
3.4 Changing Record Settings 23
3.5 Changing Network Settings 24
3.6 Changing System Settings 27
3.7 Miscellaneous 29
4. MAIN Menu 30
4.1 DTV Menu 30
4.1.1 Watching DVB-T Programs 30
4.1.2 DVB-T Program Recording 32
4.1.3 Time Shifting 33
4.2 AV IN Menu 33
4.3 Timer Record Menu 33
4.4 Browser Menu 36
4.4.1 Browsing All 37
4.4.2 Browsing Music 37
4.4.3 Browsing Photos 38
4.4.4 Browsing Movies 38
4.4.5 DVD Playback 39
4.4.6 A/V Streaming via Network 40
4.4.7 A/V Streaming via UPnP-server 41
4.4.8 Renaming / Deleting Files 43
4.4.9 Managing the Playlist 43
4.5 File Copy Menu 44
4.6 Internet Radio 45
4.7 P2P Share Menu 47
4.8 NAS Function 48
5. Upgrading the Firmware 50
6. Appendixes 51
6.1 Specifications 51
6.2 Frequently Asked Questions 52
6.3 Copyrights and Trademarks 54
6.4 Warranty 54
6.5 GPL Statement 54

English 4
1. INTRODUCTION
1.1 PREFACE
Thank you very much for purchasing the product. We hope you will enjoy using it as a great
home entertainment partner. This player has the following functionality.
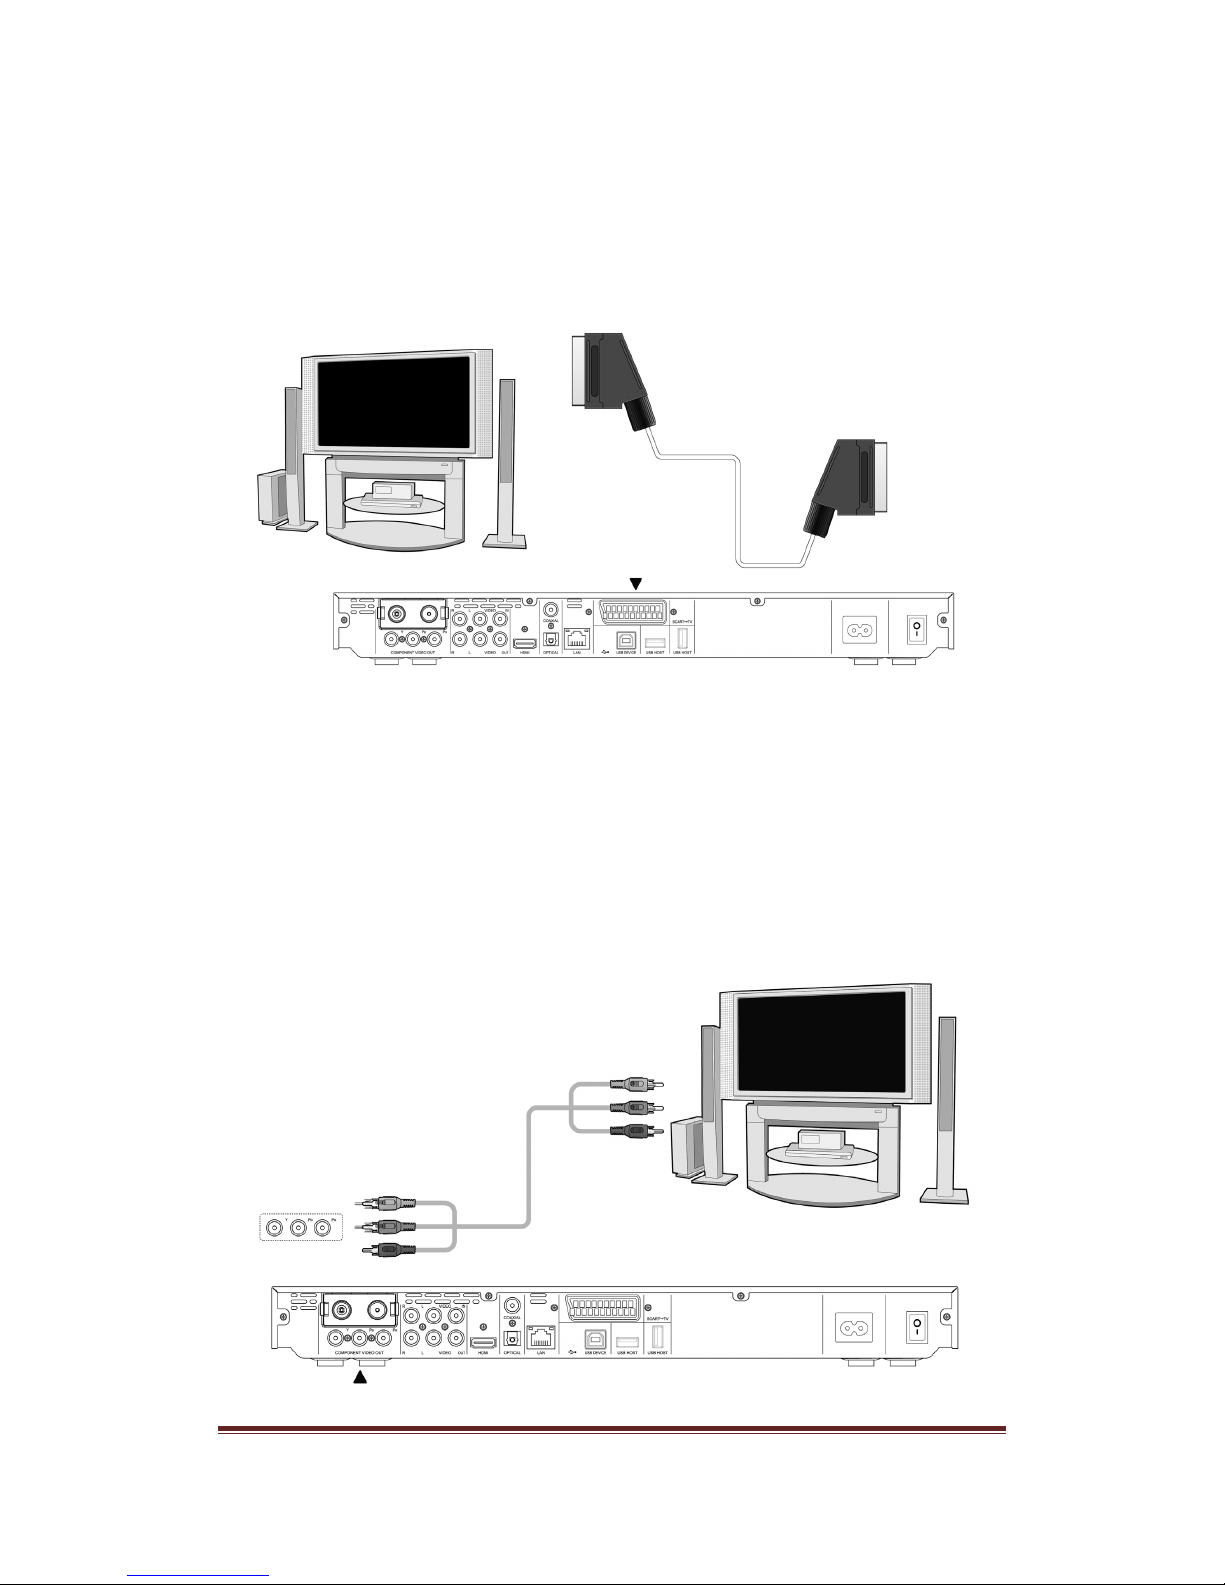
A/V Output
•HDMI V1.3 for high-definition video and digital audio
•Composite & component video and stereo audio for analog audio-visual connection
•S/PDIF coaxial & optical interface for high-fidelity digital audio
•Adjustable video output resolution (NTSC, PAL, 480p, 576p, 720p, 1080i, 1080p)
Multimedia Playback
•Supports major audio, video and image file formats (1080p HD video decoding)
•Movie format: AVI/MKV/TS/TP/TRP/M2TS/MPG/MP4/M4V/MOV/VOB/ISO/IFO/DAT/
•WMV/ASF/RM/RMVB/FLV
•Music format: MP3/OGG/WMA/WAV/AAC/FLAC
•Photo format: HD JPEG/BMP/GIF/TIF/PNG
•Photo slide show with background music
DVB-T TV
•supports Digital Video Broadcasting Terrestrial (DVB-T) TV reception
•supports Electronic Program Guide (EPG), Teletext and subtitle
•supports loop out the DVB-T signal received from Aerial.
Video Recording
•supports one button recording and scheduled recording, can easily record programs from
DVB-T TV, DVD player, DV, etc., and save as MPEG-2 (.mpg, or .ts) format;
•supports time shifting function
Network Feature
•A/V streaming/transmission via Ethernet (10M/100M) & Wi-Fi (802.11b/g/n, optional)
•File sharing via Samba server
•A/V streaming via UPnP Media Server
•BitTorrent download (controlled and managed via web server)
•Digital Radio (SHOUTcast)
File Copy
•Supports copying & moving files among Card, USB, HDD, and Network
USB 2.0 Support
•USB DEVICE port (for computer connection)
•USB HOST port x 3 (for USB storage devices)
DVD playback
•Supports DVD, RBD, Mini BD, AVCHD, VCD, CD
Note: All the information contained in this manual was correct at the time of publication.
However, as our engineers are always updating and improving the product, your device’s
software may have a slightly different appearance or modified functionality than presented in
this manual.

English 5
1.2 PACKING LIST
Part
Quantity
Player 1
A/V cable 1
Y/Pb/Pr cable 1
USB cable 1
Remote Control 1
Remote Control Battery 2
AC/DC adaptor 1
AC/DC adaptor Power Cord 1
User Manual (printed) 1
Note:
The actual contents in the package might be different from the packing list in this manual.
1.3 CAUTIONS
This player’s design and manufacture has your safety in mind. In order to safely and
effectively use this player, please read the following before usage.
1.3.1 USAGE CAUTIONS
User should not modify this player. If commercial hard disk is being used, the environmental
temperature should be within +5°C ~ +35°C.
1.3.2 POWER
The player’s power voltage: AC 100~240V.
When using this player, please connect the supplied AC adapter or AC adapter cable to the
player’s power jack. When placing the adapter cable, make sure it cannot get damaged or be
subject to pressure. To reduce the risk of electric shock, unplug the adapter first before
cleaning it. Never connect the adapter to the player in a humid or dusty area. Do not replace
the adapter or cable’s wire or connector.
1.3.3 RADIO INTERFERENCE
- If not properly shielded, almost all electronic devices will get radio interference. Under some
conditions, your player might get interference.
- The design of this player has followed the FCC/CE standard, and has followed the following
rules:
(1) This player may not cause harmful interference;
(2) This player could accept some interference received including interference that may cause
undesired operation.

English 6
1.3.4 REPAIR
If the player has a problem, you should take it to an appointed repair center and let the
specialists do the repair, never repair the player yourself, you might damage the player or
endanger yourself or your data.
1.3.5 DISPOSING OF THE PLAYER
When you dispose of the player, be sure to dispose it appropriately. Some countries may
regulate disposal of electrical device, please consult with your local authority.
1.3.6 HARD DISK CAUTIONS
The player uses an internal hard disk for data storage, in normal case, format or repair is not
required.
You should carefully read the <6.2 Frequently Asked Questions > chapter, and check our
website iconbit.com for latest information before formatting the hard disk.
- Physical impact may create bad sector in the hard disk, you can use CHKDSK to fix the
problem.
- All data stored in the player may be lost due to physical impact, electrical shock, power lost,
HDD format etc. Please backup your data.
- It is suggested to do defragment after a long period of usage.
- Regularly backup the data in the hard disk so that it can be recovered in the event of data
corruption or loss. Our company takes no responsibility for loss of data stored on the hard
disk.
1.3.7 OTHERS
When using this player, please do not let the player come into contact with water or other
liquid, if water is accidentally spilled on the player, please use a dry cloth to absorb the
spillage.
Electronic products are vulnerable, when using please avoid shaking or hitting the player, and
do not press the buttons too hard.
- Do not let the player come into contact with water or other liquid.
-Do not disassemble the player, repair the player or change the design of the player, any
damage done will not be included in the repair policy.
Do not press the buttons of the player too hard.
Avoid hitting the player with hard object, avoid shaking the player, and stay away from
magnetic fields.
During electrostatic discharge and the strong electromagnetic field, the product will
malfunction, then unplug the power cable and the product will return to normal performance
next time it is powered on.

English 7
1.4 CONNECTION
1.4.1 CONNECTING THE POWER SUPPLY
(1) Follow the picture and connect the AC adaptor to the player’s DC IN jack;
(2) Follow the picture and plug in the AC adaptor to the power outlet.
1.4.2 CONNECTING TO A PC
(1) Make sure the player is powered on;
(2) Plug in the squarish connector of the USB cable to this player’s USB DEVICE port;
(3) Plug in the rectangular connector of the USB cable to computer.
In this way, you can manage content on the built-in HDD of the player on your local PC.

English 8
1.4.3 CONNECTING A USB DEVICE
(1) Make sure the player is powered on;
(2) Plug in the USB stick or USB HDD etc. to the USB HOST port of this player.
In this way, you can browse contents on the USB device.
1.4.4 CONNECTING A MEMORY CARD
Memory card can be used by inserting to the card slot
(1) Follow the picture to insert the memory card to the card slot properly;
(2) Insert the card by following the arrow pointer in the picture.
In this way, you can browse contents on the memory card.

English 9
1.4.5 CONNECTING TO A TV
1.4.5.1 A/V IN
(1) Follow the picture and plug in the 3 color connector to the player’s A/V IN jack;
(2) Follow the picture and plug in the 3 color connector to the A/V OUT jack of the TV/IPTV
Set-Top Box (STB).
In this way, you can record TV programs from the TV/IPTV Set-Top Box.
1.4.5.2 A/V OUT
(1) Follow the picture and plug in the 3 color connector to the player’s A/V OUT jack;
(2) Follow the picture and plug in the 3 color connector to the TV’s A/V IN jack.

English 10
1.4.5.3 SCART OUT
(1) Follow the picture and plug one connector on the SCART cable to the player’s SCART
socket;
(2) Follow the picture and plug the other connector on the SCART cable to the TV’s SCART
socket.
1.4.5.4 Y/Pb/Pr Component OUT
(1) Follow the picture and plug in the 3 color connector to the player’s Y/Pb/Pr jack;
(2) Follow the picture and plug in the 3 color connector to the TV’s Y/Pb/Pr jack.
Audio Connection while using Y/Pb/Pr Video out:
First method: use the audio output from the A/V OUT jack;
Second method: use the audio output from the S/PDIF Coaxial or Optical jack.

English 11
1.4.5.5 HDMI OUT
(1) Follow the picture and plug one connector on your HDMI cable to the player’s HDMI
connector;
(2) Follow the picture and plug the other connector on your HDMI cable to the TV’s HDMI
connector. Note: The HDMI cable is an optional accessory sold separately.
In this way, you can have the highest quality video and audio via a single cable.
1.4.5.6 ANT. / RF IN
Follow the picture and plug a TV Aerial to the ANT. / RF IN socket;
1.4.5.7 ANT. / RF OUT
(1) Make sure the player is connecting to power supply;
(2) Make sure a TV Aerial is connecting to the ANT. / RF IN socket;

English 12
(3) Follow the picture and plug a TV cable to the ANT. / RF OUT socket then plug the cable to
a TV or other TV receiver.
The player can loop out the DVB-T signal to other TV receiver device. In this way, you can
watch the TV programs with another TV receiver while recording.
1.4.6 CONNECTING TO A DIGITAL AMPLIFIER
(1) Follow the picture and plug in the RCA connector on your coaxial cable to the player’s
S/PDIF Coaxial jack. Or if you use optical fiber, please plug in the Toslink connector on your
optical fiber to the player’s S/PDIF Optical jack;
(2) Follow the picture and plug in the other connector on your coaxial cable or optical fiber to
the digital audio device (digital amplifier or decoder).
Note: Optical fiber and coaxial cable are not supplied.

English 13
In this way, you can enjoy powerful Dolby Digital, DTS, or MPEG sound. (Please refer to <3.2
Changing Audio Settings> for configuration)
1.4.7 CONNECTING TO A LAN
To connect to a LAN (Local Area Network) you require a cat5, cat5e or cat6 network cable
(not supplied).
(1) Connect one of the crystal plugs on the cable to the player’s RJ45 LAN socket;
(2) Connect the other crystal plug on the cable to a RJ45 LAN port on your router, switch, or
hub devices.

English 14
1.4.8 CONNECTING TO A WLAN
(1) Make sure the player is powered on;
(2) Plug the Wireless LAN USB Adapter (i.e. Wi-Fi USB Dongle) to the USB HOST port of the
player.
Note: The Wi-Fi Dongle is an optional accessory sold separately. (Please refer to <3.5
Changing Network Settings> for more details about wireless setup)
1.5 POWER ON / OFF
Power On
After connecting the DC IN jack and press the power button on the front panel, the player will
soon enter the home screen, and the power indicator will turn blue.
Power Off
Press the power button on the front panel, the player will soon enter standby mode, and the
power indicator will turn red. Then unplug the power cord to cut off the power supply.
1.6 MENU LANGUAGE
The system language of this player can be set to English or other languages. Change the
language you wish in the setup menu, the selected language will take effect immediately.
1.7 HDD FORMAT
For users who wish to install a new SATA HDD into the player, please refer to the following
procedures to format the hard disk on the player before usage.
Step 1: Select OK on the Warning page, press ENTER to confirm.
Note: This page can be also accessed via Setup->System->HDD Format menu.
Step 2: Press the up / down button to adjust the capacity of time shift buffer.
Press the left / right button to select Next, and the enter button to confirm.

English 15
Step 3: Select Format, press ENTER, and then hard disk format will start.
The formatting procedure will be finished within a few minutes. And then you can use the hard
disk properly on the player.
Note: HDD format will remove all data stored on the hard disk drive. Please take care and
backup your data in advance!

English 16
2. ABOUT THE PLAYER
2.1 REMOTE CONTROL
All procedures in this manual can be carried out using the remote control buttons.
See the following for details on each button and its function:
1. STANDBY
2. MUTE
3. DVD 4. BROWSER
5. Numeric buttons
6. REPEAT
7. FF
8. VOL-
9. FR
10. PLAY / PAUSE
11. HOME 12. Na
vigational buttons
13. MENU
14. TIME SHIFT
15. SLOW
16. COPY
17. AUDIO
18. Red
19. EPG(Green)
20. TTX(Yellow)
21. Blue 22. SUBTITLE
23. ANGLE
24. A-B
25. ZOOM
26. GOTO
27. RETURN
28. STOP
29. PREV 30. VOL+
31. NEXT
32. INFO
33. TV SYS.
34. REC
35. EJECT
No. Button Function
1
STANDBY
Press to enter standby mode or wake up.
2
MUTE
Press to mute audio output, and press again to resume.
3
DVD
Press to play the inserted disc.
4
BROWSER
Press to enter the browser menu.
5 Numeric buttons Press to enter numeric input when changing settings.
6
REPEAT
Press to set repeat option: One, All, (and Shuffle).
7 FF
Press to fast forward the current playback. Press repeatedly to
select speeds.
8/30
VOL-/VOL+
Press to decrease/increase the volume.
9 FR
Press to fast rewind the current playback. Press repeatedly to
select speeds.
10
PLAY/PAUSE
Press to begin/pause the playback.

English 17
11
HOME
Press to enter the home screen.
12
Navigational
buttons
Press the arrow buttons to select menu options, and the
ENTER button to confirm.
13 MENU
Press to activate tools menus:
--Press to rename and delete files in the browser menu.
--Press to add shortcuts for network access in My_Shortcuts in
NET of the browser menu.
Press to add/delete internet radio stations to favorite list.
14 TIME SHIFT
Press to activate the time shift function. Time shift function
allows you to pause live TV and resume the program from the
point you left it. While paused, the program is recorded to the
internal HDD as long as the space is available.
Time shift mode remains active until you press the stop button.
15 SLOW
Press to play back in slow motion. Press the PLAY button to
resume regular playback.
16
COPY
Press to enter the file copy menu.
17
AUDIO
Press to select an audio track.
18 Red
Press to select the files in browser menu.
Press to add/delete scheduled recording in EPG menu.
19 EPG(Green)
Press to enter the Electronic Program Guide which displays an
on-screen list of programs for the coming week when watching
Digital Terrestrial TV. Press to add the selected files to the
playlist under browser menu.
20 TTX(Yellow)
Press to open Teletext OSD if it is available in the broadcasted
stream of Digital Terrestrial TV.
21
Blue
Press to activate sort function in channel set in TV setup menu.
22
SUBTITLE
Press to set subtitle options.
23 ANGLE
Press to change the view angle during DVD (with multi-angle)
playback.
24 A-B
Press to set the beginning and end points of a section to
repeat.
25
ZOOM
Press to zoom the image (photo or video).
26 GOTO
Press to jump to a specific point on a title. Specify the point
using Title, Chapter and Time.
27
RETURN
Press to return to the previous screen while navigating menus.
28
STOP
Press to stop playback.
29
PREV
Press to view the previous file / page up.
31
NEXT
Press to view the next file / page down.
32
INFO
Press to hide or display the information bar during playback.
33 TV SYSTEM
Press to switch between NTSC, PAL, 480P, 576P, 720P, 1080I,
and 1080P.
34 REC
Press to begin recording.
Press repeatedly to set one touch recording (OTR) length (30
MIN. / 60 MIN. / 90 MIN. / 120 MIN. / 180 MIN. / 240 MIN. / Off).
35
EJECT
Press to open/close the tray.

English 18
2.2 FRONT PANEL
1. DVD tray
3. Recording indicator
2. Infrared receiver window
4. Power indicator
2.3 REAR PANEL
1. ANT. / RF IN socket 2. ANT. / RF OUT socket
3. Y/Pb/Pr OUT jack 4. A/V IN jack
5. A/V OUT jack 6. HDMI jack
7. S/PDIF COAXIAL jack 8. S /PDIF OPTICAL jack
9. RJ45 LAN socket
11. USB DEVICE port (B-Type)
14. DC IN jack
10. Scart out socket
12.13. USB HOST port (A-Type)
15. Power Switch

English 19
2.4 LEFT PANEL
1. Memory card slot
2.5 RIGHT PANEL
1. USB HOST port (A-Type)
2. HDD mobile rack
1. Power button
2. Eject button
3. Slow button
4. Prev. button
5. Next button
6. Play/Pause

English 20
3. SETUP MENU
The Setup menu allows you to personalize and configure the preferences for your player.
To select a Setup option:
- Select the Setup icon on the home screen, or press the SETUP button on the remote
control.
- Use the LEFT/RIGHT navigational buttons to select an option, and then press ENTER.
There are seven Setup options, including DTV, Audio, Video, REC, Network, System, and
MISC. Use the UP/DOWN navigational buttons to select a menu. Press ENTER to confirm.
Press RETURN to cancel and display the previous menu screen.
3.1 CHANGING TV SETTINGS
Press the left / right button on the remote control to select the DTV tab from the menu bar.
TV Region
Select to set the region for Digital Terrestrial TV
Channel Scan
Select to scan for available Digital Terrestrial TV channels
AUTO SCAN
In AUTO SCAN mode, the system will automatically scan for available DVB-T TV channels.
Table of contents
Languages: