Icy Box IB-289U3 User manual

www.icybox.de
IB-289U3
User‘s Manual IB-289U3
USB 3.0 Keypad Encrypted Enclosure
Handbuch IB-289U3
USB 3.0 Gehäuse mit Tastenverschlüsselung
Manuel IB-289U3
Boîtier de lecteur HDD chiré avec clavier USB 3.0
Manuale IB-289U3
USB 3.0 Keypad Encrypted Enclosure
Manual IB-289U3
Carcasa de unidad de disco duro cifrado con teclado USB 3.0
Handleiding IB-289U3
USB 3.0 Keypad Encrypted HDD Enclosure
Podręcznik obsługi IB-289U3
Szyfrowana obudowa na dyski twarde USB 3.0 z klawiaturą
Návod k použití IB-289U3
Kryt na klávesnici pro šifrovanou jednotku pevného disku USB 3.0
Használati utasítás IB-289U3
USB 3.0 Billentyűzetes Kódolt Merevlemez Tok
Εγχειρίδιο IB-289U3
Περίβλημα σκληρού δίσκου USB 3.0 με πληκτρολόγιο ρυπτογράφησης

www.icybox.de
IB-289U3
3
Overview / Übersicht ......................................... 4
User‘s Manual IB-289U3 ..................................... 5-7
Handbuch IB-289U3 ........................................... 8-10
Manuel IB-289U3................................................ 11-13
Manuale IB-289U3.............................................. 14-16
Manual IB-289U3................................................ 17-19
Handleiding IB-289U3 ........................................ 20-22
Podręcznik obsługi IB-289U3 ............................. 23-25
Návod k použití IB-289U3................................... 26-28
Használati utasítás IB-289U3 ............................. 29-31
Εγχειρίδιο IB-289U3 ........................................... 32-34

www.icybox.de
IB-289U3
4
Overview / Übersicht
1. Unlock button / Entsperrtaste
2. Number button / Zahlentaste
3. Lock button / Sperrtaste
4. Micro USB 3.0 interface / Micro USB 3.0 Schnittstelle
5. Power and data access indicator (blue) / Strom- und
Datenzugrisanzeige (blau)
6. Unlock and button pressed indicator (green) / Entsperranzeige und
Tastenverwendung (grün)
7. Password creating or changing indicator (oragnge) / Anzeige für
Passworterstellung und –wechsel (orange)
8. Lock and error indicator (red) / Sperr- und Fehleranzeige (rot)
1. 2. 3.
4.
5. 6. 7. 8.

www.icybox.de
IB-289U3
5
Main Features
• Strong AES 256-bit Hardware Encryption
• 2.5" HDD/SSD height up to 9.5 mm, capacity not limited
• USB 3.0 Hos, Backwards compatible with USB 2.0 and 1.1
• Encrypts all data on the drive in real-time
• Built-in independent keypad for password input (up to 12 digit PIN Password)
• Protect and secure your valuable data
• Tooless HDD/SSD installation
Package content
IB-289U3, Silicone sleeve, USB 3.0 cable (Type Micro B to Type-A), Manual
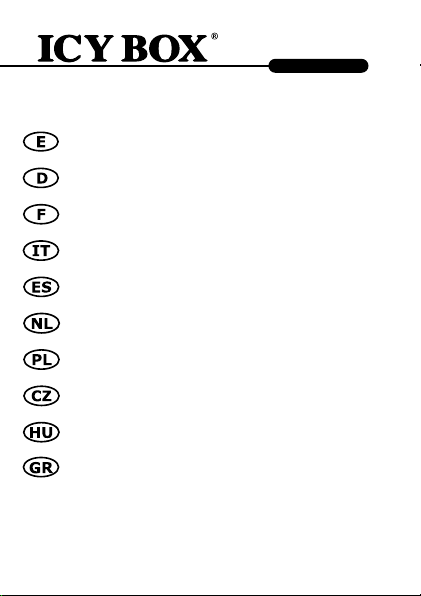
Hard disk installation
Step 1: Slide the bottom cover as shown as below to open the bottom cover.
Step 2: Connect the SATA hard disk to the slot on PCBA well.

www.icybox.de
IB-289U3
6
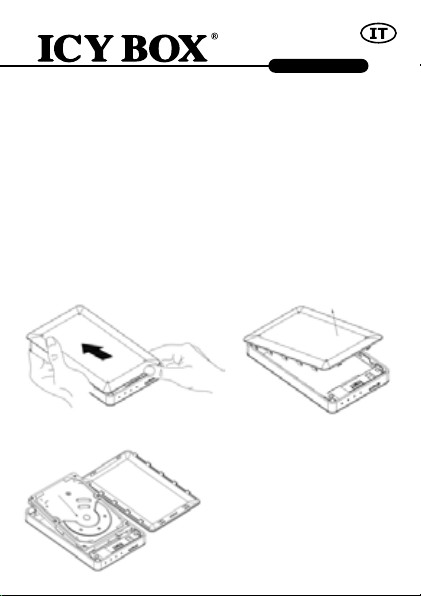
Step 3: Slide the bottom cover as shown in the picture to close the device.
The LED indicators
1. Blue LED continuously brightens when the device is powered on, and
blink when in the data access mode.
2. Green LED blink 1 time when presses the button, and continuously
brighten when the disk is unlock.
3. Orange LED continuous brightens when user mode for password
creating or password changing is active, and turns o when the new
password is completed to create or the old password keyed in is
correct.
4. Red LED blinks when the password or operation is incorrectly. It does
continuously brighten for lock mode, and turn o after unlock.

www.icybox.de
IB-289U3
7
Set-up password operation
Step 1: Install a new HDD or used HDD without data.
Note! Please backup your data of old HDD rstly. All the data on a used
HDD would be lost after set-up.
Step 2: Keep press buttons "1" and "3" at the same time, then plug the USB
cable into the host of computer, and wait for 10 seconds until blue and red LED
light keep continuous bright.
Step 3: Keep press "Lock" button for 10 seconds until the Orange LED light
keep continuous bright.
Step 4: Enter your password (1~12 digits), then press "Unlock" button to
conrm it.
Step 5: Enter the password again (the same as rst time), then press "Unlock"
button to conrm it.
At this time the red LED light goes o, then green LED light bright, it mean
successfully set up password.
Note! Make a note of your password and store it in a safe place to prevent
misuse. It’s not possible to restore the HDD if you lost the password.
Step 6: Complete the setting inside Disk management of your system.
Change password operation
Step 1: Keep press "Lock" button, and then connect Encrypted HDD enclosure
to computer by USB cable.
Step 2: Keep press "Lock" button wait for 10 seconds until the red LED and
orange LED bright at the same time, then loosen "Lock" button.
Step 3: Enter existing password, then press "Unlock" button to conrm it, at
this time the orange LED goes o.
Step 4: Enter NEW password, then press "Unlock" button to conrm it.
Step 5: Enter NEW password again, then press "unlock" button to conrm it.
Step 6: At this time, red LED goes o, green LED bright, now it change pass-
word successfully.
Additional Information
• If the password is entered incorrectly more than 99 times, the data
at the installed HDD/SSD are blocked permanently for security rea-
sons and not accessible anymore.
• The unlocked device will automatically change to the encrypted
mode after about 13 minutes of inactivity.

www.icybox.de
IB-289U3
8
Hauptmerkmale
• Starke AES 256-bit Hardware Verschlüsselung
• 2,5" Festplatte bis zu 9,5 mm Bauhöhe, ohne Kapazitätsbegrenzung
• USB 3.0 Host bis zu 5 Gbit/s
• Abwärtskompatibel mit USB 2.0 und 1.1
• Verschlüsselt alle Daten auf der Festplatte in Echtzeit
• Integriertes Tastenfeld für sichere Passworteingabe (bis zu 12 –stelli-
ges PIN Passwort)
• Beschützt und sichert Ihre wertvollen Daten
• Werkzeugloser Festplatteneinbau
Verpackungsinhalt
IB-289U3, Silikon Schutzhülle, USB 3.0 Kabel (Type Micro B zu Type-A), Handbuch
Laufwerkseinbau
Schritt 1: Um das Gehäuse zu önen, schieben Sie die untere Abde-
ckung wie unten gezeigt auf.
Schritt 2: Setzen Sie das SATA Laufwerk durch korrektes Einschieben in
den SATA Anschluss in das Gerät ein.

www.icybox.de
IB-289U3
9
Schritt 3: Um das Gehäuse zu schließen, schieben Sie die untere Abdeckung
wie unten gezeigt wieder zu.
LED Anzeige
1. Die blaue LED leuchtet durchgehend, wenn das Gerät per USB mit
Strom versorgt wird, und blinkt bei Datenzugri.
2. Die grüne LED blinkt bei Tastendruck einmal auf, und leuchtet durch-
gehend, wenn das Gerät entsperrt ist.
3. Die orange LED leuchtet durchgehend, wenn der Modus für Passwort
setzen oder ändern aktiv ist, und erlischt, wenn das neue Passwort
gesetzt wurde oder die alte Passworteingabe korrekt war.
4. Die rote LED blinkt, wenn das Passwort falsch eingegeben wurde, oder
eine andere Fehlbedienung vorgenommen wurde. Sie leuchtet durchge-
hend, wenn das Gerät gesperrt ist und erlischt nach dem entsperren.
Vorgehensweise zur Passworteinrichtung
Schritt 1: Installieren Sie ein neues Laufwerk oder verwenden ein benutz-
tes Laufwerk ohne Dateninhalt.
Hinweis! Bitte sichern Sie erst alle Daten, wenn Sie ein benutztes
Laufwerk verwenden. Alle Daten auf dem Laufwerk gehen während
des Einrichtungsvorganges verloren.
Schritt 2: Halten Sie die Tasten 1 und 3 gedrückt und stecken während-
dessen das USB Kabel an Ihren laufenden Computer und warten bis die
blaue und die rote LED durchgehend leuchten.
Schritt 3: Halten Sie nun die "Sperrtaste" für etwa 10 Sekunden gedrückt,
bis die orange LED durchgehend leuchtet.
Schritt 4: Geben Sie Ihr Passwort ein (1 - 12 Zahlen) und drücken an-
schließend die "Entsperren" Taste um die Eingabe zu bestätigen.

www.icybox.de
IB-289U3
10
Schritt 5: Geben Sie Ihr Passwort erneut ein (das Gleiche wie vorher) und
drücken anschließend die "Entsperren" Taste um die Eingabe zu bestätigen.
Nun erlischt die rote LED und die grüne LED leuchtet auf und zeigt damit die
erfolgreiche Passworteinrichtung an.
Hinweis! Notieren Sie sich das gewählte Passwort und legen es an
einer sicheren Stelle ab, damit kein Missbrauch möglich ist. Es ist
NICHT möglich die Festplatteninhalte wieder herzustellen, wenn Sie
das Passwort vergessen und/oder verloren haben.
Schritt 6: Schließen Sie die Einrichtung des Laufwerks unter der Daten-
trägerverwaltung Ihres Betriebssystems ab (initialisieren und formatieren).
Vorgehensweise zur Passwortänderung
Schritt 1: Halten Sie die Sperrtaste gedrückt und schließen dann das ver-
schlüsselte Gerät per USB Kabel an Ihren Computer an.
Schritt 2: Halten Sie die Sperrtaste weiterhin für etwa 10 Sekunden ge-
drückt, bis die rote und orange LED gleichzeitig leuchten und lassen dann
die Taste los.
Schritt 3: Geben Sie nun das vorhandene Passwort ein und drücken an-
schließend die "Entsperren" Taste um die Eingabe zu bestätigen. Nun er-
lischt die orange LED.
Schritt 4: Geben Sie nun das neue Passwort ein und drücken anschließend
die "Entsperren" Taste um die Eingabe zu bestätigen.
Schritt 5: Geben Sie nun das neue Passwort erneut ein und drücken an-
schließend die "Entsperren" Taste um die Eingabe zu bestätigen.
Schritt 6: Nun erlischt die rote LED und die grüne LED leuchtet auf und
zeigt damit die erfolgreiche Passwortänderung an.
Zusatzinformation
• Falls das Passwort mehr als 99 Mal falsch eingegeben wird, sind die
Daten auf der installierten Festplatte/SSD aus Sicherheitsgründen
unwiderruich gesperrt und nicht wieder herstellbar.
• Das entsperrte Gerät wechselt automatisch nach ca. 13 Minuten
Inaktivität in den verschlüsselten Modus.

www.icybox.de
IB-289U3
11
Principales caractéristiques
• Fort chirement matériel AES 256 bits
• Hauteur de lecteur HDD 2.5" jusqu‘à 9,5 mm, capacité non limitée
• USB 3.0 Héberge jusqu‘à 5 Gbit/s
• Rétrocompatible avec USB 2.0 et 1.1
• Chire toutes les données sur le lecteur en temps réel
• Clavier intégré indépendant pour la saisie de mots de passe (code
PIN jusqu‘à 12 chires)
• Protection et sécurisation de vos données importantes
• Installation du lecteur HDD sans outil
Contenu
IB-289U3, Housse de protection en silicone, Câble USB 3.0, Manuel
Installation du disque dur
Étape 1 : Faites coulisser le cache inférieur comme illustré ci-dessous pour l‘ouvrir.
Étape 2 : Branchez en toute sécurité le disque dur SATA au logement sur

www.icybox.de
IB-289U3
12
Étape 3 : Faites coulissez le cache inférieur comme illustré pour fermer l‘appareil.
Les voyants DEL
1. Le voyant DEL bleu s‘allume en continu quand l‘appareil est mis sous
tension, et clignote quand il est en mode d‘accès aux données.
2. Le voyant DEL vert clignote une fois quand l‘utilisateur appuie sur le
bouton, puis s‘allume en continu quand le disque est déverrouillé.
3. Le voyant DEL orange s‘allume en continu quand le mode utilisateur
de création de mot de passe ou modication de mot de passe est actif,
et s‘éteint quand le nouveau mot de passe est créé ou l‘ancien mot de
passe correctement saisi.
4. Le voyant rouge clignote quand le mot de passe ou le fonctionnement
est incorrect. Il s‘allume en continu pour le mode de verrouillage et
s‘éteint après déblocage.
Opération de conguration du mot de passe
Étape 1 : Installez un lecteur HDD neuf ou un lecteur HDD déjà utilisé
mais ne comportant aucune donnée.
Remarque! Pensez à sauvegarder d‘abord vos données de l‘ancien
lecteur HDD. Toutes les données sur un lecteur HDD déjà utilisé
seront perdues après l‘installation.
Étape 2 : Appuyez sur les boutons " 1 " et " 3 " en même temps, puis bran-
chez le câble USB au port de l‘ordinateur et attendez 10 secondes jusqu‘à
ce que le voyant DEL bleu et rouge reste allumé en continu.
Étape 3 : Appuyez sur le bouton " Lock " (Verrouiller) pendant 10 secon-
des jusqu‘à ce que le voyant DEL orange reste allumé en continu.
Étape 4 : Entrez votre mot de passe (1~12 caractères), puis appuyez sur
le bouton " Unlock " (Déverrouiller) pour le conrmer.

www.icybox.de
IB-289U3
13
Étape 5 : Entrez à nouveau le mot de passe (le même que la première
fois), puis appuyez sur le bouton " Unlock " (Déverrouiller) pour conrmer.
À ce moment-là, le voyant DEL rouge s‘éteint, puis le voyant DEL vert s‘al-
lume, ce qui signie que le mot de passe a bien été conguré.
Remarque! Notez votre mot de passe et conservez-le dans un end-
roit sûr pour éviter tout usage abusif. Il n‘est pas possible de res-
taurer le disque dur si vous avez perdu le mot de passe.
Étape 6 : Terminez les réglages dans la gestion disque de votre système.
Opération de changement du mot de passe
Étape 1 : Appuyez sur le bouton " Lock " (Verrouiller), puis connectez le
boîtier du lecteur HDD chiré à l‘ordinateur grâce au câble USB.
Étape 2 : Appuyez sur le bouton " Lock " (Verrouiller) pendant 10 secon-
des, jusqu‘à ce que les voyants DEL rouge et orange s‘allument en même
temps, puis relâcher le bouton " Lock " (Verrouiller).
Étape 3 : Entrez le mot de passe existant, puis appuyez sur le bouton "
Unlock " (Déverrouiller) pour le conrmer. Le voyant DEL orange s‘éteint.
Étape 4 : Entrez votre NOUVEAU mot de passe, puis appuyez sur le bouton
" Unlock " (Déverrouiller) pour le conrmer.
Étape 5 : Entrez votre NOUVEAU mot de passe une nouvelle fois, puis
appuyez sur le bouton " Unlock " (Déverrouiller) pour le conrmer.
Étape 6 : À ce moment, le voyant DEL rouge s‘éteint, le voyant DEL vert
s‘allume et le changement de mot de passe est terminé.
Information complémentaire
• Si le mot de passe est saisi plus de 99 fois de manière erronée, les
données du HDD/SDD sont bloquées de façon permanente pour des
raisons de sécurité et il n‘est plus possible d‘y accéder.
• Le dispositif ouvert passe automatiquement en mode crypté après
environ 13 minutes d‘inactivité.
www.icybox.de
IB-289U3
14
Caratteristiche principali
• Potente encryption hardware AES a 256 bit
• HDD da 2.5" con spessore di 9.5 mm, capacità disco rigido illimitata
• Scheda USB 3.0 Host no a 5 Gbit/s
• Retrocompatibilità con USB 2.0 e 1.1
• Crittografa in tempo reale tutti i dati del drive
• Tastierino indipendente incorporato per l‘immissione della password
(password PIN di massimo 12 caratteri)
• Protezione e sicurezza dei dati
• Installazione del disco rigido senza attrezzi
Contenuto della confezione
IB-289U3, Capa de silicone, Cavo USB 3.0, Manuale
Installazione del disco rigido
Fase 1: Spingere la copertura di fondo rimuovendola (vedi g. qui sotto).
Fase 2: Connettere il disco rigido SATA allo slot del pozzetto PCBA.
www.icybox.de
IB-289U3
15
Fase 3: Spingere la copertura di fondo per chiudere il dispositivo (vedi g.)
Indicatori LED
1. Il LED blu è acceso permanentemente quando il dispositivo è acceso e
lampeggia quando è in modalità di accesso ai dati.
2. Il LED verde lampeggia 1 volta al premere il pulsante e si accende
permanentemente a disco sbloccato.
3. Il LED arancione si accende permanentemente a modalità di creazi-
one/modica password attiva. Si spegne una volta creata la nuova
password o quando si immette la vecchia password valida.
4. Il LED rosso lampeggia quando la password non è corretta e il funzio-
namento non è corretto. Continua a lampeggiare in modalità di blocco
e si spegne dopo lo sblocco.
Per impostare la password
Fase 1: Installare un disco rigido nuovo o usato che non contiene dati.
Nota! Per prima cosa, eseguire il backup dei dati contenuti nel vec-
chio HDD. Tutti i dati presenti sul disco rigido usato risultano persi
dopo la congurazione.
Fase 2: Premere (e tenere premuti) contemporaneamente i pulsanti "1" e
"3", quindi inserire il cavo USB nell‘host del computer. Attendere 10 secon-
di n quando i LED blu e rosso si accendono permanentemente.
Fase 3: Premere (e tenere premuto) il pulsante "Blocca" per 10 secondi n
quando non si accende permanentemente il LED arancione.
Fase 4: Immettere la password (1~12 caratteri), quindi premere il pulsan-
te "Sblocca" per confermare.
Fase 5: Immettere di nuovo la password (la stessa di prima), quindi pre-
mere il pulsante "Slocca") per confermare.

www.icybox.de
IB-289U3
16
Quando il LED rosso si spegne, si accede il LED verde: l‘impostazione della
password è completata.
Nota! Prendere nota della password e custodirla in un luogo sicuro, per
prevenirne l‘uso illecito. Se la password va persa non è più possibile ripris-
tinare il disco rigido.
Fase 6: Completare l‘impostazione nel disc management del sistema.
Per cambiare la password
Fase 1: Premere (e tenere premuto) il pulsante "Blocca" e collegare la
Encrypted HDD Enclosure al computer mediante cavo USB.
Fase 2: Premere (e tenere premuto) il pulsante "Blocca". Attendere 10
secondi n quando i LED rosso e arancione si accendono contemporanea-
mente, quindi rilasciare il pulsante "Blocca".
Fase 3: Immettere la password esistente, premere il pulsante "Sblocca"
per confermarla: il LED arancione si spegne.
Fase 4: Immettere la NUOVA password, premere il pulsante "Sblocca"
per confermare.
Fase 5: Immettere di nuovo la NUOVA password, premere il pulsante
"Sblocca" per confermare.
Fase 6: Il LED rosso si spegne, il LED verde si accende: il cambio di pass-
word è completato.
Altre informazioni
• Se non viene immessa la corretta password per 99 volte, i dati
conservati nell‘HDD/SSD installato verranno bloccati permanente-
mente per motivi di sicurezza; dunque non saranno più accessibili.
• Il dispositivo bloccato passa automaticamente alla modalità cripta-
ta dopo circa 13 minuti di inattività.

www.icybox.de
IB-289U3
17
Características
• Sólido cifrado AES de 256 bits para hardware
• Altura de la unidad de disco duro de 2,5" de hasta 9,5 mm, sin
límite de capacidad
• Host USB 3.0 de hasta 5 Gbit/s
• Retrocompatible con USB 2.0 y 1.1
• Cifra todos los datos en la unidad en tiempo real
• Teclado integrado independiente para introducir contraseña (cont-
raseña PIN de hasta 12 dígitos)
• Proteja y asegure sus valiosos datos
• Instalación de la unidad de disco duro sin herramientas
Contenido de la caja
IB-289U3, Protección de silicona, Cable USB 3.0, Manual
Instalación del disco duro
Paso 1:Deslizar la tapa inferior como se muestra seguidamente para abrirla.
Paso 2: Conectar el disco duro SATA a la ranura en la placa principal.

www.icybox.de
IB-289U3
18
Paso 3: Deslizar la tapa inferior como se muestra en la imagen para
cerrar el dispositivo.
Indicadores LED
1. El indicador LED azul se ilumina continuamente si el dispositivo está
encendido y parpadea si está en el modo de acceso a datos.
2. El indicador LED verde parpadea 1 vez al pulsar el botón y se ilumina
continuamente si el disco está desbloqueado.
3. El indicador LED naranja se ilumina continuamente si el modo de
usuario para crear o cambiar la contraseña está activo, y se apaga
si se ha terminado de crear la nueva contraseña o si la contraseña
anterior introducida es correcta.
4. El indicador LED rojo parpadea si la contraseña o la operación es
incorrecta. Se ilumina continuamente en el modo de bloqueo y se
apaga tras el desbloqueo.
Operación de conguración de contraseña
Paso 1: Instalar una nueva unidad de disco duro o una unidad usada sin datos.
Nota! Haga primero una copia de seguridad de los datos de su un-
idad de disco duro usada. Todos los datos de una unidad de disco
duro usada se borrarán después de la conguración.
Paso 2: Pulsar los botones "1" y "3" al mismo tiempo, seguidamente
conectar el cable USB al ordenador host y esperar 10 segundos hasta que
los indicadores LED de color azul y rojo se iluminen continuamente.
Paso 3: Pulsar el botón "Lock" (Bloquear) durante 10 segundos hasta que
el indicador LED naranja se ilumine continuamente.
Paso 4: Introducir su contraseña (de 1 a 12 dígitos), seguidamente pulsar
el botón "Unlock" (Desbloquear) para conrmarla.

www.icybox.de
IB-289U3
19
Paso 5: Introducir la contraseña de nuevo (la misma contraseña que introdujo la
primera vez), seguidamente pulsar el botón "Unlock" (Desbloquear) para conrmarla.
En el mismo momento en que el indicador LED rojo se apague, el indicador LED verde
se ilumina, lo que signica que la contraseña se ha establecido correctamente.
Nota! Anote su contraseña y consérvela en un lugar seguro para
impedir su uso indebido. No podrá restaurar la unidad de disco
duro si pierde la contraseña.
Paso 6: Completar la conguración desde Administración de discos del
sistema operativo del ordenador.
Operación de cambio de contraseña
Paso 1: Mantener pulsado el botón "Lock" (Bloquear) y seguidamente
conectar la carcasa de la unidad de disco duro cifrado al ordenador medi-
ante el cable USB.
Paso 2: Mantener pulsado el botón "Lock" (Bloquear) y esperar 10 se-
gundos hasta que los indicadores LED rojo y naranja se iluminen al mismo
tiempo, entonces soltar el botón "Lock" (Bloquear).
Paso 3: Introducir su contraseña actual, seguidamente pulsar el botón
"Unlock" (Desbloquear) para conrmarla, en ese momento el indicador LED
naranja se apagará.
Paso 4: Introducir la NUEVA contraseña, seguidamente pulsar el botón
"Unlock" (Desbloquear) para conrmarla.
Paso 5: Introducir otra vez la NUEVA contraseña, seguidamente pulsar el
botón "Unlock" (Desbloquear) para conrmarla.
Paso 6: En ese momento, el indicador LED rojo se apaga, y el indicador LED
verde se ilumina conrmando que la contraseña se ha cambiado correctamente.
Información adicional
• Si se introduce una contraseña incorrecta más de 99 veces, los
datos en el HDD/SSD instalado se bloquearán de forma permanente
por motivos de seguridad y será imposible volver a acceder a ellos.
• El dispositivo desbloqueado cambiará automáticamente al modo de
cifrado transcurridos aprox. 13 minutos de inactividad.

www.icybox.de
IB-289U3
20
Belangrijkste kenmerken
• Krachtige AES 256-bit Hardware Encryptie
• 2,5" HDD hoogte tot 9,5 mm, capaciteit niet beperkt
• USB 3.0 Host tot 5 Gbit/s
• Achterwaarts compatibel met USB 2.0 en 1.1
• Encrypteert in real time alle gegevens op de schijf
• Ingebouwd onafhankelijk toetsenbord voor invoer van wachtwoord (tot
12-cijferig PIN-wachtwoord)
• Bescherm en beveilig uw waardevolle gegevens
• Installatie van HDD zonder gereedschap
Inhoud packet
IB-289U3, Siliconen hoesje, USB 3.0 kabel, Handleiding
Installatie van harde schijf
Stap 1: Schuif de onderste afdekking zoals afgebeeld opzij om de onderste
afdekking te openen.
Stap 2: Sluit de SATA-harde schijf aan op de sleuf in de PCBA-opening.
Table of contents
Languages:
Popular Keypad manuals by other brands


DMP Electronics
DMP Electronics 7800 International Series Installation and programming guide

NAPCO
NAPCO RP1054e installation instructions

Clare Controls
Clare Controls ClareVue 5 Replacement manual

Satel
Satel PRF-LCD user manual

GE
GE NX-148E - Security NetworX LCD Keypad Installation and setup

Chamberlain
Chamberlain LiftMaster TAC2C installation guide


