Ideen Welt XJ-2K960 User manual
DMini-Fritteuse / Fondue Set
Bedienungsanleitung
Mini Deep Fryer / Fondue Set
Instruction manual
Mini-fritéza / Fondue Set
Návod k obsluze
Miniaturowa Frytownica / Zestaw do Fondue
Instrukcja obsugi
HMini-Fritz / Fondü készlet
Használati útmutató
XJ-2K960

DEINLEITUNG .................................................................................................................................1
SICHERHEITSHINWEISE ............................................................................................................1
TEILE .............................................................................................................................................2
VOR ERSTER INBETRIEBNAHME..............................................................................................2
INBETRIEBNAHME UND BEDIENUNG.......................................................................................2
REINIGUNG UND PFLEGE..........................................................................................................4
TECHNISCHE DATEN..................................................................................................................5
INTRODUCTION ...........................................................................................................................6
SAFETY INSTRUCTIONS ............................................................................................................6
PARTS ...........................................................................................................................................7
BEFORE FIRST USE....................................................................................................................7
INITIAL START-UP AND OPERATION........................................................................................7
CLEANING AND CARE.................................................................................................................9
TECHNICAL DATA........................................................................................................................9
ÚVOD...........................................................................................................................................10
BEZPENOSTNÍ POKYNY ........................................................................................................10
SOUÁSTI...................................................................................................................................11
PED PRVNÍM POUITÍM .........................................................................................................11
UVEDENÍ DO PROVOZU A OBSLUHA.....................................................................................11
ITNÍ A ÚDRBA ...................................................................................................................13
TECHNICKÉ ÚDAJE...................................................................................................................13
WPROWADZENIE.......................................................................................................................14
WSKAZÓWKI BEZPIECZESTWA............................................................................................14
CZCI........................................................................................................................................15
PRZED PIERWSZYM UYCIEM................................................................................................15
PIERWSZE UYCIE ORAZ OBSUGA .....................................................................................15
CZYSZCZENIE I KONSERWACJA ............................................................................................17
DANE TECHNICZNE ..................................................................................................................18
HBEVEZET..................................................................................................................................19
BIZTONSÁGI UTASÍTÁSOK.......................................................................................................19
RÉSZEK.......................................................................................................................................20
MIELTT ELSZÖR HASZNÁLNÁ............................................................................................20
ÜZEMBE HELYEZÉS ÉS KEZELÉS ..........................................................................................20
TISZTÍTÁS ÉS ÁPOLÁS .............................................................................................................22
MSZAKI ADATOK.....................................................................................................................22

1
D
EINLEITUNG
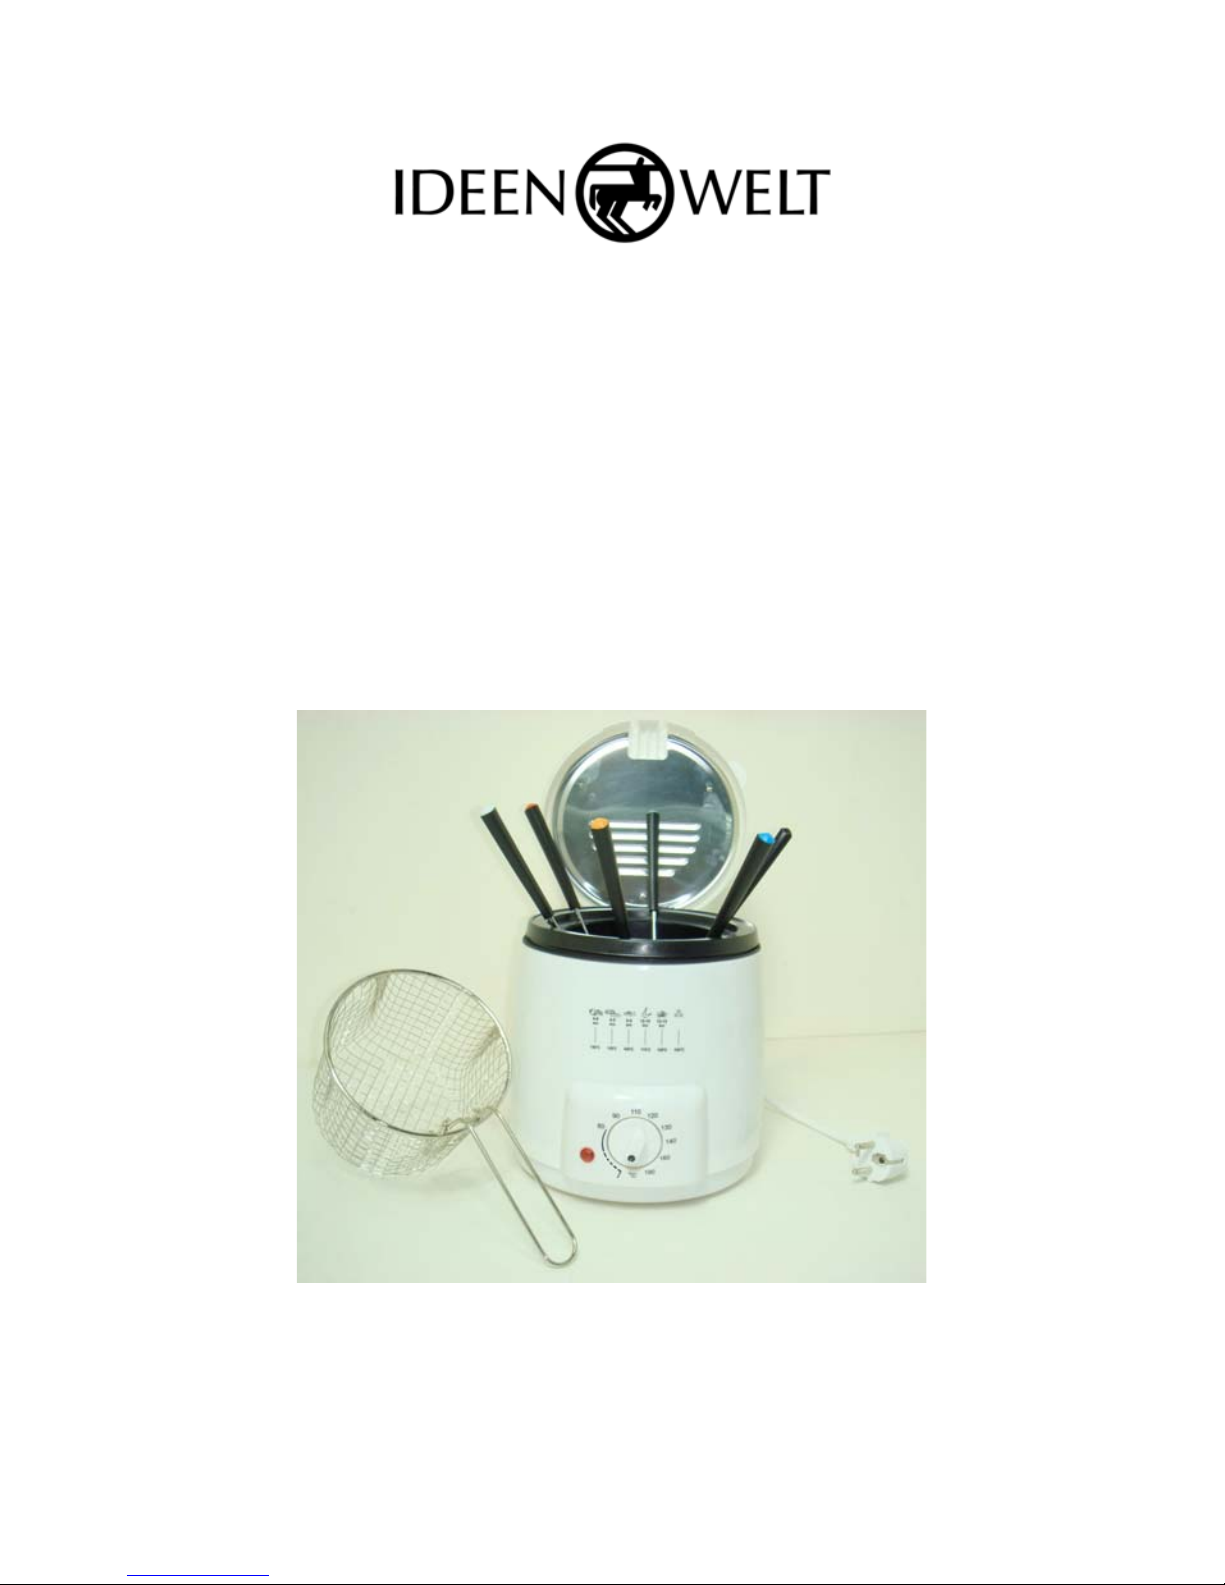
Dieses Gerät dient zum Frittieren von Lebensmitteln und ist mit einem Frittierkorb und Fondueeinsatz ausgestattet. Mit
diesem Gerät sollten nur Lebensmittel zubereitet werden, die zum Frittieren geeignet sind. Dieses Gerät sollte nicht zur
Zubereitung von Lebensmitteln in anderer Form benutzt werden.
SICHERHEITSHINWEISE
1. Lesen Sie diese Gebrauchsanweisung vor Inbetriebnahme des Gerätes sorgfältig durch! Beachten Sie alle
Sicherheitshinweise, um Schäden durch nicht sachgemäßen Gebrauch zu vermeiden!
2. Bewahren Sie die Gebrauchsanweisung für den weiteren Gebrauch auf. Sollte dieses Gerät an Dritte
weitergegeben werden, muss diese Gebrauchsanweisung mit ausgehändigt werden.
3. Das Gerät ist nur für den Privatgebrauch geeignet.
4. Verwenden Sie das Gerät nur für den vorgesehenen Zweck und nur in Innenräumen. Verwenden Sie das Gerät
weder im Freien noch im Badezimmer.
5. Das Gerät dient nur zur Zubereitung von Lebensmitteln, die zum Frittieren geeignet sind.
6. Im Falle von unsachgemäßem Gebrauch oder falscher Handhabung kann keine Haftung für eventuell
auftretende Schäden übernommen werden.
7. Vor erstem Gebrauch prüfen Sie bitte, ob die Stromart und Netzspannung mit den Angaben auf dem Typenschild
übereinstimmen.
8. Kinder oder Personen, denen es an Wissen oder Erfahrung im Umgang mit dem Gerät mangelt, oder die in ihren
körperlichen, sensorischen oder geistigen Fähigkeiten eingeschränkt sind, dürfen das Gerät nicht ohne Aufsicht
oder Anleitung durch eine für ihre Sicherheit verantwortliche Person benutzen.
9. Kinder müssen beaufsichtigt werden, damit sie nicht mit dem Gerät spielen.
10. S
ST RO MSC H LA GG E FA HR !
Versuchen Sie nie, das Gerät selbst zu reparieren. Lassen Sie das Gerät im Falle
von Störungen nur von qualifizierten Fachleuten reparieren.
11. Überprüfen Sie regelmäßig den Netzstecker und das Netzkabel. Wenn das Netzkabel dieses Gerätes beschädigt
wird, muss dieses durch den Hersteller oder seinen Kundendienst oder eine ähnlich qualifizierte Person ersetzt
werden, um Gefährdungen zu vermeiden.
12. Verhindern Sie eine Beschädigung des Netzkabels durch Quetschen, Knicken oder Scheuern an scharfen
Kanten und halten Sie es von heißen Oberflächen und offenen Flammen fern.
13. Ziehen Sie den Netzstecker nicht am Kabel aus der Steckdose und wickeln Sie das Anschlusskabel nicht um das
Gerät.
14. Wird ein Verlängerungskabel benutzt, muss dieses für die entsprechende Leistung geeignet sein, ansonsten
kann es zu Überhitzung von Kabel und/oder Stecker kommen.
15. Verlegen Sie das Anschlusskabel so, dass ein unbeabsichtigtes Ziehen daran bzw. ein Darüberstolpern nicht
möglich ist.
16. A
ACH T UN G LE BEN S GE FA HR !
Tauchen Sie das Gerät während des Reinigens oder des Betriebes nie in
Wasser oder andere Flüssigkeiten. Das Gerät nie unter fließendes Wasser oder andere Flüssigkeiten halten.
17. Fassen Sie das Gerät oder den Netzstecker nie mit nassen oder feuchten Händen an.
18. Führen Sie keine fremdartigen Gegenstände in das Innere des Gehäuses ein.
19. Öffnen Sie unter keinen Umständen das Gehäuse.
20. Ziehen Sie vor jeder Reinigung, und falls das Gerät nicht benutzt wird, den Netzstecker.
21. Stellen Sie das Gerät nicht auf Kochplatten (Gas-, Elektro-, Kohle-Herd usw.). Halten Sie das Gerät von allen
heißen Flächen fern. Betreiben Sie das Gerät immer auf einer ebenen, stabilen, sauberen, hitzebeständigen und
trockenen Fläche und außerhalb der Reichweite von Kindern und geistig behinderten Personen.
22. Platzieren Sie das Gerät so, dass der Netzstecker jederzeit zugänglich ist.
23. Nehmen Sie das Gerät nicht mit feuchten Händen, oder auf nassem Boden stehend in Betrieb.
24. Das Gerät steht unter Strom, solange es ans Stromnetz angeschlossen ist.
25. Trocknen Sie das Gerät und alle Zubehörteile vor Anschluss an das Stromnetz und der Anbringung von
Zubehörteilen.
26. Die Benutzung von Zubehörteilen, die vom Hersteller nicht ausdrücklich empfohlen werden, können
Verletzungen und Beschädigungen verursachen.
27. Verwenden Sie ausschließlich Original- , bzw. vom Hersteller empfohlene Zubehörteile.
28. Lassen Sie das Gerät an einem sicheren, von Kindern und Behinderten unzugänglichen Ort abkühlen.
29. V
VERB RE N N UN GS GE F A H R!
Vorsicht ist geboten im Umgang mit heißen Ölen. Lehnen Sie sich während des
Betriebes oder beim Öffnen des Deckels nicht über das Gerät. Gefahr durch Ölspritzer und heiße Dämpfe!
Vermeiden Sie, das Gerät zu bewegen, solange sich heißes Öl darin befindet. Teile des Gerätes werden
während des Betriebes sehr heiß. Fassen Sie das heiße Gerät möglichst nur mit Topflappen oder hitzeisolierten
Küchenhandschuhen an.
30. Um einen Hitzestau zu vermeiden, das Gerät nicht direkt unter einem Schrank betreiben. Sorgen Sie für
genügend Freiraum.
31. B
BRAN D GE FA HR !
Das Gerät nie unbeaufsichtigt lassen. Das Gerät darf nicht mit leicht entzündlichem Material, z.B. Vorhängen,
Textilien, Wänden u.ä., in Berührung kommen oder damit zugedeckt werden. Achten Sie darauf, dass immer ein
ausreichender Sicherheitsabstand zu entzündlichen Materialien eingehalten wird.

2
D
32. Sorgen Sie jederzeit für gute Belüftung während des Gebrauchs.
33. Sollte ein Brand entstehen, ziehen Sie zuerst den Stecker aus der Steckdose oder trennen Sie das Gerät
anderweitig von der Stromversorgung, bevor Sie geeignete Maßnahmen zur Brandbekämpfung einleiten.
ACH T UN G !
Schütten Sie kein Wasser auf das noch unter Spannung stehende Gerät:
ST RO MSC H LA GG E FA HR !
34. Das Gerät sollte nicht mit einer externen Zeitschaltuhr oder mit einem gesonderten Fernbedienungssystem
betrieben werden.
Spezielle Sicherheitshinweise
1. Heizen Sie das Gerät nicht im leeren Zustand auf. Das Gerät erst einschalten, nachdem sich Öl im
Frittierbehälter befindet.
2. Beachten Sie die MIN/MAX Füll-Markierungen im Inneren des Frittierbehälters. Die minimale Füllmenge für Öl
darf nicht unterschritten werden. Die maximale Füllmenge darf nicht überschritten werden.
3. Frittierkorb korrekt in den Frittierbehälter einsetzen. Deckel beim Frittier-Betrieb geschlossen halten.
4. Falls das Öl anfängt zu brennen, den Deckel schließen und Netzstecker umgehend aus der Steckdose ziehen.
5. Verwenden Sie nur Qualitätsöle. Verschiedene Öle nicht miteinander vermischen. Keine festen Fette mit diesem
Gerät verwenden.
6. Nach der Benutzung das Gerät, sowie darin befindliches heißes Öl an einem sicheren und von Kindern
unzugänglichen Ort abkühlen lassen.
7. Es muss darauf geachtet werden, dass das Netzkabel keine heißen Oberflächen des Gerätes berührt.
Dieses Gerät dient ausschließlich für den privaten Haushaltsgebrauch und darf nicht für
kommerzielle Zwecke benutzt werden.
TEILE
VOR ERSTER INBETRIEBNAHME
1. Entfernen Sie sämtliche Verpackungsmaterialien.
2. Überprüfen Sie den Lieferumfang auf Vollständigkeit und eventuelle Transportschäden. Sollten
Transportschäden vorhanden oder der Lieferumfang unvollständig sein, so kontaktieren Sie Ihren Fachhändler.
3. Heben Sie die Originalverpackung auf. Diese kann zum Transport oder Lagerung wieder genutzt werden.
Entsorgen Sie nicht mehr benötigtes Verpackungsmaterial umweltgerecht gemäß den geltenden Vorschriften und
machen Sie diese Kindern nicht zugänglich.
4. Das Gerät wie im Abschnitt Reinigung und Pflege beschrieben reinigen. Reinigen Sie Frittierkorb (8), Halter (13),
Frittierbehälter (6) und Fonduegabeln (5). Anschließend sorgfältig abtrocken.
5. Haken Sie den Halter (13) in die Aufnahme am Frittierkorb (8) ein. Drücken Sie dabei den Halter zusammen. Die
Enden des Halters müssen in die Öffnungen der Aufnahme am Frittierkorb greifen, so dass der Halter fest sitzt.
INBETRIEBNAHME UND BEDIENUNG
1. Stellen Sie das Gerät an einem hitzebeständigen, trockenen, stand- und rutschfesten Ort auf. Die Standfüße sind
mit rutschfesten Enden bestückt.
2. Bereiten Sie das Frittiergut vor. V
Vorsicht!
Feuchtes Frittiergut sorgfältig trocknen, bevor es in den
Frittierbehälter gegeben wird. G
Gefahr durch Ölspritzer!
3. Bei erster Benutzung können sich leichte Gerüche und Rauch bilden. Dies ist kein Grund zur Sorge, achten Sie
jedoch auf ausreichende Raumbelüftung.
4. Den Deckel (1) des Gerätes öffnen und den Frittierkorb (8) entnehmen.
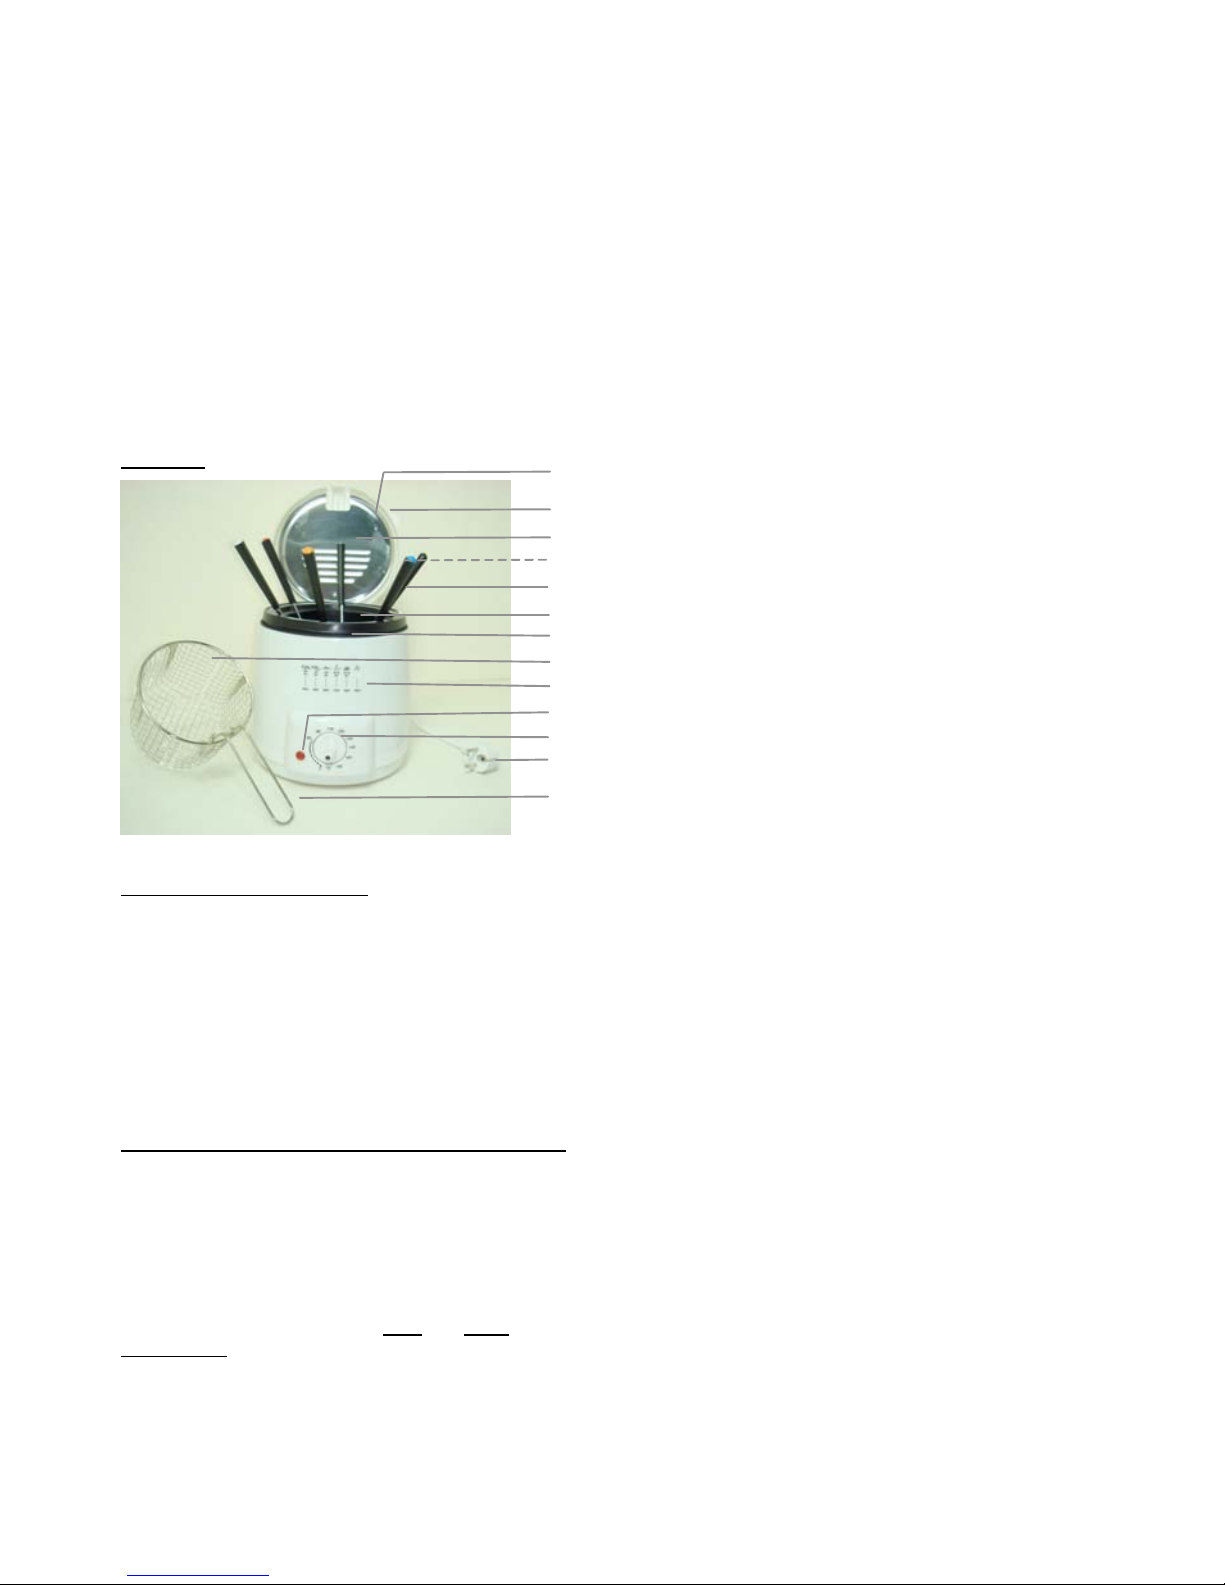
1. Deckel
2. Deckelgriff
3. Metallabdeckung
4. Filter (nicht sichtbar)
5. Fonduegabeln (6 Stück)
6. Frittierbehälter, antihaftbeschichtet
7. Fondueeinsatz
8. Frittierkorb
9. Temperaturtabelle
10. Rote Kontrollleuchte
11. Temperaturregler
12. Netzstecker mit Netzkabel
13. Halter für Frittierkorb
2
3
4
5
6
7
1
8
9
10
11
13
12

3
D
5. Geeignetes Lebensmittelöl in den Frittierbehälter (9) einfüllen. Es wird empfohlen, ein auf pflanzlicher Basis
hergestelltes Qualitätsöl zu verwenden. Achten Sie darauf, dass die eingefüllte Ölmenge zwischen der im
Inneren des Frittierbehälters befindlichen Minimalmarkierung
MIN
und Maximalmarkierung
MAX
liegt!
Hinweis: Verwenden Sie mit diesem Gerät kein festes Fett. Insbesondere Margarine und Butter entwickeln bereits bei
geringer Temperatur starken Geruch und Dämpfe. Bestimmte Öle, wie Olivenöl, sind zum Frittieren nicht geeignet.
Achten Sie beim Kauf von Frittieröl auf die Herstellerangaben, um sicherzustellen, dass das Öl zum Frittieren geeignet
ist.
6. Schließen Sie den Deckel.
7. Den Temperaturregler (11) entgegen dem Uhrzeigersinn bis zum Anschlag drehen. Wenn der Temperatur-regler
auf Position
/
steht, ist das Gerät ausgeschaltet. Den Netzstecker mit einer passenden Netzsteckdose verbinden.
8. Stellen Sie den Temperaturregler auf die benötigte Temperatur. Die rote Kontrollleuchte leuchtet auf und zeigt
damit an, dass das Gerät aufheizt.
9. Legen Sie das Frittiergut in den Frittierkorb. Frittierkorb nicht überfüllen, da dadurch die Ölspritzgefahr erhöht
wird, sowie die Lebensmittel nicht gleichmäßig frittiert werden.
10. Sobald die eingestellte Temperatur erreicht ist, erlischt die rote Kontrollleuchte (10). Dieser Vorgang kann bis zu
10 Minuten dauern. Öffnen Sie vorsichtig den Deckel am Deckelgriff (2). V
Vorsicht! Verbrennungsgefahr
durch heiße Dämpfe!
S
Schützen Sie Ihre Hand mit einem wärmeisolierten Küchenhandschuh.
11. Setzen Sie den Frittierkorb mit den Lebensmitteln in den Frittierbehälter (6).
Vorsicht! Achten Sie auf Ölspritzer!
Insbesondere feuchte und gefrorene Lebensmittel können bei Kontakt
mit heißem Öl spritzen. V
Verbrennungsgefahr!
12. Schließen Sie den Deckel (w
wärmeisolierten Küchenhandschuh verwenden!)
. Achten Sie dabei darauf,
dass die beiden Schlitze im Deckel über den Halter (13) des Frittierkorbs fassen. Dies gewährleistet, dass der
Deckel vollständig geschlossen ist.
13. Das Gerät verfügt über einen eingebauten Thermostat. Die rote Kontrollleuchte (10) kann während des
Frittierens wechselweise aufleuchten und wieder erlöschen. Dadurch wird angezeigt, dass das Gerät das Öl
kurzfristig aufheizt, um die Temperatur zu halten.
14. Die Frittierdauer und die benötigte Temperatur hängen von der Art und Beschaffenheit des Frittiergutes ab.
Achten Sie auf die Informationen des entsprechenden Nahrungsmittelherstellers. Zur schnellen Orientierung
können Sie sich auch nach der am Gerät aufgedruckten Temperaturtabelle (9) richten. Die Temperaturtabelle
und die folgenden Temperaturen sind Richtwerte:
Frittiergut
Temperatur
Frittierzeit in Minuten
Pommes Frites (frisch) 180ºC
danach 190ºC 9 - 11
1 - 2,
bis sie goldbraun sind
Pommes Frites (gefroren) Nach Herstellerangaben Nach Herstellerangaben
MEERESFRÜCHTE
Garnelen (gefroren), paniert. Menge:
Gerade soeben den Boden des Frittierkorbs
abdeckend
170ºC
3 - 5
Kabeljau oder Schellfisch (frisch) 160ºC 5 - 10
(abhängig von der Dicke)
Kabeljau oder Schellfisch (gefroren), oder in
Portionen (paniert oder in Teig) 190ºC 10 - 15
(abhängig von der Dicke)
Scholle (gefroren) 190ºC 5 - 6
FLEISCH
Hamburger Patties ca. 50 g (gefroren) 150ºC 3 - 5
Hähnchen Portionen (klein), paniert
Hähnchen Portionen (groß), paniert 160ºC 10 - 12
15 - 30
Kalbsschnitzel (gefroren) 170ºC 3 - 8
(abhängig von der Dicke)
Hähnchenkeulen, paniert 170ºC 15
15. Sobald die Lebensmittel fertig frittiert sind, den Deckel vorsichtig öffnen. W
Wärmeisolierte
Küchenhandschuhe verwenden.
Einige Sekunden warten, damit der heiße Dampf entweichen kann.
Vorsicht:
Heiße Dämpfe und eventuell spritzendes Öl können zu Verbrennungen führen!
16. Frittierkorb (8) aus dem Frittierbehälter (6) herausheben und das Öl abtropfen lassen.
17. Das Frittiergut kann nun aus dem Frittierkorb entnommen werden.
18. Den Temperaturregler (11) entgegen dem Uhrzeigersinn bis zum Anschlag drehen. Wenn der Temperatur-regler
auf Position
/
steht, ist das Gerät ausgeschaltet. Die rote Kontrollleuchte (10) erlischt. Ziehen Sie den
Netzstecker (12) aus der Steckdose.
19. Lassen Sie das Gerät mit dem darin befindlichen heißen Öl an einem sicheren und von Kindern unzugänglichen
Ort vollständig abkühlen.

4
D
Fondue-Betrieb
:
1. Öffnen Sie den Deckel (1).
2. Ein hochwertiges Frittieröl in den Frittierbehälter (6) einfüllen.
3. Temperaturregler (11) auf eine niedrige Frittiertemperatur (140ºC oder 150ºC) einstellen. Siehe auch obige
Tabelle. Die rote Kontrollleuchte (10) leuchtet auf.
4. Fondueeinsatz (7) auf den Rand des Frittierbehälters (6) setzen.
5. Netzstecker (12) mit einer Steckdose verbinden.
6. Sobald die rote Kontrollleuchte erlischt, ist die eingestellte Frittiertemperatur erreicht und Sie können mit dem
Fondue beginnen.
7. Verwenden Sie die Fonduegabeln (5), um damit das Frittiergut aufzuspießen und in das heiße Öl zu tauchen.
8. Nach der Benutzung den Temperaturregler entgegen dem Uhrzeigersinn auf Position
/
drehen, den Deckel
schließen und den Netzstecker aus der Steckdose ziehen.
9. Lassen Sie das Gerät mit dem darin befindlichen heißen Öl an einem sicheren und von Kindern unzugänglichen
Ort vollständig abkühlen.
10. Mit diesem Gerät sollte nur Öl-Fondue zubereitet werden!
REINIGUNG UND PFLEGE
•A
Achtung!
Schalten Sie das Gerät vor jeder Reinigung aus und ziehen Sie den Netzstecker aus der Steckdose.
Lassen Sie das Gerät an einem von Kindern unzugänglichen Ort vollständig abkühlen.
•Säubern Sie das Gerät nach jedem Frittieren. Essensreste können leicht zu brennen anfangen und bereits
verwendete Frittieröle können dadurch schneller ranzig werden. Sofern Sie das Öl wiederverwenden, sollten die
Essensreste im Öl entfernt werden.
•Erneuern Sie in regelmäßigen Abständen das Öl.
•Reinigen Sie das Außengehäuse und den Deckel mit einem leicht angefeuchteten Tuch und ggf. etwas mildes
Reinigungsmittel.
•Den Frittierbehälter (9) mit heißem Wasser und Spülmittel reinigen; anschließend mit kaltem Wasser nachspülen.
•Der Frittierkorb (8) und der Halter (13) können mit heißem Wasser und Spülmittel, auch im Geschirrspüler,
gereinigt werden.
•Fondue-Einsatz (7) und Fonduegabeln (5) mit heißem Wasser und Spülmittel reinigen.
•D
Das Gerät keinesfalls in Wasser eintauchen oder unter fließendes Wasser halten.
•A
Achten Sie bei der Reinigung darauf, dass kein Wasser in das Geräteinnere eintritt.
•A
Achtung!
Verwenden Sie auf keinen Fall Alkohol, Azeton, Benzin, aggressive Reinigungsmittel usw., um die
Kunststoffteile zu reinigen. Verwenden Sie auch keine harten Bürsten oder metallischen Gegenstände.
•Nach jeder Reinigung alle Bauteile gut trocknen, bevor das Gerät erneut verwendet wird.
•Das Gerät an einem trockenen, kühlen, vor Feuchtigkeit und direkter Sonneneinstrahlung geschützten Ort
aufbewahren.
•Das Gerät an einem von Kindern unzugänglichen Ort aufbewahren.
Filter reinigen:
•Der Filter sollte in regelmäßigen Abständen gereinigt werden.
•Hierzu muss die Metallabdeckung abgenommen werden. Lösen Sie dazu die 3 Schrauben der Metallabdeckung.
Verwenden Sie einen Kreuzschlitzschraubendreher.
•Der verschmutzte Filter kann dann entnommen und mit heißem Wasser und Geschirrspülmittel gewaschen
werden. Danach mit klarem warmen Wasser ausspülen.
•Lassen Sie den Filter an einem gut belüfteten Ort vollständig trocknen, bevor er wieder in den Deckel eingesetzt
wird. Der Filter kann sich durch den Waschvorgang verformen, kann jedoch weiterhin verwendet werden.
•Die Metallabdeckung danach wieder anschrauben.

5
D
TECHNISCHE DATEN
Netzbetrieb: 220 V - 240 V ~ 50Hz
Leistungsaufnahme: 840W
Schutzklasse: I
Beseitigung der alten elektrischen Geräte
Die europäische Richtlinie 2002/96/EC über Elektro- und Elektronik-Altgeräte (WEEE) besagt, dass
gebrauchte Haushaltsgeräte nicht zusammen mit unsortiertem Gemeindeabfall entsorgt werden
dürfen. Diese gebrauchten Geräte müssen vom regulären Haushaltmüll getrennt gesammelt werden,
um den Anteil zurückgewonnener Geräte zu erhöhen und deren Materialien zu recyceln mit dem Ziel,
die Auswirkungen auf die menschliche Gesundheit und auf die Natur zu verringern.
Das Zeichen der durchgestrichenen Mülltonne wird auf alle Geräte aufgebracht, um an die Verpflichtung zur
getrennten Sammlung zu erinnern. Die Verbraucher müssen die lokalen Verantwortlichen oder ihren Verkäufer
ansprechen, um sich über die Art und Weise zu erkundigen, wie ihr Gerät entsorgt werden muss.
Wenn das Ende der Lebensdauer erreicht ist, machen Sie das Gerät unbrauchbar, indem Sie den
Stecker aus der Steckdose ziehen und das Kabel durchtrennen.
Sorgen Sie für eine fachgerechte Entsorgung von Verpackungsmaterialien. Informieren Sie sich über
Sammelstellen bzw. Mülltrennung bei Ihrer Kommune.
Importiert durch:
Dirk Rossmann GmbH
Isernhägener Straße 16
30938 Burgwedel

6
INTRODUCTION
This device is intended for frying food and is equipped with a frying basket and a fondue insert. This device should only
be used to prepare food products that are suitable for frying. This device should not be used to cook any other types of
foods.
SAFETY INSTRUCTIONS
1. Read the instruction manual carefully before operating the device! Follow all safety instructions in order to avoid
defects due to improper use!
2. Keep the operating instructions for further use. Should this device be given to a third party, these operating
instructions must also be handed over.
3. This device is only suitable for private use.
4. Use this device solely for its intended purpose and only indoors. Do not use this device outdoors or in the
bathroom.
5. This device is only to be used for preparing food products that are suitable for frying.
6. The manufacturer is not responsible for damages caused by improper use or non-observance of this instruction
manual.
7. Prior to connecting the device to the power supply, check if the type of current and voltage correspond to the
data on the rating plate of the device.
8. This device is not intended to be used by persons (including children) with reduced physical, sensory, or mental
capabilities, or by those who lack experience and knowledge, unless they are supervised or have been given
instructions concerning the use of the device by a person responsible for their safety.
9. Children must be supervised at all times to ensure they do not play with the device.
10. D
DANGER OF ELECTRIC SHOCK!
Do not try to repair the device on your own. Repairs should be conducted
by qualified specialists only.
11. Regularly check the power cord and plug for possible damages. In case of damages, to avoid danger the power
cord and plug should be replaced by the manufacturer, its Customer Service or a qualified specialist only.
12. Prevent damage to the power cord caused by squeezing, bending or scraping on sharp edges and keep it away
from hot surfaces and open flames.
13. Disconnect the power plug from the socket by pulling the plug, not the cord. Do not wrap the power cord around
the device.
14. Should an extension cord be used, it must correspond to the power rating, otherwise the power cord and/or the
power plug could overheat.
15. Place the cord and in such a way that pulling or tripping over it is impossible.
16. W
WARN IN G ! FA TA L I NJU RI E S!
Do not submerge this device in water or in any other liquid, especially when it is
in operation or while cleaning. Never hold the device under running water or other liquids.
17. Do not touch the device or the power plug with wet or damp hands.
18. Do not insert any foreign objects inside of the outer casing.
19. Do not open the device.
20. Unplug the device before each cleaning and when the device is not in use.
21. Do not place this device on hotplates (gas, electric / coal stoves, etc.). Keep this device away from all hot
surfaces. Always operate the device on a flat, solid, clean, fireproof and dry surface that is out of reach of
children and the mentally handicapped.
22. Position the device in such a way that the plug is always accessible.
23. Do not operate this device with wet hands or when standing on a wet floor.
24. The device is energised as long as it is connected to the power supply.
25. Dry off the device and all accessories before connecting it to a power socket and before attaching the
accessories.
26. Using accessories that were not specifically recommended by the manufacturer could cause injuries and
damages.
27. Only use the original accessories or those that are recommended by the manufacturer.
28. Let the device cool down in a location that is safely out of reach of children or the mentally handicapped.
29. D
DA N GE R O F BU RN S !
Caution is advised when using hot oils. Do not lean over the device when it is in
operation or when opening the lid. There is a danger of splashing oil and hot steam! Do not move the device as
long as there is still hot oil in it. Some parts of the device become very hot during operation. Always use pot
holders or heat resistant kitchen gloves when touching the hot device.
30. In order to avoid the accumulation of heat, do not use this device directly underneath a cupboard. Ensure for
sufficient ventilation.
31. F
FIR E HA ZA RD !
Never leave the device unattended. Do not let the device come into contact with or become covered by easily
flammable materials, e.g. curtains, textiles, walls, etc. Please make sure that the device is always kept a safe
distance away from flammable materials.
32. Always ensure that there is sufficient ventilation during use.
7
33. Should a fire break out, pull the plug out of the power socket or otherwise separate the device from the power
source first before using appropriate fire-fighting measures. A
AT TE N T I ON !
Do not pour water on the device,
especially while it is still plugged in: D
DA N GE R O F E LE C T RIC S HO CK !
34. The device is not intended to be operated by means of an external timer or separate remote control system.
Special Safety Instructions
1. Never heat up the device when it is empty. Only turn on the device after oil has been put into the frying container.
2. Pay attention to the MIN/MAX fill markings on the inside of the frying container. Do not fill the container with oil
below the minimum filling amount. The maximum filling quantity should not be exceeded.
3. Ensure that the frying basket is properly inserted into the frying container. Keep the lid closed when frying foods.
4. Should the oil begin to burn, then close the lid and immediately disconnect the power plug from the socket.
5. Only use quality oils. Never mix different types of oil. Do not use solid fats in this device.
6. After operation, let the device with hot oil inside cool down in a safe location inaccessible to children.
7. Make sure that the power cord does not come into contact with any of the device’s hot surfaces.
This device is intended solely for private household use and may not be used for commercial
purposes.
PARTS
BEFORE FIRST USE
1. Remove all packaging materials.
2. Check the scope of delivery for completeness and possible transport damages. Should the device be damaged,
or the packaging incomplete, contact your dealer.
3. Remove the original packaging. It can be later used for transport or storage. Dispose of the packaging material in
an environmentally friendly way and according to the binding laws and regulations. Keep it away from children.
4. Clean the device as described in the section Cleaning and Care. Clean the frying basket (8), handle (13), frying
container (6) and fondue forks (5). Dry off all parts thoroughly.
5. Hang the handle (13) into the slots on the frying basket (8). Press the handle together. The end of the handle
must fit tightly into the slots on the frying basket so that the handle is secure.
INITIAL START-UP AND OPERATION
1. Place the device on a dry, heat-resistant, firm and non-slip surface. The feet are equipped with non-slip ends.
2. Prepare the food for frying. C
Caution!
Always dry off the food well before placing it into the frying container.
Danger of oil splashes!
3. When using for the first time, slight odours and smoke could develop. This is no reason to worry but make sure
that there is sufficient ventilation in the room.
4. Open the lid (1) of the device and remove the frying basket (8).
5. Fill the frying container (6) with suitable oil. It is recommended to use quality vegetable oil. Make sure that the oil
is filled up to between the M
MIN
and M
MAX
markings!
Please note: Do not use solid fats in this device. Margarine and butter can especially develop strong odours and
steam, even at low temperatures. Some oils, such as olive oil, are not suitable for frying. When buying frying oil, pay
attention to the information by the manufacturer to ensure that it is suitable for frying.
6. Close the lid.
7. Turn the temperature control dial (11) counter clockwise as far as it will go. If the temperature control dial is on
position /, then the device is off. Connect the power plug to a suitable power socket.
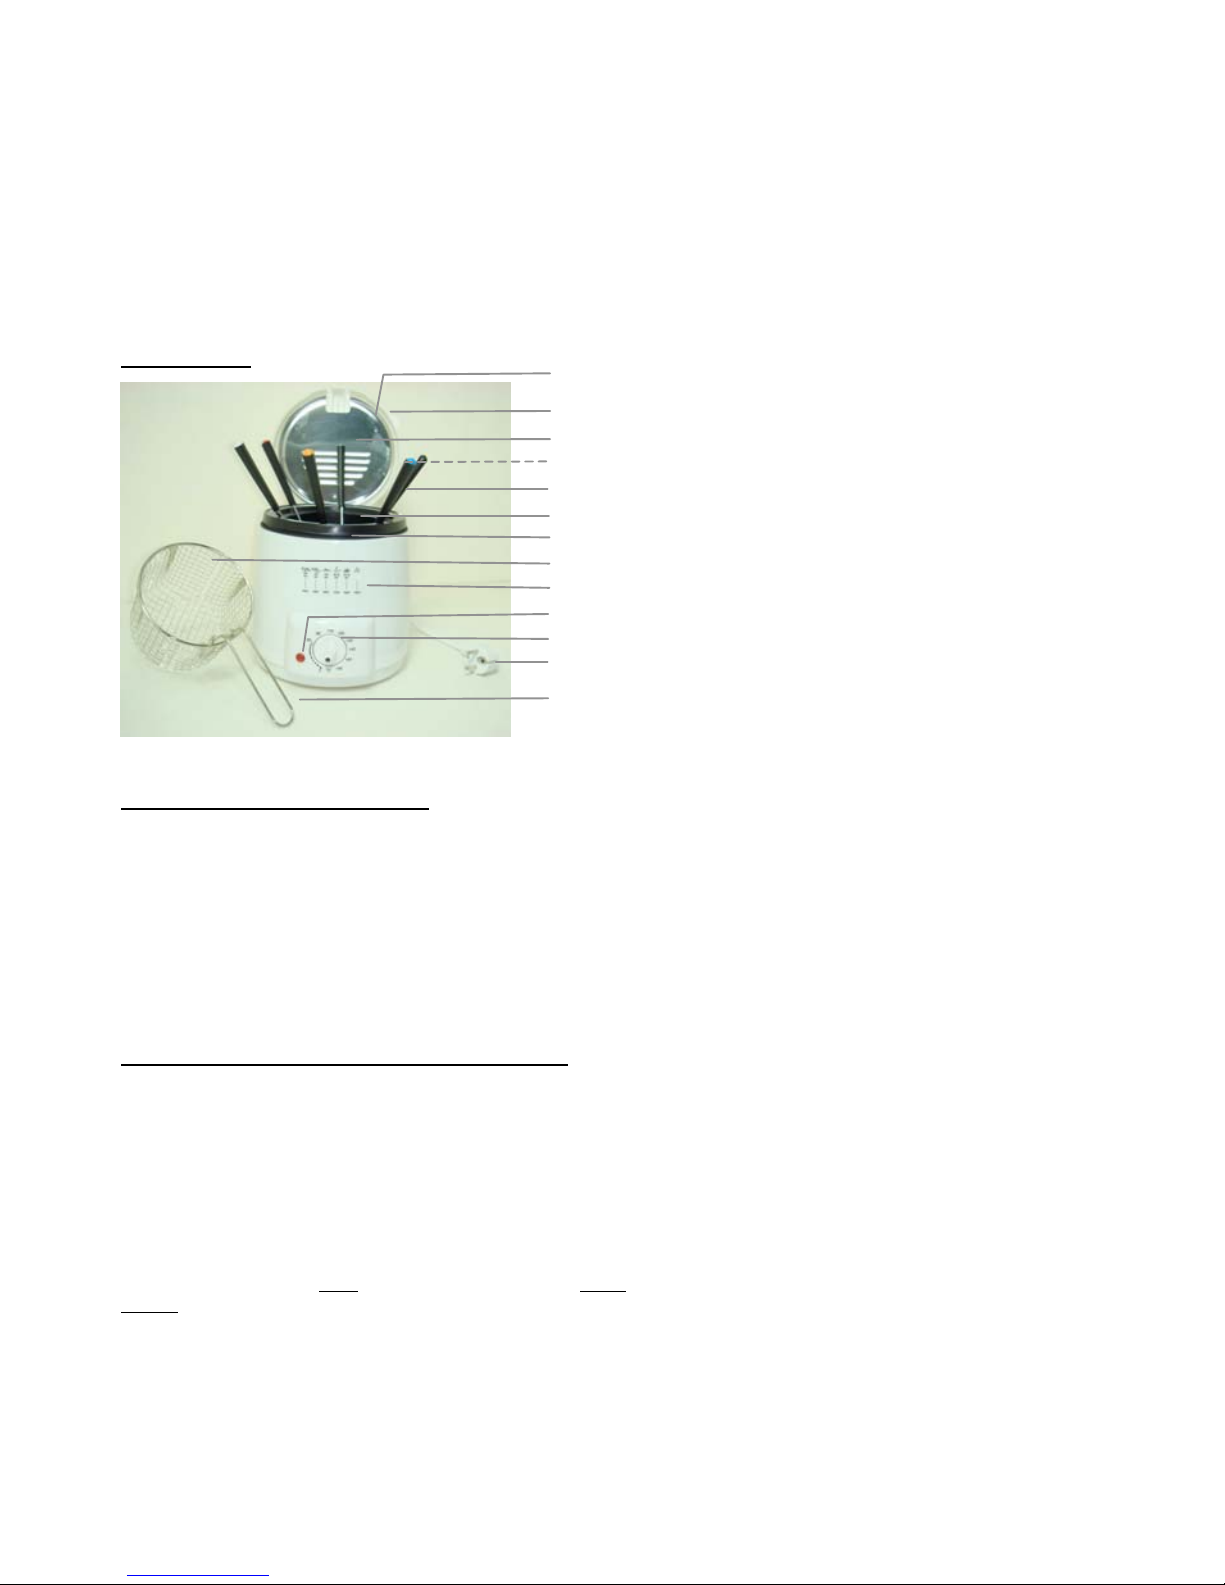
1. Lid
2. Lid handle
3. Metal cover
4. Filter (not visible)
5. Fondue forks (6 pc.)
6. Frying container, non-stick coated
7. Fondue insert
8. Frying basket
9. Temperature table
10. Red indicator lamp
11. Temperature control dial
12. Power plug with power cord
13. Handle for frying basket
2
3
4
5
6
7
1
8
9
10
11
13
12

8
8. Set the temperature control dial to the desired temperature. The red indicator lamp will go on, indicating that the
device is heating up.
9. Put your food into the frying basket. Do not overfill the frying basket as this will increase the danger of oil
splashes and the food will not be fried evenly.
10. As soon as the set temperature is reached, the red indicator lamp (10) will go out. This can take up to 10
minutes. Carefully open the lid using the lid handle (2). C
Caution! There is a danger of burns from hot
steam!
P
Protect your hand with a heat-resistant kitchen glove.
11. Insert the frying basket with food into the frying container (6).
Caution! Be careful of oil splashes!
Upon contact with the hot oil, damp and frozen food could especially
splash oil. D
Danger of burns!
12. Close the lid (u
use heat-resistant
k
kitchen gloves!
). Make sure that the two slits in the lid grasp the handle
(13) of the frying basket. This guarantees that the lid is completely closed.
13. This device is equipped with an integrated thermostat. The red indicator lamp (10) could turn on and off during
the frying process. This indicates that the device is briefly heating the oil to retain the set temperature.
14. The frying duration and the necessary temperature are dependent on the type and composition of the food. Pay
attention to the information provided by the corresponding food manufacturer. For quick reference, you can also
read the temperature table (9) on the device. The temperature table and the following temperatures are
guidelines:
Food
Temperature
Frying time in minutes
French fries (fresh) 180ºC
then 190ºC 9 - 11
1 - 2,
until they are golden brown
French fries (frozen) According to the
manufacturer’s instructions According to the
manufacturer’s instructions
SEAFOOD
Shrimp (frozen), breaded. Amount: Just
enough to cover the bottom of the frying
basket
170ºC
3 - 5
Cod or haddock (fresh) 160ºC 5 - 10
(depending on the thickness)
Cod or haddock (frozen), or in portions
(breaded or in pastry) 190ºC 10 - 15
(depending on the thickness)
Plaice (frozen) 190ºC 5 - 6
MEAT
Hamburger patties, approx. 50 g (frozen) 150ºC 3 - 5
Chicken, portions (small), breaded
Chicken, portions (large), breaded 160ºC 10 - 12
15 - 30
Veal cutlet (frozen) 170ºC 3 - 8
(depending on the thickness)
Chicken legs, breaded 170ºC 15
15. As soon as the food has finished frying, carefully open the lid. U
Use heat-resistant kitchen gloves.
Wait a
few seconds so that the hot steam can escape.
Caution:
Hot steam and possible splashing oil can lead to burns!
16. Lift the frying basket (8) out of the frying container (6) and let the oil drip off.
17. Now the food can be taken out of the frying basket.
18. Turn the temperature control dial (11) counter clockwise as far as it will go. If the temperature control dial is on
position /
/
, then the device is off. The red indicator lamp (10) goes out. Pull the power plug (12) out of the power
socket.
19. Let the device with hot oil inside cool down completely in a safe location out of reach of children.
Fondue function:
1. Open the lid (1).
2. Fill the frying container (6) with high quality oil.
3. Set the temperature control dial (11) to a low frying temperature (140ºC or 150ºC). Consult the above table as
well. The red indicator lamp (10) goes on.
4. Place the fondue insert (7) onto the rim of the frying container (6).
5. Connect the power plug (12) to a suitable power socket.
6. As soon as the red indicator lamp goes out, the set temperature is reached and you can begin with the fondue.
7. Use the fondue forks (5) to spear the food and submerge it into the hot oil.

9
8. After using the device, switch it off by turning the temperature control dial counter clockwise to position /. Close
the lid and unplug the power plug from the power socket.
9. Let the device with hot oil inside cool down completely in a safe location inaccessible to children.
10. This device is only suitable for oil fondues!
CLEANING AND CARE
•A
Attention!
Prior to each cleaning, turn the machine off and disconnect the power plug from the socket. Let the
device cool down completely in a location that is safely out of reach of children.
•Clean the device after each frying process. Food remains can begin to burn easily and can cause the used oil to
become rancid quickly. If you do reuse the oil, make sure to remove any food remains from the oil first.
•Change the oil regularly.
•Clean the outer casing and lid with a slightly damp cloth and a mild cleanser, if necessary.
•Clean the frying container (6) with hot water and dish soap; then rinse with cold water.
•The frying basket (8) and the handle (13) can be cleaned with hot water and dish soap as well as in the
dishwasher.
•Clean the fondue insert (7) and the fondue forks (5) with hot water and dish soap.
•N
Never submerge this device into water and never hold it under running water.
•M
Make sure that no water gets inside the device during cleaning.
•A
Attention!
Do not under any circumstance use alcohol, acetone, petrol, aggressive cleansers, etc. to clean the
plastic parts. In addition, do not use hard brushes or metal objects for cleaning purposes.
•After each cleaning, dry off each part thoroughly before the device is used again.
•Store the device in a dry, cool location that is protected from moisture and direct sunlight.
•Store the device in a location that is inaccessible for children.
Cleaning the filter:
•T
The filter should be cleaned on a regular basis.
•I
In order to clean the filter, the metal cover has to be removed. To do this, loosen the 3 screws
in the metal cover. Use a Phillips head screwdriver.
•T
Then the dirty filter can be removed and cleaned with hot water and dish soap. After that, rinse
the filter with clean warm water.
•L
Let the filter cool off completely in a well ventilated location before putting it back into the lid.
The filter could become deformed from washing it, but may still be used.
•S
Screw on the metal cover again.
TECHNICAL DATA
Mains operation: 220 V – 240 V ~ 50Hz
Power consumption: 840W
Safety Class: I
Disposal of old electric devices.
The European directive 2002/96/EC for waste electrical and electronic equipment (WEEE) states that
used household devices should not be disposed of with unsorted community waste. These used
devices must be collected separately from household waste in order to increase the percentage of
recovered devices and to recycle their parts, with the goal of reducing the negative effects on human
health and on the environment.
The symbol of the crossed out garbage can will be stamped onto all devices as a reminder of the obligation to put them
in a separate garbage collection. The consumer must consult local authorities or the vendor to inform themselves about
the manner in which their device should be disposed of.
When the device has reached the end of its service life, make it defective by disconnecting the
power plug from the socket and cutting the cord in two.
Dispose of the packaging materials in an appropriate way. Contact your local authorities about
collecting points or waste separation.
Imported by:
Dirk Rossmann GmbH
Isernhägener Straße 16
30938 Burgwedel

10
ÚVOD
Tento pístroj slouí k fritování potravin a je vybaven fritovacím koem a vlokou fondue. Tímto pístrojem smjí bt
pipravovány pouze potraviny vhodné k fritování. Tento pístroj nesmí bt pouit k pípravpotravin v jiné form.
BEZPENOSTNÍ POKYNY
1. Ped uvedením spotebie do provozu si pelivpette tuto píruku! Dodrujte vekeré bezpenostní pokyny,
aby vlivem nesprávného pouívání nedolo k závadám!
2. Návod k pouívání uchovávejte pro dalí pouití na snadno dostupném míst. Pokud by tento spotebipeel na
tetí stranu, musíte jí pedat i tyto pokyny k pouívání.
3. Tento spotebije vhodnjen pro soukromé pouívání.
4. Pouívejte pístroj pouze k danému úelu a pouze ve vnitních prostorách. Nepouívejte pístroj v terénu nebo v
koupeln.
5. Pístroj slouí pouze k pípravpotravin vhodnch k fritování.
6. Vrobce není odpovdnza kody zpsobené nevhodnm pouíváním nebo nedodrováním pokynv této
píruce.
7. Ped zapojením spotebie k pívodu energie zkontrolujte, zda naptí odpovídá údajm na títku spotebie.
8. Tento spotebinení uren k pouívání osobami (vetndtí) se sníenmi fyzickmi, smyslovmi nebo
duevními schopnostmi, ani osobami, které postrádají zkuenosti a znalosti, pokud nejsou pod dohledem osoby
odpovdné za jejích bezpenost nebo pokud od takové osoby nedostaly pokyny ohlednpouívání spotebie.
9. Dti je nutné mít neustále pod dohledem, aby si se spotebiem nehrály.
10. N
NEBEZPEÍ ÚRAZU ELEKTRICKM PROUDEM!
Nepokouejte se sami spotebiopravovat. Opravy by
ml provádt pouze kvalifikovanodborník.
11. Pívodní ru a zástrku pravidelnkontrolujte na pípadná pokození. V pípadpokození by pívodní ru
nebo zástrku ml vymnit jen vrobce nebo kvalifikovanodborník.
12. Pedcházejte pokození pívodního kabelu zpsobeného makáním, ohbáním nebo dením o ostré hrany a
uchovávejte ho mimo horké povrchy a stranou od oteveného plamene.
13. Zástrku odpojte od zásuvky tahem za zásuvku, nikoli za ru. Pívodní ru neomotávejte kolem spotebie.
14. Jestlie se pouije prodluovací kabel, musí bt vhodnpro píslunvkon, jinak me dojít k pehátí kabelu a/
nebo zástrky.
15. ru a spotebiumístte tak, aby nebylo moné za ntahat ani o nzakopnout.
16. P
PO Z OR NE B E ZPE Í IV O TA !
Neponoujte pístroj bhem itní nebo provozu do vody nebo jinch kapalin.
Pístroj nesmí pijít do styku s tekoucí vodou nebo jinmi kapalinami.
17. Nuchopujte pístroj nebo síovou zástrku mokrma rukama.
18. Dovnitkrytu nezavádjte cizí pedmty.
19. Spotebineotvírejte.
20. Ped kadm itním a pokud pístroj není pouíván, vytáhnte síovou zástrku.
21. Nestavte pístroj na topné plotnky (na plyn, elektrické, sporáky na uhlí apod.) Izolujte pístroj od vech horkch
ploch. Provozujte pístroj vdy na rovné, stabilní, isté, teplu odolné a suché ploe mimo dosah dtí a duevn
postiench osob.
22. Umístte pístroj tak, aby síová zástrka byla kdykoliv pístupná.
23. Neuchopujte pístroj vlhkma ruka nebo nedopuste stát jej na mokré podlaze.
24. Spotebije napájen, pokud je pipojen k pívodu energie.
25. Vysute pístroj a vechny díly písluenství ped pipojením k síti a umístním dílpísluenství.
26. Pouití dílpísluenství, které nejsou prkazndoporueny vrobcem, mohou zpsobit poranní a pokození.
27. Pouívejte vlunoriginální díly písluenství a doporuené vrobcem.
28. Pístroj nechte ochladit na bezpeném míst, nepípustném dtem a postienm.
29. N
NEBE Z PE Í P O P Á LE N Í!
Pozor - je zakázáno ve styku s horkmi oleji. Neopírejte se bhem provozu nebo pi
otevení krytu o pístroj. Nebezpeí vystíknutí horkého oleje nebo párami! Zamezte pohybovat pístrojem, pokud
se v nm nachází horkolej. ásti pístroje jsou bhem provozu velmi horké. Uchopte horkpístroj pokud
mono pouze chapkou na hrnce nebo tepelnizolovanmi kuchyskmi rukavicemi.
30. Pro zamezení akumulace tepla, nemít pístroj v provozu pímo pod skíní. Zajistte dostatenvolného prostoru.
31. N
NEBE Z PE Í P O ÁR U!
Pístroj nenechat bez dohledu. Pístroj nesmí pijít do styku se snadno vzntlivm materiálem, nap. závsy,
textil, stny apod. nebo bt jimi pikryt. Pozor na to, aby byla vdy dodrena dostatená bezpenostní
vzdálenost ke vzntlivm materiálm.
32. Bhem pouívání zajistte vdy dobré vtrání.
33. Pokud by dolo k poáru, vytáhnte nejprve síovou zástrku ze zásuvky nebo oddlte pístroj od sítjinak díve,
nezahájíte opatení k boji s ohnm. P
PO Z OR !
Nelijte vodu na pístroj, kterje dosud pod naptím: N
NEB E ZP E Í
ÚRA Z U P R OU D E M !
34. Pístroj nesmí bt pouíván s externím asovaem nebo systémem dálkového ovládání.
11
Speciální bezpenostní pokyny
1. Nevyhívejte pístroj v prázdném stavu. Pístroj zapnout teprve, jestlie se ve fritovací nádobnachází olej.
2. Pozor na oznaení náplnMIN/MAX uvnitfritovací nádoby. Minimální plnicí mnoství oleje musí bt dosaeno.
Maximální plnicí mnoství nesmí bt pekroeno.
3. Fritovací kovloit správndo fritovací nádoby. Víko musí bt pi fritování uzavené.
4. Jestlie se olej zaíná pálit, uzavít kryt a síovou zástrku okamitvytáhnout ze zásuvky.
5. Pouívejte pouze kvalitní oleje. Nemíchat vzájemnrzné oleje. V tomto pístroji nepouívat pevné tuky.
6. Po pouití nechat pístroj a olej, kterse v nm nachází, vychladnout na bezpeném míst, nepístupném dtem.
7. Pozor na to, aby se síovkabel nedotkal horkch ploch pístroje.
Tento spotebije uren vhradnpro soukromé pouití v domácnosti a nesmí se pouívat ke
komerním úelm.
SOUÁSTI
PED PRVNÍM POUITÍM
1. Odstrate vechny obalové materiály.
2. Zkontrolujte úplnost dodávky a pípadná pokození bhem dopravy. Pokud by spotebibyl pokozen nebo
balení neúplné, spojte se svm prodejcem.
3. Odstrate pvodní obal. Pozdji se me pouít pro pepravu nebo uskladnní. Obalové materiály likvidujte
ekologicky a podle závaznch zákona pedpis. Uschovávejte je mimo dosah dtí.
4. Pístroj vyistit podle popisu v ásti itní a údrba. Vyistte fritovací ko(8), drák (13), filtraní nádobu (6)
fondue vidlice (5). Dále pelivvysuit.
5. Zaseknte drák (13) do upevnní na fritovacím koi (8). Pitom stisknte drák. Konce dráku musejí
zasahovat do otvorupnutí na fritovacím koi, take je drák správnupevnn.
UVEDENÍ DO PROVOZU A OBSLUHA
1. Instalujte pístroj na tepelnodolném, suchém, stabilním míst, odolném proti skluzu. Patky jsou osazeny konci
odolnmi proti skluzu.
2. Pipravte fritovací materiál. P
Pozor!
Vlhkfritovací materiál ádnvysuit ped umístním ve filtraní nádob.
Nebezpeí vystíknutí oleje !
3. Pi prvním pouitím se mohou tvoit lehké pachy a kou. To není dvod k obav, dbejte vak na dostatené
vtrání prostoru.
4. Odejmte víko (1) pístroje a otevete fritovací ko(8).
5. Fritovací nádobu (6) naplnit vhodnm potravináskm tukem. Doporuuje se pouít kvalitní tuk vyrobenna
rostlinné bázi. Pozor na to, e naplnné mnoství oleje se musí pohybovat mezi vnitním oznaením fritovací
nádoby minimální M
MIN
a maximálním oznaením M
MAX
!
Pokyn: Nepouívejte s tímto pístrojem pevntuk. Zejména margarin a máslo vyvolávají jipi nízké teplotsilnum a
páry. Urité oleje, jako olivovolej, nejsou ke fritování vhodné. Pozor pi nákupu fritovacího oleje na údaje vrobce,
abyste se ujistili, e olej je vhodnk fritování.
6. Uzavete víko.
7. Teplotní regulátor (11) otáet proti smru hodinovch ruiek ak zaráce. Jestlie je teplotní regulátor nastaven
na pozici /, je pístroj vypnut. Síovou zástrku umístit do písluné zásuvky.
8. Nastavte teplotní regulátor na ádanou teplotu. Svítí ervená kontrolka a tím ukazuje, e pístroj vyhívá.
9. Polote materiál k fritování do fritovacího koe, filtraní konepeplnit, protoe se tím zvyuje nebezpeí
vystíknutí oleje a potraviny nejsou fritovány stejnomrn.
1. Víko
2. Drák víka
3. Kovové víko
4. Filtr (není vidt)
5. Vidlice fondue (6 kus)
6. Fritovací nádoba, s nepilnavou vrstvou
7. Vloka fondue
8. Fritovací ko
9. Teplotní tabulka
10. ervená kontrolka
11. Teplotní regulátor
12. Síová zástrka s kabelem
13. Drák fritovacího koe
2
3
4
5
6
7
1
8
9
10
11
13
12

12
10. Jakmile je dosaena nastavená teplota, zhasne ervená kontrolka (10). Tento proces me trvat a10 minut.
Otevete opatrnkryt za dradlo (2). P
Pozor! Nebezpeí popálení horkmi parami! Chrate ruce
tepelnizolující kuchyskou rukavicí.
11. Vlote fritovací kos potravinami do fritovací nádoby (6).
Pozor! Plej me vystíknout!
Zejména vlhké a zmrzlé potraviny mohou pi kontaktu s horkm olejem stíkat.
Nebezpeí popálení!
12. Uzavete víko (p
pouít tepelnizolující kuchyskou rukavici!
). Pitom dbejte na to, aby oba záezy ve víku
pesahovaly pes drák (13) fritovacího koe. To zajiuje, e je víko zcela uzavené.
13. Pístroj má k dispozici zabudovantermostat. ervená kontrolka (10) se me bhem fritování stídav
rozsvcet a znovu zhasínat. Tím je signalizováno, e pístroj olej krátkodobvyhívá, aby udroval teplotu.
14. Doba fritování a potebná teplota závisejí na druhu a povaze fritovaného materiálu. Dbejte na informace
písluného vrobce potravin. K rychlému orientování se mete ídit rovn teplotní tabulkou uvedenou na
pístroji (9). Teplotní tabulka a následující teploty jsou smrné hodnoty:
Fritovací materiál
Teplota
Doba fritování v min.
Pommes Frites (erstvé) 180ºC
potom190ºC 9 - 11
1 - 2,
ajsou zlatohndé
Pommes Frites (zmrazené) Podle údajvrobce Podle údajvrobce
Moské plody
Krevety (zmrazené), smaené. Mnoství:
Aby bylo pikryto dno fritovacího koe 170ºC
3 - 5
Treska obecná nebo treska skvrnitá
(erstvé) 160ºC 5 - 10
(v závislosti na tlouce)
Treska obecná nebo treska skvrnitá
(zmrazené), nebo v porcích (smaené nebo
v tstíku)
190ºC 10 - 15
(v závislosti na tlouce)
Platz (mrazen) 190ºC 5 - 6
Maso
Hamburger Patties cca 50 g (zmrazen) 150ºC 3 - 5
Kuecí porce (malé) , smaené
Kuecí porce (velké), smaené 160ºC 10 - 12
15 - 30
Telecí ízek (mrazen) 170ºC 3 - 8
( v závislosti na tlouce)
Kuecí stehna, smaená 170ºC 15
15. Jakmile jsou potraviny zcela fritované, opatrnotevít víko. P
Pouít tepelnizolující kuchyské rukavice.
Pokat nkolik sekund, aby mohla uniknout horká pára.
Pozor:
Horké páry a eventuálnstíkající olej mohou zpsobit popálení!
16. Fritovací ko(8) v závislosti na tlouce jmout z fritovací nádoby (6) a nechat vykapat olej.
17. Fritovací materiál me bt nyní vybrán z fritovacího koe.
18. Teplotní regulátor (11) otáet proti smru hodinovch ruiek ak zaráce. Jestlie je teplotní regulátor nastaven
na pozici /, je pístroj vypnut.
ervená kontrolka (10) zhasne. v závislosti na a vytáhnte síovou zástrku (12)
ze zásuvky.
19. Nechte pístroj s olejem, kterse v nm nachází, zcela ochladit na bezpeném míst, nepístupném dtem.
Provoz fondue
:
1. Otevete víko (1).
2. Kvalitní fritovací olej naplnit do fritovací nádoby (6).
3. Teplotní regulátor (11) nastavit na nízkou fritovací teplotu (140ºC nebo 150ºC). Viz rovn tabulka ve.
ervená kontrolka (10) se rozsvítí.
4. Vloku fondue (7) umístit na okraj fritovací nádoby (6).
5. Síovou zástrku (12) zasunout do zásuvky.
6. Jakmile zhasne ervená kontrolka, je dosaena nastavená fritovací teplota a mete zaít s fondue.
7. Pouijte vidlice fondue (5), abyste tak nabodli fritovací materiál a ponoili do horkého oleje.
8. Po pouití teplotní regulátor otáet proti smru hodinovch ruiek na pozici /, zavít víko a síovou zástrky
vytáhnout ze zásuvky.
9. Nechte pístroj s horkm olejem ochladit na bezpeném míst, nepípustném dtem.
10. Tímto pístrojem mohou bt pipravovány pouze olejové fondue!

13
ITNÍ A ÚDRBA
•P
Pozor!
Vypnte pístroj ped kadm itním a vytáhnte zástrku ze zásuvky. Nechte pístroj zcela ochladit
na místnepístupném dtem.
•istte pístroj po kadém fritování. Zbytky jídla mohou snadno zpsobit poár nebo jipouité fritovací oleje
mohou tím rychleji luknout. Pokud pouíváte olej znovu, musejí bt odstranny zbytky jídla v oleji.
•Olej v pravidelnch intervalech vymujte.
•istte vnjí kryt a víko lehce navlhenm hadíkem a event. trochou jemného istícího prostedku.
•Fritovací nádobu (6) istit horkou vodou a mycím prostedkem, dále opláchnout studenou vodou.
•Fritovací ko(8) a drák (13) mohou bt opláchnuty horkou vodou a mycím prostedkem, rovn itny v
pípravku na mytí nádobí.
•Umyjte vloku fondue (7) a vidlici fondue (5) v horké vodse saponátem.
•P
Pístroj nesmí bt v ádném pípadponoen do vody nebo bt vystaven tekoucí vod.
•P
Pi itní pozor na to, aby dovnitpístroje nevnikla voda.
•P
Pozor!
V ádném pípadnepouívejte k itní líh, aceton, benzín, agresivní isticí prostedky apod., abyste
vyistili plastové díly. Rovn nepouívejte tvrdé kartáky nebo kovové pedmty.
•Po kadém itní vechny konstrukní díly dobe vyschnout, neje pístroj znovu pouit.
•Pístroj skladovat na suchém, chladném míst, chránném ped vlhkostí a pímm slunením záením.
•Pístroj skladovat na místnepístupném dtem.
itní filtru:
1. Filtr musí bt itn v pravidelnch intervalech.
2. K tomu je teba odejmout kovové víko. Proto uvolnte 3 rouby na víku. Pouijte roubovák s
kíovou drákou.
3. Zneitnfiltr je moné vyjmout a omt horkou vodou a prostedkem na mytí nádobí. Potom
vypláchnout istou teplou vodou.
4. Neumístíte filtr do víka, nechte ho zcela vyschnout na dobe vtraném míst. Filtr se me
pi mytí zdeformovat, me bt vak znovu pouit.
5. Potom znovu naroubovat kovové víko.
TECHNICKÉ ÚDAJE
Síovprovoz: 220 V - 240 V ~ 50Hz
Píkon: 840W
Tída krytí: I
Likvidace starch elektrickch pístroj.
Evropská smrnice 2002/96/EC o starch elektrickch a elektronickch pístrojích (WEEE) uvádí, e
pouité domácí pístroje nesmjí bt odstranny stejns domácím odpadem. Tyto pouité pístroje
musejí bt shromaovány oddlenod domácího odpadu, aby se zvil podíl zpt získanch
pístroj, jejich materiály recyklovat s cílem, sníit dsledky na zdraví lidí a na pírodu.
Oznaení pekrtnuté popelnice je umístno na vech pístrojích, abyste nezapomnli na povinnost oddlovaného
sbru. Spotebitelé musejí poádat místní zodpovdnou osobu nebo prodejce, aby se informovali, jak musí bt pístroj
zlikvidován.
Kdyje spotebina konci ivotního cyklu, odpojte kabel ze zásuvky a znehodnote spotebi
pestiením kabelu.
Zlikvidujte obalovmateriál pedepsanm zpsobem. Informujte se na místním úad, kde se
nacházejí sbrná místa nebo kontejnery na tídnodpad.
Dovozce:
Dirk Rossmann GmbH
Isernhägener Straße 16
30938 Burgwedel

14
WPROWADZENIE
Urzdzenie suy do smaenia poywienia i zostao wyposaone w koszyk do gbokiego smaenia oraz wkad do
fondue. W urzdzeniu mona przygotowywawycznie poywienie, które nadaje sido smaenia. Nie uywaj
urzdzenia do przygotowywania potraw pod innpostaci.
WSKAZÓWKI BEZPIECZESTWA
1. Przed pierwszym uyciem dokadnie przeczytaj instrukcjobsugi! Stosuj sido wskazówek bezpieczestwa, aby
unikn uszkodzespowodowanych nieprawidowym uyciem!
2. Zachowaj instrukcjdo przyszego wgldu. Jeli przekazujesz urzdzenie osobom trzecim, docz równie
niniejszinstrukcj.
3. Urzdzenie nadaje siwycznie do uytku prywatnego.
4. Uywaj urzdzenia zgodnie z przeznaczeniem i tylko w pomieszczeniach. Nie uywaj urzdzenia na zewntrz lub
w azience.
5. Urzdzenie suy wycznie do przygotowywania potraw, które nadajsido smaenia.
6. Producent nie ponosi odpowiedzialnoci za uszkodzenia wynikajce z niewaciwego uycia lub
nieprzestrzegania niniejszej instrukcji obsugi.
7. Przed pierwszym uyciem sprawd, czy typ prdu oraz napicie szgodne z danymi na tabliczce znamionowej
urzdzenia.
8. Niniejsze urzdzenie nie jest przeznaczone dla osób (w tym dzieci) o ograniczonych zdolnociach fizycznych,
sensorycznych lub umysowych, odznaczajcych sibrakiem dowiadczenia lub wiedzy, chyba e pozostajpod
nadzorem osoby odpowiedzialnej za ich bezpieczestwo lub otrzymajod niej wskazówki dotyczce uywania
urzdzenia.
9. Dzieci powinny pozostawapod nadzorem, aby nie bawiy siurzdzeniem.
10. N
NIEBEZPIECZESTWO PORAENIA PRDEM!
Nie próbuj naprawiaurzdzenia samodzielnie.
Naprawa musi byprzeprowadzona wyczne przez wykwalifikowanego specjalist.
11. Regularnie sprawdzaj kabel zasilania pod ktem ewentualnych uszkodze. Aby unikn niebezpieczestwa,
uszkodzony kabel zasilania wraz z wtyczkpowinien zostawymieniony wycznie przez producenta lub
wykwalifikowanego specjalist.
12. Aby unikn uszkodzenia kabla sieciowego naley unikaciskania, zginania i tarcia go o ostre krawdzie.
Trzymaj kabel z dala od gorcych powierzchni.
13. Odczaj kabel zasilania z gniazda sieci cignc za wtyczk, nie za kabel. Nie owijaj kabla zasilania wokó
urzdzenia.
14. Jeeli ma byuywany przeduacz, musi on bydopasowany do odpowiedniego obcienia, w przeciwnym
razie moe doj do przegrzania sikabla i/lub wtyczki.
15. Umie kabel w takim miejscu, aby nie stwarzaon zagroenia ewentualnego potknicia, oraz aby nie byon
naraony na pocignicie.
16. U
UW A G A , RY ZY K O U T RA T Y Y CI A !
Podczas czyszczenia i obsugi, nigdy nie zanurzaj urzdzenia w wodzie
lub innych cieczach. Nie trzymaj urzdzenia pod biecwodlub innymi cieczami.
17. Nigdy nie dotykaj urzdzenia i wtyczki mokrymi lub wilgotnymi rkami.
18. Nie wkadaj obcych przedmiotów do rodka obudowy.
19. W adnym wypadku nie otwieraj obudowy urzdzenia.
20. Wyjmuj wtyczkz gniazda zasilania przed kadym czyszczeniem oraz jeli nie uywasz urzdzenia.
21. Nie stawiaj urzdzenia na pytach kuchennych (piecykach gazowych, elektrycznych, wglowych itd.). Trzymaj
urzdzenie z dala od gorcych powierzchni. Uywaj urzdzenia na równej, stabilnej, czystej, aroodpornej i
suchej powierzchni, poza zasigiem dzieci oraz osób o ograniczonych zdolnociach umysowych.
22. Ustaw urzdzenie w taki sposób, eby wtyczka zawsze bya atwo dostpna.
23. Nie uywaj urzdzenia, jeli masz wilgotne rce lub stoisz na mokrym podou.
24. Urzdzenie jest pod napiciem dopóki jest podczone do róda zasilania.
25. Zanim podczysz urzdzenie do róda zasilania i doczysz akcesoria, wysusz urzdzenie oraz wszystkie
akcesoria.
26. Uywanie akcesoriów, które nie sjednoznacznie zalecane przez producenta mogspowodowaurazy ciaa
oraz uszkodzenie urzdzenia.
27. Uywaj wycznie oryginalnych akcesoriów lub tych zalecanych przez producenta.
28. Odstaw urzdzenie do ostygnicia w bezpiecznym miejscu, do którego nie majdostpu dzieci i osoby z
ograniczonymi zdolnociami umysowymi.
29. R
RY ZY K O P O PAR ZE !
Zachowaj ostrono przy obchodzeniu siz gorcymi olejami. Podczas obsugi
urzdzenia, jak równiepodczas otwierania pokrywy nie pochylaj sinad urzdzeniem. Ryzyko poparzenia
poprzez rozpryski oleju oraz gorce opary! Unikaj przesuwania urzdzenia jeli znajduje siw nim olej. Czci
urzdzenia bardzo rozgrzewajsipodczas pracy. Dotykaj urzdzenie jedynie przez aroodporne rkawice
kuchenne.
30. Aby unikn akumulacji ciepa, urzdzenie nie moe pracowabezporednio pod szafkkuchenn. Zadbaj o
wystarczajco duo miejsca.

15
31. R
RY ZY K O P O A RU !
Nigdy nie zostawiaj urzdzenia bez nadzoru. Urzdzenia nie moe miekontaktu z atwopalnymi materiaami, np.
zasonami, tekstyliami, cianami itd., i nie moe bynimi przykryte. Zawsze upewniaj si, e zostazachowany
odpowiedni dystans do atwopalnych materiaów.
32. Zawsze zapewniaj dobrwentylacjpodczas pracy urzdzenia.
33. Jeli dojdzie do poaru, najpierw wyjmij wtyczkz gniazda zasilania lub odcz urzdzenie od róda zasilania w
inny sposób, zanim podejmiesz odpowiednie kroki w celu ugaszenia poaru. U
UW A G A !
Nie lej wody na
urzdzenie znajdujce siwci pod napiciem: R
RY Z YK O P O RA E NI A P R D E M !
34. Urzdzenie nie moe byobsugiwane przy pomocy zewntrznego wycznika czasowego lub oddzielnego pilota
zdalnego sterowania.
Dodatkowe wskazówki bezpieczestwa
1. Nie rozgrzewaj urzdzenia, jeli jest ono puste. Wczaj urzdzenie dopiero wtedy, gdy olej znajdzie siw
pojemniku na smaenie poywienia.
2. Zwracaj uwagna oznaczenie napenienia MIN/MAX znajdujce siwewntrz pojemnika. Nie wolno wlamniej
oleju nizaznaczona ilo minimalna, jak równienie wolno wlawicej oleju nizaznaczona ilo maksymalna.
3. Wókoszyk do pojemnika. Podczas smaenia pokrywa musi byzamknita.
4. Jeli olej zacznie sipali, zamknij pokrywi natychmiast wyjmij wtyczkz gniazda zasilania.
5. Uywaj wycznie olejów dobrej jakoci. Nie mieszaj rónych rodzajów olejów. Nie uywaj tuszczu staego wraz
z tym urzdzeniem.
6. Po skoczeniu uywania, pozwól urzdzeniu wraz ze znajdujcym siw nim gorcym olejem ostygn w
bezpiecznym miejsce poza zasigiem dzieci.
7. Uwaaj, aby kabel sieciowy nie dotykagorcych czci urzdzenia.
Urzdzenie jest przeznaczone do celów prywatnych i nie moe byuywane w celach komercyjnych.
CZCI
PRZED PIERWSZYM UYCIEM
1. Usuwszystkie materiay opakowania.
2. Sprawdzawarto pod ktem kompletnoci i ewentualnych uszkodzepowstaych podczas transportu. Jeli
urzdzenie jest uszkodzone lub zawarto jest niekompletna skontaktuj size sprzedawc.
3. Usuoryginalne opakowanie. Moe byono póniej uyte do transportu lub przechowywania. Zutylizuj materiay
opakowania w sposób przyjazny dla rodowiska i zgodnie z obowizujcymi przepisami. Trzymaj je z dala od
dzieci.
4. Wyczy urzdzenie jak opisano w rozdziale Czyszczenie i Konserwacja. Wyczy koszyk do smaenia (8),
uchwyt (13), pojemnik do smaenia (6) oraz widelczyki do fondue (5). Na koniec dokadnie wysusz wszystkie
czci.
5. Wóuchwyt (13) do otworu na koszyku do smaenia (8). Dokadnie dopasuj pozycjuchwytu. Aby uchwyt
znalazsiw odpowiednim miejscu, jego koce muszwej w otwory na koszyku.
PIERWSZE UYCIE ORAZ OBSUGA
1. Postaw urzdzenie na aroodpornym, suchym, stabilnym miejscu, w którym urzdzenie nie mogoby si
przewróci. Nóki urzdzenia szakoczone antypolizgowymi kocówkami.
2. Przygotuj poywienie. U
Uwaga!
Wilgotne poywienie naley dokadnie wysuszyprzed woeniem do pojemnika.
Ryzyko rozpryskania sioleju!
1. Pokrywa
2. Uchwyt pokrywy
3. Metalowe pokrycie
4. Filtr (niewidoczny)
5. Widelczyki do fondue (6 sztuk)
6. Pojemnik do smaenia, pokryty warstwteflonu
7. Wkad fondue
8. Koszyk do smaenia
9. Tabela temperatur
10. Czerwona lampka kontrolna
11. Regulator temperatury
12. Wtyczka i kabel zasilania
13. Uchwyt koszyka do smaenia
2
3
4
5
6
7
1
8
9
10
11
13
12

16
3. Podczas pierwszego uycia z urzdzenia mogwydobywasisabe zapachy oraz dym. Nie jest to powód do
niepokoju, tym niemniej zadbaj o odpowiedniwentylacjpomieszczenia.
4. Otwórz pokryw(1) urzdzenia i wyjmij koszyk do smaenia (8).
5. Napenij pojemnik (6) odpowiednim olejem. Zaleca siuycie oleju rolinnego. Zwróuwag, aby poziom oleju
znajdowasipomidzy oznaczeniem M
MIN
oraz oznaczeniem M
MAX
, umieszczonymi wewntrz pojemnika!
Wskazówka: Nie uywaj tuszczów staych wraz z tym urzdzeniem. Zwaszcza margaryna i maso juprzy niskiej
temperaturze zaczynajwydzielamocny zapach oraz opary. Niektóre oleje, na przykad oliwa z oliwek, nie nadajsi
do gbokiego smaenia. Przy kupnie oleju zwracaj uwagna wskazówki producenta, aby upewnisi, e dany olej
nadaje sido gbokiego smaenia.
6. Zamknij pokryw.
7. Przekr regulator temperatury (11) do samego koca w kierunku przeciwnym do ruchu wskazówek zegara. Jeli
regulator temperatury znajduje sina pozycji /
/
, urzdzenie jest wyczone. Wówtyczkdo odpowiedniego
gniazda zasilania.
8. Ustaw regulator na wybrantemperatur. Zapali siczerwona lampka, co oznacza, iurzdzenie sinagrzewa.
9. Wópoywienie do koszyka. Nie przeadowuj koszyka poywieniem, gdyzwikszy to ryzyko rozpryskania si
oleju, jak równiepoywienie nie zostanie równomiernie usmaone.
10. Po osigniciu ustawionej temperatury czerwona lampka (10) zganie. Nagrzewanie siurzdzenia moe trwa
do 10 minut. Ostronie otwórz pokrywtrzymajc za uchwyt (2). U
Uwaga! Ryzyko poparzepoprzez
gorce opary!
C
Chrorkaroodpornrkawickuchenn.
11. Wókoszyk z poywieniem do pojemnika (6).
Uwaga! Uwaaj na rozpryski oleju!
Przede wszystkim wilgotne oraz mroone poywienie moe
spowodowarozpryski przy zetkniciu z gorcym olejem. R
Ryzyko poparze!
12. Zamknij pokryw(u
uyj aroodpornej rkawicy kuchennej!
). Zwróuwag, aby oba otwory w pokrywie
znalazy sinad uchwytem (13) koszyka do smaenia. W ten sposób pokrywa zostanie odpowiednio zamknita.
13. W urzdzenie zostay wbudowany termostat. Podczas smaenia, czerwona lampka kontrolna (10) moe na
przemian zapalasii gasn. Oznacza to, iurzdzenie przez chwilnagrzewa olej, aby utrzymatemperatur.
14. Dugo smaenia oraz wysoko temperatury zale od rodzaju i konsystencji poywienia. Kieruj si
informacjami producenta danego poywienia. Ogólnej orientacji suy tabela temperatur (9) znajdujca sina
urzdzeniu. Tabela oraz ponisze temperatury swartociami rednimi:
Poywienie
Temperatura
Czas smaenia w
minutach
Frytki (wiee) 180 ºC
nastpnie 190 ºC 9 - 11
1 - 2,
azrobisizoto-brzowe
Frytki (mroone) Zgodnie ze wskazówkami
producenta Zgodnie ze wskazówkami
producenta
OWOCE MOA
Krewetki (mroone), panierowane. Ilo:
tyle, aby przykrydno koszyka do smaenia 170 ºC
3 - 5
Dorsz lub plamiak (wiey) 160 ºC 5 - 10
(zaley od gruboci)
Dorsz lub plamiak (mroony), lub w porcjach
(panierowany lub w ciecie) 190 ºC 10 - 15
(zaley od gruboci)
Fldra (mroona) 190 ºC 5 - 6
MISO
Hamburgery ok. 50 g (mroone) 150 ºC 3 - 5
Porcje kurczaka (mae), panierowane
Porcje kurczaka (due), panierowane 160 ºC 10 - 12
15 - 30
Sznycel cielcy (mroony) 170 ºC 3 - 8
(zaley od gruboci)
Udka kurczaka, panierowane 170ºC 15
15. Po usmaeniu poywienia ostronie otwórz pokryw. U
Uywaj aroodpornych rkawic kuchennych.
Poczekaj kilka sekund, agorca para siulotni.
Uwaga:
Gorca para oraz ewentualny pryskajcy olej mogspowodowapoparzenia!
16. Wyjmij koszyk (8) z pojemnika (6) i odscz olej.
17. Teraz moesz wyj usmaone poywienie z koszyka.
18. Przekr regulator temperatury (11) do samego koca w kierunku przeciwnym do ruchu wskazówek zegara. Jeli
regulator temperatury znajduje sina pozycji /
/
, urzdzenie jest wyczone. Czerwona lampka kontrolna (10)
zganie. Wyjmij wtyczk(12) z gniazda zasilania.

17
19. Odstaw urzdzenie wraz ze znajdujcym siw nim olejem do ostygnicia w bezpieczne miejsce poza zasigiem
dzieci.
Tryb Fondue
:
1. Otwórz pokryw(1).
2. Wlej dobrej jakoci olej do smaenia do pojemnika (6).
3. Ustaw regulator temperatury (11) na nisktemperatur(140ºC lub 150ºC). Spójrz równiena tabelwyej.
Czerwona lampka kontrolna (10) sizapali.
4. Zaówkad fondue (7) na brzeg pojemnika (6).
5. Wówtyczk(12) do gniazda zasilania.
6. Zganicie czerwonej lampki kontrolnej oznacza, iustawiona temperatura zostaa osignita i mona zacz
fondue.
7. Uywaj widelczyków do fondue (5) do nadziewania poywienia i zanurzania go w gorcym oleju.
8. Po uyciu przekr regulator temperatury w kierunku przeciwnym do ruchu wskazówek zegara na pozycj/,
zamknij pokrywi wyjmij wtyczkz gniazda zasilania.
9. Odstaw urzdzenie wraz ze znajdujcym siw nim olejem do ostygnicia w bezpieczne miejsce poza zasigiem
dzieci.
10. W urzdzeniu mona przygotowywajedynie fondue na bazie oleju!
CZYSZCZENIE I KONSERWACJA
•U
Uwaga!
Przed kadym czyszczeniem wyczaj urzdzenie i wyjmuj wtyczkz gniazda zasilania. Odstaw
urzdzenie do ostygnicia w miejscu poza zasigiem dzieci.
•Czy urzdzenie po kadym smaeniu. Resztki jedzenia mogatwo zacz sipalii raz uyty olej moe przez
to szybciej zjecze. Jeli chcesz uyoleju ponownie, usuresztki jedzenia.
•Regularnie wymieniaj olej.
•Czy obudoworaz pokrywza pomoclekko wilgotnej szmatki oraz, jeli zachodzi taka potrzeba, agodnego
rodka czyszczcego.
•Czy pojemnik (6) gorcwodoraz pynem do zmywania naczy; na kocu wypucz w zimnej wodzie.
•Koszyk (8) oraz uchwyt (13) mogbyczyszczone gorcwodoraz pynem do zmywania naczy, jak równie
w zmywarce.
•Czy wkad fondue (7) oraz widelczyki (5) gorcwodoraz pynem do zmywania naczy.
•W
Wadnym wypadku nie zanurzaj urzdzenia w wodzie i nie trzymaj go pod biecwod.
•P
Podczas czyszczenia zwracaj uwag, aby do rodka urzdzenia nie dostaa siwoda.
•U
Uwaga!
W adnym wypadku nie uywaj alkoholu, acetonu, benzyny, silnych rodków czyszczcych itd. do
czyszczenia plastikowych czci. Nie uywaj twardych szczotek lub metalowych przedmiotów.
•Po kadym czyszczeniu dokadnie osusz wszystkie czci zanim ponownie uyjesz urzdzenie.
•Przechowuj urzdzenie w suchym, zimnym miejscu, chronionym przed wilgocioraz bezporednim dziaaniem
promieni sonecznych.
•Przechowuj urzdzenie w miejscu poza zasigiem dzieci.
Czyszczenie filtra:
•F
Filtr powinien byregularnie czyszczony.
•N
Najpierw zdejmij metalowe pokrycie. Poluzuj w tym celu 3 ruby pokrycia. Uyj rubokrta
krzyakowego.
•W
Wyjmij zabrudzony filtr i wymyj go gorcwodz pynem do zmywania naczy. Nastpnie
wypucz czyst,ciep wod.
•P
Przed ponownym woeniem do pokrywy, filtr musi zostacakowicie wysuszony w dobrze
przewietrzonym miejscu. Podczas czyszczenia filtr moe straciswój pierwotny ksztat, jednak
mona go dalej uywa.
•P
Przykr metalowe pokrycie.

18
DANE TECHNICZNE
Napicie znamionowe: 220 V - 240 V ~ 50Hz
Pobór mocy: 840W
Klasa ochrony: I
Utylizacja zuytych urzdzeelektrycznych.
Zgodnie z dyrektyweuropejsk2002/96/EC o Zuytym Sprzcie Elektrycznym i Elektronicznym
(WEEE) zuyte urzdzenia nie mogbyutylizowane wraz z nieposortowanymi odpadami z danej
wspólnoty. Zuyte urzdzenia muszzostaoddzielone od zwykych odpadów domowych, aby
zwikszyudziaodzyskiwanych urzdzei poddaich czci procesowi recyklingu w celu
zmniejszenia negatywnych skutków na ludzkie zdrowie oraz natur.
Znak przekrelonego kosza na odpady bdzie obecny na wszystkich urzdzeniach, aby przypominao koniecznoci
sortowania odpadów. Uytkownik musi skontaktowasiz lokalnymi wadzami lub sprzedawc, aby dowiedziesijak
zutylizowadane urzdzenie.
Gdy okres uytkowania urzdzenia dobiegnie koca, dezaktywuj urzdzenie poprzez odczenie
wtyczki z gniazda sieciowego i przecicie przewodu na dwie cz ci.
Zutylizuj materiay opakowania w odpowiedni sposób. Skontaktuj siz lokalnymi wadzami, aby
dowiedziesigdzie znajdujsipunkty zbiorcze lub miejsca segregujce odpady.
Importowane przez:
Dirk Rossmann GmbH
Isernhägener Straße 16
30938 Burgwedel
Table of contents
Languages:
Popular Fryer manuals by other brands

Tower Hobbies
Tower Hobbies T17026 Safety and instruction manual

Bente Munck
Bente Munck Mini Fryer Fun instruction manual

BRAYER
BRAYER BR2832BK instruction manual

Rasonic
Rasonic RAF-B271W Operation manual

VALERA
VALERA Quick 'n' Crispy QNC-GF5 datasheet

Lincat
Lincat Opus 800 Series Installation, operating and servicing instructions


RM
RM FT-94ET Series Instructions for the installation and use

Frymaster
Frymaster J1C/MJ15 Operation, service and parts manual

Frymaster
Frymaster FilterQuick FQE30 Service manual

Cuisinart
Cuisinart CDF-100 Series INSTRUCTION AND RECIPE BOOKLET

ElectrIQ
ElectrIQ HOV17D user manual

Henny Penny
Henny Penny LOV LVE-100 Series quick start guide