Ideen Welt KT-212E User manual
k Toaster
Bedienungsanleitung
t Toaster
Instruction manual
j Topinkovač
Návod k obsluze
P Toster
Instrukcja obsługi
A Kenyérpirító
Használati útmutató
Z Ekmek Kızartma Makinesi
Güvenlik önerileri
KT-212E
KT-212E Toaster-6L_P130162_050832013.indd 1 05/08/2013 2:27 PM

k
t
j
P
Z
A
EINLEITUNG................................................................................................................................1
SICHERHEITSHINWEISE............................................................................................................1
TEILE............................................................................................................................................3
VOR DER ERSTEN INBETRIEBNAHME.....................................................................................3
STROMVERSORGUNG...............................................................................................................3
INBETRIEBNAHME......................................................................................................................4
REINIGUNG UND PFLEGE .........................................................................................................5
TECHNISCHE DATEN .................................................................................................................6
UMWELTSCHUTZ........................................................................................................................6
INTRODUCTION..........................................................................................................................7
SAFETY INSTRUCTIONS............................................................................................................7
COMPONENTS............................................................................................................................9
BEFORE FIRST USE ...................................................................................................................9
POWER SUPPLY .........................................................................................................................9
FIRST USE.................................................................................................................................10
CLEANING AND CARE..............................................................................................................11
TECHNICAL DATA .....................................................................................................................12
ENVIRONMENTAL SAFETY......................................................................................................12
ÚVOD: ........................................................................................................................................13
BEZPEČNOSTNÍ POKYNY........................................................................................................13
ČÁSTI.........................................................................................................................................15
PŘED PRVNÍM POUŽITÍM ........................................................................................................15
NAPÁJENÍ..................................................................................................................................15
UVÁDĚNÍ DO PROVOZU ..........................................................................................................16
ČIŠTĚNÍ A ÚDRŽBA...................................................................................................................17
TECHNICKÉ ÚDAJE..................................................................................................................18
OCHRANA ŽIVOTNÍHO PROSTŘEDÍ .......................................................................................18
WSTĘP.......................................................................................................................................19
UWAGI DOTYCZĄCE BEZPIECZEŃSTWA...............................................................................19
CZĘŚCI ......................................................................................................................................21
PRZED PIERWSZYM URUCHOMIENIEM ................................................................................21
ZASILANIE .................................................................................................................................21
OBSŁUGA ..................................................................................................................................22
CZYSZCZENIE I PIELĘGNACJA...............................................................................................23
DANE TECHNICZNE .................................................................................................................24
OCHRONA ŚRODOWISKA........................................................................................................24
BEVEZETÉS ..............................................................................................................................25
BIZTONSÁGI UTASÍTÁSOK ......................................................................................................25
RÉSZEK .....................................................................................................................................27
MIELŐTT ELŐSZÖR HASZNÁLNÁ ...........................................................................................27
ÁRAMELLÁTÁS .........................................................................................................................27
ÜZEMBE HELYEZÉS .................................................................................................................28
TISZTÍTÁS ÉS KARBANTARTÁS ..............................................................................................29
MŰSZAKI ADATOK ....................................................................................................................30
KÖRNYEZETVÉDELEM ............................................................................................................30
GİRİŞ..........................................................................................................................................31
GÜVENLİK UYARILARI..............................................................................................................31
PARÇALAR ................................................................................................................................33
İLK KULLANIMDAN ÖNCE ........................................................................................................33
GÜÇ KAYNAĞI...........................................................................................................................33
ÇALIŞTIRMA..............................................................................................................................34
TEMİZLİK VE BAKIM .................................................................................................................35
TEKNİK ÖZELLİKLER................................................................................................................36
ÇEVRE KORUMASI...................................................................................................................36
KT-212E Toaster-6L_P130162_050832013.indd 2 05/08/2013 2:27 PM
1k
EINLEITUNG
Dieser Toaster dient zum Toasten von Brotscheiben, sowie zum Aufbacken von Brötchen. Der
Toaster kann zum Auftauen von Brot und Brötchen verwendet werden. Der Bräunungsregler kann
in einem Bereich von 1 - 7 eingestellt werden. Das Gerät ist zusätzlich mit einem ausziehbaren
Krümelblech ausgestattet, welches Ihnen ermöglicht, Krümelreste einfach und problemlos zu
entfernen.
SICHERHEITSHINWEISE
1. Lesen Sie vor dem Gebrauch diese Bedienungsanleitung vollständig durch.
2. Bei Weitergabe des Gerätes an Dritte muss auch diese Bedienungsanleitung ausgehändigt
werden.
3. Dieses Gerät entspricht den technischen Normen und den betreffenden
Sicherheitsanforderungen für elektrische Geräte.
4. Der Hersteller übernimmt keine Haftung für Schäden, die auf unsachgemäßen Gebrauch
oder Nichtbeachtung dieser Bedienungsanleitung zurückzuführen sind.
5. Diese Geräte können von Kindern ab 8 Jahren und darüber und von Personen mit
reduzierten physischen, sensorischen oder mentalen Fähigkeiten oder Mangel an Erfahrung
und/oder Wissen benutzt werden, wenn sie beaufsichtigt oder bezüglich des sicheren
Gebrauchs des Gerätes unterwiesen wurden und die daraus resultierenden Gefahren
verstanden haben. Kinder dürfen nicht mit dem Gerät spielen. Reinigung und Benutzer-
Wartung dürfen nicht durch Kinder ohne Beaufsichtigung durchgeführt werden.
Kinder jünger als 8 Jahre sollten vom Gerät und der Anschlussleitung ferngehalten werden,
wenn es eingeschaltet ist oder abkühlt.
6. Kinder sollten beaufsichtigt werden um sicherzustellen, dass sie nicht mit dem Gerät spielen.
7. Das Gerät darf nicht in der Nähe einer Badewanne oder Dusche oder einem mit
Wasser gefüllten Waschbecken verwendet werden.
8. Sollte das Gerät doch einmal ins Wasser fallen, ziehen Sie sofort den Netzstecker
aus der Steckdose und lassen das Gerät vor dem Wiedereinschalten von einem
Fachmann überprüfen.
9. Tauchen Sie das Gerät nicht unter Wasser. Stromschlaggefahr!
10. Öffnen Sie das Gerät nicht. Stromschlaggefahr!
11. Stellen Sie das Gerät immer auf trockenem, waagerechtem und ebenem
Untergrund auf.
12. Das Gerät muss an eine Steckdose mit Schutzleiter angeschlossen werden.
13. Benutzen Sie das Gerät nicht, wenn es beschädigt ist. Versuchen Sie nie, das Gerät selbst
zu reparieren. Um Gefahren zu vermeiden, dürfen defekte Bauteile nur vom Hersteller,
seinem Kundendienst oder ähnlich qualizierten Personen ersetzt werden.
14. Ziehen Sie den Netzstecker immer am Stecker aus der Steckdose, nicht am Kabel.
15. Führen Sie keinerlei Gegenstände in das Innere des Gehäuses.
16. Benutzen Sie das Gerät nicht in der Nähe von Hitzequellen wie Feuer, Kochplatten,
Heizkörpern etc.
17. Fassen Sie das Gerät nicht mit nassen Händen an. Benutzen Sie das Gerät nicht auf
feuchtem Boden oder wenn es nass ist.
18. Fassen Sie den Netzstecker nie mit nassen oder feuchten Händen an.
19. Überprüfen Sie das Netzkabel und den Netzstecker regelmäßig auf evtl. Beschädigungen.
Wenn das Netzkabel dieses Gerätes beschädigt wird, muss dieses durch den Hersteller
oder seinen Kundendienst oder eine ähnlich qualizierte Person ersetzt werden, um
Gefährdungen zu vermeiden.
20. Nehmen Sie das Gerät nicht in Betrieb, falls das Gerät auf den Boden gefallen sein sollte
oder anderweitig beschädigt wurde. In solchen Fällen muss das Gerät zur Überprüfung und
evtl. Reparatur in eine Fachwerkstatt gebracht werden.
21. Lassen Sie das Netzkabel nicht über scharfe Kanten hängen und halten Sie es von heißen
Gegenständen und offenen Flammen fern.
KT-212E Toaster-6L_P130162_050832013.indd 1 05/08/2013 2:27 PM

2k
22. Verlegen Sie das Kabel sowie ein evtl. benötigtes Verlängerungskabel so, dass ein
unbeabsichtigtes Ziehen daran bzw. ein Stolpern über das Kabel nicht möglich ist.
23. Verwenden Sie ein Verlängerungskabel, so muss dieses für die entsprechende Leistung
geeignet sein, da es ansonsten zu Überhitzung von Kabel und/oder Stecker kommen kann.
24. Einen zusätzlichen Schutz bietet Ihnen der Einbau einer Fehlerstrom-Schutzeinrichtung mit
einem Nennauslösestrom von nicht mehr als 30 mA in der Hausinstallation. Lassen Sie sich
von Ihrem Elektroinstallateur über die Vorrichtung und Installation beraten.
25. Schalten Sie das Gerät vor Ziehen des Netzsteckers aus.
26. Vorsicht! Das Gerät steht unter Strom solange es ans Stromnetz angeschlossen ist.
27. Schalten Sie das Gerät aus und ziehen Sie den Netzstecker, wenn das Gerät nicht mehr
benötigt oder wenn es gereinigt wird.
28. Tragen Sie das Gerät nicht am Netzkabel.
29. Verwenden Sie nur Zubehör, welches der Verpackung beigelegt war oder vom Hersteller
empfohlen wird.
30. Halten Sie das Netzkabel jederzeit von heißen Oberächen des Gerätes fern.
31. Lassen Sie das Gerät während des Gebrauchs nie unbeaufsichtigt.
32. Stellen Sie das Gerät immer auf eine stabile, ebene und rutschfeste Oberäche. Andernfalls
kann es zu Verletzungen und Beschädigungen des Gerätes kommen.
33. Verbrennungsgefahr! Teile des Gerätes werden sehr heiß!
34. Benutzen Sie das Gerät nicht im Außenbereich.
35. Verwenden Sie das Gerät nur zum Toasten von Brot bzw. zum Aufbacken von Brötchen.
36. Brandgefahr! Brot kann brennen! Lassen Sie das Gerät daher nie unbeaufsichtigt. Das
Gerät darf nicht mit leicht entzündlichem Material, z.B. Vorhängen, Textilien, Wänden u.ä.,
in Berührung kommen oder damit zugedeckt werden. Achten Sie darauf, dass immer ein
ausreichender Sicherheitsabstand zu entzündlichen Materialien eingehalten wird.
37. Das Gerät sollte nicht mit einer externen Zeitschaltuhr oder gesonderten
Fernbedienungssystem betrieben werden.
Erstickungsgefahr! Halten Sie jegliches Verpackungsmaterial von
Kleinkindern und Kindern fern. Sorgen Sie für eine fachgerechte Entsorgung
von Verpackungsmaterialien. Informieren Sie sich über Sammelstellen bzw.
Mülltrennung bei Ihrer Kommune.
Dieses Gerät ist ausschließlich für den privaten Haushaltsgebrauch geeignet.
KT-212E Toaster-6L_P130162_050832013.indd 2 05/08/2013 2:27 PM
3k
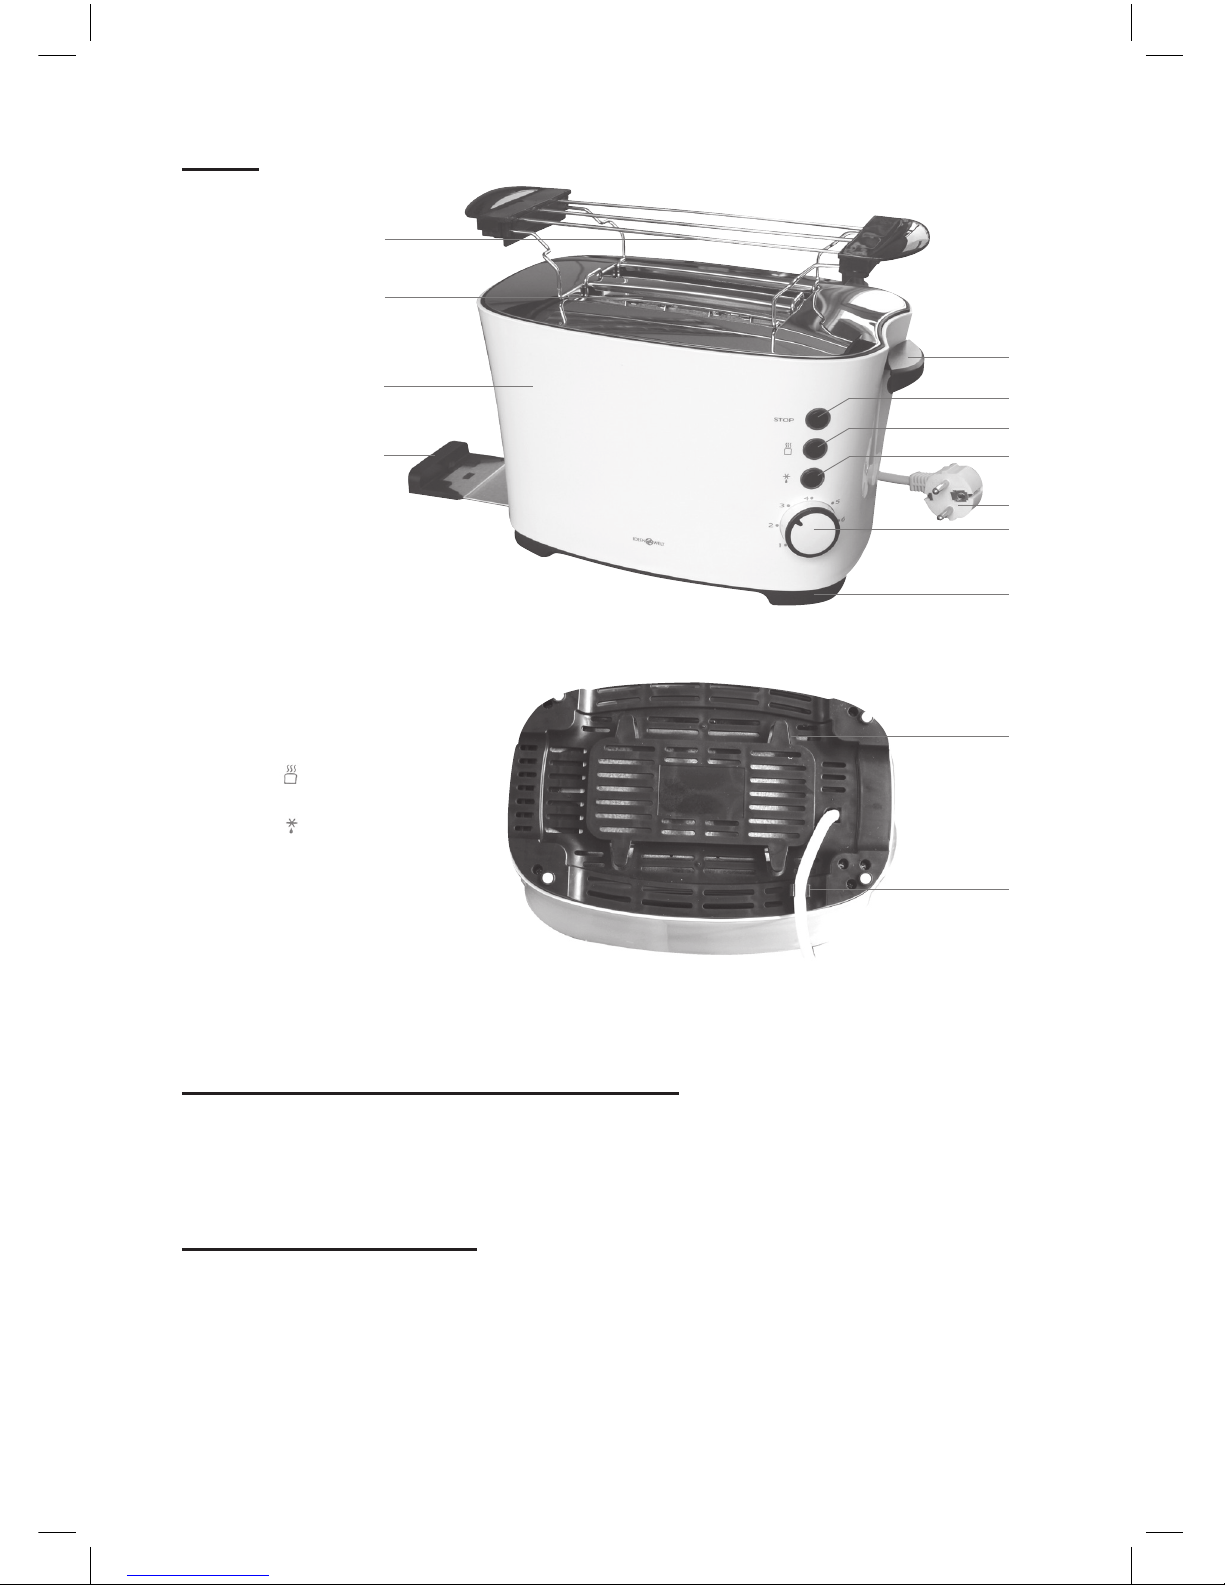
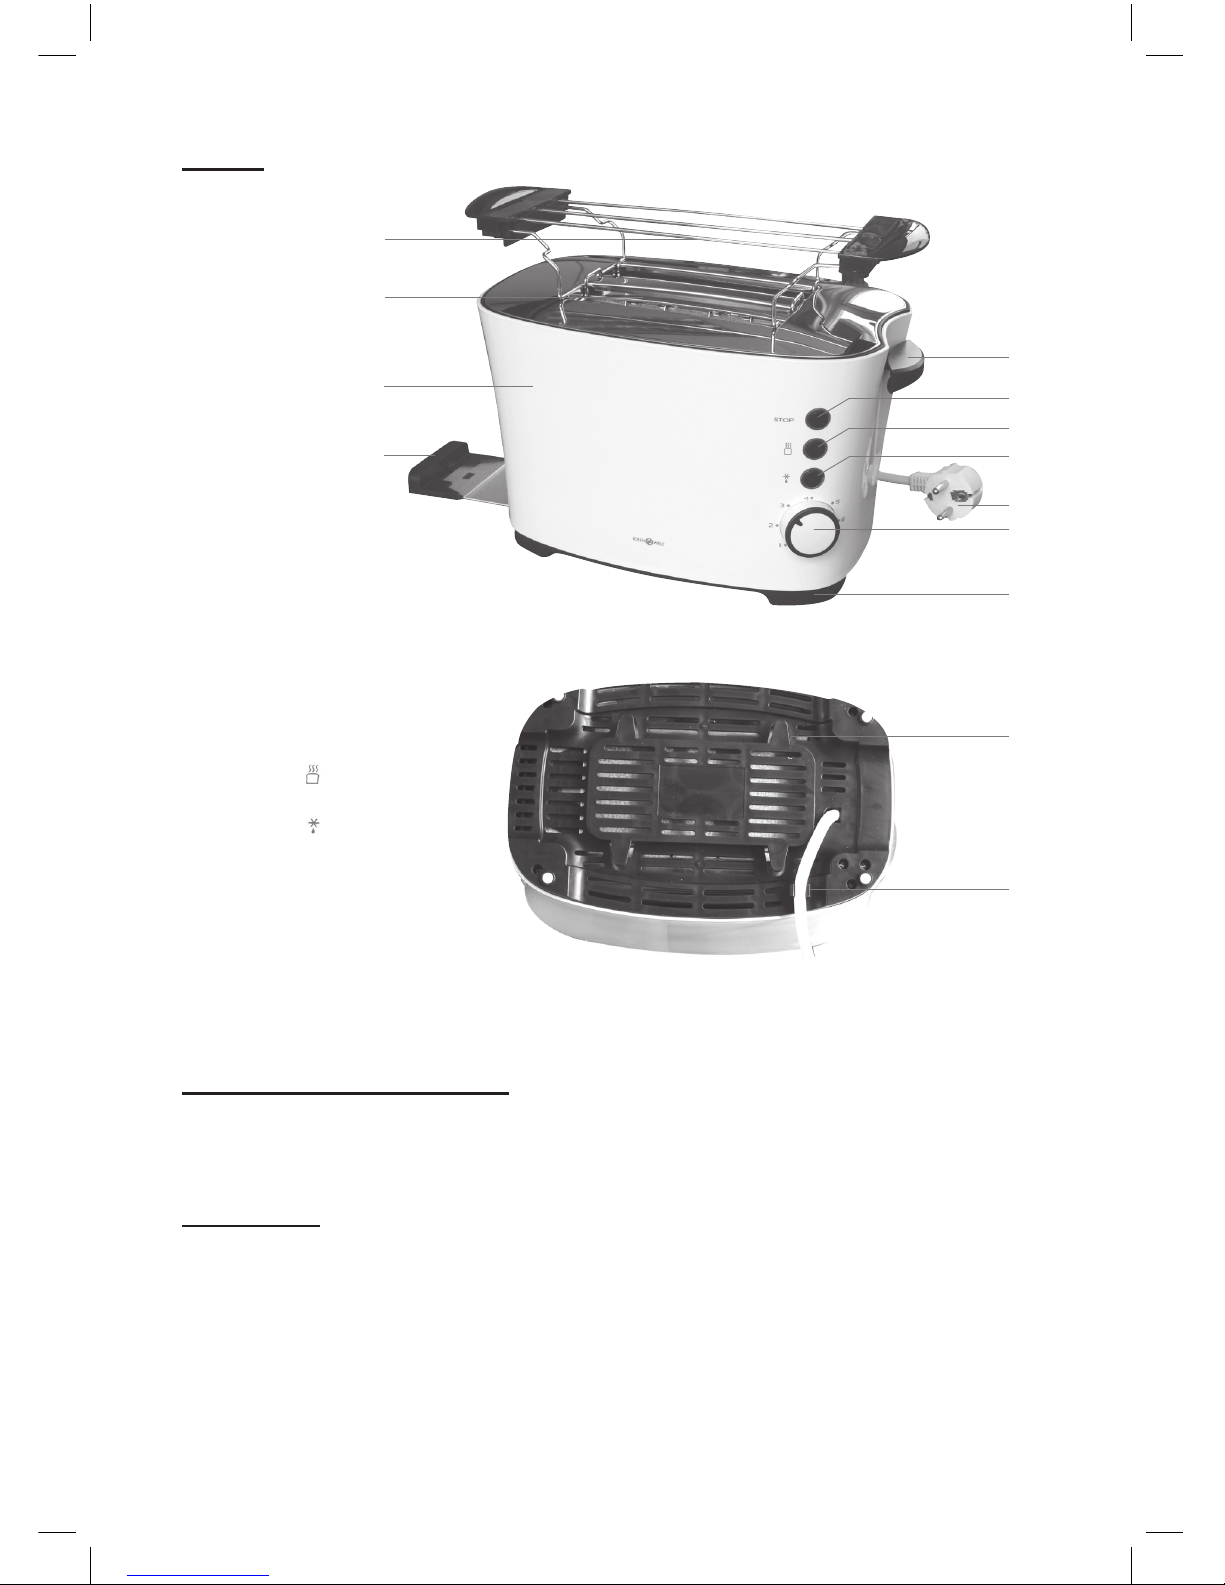
TEILE
VOR DER ERSTEN INBETRIEBNAHME
• Entfernen Sie alle Verpackungsmaterialien und kontrollieren Sie das Gerät und Zubehör auf
Beschädigungen.
• Reinigen Sie das Gerät, wie unter Abschnitt Reinigung und Pege beschrieben. Beachten Sie
dazu ebenfalls die Sicherheitshinweise.
STROMVERSORGUNG
Das Gerät wird über eine 220-240V~ 50Hz Steckdose mit Schutzleiter betrieben.
12
13
1 Ausziehbares Krümelblech
2 Gehäuse
3 Brotschlitz
4 Brötchengitter
5 Einschalthebel
6 Taste STOP mit Kontrollleuchte
(Toastvorgang abbrechen)
7 Taste (Aufwärmen)
mit Kontrollleuchte
8 Taste (Auftauen)
mit Kontrollleuchte
9 Netzkabel mit Netzstecker
10 Bräunungsregler
11 Rutschfeste Standfüße
12 Kabelaufwicklung
13 Kabelführung
1
3
4
5
6
7
8
9
10
11
2
KT-212E Toaster-6L_P130162_050832013.indd 3 05/08/2013 2:27 PM

4k
INBETRIEBNAHME
BESONDERE SICHERHEITSHINWEISE
1. Gewisse Teile des Gerätes werden während des Betriebes sehr heiß. Verwenden Sie gut
isolierte Küchenhandschuhe oder Topappen zum Anfassen.
2. Fassen Sie niemals während des Betriebes in den Brotschlitz, um Brot aufzunehmen.
Verbrennungsgefahr!
3. Benutzen Sie den Toaster nie, wenn dieser Beschädigungen wie z.B. Brüche oder
Beschädigungen am Netzkabel aufweist.
4. Ziehen Sie den Netzstecker aus der Steckdose, wenn das Gerät nicht benutzt wird.
ENTFERNEN VON HERSTELLUNGSRÜCKSTÄNDEN
Heizen Sie das Gerät einmal auf Stufe 3 und danach zweimal auf Stufe 7 ohne Brot auf, um
Herstellungsrückstände zu entfernen. Achten Sie dabei auf ausreichende Belüftung des Raumes
(z.B.: geöffnetes Fenster). Ein leichter Geruch kann während des ersten Aufheizens entstehen.
Dies ist jedoch unbedenklich und nur von kurzer Dauer.
NORMALES TOASTEN
1. Wickeln Sie das Netzkabel vollständig von der Kabelaufwicklung (12) ab und führen Sie
das Netzkabel durch die Kabelführung (13). Verbinden Sie den Netzstecker (9) mit einer
geeigneten Steckdose.
2. Legen Sie je eine Toastscheibe in horizontaler Position in die Brotschlitze (3) ein.
3. Stellen Sie den Bräunungsregler (10) auf die von Ihnen gewünschte Bräunungsstufe im
Bereich von 1 - 7 ein. Bei der ersten Benutzung empfehlen wir, die Stufe 3 zu benutzen.
Die Stufe 1 ist die hellste und die Stufe 7 ist die dunkelste Bräunung. Beachten Sie,
dass die Bräunung von Brotart zu Brotart unterschiedlich ausfallen kann. Es ist deshalb
empfehlenswert, mehrere Versuche durchzuführen, um eine optimale Bräunung zu erhalten.
4. Drücken Sie den Einschalthebel (5) nach unten, bis dieser einrastet. Der Toastvorgang
beginnt. Die Kontrollleuchte der Taste STOP (6) leuchtet während des Toastens auf.
Hinweise:
- Der Einschalthebel kann nicht nach unten gedrückt werden, wenn das Gerät vom
Stromnetz getrennt ist.
- Wenn Sie nur eine Toastscheibe toasten, sollte eine niedrige Bräunungstufe gewählt
werden. Beachten Sie, dass bei ununterbrochenem Betrieb durch die Hitzeaufnahme
des Gerätes das Brot bei gleicher Bräunungsstufe allmählich dunkler wird. Lassen Sie den
Toaster nach jedem Toastvorgang für ca. 20 Sekunden abkühlen, damit sich der
eingebaute Thermostat zurücksetzen kann.
5. Sie können die Bräunungstufe während des Toastvorgangs verändern, falls Sie nach dem
Einschalten feststellen, dass Sie eine zu helle oder zu dunkle Bräunung gewählt haben.
6. Nach Erreichen der eingestellten Bräunungstufe schaltet sich das Gerät automatisch aus.
Der Einschalthebel springt nach dem Abschalten nach oben. Die Kontrollleuchte der Taste
STOP erlöscht. Die Toastscheiben werden nach oben freigegeben und können entnommen
werden.
Vorsicht! Seien Sie beim Entnehmen der Toastscheiben sehr vorsichtig, da die Metallteile
und das Brot sehr heiß werden können.
7. Drücken Sie die Taste STOP, um den Toastvorgang vorzeitig zu beenden. Der
Einschalthebel springt nach oben und die Toastscheiben können entnommen werden.
8. Ziehen Sie den Netzstecker aus der Steckdose, wenn das Gerät nicht mehr benutzt wird.
KT-212E Toaster-6L_P130162_050832013.indd 4 05/08/2013 2:27 PM
5k
TOASTEN VON GEFRORENEM TOAST
1. Drehen Sie den Bräunungsregler (10) auf die gewünschte Stufe und drücken Sie den
Einschalthebel nach unten, bis dieser einrastet. Drücken Sie die Taste (8) (Auftauen).
Der Toastvorgang startet und die Kontrollleuchten der Tasten und STOP leuchten auf.
2. Beim Toasten von gefrorenem Toastbrot unter Verwendung der Auftau-Taste dauert der
Toastvorgang länger, als bei nicht gefrorenem Toastbrot.
AUFWÄRMEN VON BEREITS GETOASTETEM BROT
1. Drehen Sie den Bräunungsregler auf die gewünschte Stufe.
2. Drücken Sie den Einschalthebel nach unten, bis dieser einrastet.
3. Drücken Sie danach die Taste (7) (Aufwärmen). Der Aufwärmvorgang startet und die
Kontrollleuchten der Tasten (Aufwärmen) und STOP leuchten auf.
AUFWÄRMEN VON BRÖTCHEN
1. Setzen Sie das Brötchengitter (4) auf den Toaster. Legen Sie die Brötchen auf das
Brötchengitter. Wählen Sie eine Bräunungstufe über Stufe 3. Drücken Sie den
Einschalthebel nach unten, bis dieser einrastet. Der Aufwärmvorgang beginnt und die
Kontrollleuchte der Taste STOP leuchtet auf. Wenden Sie die Brötchen ab und zu. Toasten
Sie nicht gleichzeitig Brot, während Sie Brötchen aufwärmen.
Hinweis:
Es darf kein Toastbrot auf dem Brötchengitter aufgewärmt werden, da Toastbrot eine
ausreichende Belüftung behindert. Brandgefahr!
2. Drücken Sie die Taste STOP, wenn das Aufwärmen vorzeitig abgebrochen werden soll, oder
falls Sie aus Versehen eine falsche Taste gedrückt haben.
HINWEISE ZUM ENTNEHMEN VON TOASTSCHEIBEN
1. Achtung! Die Toastscheiben, Brötchen und Teile des Gerätes sind während und direkt nach
dem Toastvorgang sehr heiß! Fassen Sie die Toastscheiben oder Brötchen beim Entnehmen
nicht mit bloßer Hand an. Verbrennungsgefahr!
2. Zum Entnehmen von kleinen Toastscheiben, lässt sich der Einschalthebel manuell zusätzlich
um ca. 10 mm nach oben ziehen. Die Toastscheiben werden dabei angehoben und können
leichter entnommen werden.
3. Sollten Toastscheiben im Toaster stecken bleiben, drücken Sie umgehend die Taste STOP,
um das Gerät auszuschalten. Trennen Sie danach den Netzstecker vom Stromnetz und
lassen Sie das Gerät vollständig abkühlen. Versuchen Sie dann das Brot so zu entnehmen,
dass der Toaster nicht beschädigt wird. Verwenden Sie keine elektrisch-leitenden Hilfsmittel,
wie z. B. Messer oder Gabel, um das Brot zu entfernen.
REINIGUNG UND PFLEGE
Achtung! Schalten Sie das Gerät vor jeder Reinigung aus und ziehen Sie den
Netzstecker aus der Steckdose.
Achtung! Verwenden Sie auf keinen Fall Alkohol, Azeton, Benzin, aggressive
Reinigungsmittel usw., um die Kunststoffteile zu reinigen. Verwenden Sie auch
keine harten Bürsten oder metallischen Gegenstände.
KT-212E Toaster-6L_P130162_050832013.indd 5 05/08/2013 2:27 PM

6k
1. Zur Reinigung auch unbedingt die Sicherheitshinweise
beachten.
2. Lassen Sie das Gerät vollständig abkühlen.
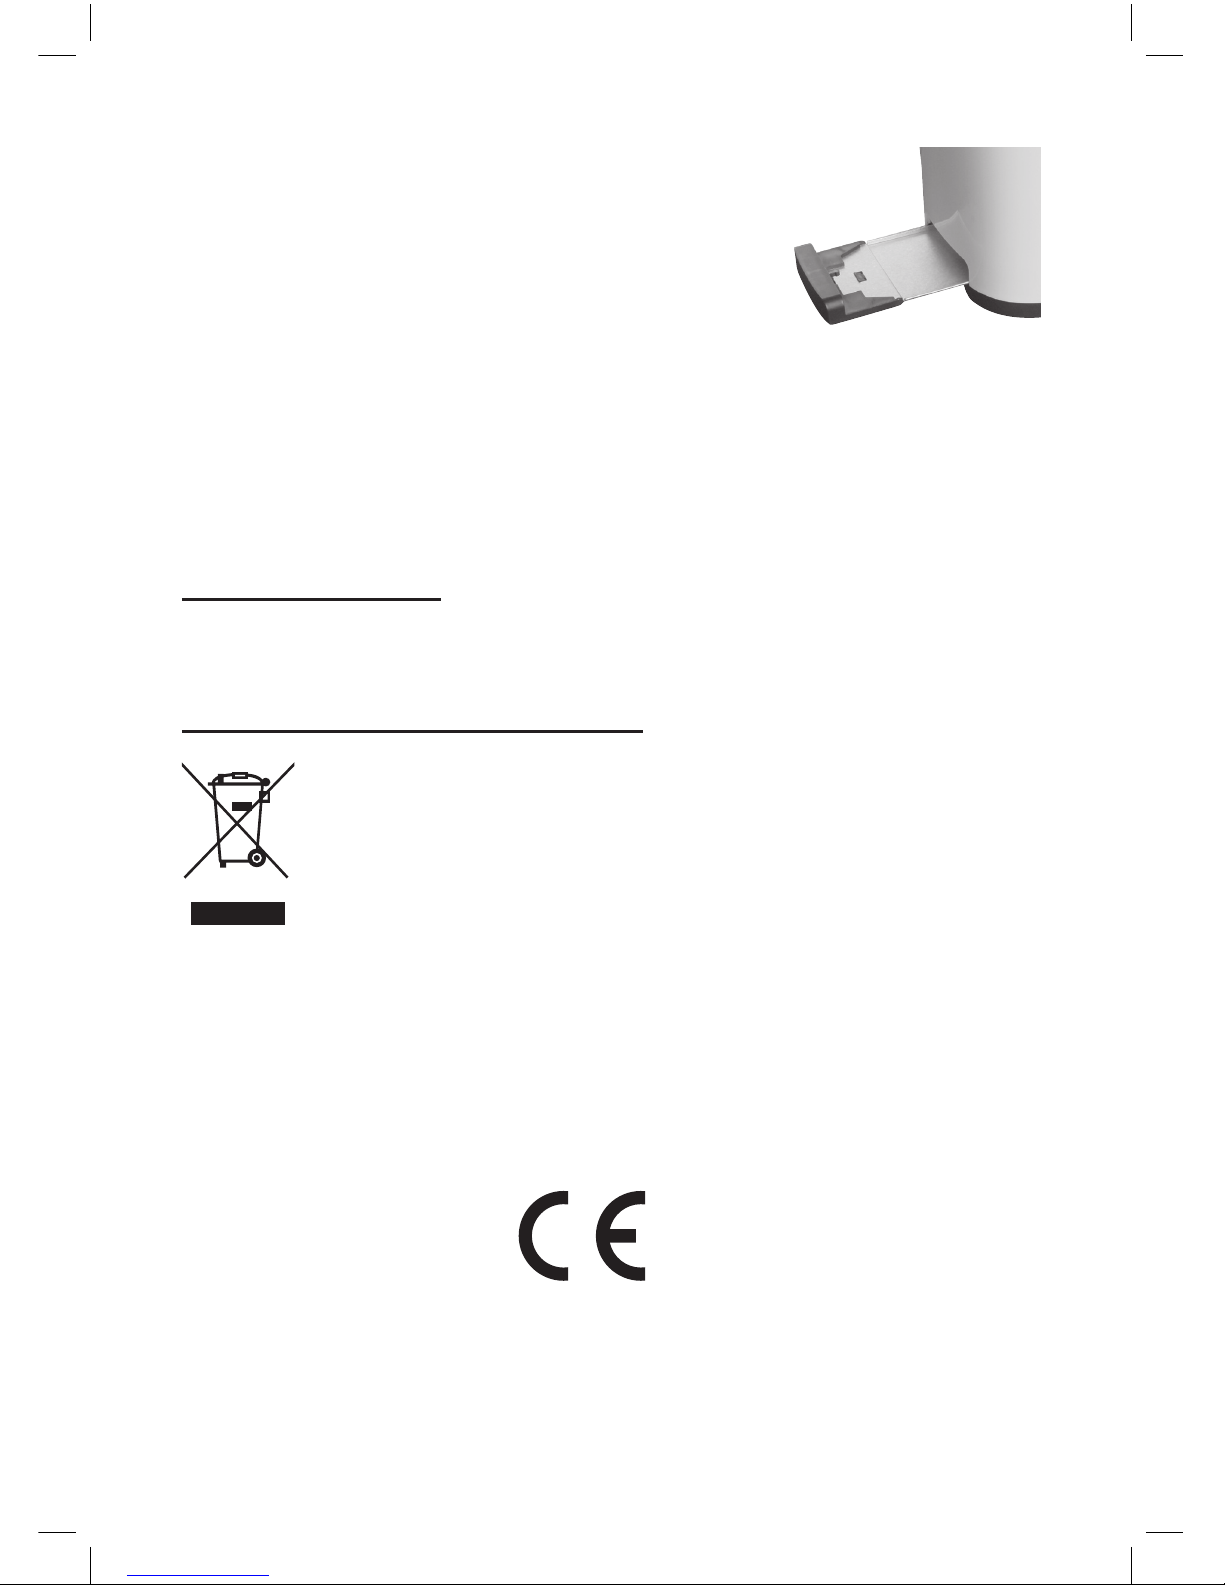
3. Reinigen Sie das Krümelblech (1) nach jeder Benutzung, um
eine Ansammlung von Brotkrümeln zu vermeiden. Drücken Sie
auf das Krümelblech, um es freizugeben und ziehen Sie es mit
den aufgefangenen Krümeln aus dem Gehäuse (2).
4. Entfernen Sie die Brotkrümel. Reinigen Sie das Krümelblech
mit einem leicht angefeuchteten Lappen und trocknen Sie es
anschließend sorgfältig ab.
5. Schieben Sie das Krümelblech nach der Reinigung wieder in die Aufnahme zurück, bis es
einrastet.
Lassen Sie keine Brotkrümel im Gerät ansammeln. Brandgefahr!
6. Drehen Sie das Gerät über Kopf und schütteln Sie dieses leicht über einem Waschbecken,
um innenliegende Brotkrümel zu entfernen.
7. Verwenden Sie ein leicht angefeuchtetes Tuch und ggf. etwas mildes Reinigungsmittel, um
das Gehäuse (2) zu reinigen. Trocknen Sie danach das Gehäuse sorgfältig ab.
8. Wickeln Sie das Netzkabel an der Kabelaufwicklung (12) unterhalb des Gerätes auf, wenn
der Toaster platzsparend aufbewahrt werden soll. Bewahren Sie den Toaster an einem
trockenen, kühlen und vor Feuchtigkeit geschützten Ort auf.
TECHNISCHE DATEN
Betriebsspannung: 220-240V~ 50Hz
Leistungsaufnahme: 850W
Schutzklasse: I
UMWELTSCHUTZ
Beseitigung der alten elektrischen Geräte.
Die europäische Richtlinie 2002/96/EC über Elektro- und Elektronik-Altgeräte
(WEEE) besagt, dass gebrauchte Haushaltsgeräte nicht zusammen mit
unsortiertem Gemeindeabfall entsorgt werden dürfen. Diese gebrauchten Geräte
müssen vom regulären Haushaltmüll getrennt gesammelt werden, um den Anteil
zurückgewonnener Geräte zu erhöhen und deren Materialien zu recyceln mit
dem Ziel, die Auswirkungen auf die menschliche Gesundheit und auf die Natur zu
verringern.
Das Zeichen der durchgestrichenen Mülltonne wird auf alle Geräte aufgebracht, um an die
Verpichtung zur getrennten Sammlung zu erinnern. Die Verbraucher müssen die lokalen
Verantwortlichen oder ihren Verkäufer ansprechen, um sich über die Art und Weise zu
erkundigen, wie ihr Gerät entsorgt werden muss.
• Wenn das Gebrauchsende erreicht ist, machen Sie das Gerät unbrauchbar, indem Sie
den Stecker aus der Steckdose ziehen und das Kabel durchtrennen.
Importiert durch:
Dirk Rossmann GmbH
Isernhägener Straße 16
30938 Burgwedel
KT-212E Toaster-6L_P130162_050832013.indd 6 05/08/2013 2:27 PM

7t
INTRODUCTION
This toaster is used to toast slices of bread and to warm up rolls. The toaster can also be used
to thaw bread and rolls. The browning control can be set between 1 – 7. In addition, the device
is outtted with a crumb tray which allows you to simply and smoothly dispose of bread crumbs.
SAFETY INSTRUCTIONS
1. Read this instruction manual thoroughly before use.
2. If you give the device to a third party you must include this user manual.
3. This device complies with the technical standards and applicable safety requirements for
electrical appliances.
4. The manufacturer accepts no liability for damages due to improper use or failure to follow
this instruction manual.
5. This appliance can be used by children aged from 8 years and above and persons with
reduced physical, sensory or mental capabilities or lack of experience and knowledge if they
have been given supervision or instruction concerning use of the appliance in a safe way
and understand the hazards involved. Children shall not play with the appliance. Cleaning
and user maintenance shall not be made by children without supervision.
Keep the appliance and its cord out of reach of children less than 8 years, when it is
switched on or cooling down.
6. Children should be supervised to ensure that they do not play with the appliance.
7. The device may not be used near bathtubs, showers or sinks lled with water.
8. If the device does fall into water, remove the plug from the power outlet immediately
and have the device checked by a professional before turning it back on.
9. Never submerge the device in water! RISK OF ELECTRIC SHOCK!
10. Do not open the device. RISK OF ELECTRIC SHOCK!
11. Always place the device on a dry, horizontal and even surface.
12. The device must be connected to a power outlet with a protective earthing conductor.
13. Do not use the device if it is damaged. Never attempt to repair the device yourself. To
prevent risks, defective components may be replaced only by the manufacturer, customer
service or similarly qualied persons.
14. Remove the plug from the power outlet by pulling on the plug itself, not the cable.
15. Do not insert any objects into the housing interior.
16. Do not use the device near heat sources, such as re, hotplates, heaters, etc.
17. Never touch the device with moist hands. Do not use the device on a moist surface or if it is
wet.
18. Never touch the power plug with wet or moist hands.
19. Check the power cable and plug regularly for possible damages. If the power cord is
damaged, it must be replaced by the manufacturer, its service agent or similarly qualied
persons in order to avoid a hazard.
20. Do not operate the device if it has been dropped or otherwise damaged. In such cases, have
the device checked and, if necessary, repaired in a workshop.
21. Do not hang the power cable over sharp edges and keep it away from hot objects and open
ames.
KT-212E Toaster-6L_P130162_050832013.indd 7 05/08/2013 2:27 PM

8t
22. Lay the power cable in such a way that it cannot be pulled on or tripped over unintentionally.
23. If an extension cord is needed it must be suitable for the appropriate power output.
Otherwise the cable and/or plug may overheat.
24. A residual current circuit breaker with a residual operating current not exceeding 30 mA in
the house circuit offers additional protection. Consult an electrician for information on the
device and installation.
25. Turn off the device before unplugging it.
26. Caution! The device is current-carrying as long as it is plugged in.
27. Turn off and unplug the device if it is not needed or while it is being cleaned.
28. Do not carry the device by the cable.
29. Use only the accessories included in the packaging or those recommended by the
manufacturer.
30. Keep the power cable away from the device's hot surfaces at all times.
31. Never leave the device unattended during use.
32. Always place the device on a stable, even and nonslip surface. Failure to do so may lead to
injury and damage to the device.
33. Risk of burning! Parts of the device become very hot!
34. Do not use the device outdoors.
35. Use the device only to toast bread or warm up rolls.
36. Fire hazard! Bread can burn! For this reason, never leave the device unattended. The
device may not come into contact or be covered with ammable materials such as curtains,
textiles, walls, etc. Always make sure that there is a sufcient safety clearance to ammable
materials.
37. The appliance is not intended to be operated by means of an external timer or separate
remote control system.
Danger of suffocation! Keep all packaging material away from children.
Dispose of the packaging materials in an appropriate way. Contact your local
authorities about collection points or waste separation.
This device is suitable exclusively for private household use.
KT-212E Toaster-6L_P130162_050832013.indd 8 05/08/2013 2:27 PM

9t
COMPONENTS
BEFORE FIRST USE
• Remove all packaging materials and check the device and accessories for damages.
• Clean the device as described under Cleaning and care. Heed all Safety instructions while
doing so.
POWER SUPPLY
The device is powered via a 220-240V~ 50Hz power outlet with protective grounding conductor.
12
13
1 Removable crumb tray
2 Housing
3 Toast slot
4 Roll grill
5 Power lever
6 STOP button with power
indicator (interrupt toasting)
7 button (warm up) with
power indicator
8 button (thaw) with
power indicator
9 Power cable with plug
10 Browning control
11 Nonslip feet
12 Cord wrap
13 Cable slot
1
3
4
5
6
7
8
9
10
11
2
KT-212E Toaster-6L_P130162_050832013.indd 9 05/08/2013 2:27 PM

10 t
FIRST USE
SPECIAL SAFETY INSTRUCTIONS
1. Parts of the device become very hot during use. Use well-isolated kitchen mitts or potholders
to touch the device.
2. Never reach into the toast slot during use to remove bread. Risk of burning!
3. Never use the toaster if it or the power cable are damaged.
4. Unplug the device when it is not in use.
REMOVING PRODUCTION RESIDUE
Heat the device without bread once at level 3 and then twice at level 7 to remove any production
residue. Make sure the room is sufciently ventilated (i.e. open window). Some odors may occur
during this rst heating. This is both harmless and brief.
NORMAL TOASTING
1. Fully unravel the power cable from the cord wrap (12) and push it into the cable slot (13).
Connect the power plug (9) to a suitable power outlet.
2. Place one slice of toast horizontally into each toaster slot (3).
3. Set the browning control (10) to the desired level between 1 – 7. For rst use, we
recommend toasting at level 3. Level 1 is the lightest and level 7 the darkest browning.
Please note that different types of bread may brown differently. It is therefore recommended
to try several different levels until you achieve the optimal browning.
4. Push the power lever (5) down until it clicks into place. Toasting begins. The power indicator
on the STOP button (6) lights up during toasting.
Note:
- The power lever can not be pushed down while the device it not connected to the power
supply.
- To toast just one slice of bread, choose a lower browning level. Please note that in the
case of uninterrupted use, toast will become increasingly darker at the same browning
level due to the device absorbing heat. Let the toaster cool down for ca. 20 seconds so
that the built-in thermostat can reset.
5. You can adjust the browning level during toasting, should you notice that the setting is too
light or too dark.
6. After the set browning level is reached, the device turns off automatically. The power lever
pops up after the device turns off. The power indicator on the STOP button goes out. The
slices of toast can now be lifted from the top of the toaster.
Caution! Exercise caution when removing slices of toast, as both the metal parts and the
bread itself may become very hot.
7. Push the STOP button to interrupt toasting. The power lever pops up and the slices of toast
can be removed.
8. Remove the plug from the power outlet when the device is no longer in use.
KT-212E Toaster-6L_P130162_050832013.indd 10 05/08/2013 2:27 PM
11 t
TOASTING FROZEN TOAST
1. Turn the browning control (10) to the desired level and push the power lever down until it
clicks into place. Push the button (8) (thaw). Toasting begins and the power indicators on
the and STOP buttons light up.
2. Toasting frozen toast using the thaw button takes slightly longer than toasting non-frozen
toast.
WARMING UP ALREADY TOASTED BREAD
1. Turn the browning control to the desired level.
2. Push down the power lever until it clicks into place.
3. Then push the button (7) (warm up). The warming process begins and the power
indicators on the (warm up) and STOP buttons light up.
WARMING UP ROLLS
1. Place the roll grill (4) on the toaster. Lay rolls on the roll grill. Select a browning level above
level 3. Push the power lever down until it clicks into place. The warming process begins and
the power indicator on the STOP button lights up. Turn the rolls now and then. Do not toast
bread while warming up rolls.
Note:
Do not heat toast on the roll grill. Toast hinders sufcient ventilation. Fire hazard!
2. Push the STOP button to interrupt the warming process or in case you have accidentally
pushed a wrong button.
TIPS ON REMOVING SLICES OF TOAST
1. Caution! Slices of toast, rolls and parts of the device are very hot during and directly after
toasting! Do not touch slices of toast or rolls with your bare hands to remove them. Risk of
burning!
2. To remove small slices of toast, the power lever can be raised manually by about 10 mm. This
also raises the slices of toast and makes them easier to remove.
3. If a slice of toast becomes stuck in the toaster, push the STOP button immediately to turn off
the device. Then remove the plug from the power outlet and let the device cool down entirely.
Now attempt to remove the bread in such a way that does not cause damage to the toaster. Do
not use any conducting objects, such as a knife or fork, to remove the bread.
CLEANING AND CARE
Attention! Before cleaning, switch the device off and disconnect the power plug
from the socket.
Attention! Do not use alcohol, acetone, benzene, scouring cleaning agents, etc.,
to clean the synthetic parts of the device. Do not use hard brushes or metallic
objects.
KT-212E Toaster-6L_P130162_050832013.indd 11 05/08/2013 2:27 PM

12 t
1. Heed all safety instructions while cleaning.
2. Let the device cool down completely.
3. Clean the crumb tray (1) after each use to prevent crumb
build-up. Push the crumb tray to loosen it and then pull it with
the collected crumbs from the housing (2).
4. Dispose of the bread crumbs. Clean the crumb tray with a
slightly damp cloth and dry it thoroughly afterward.
5. Reinsert the crumb tray into the slot until it clicks into place
after cleaning.
Do not allow crumbs to build up in the device. Fire hazard!
6. Turn the device over and shake it slightly over a sink to dislodge any crumbs left inside the
toaster.
7. Use a slightly damp cloth and, if necessary, a little cleaning detergent to clean the housing (2).
Dry the housing thoroughly afterward.
8. Wrap the cord up using the cord wrap (12) underneath the device for space-saving storage.
Store the toaster at a dry, cool location shielded from moisture.
TECHNICAL DATA
Operating voltage: 220-240V~ 50Hz
Power consumption: 850W
Protection class: I
ENVIRONMENTAL SAFETY
Disposal of old electric devices.
The European directive 2002/96/EC for waste electrical and electronic equipment
(WEEE) states that used household devices should not be disposed of with
unsorted community waste. These used devices must be collected separately from
household waste in order to increase the percentage of recovered devices and to
recycle their parts, with the goal of reducing the negative effects on human health
and on the environment.
The symbol of the crossed out garbage can will be stamped onto all devices as a reminder of
the obligation to put them in a separate garbage collection. The consumer must consult local
authorities or the vendor to inform themselves about the manner in which their device should be
disposed of.
• When the device has reached the end of its service life, make it defective by
disconnecting the power plug from the socket and cutting the cord in two.
Imported by:
Dirk Rossmann GmbH
Isernhägener Straße 16
30938 Burgwedel
KT-212E Toaster-6L_P130162_050832013.indd 12 05/08/2013 2:27 PM
13 j
ÚVOD:
Tento topinkovač je určený k toustování plátků chleba a také pro rozpékání pečiva. Topinkovač
můžete použít k rozmrazování chleba a pečiva. Stupeň opečení můžete nastavit od 1 do 7. Přístroj
je vybaven vysouvacím plechem na drobky, který Vám umožní jednoduše a bezproblémově
odstranit drobkové zbytky.
BEZPEČNOSTNÍ POKYNY
1. Před použitím si tento návod k použití kompletně přečtěte.
2. Při předání přístroje třetím osobám musí být předán i tento návod k obsluze.
3. Tento přístroj odpovídá technickým normám a příslušným bezpečnostním požadavkům pro
elektrické přístroje.
4. Výrobce nepřejímá žádné ručení za škody, které se odvozují z neodborného používání nebo
nedodržování tohoto návodu k používání.
5. Tyto přístroje mohou být používány dětmi od 8 let a osobami se sníženými fyzickými,
smyslovými nebo mentálními schopnostmi nebo nedostatkem zkušeností a/nebo znalostí,
když jsou pod dozorem nebo jsou poučeni o bezpečném používání přístroje a porozuměly
nebezpečím, které z toho plynou. Děti si nesmějí s přístrojem hrát. Čistění a uživatelská
údržba nesmí být prováděny dětmi bez dozoru.
Když je spotřebič zapnut nebo se ochlazuje, uchovávejte jej a jeho přívodní šňůru mimo
dosah dětí mladších než 8 let.
6. Děti by měly být pod dozorem, aby si nemohly se spotřebičem hrát.
7. Přístroj nesmí být používán v blízkosti vany, ve sprše nebo nad umyvadlem
naplněným vodou.
8. Pokud by snad přístroj přesto padl do vody, ihned vytáhněte přístroj ze síťové
zástrčky a před dalším použitím ho nechte zkontrolovat od odborníka.
9. Přístroj neponořujte nikdy do vody. Nebezpečí zranění elektrickým proudem!
10. Přístroj neotevírejte. Nebezpečí zranění elektrickým proudem!
11. Stavte přístroj vždy na suchý, vodorovný a rovný podklad.
12. Přístroj musí být zapojen k zásuvce s ochranným vodičem.
13. Přístroj nepoužívejte, když je poškozený. Nikdy se nepokoušejte sami přístroj opravovat.
Abyste zabránili rizikům, smí být vadné části nahrazeny pouze výrobcem, jeho zákaznickým
servisem nebo podobně kvalikovanými osobami.
14. Síťovou zástrčku vytahujte ze zásuvky za zástrčku, nikoliv za kabel.
15. Do vnitřku krytu nezavádějte předměty žádného druhu.
16. Nepoužívejte přístroj v blízkosti zdrojů tepla, jako je oheň, varné desky, ohřívačů apod.
17. Nikdy se nedotýkejte přístroje mokrýma rukama. Nepoužívejte přístroj na mokré podlaze
nebo když je mokrý.
18. Nikdy nesahejte na síťovou zástrčku mokrýma nebo vlhkýma rukama.
19. Pravidelně kontrolujte síťový kabel a síťovou zástrčku na případná poškození.
Pokud je síťový kabel spotřebiče poškozen, je třeba jej nechat vyměnit výrobcem,
zákaznickým servisem výrobce nebo osobou s odpovídající kvalikací, aby nedošlo ke
vzniku nebezpečí.
20. Neuvádějte přístroj do provozu, pokud přístroj padl na podlahu nebo byl jinak poškozen.
V takových případech odneste přistroj k přezkoušení popřípadě opravě do odborné dílny.
21. Nenechávejte síťový kabel viset přes ostré hrany a chraňte ho proti horkým předmětům a
otevřeným plamenům.
KT-212E Toaster-6L_P130162_050832013.indd 13 05/08/2013 2:27 PM
14 j
22. Připojovací kabel popř. potřebný prodlužovací kabel položte tak, aby nebylo možné
neúmyslné tahání za něj resp. zakopnutí o něj.
23. Pokud použijete prodlužovací kabel, musí tento být vhodný pro odpovídající výkon, protože
jinak může docházet k přehřívání kabelu a/nebo kabelu.
24. Ochranu navíc Vám poskytne zabudování proudového chrániče se jmenovitým vybavovacím
proudem ne více než 30 mA v domovní instalaci. Nechte si o zařízení a instalaci poradit od
svého elektroinstalatéra.
25. Přístroj vypněte před vytahováním síťové zástrčky.
26. Pozor! Výrobek je pod napětím, dokud je kabel zapojen do zásuvky.
27. Přístroj vypněte a vytáhněte síťovou zástrčku ze zásuvky, když přístroj už nebude
požadován nebo když je čištěn
28. Nenoste přístroj za síťový kabel.
29. Používejte pouze příslušenství, které bylo přiloženo do balení nebo je doporučeno
výrobcem.
30. Nenechávejte kabel v blízkosti horkých ploch přístroje.
31. Nikdy nenechávejte přístroj v průběhu používání bez dozoru.
32. Vždy umístěte přístroj na pevnou, rovnou a nekluzkou podložku. Jinak může dojít ke
zraněním a poškozením přístroje.
33. Nebezpečí popálení! Části přístroje se velmi zahřejí.
34. Zařízení nepoužívejte venku.
35. Používejte přístroj pouze k toustování chleba nebo rozpékání pečiva.
36. Nebezpečí požáru! Chléb se může vznítit! Nikdy proto nenechávejte spotřebič bez
dozoru. Přístroj nesmí přijít do kontaktu s hořlavými materiály, jako jsou např. záclony,
textilie, stěny atd., ani jimi být přikrýt. Pozor na to, aby byl ke vznětlivým materiálům vždy
dodržen dostatečný bezpečnostní odstup.
37. Spotřebiče by neměly být provozovány prostřednictvím externí časomíry či samostatného
systému dálkového ovládání.
Nebezpečí udušení! Uchovejte veškerý obalový materiál mimo dosah dětí.
Zlikvidujte obalový materiál předepsaným způsobem. Informujte se na místním
úřadě, kde se nacházejí sběrná místa nebo kontejnery na tříděný odpad.
Tento přístroj je vhodný výhradně k použití v privátních domácnostech.
KT-212E Toaster-6L_P130162_050832013.indd 14 05/08/2013 2:27 PM
15 j
ČÁSTI
PŘED PRVNÍM POUŽITÍM
• Odstraňte veškerý balící materiál a zkontrolujte přístroj a příslušenství na poškození.
• Vyčistěte spotřebič tak, jak je popsáno v oddíle Čištění a údržba. Řiďte se přitom rovněž
Bezpečnostními pokyny.
NAPÁJENÍ
Přístroj je provozován přes zástrčku 220-240V~ 50Hz.s ochranným vodičem.
12
13
1 Výsuvný plech na drobky
2 Plášť
3 Otvor na chléb
4 Nástavec na pečivo
5 Zapínací páka
6 Tlačítko STOP s kontrolkou
(přerušit toustování)
7 Tlačítko (ohřívání)
s kontrolkou
8 Tlačítko (rozmrazování)
s kontrolkou
9 Kabel se zástrčkou
10 Nastavení opékání
11 Neklouzající patky
12 Navinutí kabelu
13 Kabelové vedení
1
3
4
5
6
7
8
9
10
11
2
KT-212E Toaster-6L_P130162_050832013.indd 15 05/08/2013 2:27 PM

16 j
UVÁDĚNÍ DO PROVOZU
ZVLÁŠTNÍ BEZPEČNOSTNÍ POKYNY
1. Určité části přístroje se v průběhu používání velmi zahřejí. K dotýkání používejte dobře
izolované kuchyňské rukavice nebo hadr na hrnce.
2. Nikdy nesahejte v průběhu provozu do otvoru na chléb, abyste vyndali chléb.
Nebezpečí popálení!
3. Nikdy toustovač nepoužívejte, jestliže vykazuje poškození jako např. trhliny nebo praskliny.
4. Odpojte kabel ze zásuvky, když nebudete přístroj používat.
ODSTRANĚNÍ VÝROBNÍCH ZBYTKŮ
Rozehřejte přístroj na stupeň 3 a potom dvakrát na úroveň 7 bez vloženého chleba, aby se
spálily zbytky z výroby. Zajistěte dostatečnou ventilaci místnosti (např. otevřete okno). V průběhu
prvního ohřevu může vzniknout lehký zápach. To je neškodné a trvá je krátce.
NORMÁLNÍ TOUSTOVÁNÍ
1. Zcela odviňte síťový kabel z návinu kabelu (12) a protáhněte síťový kabel kabelovým
vedením (13). Připojte zástrčku (9) do vhodné zásuvky.
2. Vložte vždy jeden toust ve vodorovné poloze do chlebových otvorů (3).
3. Nastavte regulátor opékání (10) na požadovaný stupeň opečení v rozpětí 1 - 7. Při prvním
použití doporučujeme nastavit na stupeň 3. Stupeň 1 je nejsvětlejší a stupeň 7 nejtmavší
opečení. Uvědomte si, že opečení může pro chléb dopadnout různě druh od druhu. Proto
vám doporučujeme několikrát vyzkoušet pro nalezení optimálního nastavení opečení.
4. Stlačte zapínací páku (5) dolů až zapadne. Proces toustování začíná. V průběhu toustování
svítí kontrolka tlačítka STOP (6).
Pokyny:
- Když je přístroj odpojen od sítě nemůže být zapínací páka stlačena dolů,
- Když toustujete jen jeden toust, měl by být zvolen nízký stupeň opékání. Dávejte pozor na
to, že při nepřerušeném provozu bude chléb na stejném opékacím stupni postupně tmavší
v důsledku ohřívání přístroje. Nechte toustovač po každém toustovacím běhu cca. 20
sekund ochlazovat, aby se zabudovaný termostat dokázal nastavit zpět.
5. Můžete stupeň opékání v průběhu toustování měnit, pokud po zapnutí zjistíte, že jste zvolili
příliš světlé nebo tmavé opékání.
6. Poté, co bylo dosaženo nastaveného stupně opečení, přístroj se automaticky vypne.
Zapínací páka vyskočí po vypnutí nahoru. Kontrolka tlačítka STOP zhasne. Krajíčky chleba
vyskočí nahoru a mohou být odebrány.
Pozor! Při vyjímání toustů buďte velice opatrní, protože kovové části a chléb mohou být
velice horké.
7. Stlačte tlačítko STOP, abyste předčasně ukončili toustování. Zapínací páka vyskočí nahoru
a tousty mohou být odebrány.
8. Když přístroj už nebudete používat, vytáhněte síťovou zástrčku ze zásuvky.
KT-212E Toaster-6L_P130162_050832013.indd 16 05/08/2013 2:27 PM
17 j
TOUSTOVÁNÍ ZMRAŽENÝCH TOUSTŮ
1. Otočte regulátor opékání (10) na požadovaný stupeň a stlačte zapínací páku dolů, až
zapadne. Stlačte tlačítko (8) (Rozmrazování). Toustování začíná a kontrolky tlačítek
a STOP se rozsvítí
2. Při toustování zmraženého toustovacího chleba s použitím tlačítka rozmrazování trvá
toustování déle, než u nemraženého toustovacího chleba.
OHŘÍVÁNÍ JIŽ OTOUSTOVANÉHO CHLEBA
1. Nastavte regulátor opékání na požadovaný stupeň.
2. Stlačte zapínací páku (5) dolů až zapadne.
3. Stlačte tlačítko (7) (Rozmrazování). Toustování začíná a kontrolky tlačítek
(Rozmrazování) a STOP se rozsvítí.
ROZPÉKÁNÍ PEČIVA
1. Nasaďte nástavec na pečivo (4) na topinkovač. Položte kousek pečiva na nástavec na
pečivo. Zvolte stupeň opékání vyšší než 3. Stlačte zapínací páku dolů, až zapadne.
Toustování začíná a kontrolky tlačítek (Rozmrazování) a tlačítko STOP se rozsvítí. Občas
housku otočte. Netoustujte chléb, když zrovna rozpékáte pečivo.
Upozornění:
Nástavec na pečivo nesmí být toustováno na otvoru pro chléb, protože to omezuje ventilaci.
Nebezpečí požáru!
2. Stlačte tlačítko STOP, když má být nahřívání předčasně skončeno, nebo když jste z
přehlédnutí stlačili nesprávné tlačítko.
POKY K ODBĚRU TOUSTŮ
1. Pozor! Tousty, pečivo a části přístroje jsou v průběhu a přímo po toustování velice horké.
Nesahejte na tousty nebo pečivo při odběru pouhýma rukama. Nebezpečí popálení!
2. K odběru malých toustů se dá zapínací páka manuálně vytáhnout nahoru o asi 10 mm.
Krajíčky se vystrčí a snadněji je vyndáte.
3. Pokud zůstanou tousty viset v toustovači, stlačte hned tlačítko STOP pro vypnutí přístroje.
Potom odpojte zástrčku ze zásuvky a nechte spotřebič zcela vychladnout. Zkuste vyndat
krajíček chleba tak, abyste nepoškodili topinkovač. Nepoužívejte elektriky vodivé pomocné
prostředky,jako např. nože nebo vidličky pro odebírání chleba.
ČIŠTĚNÍ A ÚDRŽBA
Pozor! Před čištěním přístroj vypněte a opojte kabel ze zásuvky.
Pozor! Nepoužívejte alkohol, aceton, benzen, drhnoucí čistící prostředky atd.
pro čištění plastových částí přístroje. Nepoužívejte tvrdé kartáče nebo kovové
předměty.
KT-212E Toaster-6L_P130162_050832013.indd 17 05/08/2013 2:27 PM
18 j
1. Při čištění se bezpodmínečně řiďte Bezpečnostními pokyny.
2. Nechte přístroj úplně vychladnout.
3. Plech na drobky (1) čistěte po každém použití, abyste zabránili
velkému nashromáždění chlebových drobků. Pro uvolnění
na drobkový plech zatlačte a vytáhněte ho se zachycenými
drobky z krytu (2).
4. Odstraňte drobky z chleba. Vyčistěte drobkový plech lehce
nevlhčeným hadrem a potom ho pečlivě osušte.
5. Po čištění drobkový plech zasuňte zpět do otvoru až zapadne.
Nenechte přístroj zanesený drobky. Nebezpečí požáru!
6. Otočte přístroj vrchem dolů a zatřeste s ním lehce nad umyvadlem, abyste vytřásli uvnitř se
nacházející drobky.
7. Použijte lehce navlhčený hadřík, je-li to nutné s trochou saponátu, pro otření pláště přístroje (2).
Potom spotřebič dobře osušte.
8. naviňte síťový kabel na návin kabelu (12) pod přístrojem, když má být toustovač uložen s
úsporou místa. Skladujte toustovač na suchém, chladném místě, které je chráněno proti
vlhkosti.
TECHNICKÉ ÚDAJE
Provozní napětí: 220-240V~ 50Hz
Spotřeba: 850W
Ochranná třída: I
OCHRANA ŽIVOTNÍHO PROSTŘEDÍ
Likvidace starých elektrických přístrojů.
Evropská směrnice 2002/96/EC o starých elektrických a elektronických přístrojích
(WEEE) uvádí, že použité domácí přístroje nesmějí být odstraněny stejně s
domácím odpadem. Tyto použité přístroje musejí být shromažďovány odděleně
od domácího odpadu, aby se zvýšil podíl zpět získaných přístrojů, jejich materiály
recyklovat s cílem, snížit důsledky na zdraví lidí a na přírodu.
Označení přeškrtnuté popelnice je umístěno na všech přístrojích, abyste nezapomněli na
povinnost oddělovaného sběru. Spotřebitelé musejí požádat místní zodpovědnou osobu nebo
prodejce, aby se informovali, jak musí být přístroj zlikvidován.
• Když je spotřebič na konci životního cyklu, odpojte kabel ze zásuvky a znehodnoťte
spotřebič přestřižením kabelu.
Dovozce:
Dirk Rossmann GmbH
Isernhägener Straße 16
30938 Burgwedel
KT-212E Toaster-6L_P130162_050832013.indd 18 05/08/2013 2:27 PM
Table of contents
Languages:
Other Ideen Welt Toaster manuals


