Living & Co LT4B User manual

L+C 4 SLICE TOASTER SQUARE SS /
L+C 4 SLICE TOASTER SQUARE SS RED /
L&C 4 Slice Toaster Glossy Black
INSTRUCTION MANUAL MODEL: LT4B/LT4R/LT4GB

Read these instructions carefully before using your toaster, and keep it carefully.
If you follow the instructions, your toaster will provide you with many years of good
service.
SAVE THESE INSTRUCTIONS CAREFULLY
2

IMPORTANT SAFEGUARD
1. Read all instruction
b
efore using.
2. Make sure that
y
ou
r
outle
t
volta
g
e corres
p
onds to the
voltage stated on the rating label of the toaster.
3. Do not touch hot surface. Use handles o
r
knobs only.
4. To
p
rotect a
g
ainst electrical shock, do not immerse cord,
plug, or any part of the toaste
r
in water or othe
r
liquid.
5. Close su
p
ervision is necessar
y
when i
t
is used
by
o
r
near
children.
6. Un
p
lu
g
unit from outle
t
when not in use and
b
efore
cleaning.
7. Do not o
p
erate an
y
a
pp
liance with a dama
g
ed cord or
p
lu
g
,o
r
in abnormal state. If its main cord is dama
g
ed, i
t
mus
t
b
ere
p
laced
by
the manufacturer,the nearest service
agen
t
or a qualified person.
8. Do not let the cord han
g
over ed
g
e of table or counter, or
touch hot surface.
9. Do not
p
lace on o
r
near a hot
g
as o
r
electric
b
urner, or in
a heated oven.
10. Do not use the appliance for other than its intended use.
11. Oversize food, metal foil
p
acka
g
es o
r
utensils mus
t
not
b
e
inserted in the toaste
r
as the
y
ma
y
cause fire or electric
shock.
12. Bread ma
y
b
urn, therefore toasters must not
b
e used near
o
r
b
elow curtains and other combustible materials, the
y
mus
t
b
e watched.
13. The use of accessor
y
attachments not recommended
by
the appliance manufacturer may cause injuries.
14. Don’
t
attem
p
t to dislod
g
efoodwhentoaste
r
is in
operation.
15. Be sure to take the
b
read out carefull
y
after toastin
g
so as
0800 422 274
NZ
3

to avoid injuries.
16. This a
pp
liance is not intended for use
by
p
ersons
(
includin
g
children
)
with reduced
p
h
y
sical, sensor
y
o
r
mental ca
p
abilities, or lack of ex
p
erience and knowled
g
e,
unless the
y
have
b
een
g
iven su
p
ervision or instruction
concernin
g
use of the a
pp
liance
by
a
p
erson res
p
onsible
for their safet
y
.
17. Children should
b
esu
p
ervised to ensure that the
y
do not
p
la
y
with the a
pp
liance.
18.Warnin
g
:iftoas
t
of small
b
read slices less than 85mm
len
g
th,
y
ou must
p
a
y
attention to the
p
otential risk of
b
urnin
g
when takin
g
out the slices.
19. The a
pp
liance is not intended to
b
eo
p
erated
by
means of
an external timer or se
p
arate remote-control s
y
stem.
20. Don’
t
use the a
pp
liance outdoors.
21. This a
pp
liance is intended to
b
e used in household and
simila
r
a
pp
lications such as:
–
Staff kitchen areas in sho
p
s, offices and othe
r
workin
g
environments;
–
Farm houses;
–
B
y
clients in hotels, motels and other residential t
yp
e
environments;
–
Bed and
b
reakfas
t
t
yp
e environments.
22. The Hot surface warnin
g
s
y
mbol is marked on the
a
pp
liance means tha
t
the a
pp
liance ma
y
b
e hot durin
g
use.
23. Save these instructions.
24. Neve
r
o
p
erate the a
pp
liance with wet hands.
25. I
t
is recommended to have a residual current device
(
safet
y
switch
)
installed
by
q
ualified electrician to
p
rovide additional safet
y
p
rotection when usin
g
all
electrical a
pp
liances.
0800 422 274
NZ
4

KNOW YOUR TOASTER
Bread slot
Carriage handle Control panel
(see below)
Housing
Crumb tray
Bread slot
Carriage handle ntrol panel
(see below)
Housing
Crumb tray
Control panel:
1
2
35
6
4
1
2
34
5
6
Indicating light
Color control knob
Defrost button
Reheat button
Cancel button
For the first use
As there is manufacturing residue or oil remained in the toaster or heat element, it usually
will emit the odor for the first use. It is normal and will not occur after several times use,
for the first use it is suggested to operate according to the below steps, except without
bread. Then let the toaster cool down and begin toasting the first slice.
Operation:
1. Insert regular bread slice into the bread slot, which can be inserted with two slices at
most each time.
0800 422 274
NZ
5

Note: Make sure the crumb tray is completely positioned in place before use.
2. Plug the power cord into the outlet.
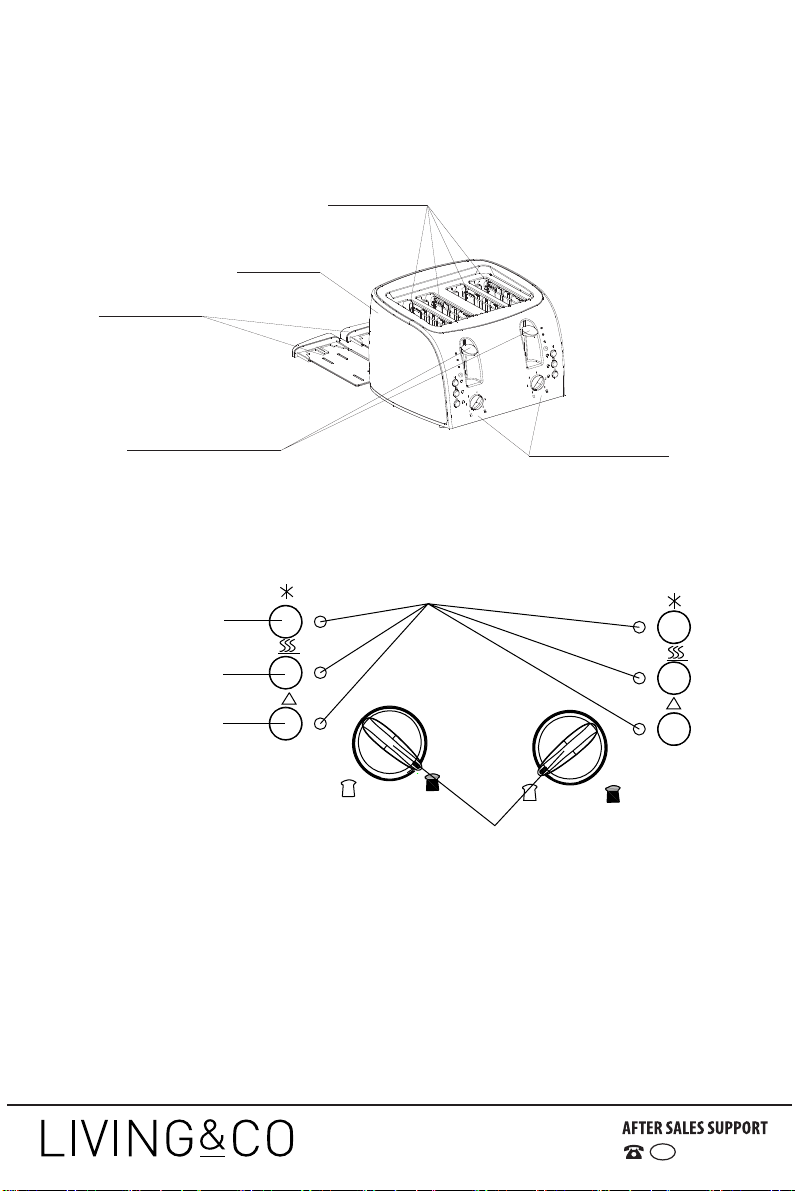
3. Set color control knob to your desired color. There is 6-position level, the lowest “1” is
for light and the highest “6” is for dark. The bread slice can be toasted to golden color at
the middle position.
Note:
1). Toasting color for one slice is darker than that for two bread slices at the same
level.
2). If toasting continuously, toasting color for the latter bread is darker than that
for the anterior bread at the same level.
4. Lower carriage handle down vertically until it is latched in place, the indicator of
Cancel will be illuminated, and the appliance will begin toasting at once.
Note: The carriage handle can only be latched when the appliance is plugged in.
5. Once the bread has been toasted to the preset color, the carriage handle will
automatically pop up. Also you can uplift the carriage handle a little to remove the bread
readily.
Note: During toasting, you may also observe the toasting color. If it is satisfactory,
you can press the Cancel button to cancel the operation at any time, but never lift
carriage handle to cancel toasting.
6. If you want to toast frozen bread, firstly set color control knob to your desired color, and
then lower carriage handle down vertically until it is latched in place. then press Defrost
button and the indicator of Defrost button will be illuminated, In this mode bread will be
toasted to your desired color.
7. If you want to warm cold toasted bread, firstly lower carriage handle vertically until it is
latched in place, and then press the Reheat button and the indicator of Reheat button will
be illuminated, In this mode toasting time is fixed, so long as time runs over, the carriage
handle will automatically spring up and end up the reheating process.
Caution:
1. Remove all protective wrappings prior to toasting.
2. If toaster starts to smoke, Press Cancel to stop toasting immediately.
3. Avoid toasting the food with extremely runny ingredients such as butter.
4. Never attempt to remove bread jammed in the slots without unplugging the toaster from
the electrical outlet first. Be sure not to damage the internal mechanism or heating
elements when removing bread.
5. The bread slot is only applicable for toasting regular bread slice.
6. In order to achieve uniform color we recommend that you should wait minimum 30s
between each toasting so that color control can reset automatically.
0800 422 274
NZ
6

Cleanin
g
and maintenance:
1.Before cleaning, unplug from the appliance and let the appliance cool down completely.
2. Wipe the outside with soft dry cloth, never use metal polish.
3. Pull out crumb tray on bottom of toaster and empty it. If toaster is used frequently,
accumulated bread crumbs should be removed at least once a week. Make sure the crumb
tray is completely closed before using the toaster again.
4. When not use or storage, the power cord may be wound under the bottom of toaster.
Environment friendly disposal
You can help protect the environment!
Please remember to respect the local
regulations: hand in the non-working electrical
equipments to an appropriate waste disposal
center.
0800 422 274
NZ
7

0800 422 274
NZ
Warranty
We pride ourselves on producing a range
of quality home appliances that are both packed with features
and completely reliable. We are so confident in our products,
we back them up with a 1 year warranty.
Now you too can relax knowing that you are covered.
Customer Helpline NZ: 0800 422 274
This Product is covered by 1 year warranty when
accompanied by proof of purchase.
This manual suits for next models
2
Table of contents
Other Living & Co Toaster manuals