Idena 680.0036 User manual
Radio Player
EMPFEHLUNG FÜR DEN KOPFHÖRERKAUF
Bevorzugen Sie beim Kauf ein Produkt, dass
es automatisch ermöglicht, den SchaIlleis-
tungspegel auf 97 dB zu beschränken.
Achtung! Bei voller Lautstärke kann die
längere Verwendung des Radio Players Oh-
renschäden verursachen. Den Radio Player
nicht zu lange verwenden. Regelmäßige
Pausen einlegen. Bei Kindern und Jugend-
lichen ist besondere Vorsicht geboten, da
diese immer früher Radio Player verwenden
und häufig sehr laut Musik hören.
RECOMMONDATION CASQUE
Préférez, lors de l‘achat, un matériel
permettant de limiter automatiquement le
niveau de puissance acoustique à 90 dB. At-
tention! A pleine puissance, l‘écoute prolon-
gée du baladeur peut endommager l‘oreille
de l‘utilisateur. N‘utilisez pas le lecteur de
manière trop prolongée, prévoyez des pau-
ses de temps à autre Soyez particulièrement
vigilant à l‘ égard des enfants et adolescents
qui utilisent le lecteur de plus en plus tôt,
souvent à une puissance excessive.
RECOMMONDATION FOR HEADPHONES
When purchasing headphones, choose a
model that automatically limits noise to
90 dB, Attention! Listening to a personal
stereo for long periods of time at full volume
can damage the user‘s hearing Do not use
the Radio Player for an extended period of
time take regular breaks. Take particaar care
regarding children and adolescents who are
using the Radio Player at increas-ingy early
ages, often at an excessive volume.
1 2.1
2.2
3.1 3.1.1 3.1.2
3.2
4.3
Usb
Bedienungsanleitung / instruction Manual / instructions d‘utilisation
Radio PlayeR with USB ConneCtion – leCteUR Radio aveC PoRt USB
ACHTUNG! Nicht geeignet für Kinder unter 3 Jahren
wegen verschluckbarer Kleinteile sowie der Gefahr
der Schlaufenbildung.
WARNING! Not suitable for children under three years.
Risk of choking due to small parts that may be
swallowed and risk of strangulation.
ATTENTION ! Inapproprié pour enfants de moins de 3
ans du fait des petites pièces pouvant être avalées et
du fait du risque présentée par la dragonne.
Wir empfehlen die Verwendung von Alkalibatterien.
Abweichungen in Farbgebung und Design vorbehalten.
Änderungen der Produktspezifikationen ohne vorherige
Ankündigung vorbehalten.
Alkaline batteries are recommended.
Colour and design may vary. Product specifications
subject to change without prior notice.
Nous vous recommendons l‘utilisation de batteries
alcalines. Déviations de couleur et de design réservées.
Modifications des spécifications du produit sans
information préalable.
Iden Berlin
Wilhelm-Kabus-Str. 75
D-10829 Berlin
www.idena.de
1
Radio Player
Art.-Nr. 680.0036Bedienungsanleitung
ACHTUNG
• Das Gerät nicht eigenmächtig reparieren, verändern oder zerlegen.
• Nicht in Wasser tauchen oder Wasser darüber gießen.
• Nicht draußen, im Wasser oder bei Feuchtigkeit benutzen.
• Nicht auf unebene, schräge Flächen stellen oder an Orte, an denen das Gerät herunterfallen kann.
• Keine kleinen Gegenstände in das Gerät stecken.
• Nicht gegen harte Gegenstände schlagen.
• Nicht an staubigen, öligen, rauchigen oder feuchten Orten aufbewahren.
• Beim Benutzen der Kopfhörer die Lautstärke optimal einstellen (eine zu laute Einstellung kann zu
Gehörschäden führen).
• Das Netzteil nicht mit feuchten Händen anfassen – es besteht die Gefahr eines Stromschlags.
• Zum Reinigen des Gerätes keine Chemikalien wie Alkohol oder Benzol benutzen.
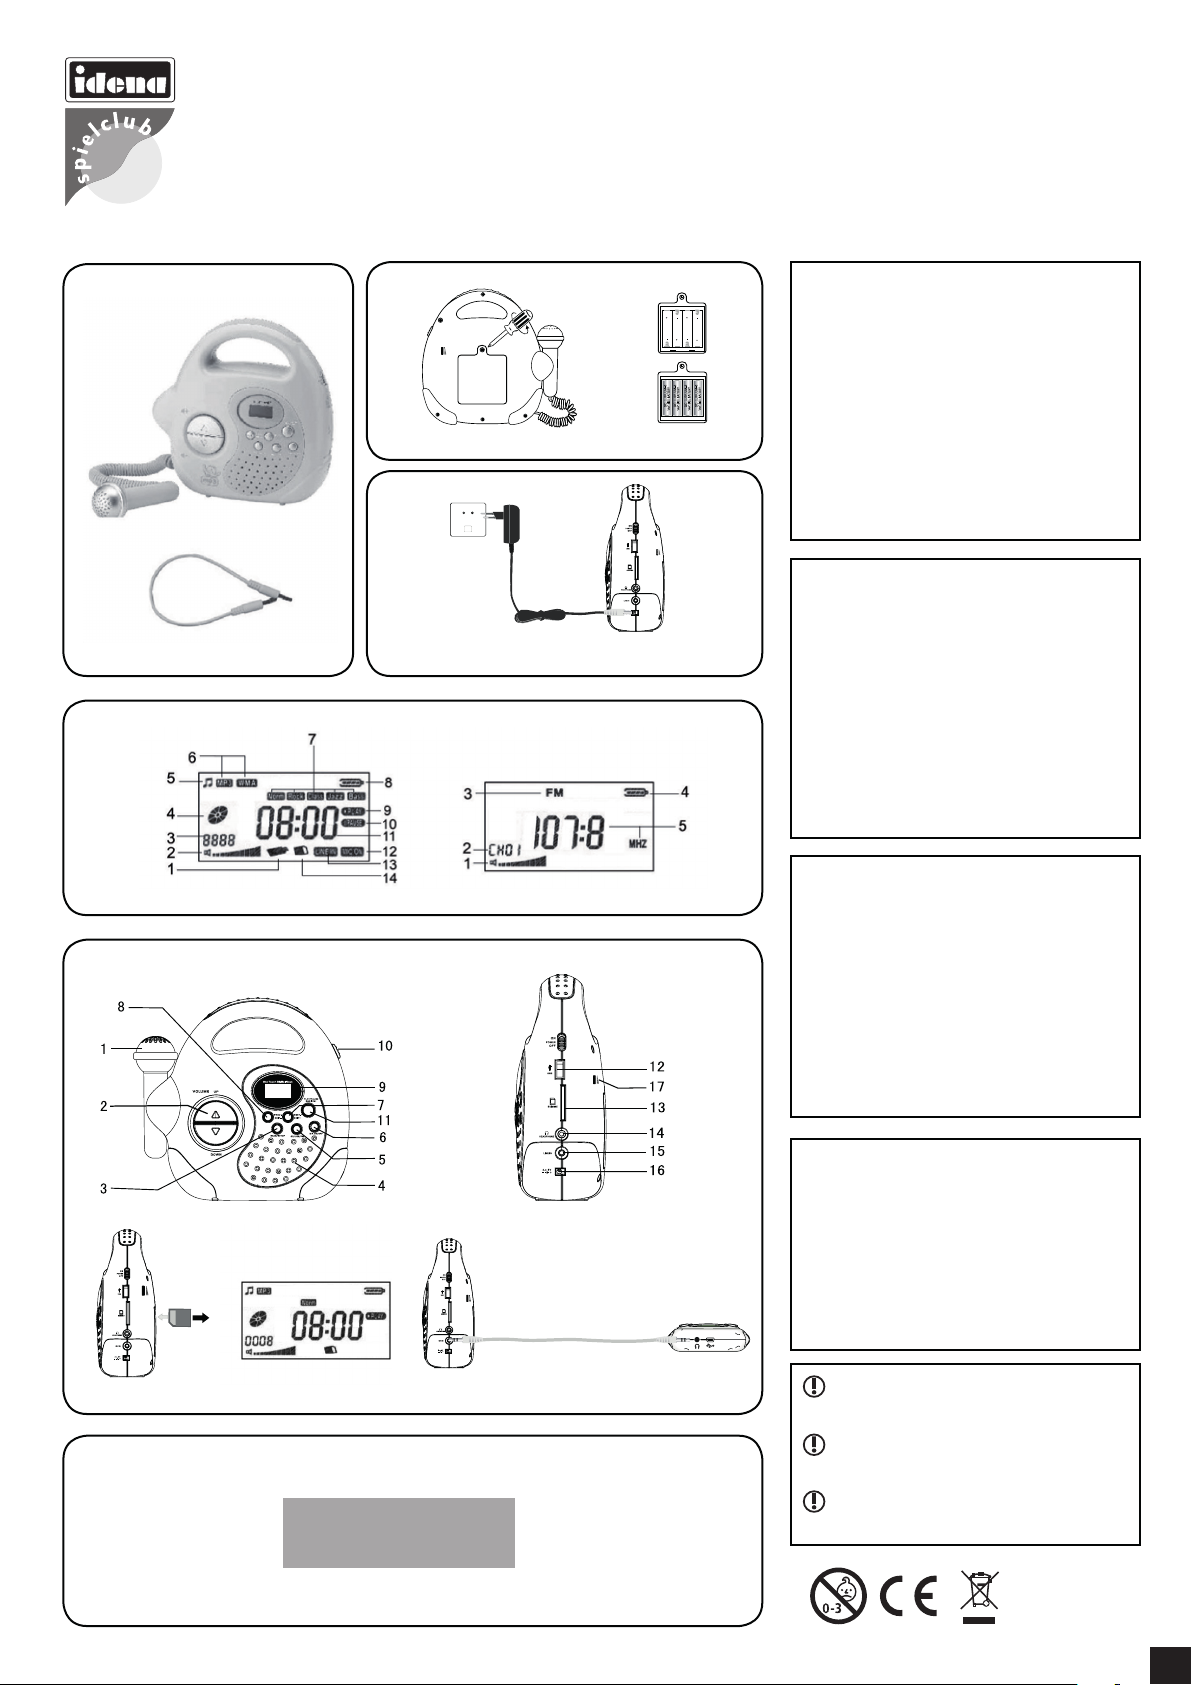
1. INHALT
1.1. Wiedergabegerät
1.2. Übertragungskabel
2. INBETRIEBNAHME DES GERÄTES
2.1. Mit Batterien (nicht enthalten). (siehe Seite 1)
• Wenn das Gerät einen längeren Zeitraum (mehr als 30 Tage) nicht benutzt wird, ist es vollständig
auszuschalten und die Batterien sind zu entnehmen.
• Wenn die Batterien leer sind, funktioniert das Gerät nicht mehr. Entnehmen Sie in diesem Fall die
Batterien.
2.2. Mit Netzteil-Anschluss (Netzteil nicht enthalten). (siehe Seite 1)
• Vergewissern Sie sich, dass die örtliche Stromspannung der Spannung des Netzteils entspricht.
• Das Netzteil an den Stromanschluss DC 6 V, 800 mA des Wiedergabegeräts und an die Steckdose
anschließen.
• Das Gerät nur mit diesem Netzteiltyp benutzen, sonst kann es zu irreparablen Schäden kommen.
• Das Netzteil sollte regelmäßig geprüft werden, um mögliche Gefahren (z. B. Beschädigungen an
Stecker, Kabel, Gehäuse oder anderen Teilen) auszuschließen.
• Sollte eine Beschädigung festgestellt werden, darf das Spielzeug nicht benutzt werden.
• Das Netzteil ist kein Spielzeug.
Technische Merkmale des Netzteils:
Eingangsleistung: AC 100 – 240 V, 50/60 Hz
Ausgangsleistung: DC 6 V, 800 mA (innen positiv, außen negativ)
3. BESCHREIBUNG DES GERÄTES (siehe Seite 1)
3.1. Display
3.1.1. SD-Kartenmodus
1. USB
2. Lautstärke
3. Dateien insgesamt und
Nummer der aktuellen Datei
4. Abspielanzeige
5. Musikmodus
6. Musikformat
7. EQ-Modus
8. Batteriestatus
9. Wiedergabe
10. Pause
11. Abspielzeit
12. Mikro
13. Line-In
14. SD-Karte
3.1.2. Radiomodus
1. Lautstärke
2. Kanalnummer
3. Radiomodus
4. Batteriestatus
5. FM-Frequenz
4. BETRIEB
Das Gerät erkennt automatisch die angeschlossenen Geräte und geht in den entsprechenden Modus.
Wird kein Gerät angeschlossen, schaltet sich automatisch der Radiomodus ein.
4.1. Radiomodus
Sendersuche:
• Automatische Sendersuche: Zum Starten der Suche Taste „Radiosuchfunktion“ drücken. Die
Sendersuche wird automatisch gespeichert (Frequenzen 87 – 108 MHz). Zum Anhalten der Suche
dieselbe Taste drücken. Nach der automatischen Suche hört man den ersten FM-Sender.
Mehrmals drücken, um alle gespeicherten Sender nacheinander zu wählen.
• Manuell: Zur Sendersuche mehrmals / drücken (bei Betätigen der Taste hält die Suche alle
0.1 MHz an).
4.2. Anschluss an ein externes Gerät (MP3, HiFi, ...)
• Vergewissern Sie sich, dass das externe Gerät korrekt funktioniert.
• Das Eingangskabel an das externe Gerät und an das Wiedergabegerät anschließen (Der Modus
wechselt automatisch).
• Zum Verlassen des Modus das Kabel herausziehen.
4.3. Anschluss an den Computer
• Das Wiedergabegerät ausschalten.
• Die SD-Karte einschieben.
• Das Übertragungskabel an den Computer und an das Gerät anschließen. Ein Symbol erscheint auf
dem Display und auf dem Computer öffnet sich ein Fenster.
• Nach dem Anschließen können die Dateien auf die SD-Karte kopiert oder von dieser gelöscht
werden und sie kann formatiert werden.
• Nach Abschluss der Datenübertragung, das Übertragungskabel vom Computer und vom Wiederga-
begerät entfernen.
Hinweis: kompatibel mit Windows 98 / 2000 / XP / Vista / 7
4.4. SD-KARTE ODER USB-STICK
ANSCHLIESSEN
1. SD-Karte oder USB-Stick mit gespeicher-
ten Musikdaten einstecken.
2. Netzschalter auf ON stellen. Das Gerät
wird in den SD-Karten- oder USB-Modus
versetzt und gibt nach der Initialisierung
automatisch Musik wieder.
3. Wiedergabe / Pause
Während des Abspielens von Musik drücken, um die Wiedergabe anzuhalten. Die Taste erneut
drücken, um die Wiedergabe fortzusetzen.
4. Vorheriger Titel / Nächster Titel
oder drücken, um den vorherigen oder den nächsten Titel wiederzugeben.
5. Lautstärke Hoch / Runter
Laustärke „UP“ / „DOWN“ drücken, um die Ausgabelautstärke von Lautsprecher und Kopfhörer zu
erhöhen oder zu verringern.
6. EQ-Modus wechseln
a. Beim Wiedergeben von Musik im SD-Karten oder USB-Modus
die Taste SCAN / SETUP drücken, um in den EQ-Auswahlmodus
zu wechseln. Der aktuelle EQ-Modus leuchtet auf (wie in der
rechten Abbildung dargestellt).
b. Die Taste oder drücken, um einen EQ-Modus auszuwäh-
len. erneut drücken, um in den ausgewählten EQ-Modus zu
wechseln. Das Gerät gibt die Musik anschließend gemäß dem
ausgewählten EQ-Modus wieder.
7. Verwendung des Mikrofons
a. Mikrofon herunterziehen und die Taste „MIC ON / OFF / REC“ drücken. Auf dem LCD-Display wird
„MIC ON“ angezeigt.
b. Mikrofon mit ca. 1 – 2 cm Abstand vor den Mund halten und den Lautstärkeregler „MIC VOL“
drehen, um die richtige Lautstärke einzustellen und zur Musik mitzusingen.
c. Aufnahmefunktion: Die Taste „MIC ON / OFF / REC“ 1 – 2 Sekunden drücken um aufzunehmen,
danach wieder lange drücken um die Aufnahme zu beenden. Bitte beachten sie, das mit der
Tonaufnahme die Musik sich automatisch ausschaltet.
d. Nach der Verwendung die Taste „MIC ON / OFF / REC“ erneut drücken. Die Anzeige „MIC ON“
verschwindet vom LCD-Display. Das Mikrofon anschließend in die Ausgangsposition zurück-
bringen und den Lautstärkeregler „MIC VOLUME“ auf die niedrigste Position drehen.
5. PROBLEMBEHEBUNG
Sollte ein Problem auftreten, z. B. die Tasten funktionieren nicht oder das Display ist blockiert, das
Gerät abstellen, einige Sekunden warten und erneut einschalten. Wenn das Wiedergabegerät wieder
funktioniert, kann es ganz normal benutzt werden.
Eine neue Karaoke-Anlage, wie für Dich maßgeschneidert! Leicht
und tragbar: Höre deine Lieblingsmusik und singe mit. Mit Radio:
wird an Speicherkarten oder MP3-Player angeschlossen.
PROBLEM LÖSUNG
Das Gerät schaltet sich
nicht ein
1. Überprüfen Sie, ob das Netzteil korrekt an das Gerät und an die
Steckdose angeschlossen ist.
2. Überprüfen Sie, ob die Batterien korrekt eingelegt sind.
3. Wechseln Sie verbrauchte Batterien aus.
4. Vergewissern Sie sich, dass zu ON gewechselt wurde.
Es ist nichts zu hören
1. Regeln Sie die Lautstärke.
2. Der Lautsprecher funktioniert nicht, wenn die Kopfhörer ange-
schlossen sind.
Schlechtes Radiosignal 1. Stellen Sie das Gerät an einen besseren Empfangsort.
2. Stellen Sie in der Nähe befindliche Elektrogeräte aus.
Musik kann nicht
korrekt herunter-
geladen werden
1. Überprüfen Sie, ob das USB-Kabel beschädigt oder fehlerhaft
angeschlossen ist.
2. Überprüfen Sie, ob genügend Speicherkapazität vorhanden ist.
3. Überprüfen Sie ob der „Driver“ mit dem Gerät kompatibel ist.
Von externen Geräten
wird kein Ton
empfangen
1. Überprüfen Sie, ob das Kabel beschädigt oder fehlerhaft ange-
schlossen ist.
2. Vergewissern Sie sich, dass das externe Gerät korrekt funktioniert.
3. Überprüfen Sie, ob der externe Modus eingestellt ist.
4. Regeln Sie die Lautstärke.
Von der SD-Karte / vom
USB-Stick wird keine
Musik wiedergegeben
1. Überprüfen Sie, ob diese korrekt angeschlossen sind.
2. Überprüfen Sie, ob sich auf diesen Musikdateien befinden.
3. Überprüfen Sie, ob die Dateien beschädigt sind.
4. Überprüfen Sie, ob die Geräte beschädigt sind.
Abspielbare Formate MP3 / WMA
USB Port 2.0
Kapazität mit USB-Support 128 MB – 8 GB
Kapazität mit SD-Kartensupport 128 MB – 8 GB
FM-Frequenzbreite 87 – 108 MHz
Senderspeicher 20
Inbetriebnahme Batterien: 4 x AA
Netzteil: AC 100 – 240 V, 50/60 MHz, DC 6 V, 800 mA
(innen positiv, außen negativ)
Ausgangsleistung Kopfhörer <5 + 5 mW
Ausgangsleistung Lautsprecher >500 mW
Display LCD
Betriebstemperatur -5 °C – 40 °C
6. TECHNISCHE DATEN
2
3.2. Tasten und Teile
1. Mikrofon
2. Lautstärkeregler
3. Automatische Sendersuche / Konfigura-
tion (im Wiedergabe-Modus länger als
eine Sekunde gedrückt halten.)
4. Lautsprecher
5. Auswahl der Quelle SD / USB / FM
6. Mikrofon ein-/ ausgeschaltet
7. Skip-Taste vorwärts (springt im Radio-
Modus weiter zum folgenden Sender)
8. Skip-Taste rückwärts (springt im Radio-
Modus zurück zum vorherigen Sender)
9. LCD-Display
10. Ein / Aus
11. Wiedergabe / Pause / nächster gespei-
cherter Sender (im Radio-Modus)
12. USB-Port
13. SD-Karteneinschub
14. Kopfhöreranschluss
15. Line-In
16. Eingang DC 6 V
17. Mikrofon-Lautstärkeregler

Radio Player
Art.-Nr. 680.0036
instruction Manual
IMPORTANT
• Do not repair, alter or disassemble the unit unless absolutely essential.
• Do not immerse it in water or pour water over it.
• Do not put it outdoors, in the bathroom or in damp places.
• Do not position in unsteady or sloping areas or places where it may fall.
• Do not insert small objects into the unit.
• Do not hit against hard objects.
• Do not store in areas that have dust, oil or are smokey or damp.
• Adjust the volume to appropriate level when using the earphones
(if too loud it could damage the ears).
• Do not touch or plug in a DC power adapter with wet hands due to the risk of electical shock.
• Do not use chemical agents such as alcohol or benzene to clean the unit.
1. CONTENTS
1.1. Player
1.2. Connection cable
2. POWER SOURCE
2.1. Batteries (not included): (as shown on page 1)
• If the product is not to be use for an extended period of time (30 days or more), turn it off fully and
remove the batteries.
• The product will automatically stop working when the batteries run out. In this case, remove the
batteries.
2.2. With power adapter port (power supply not included) (as shown on page 1)
• Ensure that local voltage matches the power adapter‘s voltage.
• Use the power adapter with the positive pole towards the plug.
• Connect the power adapter to the player‘s DC 6 V (800 mA) input and to the wall socket.
• In order to avoid irreparable damage do not use any other type of power adapters with this product.
• The power adapters should be inspected regulary to avoid potential risks such as damage to the
plug, cable or cord, outer case or other parts.
• The toy should not be use if the power adapter is damaged.
• The power adapter is not a toy.
Characteristics of the power adapter:
Input power: AC 100-240 V, 50/60 Hz
Output power: DC 6 V, 800 mA (positive interior and negative exterior)
3. DESCRIPTION OF THE DEVICE (as shown on page 1)
3.1. Screen icons
3.1.1. SD Card Mode
1. USB
2. Volume
3. Total file and current file number
4. Rotating wheel indicator
5. Music mode
6. Music formate
7. EQ mode
8. Battery capacity
9. Play
10. Pause
11. Elapsed time
12 Mic.
13 Line in
14 SD card
3.1.2. Radio Mode
1. Volume
2. Channel number
3. Radio mode
4. Battery capacity
5. FM frequency
4. OPERATIONS
The product automatically identifies the connected devices and switches into the relevant mode.
If no device is connected, it will switch on in its default mode, which is the Radio Mode.
4.1. Radio mode
Station search:
• Automatic: press button „Radio station search function“ (3) to start and store the station search
automatically (frequencies 87-108MHz), and use the same button to stop the search. After the
automatic search, the first FM station will be played.
Press repeatedly to click through and select any stored station.
• Manual: press / repeatedly to search for stations(on pressing the button, it will stop
every 0.1 MHz).
4.2. Connection to an external device (mp3, HiFi, ...)
• Ensure that the external device works properly.
• Connect the input cable to the external device and to the player. It will automatically change mode.
• To exit this mode, remove the cable.
4.3. Connection to a computer
• Switch off the player.
• Insert the SD card.
• Connect the connection cable to the computer and the machine, and the corresponding icon will
display at the right and bottom edge of the window, and LCD screen of the machine will show the
above picture.
• Once connected, you can copy or delete files from the SD card and format it.
• Once the data transfer has finished, remove the connection cable from the computer and from the
player.
Note: it is compatible with Windows 98 / 2000 / XP / Vista / 7
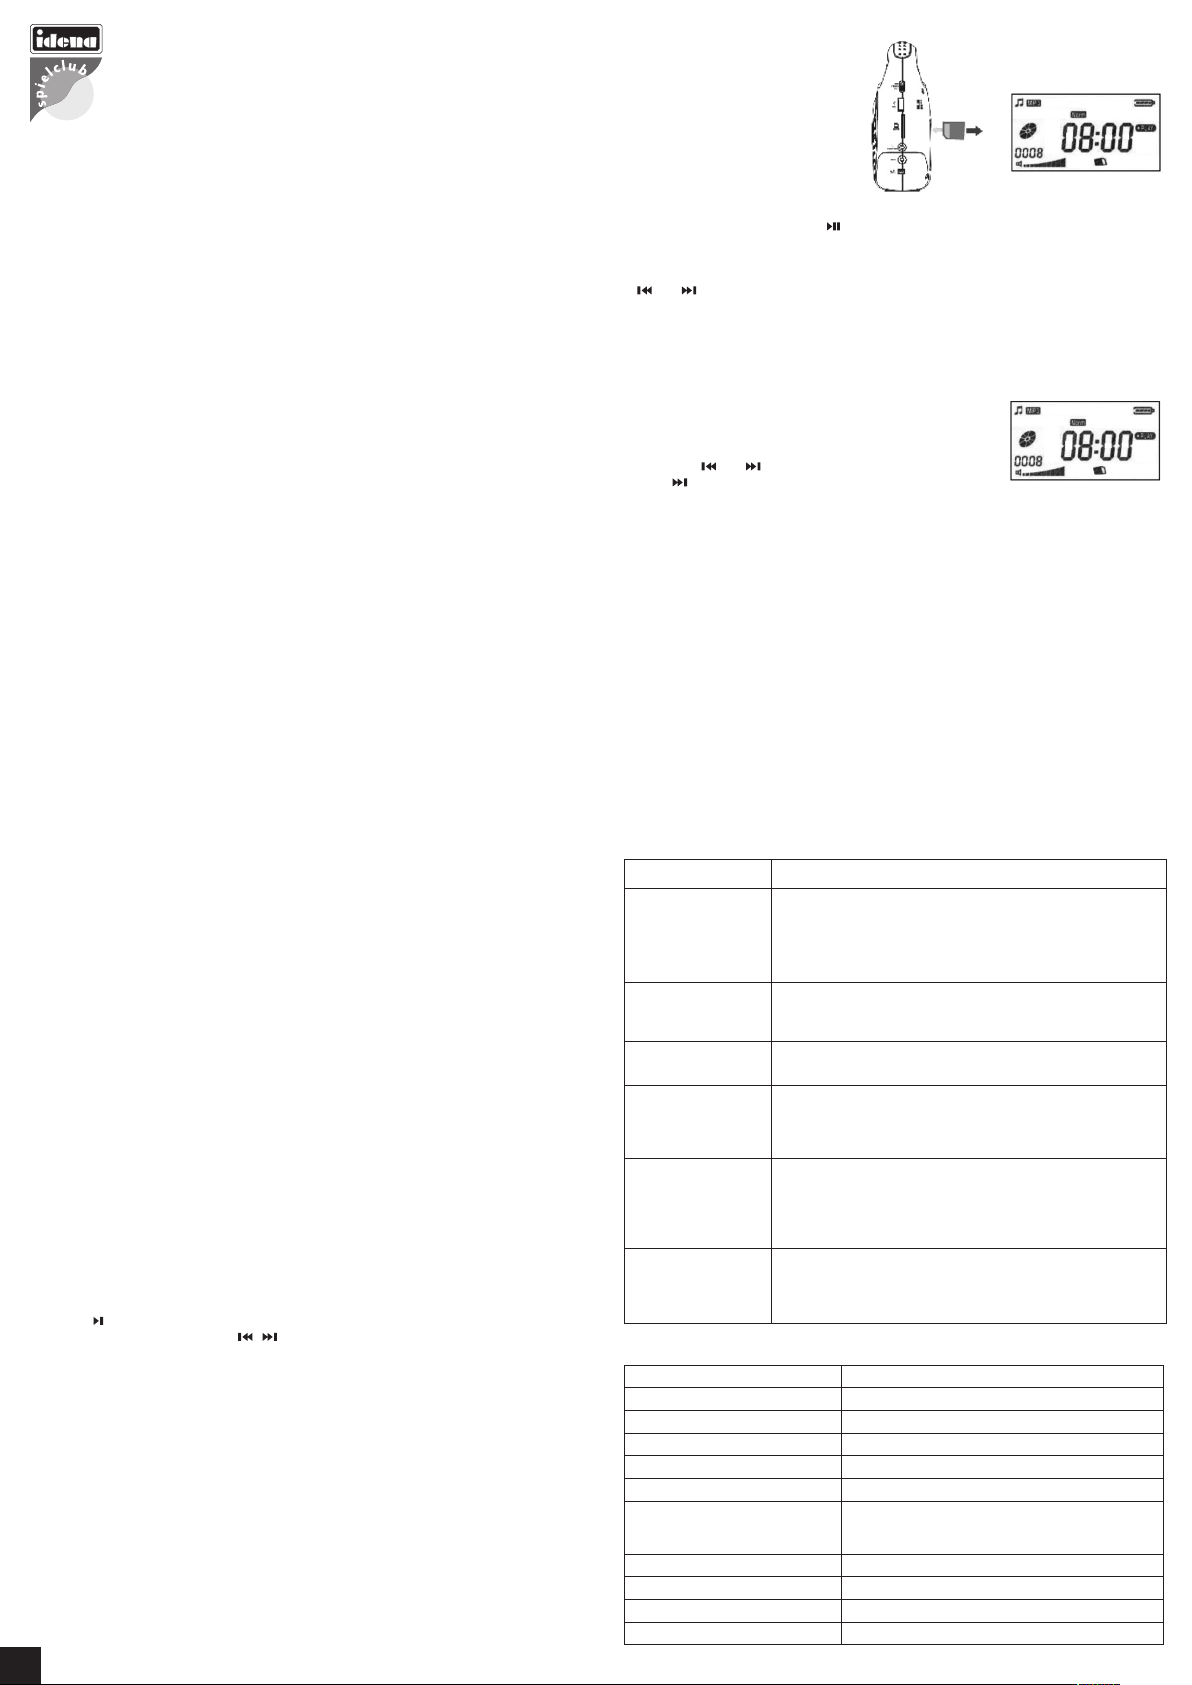
4.4.CONNECT SD CARD OR USB:
1. Insert SD card or USB with music files inside.
2. Slide the power switch to ON, the product
will go into SD card or USB run mode and
play music automatically after it completes
initialization.
3. Play / Pause
When playing music, press to pause
and press it again to resume playing.
4. Previous track / Next track
Press or to play previous track or next track.
5. Volume Up/Down
Press volume “UP“ / “DOWN“ to increase or decrease speaker and headphone output volume.
6. Change EQ mode
a. When playing music in SD card or USB mode, press SCAN / SETUP button to go into EQ
selecting mode, at this moment the current EQ mode flashes (as shown in the right figure).
b. Press or button to select EQ mode, press button again to enter, the unit will play
music in accordance with your select EQ mode.
7. Use of microphone
a. Take down the microphone and press “MIC ON / OFF / REC“
button and LCD screen will show “MIC ON“.
b. Aim your mouth at microphone and keep 1-2 cm distance and
rotate MIC VOL knob to proper volume and sing alone with the
music.
c. Recording function: Press Button “MIC ON / OFF / REC“ an hold approx. 2 seconds to start
recording function. Press the same button again and hold approx. 2 seconds to stop recording
function. Please note: While using recording function the music will automatically switch off.
d. After use, press “MIC ON / OFF / REC“ button, and the “MIC ON“ will disappear in the LCD
screen. Then replace the microphone and turn “MC VOLUME“ knob to minimum position.
5.TROUBLE SHOOTING
If there is any problem, for example the buttons do not work or the screen freezes, turn off the unit,
wait a few seconds and turn back on. If the player works again it can be used as usual.
A new karaoke experience, just for you! Light and portable, listen
to and sing your favourite songs. With a radio, it also connects to
memory cards or mp3 players.
3.2. Parts/Buttons
1. Microphone
2. Volume up/down
3. Automatic station search / setup
(press Scan / Setup for more than
1 second during play Mode)
4. Speakers
5. Selection of SD / USB / FM / VOICE
6. Microphone ON / OFF / REC
7. Next / forward (in radio mode it goes to
the next station)
8. Previous / back (in radio mode it goes to
the previous station)
9. LCD screen
10. On / Off
11. Play / Pause / radio M+ (next stored
station in radio mode)
12. USB port
13. Memory card slot
14. Earphones input
15. Input for external audio signal
16. DC : 6 V input 800 mA
17. Microphone volume
PROBLEM SOLUTION
It does not turn on
1. Check that the power adapter is properly connected to the device
and the wall socket.
2. Check that the batteries have been positioned correctly.
3. Replace empty batteries.
4. Ensure that it has been switched to ON.
There is no sound 1. Adjust the volume.
2. The speaker does not work if earphones are connected.
Bad radio signal 1. Change the position of the device.
2. Turn off nearby electronic equipment.
Music cannot be
downloaded
properly
1. Check that the USB cable is not damaged or poorly connected.
2. Check that there is enough memory available.
3. Check if the driver is compatible with the device.
No sound comes
from external
devices
1. Check that the connection cable is not damaged or poorly
connected.
2. Check that the external device works properly.
3. Check that it is in External Mode.
4. Adjust the volume.
It does not play
music from the SD
card/USB device
1. Check that they are connected properly.
2. Check that they contain music files.
3. Make sure the files are not damaged.
4. Make sure the devices are not damaged.
Formats played MP3 / WMA
USB port 2.0
USB capacity supported 128 MB – 8GB
SD/MMC capacity supported 128 MB – 8GB
Range of FM frequencies 87 – 108 MHz
Channel memory 20
Power source Batteries: 4 x AA
Power adapter: AC 100 – 240 V, 50/60 MHz,
DC 6 V, 800 mA (positive interior, negative exterior)
Earphone output power <5 + 5 mW
Speaker output power >500 mW
Display LCD
Operating temperature -5°C – 40°C
6. TECHNICAL INFORMATION
3

Radio Player
Art.-Nr. 680.0036
instructions d‘utilisation
ATTENTION
• Ne pas réparer, détériorer ou démonter l‘unité de manière arbitraire.
• Ne pas mettre en contact avec de l‘eau.
• Ne pas installer à l‘extérieur, dans une salle de bain ou sur des surfaces humides.
• Ne pas placer sur une surface instable, inclinée ou dans un endroit qui pourrait provoquer sa chute.
• Ne pas insérer de petits objets dans l‘appareil.
• Ne pas frapper contre des objets durs.
• Protéger l‘appareil de la poussière, huile, fumée et humidité.
• Pour l‘utilisation des écouteurs, régler le volume à un niveau adéquat (un volume excessif pourrait
endommager votre ouïe).
• Ne pas toucher ni brancher un transformateur DC avec les mains humides, au risque de provoquer
une décharge électrique.
• Ne pas utiliser de détergent chimique comme des produits à base d‘alcool ou de solvant pour
nettoyer l‘appareil.
1. CONTENU
1.1. Lecteur
1.2. Câble de connexion avec une fiche de 3,5 mm
2. MISE EN SERVICE DE L‘APPAREIL
2.1. Avec piles (non comprises) (voir page 1)
• Si vous n‘utilisez pas le produit pendant une longue durée (30 jours au plus), éteignez-le
complètement et retirez les piles.
• Lorsque les piles sont usagées, le produit cesse automatiquement de fonctionner.
Dans ce cas, enlevez les piles.
2.2. Avec raccordement secteur (adaptateur secteur non inclus) (voir page 1)
• Assurez-vous que le voltage local correspond au voltage du transformateur.
• Utilisez le produit uniquement avec ce type de transformateur au risque de causer des dommages
irréparables.
• Le transformateur doit être examiné régulièrement afin d‘éviter tout danger potentiel; examiner les
éventuels dommages de la prise, du câble ou cordon, du boîtier ou autres parties.
• Le jouet ne doit pas être utilisé s‘il est endommagé.
• Le transformateur n‘est pas un jouet.
Caractéristiques du transformateur
Puissance d‘entrée: AC 100-240V, 50/60 Hz.
Puissance de sortie: DC 6V, 800 mA. Intérieur positif et extérieur négatif.
3. DESCRIPTION DE L‘APPAREIL (voir page 1)
3.1. Icônes de l‘écran
3.1.1. Mode Carte SD
1. USB
2. Volume
3. Total des fichiers et numéro du fichier courant
4. Affichage de lecture
5. Mode musique
6. Format de la musique
7. Mode EQ
8. Capacité de la batterie
9. Lecture
10. Pause
11. Temps écoulé
12. Mic
13. Entrée ligne
14. Carte SD
3.1.2. Mode Radio
1. Volume
2. Numéro de canal
3. Mode radio
4. Niveau des piles
5. Fréquence FM
4. FONCTIONNEMENT
Le produit reconnaît automatiquement les dispositifs connectés et choisit le mode correspon-dant.
Si aucun appareil n‘est connecté, il s‘allumera par défaut en Mode Radio.
4.1. Mode Radio
Recherche de stations:
• Automatique: appuyer sur le bouton 3 pour lancer et enregistrer la recherche de stations automa-
tiquement (fréquences 87-108 MHz), et sur le même bouton pour arrêter la recherche. Après celte
recherche automatique, la première station FM est lancée.
Appuyez sur à plusieurs reprises pour sélectionner n‘importe quelle station enregistrée.
• Manuelle: appuyez sur / à plusieurs reprises pour rechercher les stations
(intervalles de 0,1 MHz).
4.2. Connexion d‘un appareil externe (mp3, Hi-Fi...)
• Assurez-vous que l‘appareil externe fonctionne correctement.
• Connectez le câble d‘entrée à l‘appareil externe et au lecteur. Le Mode sera automatiquement
modifié.
• Pour quitter ce mode, enlevez le câble.
4.3. Connexion à l‘ordinateur
• Éteignez le lecteur. - Insérez la carte SD.
• Connectez le câble USB à l‘ordinateur et à l‘appareil, une icône apparaît sur l‘écran de l‘appareil et
une fenêtre s‘ouvre sur l‘écran de l‘ordinateur.
• Une fois connecté, vous pourrez copier ou supprimer des fichiers de la carte SD et la formater.
• Le transfert de données terminé, retirez le dispositif USB de l‘ordinateur et du lecteur.
Remarque: compatible avec Windows 98 / 2000 / XP / Vista / 7
4.4. CONNECTER UNE CARTE SD
OU UNE CLÉ USB:
1. Insérez une carte SD ou une clé USB qui
contient des fichiers musicaux.
2. Placez l‘interrupteur en position ON, le
lecteur passe en mode lecture de carte SD
ou clé USB et joue la musique automati-
quement une fois l‘initialisation terminée.
3. Lecture/Pause
Quand vous écoutez de la musique, appuyez une fois sur pour mettre en pause, et une deuxi-
ème fois pour reprendre la lecture.
4. Piste précédente / Piste suivante
Appuyez sur ou sur pour lire la piste précédente ou suivante.
5. Augmenter ou diminuer le volume
Appuyez sur „UP“/“DOWN“ pour augmenter (UP) ou diminuer (DOWN) le volume de sortie dans les
écouteurs ou les haut-parleurs.
6. Changer le mode EQ
a. Quand vous écoutez de la musique en mode carte SD ou clé
USB, appuyez sur le bouton SCAN / SETUP pour entre en mode
de sélection EQ. Le mode EQ courant s‘affiche en clignotant.
(comme sur la figure à droite)
b. appuyez sur le bouton ou sur pour choisir le mode EQ, puis à nouveau sur le bouton
pour confirmer. Le lecteur fonctionne alors dans le mode EQ choisi.
7. Utilisation du microphone
a. Prenez le microphone et appuyez sur le bouton „MIC ON / OFF / REC“. L‘écran LCD affiche „MIC ON“
b. Placez le microphone à 1 ou 2 centimètres de votre bouche et faite tourner le bouton MIC VOL
pour ajuster le volume du son à votre convenance et chanter avec la musique.
c. Fonction enregistrement: Appuyer sur la touche „MIC ON / OFF / REC“ pendant 1 à 2 secondes
pour enregistrer, puis appuyer de nouveau longuement pour arrêter l‘enregistrement. Veuillez
noter que la musique s‘arrête automatiquement pendant l‘enregistrement.
d. Une fois terminé, appuyez sur le bouton „MIC ON / OFF / REC“ et les mots „MIC ON“ disparais-
sent de l‘écran LCD. Remettez le microphone en place et tournez le bouton „MIC VOLUME“ en
position minimum.
5. DÉPANNAGE
Si un problème survient, tel que la panne des boutons ou le blocage de l‘écran, éteignez l‘appareil,
attendez quelques secondes puis rallumez-le. Si le lecteur fonc-tionne à nouveau, il peut être utilisé
normalement.
Un nouveau karaoké à leur mesure ! Léger et portable, pour écouter et
chanter partout leurs chansons préférées. Il dispose d‘une radio et peut
être connecté à une carte mémoire ou à un lecteur mp3.
3.2. Composants/boutons
1. Microphone
2. Bouton de réglage du volume
3. Recherche automatique de stations /
Configuration (en appuyand‘une seconde
en Mode Lecture)
4. Haut-parleur
5. Sélection des sources SD / USB / FM
6. Microphone allumé / éteint.
7. Suivant / Avant (en Mode Radio, passe à
la station suivante)
8. Précédent / Arrière (en Mode Radio,
passe à la station antérieure)
9. Écran LCD
10. Marche/Arrêt
11. Lecture / pause / station programmée
suivante (en Mode Radio)
12. Port USB.
13. Entrée carte de mémoire
14. Entrée écouteurs
15. Entrée pour signal audio externe
16. Entrée DC: 6V
17. Volume microphon
PROBLÈME SOLUTION
L‘appareil ne s‘allume
pas
1. Vérifiez que le transformateur est correcte ment connecté à
l‘appareil et à la prise de courant.
2. Vérifiez que les piles sont bien disposées.
3. Remplacez les piles usagées.
4. Assurez-vous que l‘appareil est en.
Il n‘y a pas de son
1. Réglez le volume.
2. Le haut-parleur ne fonctionne pas lorsque les écouteurs sont
connectés.
Ma uvaise réception 1. Déplacez l‘appareil.
2. Éteignez les appareils électroniques à.
Impossible de
télécharger correcte-
ment de la musique
1. Vérifiez que le câble USB est en bon état et bien connecté.
2. Vérifiez qu‘il y a suffisamment de mémoire.
3. Vérifier que le «driver» est compatible avec l‘appareil.
Pas de son avec les
appareils externes
1. Vérifiez que le câble est en bon état et bien connecté.
2. Vérifiez que l‘appareil externe fonctionne correctement.
3. Vérifiez que l‘appareil est en Mode Externe.
4. Réglez le volume.
L‘appareil ne lit pas la
musique de la carte
SD / dispositif USB
1. Vérifiez que tous les branchements sont corrects.
2. Vérifiez que la musique se trouve sur le périphérique.
3. Vérifiez que les fichiers ne sont pas endommagés.
4. Vérifiez que ces dispositifs ne sont pas.
Formats reproduits MP3 / WMA
Port USB. 2.0
Capacité de l'USB 128 MB – 8 GB
Capacité de la carte SD 128 MB – 8 GB
Fréquences FM 87 – 108 MHz
Mémoire de stations 20
Source d‘alimentation Piles: 4 x AA
Transformateur: AC 100 – 240 V, 50/60 MHz,
DC 6 V, 800 mA
Puissance de sortie écouteurs <5 + 5 mW
Puissance de sorte haut-parleur >500 mW
Écran LCD
Température de fonctionnement -5 °C – 40 °C
6. CARACTÉRISTIQUES TECHNIQUES
4
Table of contents
Languages:
Other Idena Karaoke System manuals

Popular Karaoke System manuals by other brands

Vocal-Star
Vocal-Star VS-400 user manual

Sakar
Sakar Disney DESCENDANTS 68035-TRU owner's manual

LENCO
LENCO BTC-055 user guide

Radio Shack
Radio Shack 32-1156 owner's manual

Modern Electronics Factory
Modern Electronics Factory JT1098 user guide

Singing Machine Kid's
Singing Machine Kid's SMK1010 instruction manual


