Spotnails MET567 User manual

BLUETOOTH KARAOKE STAGE WITH DUAL
MICROPHONES AND LIGHT EFFECTS
MODEL: MET567
USER MANUAL
CAUTION: THIS IS NOT A TOY!
Electrically Operated Product - Please use care when plugging into
AC outlet. For best use: remove shoes before stepping on the mat.

1
WARNING
Follow the advice below for safe operations.
1. Read these instructions.
2. Keep these instructions.
3. Heed all warnings.
4. Follow all instructions.
5. Do not use this apparatus near water.
6. Cleaning – Unplug this product from the wall outlet before cleaning. Do not use liquid
cleaners or aerosol cleaners. Clean only with a dry cloth.
7. Do not install near any heat sources such as radiators, heat registers, stoves, or other
apparatus (including amplifiers) that produce heat.
8. Only use attachments/accessories specified by the manufacturer.
9. This apparatus shall not be exposed to dripping or splashing water and that no object
filled with liquids such as vases shall be placed on the mat or apparatus
10.Do not use this machine outdoor.
11.Stop operation immediately if any liquid or solid object should fall into the mat or
cabinet.
12.Before use, check that the rated voltage of your unit matches your local voltage.
13.Ensure a minimum distance of 2 inches (5 cm) around the apparatus for sufficient
ventilation.
14.Ensure that the ventilation is not impeded by covering the ventilation openings with
items, such as newspapers, table cloths, curtains, etc.
15.Do not place naked flame sources, such as lighted candles on the apparatus.
16.Use the apparatus only in moderate climates.
17.Do not expose the AC/DC adaptor and apparatus to dripping or splashing.
18.The AC/DC adaptor of apparatus should not be obstructed and should be easily
accessed during intended use.
19. To be completely disconnected from the power input, the AC/DC adaptor of apparatus
should be disconnected from the mains.
20.If the unit is not to be used for a long period of time, make sure that all power sources
are disconnected from the unit. Unplug the AC adapter from the wall outlet. Make it a
practice to remove the AC adapter by grasping the plastic body and not by pulling the
cord.
Should any trouble occur, disconnect the AC Adapter and refer servicing to qualified
personnel.

2
COMPLIANCE WITH FCC REGULATIONS
This device complies with Part 15 of the FCC Rules. Operation is subject to the following two
conditions:
(1) This device may not cause harmful interference, and
(2) This device must accept any interference received, including interference that may cause
undesired operation.
This equipment has been tested and found to comply with the limits for a class B digital device,
pursuant to Part 15 of the FCC Rules. These limits are designed to provide reasonable protection
against harmful interference in a residential installation. This equipment generates, uses and can
radiate radio frequency energy and, if not installed and used in accordance with the instructions, may
cause harmful interference to radio communications. However, there is no guarantee that
interference will not occur in a particular installation. If this equipment does cause harmful
interference to radio or television reception, which can be determined by turning the equipment off
and on, the user is encouraged to try to correct the interference by one or more of the following
measures:
•Reorient or relocate the receiving antenna.
•Increase the separation between the equipment and receiver.
•Connect the equipment into an outlet on a circuit different from that to which the receiver is
connected.
•Consult the dealer or an experienced radio/TV technician for help.
CAUTION
Changes or modifications not expressly approved by the party responsible for compliance could void
the user’s authority to operate the equipment.
CONTENTS OF YOUR PRODUCT
MET567 Karaoke Machine x 1 set
LightedStageMat x1pc
Aux In Cable x 1 pc
Microphone with Cable x 2 pcs
AC Adapter x 1 pc
User Manual x 1 pc
INSTALLATION
CAUTION: This product contains small parts, only adults should install this product.
1. Carefully remove all packing materials to find parts below for assembly.
A. Microphone stand and base Connector
B. Microphone stand (wider outer pole)
C. Height adjusting knob
D. Microphone stand (upper pole)
E. Microphone holder and cradle connector
F. Fixing screw
G. Main Unit Base

3
2. Fully insert the Microphone stand (wider outer pole) into the base connector 䐟.
3. Fully insert the cradle connector into the Microphone stand (upper pole) and fix it by
fixing screw (included) 䐠.
4. Turn the height adjusting knob in counter-clockwise direction to loosen the joint, then
move upper pole up and down to adjust the microphone stand to desired height.
5. After stand height is set, tighten it up by turning the Height adjusting knob in clockwise
direction 䐡.
6. Move the unit to the location you want to play and connect accessories by following
operations in this manual.
3
1
2

4
LOCATION OF CONTROLS
1. Mic. Volume Control Knob
2. Master Volume Control Knob
3. Play/Pause/Pair Button
4. Power Button
5. Power Indicator
6. BT Pair Indicator
7. Light on/off Pedal
8. Mat Control Out Connector
9. Mic. Input Jack
10. AUX IN Jack
11. DC Input Jack
12. Mic. Holders
13. Tablet/Smartphone Holder
14. Height adjustable Mic. Stand
12
34567
89
10
12 13 14
11
12
9

5
POWER SOURCES
AC OPERATION
Plug the supplied AC adapter into the DC jack (12V DC input) on the rear panel of the unit
and connect to a standard AC wall socket. Press the POWER ON/OFF button on the
Karaoke system to turn on and the POWER INDICATOR will light.
Note: When the unit is not operated for long periods of time, unplug the AC adapter from the
unit and wall outlet.
CONNECTING LIGHTED STAGE MAT
WARNING - Please ensure the floor that you are going to use the lighted stage mat on is
completely dry to avoid slipping.
To prevent the lighted stage mat from getting damaged:
-To keep away from water.
-Do not step on the LED strip surrounding 4 sides of mat.
-Do not fold the LED strip.
-Take off shoes before you step on the mat.
1. Plug the lighted stage mat into the MAT CONTROL OUT connector at rear panel of the
base, change to period
2. LED surrounding 4 sides of the mat will be lighting and changing with the music.
Note: If the brightness is glaring, turn on room lights.
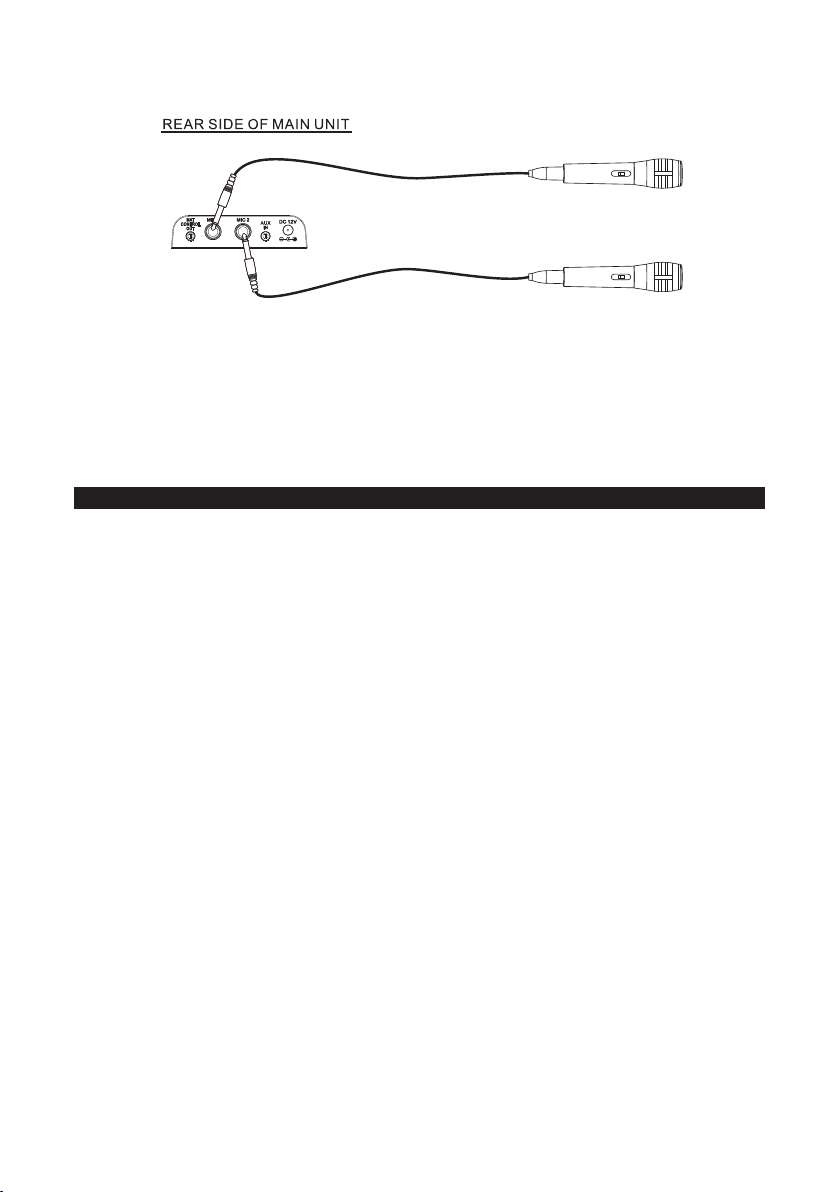
CONNECTING THE MICROPHONE
WARNING - Tapping or dropping the microphone while it is on can permanently damage
your microphone. Do not swing the microphone around by the cord.
Note: To prevent feedback or whistling from occurring, please be sure that the microphone
is not too close to unit’s speaker.
6
1. Connect the supplied Microphone to either one of the MIC input jacks.
2. Press the POWER button to turn on the unit, the POWER INDICATOR will light.
3. Slide the ON/OFF switch located on the Microphone to the ON position and speak or
sing into the Microphone. The Microphone sensitivity and loudness can be adjusted as
required by turning the MIC VOLUME control and/or MASTER VOLUME control.
4. Turn off the unit after use by pressing the POWER button again. The POWER
INDICATOR will go off. Place the microphone (s) in the Mic Holder (s) of the stand.
USING AUX IN FUNCTION
This feature allows you to plug a tablet or smartphone (both not included) which contains
downloaded music and lyrics for Karaoke singing.
1. Placed your external device in the Tablet/Smartphone Holder on Mic Stand.
2. Plug a 3.5mm audio cable (included) into the headphone jack of your tablet or
smartphone and connect the other end (3.5mm plug) into the AUX IN jack on the rear
side of this unit. The unit will automatic change to AUX IN mode.
WARNING - Please take extra care to plug in the AUX IN jack but not MAT CONTROL
OUT connector to avoid damaging your external device.
3. Press the POWER button to turn on the unit, POWER INDICATOR will light. Turn on
your external device as well.
4. Select a Karaoke song stored in your tablet or smartphone to play. Slide the ON/OFF
switch located on the Microphone to the ON position and speak or sing into the
Microphone. The Microphone sensitivity and loudness can be adjusted as required by
turning the MIC VOLUME control and/or MASTER VOLUME control.
WARNING - Do not use excessive force to tap your tablet or smartphone screen when
it’s placed on Tablet/Smartphone Holder. It may cause stand falling down
and damage to your external device.
5. Adjust the volume control of your audio player and then the MASTER VOLUME
CONTROL of the unit to obtain the desired audio sound level.
6. Turn off both the external audio player and this unit after use, unplug the audio cable
from AUX IN jack.

7
Note: If it is not in use AUX In function, please unplug the AUX In cable on the rear
side of this unit.
Bluetooth OPERATION
External devices that have a built-in Bluetooth feature can connect wirelessly to the unit.
Getting Connected
Pairing a Bluetooth device
1. Make sure unplug the AUX In cable on the rear side of this unit.
2. Press the POWER button to turn on the unit, the unit is in BT mode. BT indicator will
flash.
3. Set the Bluetooth function of your external device to on and begin searching for devices.
Note: The effective distance between your external device and this apparatus is 10
meters (30 feet).
4. Once “AI KARAOKE MAT” appears on the paired device list of your external device,
select it.
5. If you are asked for a password, enter “0000”
6. An audible chime will be heard and BT indicator light blue steadily that indicates a
connection has been established.
7. A few seconds later your Bluetooth connection should be ready to use.
Note: After initial pairing, the unit will stay paired unless unpaired manually by the user or
erased due to a reset of the device. If your devices should become unpaired or your find it is
unable to connect, repeat the above steps or press & hold the PAIR button again.
Playing Music from an External Bluetooth Device
1. Follow the “Getting Connected” steps above to pair your external device.
2. Turn on the music player program on your external device and set it to play.
3. Audio played through the connected Bluetooth Device will now be heard through the
speakers.
4. Short press the PLAY/PAUSE button to pause or resume play.
5. Adjust the MASTER VOLUME CONTROL of the unit to obtain the desired audio sound
level.

8
RESETTING THE UNIT
If the system does not respond or exhibits erratic or intermittent operation, you may have
experienced an electrostatic discharge (ESD) or a power surge that triggered the internal
microcontroller to shut down automatically. If this occurs, simply disconnect the AC Adapter.
Wait for at least 3 minutes and then setup the unit again as if you were using it for the very
first time.
CARE AND MAINTENANCE
1. Clean your unit with a damp (never wet) cloth. Solvent or detergent should never be
used.
2. Avoid leaving your unit in direct sunlight or in hot, humid or dusty places.
3. Keep your unit away from heating appliances and sources of electrical noise such as
fluorescent lamps or motors.
TROUBLESHOOTING GUIDE
PROBLEM POSSIBLE CAUSE SOLUTION
No power when
plugged in
AC adapter is not plugged into the
AC outlet.
Insert the AC adapter into the AC outlet.
The AC outlet may not have
power.
Check the outlet with a working lamp or other
electrical appliance.
No sound MASTER VOLUME control is set
to minimum.
Turn up the master volume.
Unit is not linked with the
Bluetooth enabled device.
Go through “Pairing a Bluetooth device” process
to link the unit.
Unit placement out of range Relocate the unit within Bluetooth operating
range (30 feet)
Cannot sing
through the Mic.
Improper mic volume control. Adjust MIC and MASTER volume level controls
to appropriate levels.
Mic is off. Turn on mic with the ON/OFF switch located on
the microphone.
Mic is not properly plugged in. Insert the mic plug into either MIC 1 or MIC 2
jack of the unit properly.

9
SPECIFICATIONS
Audio Output Power : 2.5 W (RMS) (Mono)
Sound Source input : Bluetooth, Aux In
Aux In Jack : 1 x 3.5 mm
Microphone Inputs : 2 x 600 ohms Impedance with 6.3 mm jack
Microphone : 2 x Dynamic Microphone
Power Source : AC Adapter: Input AC 100-240V~ 50/60Hz 0.8A
Output DC 12 V 0.6A
Due to continuing improvement, the features and the design are subject to change without
notice.
Table of contents


