iDRY Standard User manual


Introduction 4.........................................................
Safety 5....................................................................
Specifications 5.......................................................
Technical Drawings 6.............................................
iDry Standard 6.......................................................................
iDry PLUS 7..............................................................................
Installation & Startup: 8.........................................
Placement 8..............................................................................
Track & Trolley Installation 9.................................................
Power 12...................................................................................
Plumbing 13..............................................................................
Loading 14................................................................................
Closing Door 16........................................................................
Powering Up 17........................................................................
Kiln Monitoring 19.................................................
Daily Monitoring 19.................................................................
Unloading Kiln 19...................................................
Opening Door 19..................................................................................................................
Checking Oven Weighted Samples 19.................................................................................
CORRECT USE 20..................................................
Lumber preparation 20.......................................................................................................
Baffling 20...........................................................................................................................
Proper Stacking 20..............................................................................................................
Reducing Degrade 20..........................................................................................................
Winter vs Summer 20..........................................................................................................
Initial Moisture Content 21.................................................................................................
iDRY User Manual
© 2020 iDRY, LLC
2

Mixing Species 21................................................................................................................
Mixing Thickness 21............................................................................................................
Frozen Lumber 21................................................................................................................
Drying Interruptions 21.......................................................................................................
MAINTENANCE & BASIC PROCEDURES 22......
Door Seal 22.............................................................................
Handwheels 23........................................................................
Chamber Interior 23................................................................
Drain 23...................................................................................
Vacuum Pump 26.....................................................................
HMI 27......................................................................................
More Information 30...............................................................
Troubleshooting 31.................................................
Troubleshooting and Alarms 31..........................................................................................
Warning labels 34...................................................
Terms and Conditions 35.......................................
iDRY User Manual
© 2020 iDRY, LLC
3
Introduction
Congratulations on your purchase of an IDRY Systems iDRY lumber dryer. This equipment
is a product of IDRY, LLC’s quality engineering and manufacturing. With a high quality
rugged stainless steel pressure vessel and state of the art electronics this iDRY dryer will,
with proper maintenance provide long term satisfactory service. To obtain the best use of
your iDRY dryer, please read this manual carefully. It will help you become familiar with the
operation of the equipment and contains helpful information regarding installation,
operation, maintenance and troubleshooting.
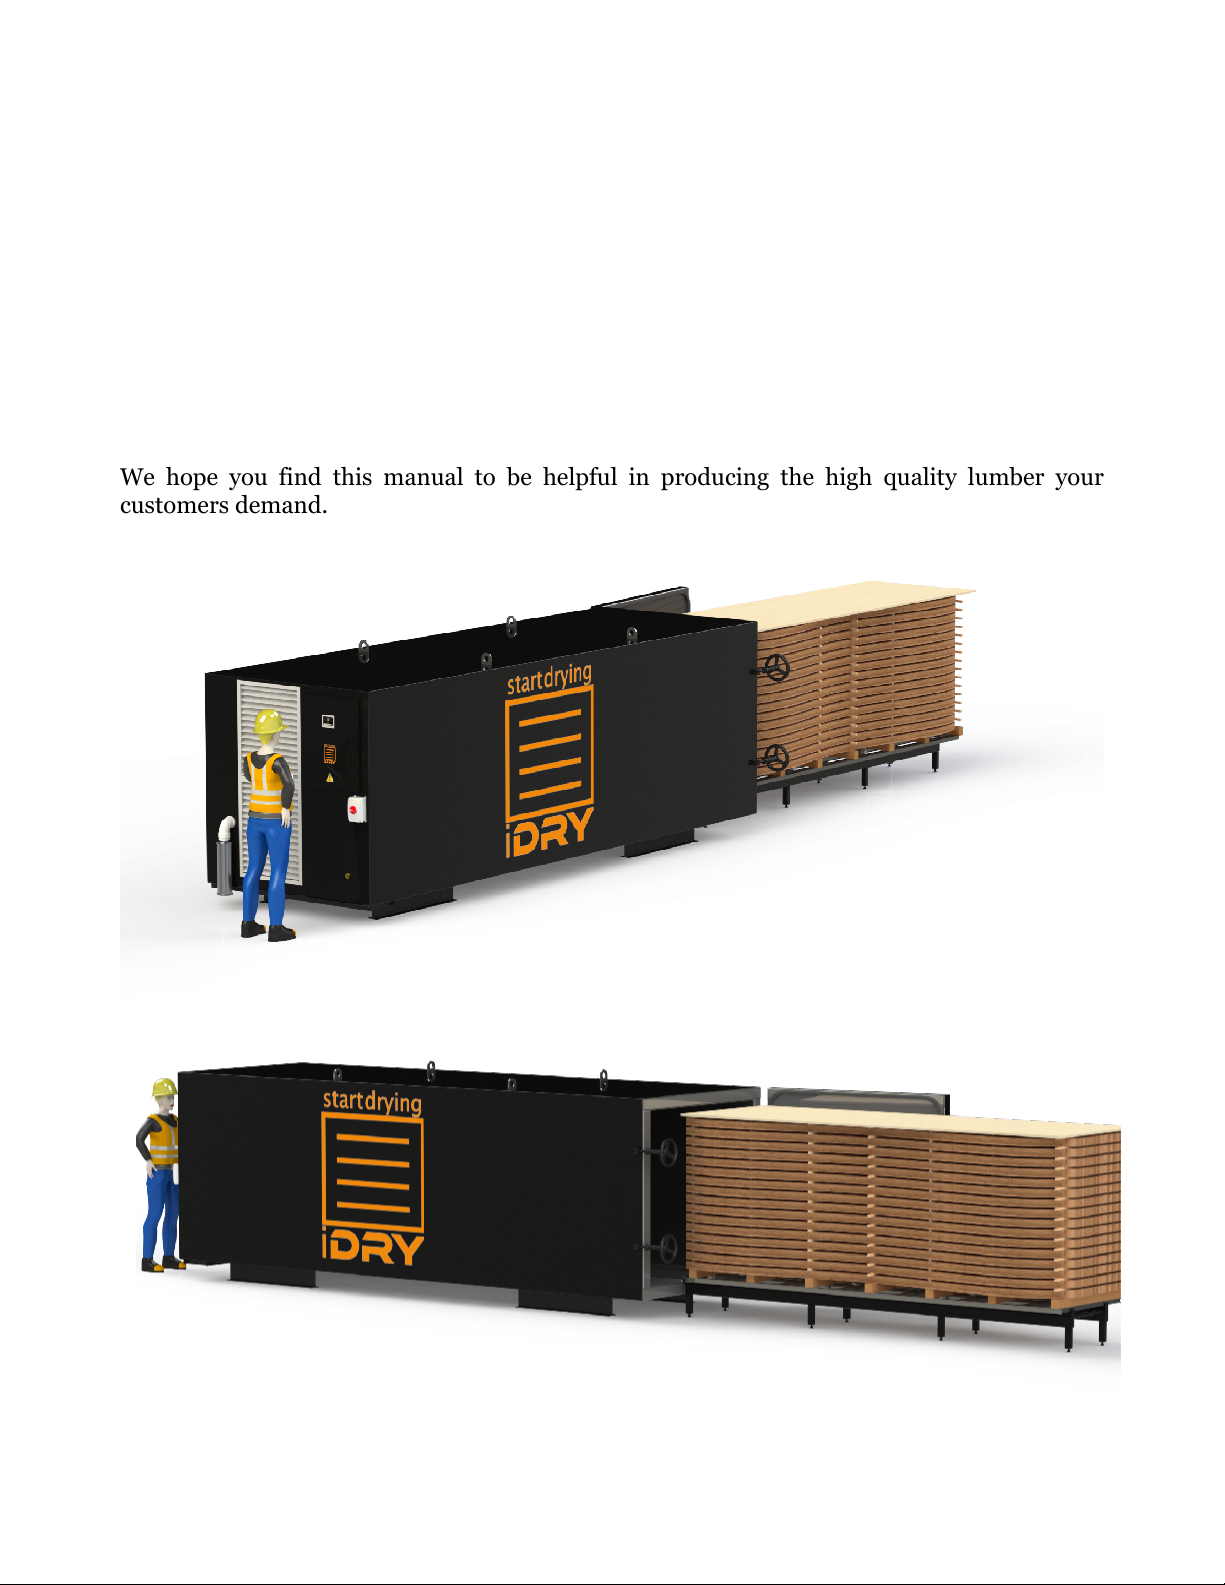
We hope you find this manual to be helpful in producing the high quality lumber your
customers demand.
iDRY User Manual
© 2020 iDRY, LLC
4

Safety
This equipment should be operated by trained personnel and maintained by certified
professionals. The equipment is intended for non-treated lumber only and should not be
used for any other purpose. Any modifications of the equipment or use of unauthorized parts
is forbidden unless approved by the original manufacturer. Any electrical or plumbing work
performed on this installation should be performed by certified professionals working to
local codes.
Safety warnings are noted in each section; example below:
Specifications
The following machine specifications are for iDRY Standard and iDRY Plus Lumber Dryers:
WARNING: THE VOLTAGES INSIDE THE CONTROL BOX ARE HIGH ENOUGH TO
CAUSE DEATH IF YOU COME IN CONTACT WITH THEM.
Main Power
208-240 VAC 1 Phase, 60 Amps!
Water Supply
Soft & Clean Water @ 70 Deg F / 21 C or less with avg flow of 0.75
Gallons per Minute / 2.8 Liters per minute, MIN 50 PSI
Drains
Air Gap (included) required - 2inch / 51mm PVC Connection!
Installation Environment
Above freezing dry space. For best operating performance ambient
temperature should be kept above 60 F / 15.5 C
Remote Connection
Ethernet Cable 200 Feet / 60 Meters max!
Lumber
3/4inch / 1.9cm or greater stickers recommended!
Lumber Load Capacity
STANDARD: 13ft Long x 48in Wide x 55in Tall / 3.96M Long x 1.2M Wide
x 1.4M Tall!
PLUS: 17ft Long x 60in Wide x 65in Tall / 5.18M Long x 1.5M Wide x
1.65M Tall
Drying Time
Approximately 1 week per 1 inch (2.54cm) of thickness (Maple)
iDRY User Manual
© 2020 iDRY, LLC
5
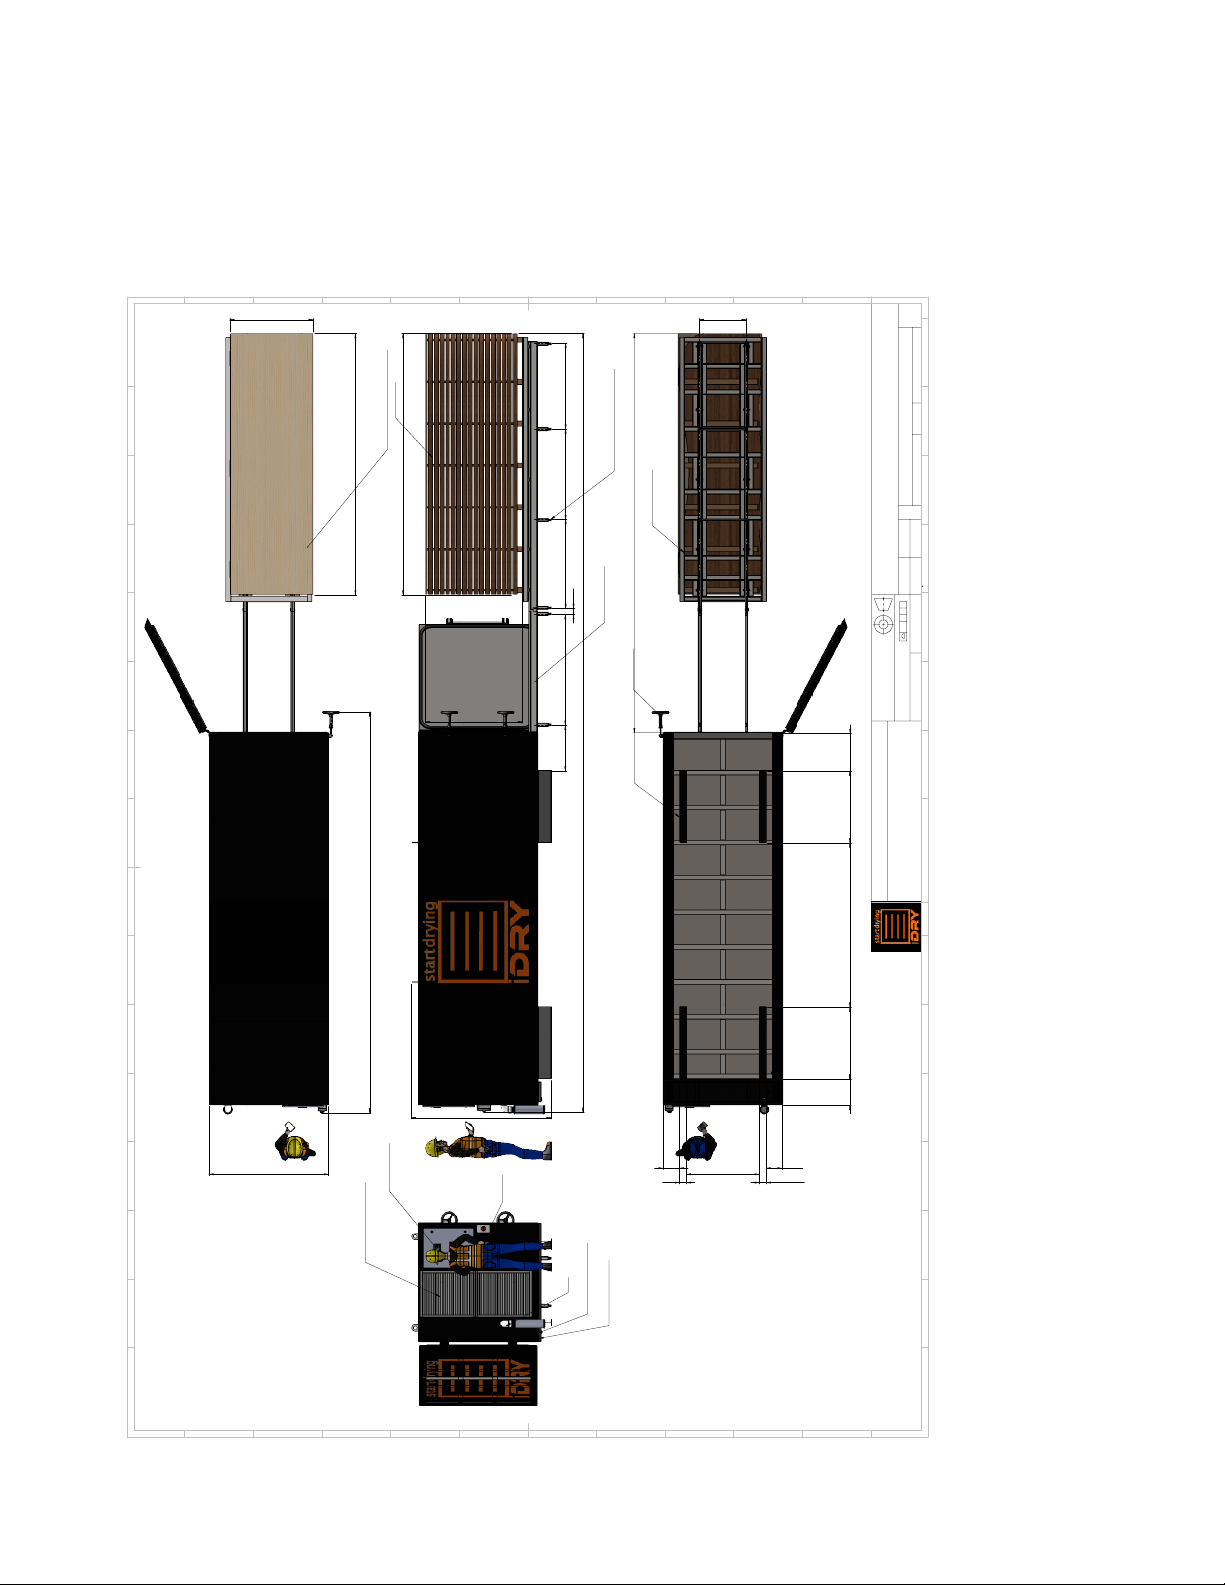
Technical Drawings
iDry Standard
iDRY User Manual
© 2020 iDRY, LLC
6
446.83
55.75
150.00
48.98 52.00 51.02
80.27
3.50
63.50 26.16
WOOD PILE
SHIM FEET SO WATER ON FLOOR
FLOWS TO BACK DRAIN ON
CONTROL PANEL END
ADJUST LEVELING FEET ON TRACK
FOR SMOOTH TROLLEY ROLLING
SIDE VIEW
OPTIONAL BRIDGE
150.00
48.00
230.02
68.62
RECOMMENDED PLYWOOD TOP
TOP VIEW
21.40
41.25 94.28 41.25
3.94
15.00
229.02
9.09
41.89
9.39
3.94
27.00
KILN CHAMBER FEET
INTERNAL TROLLEY
HAND WHEEL
BOTTOM VIEW
208-230v
1PH
60A
POWER
VENT
DRAIN CONNECTION
AIR GAP CONNECTION
0.75GPM
WATER CONNECTION
TOUCH SCREEN
REMOVABLE VENT PANELS
END VIEW
F
8
E
D
C
B
A
G
H
J
K
L
M
7
6
5
4
3
2
1
9
10
11
12
13
14
15
16
9
1
2
3
4
5
6
7
8
10
11
12
K
G
A
B
C
D
E
F
H
J
SEE NOTES SEE NOTES
DWG BY:
0.1
MATERIAL:
INTERPRET GEOMETRIC
TOLERANCES PER ANSI Y14.5-2009
UNLESS OTHERWISE SPECIFIED
DIMENSIONS ARE IN INCHES
PART NUMBER:
MOD BY:
DESCRIPTION:
CHK BY:
A1
SIZE:
SCALE:
SHT
20
OF
23
REV
1:50
iDRY Drying Systems
20
JAP
C
BA
FINISH:
MASS:
UNLESS OTHERWISE SPECIFIED
ALL UNTOLERANCED
DIMENSIONS ARE BASIC:
INSTALLATION
APR BY:
Green Mountain Mechanical Design, Inc
29 PITMAN RD BARRE, VT 05641
©2018 All Rights Reserved
CONFIDENTIAL
13
14
15
16
L
M
LAST SAVED
Monday, February 11, 2019 3:24:54 PM

iDry PLUS
iDRY User Manual
© 2020 iDRY, LLC
7
45 52 52 51
3.00
41 39.25 25 41 121 41 41
96.27
554.96
SIDE VIEW
OPTIONAL BRIDGE
ADJUST LEVELING FEET
ON TRACK FOR SMOOTH
OPERATION
252.00
82
264
9
4 58
9
4
41 37 121 41 22
BOTTOM VIEW
CHAMBER FEET
HANDWHEEL
INTERNAL TROLLEY
60.00
200.00
94.43
TOP VIEW
RECOMMENDED PLYWOOD TOP
REMOVABLE
VENTED PANELS
0.75GPM
WATER CONNECTION
208-230V
1PH
60A POWER
TOUCHSCREEN
LIFT POINTS
WATER DRAINS
END VIEW
SHIM FEET SO WATER ON FLOOR
FLOWS TO BACK DRAIN ON
CONTROL PANEL END
FOR OPTIMAL PERFORMANCE INSTALL
IN ABIENT TEMPERATURES ABOVE 60F
F
8
E
D
C
B
A
G
H
J
K
L
M
7
6
5
4
3
2
1
9
10
11
12
13
14
15
16
9
1
2
3
4
5
6
7
8
10
11
12
K
G
A
B
C
D
E
F
H
J
SEE NOTES SEE NOTES
DWG BY:
0.1
MATERIAL:
INTERPRET GEOMETRIC
TOLERANCES PER ANSI Y14.5-2009
UNLESS OTHERWISE SPECIFIED
DIMENSIONS ARE IN INCHES
PART NUMBER:
MOD BY:
DESCRIPTION:
CHK BY:
A1
SIZE:
SCALE:
SHT
21
OF
23
REV
1:50
iDRY Drying Systems
1
JAP
C
BA
FINISH:
MASS:
UNLESS OTHERWISE SPECIFIED
ALL UNTOLERANCED
DIMENSIONS ARE BASIC:
INSTALLATION
APR BY:
Green Mountain Mechanical Design, Inc
29 PITMAN RD BARRE, VT 05641
©2018 All Rights Reserved
CONFIDENTIAL
13
14
15
16
L
M
LAST SAVED
Wednesday, April 17, 2019 4:45:27 PM

Installation & Startup:
Complete the following prior to iDRY Systems assisted startup procedure:
*You can also find tutorial videos here: www.youtube.com/watch?v=Mg9MixxbL-M
Placement
1
Locate Kiln Chamber in Dry, Climate controlled space at recommended temperature of 70 DegF!
/ 21.1 C
2
Loosen Handwheels just enough to rotate them out of the way (if you continue to loosen the
threads the hand wheels will come off.
3
Shim chamber to ensure water flows to drain (chamber is pre-shimmed 1/2inch / 1.27cm)
4
Remove the ratchet Straps, then remove Track, Trolley and Bridge sections from chamber. Set
aside the cardboard box.
iDRY User Manual
© 2020 iDRY, LLC
8
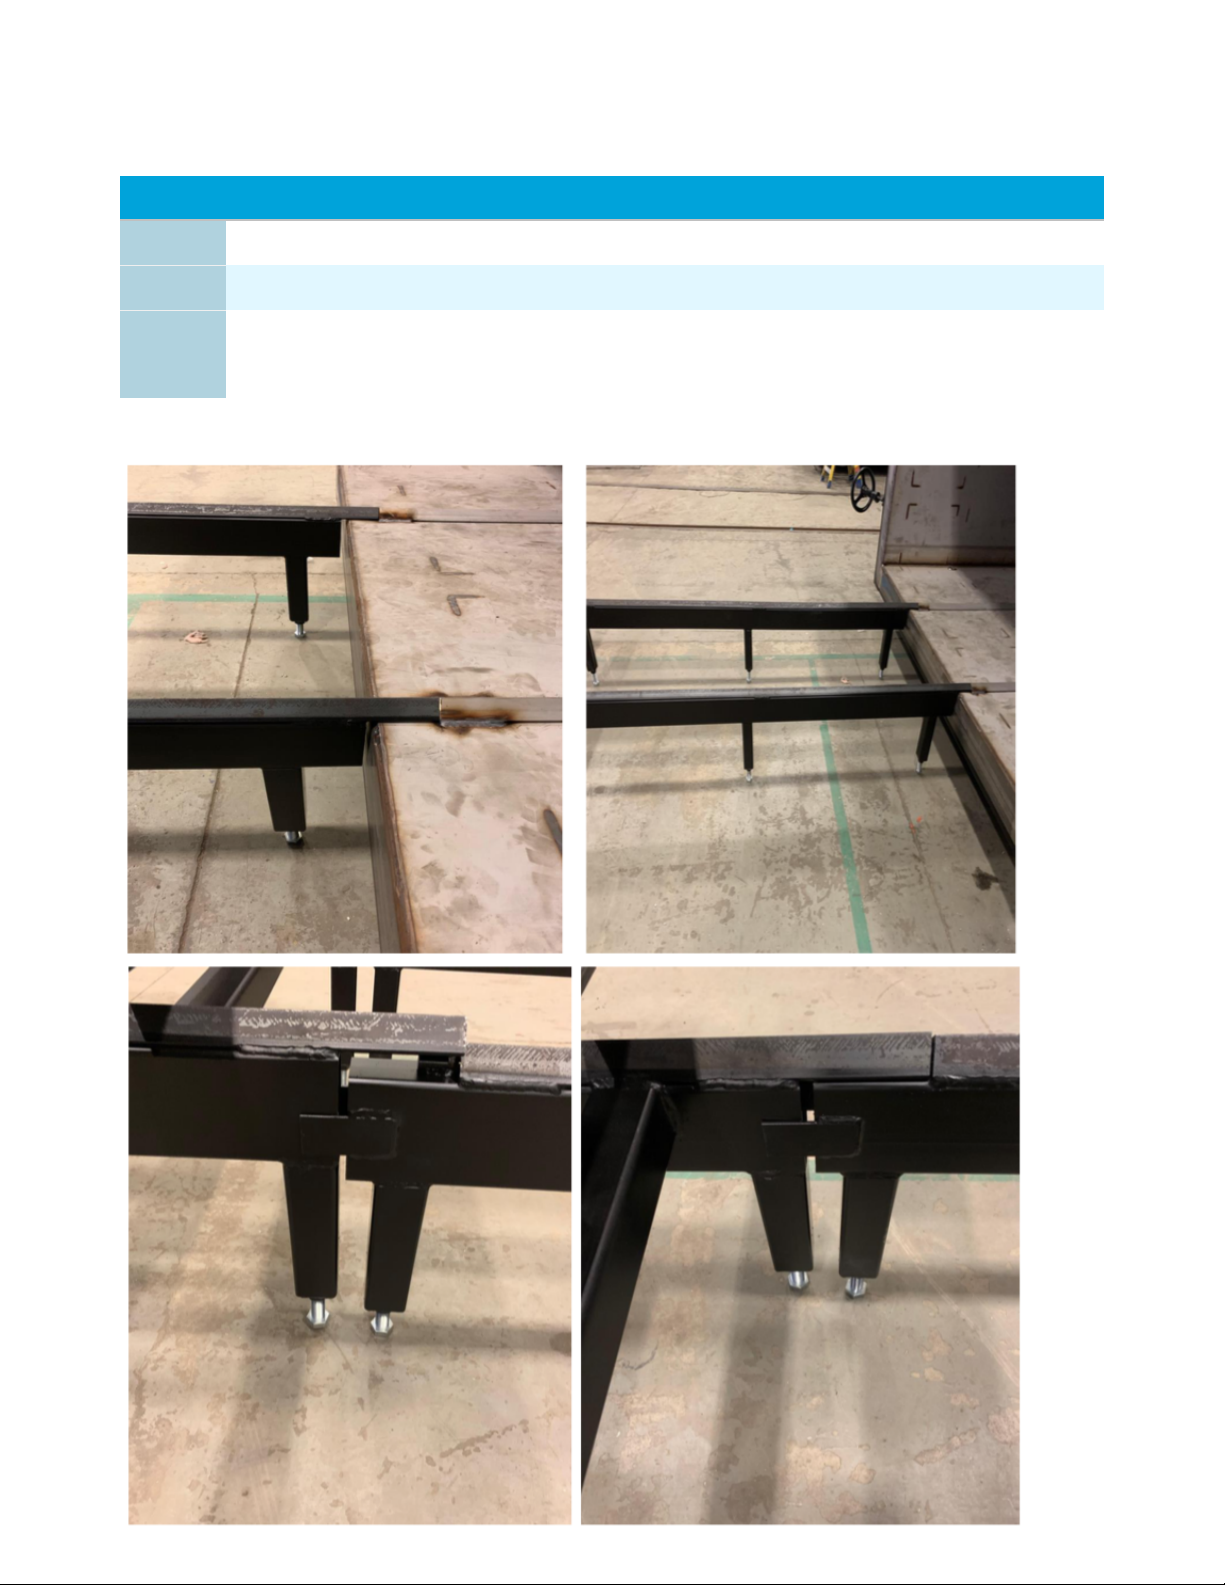
Track & Trolley Installation
4
The two pieces on top are called the track bridge extensions.
5
Match up the track bridges to the chamber and the track frame using the two alignment tabs.
6
Adjust the track feet so that both the track and bridge are level leading up to the kiln chamber.
*You will need either an adjustable wrench or an 1-1/8inch / 29mm wrench. All feet should be
on the ground *The track can be used with, or without the track bridge extensions.
iDRY User Manual
© 2020 iDRY, LLC
9
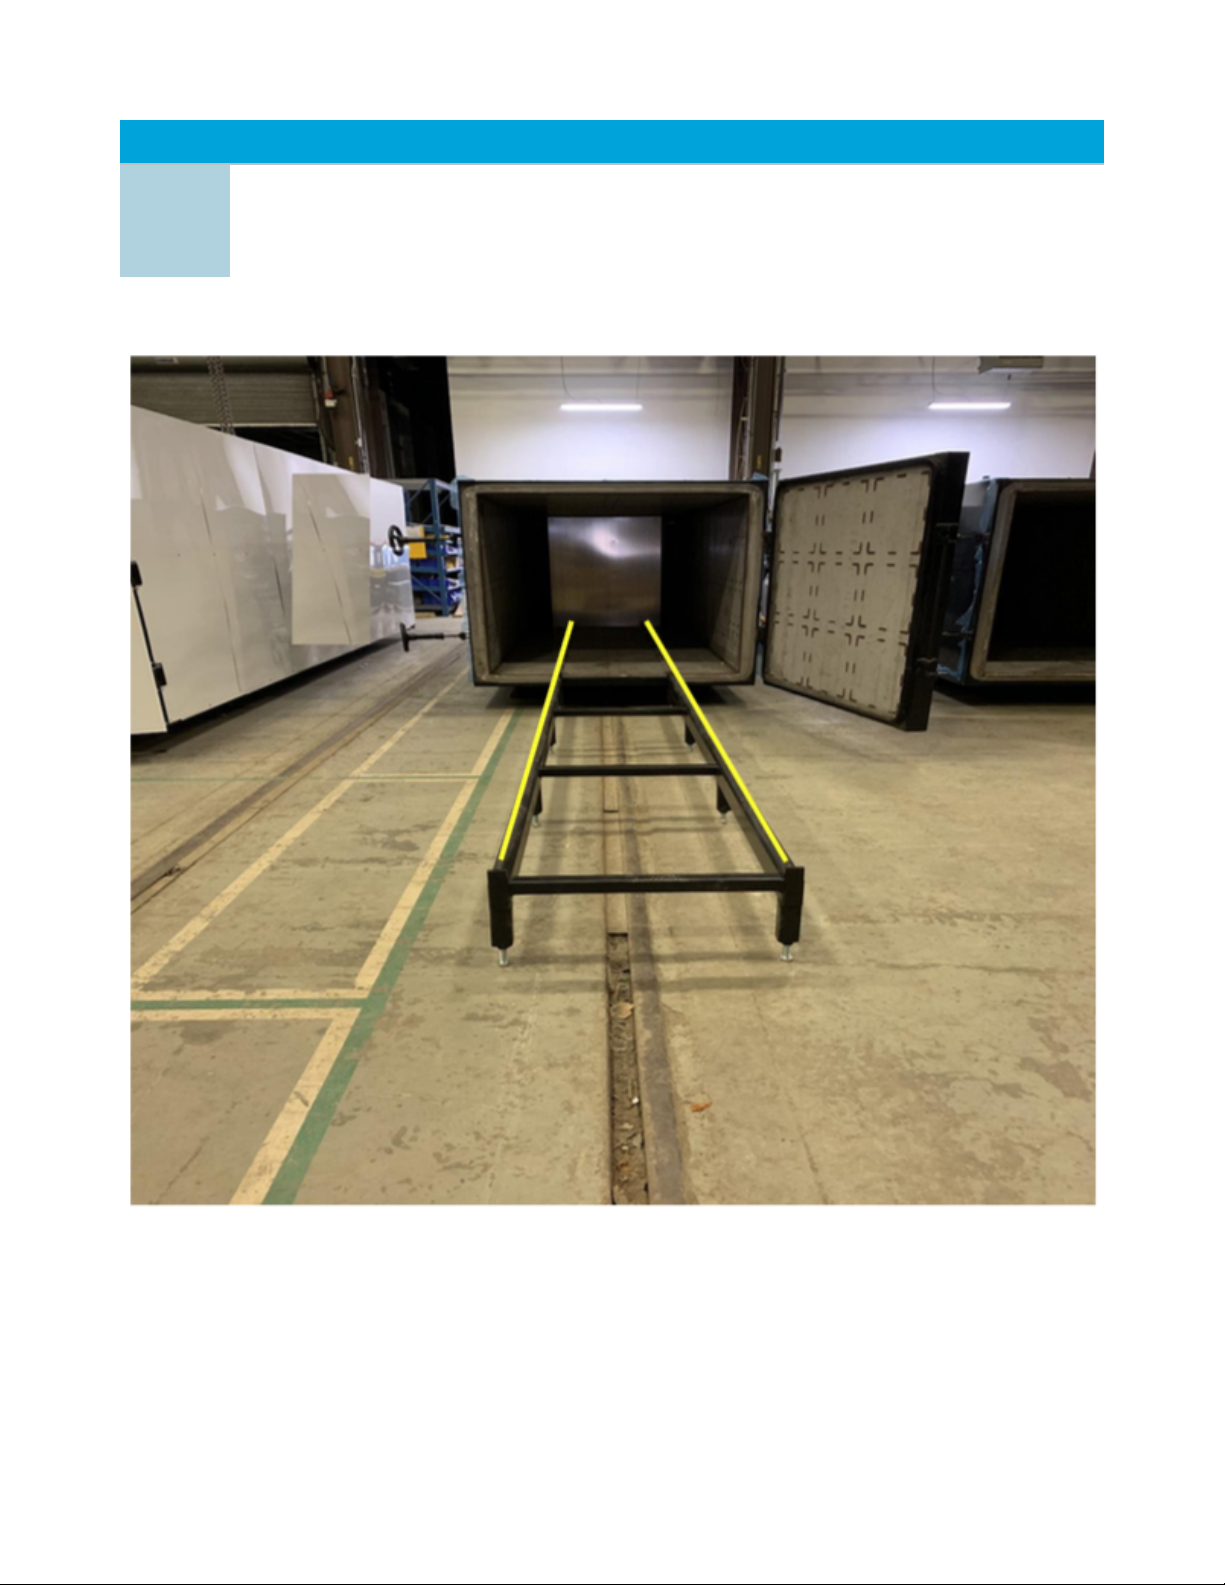
7
Using a string or straight edge, aligned the track angle peak from the chamber to the opposite
far end of the track. It is imperative that the tracks on the track frame and extensions are in
alignment with the track in the chamber. Failure to do so will result in the trolley coming offthe
tracks.
iDRY User Manual
© 2020 iDRY, LLC
10
8
Place the trolley onto the track and perform an unloaded test to confirm the trolley rolls easily all
the way in and out of the kiln chamber!
*For door operation you will need to move the track bridge extensions. For best results mark the
floor where the track and bridge sections are lined up, or permanently affix the track frame to the
floor
iDRY User Manual
© 2020 iDRY, LLC
11

Power
9
Connect 208-240V 1PH 60A 60Hz electrical at Rotary disconnect located at control panel end
of chamber
iDRY User Manual
© 2020 iDRY, LLC
12

Plumbing
10
Connect 0.75GPM / 2.8 LPM of clean, 70F / 21C or less fresh water to connection port located
on control panel end of kiln, left side underneath. The fitting is a 1/2” / 13mm female brass
fitting.
11
Connect vessel drain with air gap (2” PVC / 51mm) to your facilities drain!
12
Connect vacuum pump drain with air gap (2” PVC / 51mm) to your facilities drain!
Electrical and plumbing installations should be performed by certified
professionals based on local building codes only.
iDRY User Manual
© 2020 iDRY, LLC
13

Loading
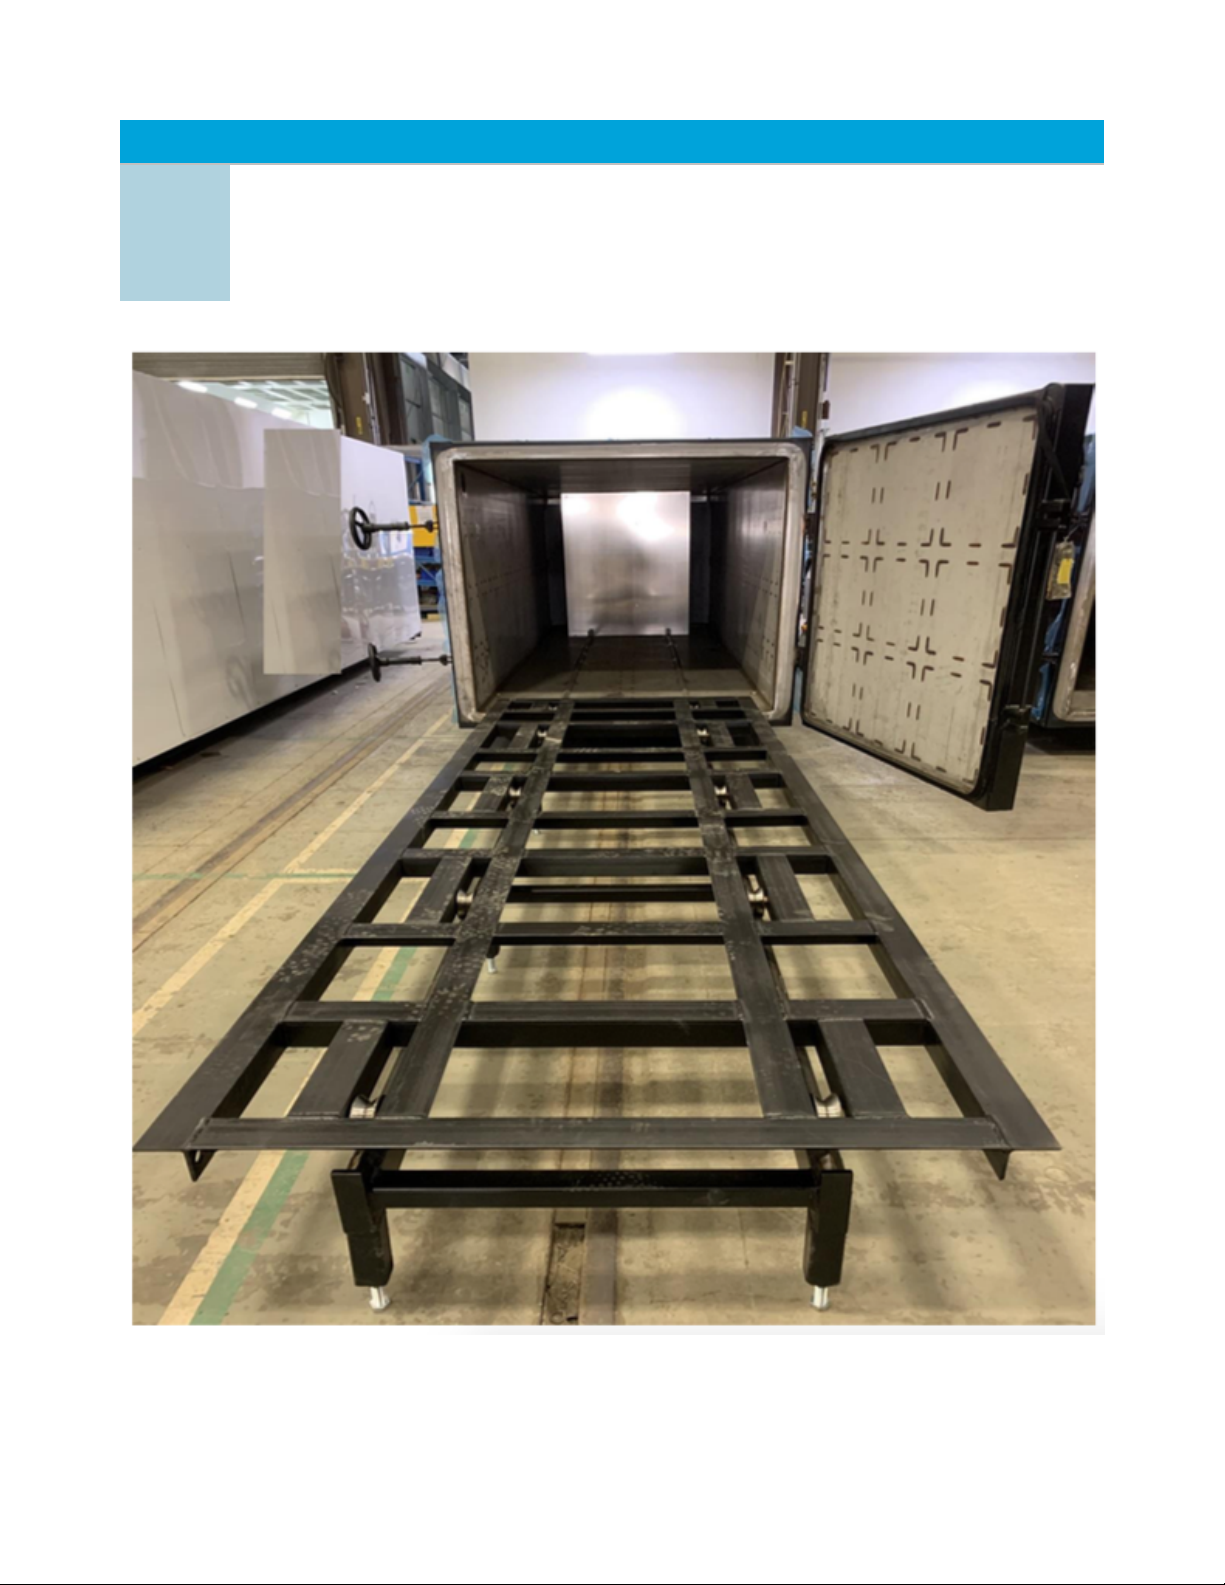
13
Place stickered pile of lumber or slabs onto Internal Trolley with not more than 3 inches of
overhang on either side of trolley, with no overhang on either end of trolley
14
Confirm that pile height is 55inches from top of track to top of lumber pile!
15
Place stickers on top of pack of lumber and place a sheet of plywood or similar on top of
stickers to prevent condensation from dripping on top layer of wood
16
Sticker placement in pile should be straight and provide for good air circulation through pile
17
Push trolley with stickered pile of lumber into chamber.
iDRY User Manual
© 2020 iDRY, LLC
14

17
Remove bridge track sections.
iDRY User Manual
© 2020 iDRY, LLC
15
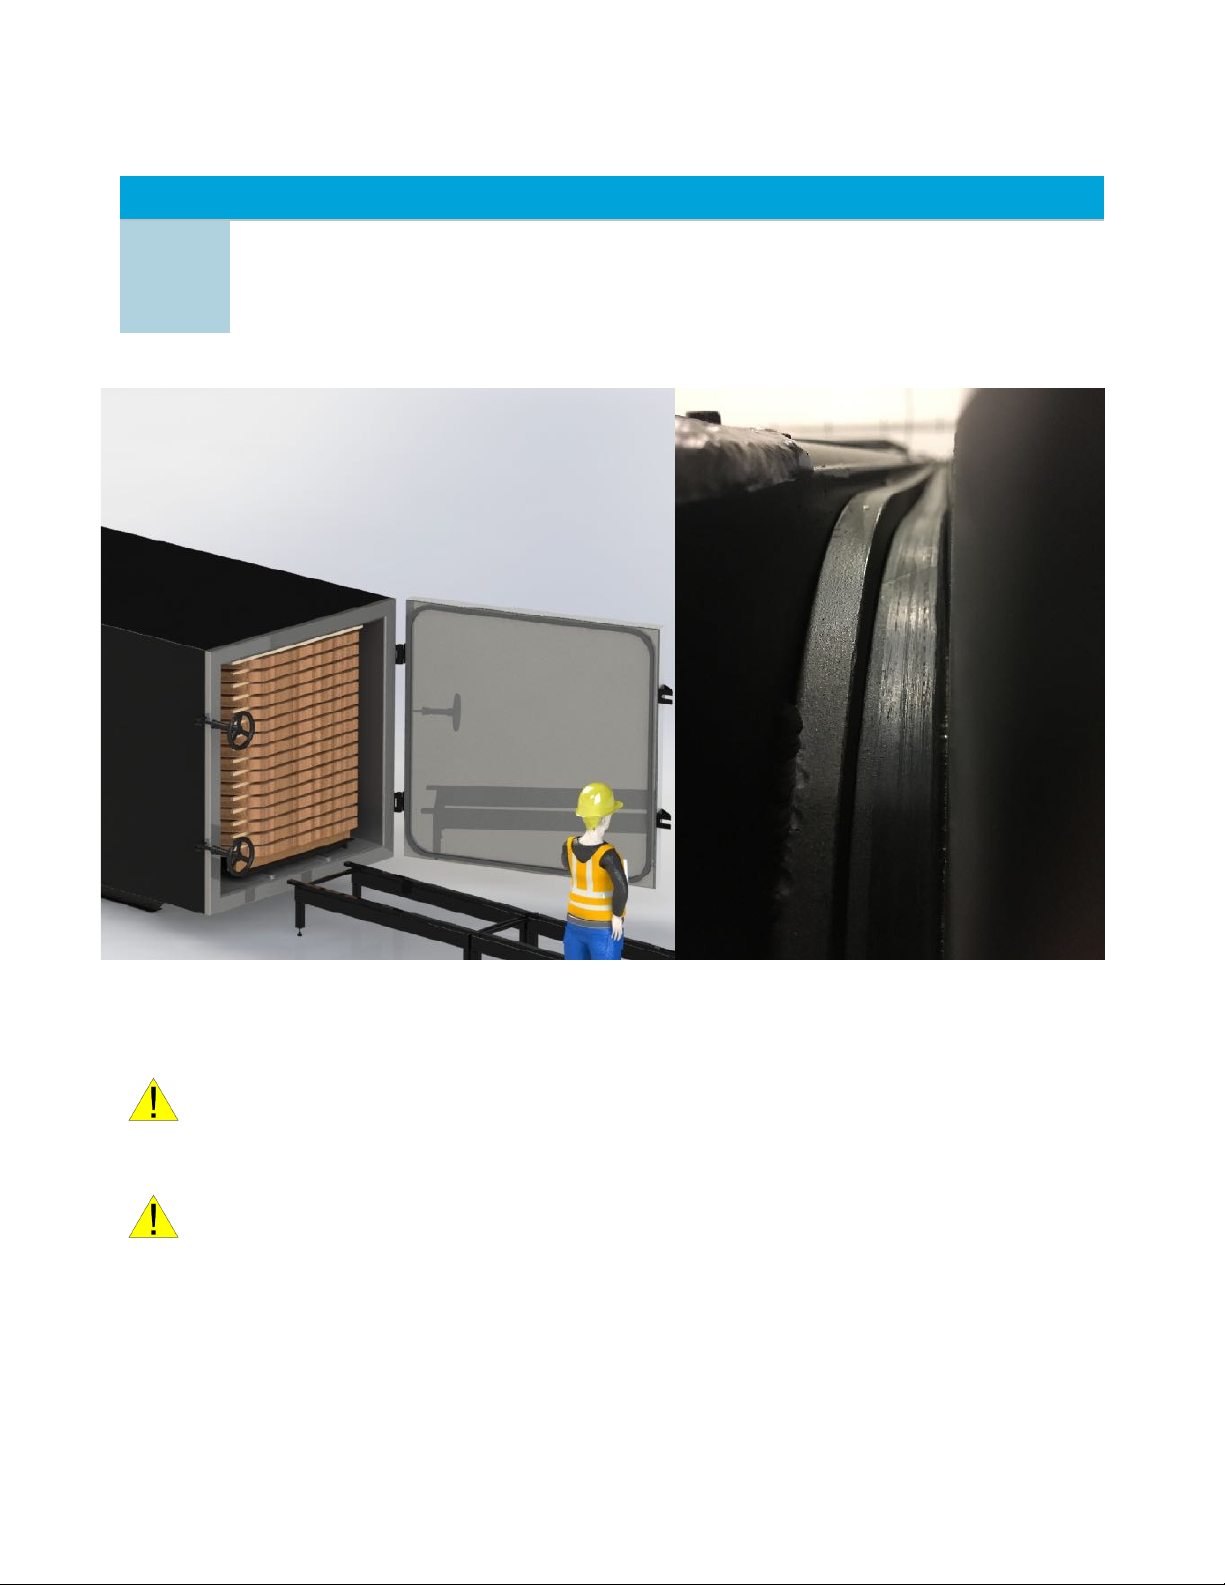
Closing Door
18
After confirming all persons have exited the chamber, close door and tighten hand wheels until
rubber gasket contacts chamber sealing surface.!
*DO NOT OVERTIGHTEN HANDWHEELS, AND NEVER TIGHTEN HANDWHEELS WHEN
CHAMBER IS IN OPERATION UNDER VACUUM
WARNING!! CHAMBER IS A CONFINED SPACE. NO PERSONS SHALL ENTER THE CHAMBER
WITHOUT A TRUSTED “BUDDY” TO SUPERVISE AND ENSURE NO PERSONS ARE IN THE CHAMBER
WHEN THE DOOR IS CLOSED OR WHEN THE MACHINERY IS IN OPERATION
WARNING!! DO NOT TIGHTEN HAND-WHEELS AFTER CHAMBER IS UNDER VACUUM - THIS
WILL RESULT IN DAMAGE TO THE HAND-WHEEL!!
iDRY User Manual
© 2020 iDRY, LLC
16
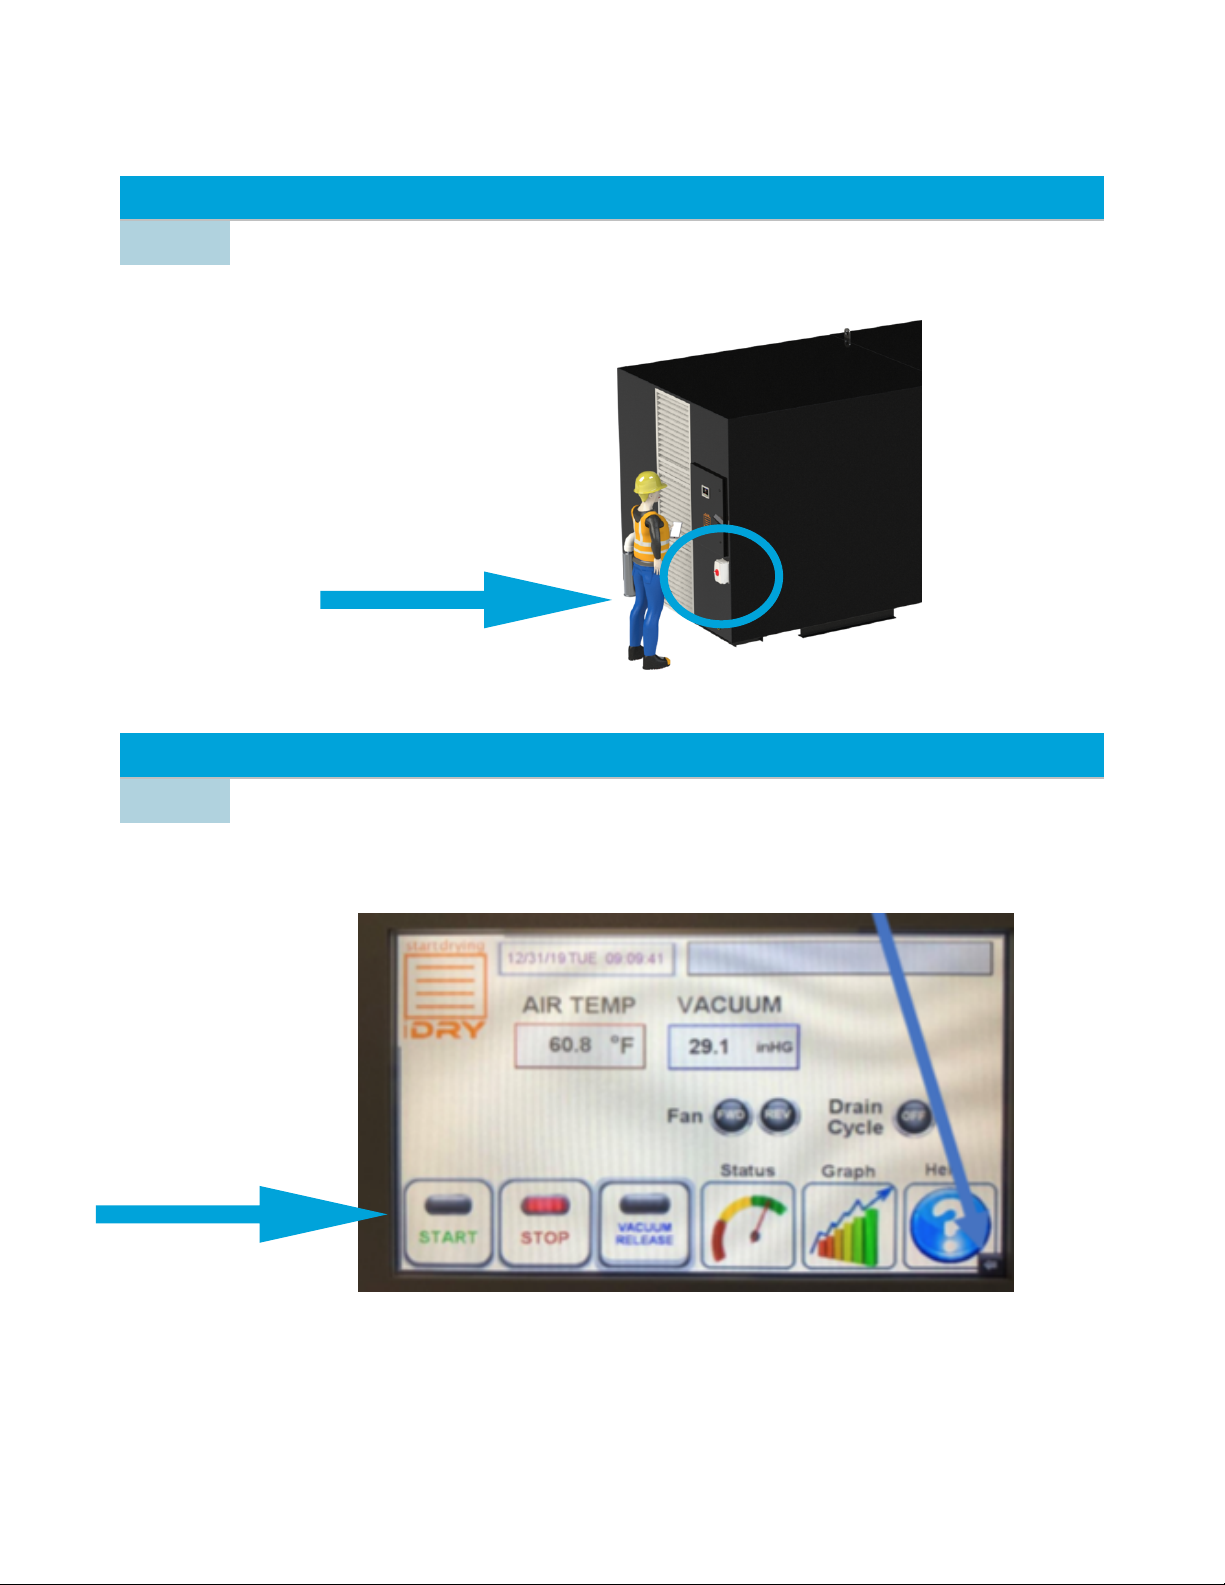
Powering Up
19
At Control Panel turn rotary disconnect switch to power up machine
20
Allow Touch Screen to power up and Press START
iDRY User Manual
© 2020 iDRY, LLC
17
21
Monitor the vacuum set point for a few minutes to ensure that the actual vacuum begins to drop
towards 7-8inHg (270 hPa) Vacuum
22
The temperature will automatically warm up the wood slowly and continue to rise over time. The
temperature will raise slower using low power mode.
23
The kiln will reach a max temperature of 160 Deg F / 71C but the time to get there will vary
depending on low or full power mode, species, initial MC%, thickness and other factors.
24
Moisture content should be checked weekly. Time will vary by species but 4/4 Maple will take
about one week to dry. Each inch more would take and additional week. Some species take
longer. Moisture content can be checked with either a moisture meter or by oven weight
method. *it is recommended you wait at least 25 minutes to open the door after machine
is stopped to allow vacuum to release and chamber to cool
20
If wood is not dried to desired moisture content, close door and press start to continue drying
Problem: Actual Vacuum value not decreasing
Possible Cause: Door may be leaking vacuum due to seal not fully contacting the sealing
surface of the chamber. Solution A: For a short term solution Using tape the operator
may plug small cracks to make the door seal, once the door has pulled in and the seal is
compressed the problem should stop.
Solution B: iDRY, LLC can provide rubber shims for problem areas where the rubber seal
does not fully contact the chamber
Problem: Temperature is above 70F
Possible Cause: Higher than normal water temperature will cause the vacuum pump to
run more and possibly not reach the vacuum set point.
Solution: Check that water supply hasn’t warmed up.Lower water temperature by chiller
or new water source.
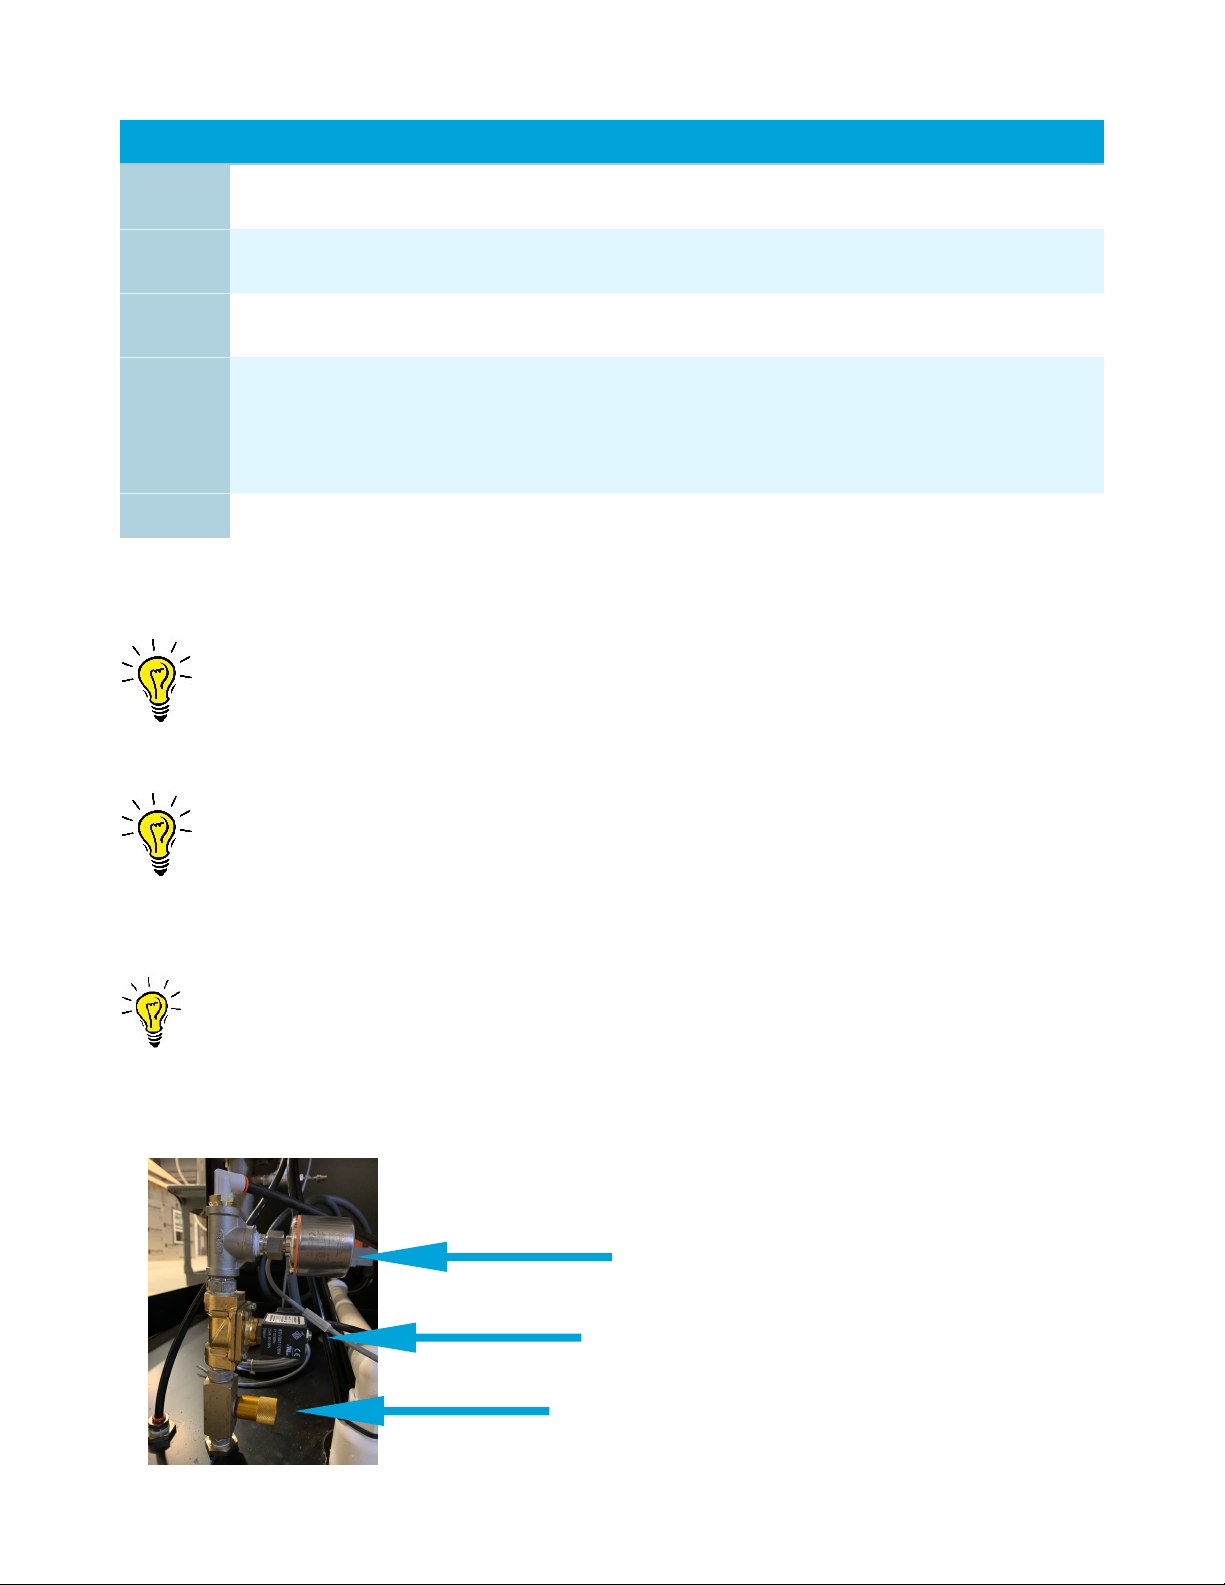
Problem: Vacuum Pump Water Flow is below 0.25 gpm
Possible Cause: Lack of water pressure caused by restriction, solenoid
valve closed, water pump failure, Flow meter failure, or insufficient supply
Solution: Check Flow/Temp sensor ahead of vacuum pump water feed.
Check water booster pump (if installed) is running. Check overall water
supply from well or city.
Confirm no blockages in supply line
Adjust brass Needle Valve to allow for increased flow
iDRY User Manual
© 2020 iDRY, LLC
18
Brass Needle Valve
Water Solenoid Valve
Temperature and flow meter

Kiln Monitoring
Daily Monitoring
Once or twice per week the operator should spend a few minutes at the kiln to monitor the
drying process and functionality of the kiln equipment.
The vacuum pump may only run periodically to maintain vacuum pressure.
At any time in the drying process the operator may press STOP and Release Vacuum.
Once the vacuum is completely released the operator can open the door and check the
condition of the wood.
The operator may also choose to open and check during a drain cycle. The kiln will enter a
drain cycle once a day and drains for approx 20 Mins.
Unloading Kiln
Opening Door
1. Press STOP at control panel HMI (touchscreen)
2. Press Vacuum Release on the Touchscreen
3. Loose and swing free Door Hand wheels
4. Swing open door
Checking Oven Weighted Samples
1. Pull at least 4 of the sample boards that were oven tested and weight prior to starting the
load. (Reference the ASTM D4442-15 standard for proper oven weight sampling of
lumber samples for proper procedure.)
iDRY User Manual
© 2020 iDRY, LLC
19

CORRECT USE
Lumber preparation
Care must be taken when preparing stacks of green lumber before the stacking and loading
process begins. Pack widths and length combinations need to fill the complete length and
width of the Internal Trolley with no less than 6 inches / 2.54cm of a gap between boards
and chamber walls. Reference Stacking guide for more detail.
Baffling
Evening the air flow equals more even drying. If you have enough lumber to fill the kiln use
additional material to baffle.
Proper Stacking
Lumber pile and stickers must be stacked vertically enough to fit into the kiln chamber using
3/4 inch / 1.9cm stickers. It is recommended that a sheet of plywood be placed on top of the
lumber pile with stickers between the lumber and plywood to provide airflow over the top of
the pile while reducing condensation dripping onto top of lumber.
Reducing Degrade
Drying slower can reduce degrade. Use LOW POWER mode or lower temperature set point
until the lumber is below 25%.
Winter vs Summer
The kiln is designed to operate most efficiently in an operating environment of 70 Degs F /
21.1C. If your space is colder in the winter time then the kiln could dry slower. If your space
is warmer in the summer then it may dry faster. Using LOW POWER mode in the summer
and improving the ventilation in the space would be recommended. Adding more insulation
or space heating in the winter would be recommended.
Large gap between pile and one end of chamber may result in short circuiting of
airflow and improper heating. Move packs so the total lumber length is equal to the
Trolley Length or baffle as necessary.
Freezing temperatures could damage equipment. Excessive hot temperatures could
damage electronics! Do not operate equipment in freezing environments.
iDRY User Manual
© 2020 iDRY, LLC
20
This manual suits for next models
1
Table of contents
Popular Dryer manuals by other brands

GE
GE Profile DPVH880GJ Dimensions and installation information

Alliance Laundry Systems
Alliance Laundry Systems 70260301?8 Installation

Air Wolf
Air Wolf V Series manual

Beko
Beko DHS 7413 PA0 user manual

Airflow
Airflow ecoDRY mini Installation and operating guide

STEINEL PROFESSIONAL
STEINEL PROFESSIONAL HG 2520 E Information

Electrolux
Electrolux TD6-14 installation manual

GE
GE GFDS150EDWW installation instructions

Whirlpool
Whirlpool WED9050X Dimensions and installation

Fisher & Paykel
Fisher & Paykel Smartload DGGX1 Technical bulletin

Hotpoint
Hotpoint AQUALTIS AQC9 BF5 Instruction booklet

therm-ic
therm-ic ThermicDryer Instructions for use


