Iget Guard F80 HD User manual

User guide
for product
GUARD F80 HD
www.iget.eu
SUPPORT: http://www.iget.eu/helpdesk

Dear Users:
Thank you for buying this high-resolution car DVR. This product is characterized by advanced
technology, unique appearance and strong function.
This manual provides the detailed instructions regarding how to use this device and other detailed
information, including use, operation, technical specifications, etc.. Before use, please read this
manual carefully and be sure to understand it completely. Please keep this manual properly. We
hope that this product can meet your demand and we would like to serve you for long time!
Install and remove memory card
1. As per the direction indicated, insert the memory card into the card slot until it is fixed firmly in
the slot.
2. When taking the memory card, slightly press the memory card; after it is ejected out, you may
take it out.
3. If no card is inserted, the screen will display the information “No TF card!”
Note:
1. Please make sure the direction in which you insert the card is right. Otherwise, the device and
the memory card may be damaged.
2. After the memory card is inserted into the device, the device will set the memory card.
3. The documents and data occurring in the use of this device should be backed up. Should any
loss, we will not assume any legal responsibilities arising thereform.
4. For the first use of TF, please use the “Format” tool in the “System Setup” in the device to
format the TF card.

Product Characteristics
Super small portable mini car DVR facilitates the easy photo and video taking, audio
recording and free high-definition image capture in various situations.
2.7″ LTPS TFT LCD;
4pcs prime lens with focus range of 12cm~infinite;
High-definition wide angle camera;
4X digital zoom;
Video specs: MJPEG (AVI)
Inbuilt with microphone (speaker);
Supports the function of video while charging;
Supports high-capacity T-flash card;
Supports moving detection photograph function.
The number of shots & time of video recording (only for reference)
TF
Card
(HD)
(D1)
(640P)
1280*1024
(1M)
1600*1200
(2M)
2048*1536
(3M)
2592*1944
(5M)
16G
240 min
298 min
530 min
12160(pcs)
11500(pcs)
10960(pcs)
9440(pcs)
8G
120 min
149 min
265 min
6080(pcs)
5890(pcs)
5530(pcs)
4720(pcs)
4G
60 min
74 min
132 min
3040(pcs)
2900(pcs)
2760(pcs)
2360(pcs)
2G
30 min
37 min
66 min
1520(pcs)
1450(pcs)
1380(pcs)
1180(pcs)
1G
15 min
18 min
33 min
760(pcs)
725(pcs)
690(pcs)
590(pcs)
Note: The number of shots that can be taken will vary depending on device settings, the subject
and the memory card used.
Product Structure
1. Infrared lamp 2. Lens 3. TF card slot
4. Lithium battery charging indicator (red) 5. Microphone 6. LCD Screen
7. Speaker 8. Onboard bracket 9. RESET key
10. POWER key 11. MENU key 12. MODE key
13. OK key 14. Down key 15. Up key
16. USB port

Charge: For the first three uses of car DVR, please charge the battery only after it is completely
used up; and keep charging it for 12h every time continuously until the battery can have the
maximal efficiency.
This device is inbuilt with rechargeable lithium battery. For the first use, please charge it in
any of the following manners:
1) Connect it to PC with USB data cable for charging.
2) To charge with a charger, connect the USB cable with the charger holder and then plug the
charger into the power supply socket.
Note: When the battery is in low power status, the car DVR will directly enter the
protected status and thus cannot be switched on. In such case, please charge it.
Use Guide:
Power On/Off and Mode Switching
1. Press the POWER key shortly to switch on the device.
2. After the device is switched on, the system will have the video mode in default. In such case,
press the OK key to start video recording and again to pause with the video file saved
automatically.
3. If it is necessary to switch the mode, in the pause state, press the MODE key to enter the picture
mode, a second time to enter audio recording mode, a third time to enter the replay mode and a
fourth time to back the video mode.
4. In the pause state, press the POWER key for 3s to power off the device.
Function Keys
Video recording / Photo/Audio recording / Playback
Menu Setup
I. Video Setup/System Setup
Press the POWER key to power on the device. In the video mode, press the MENU key to enter the
menu setup mode and press the MODE key for (Video Setup/System Setup), press the UP/DOWN key
to choose the desired item and press the OK key to confirm.
Video Setup:
1. Video format setup: 1920*1080, 1280*720, 848*480 and 640*480 available for choice.

2. Video time stamp: choose to set the video with time or without time.
3. Moving detection: On/Off. When On is chosen, if there is an object moving, the device will
automatically start videoing and get one video file every 2 minutes; after 2 minutes, if there is
no object moving, the device will be in the moving detection standby mode; when there is a
moving object, it will start working again.
4. Cyclic video: On/Off.
5. Cyclic video time: you may select the duration as 2min, 5min or 10min to save the video by
segments.
6. Audio: On/Off. Choose to set the video with audio or without audio.
7. Power-off delay: Off/10min/20min. This function allows extending videoing after the vehicle
stops.
8. Video sound: On/Off. You may set the video with sound or without sound.
After select the desired settings, press the OK key to confirm and complete the setup, press the
MENU to exit.
II. Photo Setup
Press the POWER key to power on the device. In the video mode, press the MODE key to enter the
picture mode, choose the MENU key to enter the menu setup mode and press the MODE key to choose
the desired item.
1.Size: 1280*1024(1M),1600X1536(2M), 2048*1536(3M), 2592*1944(5M).
2. Quality: Very good/Good/Common.
3. Exposure: -2.0, -1.7, -1.3, -1.0………+1.0, 1.3, +1.7, +2.0
4. Mode: Off/Self-timer 2s/Self-timer 10s/Continus.
5. Time stamp: Off/Date/Date & time.
After selecting the desired item, press the OK key to confirm and complete the setup and then press the
MENU key to exit.
III. Replay Setup
Press the POWER key to power on the device. In the video mode, press the MODE key three times to
enter the replay mode. Choose the MENU key to enter the menu setup mode and press the MODE key
to choose the desired item:
1. Lock: Lock/Unlock Single/All
2. Delete: Delete Single/All.
3. Slide play: Start / 2S intervals / cycle /yes
4. Sound memo: Add/Delete.
5. Set as power-on picture: Yes/No.
After selecting the desired item, press the OK key to confirm and complete the setup and then press the
MENU key to exit.
IV. System Setup
Press the POWER key to power on the device. In the video mode, press the MENU key to enter the
menu setup mode and press the MODE key for (Video Setup/System Setup), choose System Setup and
press the OK key to confirm.
1. Sound setup
Shutter tone: Off/On.

Power-on tone: three types or none available for choice.
Key tone: Off/On.
Volume: 0, 1, 2, 3; 0 means mute.
2. Power frequency:50Hz, 60Hz.
3. Auto power-off: 1 min, 3min or 5min.
4. Screen protection time: Off, 30s, 1min or 2min.
5. Date/time setup: Month/Day/Year; Hour/Minute.
6. Language: English, Chinese (Simplified), Chinese (Traditional), Spanish, French,
Portuguese, Russian, German. Japanese, Korean, Polish, Hungarian, Greek, Czech, Slovak
8. Power-on image: Off/System/Custom.
9. Format: Yes/No.
10. LED light supplement lamp: On/Off.
11. Restore factory settings: Yes/No.
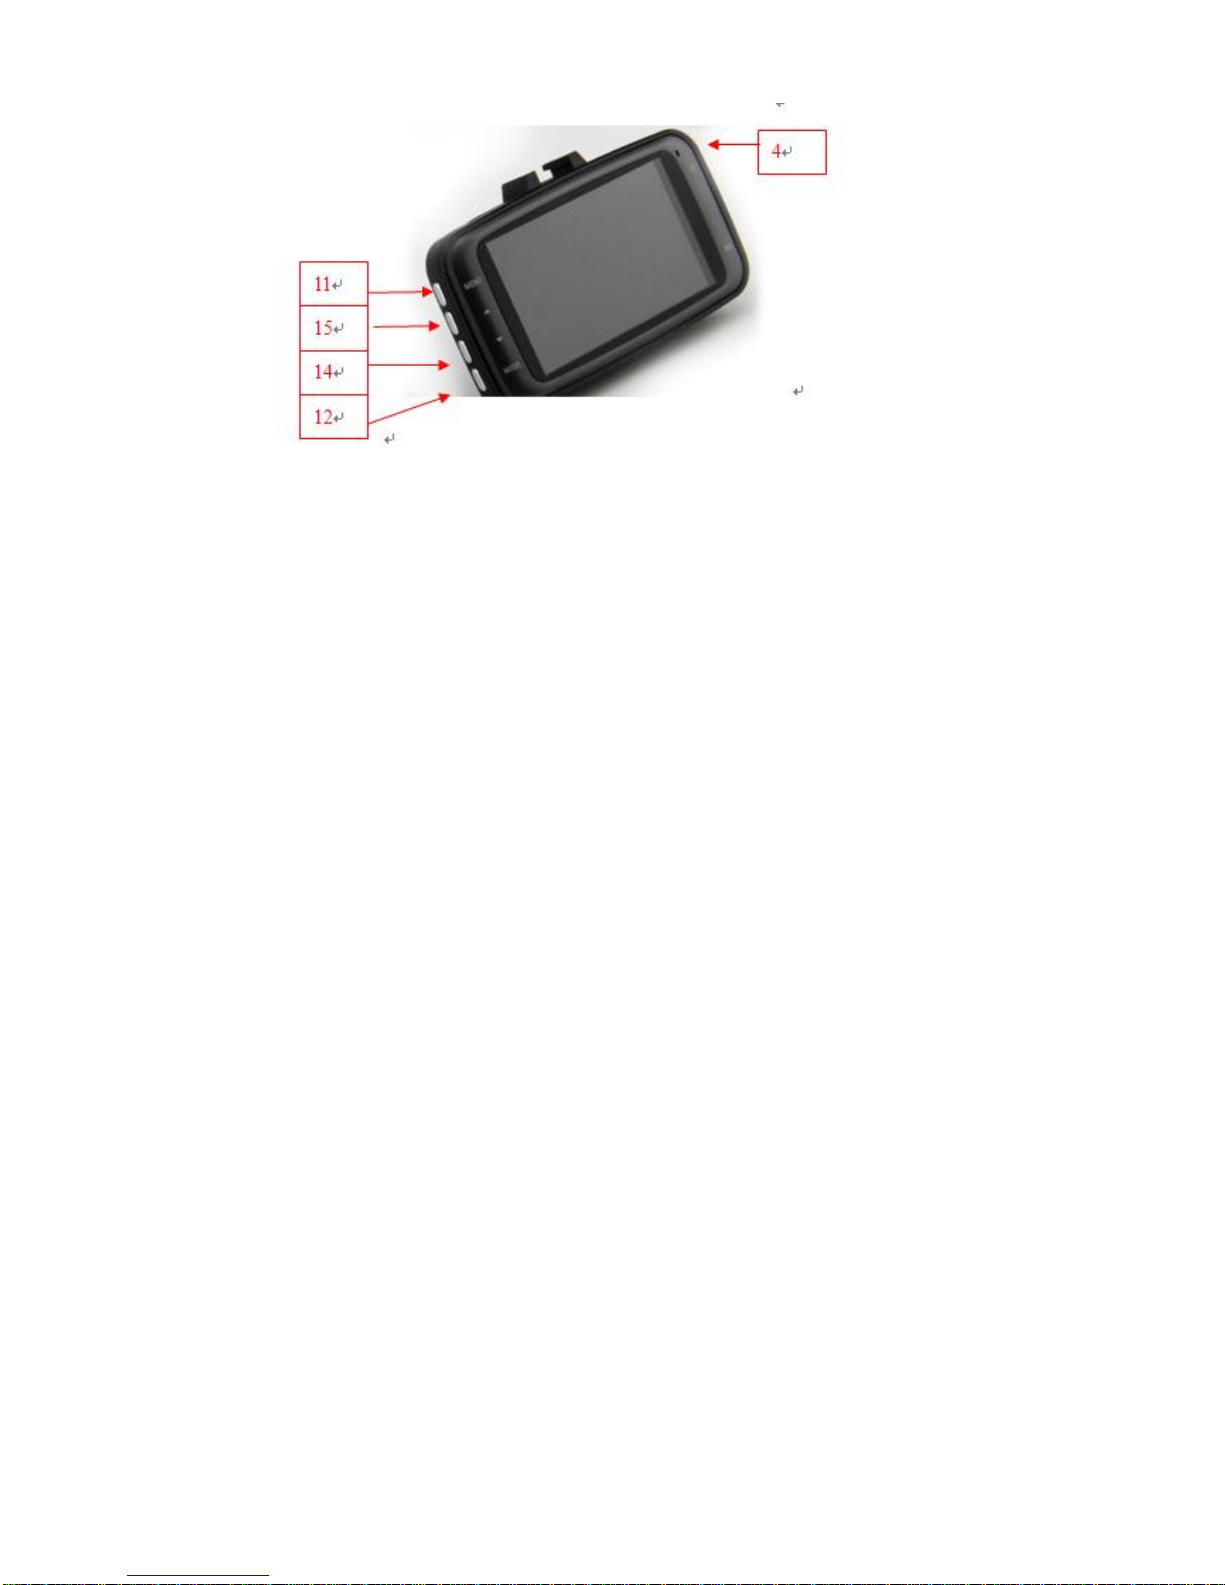
12. Version info: you may have the version of the software.
Choose the desired setting via “DOWN/UP” and press the OK key to confirm and complete the setup,
then press the MENU key to exit. After that, press the POWER key to power off the device. After the
device is powered on again, the setup will function.
V. Functional Operation:
Power-on and Cyclic Video record
1. After the car DVR completes power-on procedure, it will enter the video record mode and there
will be a red video symbol on the left upper corner, indicating the device has entered the standby
state. Press the video record OK key to start; during videoing process, if the device is not
controlled manually, it will save one video file every 2min automatically; when the card is full of
video files, the first video file will be deleted automatically and the device will continue working.
This is the cyclic video record function of this device.
Cyclic Video record while Charging
After the card DVR is connected with the charger and powers on automatically, it will enter the
video record mode and automatically start videoing and have one video file every 2 minutes.
When the card is full of video files, the first video file will be deleted automatically and the device
will continue working, achieving the function of cyclic video record. To stop, press the OK key.
Note:
1. If this device is connected to PC and charger but it cannot have the function of video
record while charging, please power it off and reconnect with the charger.
2. If you do not want the cyclic video record function, you may choose “Activate” and
“Inactivate” on the “Cyclic Video Record” in the video menu; “Activate” means activating
the cyclic video record function and recording one video file every 2 minutes.
3. Whether with car charger or common charger, you may have the function of videoing
while charging.
4. If you charge the device with car charger, after the car is powered on, the device will be
charged and start to take video automatically; after the car stops, it will save files and
power off after 5s automatically.
5. You may set the cyclic video time as 2min, 5min or 10min.

Photo Mode
1. After the car DVR completes the power-on procedure, press the MODE key to select the
picture mode, then there will be a red symbol on the left upper corner of the screen, indicating
the device has entered the picture mode.
2. Aim the device at the object and press the UP/DOWN key to have upward /downward
digital zoom. In such case, be sure to hold the device firmly without any dithering.
3. Press the OK key, then the device will have a “click” sound, indicating the work has been
done.
4. Self-timer and other functions.
In the picture mode, press the MENU key, press the DOWN key to adjust downward and the
OK key to confirm the mode.
Choose the requirements for self-timer, then press the OK key to confirm.
Audio Record
After the car DVR completes the power-on procedure, press the MODE key twice to enter the
audio recording mode, then there will be one symbol on the left upper corner of the screen as
shown in the figure. This indicates that you have entered the audio record mode. Press the OK
key to start timing. In recording process, press the UP key to pause and continue, press the
OK key to stop recording and save the audio file. For a second recording, press the OK key.
Replay Mode
After the car DVR completes the power-on procedure, press the MODE key three times to
enter the replay mode, then the left upper corner of the screen will display the icon of play. To
play video or audio file, you may press the “UP/DOWN” key to choose upward and
downward the desired file. After selection, press the OK key to play and the OK key to pause
or continue.

Product Specs:
Sensing element
COMS wafer
Lens
Wide angle, 120º
Focus range
12cm~infinite
Screen
2.7” LTPS TFT LCD
Picture
1M, 3M,5M
Video format
AVI (H264)
Video
FHD(30frames)HD(30 frames/s);D1 (30 frames/s);640 (30
frames/s)
Zoom
4 x Digital zoom
Memory
External: T-flash (Micro SD) card(max. 32G,SDHC card )
Shutter
Electronic
Shutter speed
1/2~1/1,000s
Connector
USB2.0
Battery
260mAh
USB
USB2.0 high-speed transmission
Dimensions/Weight
90.5*53*13 mm
Working
temperature/humidity
0~40ºC / 10%~80%
Troubleshooting
Unable to take pictures, videos?
Please change picture or video resolution or replace the memory card with one with sufficient
space, and check if the memory card is inserted properly.
Unclear images/videos?
Mop the lens subject to light with soft cloth before use.
Tips for operation:
This device is similar to PC. If it does not operate, please directly press the RESET key to restart
the device.
Table of contents
Other Iget Dashcam manuals